|
|
Post by Franklin1 on Jun 11, 2013 17:54:54 GMT 10
G'day seeshell, Not so much "need one now", but will need one eventually. I guess I was more interested in knowing whether the person with the equipment was still around and still able to make them. About a year ago I bought the local franchise for Reddo's Shed of Invention, so coming up with alternatives is not even a challenge for those in the franchise group. Not sure about the pink uniform that has to be worn, but I guess the head honcho knows what he's doing.   cheers, Al. |
|
|
|
Post by Franklin1 on Jun 11, 2013 11:04:15 GMT 10
The email to campapack(at)dodo.com.au has been returned to me because it couldn't be delivered to the recipient, so I guess they don't have that email address anymore.
Is there someone who could make contact with Belinda to find out some more information about where this business was located?
A search for "Campapack" brings back a result for a campervan dealer down in the Nowra region, but nothing in the Sydney region where I presume the business is/was located.
cheers,
Al.
|
|
|
|
Post by Franklin1 on Jun 10, 2013 22:59:13 GMT 10
G'day cobber, There was also another thread where Belinda talked about a camping business that could make a replacement ice shelf (or tray, or "waffle thingys" - as Belinda called it). parts for ice boxes availableI'm going to send an email to the address Belinda posted, and see if anybody still lives there. I need one of those waffle thingys for my chest (errr...my ice chest, that is. I've already got Bonds for my other chest.  ). cheers, Al. |
|
|
|
Post by Franklin1 on Jun 9, 2013 9:49:24 GMT 10
When removing the ice chest from my "1960 Newcastle" van, a Lysaght brand mark was found on the back of the chest... 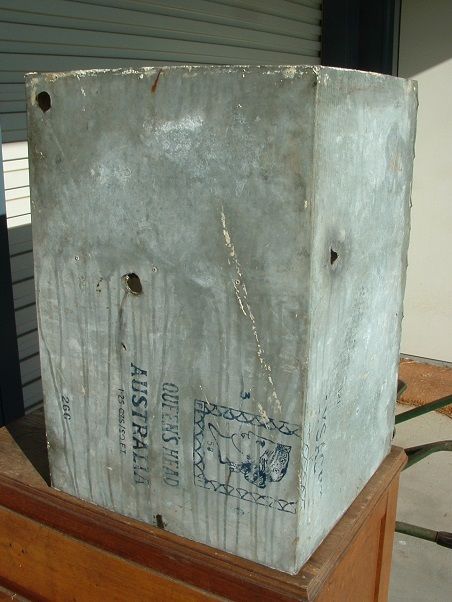 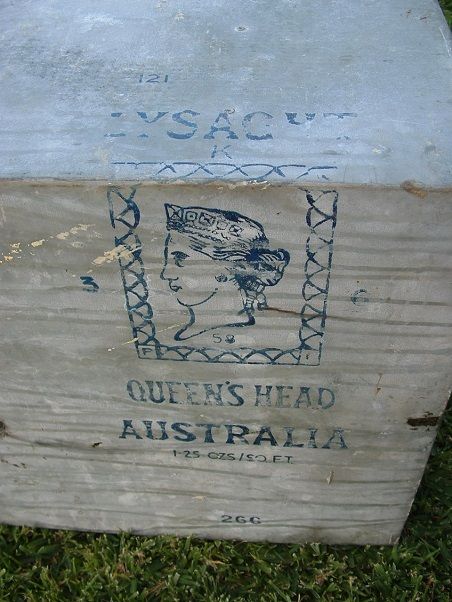 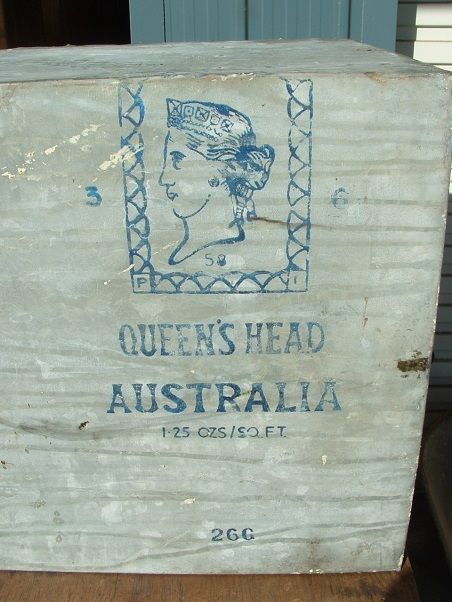 cobber cobber has decoded the manufacturing information, and I'll quote him from another thread about my van: "...a beaut piece of 26 gauge Lysaght Works Pty Ltd galvanised iron made at Port Kembla on the 3rd of June 1958..." |
|
|
|
Post by Franklin1 on Jun 8, 2013 20:02:02 GMT 10
Thankyou for the comments and hints   hilldweller hilldweller, it does seem like you're just treading water at times, ay!  cobber cobber, thanks for decoding the manufacturing details on the Lysaght brand mark. I never thought of checking with your Techo info, so I've given myself a good uppercut.  The date gives me more confidence that the van is from around 1960. You would think any galv would be used up within a year or so of it being made, eh? (Unless that cheapskate Walshy bought it at an auction a number of years later  [cheapskate = refer sink]) I didn't find any other date markings anywhere in the kitchen cupboards, so the ice chest is really the only thing to verify the approximate age of the van. Needless to say, now that I know the significance of the ice chest, the decision on what to do with it is a no-brainer. Leave it to me to post the photos in the other galv thread. I'll take a better photo of the date marks so they are easier to see (although I congratulate you on your abilitiy to pick them up from the photo I posted). ST, I remember you saying in the past about laminating both surfaces of the table. The original table in the project van was only covered on the top surface and seems to have stood up to time fairly well, with only a slight bow. By coincidence, the flip-up lid over the cooking area is laminated on both surfaces and is still as flat as a tack, but unfortunately the ply layers between are shot to bits from water ingress. For the replacement table I made, the framework underneath is 30mm thick, so I'm hoping that is enough to prevent any significant bowing. I do take your point though, and if I was making a table out of just the sheet ply, I would follow your advice and laminate both surfaces.  seeshell seeshell, thanks for the info on the Quick Steel stuff. Sounds pretty impressive! Will keep it in mind when the time comes to actually do something about fixing this ice chest.  I meant to clarify in my previous post above why I'm using new laminex. It's all because of that crappy old sink not being usable. It means I have to use another vintage sink of a different size and shape, which means a slightly larger kitchen cupboard is needed, and the old laminex can't be reused. The original table and the larger splashback sheet have been salvaged and are going to another forum member who needs a good clip under the ear (and that's a cryptic clue, not a nasty comment  ). We "think" it goes close to matching what's in his van at the moment, and he wants to make a table to match the existing laminex. cheers, Al. |
|
|
|
Post by Franklin1 on Jun 7, 2013 22:34:41 GMT 10
Great effort, reddo, and a great result!! Congratulations and well done on another fine achievement out of the Shed of Invention.   Can't help you with any name suggestions, but to me the finished TD looks like a type of underwater exploration module, so maybe a nautical name might fit (but don't go for 'Titanic' or for sure it will leak on the first night  ). cheers, Al. |
|
|
|
Post by Franklin1 on Jun 7, 2013 22:10:33 GMT 10
Time for another update... The project is in a bit of a shambles at the moment. Lots being done, but nothing being finished. Seems I'm always waiting for another bit to be done before I can complete anything.  I've built a new table... 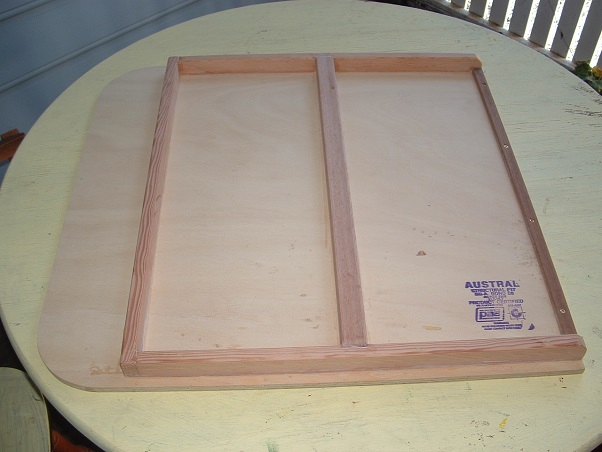 ...and cut the laminex for it... 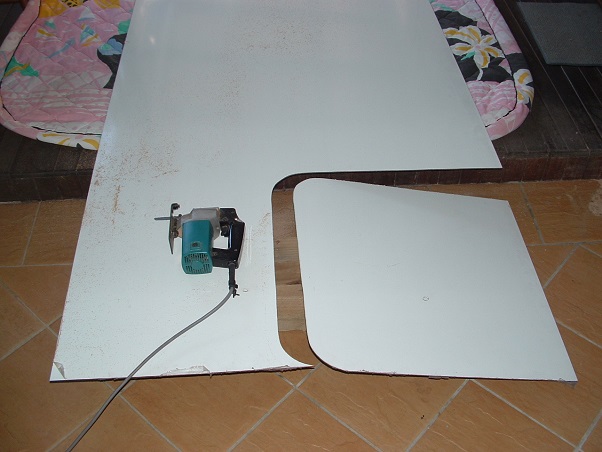 ...but I still have to glue the laminex on. The white side is the back of the sheet. I can't show you the top because it isn't vintage, but it's the least worst of anything I've come across in the last two years. It's a sheet of superceded "Lamipanel" (now known as 'Aquapanel') that I had in the shed. The table being test fitted...  ...and the original leg being test fitted... 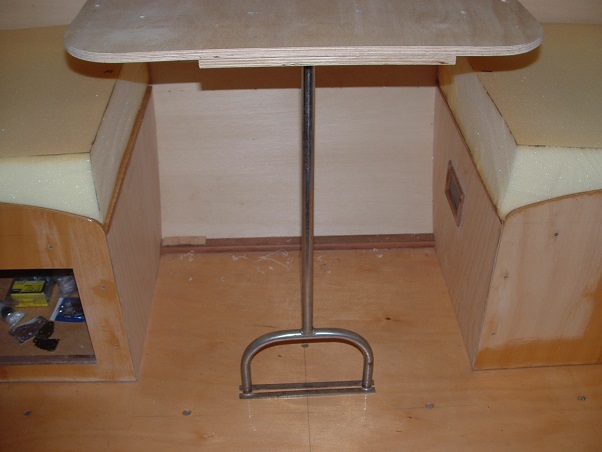 The seat boxes have essentially been made, but I have to fit the bits together to complete them. Some important slot head screws arrived from the UK this week that were needed for the new hinges for the seat tops. I made a start on cutting up a double bed foam mattress for the seat cushions... 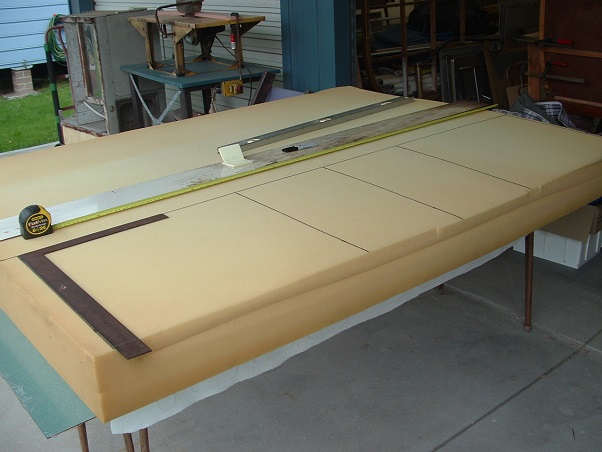 It's no fun when your electric knife carks it after cutting only 2 foot along the first line. At 3pm on a Saturday, there's not a lot of options to allow the job to continue. I had to raid the kitchen drawer for a serrated knife to hack up the rest of the foam blocks. Funnily enough, I'd been in a local Salvo's store a few days before and saw three of the electric knives on the shelf. "Huh, don't need 'em", I says. Well...guess who went back to the Salvo's the following week?  Test fitting the hacked foam blocks...  I've got the vinyl and the upholstery, but I have to get around to cranking up my Singer jumbo sewing machine and make the covers. I've mentioned earlier in this thread about the rusty old sink from the van... 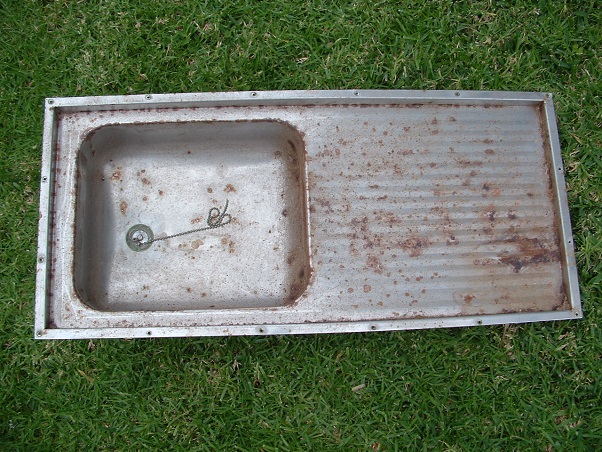 When I had a close look at that sink yesterday, I realised that not only was it really rusty, but it had two cracks in two corners of the bowl. This is one of the corners... 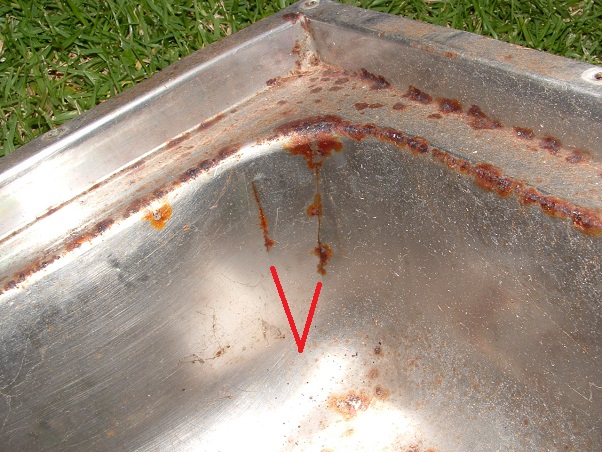 No wonder a lot of the timber in the kitchen cupboards was rotted.  I ended up having to demolish the old kitchen cupboards so I could get the ice chest out. Way back at the start of this thread I showed how the ice chest had been converted to a fridge. I'd originally cut the compressor off the drawbar, and now it was time to cut the freezer section out of the ice chest... 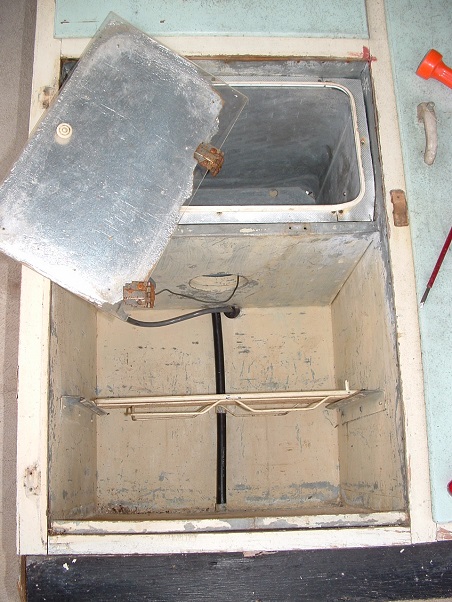 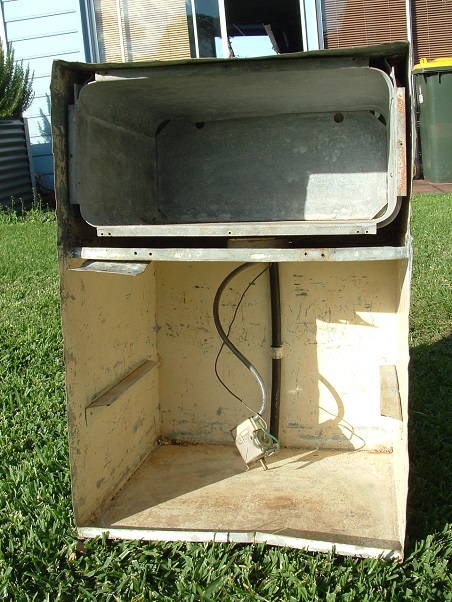 ...which wasn't that easy with all the bolts that had been used to hold it in position, and the fact that they'd all been soldered over as well...  After a bit of time with my gas burner and my angle grinder, I managed to cut all the necessary bits off, and remove the freezer unit... 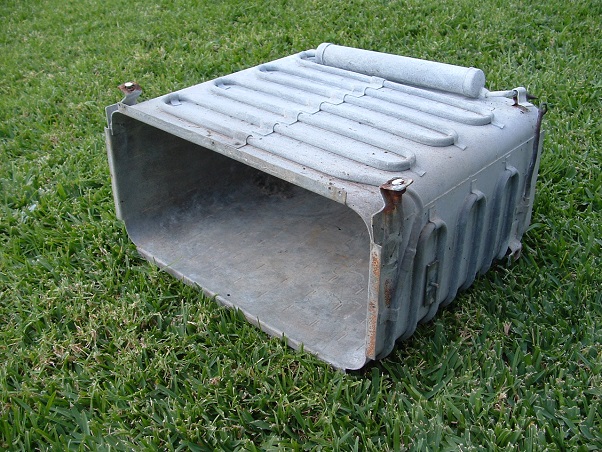 ...which left a heap of holes in the ice chest cabinet (and which now looks more like a piece of Swiss cheese  )...  Not sure what to do with it now. Can't use it as an ice chest the way it is. Will have to think about it for a bit, and decide whether to try and repair this one, or make a replacement ice chest out of the galv sheeting that came off the roof of my Franklin van. Something that might interest the likes of cobber is the large Lysaght stamp on the side of the cabinet... 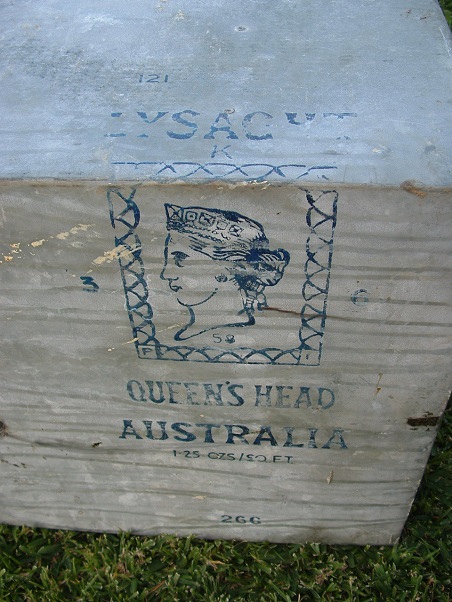 Hopefully a lot of the various jobs will come together over the next couple of weeks. cheers, Al. |
|
|
|
Post by Franklin1 on Jun 3, 2013 17:50:21 GMT 10
G'day Gypsyqueen73 Hard to say decisively. Probably a metho stove to begin with. I presume there's no indication of there being any gas lines in your van, so I'm guessing it wasn't a gas stove (Portagas was introduced into the caravan market in NSW in 1956). If you scroll down to Reply #19 in my thread , you'll see a couple of photos of metho stoves. cheers, Al. |
|
|
|
Post by Franklin1 on Jun 3, 2013 17:28:15 GMT 10
G'day glaucus75, I'm inclined to think you've got a Victorian-built Viscount from the first half of the 1960s. It's a shame the original chassis number is missing, because that would help considerably in pinpointing the age and factory origin. The stamped R14TK--- number is a trailer number issued by the registration authorities when no original VIN identity can be established, so it looks like the drawbar must have been replaced at some time. The 01 - 65 number underneath might have been carried over as an indication of the original date of registration (January 1965?), which would put your van as being late 1964 from the factory. The appearance of the side of your van is consistent with other Viscounts of the time. Whether they have wrap-around windows or not is not the deciding factor. Some did and some didn't. There are two threads that might put your mind at ease about the approximate date. The first thread will contain a link that takes you to the second thread. Have a read through both of them, and note the appearance of Bluetanjo's Viscount in the second link. Flatten the front windows and it would be pretty similar to yours... Re: Jodestar & her uncle's ViscountYou'll also see photos in Bluetanjo's thread showing what the inside of her Viscount looks like. I would think your van was probably fairly similar to this originally, which means there has been quite a number of changes made to the inside of your van. cheers, Al. |
|
|
|
Post by Franklin1 on Jun 2, 2013 21:06:52 GMT 10
I don't know much about this sort of stuff  ... 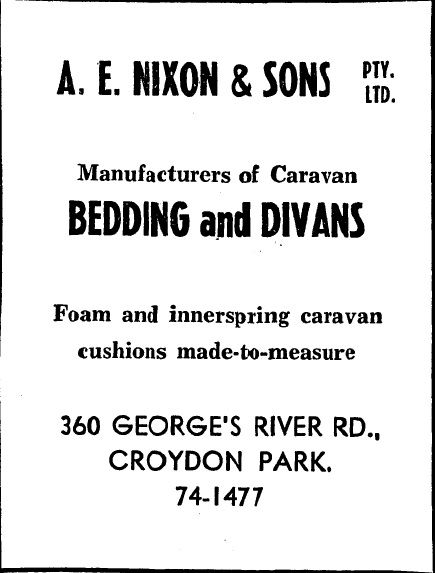 They were a supplier to Millard for a good many years. At least 6, if akeepsakes van is a '63 model, because the advert above is from 1969. cheers, Al. |
|
|
|
Post by Franklin1 on Jun 1, 2013 21:51:27 GMT 10
G'day ourgirlannie, The van is coming along nicely!   Can you tell us a bit more about the laminex that's being sold by the RV people, please? Were you able to look through the sheets and choose what you wanted? In your photo, it seems like it's all stacked on a number of pallets. What if you wanted to look at the stuff on the bottom? What sort of patterns are available? cheers, Al. |
|
|
|
Post by Franklin1 on Jun 1, 2013 21:36:43 GMT 10
Drove past this today on my way home from the local second-hand "Shed". Had to slow down and crawl along while I had a good gander at it. It's a pretty impressive van!
I think the museum headquarters might be bulging a tad with this addition.
cheers,
Al.
|
|
|
|
Post by Franklin1 on May 28, 2013 21:07:54 GMT 10
G'day sgtl, That's a very good effort for a first-time go at laminating plywood strips. I would only deduct a mark or two for the air gaps between the layers, but they can be filled with PVA if he hasn't already fitted the piece into position. Don't worry about the apparent lack of strength. It'll do the job fine. It's not the only piece of timber holding the van together, and it's a darn sight better than the bit that was in there previously. To improve any future attempts, he needs Mum to shout him a few more clamps so he can clamp the strips at closer intervals. The aim is to create a "solid block" of layers with no noticeable air gaps between the layers... 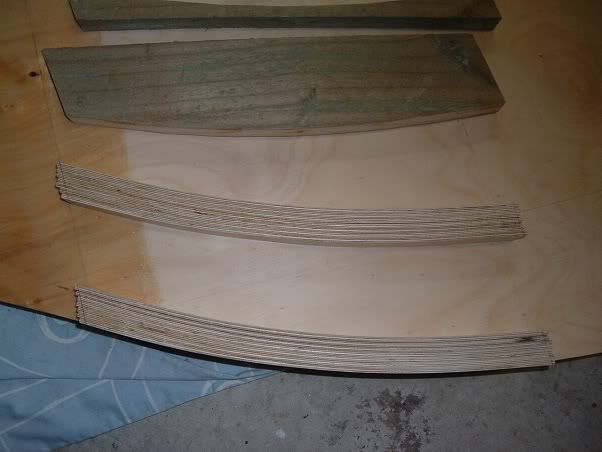 You would probably have seen the photos in my thread where I laminated 7 strips of ply around the walls. It just goes to show you can never have too many clamps   ... 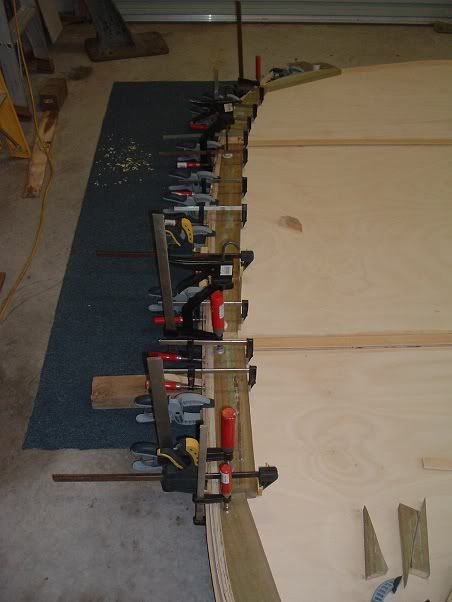 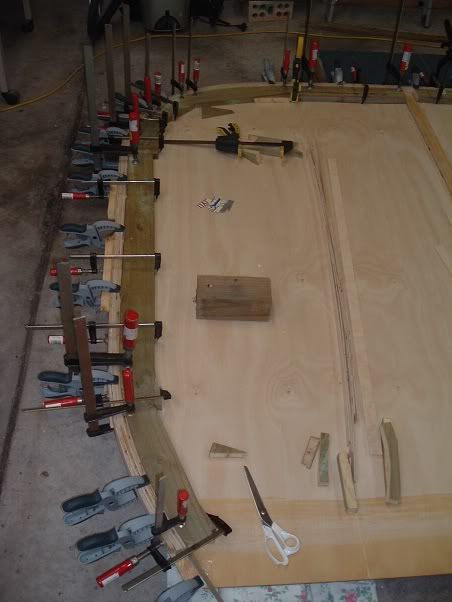 Good effort also on the steam box.   My only query is about how the timber is kept off the bottom of the box so the steam can get into the timber on all the faces. Cripes, the young fella will know more about steam bending and laminating at 16, than I did when I was 50!   ;D Good on him! You tell him I reckon he's doing a great job!   cheers, Al. |
|
|
|
Post by Franklin1 on May 28, 2013 0:11:27 GMT 10
G'day case, When the dual regulators were introduced to the caravanning market, there were reports of the lining in the hoses perishing due to liquid LPG sitting in the hose for extended periods. This led to a recommendation issued by the Gas Authorities as to how to position the regulators to avoid this, and how to overcome the problem by using copper pigtails. You might like to read through this thread on the Classic forum, where we tossed this subject around for a bit, late last year: Gas Regulator positioncheers, Al. |
|
|
|
Post by Franklin1 on May 24, 2013 12:53:43 GMT 10
G'day Murray, you ol' galah, you! ;D ;D As I said to you in my PM, I'm thinking your chassis number of B358 is from "around 1963". Now that I've seen a photo of your van, I can give you some more info to help narrow down the age of your van. The Valiant model seems to have been launched in early 1962. It also seems that at first they were given an 'A' series chassis number, the same as the Viscount models. In fact, I'm guessing they just allocated the next chassis number available, irrespective of whether it was a Viscount or a Valiant. I'm thinking that if we saw a line-up of the chassis numbers A01 to A500 in order, some of them would be Viscounts, and some would be Valiants. At some point during the first year of marketing, they've changed the Valiant numbering system and started a 'B' series. Somebody must have decided it was better to distinguish between the Viscount and the Valiant models. The Viscount continued to get an 'A' series number, and the Valiant started to get the 'B' numbers. In mid-1962, the Valiant was being advertised as "aluminium and rescote", which I presume means that the sides were Rescote plywood, and the roof/ends were aluminium...  Then in late 1962, they were being advertised as "all aluminium", meaning the full cladding was aluminium (but not the framework, which came later)... 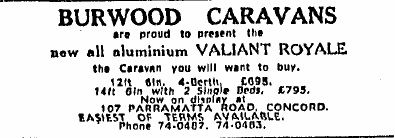 In February 1963, customers were being offered the choice of figured aluminium or the latest American ribbed cladding... 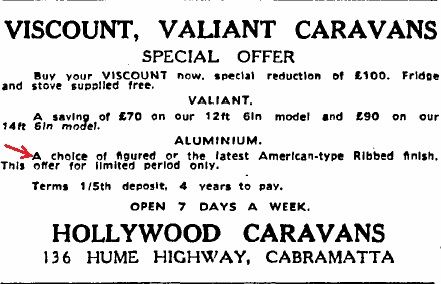 From what I understand about the history, "figured aluminium" is the flat diamond pattern aluminium that was used in the early 1960s. If you look at the first Valiant in the DHL thread and note the photo when it was the original plain cladding with the green stripe, you'll see what I think was called the "figured aluminium" cladding. (And no, that van is not a 1968 Valiant. We've learnt heaps more about Valiants since that post was made in 2007.   ) In November 1963, they started using the sloping windows on the Valiants, "as in Viscounts"... 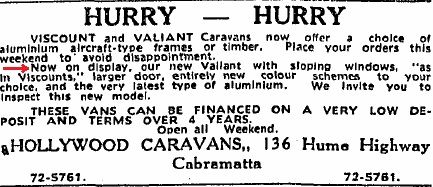 So in summary, I reckon you've got the American ribbed cladding that was optional in early 1963. You've also got the straight windows before the sloping windows came in at the end of 1963. I've only ever seen this particular ribbed cladding on the Valiant model, never the Viscount, and it only seems to have been a short-term thing, because in late 1963 the new ribbed profile from Comalco became available and was being used in both the Viscount and Valiant models. Does all that make sense??  cheers, Al. |
|
|
|
Post by Franklin1 on May 21, 2013 20:05:53 GMT 10
We've been touring around the lower central NSW region over the last couple of weeks, in our other caravan (  ) . We stopped for lunch in a little country town called Coolamon, and had a delicious meal of Driftwood soup with Newcastle damper roll, followed by Ol'36 pudding. Scrum-diddly-umptious!   I can highly recommend this little cafe if you happen to be visiting Coolamon...  ;D ;D cheers, Al. |
|
|
|
Post by Franklin1 on May 19, 2013 19:46:08 GMT 10
G'day DonR, Well done to you for getting the chassis number.   If you look at the 1965 Ambassador painted design in this DHL thread , you'll see it matches the van you've discovered. I presume you have the Moderator powers to modify anyone's post on the forum, so it would be great if you could insert your photo and the chassis number details into the 1965 section of that thread. It would save me having to copy your photo and doing it myself.   cheers, Al. |
|
|
|
Post by Franklin1 on May 18, 2013 20:37:23 GMT 10
G'day Karen, Trying to get a clearer picture of the age of Millard chassis numbers is proving to be quite frustrating. As soon as I think I've got a pattern happening, along comes an example that throws my theory out of whack. I think your chassis number might be from 1967, and I only think this because of the information in the following thread link, where the van has the chassis number of M5642 (about 500 numbers after yours), and they had the fridge warranty card dated in September 1967: Millard Capri 1968 - Advice pleaseHaving said the possible age of your van, I can also point you towards Millard chassis number M8079 which is supposedly a 1966 Millard. How can a van have a chassis number that is 3000 numbers higher than yours, but be from a year earlier than yours? Good question! And gees, I do wish I had a good answer.   But fear not, Karen...one day I'll get to the bottom of it all.   cheers, Al. |
|
|
|
Post by Franklin1 on May 17, 2013 21:15:20 GMT 10
Struth, Ray...between your photos from less than two weeks ago, and your photos now, you've certainly had the bit between your teeth on this job!   Beautiful, beautiful result, and you deserve all the congratulations you'll get.   One question about that coupling...is the tapered hole exposed on the underside to any degree, or is the whole taper completely enclosed? I'm thinking that if it was exposed, it might be part of the foundry process to minimise the usage of metal, and to minimise the amount of subsequent grinding necessary to make the underside flat for fixing to the drawbar. Once again, well done on the Rowvan! ;D cheers, Al. |
|
|
|
Post by Franklin1 on May 11, 2013 12:29:16 GMT 10
G'day kfisher, Just in storage. I picked it up at a local monthly market a number of years ago for the princely sum of ten bucks. Didn't really need it but it was too good a bargain to leave there (I'm a real sucker when it comes to bargains...   ) I don't even know if it works or not. I've never hooked it up to see, but if looks are anything to go by, I don't see any reason why it won't work. It certainly looks to be in very good condition. One day I'll clean my shed out and all this surplus caravan stuff will find new owners. It's the 'cleaning out' bit that I dread.   ------------------------------------------ Ray, during my 36 years at the local Steelworks, we had the occasional boilermaker/welder suffer injuries when welding sparks made contact with their butane lighters in their top pocket. Not a pretty sight when a lighter explodes against your chest. cheers, Al. |
|
|
|
Post by Franklin1 on May 10, 2013 22:28:46 GMT 10
G'day kfisher, The gas stove you're thinking of might be one of the Shields Jetflame models. I have the 3-burner version in my shed, with the stainless steel body and the 3 red burner knobs... 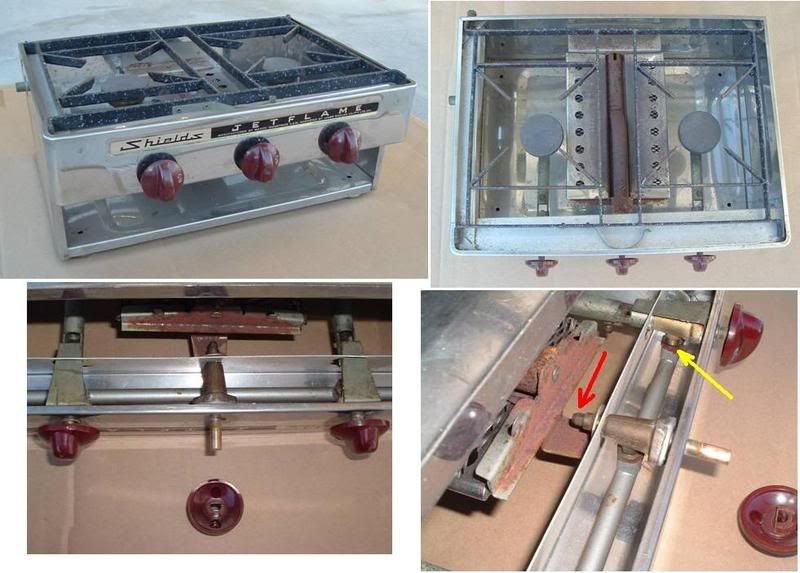 --------------------------------------------------------- isambard, I'll tell you an interesting story about those disposable butane gas canisters... Six years ago my partner and I sold both our houses and jointly bought our current property. In the big move, two houses worth of goods and chattels meant our double garage ended up being chock-a-block with all the stuff that couldn't fit into the house. Nine months after we moved in, her youngest son left a flood light on in the garage after getting his bike out. The floodlight ended up overheating a couple of foam mattresses that were stored too close to it. One thing led to another and the garage burnt down, along with $12,000 worth of belongings. In amongst all the stuff stored in there was a pack of four unused gas canisters, grouped with all the camping gear. As the heat of the fire rose, two of those canisters exploded and became jet propelled rockets. After the 'Firies' had finished, we had the overwhelming job of sorting through all the mess. I ended up finding the two empty canisters outside the garage, and traced their trajectory back to two perfectly round holes through the 1/4"-thick fibro sheeting in the garage wall. Normally you would expect the old-style fibro to shatter to pieces, but in this case it didn't. It was one of the most mind-boggling sights I've ever seen.   If you have them in your caravan and there's a fire...don't hang around.   cheers, Al. |
|
|
|
Post by Franklin1 on May 10, 2013 20:12:52 GMT 10
G'day Geoff, Maybe the plasma machine is not in as peak condition as it could be, but according to this information on the internet, cutting stainless is not as straight forward as cutting plain steel as shown in your video link. It seems that the type of gas used is crucial to successful stainless cutting. The cutter over in the Shed is amazing on black steel (as demonstrated by the discs cut for my table bracket) but I'm guessing they don't have the appropriate gas for stainless. I might make some enquiries to find out who else in my region does plasma cutting of stainless, and see what they can do for me. Thanks for your help.  -------------------------------- And thanks to kiwijim and hilldweller for their feedback.  cheers, Al. |
|
|
|
Post by Franklin1 on May 10, 2013 14:38:12 GMT 10
Back ag'in  ... Porthole windows: the frames have been glued in position, and this time I left the timber props in place overnight... 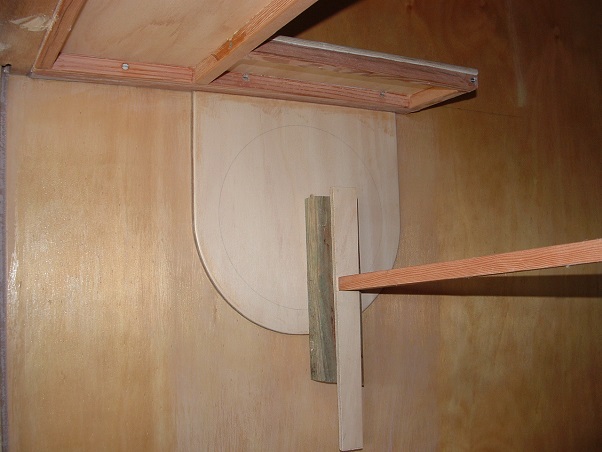  ...and then today I cut the holes out... 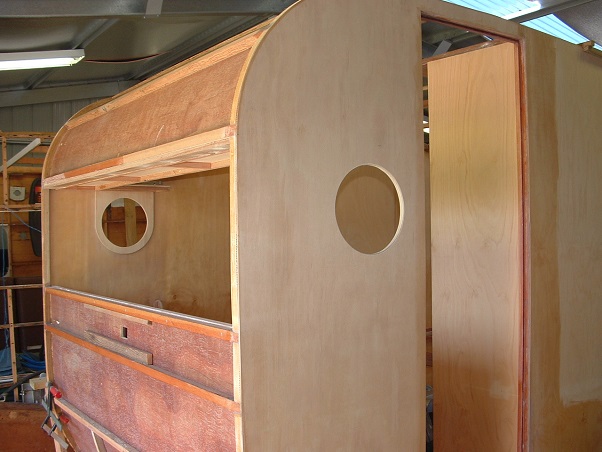 If the one on the nearside looks to be too close to the door, it's just an illusion  , and is partly because the door opening is now 100mm wider, and partly because I wanted to be able to swivel my head when sitting in the seat, and have a view towards the rear of the van. There are enough windows across the front to cover the forward view. Naming the van: I've decided to name the van after my late, great, Mum, 'Mavis'. With my thinking cap on, I've had some discussions recently with the fella over in the Shed about what the plasma cutter could do. The short story is that we decided to see how it went with cutting a nameplate out of stainless steel. I designed the look of the wording on my computer...  He then scanned that into the plasma computer and did a few test runs on galvanised sheet metal... 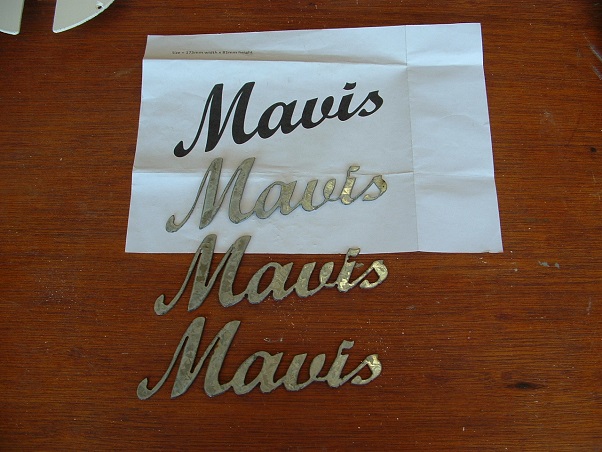 ...and then took the plunge and did it on a couple of blanks of stainless that I had lying around in my shed... 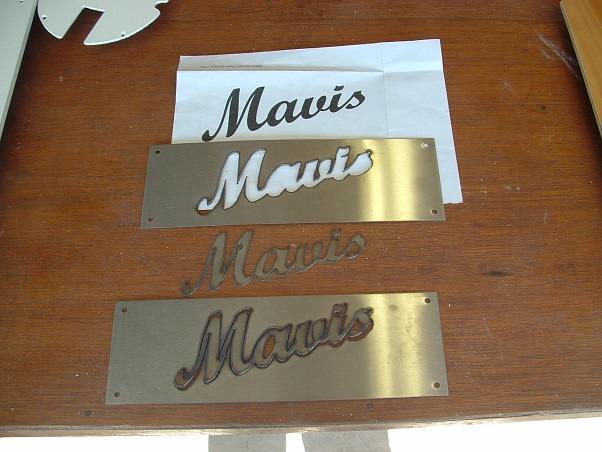 Unfortunately, the plasma cutter doesn't cut through stainless anywhere near as neatly as it does through other metals, so there's a really rough edge left, along with a lot of arc burn...  I have to now educate myself on how to clean up all the rough stuff to make the nameplate look presentable. If anybody has got any tips on how to do that, I'd be most appreciative. The fella did do a bit of light surface grinding on the underside to see how it cleaned up, and that looks better than the topside... 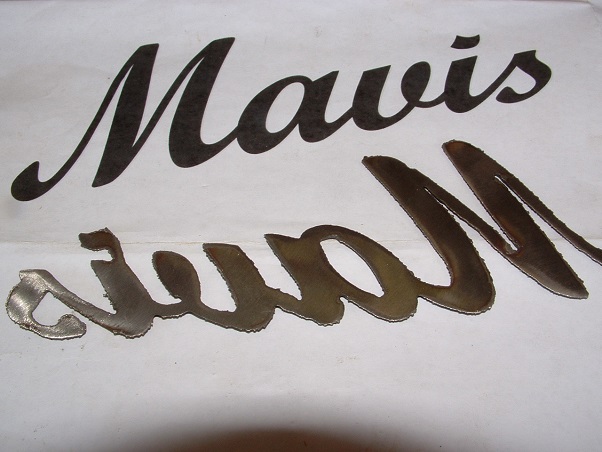 I'm not looking for a perfect mirror finish, just something that looks more presentable than what it does at the moment. If it doesn't work out, my 'Plan B' is to use one of the galvanised versions and paint it. Flyscreens: When I went over yesterday to pick up the nameplates, I was milling around waiting and I spotted out the corner of my eye some timber framed flyscreens. I went back over today to suss them out properly, and ended up getting them. They have the old-style metal mesh in them, which will come in handy for making the screens for the hatch in the van. All the timber framework will be put to good use in the van somewhere, as well... 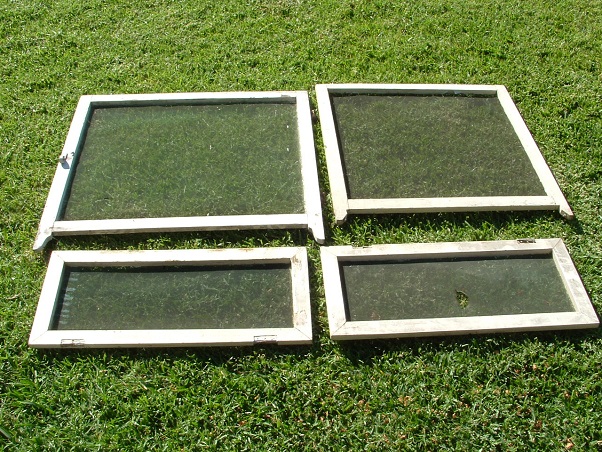 When I sorted through all the other flyscreen frames they have stacked up, I came across a couple of aluminium-framed screens... 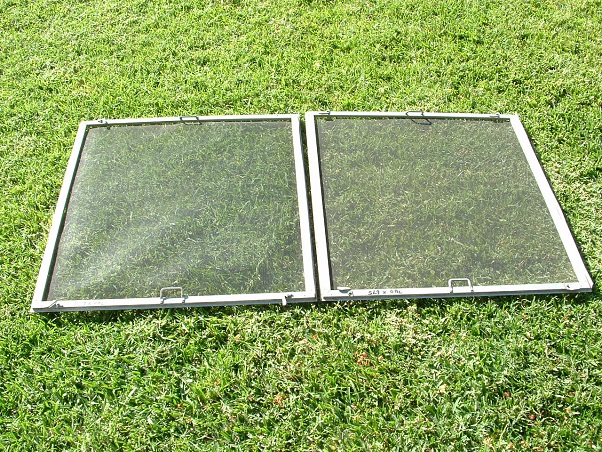 ...which have an interesting little locking lever in all four corners of each screen... 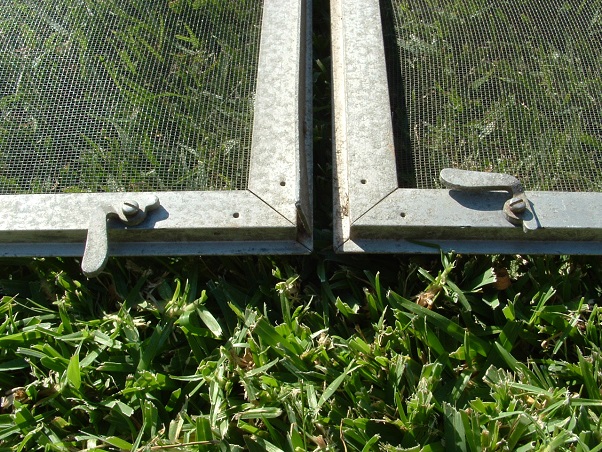 I started to think how that locking lever could be adapted for the screens in the van, so now I have another job to put on the Project list.  cheers, Al. |
|
|
|
Post by Franklin1 on May 8, 2013 19:01:14 GMT 10
What Dad has done to the timber is known as "kerfing". If you cut plenty of 'slots' in the timber, it can be bent around curves. The more slots, the tighter the radius it will bend around. The cuts need to be deeper than what Dad's done, and there needs to be more cuts per foot of timber. Former member 'myvan' has a Newcastle van, which was rebuilt by a carpenter who used the kerfing method to bend the framework. If you go down to Reply #7 in this thread, you'll see what it looks like: Pink Poodle My 1951 Bondwood re buildFor best results with the kerfing method, the slots need to be filled with glue so they make the timber "solid" again. Don't give up!! ;D cheers, Al. |
|
|
|
Post by Franklin1 on May 6, 2013 21:40:27 GMT 10
Ok, here's my contribution about bending timber... Dry bending:Dry bending is when you use dry solid timber (as opposed to plywood) that is readily available from your local timber supplier. You need to know the radius that you are bending the timber around. Then you can calculate the maximum thickness of timber that will bend around that radius. The general formula for softwoods is: Maximum thickness = radius divided by 100 If the radius is 500mm, your timber should be a maximum thickness of 500 divided by 100 = 5mm. If you need a final thickness greater than 5mm, you laminate as many 5mm strips together as you require to get the final thickness (eg, for 30mm you need six of the 5mm strips glued together). Bending solid timber is thickness dependent. Doesn't matter about width or length. If a narrow strip will bend around your radius when it's 5mm thick, then a 300mm-wide board of the same timber will bend around your radius when it's 5mm thick. Wet bending (steam bending):Best to read the posts in my thread about my Franklin van: Franklin1...finally she begins! Skip down to Repy #8 and read from there, and you'll see what happened when I tried to steam bend some timber. (Wonder whatever happened to that van?   ) Also some useful info from reddo in this thread: bending timber moulding etccheers, Al. |
|