|
|
Post by Franklin1 on Aug 12, 2013 20:41:01 GMT 10
G'day Mike,
I'm a bit confused about your question. Are you asking for help on how the front plywood is separated from the back frame, or are you asking what is the best product to replace the front plywood after you've separated it from the frame?
cheers,
Al.
|
|
|
|
Post by Franklin1 on Aug 12, 2013 20:35:23 GMT 10
I have used olive oil smeared along the glass edge with a cotton bud on one caravan, and I've used WD40 sprayed along the glass edge on another caravan. Both methods worked well, but the olive oil was far less messier than the WD40 spray method. I have no idea whether either of these methods leads to problems in the future...all I can say is they easily solve the problem in the present.   cheers, Al. |
|
|
|
Post by Franklin1 on Aug 8, 2013 21:56:42 GMT 10
I have M1125 on my records, which has been estimated at being around 1962. Based on that, your number of M1077 would be from the same time period (it's 48 numbers earlier). cheers, Al.
Photos of Millard Safari referred to by Franklin1 in this post:  Note the ribbed cladding on the lower half. |
|
|
|
Post by Franklin1 on Aug 6, 2013 15:02:00 GMT 10
Cripes, sgtl...unless you are being pedantic about having the van rebuilt exactly how it was originally, I wouldn't bother using escutcheon pins on the edges of the cladding where they will be covered by the aluminium edge moulding. These days there are galvanised fibre cement sheet nails that are more than adequate for that type of job... 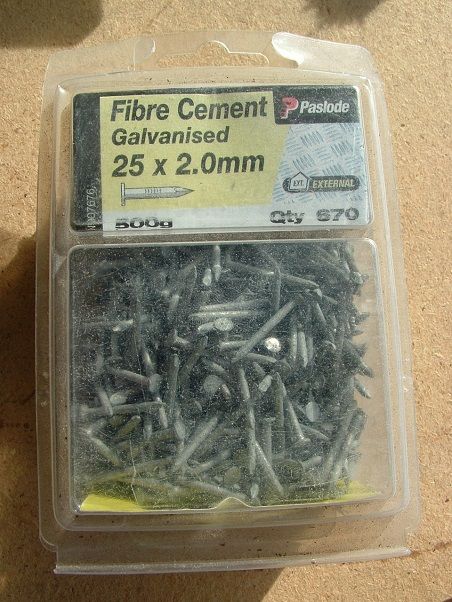 I used this type of nail on a certain poptop I restored. You can see them on the edges in these photos (ignore the circles - they were illustrating something else)... 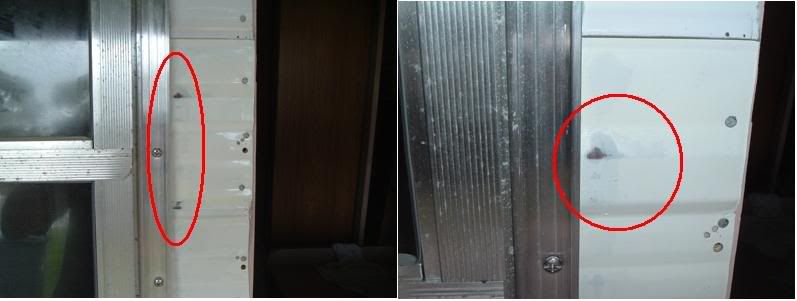 If you really wanted to go upmarket, you can get the same fibre cement nails in stainless steel... 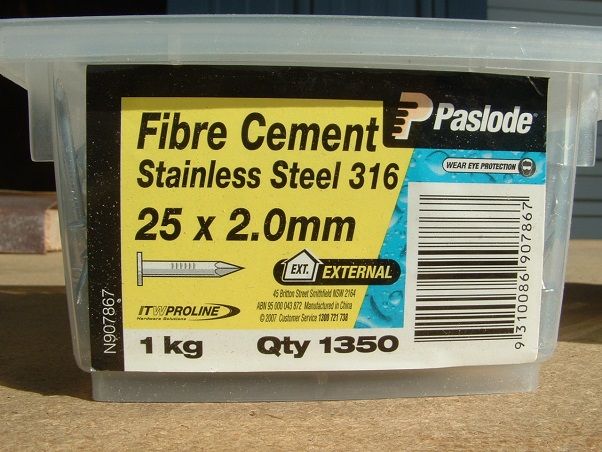 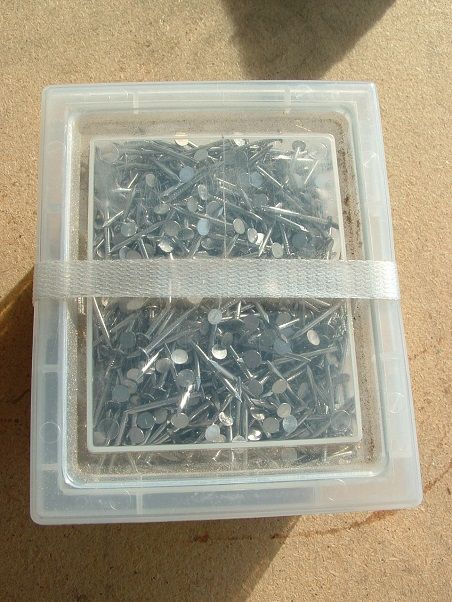 They'll cost you an arm and a leg though, in comparison to the galvanised version. By the time the mastic sealant is placed over them for the edge moulding, you'll never know what's under there anyway. The windows though, are a different matter. Looks like they are on show all the time, so best to get the escutcheon pins for those, I reckon. cheers, Al. |
|
|
|
Post by Franklin1 on Aug 5, 2013 17:07:43 GMT 10
G'day sgtl, The nails you are looking for are also known as escutcheon pins, and are really just a thicker version of the old-fashioned sewing pins your granny used to use (before the plastic-headed ones came along). I have these stainless pins in all the J-mould around my '56 Franklin, including the moulding just above the side windows... 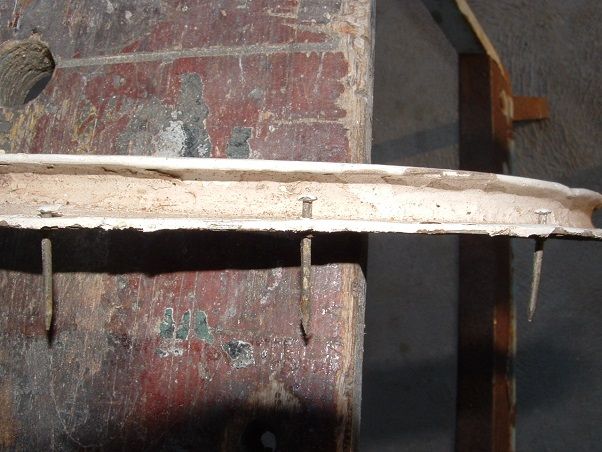 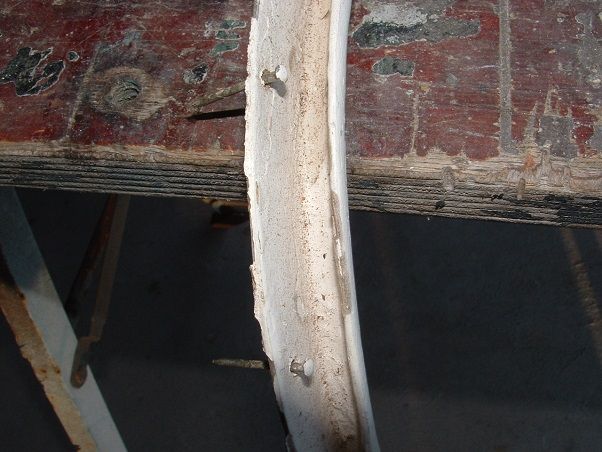 Mine are 27mm length by 1.80mm diameter, but I notice on the internet that 25mm x 1.60mm is a popular size. (See this seller in the UK.) There's a mob in Brisbane known as Anzor who claim to be specialists in stainless fastenings. They might be able to point you in the right direction as to where you might get some. Just don't let them steer you towards a stainless steel panel pin because you won't get the right shape on the head of the pin for the job you're doing. cheers, Al. |
|
|
|
Post by Franklin1 on Aug 3, 2013 7:52:59 GMT 10
Thanks for the tip, Gypsy 10  , but it's probably just a tad too far for me to drive to get one. I've decided to use one of the (horror!) modern inlet sockets, and I'm in the process of working out how to disguise it on the van and at the same time making it easily accessible. Have almost got the 'plan' worked out.   cheers, Al. |
|
|
|
Post by Franklin1 on Aug 2, 2013 17:40:08 GMT 10
Rear side windows: I completed these windows today, after a few weeks of painstaking woodwork. Lots of timber props used to hold bits of timber in position while the glue cured...  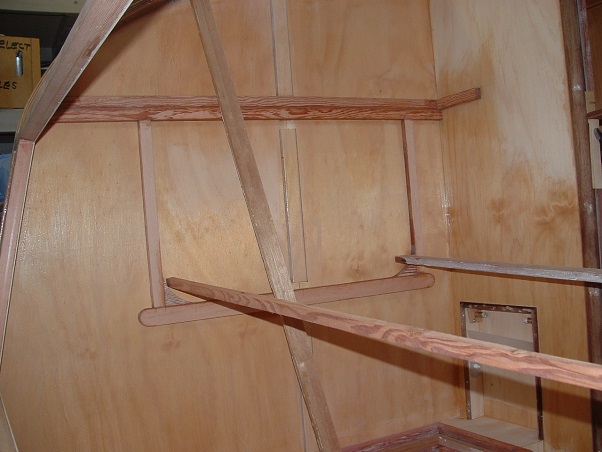  This morning I got the router going, and cut the window openings out...  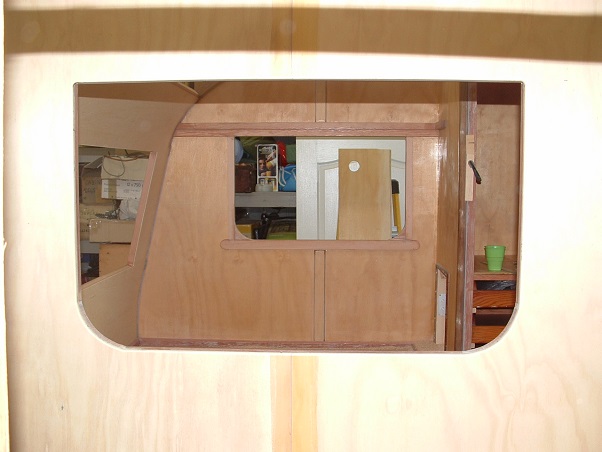 ...and then test fitted the windows... 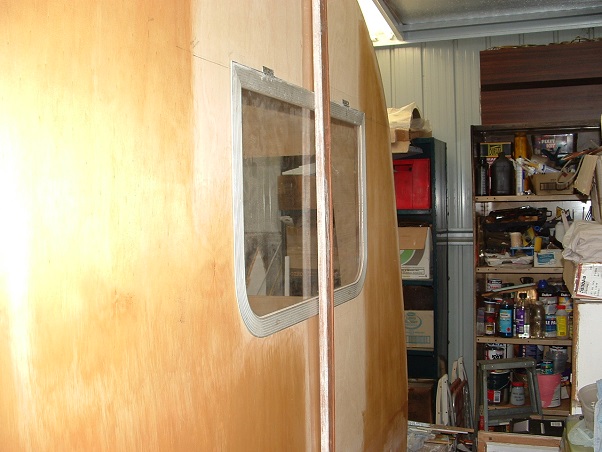 I almost had a major "Eek!" moment during the router job. I had to pause the router movement for a short period of time on both sides so the cutout didn't fall out and damage something. During the pause, the whizzing cutter scorched the surrounding ply. After cutting both windows out, I was going to go and have a well-earned cuppa, but decided to check the inside of the van first. Lucky I did, because there was a pile of smouldering sawdust inside the van under the first window I cut, started by the scorched plywood. I could have easily gone straight off the job and had the cuppa, only to wonder half an hour later what that burning timber smell was.   Luckily the damage was confined to a small burn mark on the wheel arch ply covering... 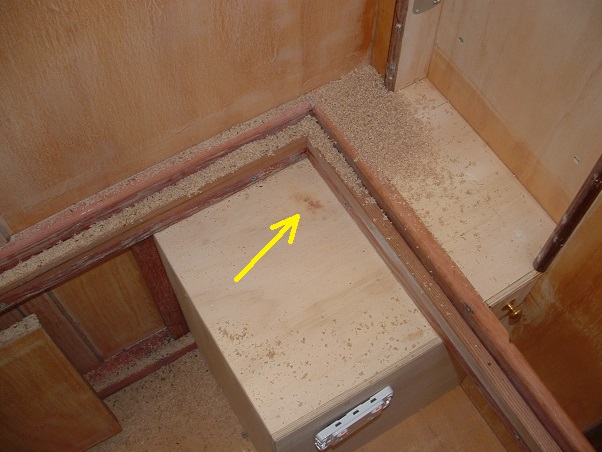 Whew!!  cheers, Al.
|
|
|
|
Post by Franklin1 on Aug 1, 2013 19:29:39 GMT 10
G'day moon, Your van is most likely from the second half of 1970, and is the 5,011th Ambassador chassis built after Viscount changed the chassis numbering system, and put the letter 'E' after the numbers (it was previously before the numbers). So, you've only missed out on being eligible for this Vintage forum by a matter of months. However, I can vouch for the folks over at our sister forum for Classic Caravans built in the 1970s. Friendly and welcoming, they are. Don't ask me how I know....I just know.   cheers, Al. |
|
|
|
Post by Franklin1 on Aug 1, 2013 8:53:05 GMT 10
G'day DonR, Congratulations to both Don257 and yourselves for a sterling effort in the display!   You've certainly done well in flying the flag for the vintage caravan fraternity. It's a little disappointing to see you not being given a special award for having your Don in the one family since 1949. If that's not "Hall of Fame"-worthy, I dunno what is.  Well done to you all for a magnificent display! ;D ps. Isn't it funny how people ask if these old vans are actually "lived in"? Nobody asks a vintage car owner, "Do you actually drive in this?"cheers, Al. |
|
|
|
Post by Franklin1 on Jul 31, 2013 11:42:27 GMT 10
Clipsal power inlet socket: Do you have one of these Clipsal power sockets on your van?... 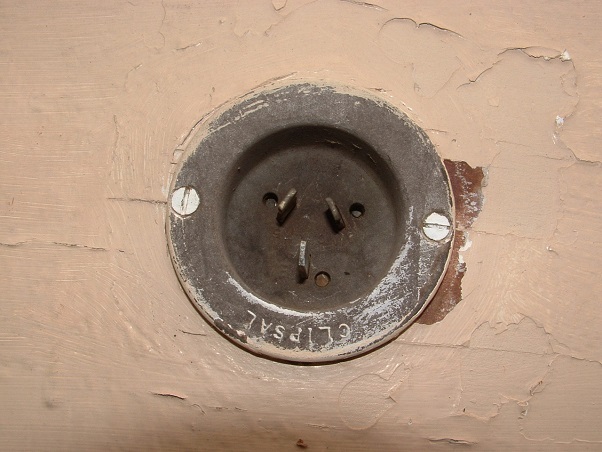 Have you ever had yours checked to see if it's: (a) in good condition (b) working correctly, and (c) electrically safe? I had a good look at mine yesterday, and noticed a couple of things that troubled me. This is the back of mine... 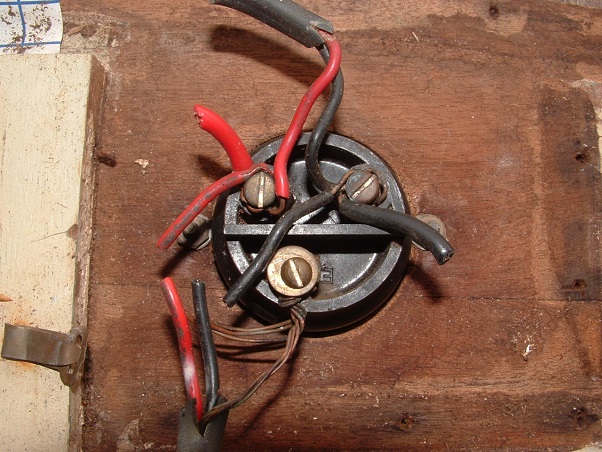 When I looked carefully at the design of these things, I came to the conclusion that the terminal screws are really only long enough to secure one wire at each terminal, and not three wires like those connected at the terminals on mine. I think these would work far better if one 3-core wiring was connected to the socket, and then that wiring goes to a junction box to separate out into the power and light circuits. I also noticed on mine that somebody had changed the Earth terminal screw so that thicker earth wiring could be secured... 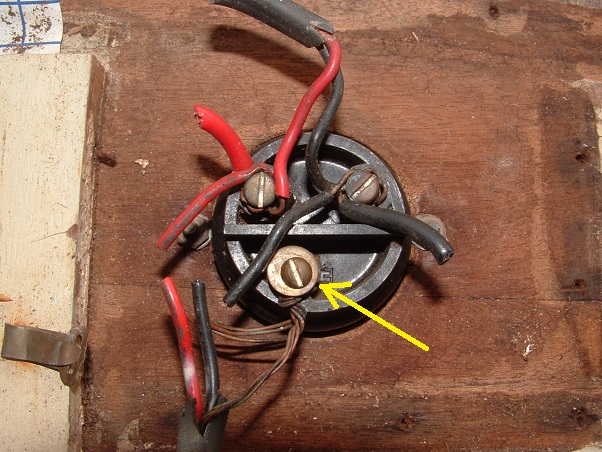 The problem with doing this was that the wiring actually now sat on top of the bakelite fitting, and not down in the recess against the terminal pin. In fact, the earth wire didn't actually touch the pin, so the van was not earthed through this socket. I removed the terminal screws, and pushed the terminal pins out of the socket (they are pushed out easily from the front of the socket)...  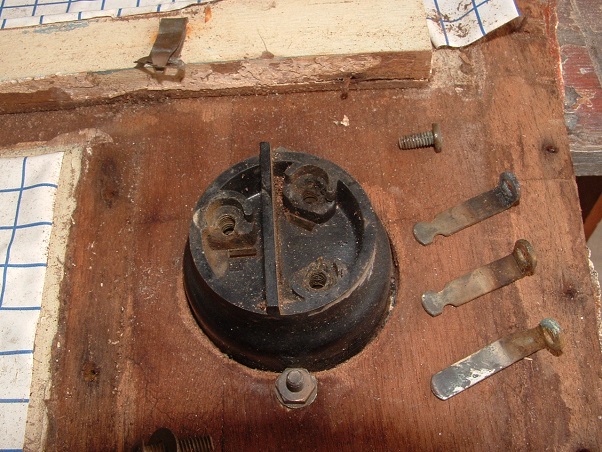 It was then that I noticed the bakelite around the Active (positive) terminal had been "cooked" at some stage, most likely due to a loose connection causing arcing... 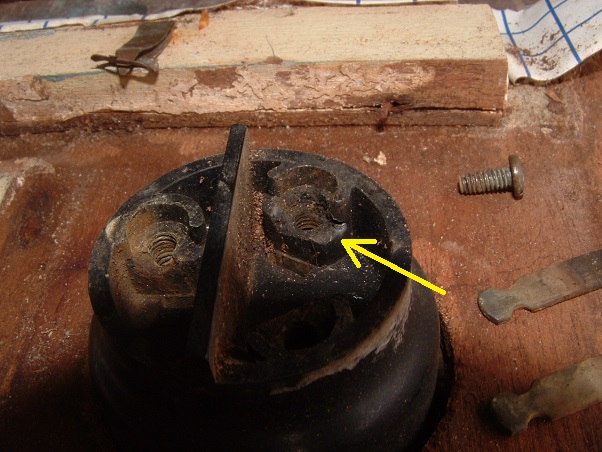 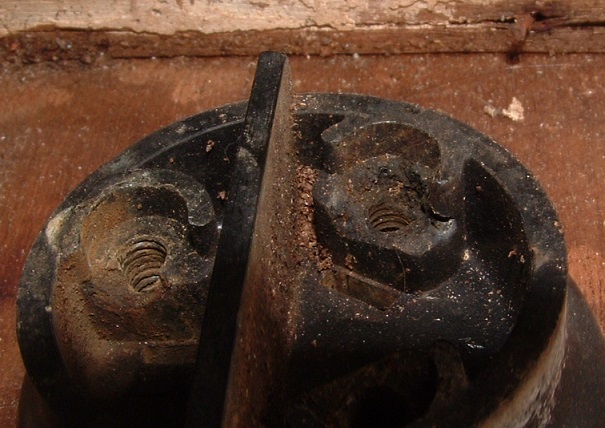 You can see in these photos how corroded the terminal pins are, particularly the Earth pin on the right, which shows no real evidence of any contact with the copper wiring... 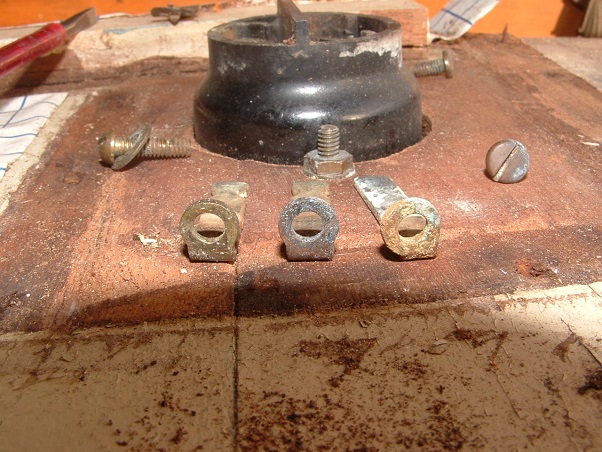 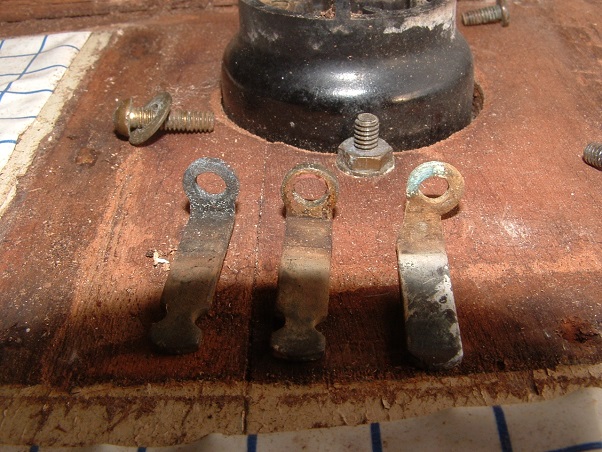 I've decided I won't be re-using this power socket, and will consign it to the "show and tell" memorabilia basket. It would make me too nervous having this on a van. cheers, Al.
|
|
|
|
Post by Franklin1 on Jul 25, 2013 19:41:58 GMT 10
Wardrobe door: The new door has been made. It is a couple of inches wider than the original door, so it made sense to build it via the "drum-built" method (ie. inner and outer skins with a frame between them). This method will stop a door this size from warping or bowing out of shape. First step was to router a shallow rebate around the perimeter of the backside of the face ply...  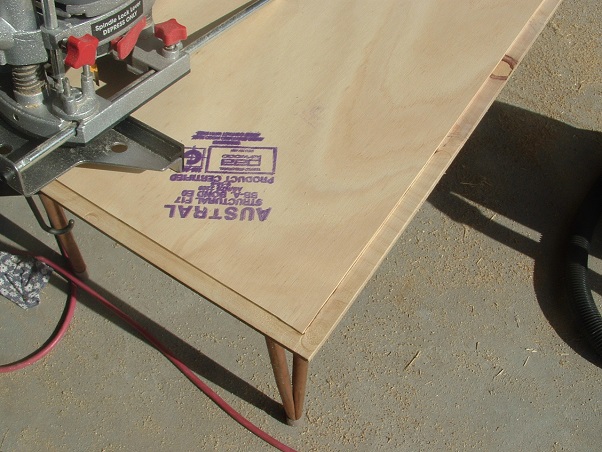 Then a layer of thin timber framing was glued to the back, including extra bits for all the hinges and other bits of hardware... 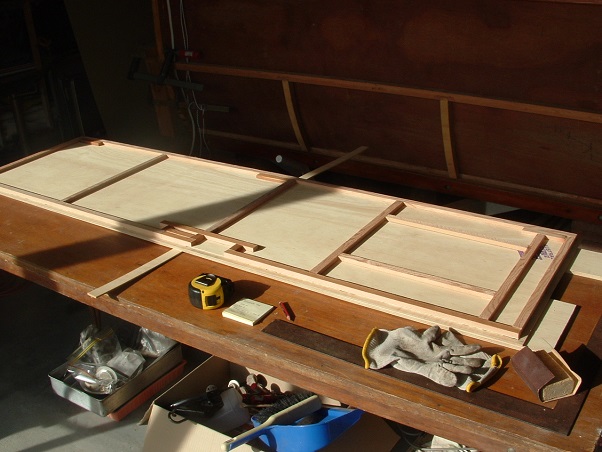 And then a 3mm skin was glued on top of that framing, and everything trimmed up... 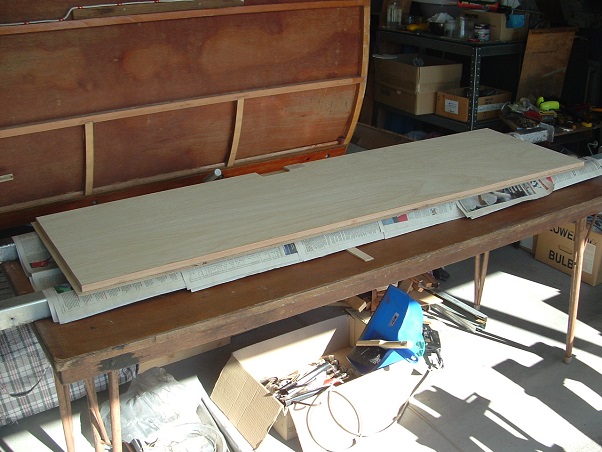 The door when fitted with all the original hardware now looks like this...  When I took the mirror off the original door, it showed the original paint colour, which is green and not blue as I had previously thought (green must fade to blue after 50 years)... 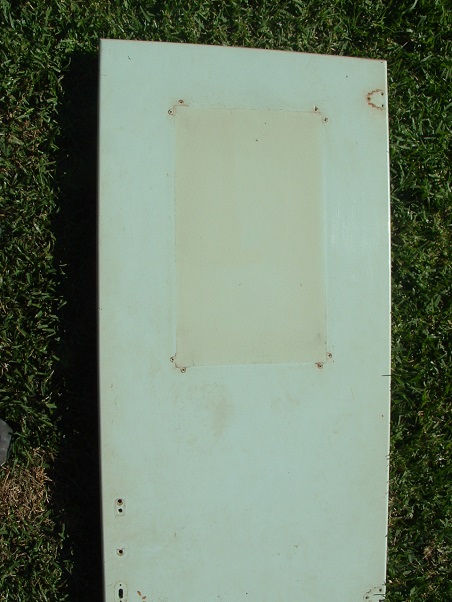 There was a plywood backing sheet behind the mirror, which I thought might have had some information about the history of the van scribbled on it...  ...but sadly there was nothing...on either side...    I intend to remedy that wasted opportunity and write what I know about the history of the van, plus what I've done to it, on that plywood backing.  All the cupboard handles in the van are held in place with a threaded bolt and two different size nuts on the ends (...just to make life difficult  )... 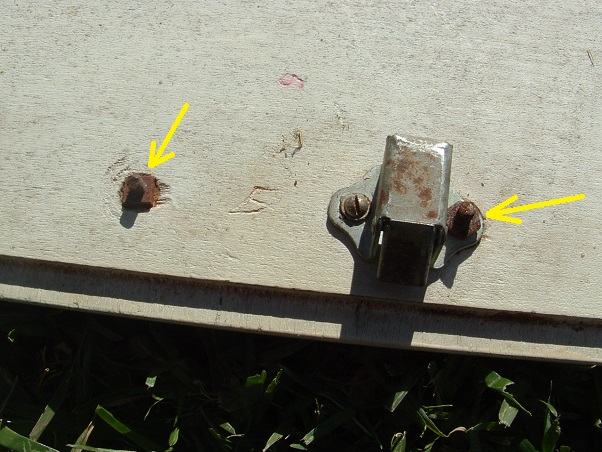 After a bit of experimenting, and some careful measuring and cutting, I was able to replace these threaded bolts with the slot-head cabinet screws that a forum member sent me (...and thanks again to that member  ). The cabinet screws have the same thread size... 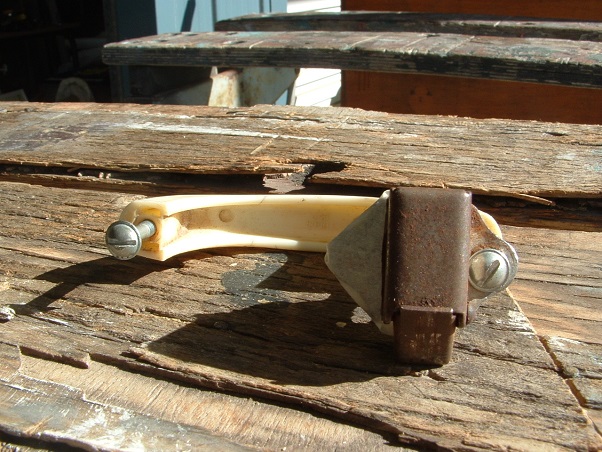 And that's a load of waffle about one bloody wardrobe door, ay?!!   cheers, Al.
|
|
|
|
Post by Franklin1 on Jul 21, 2013 18:23:12 GMT 10
I can see an engineering career ahead, SGTL!  He should probably be the keeper of the bike keys while he's got the rope hook connected there. It wouldn't be a pretty sight to see the whole roof cladding go through that pulley wheel up in the rafters, heh heh. He's doing a real fine job on the van. Give him a pat on the back from me!   cheers, Al. |
|
|
|
Post by Franklin1 on Jul 15, 2013 18:06:41 GMT 10
Thanks folks for your supportive comments.   ;D This project has sure been a major mental effort todate. It's one thing to have a picture in my mind of how I want it to look, but it's quite a different story translating that picture into pencilmarks on plywood. Not a day goes by without me having an "Oops!" moment where I stuff something up. Fortunately I've been able to remedy all those senior moments so far, and fix the errors up to make them look presentable. Hopefully people are being suitably entertained reading about the project as it unfolds.   cheers, Al. |
|
|
|
Post by Franklin1 on Jul 11, 2013 22:20:08 GMT 10
G'day Steve, I presume that's calico in your photo. If you click on this link, it will take you to humpty2's thread about his bondwood van and what he did when applying new calico to the roof. Read the second post from the top... Humpty's Bondwood Castle CaravanKeep us posted on how the job goes for you...easy or hard. cheers, Al. |
|
|
|
Post by Franklin1 on Jul 11, 2013 15:39:01 GMT 10
To continue... Wardrobe...The second ceiling sheet of ply was fitted and the hatch opening cut... 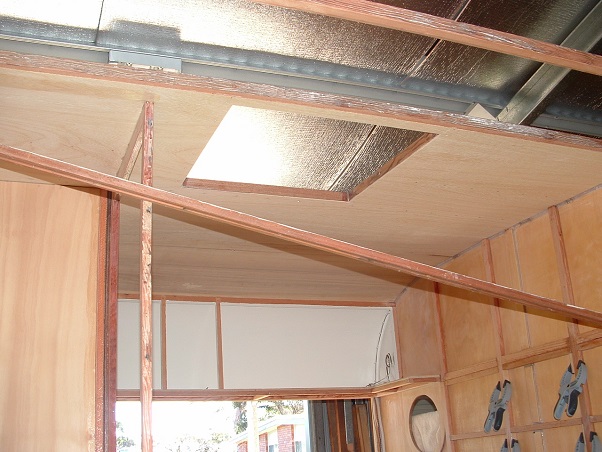 This allowed building of the new wardrobe to commence. You can see in this photo how the new wardrobe is narrower in width than the original wardrobe front... 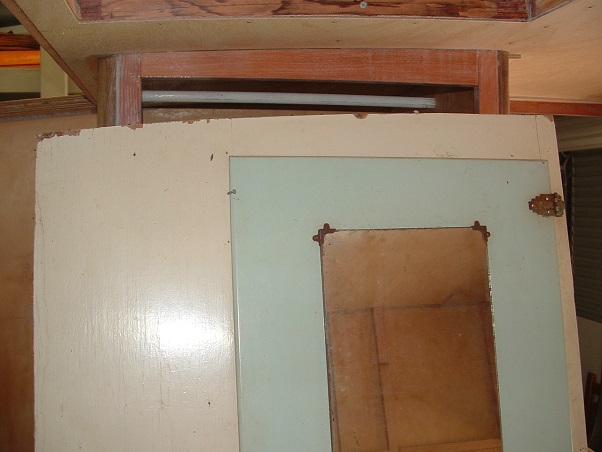 I'll explain shortly why I did it this way. Framing of the wardrobe commenced... 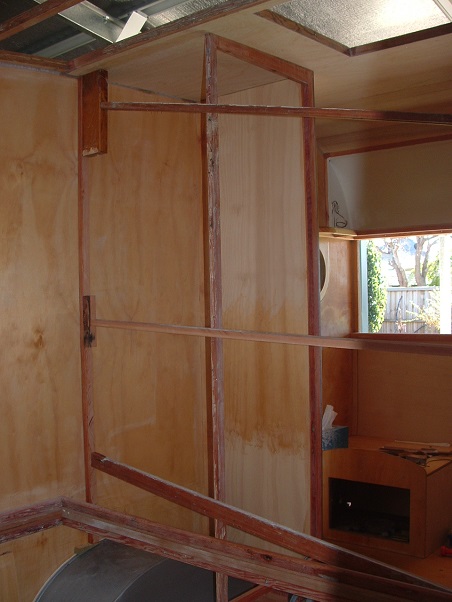 Four drawers were salvaged from a built-in wardrobe from my son's 1960-built house, so they are age-correct for the van...  I had to cut the drawers shorter in length, and rebuild the rear ends of them... 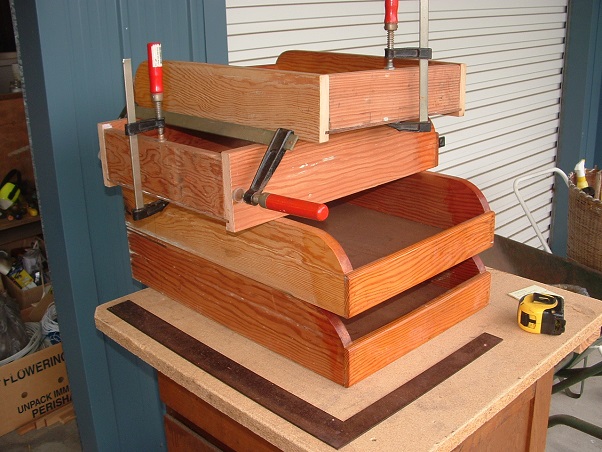 The drawers were fitted into framework built in the wardrobe... 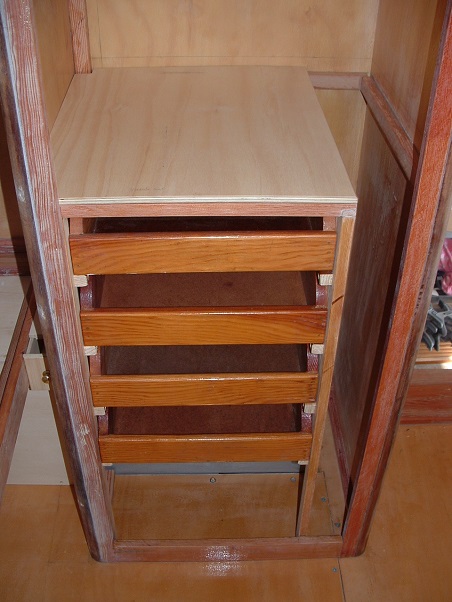 The top half is hanging space, with a few inches of long-drop hanging space on the right hand side (eg. for dressing gowns)... 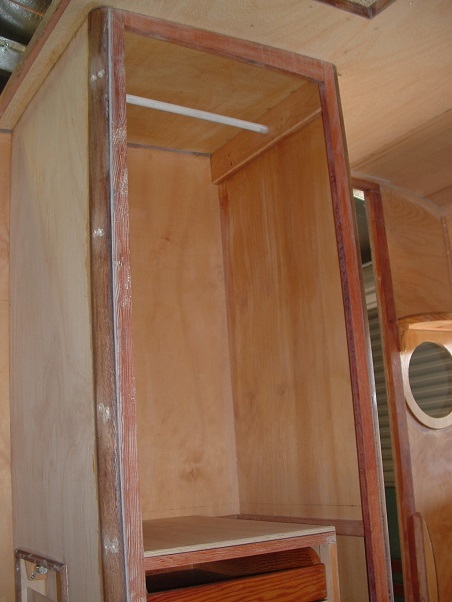 Now to explain the narrower width... In our recent poptop experience, trying to make a transverse bed was a pain in the butt when getting sheets to go into the two back corners. Kneeling on the mattress while reefing the corners of the mattress up with one hand, and tucking sheets over the mattress with the other hand, was too much fun and games for our liking. Thinking there had to be a better way, I decided to have a small gap between the bed and the wardrobe for two reasons: one, it allows the mattress to be pulled forward a few inches to make a gap in the two back corners, and two, it lessens the claustrophobic feeling of sleeping with your nose pressed against the wall of the wardrobe. That small gap will also now function as a night-time shelf for glasses/jewellery/etc... 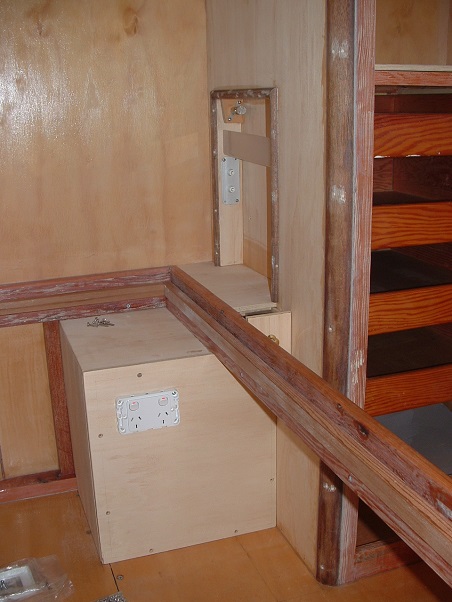 (You'll also note in the photo above the boxed-in mudguard cover, complete with hidden double-pole power point, but I'll avoid talking about that.   ). There was also a small amount of space in the wardrobe that was being wasted beside the drawers frame, so I cut an alcove into the side of the wardrobe and installed a bedlamp... 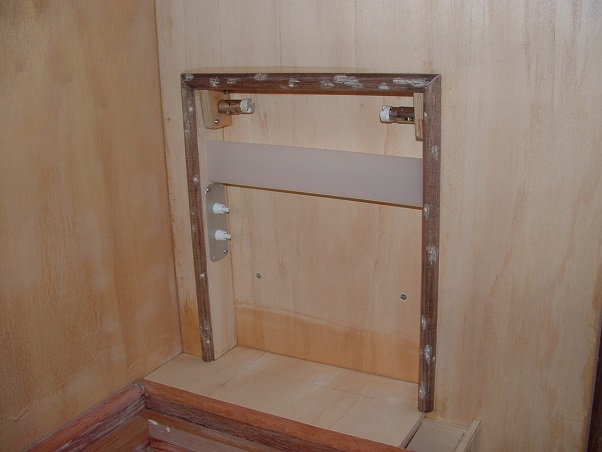 The bedlamp has two light fittings, one for a reading lamp, and one for a nightlight, and they are operated by the two push-button switches fitted below them. The acrylic light cover was cut from a fluorescent light cover that I found at the 'Shed'... 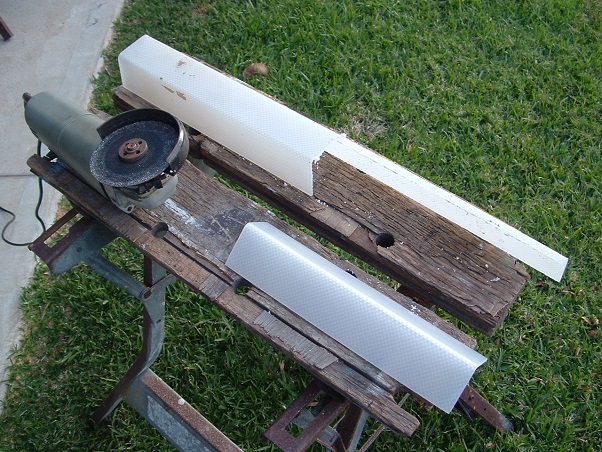 When the acrylic cover is fitted into position, it all looks like this... 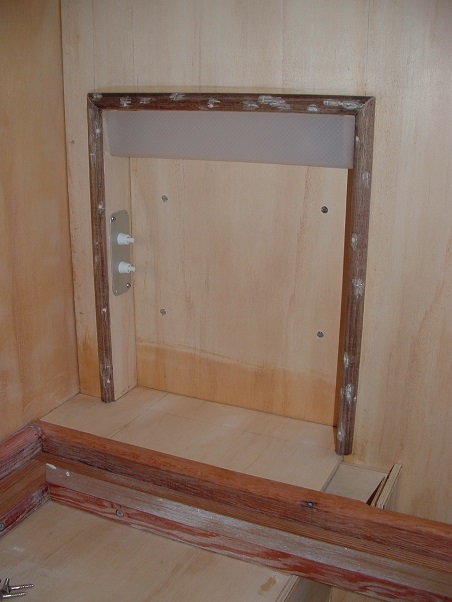 There was a gap under the night-time shelf, so I made a little trinket box that slides into that gap... 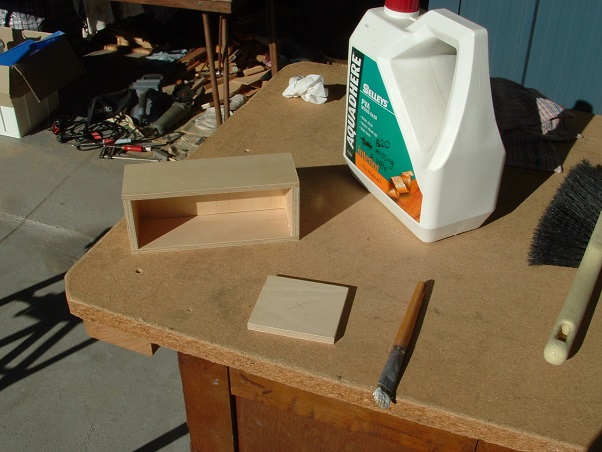 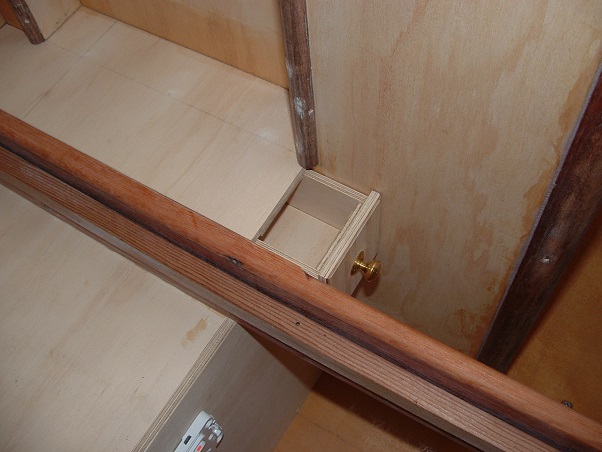 And that's just about the wardrobe section completed. I still have to make the new door for it though, so there's a job for another day. Kitchen...I'm still working on the design of the new kitchen, based on the larger replacement sink I now have to use. I haven't quite got the detail sorted out yet, so that's a work-in-progress. All I've done so far is glued some framework to the walls in readiness for the cupboards... 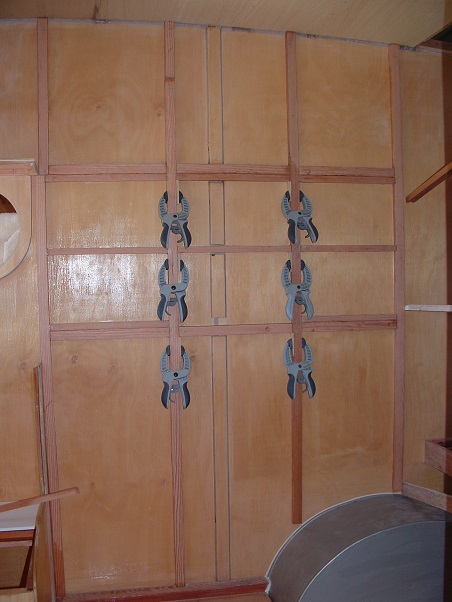 What's next?... What's next?...Yesterday I fitted the fourth sheet of internal ply to the rear, and cut the window opening out this morning... 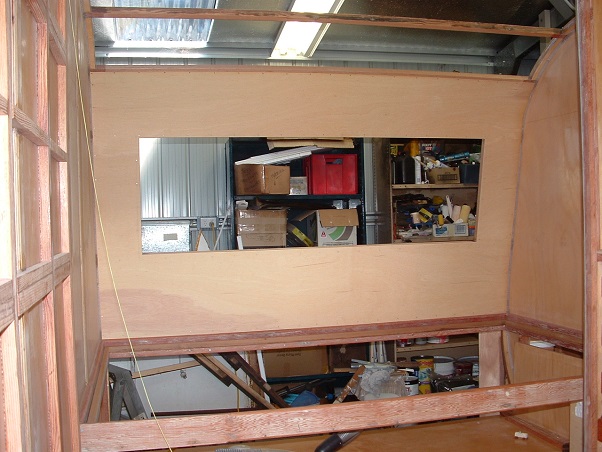 I can now start to put the framework on the sides and rear for the windows and the rear overhead cupboards. (The third ceiling sheet hasn't been fitted yet because it allows the lighting in the shed to get into the van, otherwise I can't see what I'm doing easily.) Till next time, cheers, Al. |
|
|
|
Post by Franklin1 on Jul 11, 2013 14:42:07 GMT 10
Ok, I've been a bit slack with updating this project, so here's heaps of photos... Table leg brackets...The first attempt at making copies of the brackets was a disaster. As we suspected, the wall thickness of the tubing was too thin, and the arc just blew through the wall... 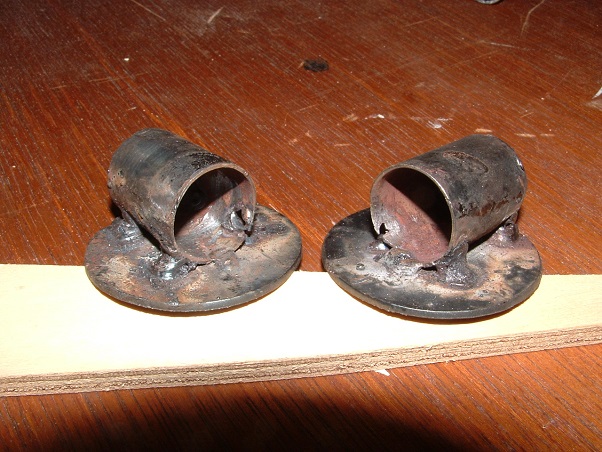 Back to the plasma cutter I went, and got the fella to cut me two sets of discs this time. The "Shed" business is up for sale so the current owners can retire, and the plasma cutter is being packed up and taken with them. I thought it would be 'smart' to get a couple of sets of discs cut before it was packed up. I also had to go hunting for some thicker wall tubing, and found it on the leg of an old aged-care chair (...and if the little old lady from the retirement village is reading this, you can still use your chair as a 3-legged stool, dearie...you just have to sort of lean to one side a bit more   ). For our second attempt at making bracket copies, we decided that brazing the parts together might be a safer option, so we went with that... 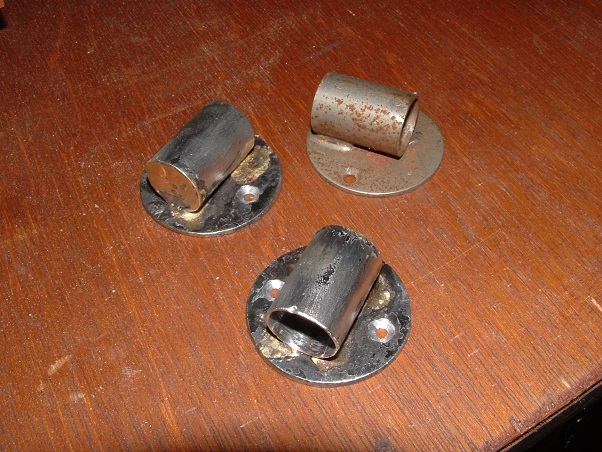 I was pretty happy with that effort, and after a couple of coats of silver paint, they now look like this (with the original bracket in the background)...  Wiring... Wiring...Wiring has commenced, and here's a bit of nostalgia for ya...genuine old-style brass cable clips...  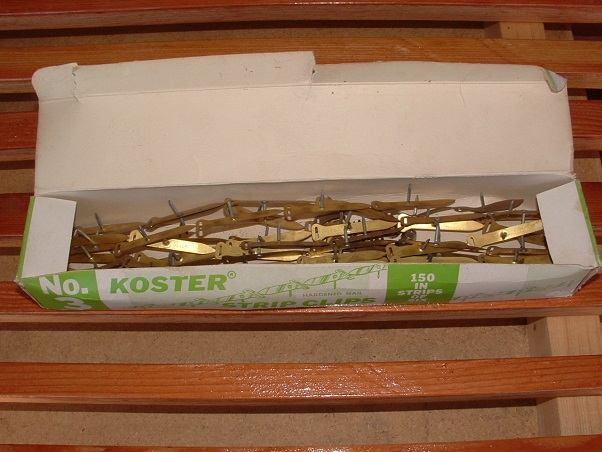 Too bad you'll never see them in the finished van.   The only way I could think of getting wiring from the roof down to the floor was via the side of the front window frame... 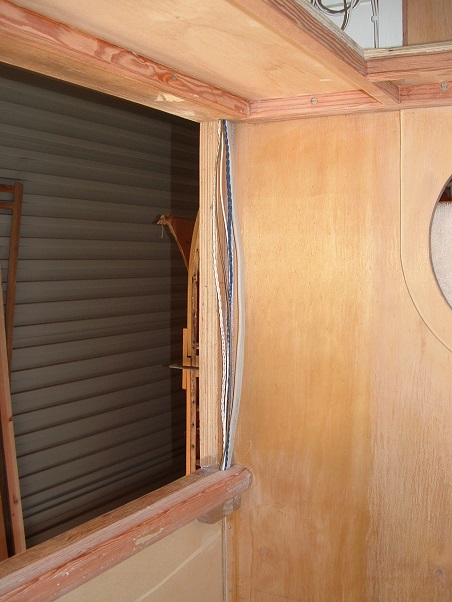 That wiring will be boxed in once the window frame is completed. The wiring for the clearance lights up in the top cupboard has been completed, and extra lengths of wire were installed to allow the connectors to be pulled across to the cupboard door opening for any maintenance...  I'm trying to design the 12V wiring so it is fairly easily accessible for any future repairs or maintenance. Edge cover mouldings...I'm making my own cover mouldings out of 25mm-wide strips of ply, with a routered edge on one side... 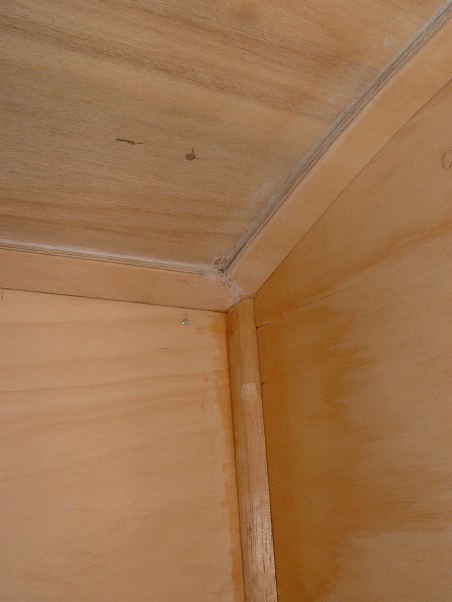 Sometimes I have to remember my high school geometry to get the moulding to go round the framework... 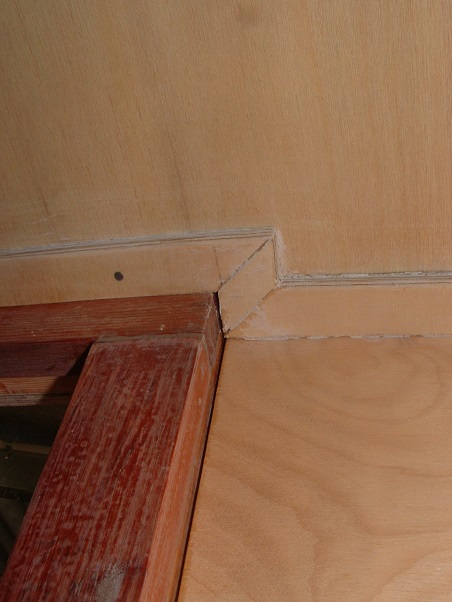 Back with more of the update shortly... |
|
|
|
Post by Franklin1 on Jun 28, 2013 20:31:25 GMT 10
G'day S&J, I wonder if your van is one of the "four new fiberglass and aluminium" models that were exhibited in the Sydney Caravan Show in late 1961?  The advert says "from 14ft...", but quite often advertising was rounded up to the nearest foot. cheers, Al. |
|
|
|
Post by Franklin1 on Jun 27, 2013 22:08:06 GMT 10
G'day Leigh, Yeah, it was a pretty woeful attempt at a cryptic clue, but clip...ear = Clipper, so it must be you.  Thanks for the tip on the wine cask bladder. Will have to make friends with the local bar staff. The other tip from smiles elsewhere on the forum about using the empty 10 litre spring water containers was helpful too. All of the tips seem to be great ideas. cheers, Al. |
|
|
|
Post by Franklin1 on Jun 27, 2013 20:19:45 GMT 10
Thanks for the tips, reddo  I did wonder about whether it needed holes for the water to drain away, but I couldn't see any in the professional one Belinda had made for her van, so I figured the water must just flow to the end of the channels and seep down the stands to the floor tray. I'll put a couple of holes in each valley to allow the water to escape and the cold air to circulate better.  Funnily enough, I was exploring the option of using an aluminium pizza tray before the roofing came on the scene. Plenty of holes to let the water and cold air through...  Working out how to make the stands for it was throwing me for a bit of a loop, though.  cheers, Al. |
|
|
|
Post by Franklin1 on Jun 27, 2013 10:45:31 GMT 10
G'day again, I've been toying with the ice chest lately, trying to come up with a way of making an ice tray for the top of the chest. I went over to the local "Shed", looking for some mini-orb/ripple iron, and some galvanised C-channel. Blow me down if I didn't almost trip over a small pile of C-channel offcuts when I walked in the gate...  Usually two of these channels interlock together to make part of the frame for a steel-framed house... 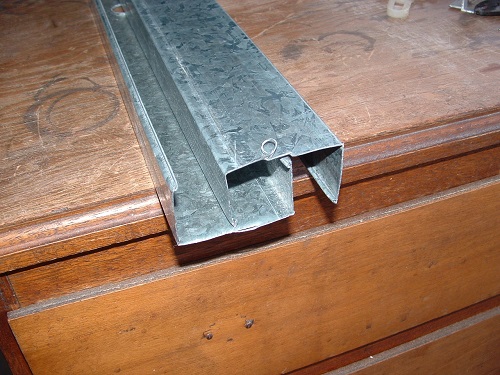 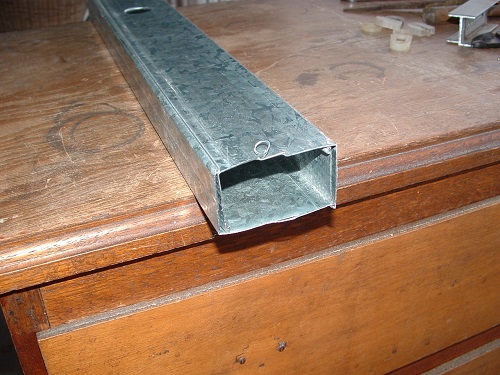 With a bit of cutting and rearranging, I (very amateurishly) soldered two pieces together to make the end stands... 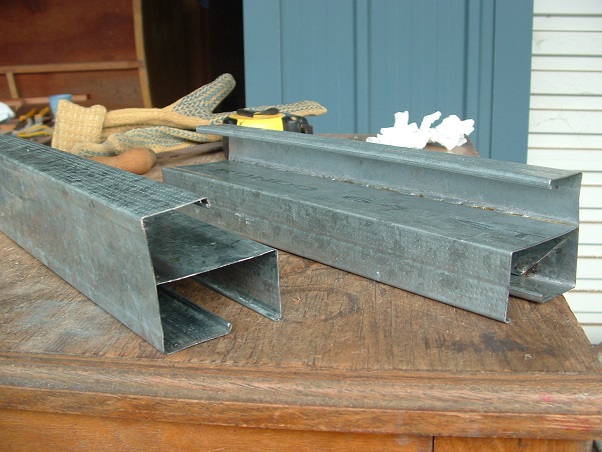 I didn't find any ripple iron, but I did notice some old aluminium roof sheeting that had some potential, so I cut a couple of metres of that and took it home with me. This is the roofing... 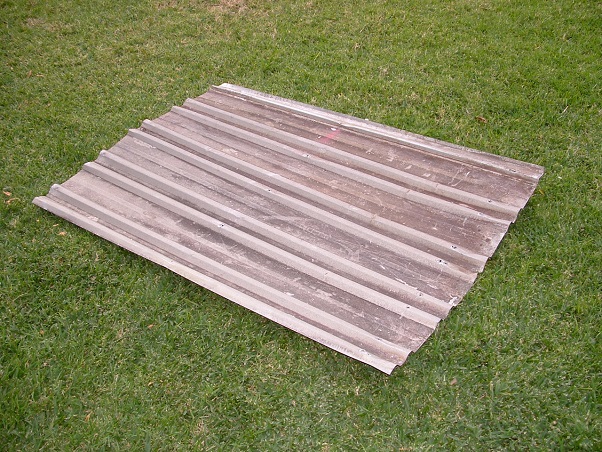 ...but when it's cleaned up and looked at more closely, it has a surface appearance that some people might recognise... 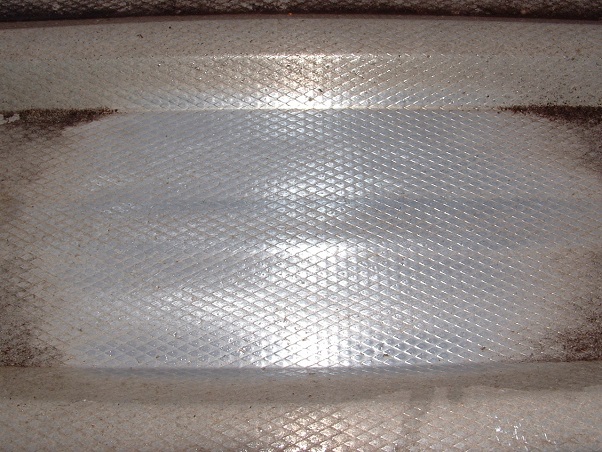 It wouldn't surprise me to know this roofing is actually from the 1960s.   Next step was to cut a panel out of the sheet, plus one extra rib... 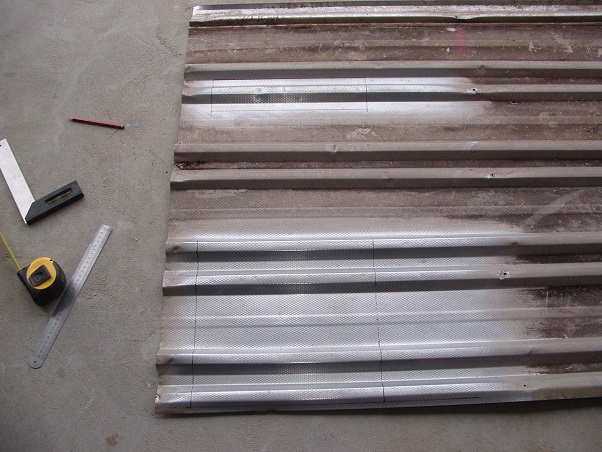 ...and the extra rib sits on the flat section on the large panel... 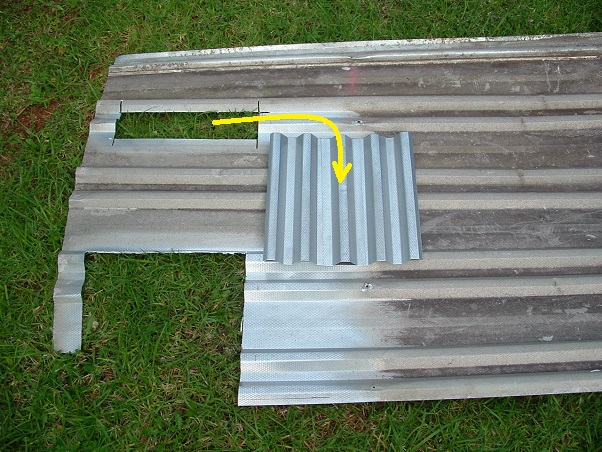 A pop rivet in every roofing valley tied it all together...  And there you have it...one genuine fake vintage ice chest tray... 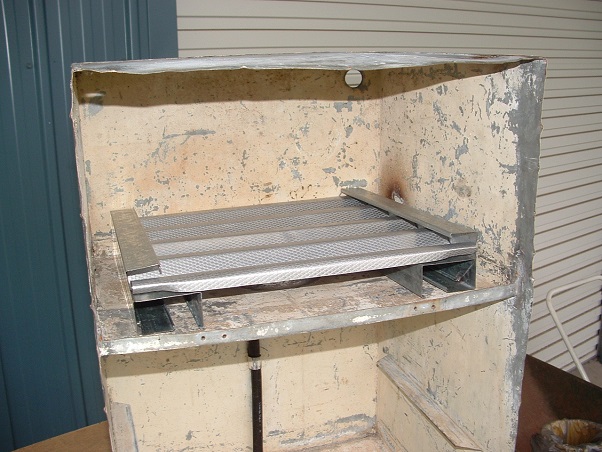  I had also recently found a large-ish aluminium catering tray/dish at another local recycling centre...  ...which by coincidence fits neatly into the ice chest tray section (talk about a lucky find!  )... 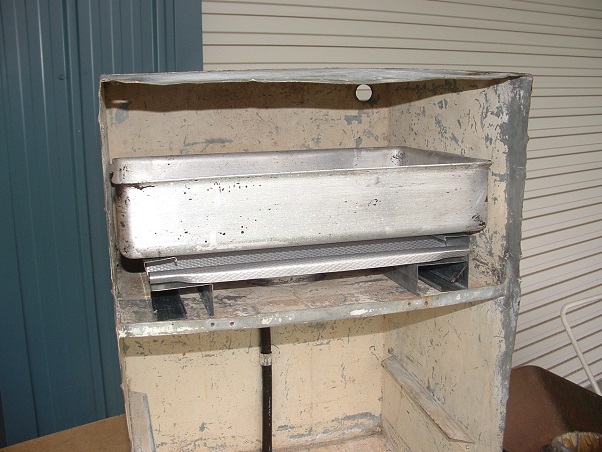 I figure if I can freeze water in that tray, it will make a block of ice that's just the right size for the ice chest.   Now to get the actual chest sorted out.   cheers, Al. |
|
|
|
Post by Franklin1 on Jun 22, 2013 22:00:21 GMT 10
G'day S&J, No reason why it couldn't be. I was interested to see the advertisement posted by griffin earlier, and noted it was from the 1962-63 Camping Guide. It would be nice to know when that was actually published, whether at the start of '62 or partway between '62 and '63. Either way, it shows the President model was available earlier than the first advert I found in late '63. I also wonder whether the 13' 6" model would have the room for a U-shaped lounge anyway. Maybe that was something that was only available in the 15-footer or larger (it would be a bit of a squeeze getting one into a 15ft van as well, I reckon). I did notice the timber grain laminex on the table. That's not a pattern I can recall seeing on other vans from this era, so that's another option for anyone searching for laminex. Nice surprise with the Holden. I think it's a great reward for the amount of searching and finding of old vans that you've done over the last year or so. Good for you!  cheers, Al. |
|
|
|
Post by Franklin1 on Jun 16, 2013 22:33:01 GMT 10
|
|
|
|
Post by Franklin1 on Jun 14, 2013 21:05:35 GMT 10
Checking our DHL section for the Pathfinder vans just now, and I realise I've already posted the newspaper photos I had in my collection (although I missed the 1965 photo which I've now added in the modified post). There's some photos in that DHL thread of an estimated 1963 Pathfinder, but the side stripes match the photo of the 1965 van I've just added in. The appearance of the President model in this November '63 sketch is the closest I've seen to the one S&J has discovered... 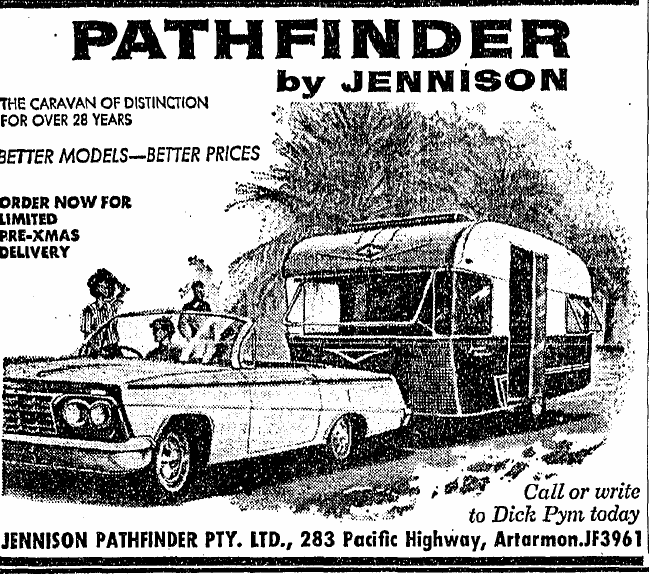 cheers, Al. |
|
|
|
Post by Franklin1 on Jun 13, 2013 23:58:05 GMT 10
G'day Susan,
I have a non-vintage van (20 years old), and it's parked in the open front yard (I'm 100km south of Sydney).
A friend of a friend recently gave me a caravan cover which is a well-made brand and probably cost up around a couple of hundred dollars when it was new (I got it second-hand).
The material it is made out of is waterproof but breatheable, so apparently you don't get condensation forming under it.
I had it on the van for a couple of weeks, and it seemed to work well in protecting the van when it rained during that time.
However, here's the reason I took it back off...I went out to check something in the van when it was a sunny day, and as soon as I stepped inside it was like an oven! The thermometer in the van showed 40 degrees, whereas the temp outside at the time was about 28. I was quite shocked to discover how much heat is trapped under the cover!
Knowing the sorts of temperatures you guys get in the SA region in summer, I would hesitate to have one of these covers on the van for any length of time when it's hot.
Hope this helps.
cheers,
Al.
|
|
|
|
Post by Franklin1 on Jun 13, 2013 23:35:05 GMT 10
G'day Jeff,
I've been trying to reply with some archive information, but Photobucket is not working for me tonight for some reason.
From my collected history, the Pathfinder President model was first advertised in October 1963, and continued to be advertised until around April 1967.
In November 1967, Pathfinder started to advertise themselves as "Pathfinder and Franklin" (same old address), and a few months later in March 1968, Pathfinder is listed in a Franklin corporate advertisement as an "authorised distributor" of Franklin caravans.
So, what to make of all of that? My guess is they stopped making their own caravans around the second half of 1967, and progressively made the change to become a Franklin distributor. From what I can see, no vans were ever "rebadged", so the President is made by Pathfinder.
When the President model was first advertised in '63, the advertisement copy read, "Australia's Quality Aluminium Caravan, with the latest U-shaped lounge, and many other improvements exclusive to Jennison models. See special display models 15ft and 19ft at reduced prices."
It will be interesting to see the inside of this President van to see if it has the U-shaped lounge.
In August 1966, the President model got new features: "...a rear-loading "boot", COOLITE insulation, aluminium frame, and the world's largest roof hatch."
I have a newspaper photo that was published at the end of '66 showing what looks like a 15-footer. It doesn't have the same side stripes as the one above, so it looks like S&J's van might be from an earlier time.
I'll post the photo when P/b starts to cooperate again.
cheers,
Al.
|
|