|
|
Post by takeiteasy on Feb 29, 2012 23:49:08 GMT 10
OK, the floor on my Olympic seems to be under control (I didn't get rid of the buckle in the fiberglass but I can live with that). Now I need to build 2 single beds, slightly larger than the original Olympic singles to fit our larger frames. I really have no idea about it and are tempted just to get someone to build them. Before I do that I want to at least investigate the idea. Any suggestions, examples, etc would be greatly appreciated. If there are any Perth (or surrounds.... I am in Wandering) people kind enough to meet and show me how they did it I would be greatly appreciative.
I was all for getting some ordinary beds and bolting them to the floor but my wife is scornful of this idea.... probably too heavy anyway.
cheers, Bill
|
|
|
|
Post by takeiteasy on Feb 29, 2012 23:00:13 GMT 10
Thanks everyone. I knew about scoring the ply but just forgot all about it. It has been at least 10 years since I did any such work.
|
|
|
|
Post by takeiteasy on Feb 28, 2012 21:31:11 GMT 10
No, I am more cautious. It was over a decade ago and I was grinding glue of some slim strips of teak - holding them in one hand. Strictly two hands on the grinder these days.
|
|
|
|
Post by takeiteasy on Feb 28, 2012 19:04:22 GMT 10
Ok, i like the grinder idea but will get a handsaw as well. Now, excuse me being pedantic - below is a pic of my grinder. If I used a straight bit of timber as a guide what part of the grinder would follow the guide.... it seems to have no adequate flat surface.  Darn thing hasn't been out of its box since it tried to eat my thumb (twice). |
|
|
|
Post by takeiteasy on Feb 28, 2012 18:06:25 GMT 10
Thanks F1 and Graham. Graham the thought of cutting sheets of ply by hand makes me feel exhausted. Still, I have no bench saw or anything like that so it might come down to manual. I doubt I could keep a straight line though.... that's another problem.
|
|
|
|
Post by takeiteasy on Feb 28, 2012 16:32:00 GMT 10
How do you cut ply sheeting without fraying little bits of the surface off? Particularly with a jigsaw. I never seem to manage it.
|
|
|
|
Post by takeiteasy on Feb 28, 2012 14:47:15 GMT 10
I think I have figured out what happened to cause the damage. The owner told me the pump somehow dumped a lot of water in the van. It looks like it gathered in the glass recess around the outside of the floor and filled up like a bath. There is a small hole there where it was drained. Anyhow, here is one side with a lot of the mouldy ply cut out. I have left a bit around the edges but it is in bad condition and I might have to take it out altogether. 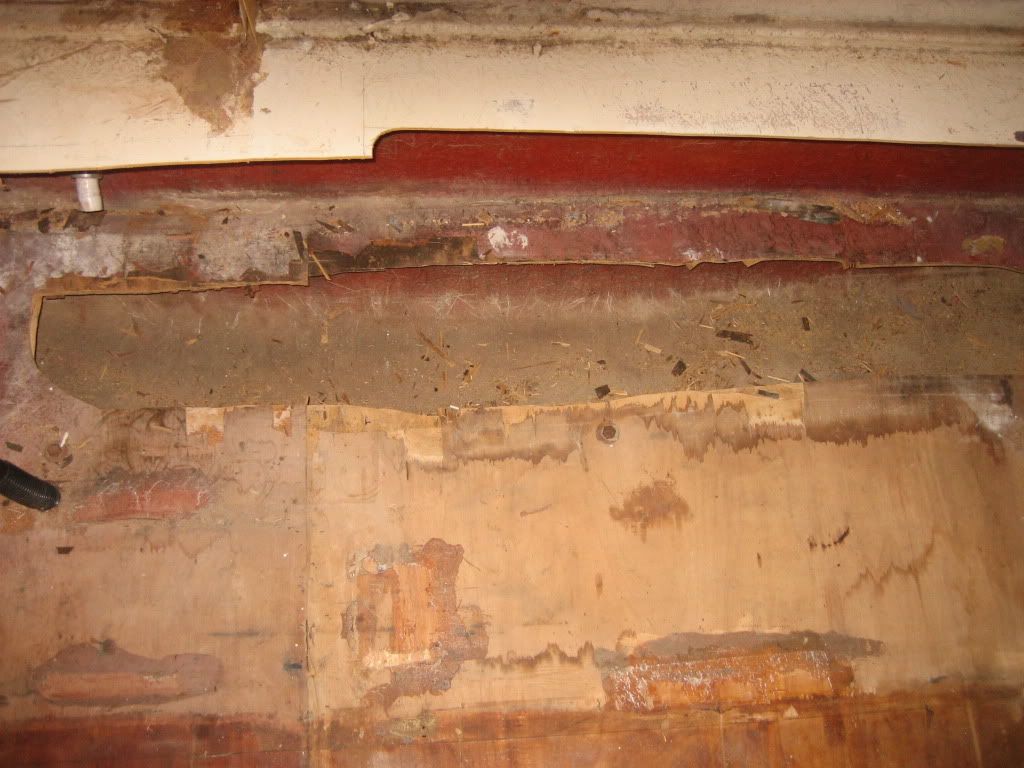 The other side is much more intact so I am going to leave it where it is. I know it is delaminating underneath because it makes cracking sounds when I put weight on it. Be that as it may it is a flat surface to lay the new floor on and it will be sealed out of harm's way when I am finished. Here is the other side.  |
|
|
|
Post by takeiteasy on Feb 28, 2012 12:56:01 GMT 10
I have the back ready so I starting doing some dismantling. I am starting to think I might just do the back of the van. I was going to run the floor right through so it was all level but the floor at the other end is in good condition and, to be honest, I am struggling with this a bit. Anyhow, here is a picture of the "culprit". notice the little electric pump in the corner. It malfunctioned and let a pile of water in, which did the damage. 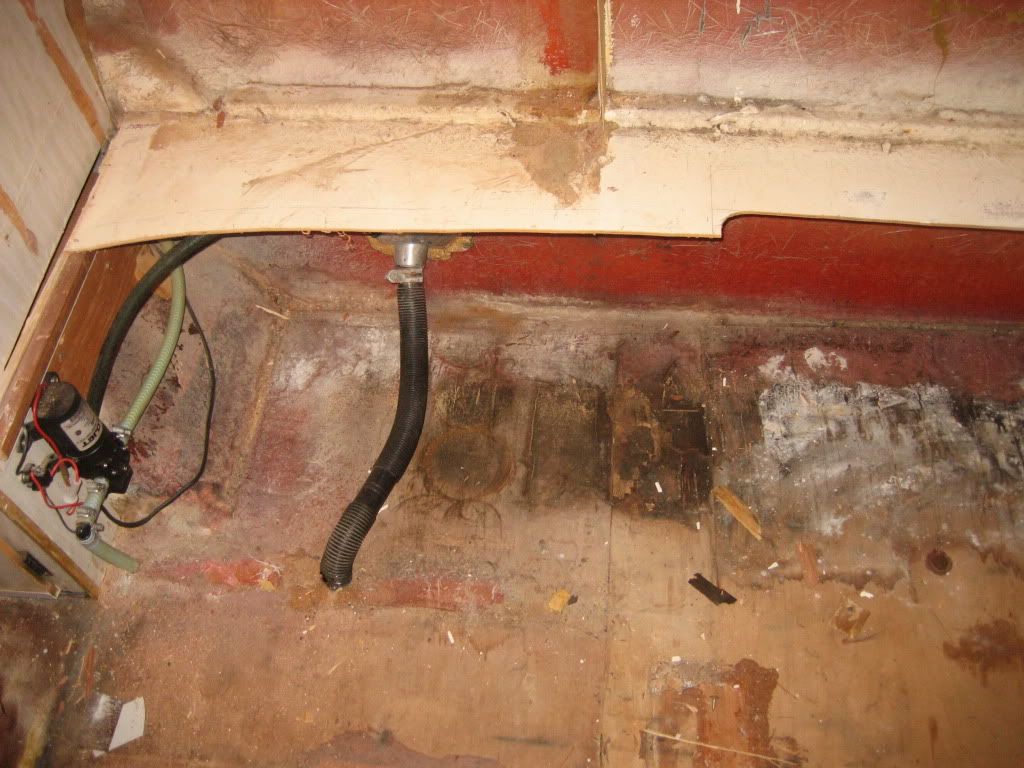 This is the back of the van with most of it stripped out. The floor is good other than the edges. I have left some remains of the original structure because it might be handy when I start thinking "beds". 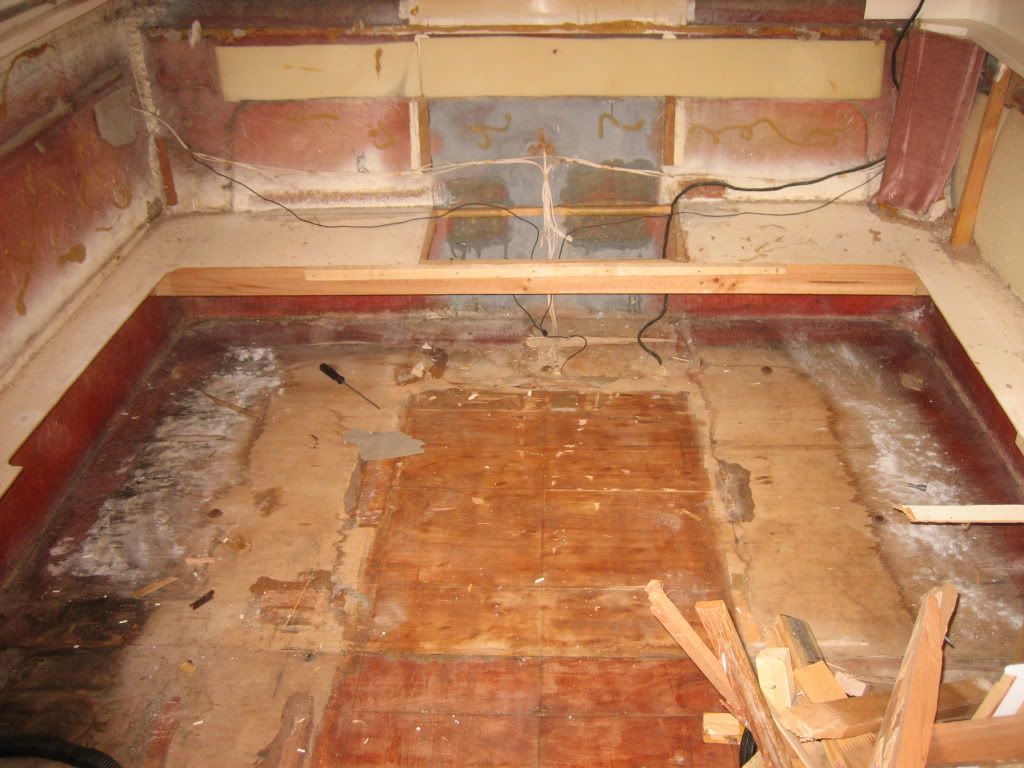 I am going back out to cut away the dead ply now. |
|
|
|
Post by takeiteasy on Feb 28, 2012 11:18:08 GMT 10
You guys enjoy this!!?? (note broken cross piece on the support). 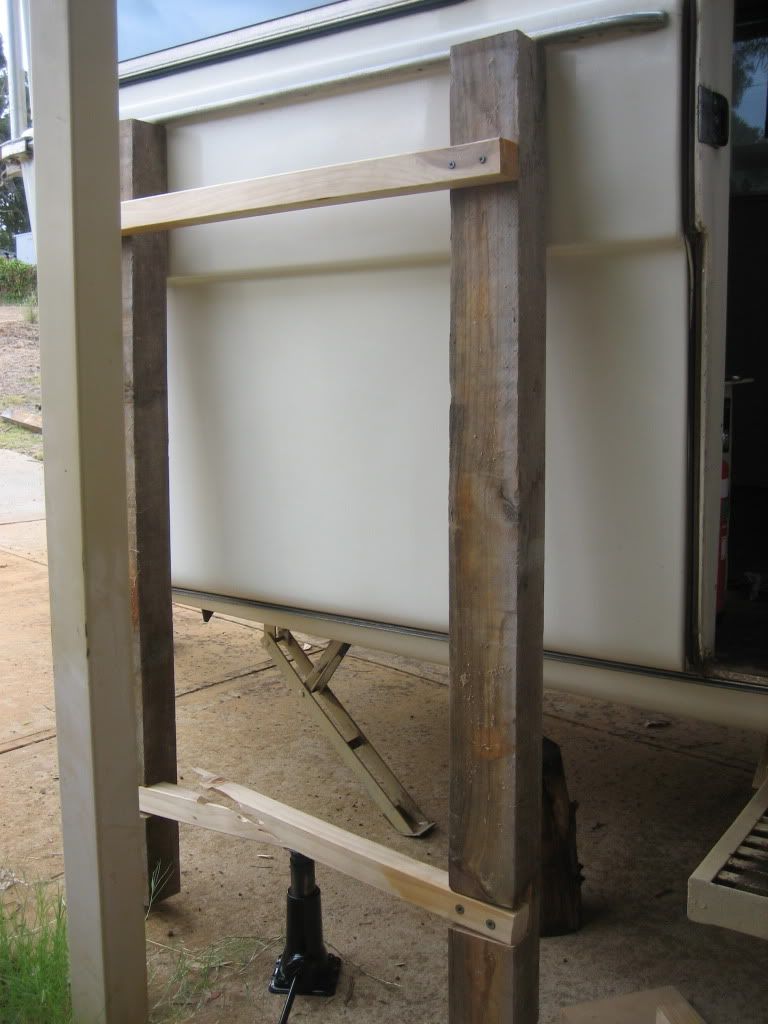 |
|
|
|
Post by takeiteasy on Feb 28, 2012 0:43:48 GMT 10
Great little van. I love the multicoloured drawers... classic.
|
|
|
|
Post by takeiteasy on Feb 28, 2012 0:37:33 GMT 10
I spend a few hours trying to get the van level before starting to jack up the sides... to no avail.  It is on a cement driveway that slopes sideways and up/down. I think I am making it overcomplicated. I was trying to block it up with blocks and wedges on the chassis as I haven't got adjustable stands...... that resulted in one block or another throwing the level out. I had the handbrake on and I think that may have made it more difficult. Tomorrow i am going simple. I will jack up under the axel and block up under the low tyre to get the van as side to side level as possible, then fine tune by simply letting some air out of one tyre. i will then level end to end with the jockey wheel. Then wind the caravan support jacks down nice and tight and not worry about any other supports. The jacks should take any movement of the springs out of the equation and keep floor nice and rigid. My concern was that once the body was jacked independent of the floor then any movement in the floor would pop the wet fiberglass off the wall..... hence me trying to block it up under the chassis. On reflection the caravan supports should do the trick given most of the existing floor is still glassed to the body. Does that make sense? It's 10.30pm and I just want to go out and get it right.... but it's too dark. I envy shed owners and people who live in a town with a hardware at the moment. |
|
|
|
Post by takeiteasy on Feb 26, 2012 22:12:23 GMT 10
I only just looked at this thread Mia. Lovely van and great work. Are you finished?
|
|
|
|
Post by takeiteasy on Feb 26, 2012 21:55:14 GMT 10
Hi Gavin, look forward to pictures.
Bill
|
|
|
|
Post by takeiteasy on Feb 26, 2012 17:56:05 GMT 10
To all who have done a floor on an Olympic Debonair - how much resin does it take? Last time I bought resin (long time ago) it was in 4 litre tins. How many litres am I likely to need (without scrimping and allowing a bit left over rather than running short)?
cheers, Bill
|
|
|
|
Post by takeiteasy on Feb 26, 2012 17:46:01 GMT 10
I traded some timber for a slab of emu bitter (the mans has good taste) and made the props today. Working tomorrow so lift day is Tuesday. I have 4 jacks if I rob every vehicle. If my wife gets a flat tyre on tuesday you will hear the curses in Queensland.
One thing I have found is it is difficult to find a flat surface to measure a level. The floor says level - the ally strip on the body says not. I think the floor is probably telling the truth as the ally strip seems slightly curved and a bit bumpy. Damn thing hasn't got one flat surface.... that's probably what attracted me to it.
|
|
|
|
Post by takeiteasy on Feb 25, 2012 17:38:04 GMT 10
"Can't see the purpose of the piece at the end of the beds." - I am hoping that's where valuables were stored a long time back and they lay there forgotten.
Atog, I think the kitchen end is a complete rebuild, even the floor. It is not ideal but I think I can live with it. We made an undertaking that, if we get a caravan, that we would still do a lot of outside sitting... even cooking. So the lack of seats and table at that end doesn't worry. There is a table that sits loose but it weighs a ton. I will come up with another solution for that. BUT - that is for another year. Floor and beds is the thing.
I removed one of the drawers but the other one is firmly attached so I will wait for joists to be in. I am 170km from Perth so unless I can beg some timber to make joists from a local my hands are tied for a few days. Dammit.
|
|
|
|
Post by takeiteasy on Feb 25, 2012 15:42:59 GMT 10
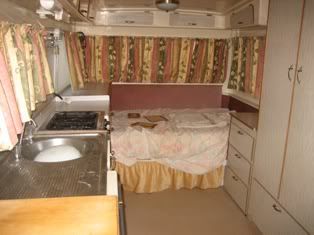
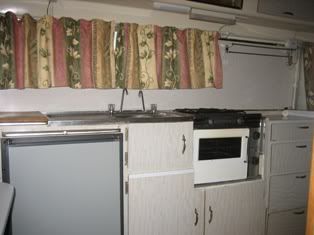
OK, I have taken out anything that is permanently fixed and can confirm the floor is ok everywhere but the back end, right hand side. That is where the buckled fiberglass is. Once I took the double bed out the remains of the original singles were revealed. The conversion to a double was not a refined job and the 1/2 inch chipboard was heavy. Good to have it out. This is a photo of the bed end, where the floor is sunk. The two drawers right and left will have to go to fit the beds in. One of them was originally in the middle of two singles. I would like to put it back there but I want full width singles so it might not be possible. ![]() i969.photobucket.com/albums/ae172/marribill/IMG_425 i969.photobucket.com/albums/ae172/marribill/IMG_4254.jpg[/IMG] This is the same view but closer. I will rip all this out. Might leave the box in the centre. Anyone know why it's there? 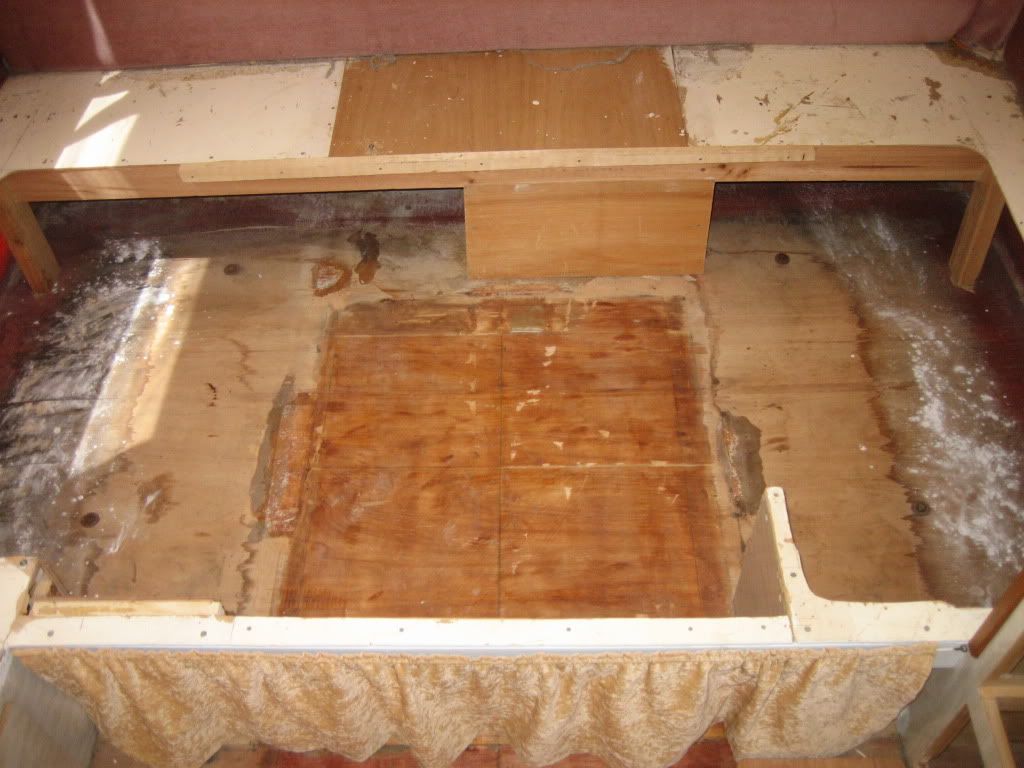 This is looking back the other way. It isn't original. The floor looks pretty good there. 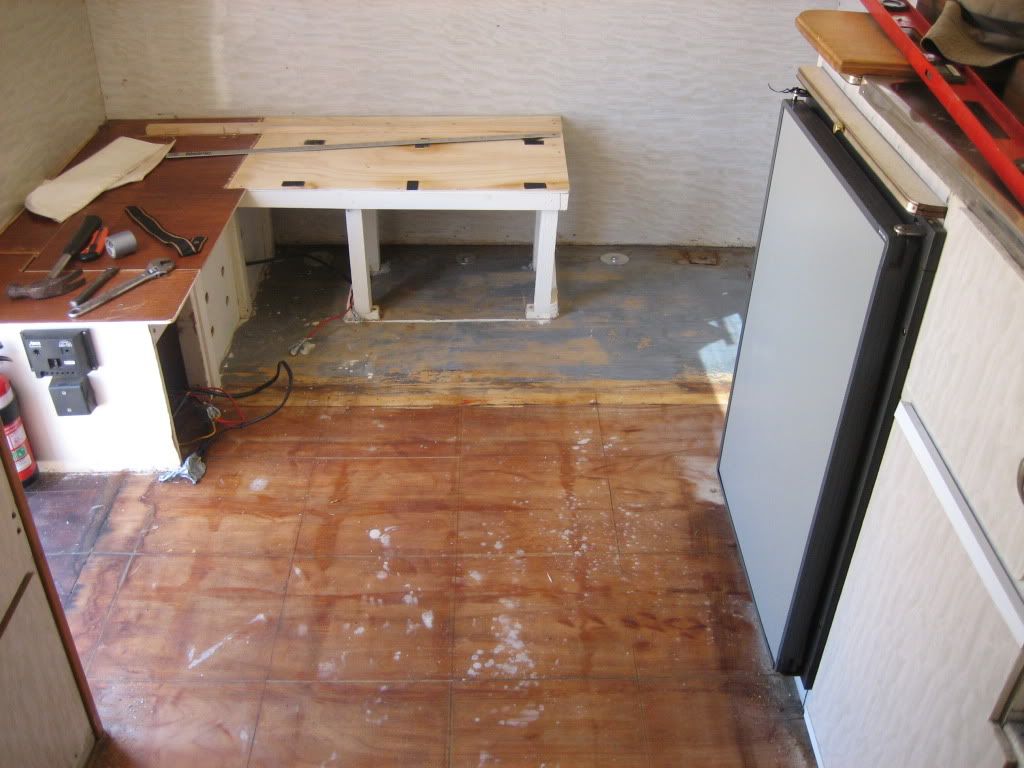 This is a closer view. I have a feeling I will have to take the wall panel off to get at the fibergalss wall/body join. I don't want to though... it justs adds work. 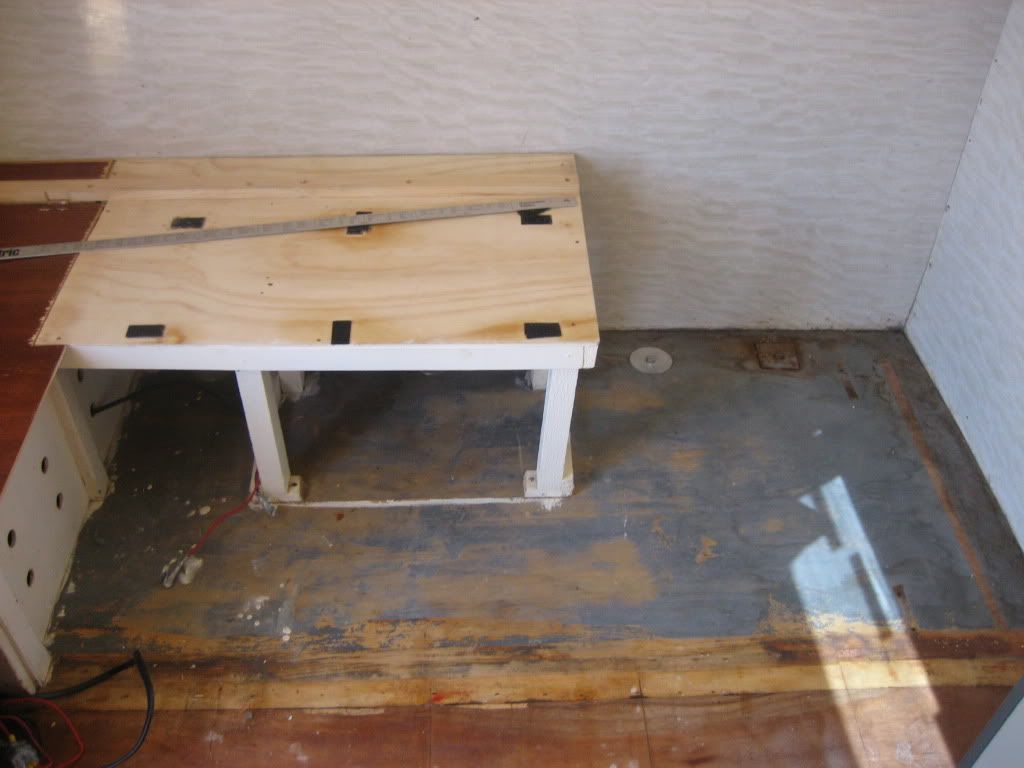 Someone has already done a floor repair at the door, so it is pretty good. I think I will put an aluminium checkerplate there though. 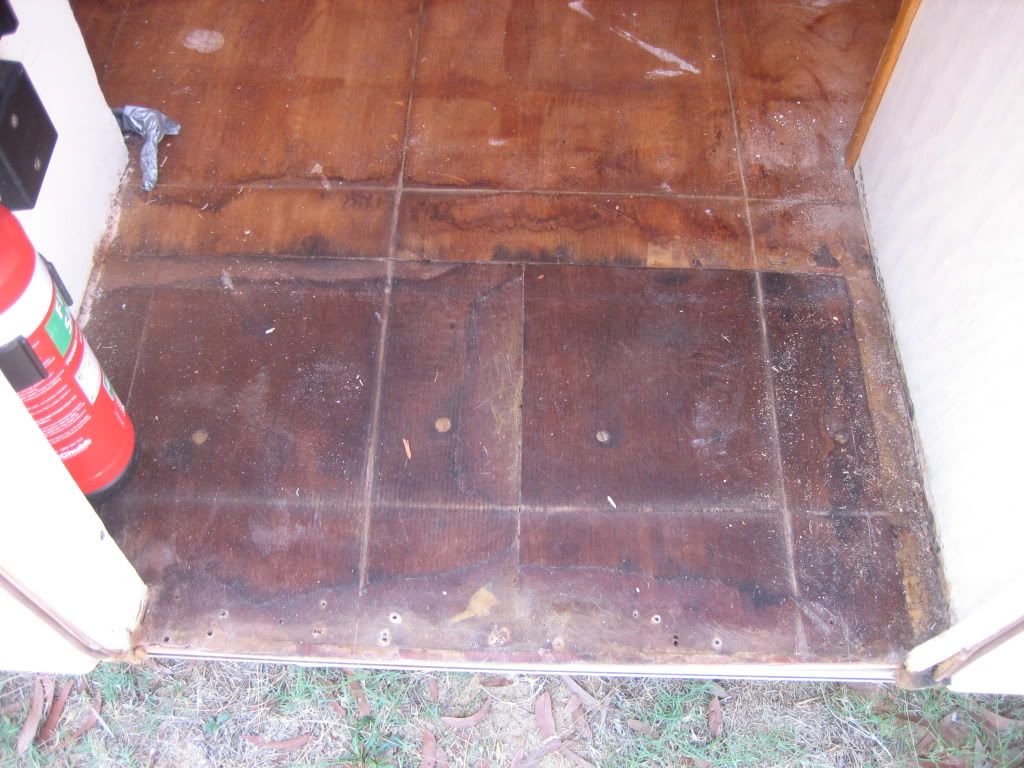 Next objective - brace the sides and take out what remains of the bed. cheers, Bill |
|
|
|
Post by takeiteasy on Feb 25, 2012 15:33:12 GMT 10
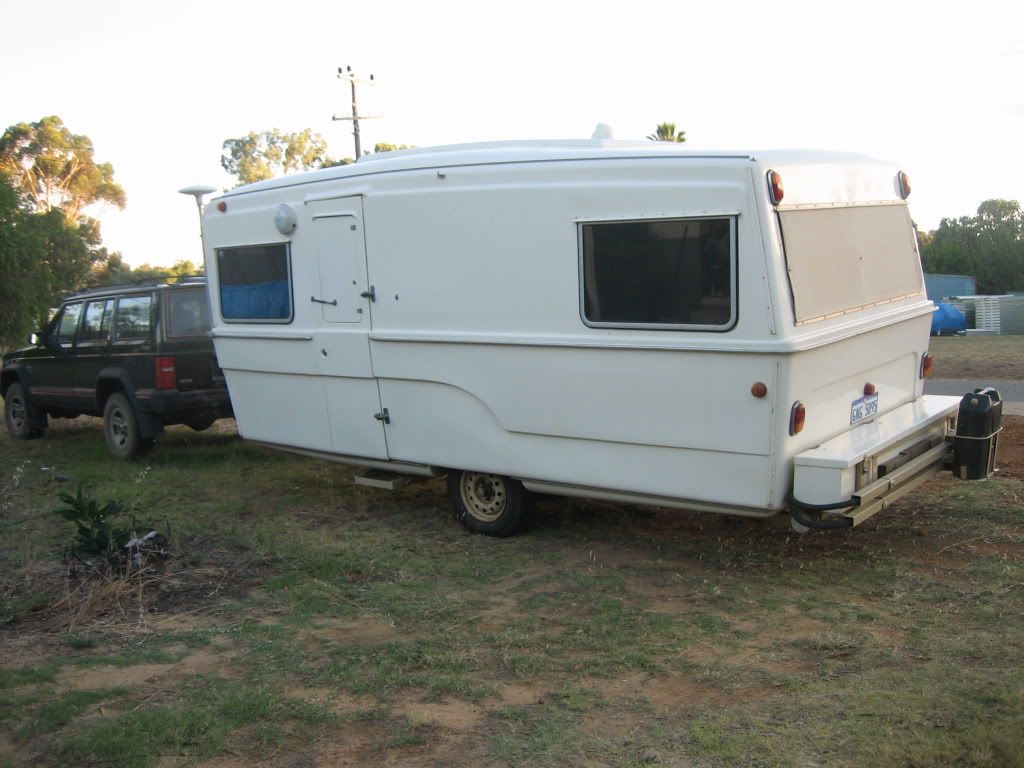
The story so far - I bought the Olympic knowing the floor was damaged in one place. what I didn't see was the buckling of the fiberglass resulting from this. 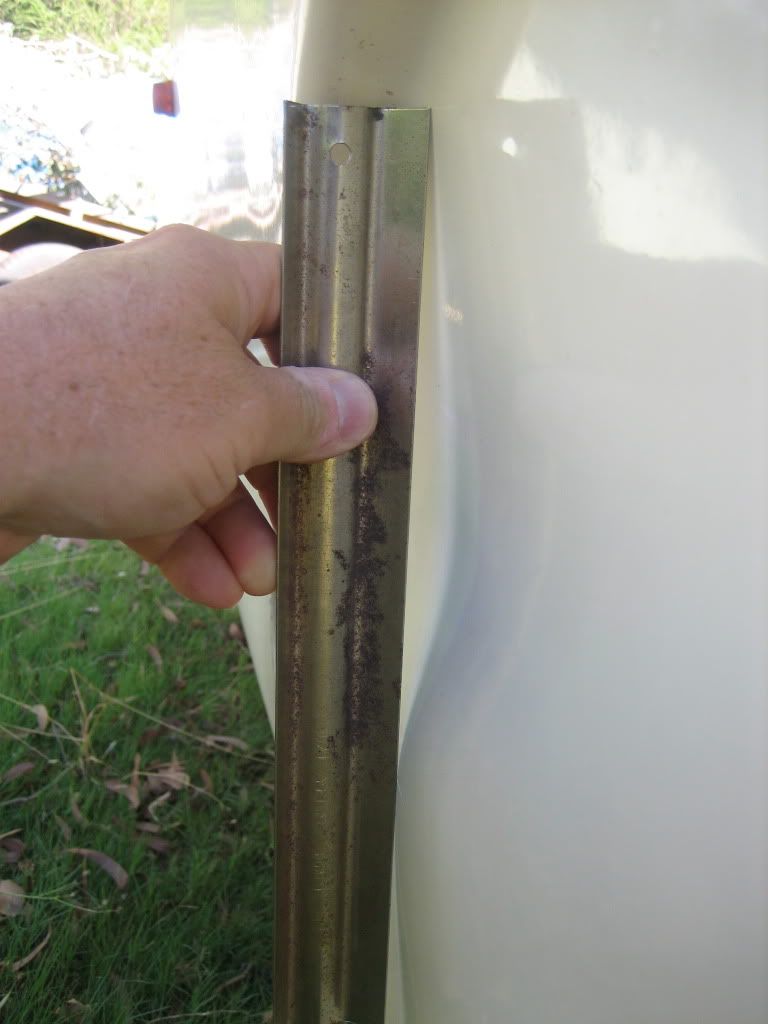 I found two adjacent areas where a leak from the water pump had softened the floor and allowed the fiberglass body to subside. 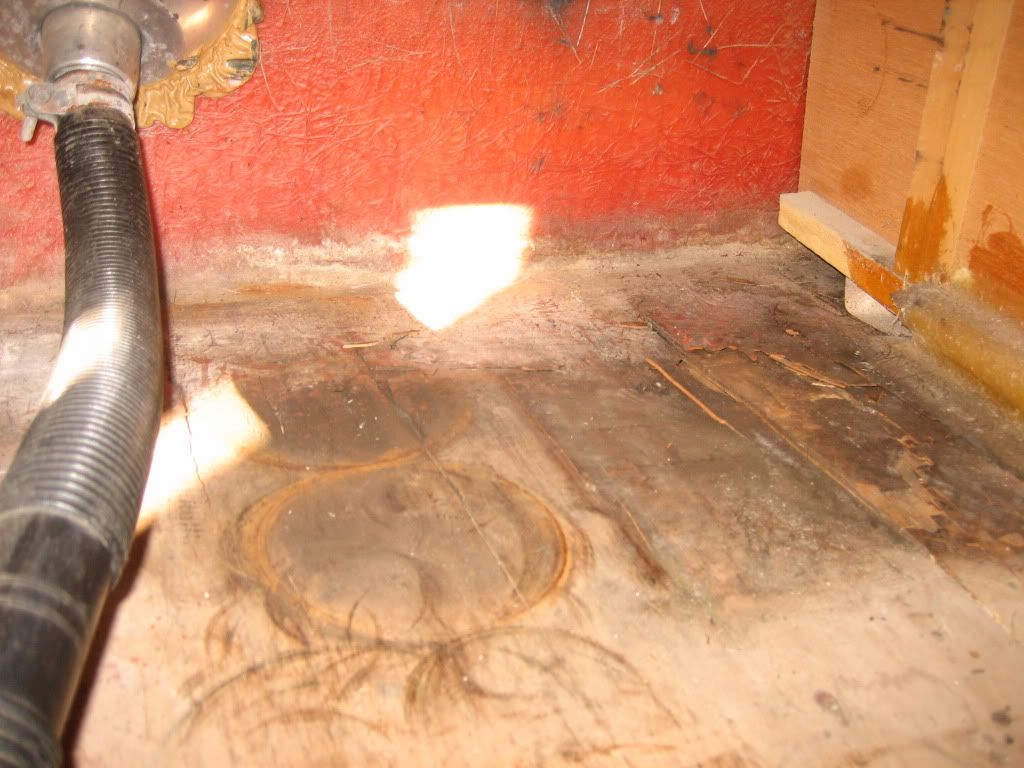 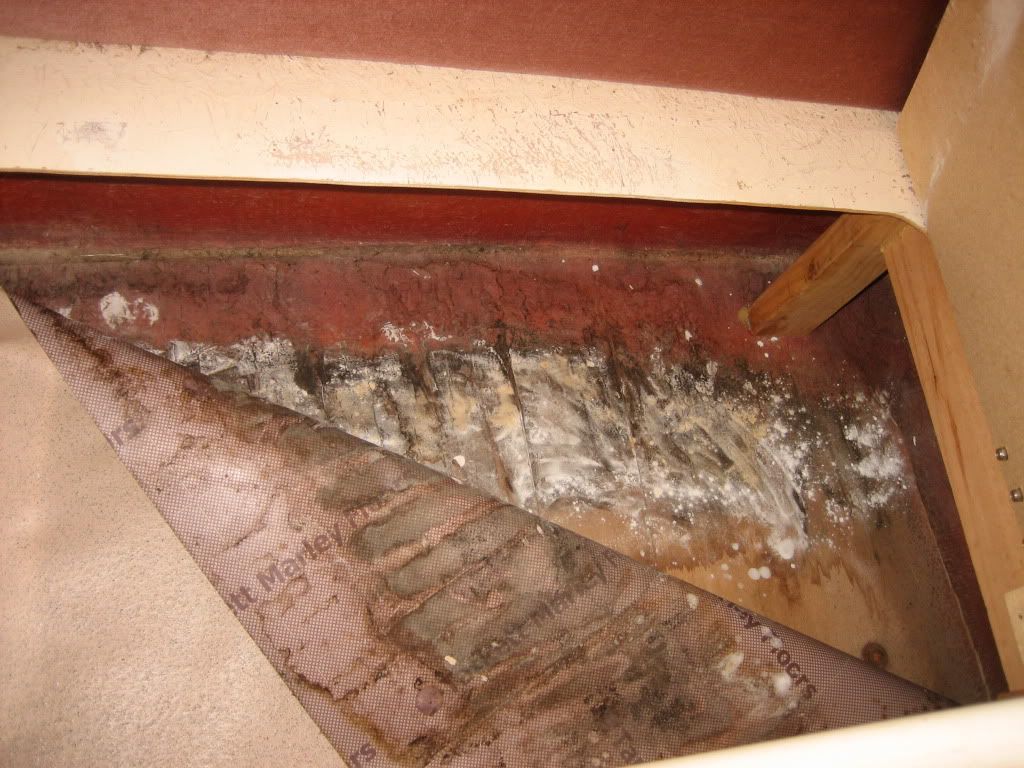 OBJECTIVE - to fix the floor and build in two single beds where there is a double (which was originally two singles). |
|
|
|
Post by takeiteasy on Feb 25, 2012 15:25:29 GMT 10
I will start a thread documenting my journey in the members photos section rather than sustain a long thread here. Please please please people keep an eye on it and shout if it looks like I have missed something.
Ray, it is a bummer but I knew about that bit of moisture damage. I just didn't fully understand the work involved in fixing it. On the positive I am only working two days a week and was getting very bored.
|
|
|
|
Post by takeiteasy on Feb 25, 2012 0:51:47 GMT 10
Thanks Atog, wow, Tony's project is huge. I am hoping I can get away with jacking up one side to get the chassis level. Its only about 2 metres of floor that has let go so the rest should still be where it's supposed to be. I reckon I just need to jack up where its dropped and lay new over old. wish I had a nice level surface to work on.... I am on the front lawn.
|
|
|
|
Post by takeiteasy on Feb 24, 2012 22:27:08 GMT 10
Thanks Atog. The areas photographed have dropped an inch or so because the ply got soft. Everywhere else seems ok. I have decided to remove the double bed and replace the whole floor at that end. I will likely replace right through but not remove the built in furniture as the floor is ok. Bob has sent me some detailed instructions but I confess to being nervous about it. Its actually the levelling of the van that has me mentally stumped at the moment.
Once I have the floor done I will put two single beds in..... that will be panic No. 2.
I will start another thread and post steps as I do them. Please, anyone who has the time and inclination, give me feedback and advice as you see it.
Ah - I only have 2 days a week work this year and was getting bored... so this will keep me out of trouble for a while.
|
|
|
|
Post by takeiteasy on Feb 23, 2012 19:06:22 GMT 10
Yep, water damage from a burst pump pipe that wasn't attended to. I knew about under the bed but under the drawers had loose ply covering it. Hidden by drawers Under the bed |
|
|
|
Post by takeiteasy on Feb 23, 2012 18:48:21 GMT 10
|
|
|
|
Post by takeiteasy on Feb 23, 2012 18:43:33 GMT 10
I have tried to take a few pictures. My gut feeling is it is not drastic enough to stop me using the van, rather, something I gotta fix this year. In the long distance shot you can hopefully see the change in reflection that indicates the bulge. The other shot is self evident. What do you reckon people?  |
|
|
|
Post by takeiteasy on Feb 23, 2012 12:37:59 GMT 10
WAHHHH. Thanks Bob.
|
|


 It is on a cement driveway that slopes sideways and up/down. I think I am making it overcomplicated. I was trying to block it up with blocks and wedges on the chassis as I haven't got adjustable stands...... that resulted in one block or another throwing the level out. I had the handbrake on and I think that may have made it more difficult. Tomorrow i am going simple. I will jack up under the axel and block up under the low tyre to get the van as side to side level as possible, then fine tune by simply letting some air out of one tyre. i will then level end to end with the jockey wheel. Then wind the caravan support jacks down nice and tight and not worry about any other supports. The jacks should take any movement of the springs out of the equation and keep floor nice and rigid.