|
|
Post by Franklin1 on Feb 16, 2014 21:12:18 GMT 10
G'day amanda, Rather than search for original bunks, an alternative might be to do the same sort of thing that halps did for his Capricorn he used to own. A good description with photos can be found in this thread: building bed and bunks. There are some other ideas/links in that thread worthwhile thinking about, as well. cheers, Al. |
|
|
|
Post by Franklin1 on Feb 14, 2014 22:02:18 GMT 10
This post is more about me being "just curious" rather than expecting any firm responses. Right at the bottom of our home page is says the Forum Age is currently 9 years, 6 months, and 19 days. Using this website, it means the forum started on July 26, 2004. With the Nationals happening this year, has there been any time to think about how the tenth anniversary will be celebrated in July? I realise a lot of people don't have any time at the moment to even scratch themselves, but if you're looking for volunteers to make any ideas come to fruition, count me in. And no, I don't have any ideas either.   (But I'm thinking on it...  ) cheers, Al. |
|
|
|
Post by Franklin1 on Feb 14, 2014 20:20:22 GMT 10
Well, good on you, hilldweller, you old steambender, you!   What a great effort! And you've used just the sort of ingenuity that these projects require from time to time. I'm giving you 10 out of 10 for this one!   I don't think you'll have any problems with the bent timber, provided it is anchored properly to the adjacent framework, and it is glued to the internal lining (is it masonite on the inner wall of your van?). I've copied one of your photos, and with apologies for the multicolours, let me try and explain what I think would help... 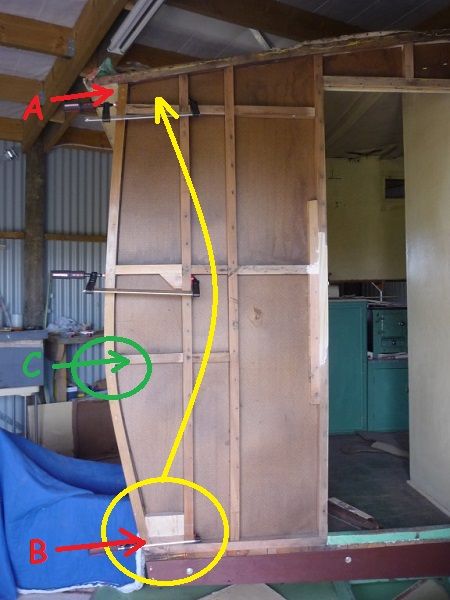 The highest stresses in the timber will be at points A and B. These are the two points that will want to try and straighten themselves out again. I would recommend you do a similar thing at point A (top) that you've done at point B at the bottom, and that is to insert a block that locks point A to the adjacent upright on the right. Glue and screw the block and both the timbers either side into one solid block. Point C is where the stresses are most likely to crack the timber, so the horizontal piece you've got there locking point C to the next upright is exactly what you need, and that would have to be repeated in each corner. I had a bit of a look on the internet and this link says NZ rimu steam bends "satisfactorily", but this link says it "has a very poor steam bending classification", so I don't know what the truth is. It might be that you are only partly steam bending the timber, and mostly "cold bending" it when you clamp it to the template jig. I guess the bottom line is that if it doesn't split or crack when you do the bend, it's good enough to fit it into position and anchor it securely. Once you've done that, it'll stay in position and eventually lose the will to spring back straight (particularly if humidity can get into the timber over time). Keep calm and carry on!   cheers, Al. |
|
|
|
Post by Franklin1 on Feb 14, 2014 18:37:25 GMT 10
Ice chest: I finished another job today that I've been progressively working on over the last week or so. I cut up some more of my stash of second-hand timber, and made some frames... 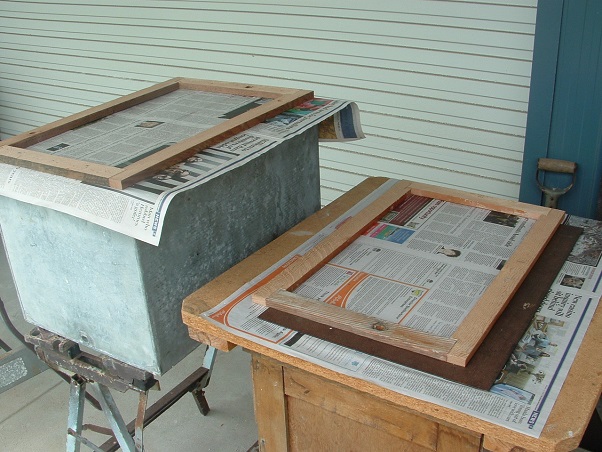 ...and then boxed in the ice chest... 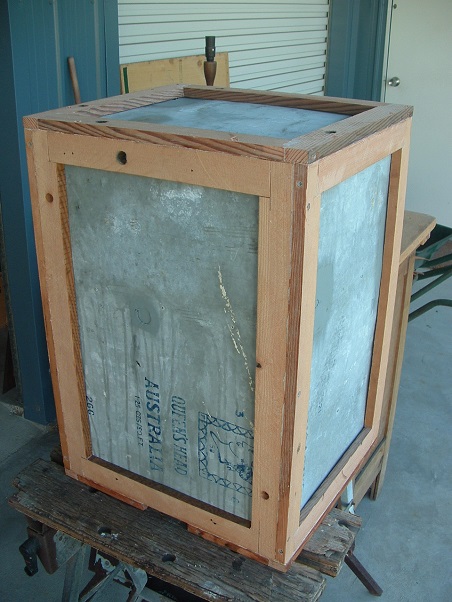 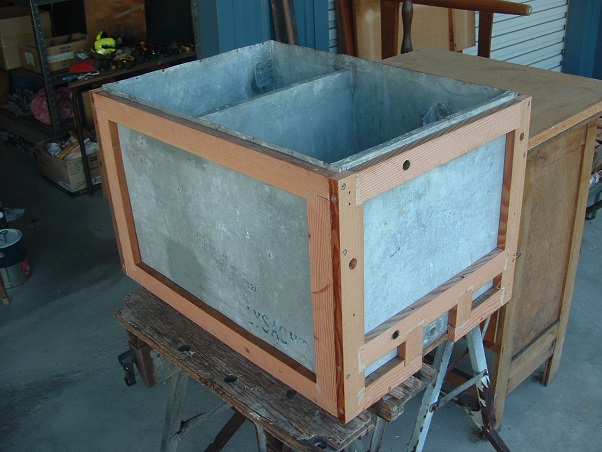 I had some metal roofing insulation left over from a house project, so I cut that up and fitted it into the frames... 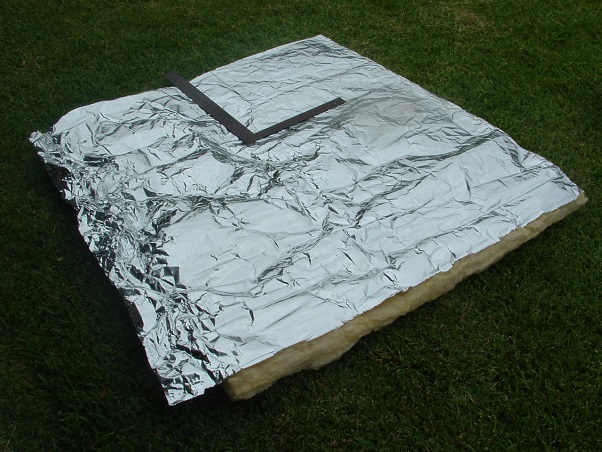 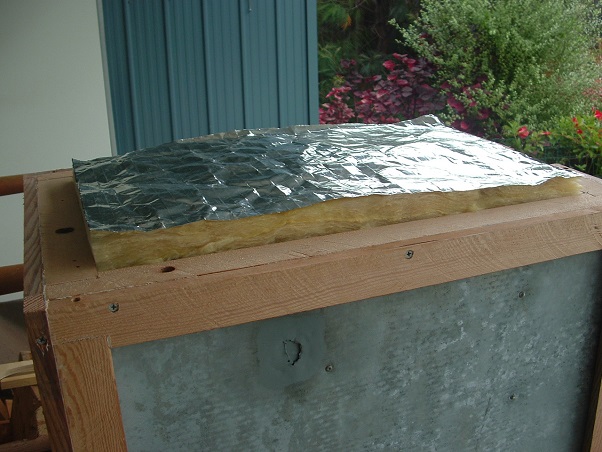 Then it was a matter of cutting up some 3mm plywood and glueing it around the outside of the framework, compressing the insulation in the process... 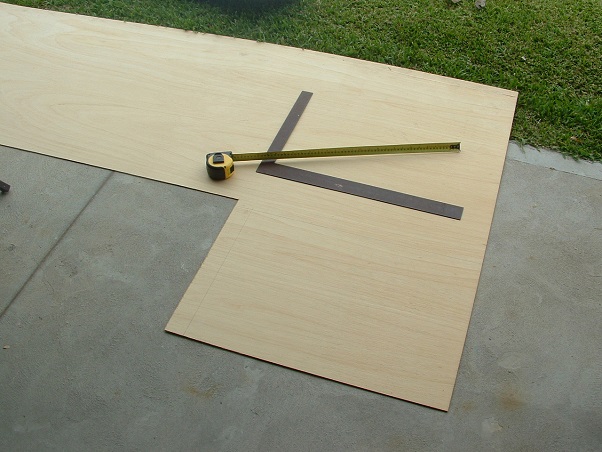 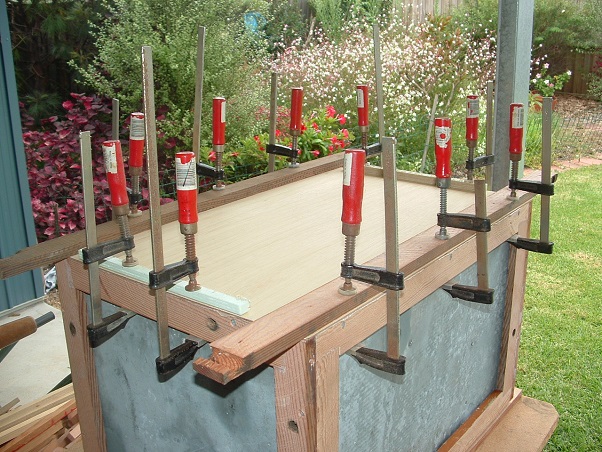 Today I gave the finished cabinet a coat of Bote-Cote resin to seal the plywood... 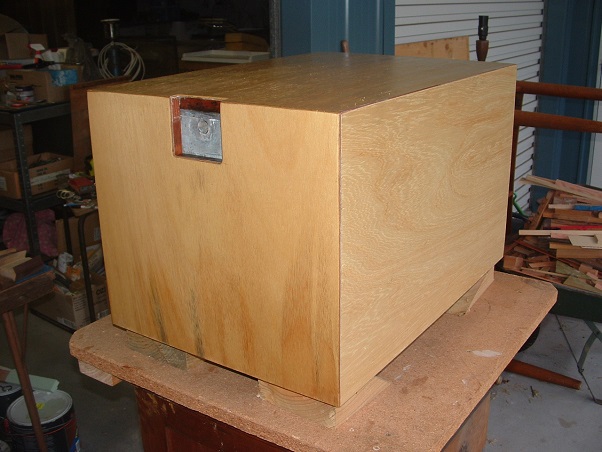 Funnily enough, the cabinet looks heaps nicer than the inside of the ice chest, but you won't see the cabinet once it's fitted into the kitchen cupboard.  I'll let the resin cure for a couple of days, and then I can start to see what's required in the kitchen cupboard to allow the ice chest cabinet to be installed. cheers, Al.
|
|
|
|
Post by Franklin1 on Feb 13, 2014 22:25:07 GMT 10
G'day LaConic,
When it comes to gas equipment requiring certification, it's worthwhile ringing whoever will certify the system, and asking them if there will be any problems.
These stoves can be found in quite a number of vintage vans, so they must be considered acceptable, otherwise we would have heard about it by now. I presume most of them operate on LPG rather than butane. A gas operating pressure of 11 inches water gauge (the 11 INS W.G. you've read on the label) is equivalent to 2.74 kilopascals pressure, which is near enough to the 2.75 kPa pressure that LPG operates at in these stoves. Butane is a slightly different gas to the Propane in LPG, but people have been using these stoves on LPG without any issues.
If you don't already have a gas system installed in your van, you'll be up for the newer type of regulator and associated pipework. If you do have a system and it's got the old style regulator on it, be prepared for the cost to have it upgraded.
Talk to your gas man or lady. They'll be the ones putting their signature on the paper, so they'll tell you how it has to be.
cheers,
Al.
|
|
|
|
Post by Franklin1 on Feb 13, 2014 20:56:32 GMT 10
Thanks for your comments, hilldweller and reddo.   Funny you should say this, reddo: "Been silently lurking on your posts for a damn long time now." We've just passed the third anniversary since I made a fair dinkum start on this project, so it has been a damn long time now.  After mucking around fixing up various vans since early 2008 (the others weren't vintage), I think I need a rest from all this restoration stuff, and I reckon I might go get a life when this project is finished. In the meantime, I'm happy to put my heart and soul into this project, just so I can say I've completed ONE vintage restoration, after being on this forum for eight years. You others who have churned them out like loaves of bread over the years have left me well and truly for dead. Time to get back to the hammer and keep plugging on... cheers, Al. |
|
|
|
Post by Franklin1 on Feb 13, 2014 16:59:21 GMT 10
I've managed to make a bit of progress with the kitchen sink cupboard. After agonizing about how to do it, I had to bite the bullet and put some timber down otherwise the project would never keep moving. First came the base parts... 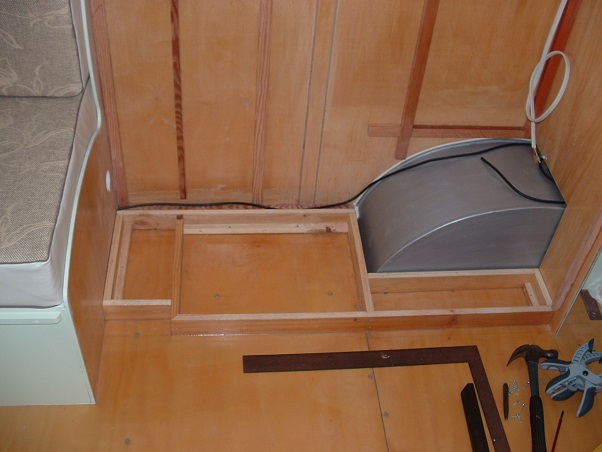 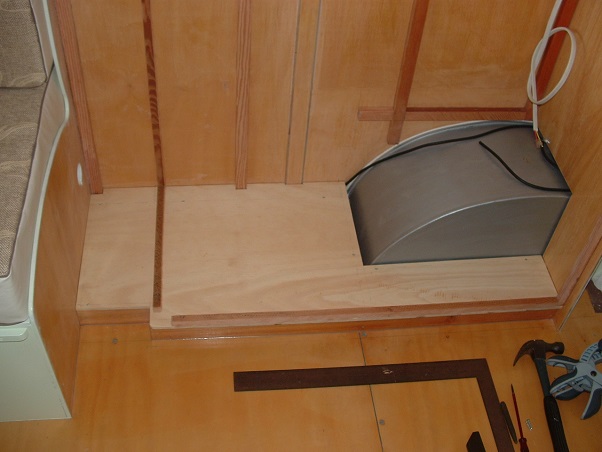 ...and then a couple of open shelves on the left hand end, for reasons I'll explain shortly... 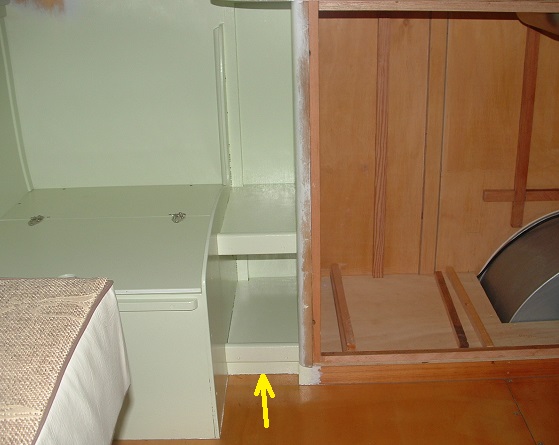 Then everything above the sink was completed. Unfortunately, the replacement laminex is not your vintage cracked ice pattern - more like cracked pepper.   But at least it blends in with the green colours of the paint.  Along with the new laminex, a light fitting, a vintage tea-towel rail, and a power point were also fitted... 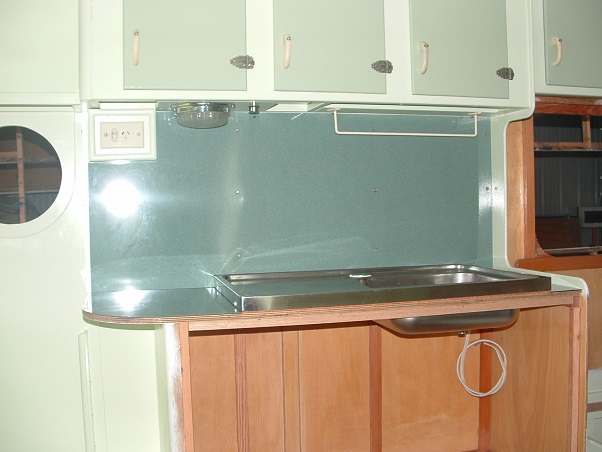 The open shelves at the left hand end were necessary so the benchtop could be curved at that end. That allows more access room into the offside seat... 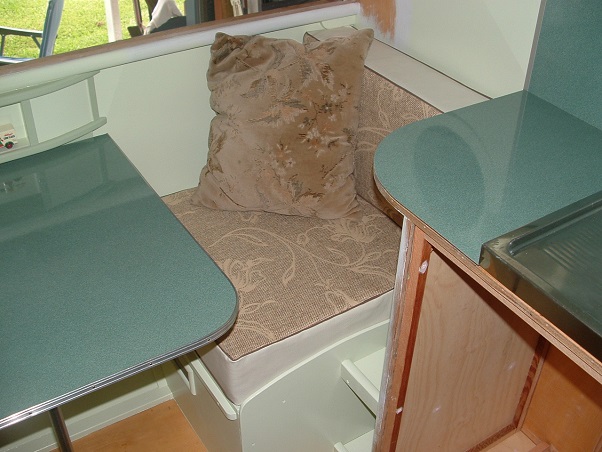 The power point showing above the bench is one of the two original power points in the van. Both of them had some melting in the plastic face due to electrical arcing in the positive terminal at some time in the past... 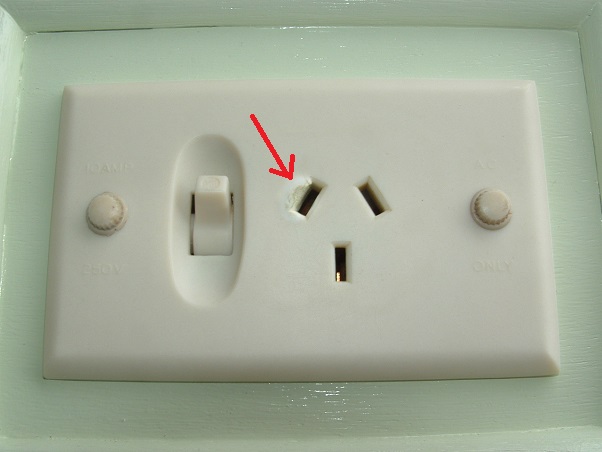 I didn't want to use these power points, but I did want to include one of them as a "show and tell" piece of history, so I worked out a way of doing that. The old power point is actually fitted to a box lid, which pulls away from the wall to reveal a modern double pole power outlet behind it. Sneaky, hey!?... 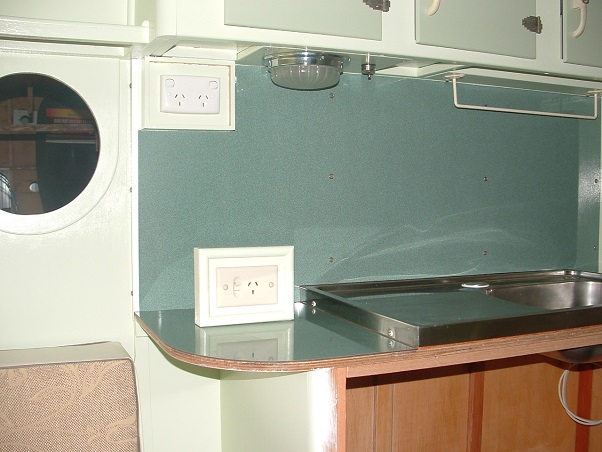 -------------------------------------------------------------------------------------- If you ever have to fit a piece of laminex or plywood into a border, and do it fairly accurately, this method worked well for me when I cut the laminex splashback... 1. Save a number of empty breakfast cereal boxes... 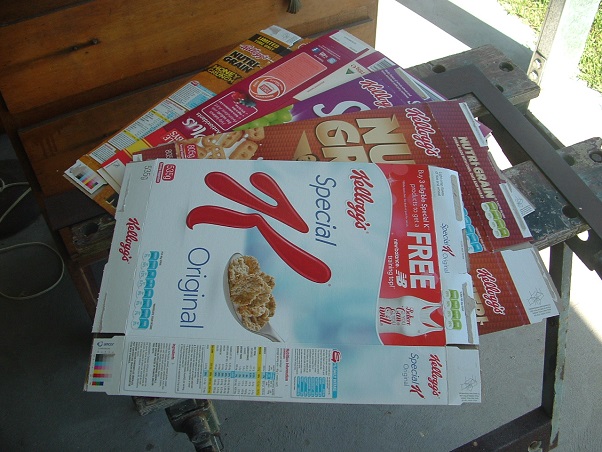 2. Cut pieces of cardboard using a straight edge and a sharp knife, and tack those pieces around the perimeter of the border. Tape any overlapping joints as you go... 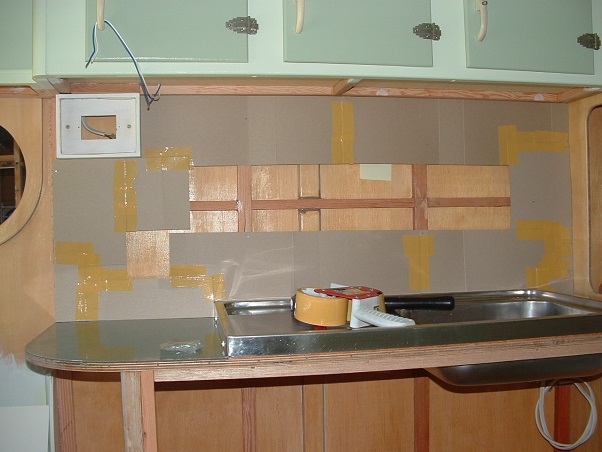 3. Fill in the centre gap with more cardboard, and tape every joint... 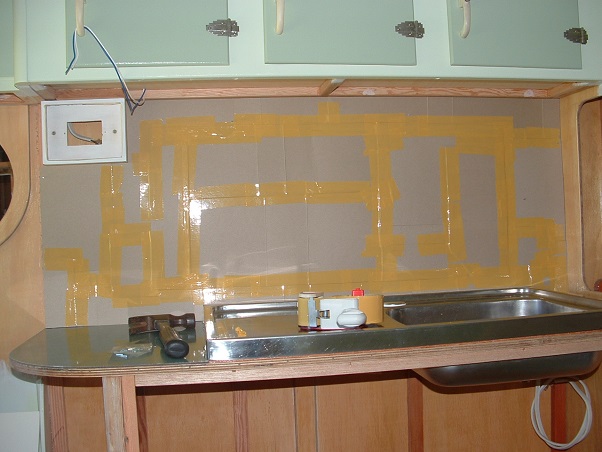 4. Pull out any nails/tacks, and lay the cardboard on the floor and tape all the joints on the other side... 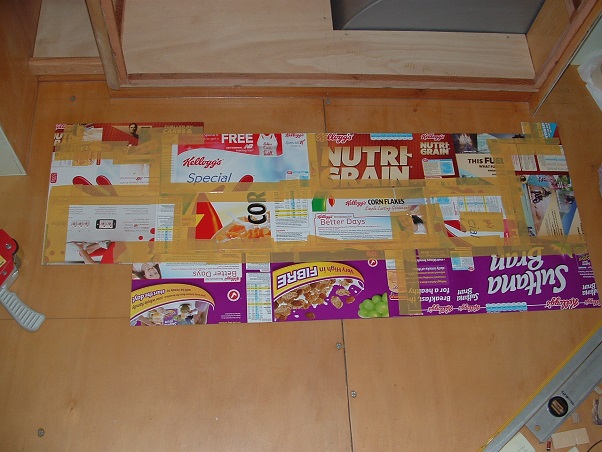 5. You now have a template that you can trace around. Lay the template on the material you have to cut, making sure you have the correct side of the template facing the material, and clamp it to the material. Then trace around the template... 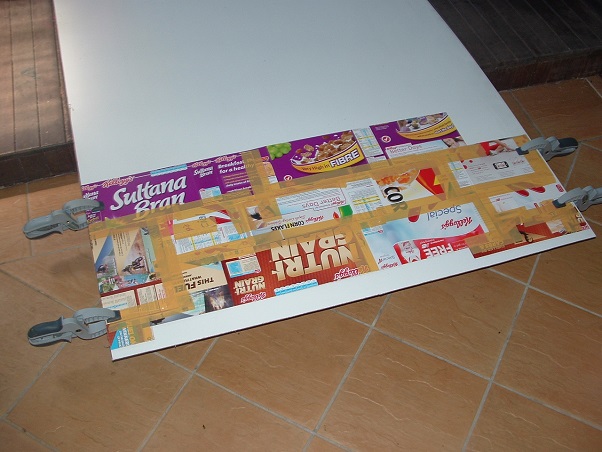 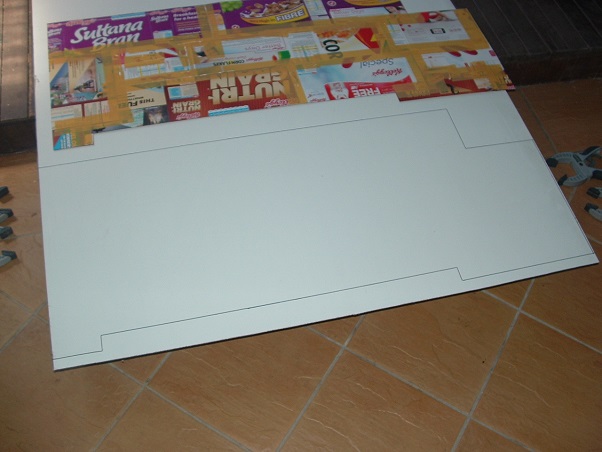 6. Cut around the outline, just on the inside of the tracing line, and you should end up with a "perfect fit"... 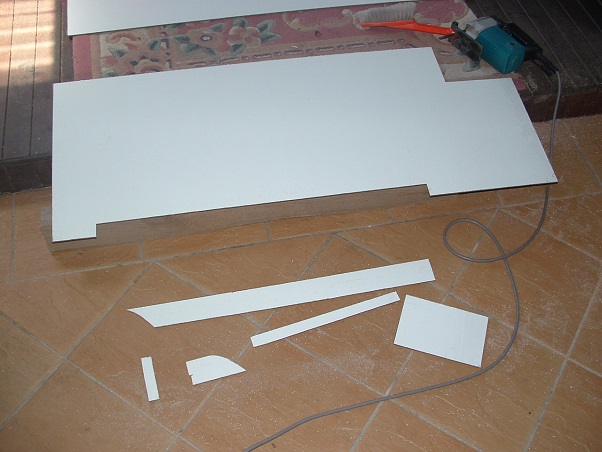 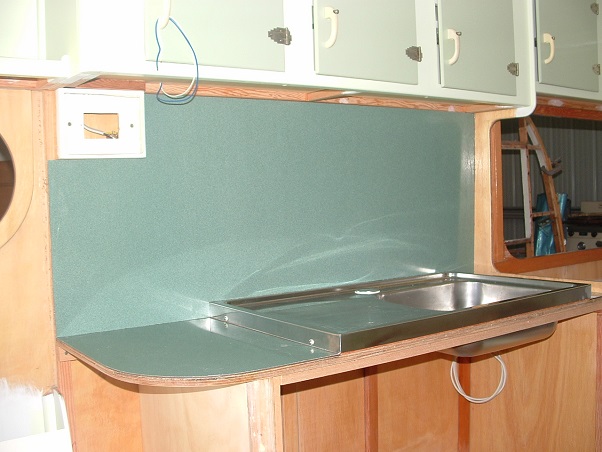 till next time, cheers, Al. |
|
|
|
Post by Franklin1 on Feb 13, 2014 14:01:15 GMT 10
Yeah, I immediately wondered whether people should rethink the insured value of their caravans, if this sort of price is "normal". The new-old-retro ones being made in Qld are listed for $350 each. Clearly my super fund is investing in the wrong market.   cheers, Al. |
|
|
|
Post by Franklin1 on Feb 12, 2014 22:29:12 GMT 10
G'day Clueless, It's a shame you weren't looking for one back in December: Porthole windows on ebayIt's also a shame we can't talk about the prices of caravans on this forum, so let's talk about the prices of porthole windows instead.   cheers, Al. |
|
|
|
Post by Franklin1 on Feb 12, 2014 21:53:47 GMT 10
G'day DonR, hughdeani's probably typing the same answer as I type this, but the van is a Quest Globe Trotter, and is from later than 1973, based on the wind-out windows. A member of the Classic Caravans forum has a 1976 Quest Globe Trotter which can be seen in this thread: Quest Globe Trotter 16' 1976cheers, Al. |
|
|
|
Post by Franklin1 on Feb 12, 2014 15:35:26 GMT 10
G'day sgtl, After searching high and low in my shed, I found the little blighter hiding in a plastic bag, nowhere near where I thought it should be.   The good news is that thanks to you making me do the search, I found some other caravan door locks in the same bag that I'd completely forgotten about. I must have rummaged through all the door locks in the second-hand Shed some time back, and grabbed anything I thought would suit a vintage van. Anyhoo, this is the Lockwood lock I've got, and the dimensions of same... 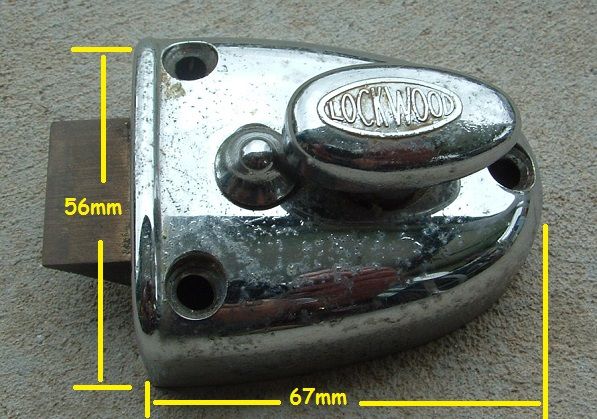 Let me know if it's of any use to you. I haven't pulled it apart to check out the internal condition, but it seems to work freely and is not sloppy in the action. cheers, Al. |
|
|
|
Post by Franklin1 on Feb 11, 2014 19:11:11 GMT 10
G'day sgtl, I seem to remember picking one up from the local second-hand Shed some time ago. God only knows where it is in my shed at the moment though, so I'd have to send out a search party. If you can send me the measurements of width and length of the one you're looking for, I'll see if mine is the same (the caravan door locks were smaller than the house door locks of the same design). I only have the lock, not the catch/striker plate that fits on the door frame. The second hand Shed gets lots of doors in, but they never salvage the door frame to go with it. Consequently, they have boxes of locks, but no catches. Keep your fingers crossed...   ps. Brand new ones will set you back about $130: LOCKWOOD Streamlatch 200 Chromecheers, Al. |
|
|
|
Post by Franklin1 on Feb 11, 2014 10:17:08 GMT 10
Err...yep, sure - check out the third photo above!   |
|
|
|
Post by Franklin1 on Feb 10, 2014 21:32:51 GMT 10
G'day hamsy, and welcome to the forum!  It's a little hard to see the detail in your small avatar photo, but it certainly looks a lot like another Newcastle van on the forum. I'm going to send you down a few rabbit burrows to let you have a good look at another one on the forum, and you can compare all the inside bits and see if yours is the same. This thread is the original story about the van: Marilyn's albumThe owner of this van gave me nightmares the way she kept registering on the forum with a different username, and the way she changed the name she'd given to the van. This thread is about the van appearing on the ABC collectors programme, and how the name of the van is now 'Alice'. Most important is to scroll down the page to the third post to find the link to Kathryn's website showing more photos of the van: My caravan also on the collectors programmeThis thread is when the van was rebuilt by a boat builder (and the van's name has changed again from "Alice" to the "Pink Poodle"): Pink Poodle My 1951 Bondwood re buildSee how you go with that lot.   cheers, Al. |
|
|
|
Post by Franklin1 on Feb 10, 2014 20:50:57 GMT 10
You should grab the other van, Murray. Most people would die for a mid-60s Franklin Premier (ok, maybe not "most" people, but 1 or 2 might. Ok, maybe not "die for" but they'd be prepared to get awfully sick.  ) If you happen to go back for another look at the vans, grab the chassis number off the drawbar of the Franklin for me please.  Nice bit of posting of the electrical certificate for the Carapark Voyager. I love it when people post supporting historical information.   There's a Carapark Voyager just down the road from my brother's place, about 30kms from me. It's chock-a-block full of crap 'n stuff, wasting away in the backyard of a house. Been there a long time. Darn shame, really. Hope somebody grabs the one you've listed. cheers, Al. |
|
|
|
Post by Franklin1 on Feb 9, 2014 20:08:22 GMT 10
G'day oldskool, Not much around these days for spare parts. You can get black ones or white ones at CaravansPlus. You used to be able to get grey ones, but they must have been discontinued. cheers, Al. |
|
|
|
Post by Franklin1 on Feb 9, 2014 15:49:46 GMT 10
G'day DonR,
Here's a bit more info from the Perth 'Mirror' newspaper, 30 Oct 1937:
"OPPY will pedal TO SYDNEY
Preparations Under Way
Hubert Opperman, crack Victorian road cyclist, who holds most of the Australian road records, will attempt a marathon ride to Sydney next week, and preparations are well in hand for the trip.
In the capable hands of H. G. (Herb) Elliot and his nephew, H. C. (Herb) Elliot, the Romany road caravan, which will accompany the lion-hearted cyclist on his long ride, arrived after a rough trip overland about 10.15 a.m. today, and was met by Mr. and Mrs. Opperman, Mr. Bruce Small (who had arrived earlier on the Trans-train), and a crowd of interested onlookers. The caravan is neatly and compactly fitted out with three mattress bunks, wash-basin with running water, a wireless set (broken on the rough journey over), an ice-chest, a wardrobe with mirror, and cupboards for crockery and cutlery. It is small but comfortable, with windows on three sides shaded by lace curtains and blinds. A most snug little conveyance, but very hot in the middle of Australia, we should imagine! The interior is painted cream and, apart from the inevitable red dust which had collected in the drawers and transformed the cutlery, everything is spotless.
The caravan is a two-wheel type with a streamlined appearance, and the rough passage through the dangerous Madura Pass caused the Elliots a lot of concern. On one occasion it turned over, but no serious damage was done. Mr. Bruce Small, who on behalf of Malvern Star Ltd. is sponsoring the trip, arrived by the Trans this morning to meet the caravan. He will accompany the cyclist during his ride, and Mrs. Opperman will see to the cooking on the caravan's stove."
|
|
|
|
Post by Franklin1 on Feb 9, 2014 15:34:03 GMT 10
There are photos of Wanda's van in the following thread: Seeking a van for family outingsScroll down the page and look for all the posts made by Wanda. cheers, Al. |
|
|
|
Post by Franklin1 on Feb 9, 2014 14:42:32 GMT 10
You have to love the way some things are marketed. I noticed in one of the search results that an advert about the Romany Road caravans said they were "imported". That made me raise my eyebrows a bit because I'd always thought the Romany Road vans were made in Australia. It turns out that in 1938, Romany Road vans became available for sale in WA, and I guess anything that crossed the Nullabor back in those days was 'imported'. The RR vans must have been pretty good in their day. This quote from a 1938 edition of the Perth 'Mirror': "At the recent Melbourne motor show over 100,000 people inspected the new Romany Road caravans; over 300 orders were taken, and those for hire are booked up months ahead. Perth is following the lead." 300 orders!! And did you know that in late 1937, Romany Road specially made a motorhome by building a van on a 1937 Ford V8 car chassis, with the wheelbase extended to 155 inches? Western Australia was in the fledgling stages of caravanning in the late 1930s, as this clipping from early 1938 shows: "And we're doing that — at least some of us are. There are at present 20 privately owned caravans in this State, and hundreds in the Eastern States. What's more, most of those available for hire in Perth are booked up months ahead." 20 caravans! We've certainly come a long way - doesn't Mark Taylor have that many on his own now??!   Fascinating stuff, these archives... cheers, Al. |
|
|
|
Post by Franklin1 on Feb 9, 2014 11:27:55 GMT 10
I see that a lot of the West Aust papers have now been digitised by Trove. I was mucking around last night testing it out with searches for some of the WA brands, eg. Baravan, etc. Well, silly me! That ended up being a dumb thing to do because it discovered other brands that we've not got much info on yet... Swan Caravans: Roydhouse and Station Sts., near St. John of God Hospital, Subiaco. Caravans first mentioned in June 1948 as being built, but by 1954 or thereabouts they are focussed on hiring vans out. This manufacturer is in our DHL section from when they moved to Shenton Park a couple of years or so later. Caple Caravans: Built by M. Caple, caravan builder. First shows up in early 1947, where he was advertising that all vans had been booked out for Easter. In December 1948, he was advertising, "CARAVANS. Don't pay high prices for used Vans when you can buy a new van cheaper. Consult M. Caple, Caravan Builder. 208 Beaufort St, Perth. phone B2276." If any of you West Australians are interested in researching your brand of van, have a play around with the digitised newspaper section of Trove. cheers, Al. |
|
|
|
Post by Franklin1 on Feb 9, 2014 11:07:00 GMT 10
That would have to be Archie's Paramount that just finished on ebay. I sure hope they tied down the hatch and protected those windows properly. cheers, Al. |
|
|
|
Post by Franklin1 on Feb 6, 2014 15:03:01 GMT 10
G'day reddo, Yeah, I hear what you're saying, and I definitely wouldn't use normal house bricks or small, thin pavers...  The timber blocks I use, to jack the side of a van up, are off-cuts from treated pine sleepers, which are about as thick as a brick (in size, not mentality...  )... 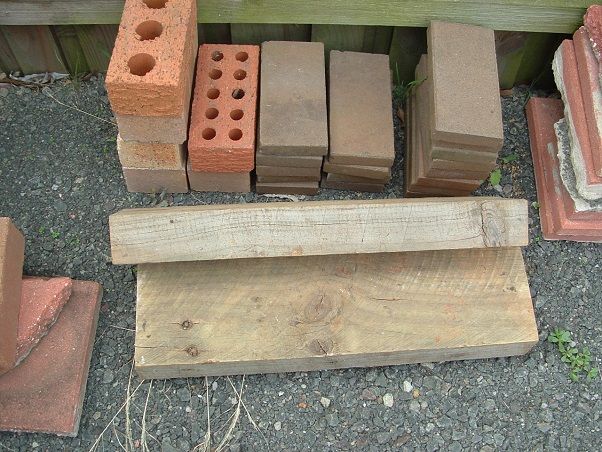 The project van in the shed is sitting on a stack of 200mm x 200mm size pavers in each corner, with a piece of 1/2" plywood cut to size on top of each stack to protect the steel chassis. The stacks are about 500mm high, and the wheels are just touching the concrete floor after the weight is taken off the springs... 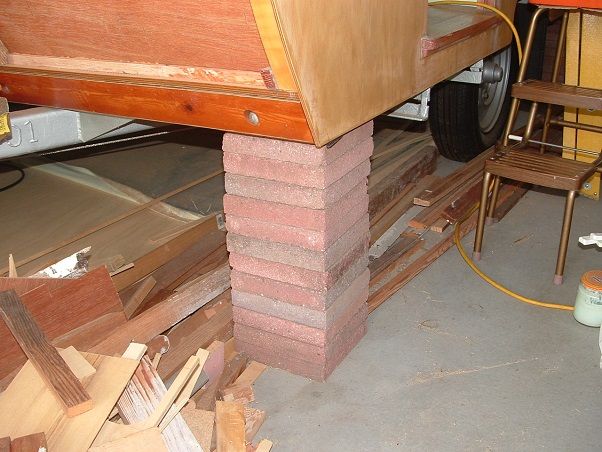 The 500mm height gives me enough room to crawl around under the van without banging my head all the time. The stacks of pavers have been there since I started the project two years ago. I'm all for working in a safe manner, so would the jack stands that you're talking about, kaybee, be able to lift a van up off the ground by 500mm, and be pretty stable in doing so? I might have to rethink my paranoia if that's the case. cheers, Al. |
|
|
|
Post by Franklin1 on Feb 5, 2014 17:14:54 GMT 10
G'day Charlie, Don't do this sort of stuff, in the right hand photo... 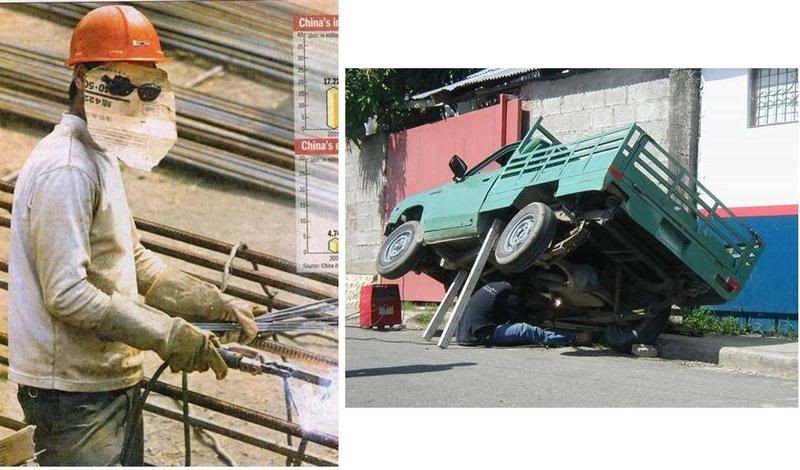 I've always jacked the sides of the van up and put a stack of large timber blocks or paving stones under the main chassis rail in two positions. Plus I chock both sides of the opposing wheel. Engage the handbrake. That sort of thing... The project I'm currently working on in the shed is completely lifted off the ground on a stack of concrete pavers in each corner. I don't trust those adjustable car jack stands, even though they are rated for fairly large loads. Just something about them that makes me a tad nervous. Probably more paranoia on my part than the reality. cheers, Al. |
|
|
|
Post by Franklin1 on Feb 5, 2014 16:46:48 GMT 10
The attachment system is going to be an ongoing problem for us. We exceed our monthly bandwith allowance by downloading these attachments to view them. The more people who download them for viewing, the faster we'll exceed our bandwith. Once we've gone over our limit, we lose the ability to see them until the next month. The dumb thing about the attachments system is that the photo file size can be a minimum of 1 megabyte, up to a max set by our Admin. A 1 megabyte photo is a HUGE photo, and is not required for us to see the detail. A typical photo size of 800 x 600 pixels has a file size of about 200 kilobytes, or one-fifth of the attachment minimum: 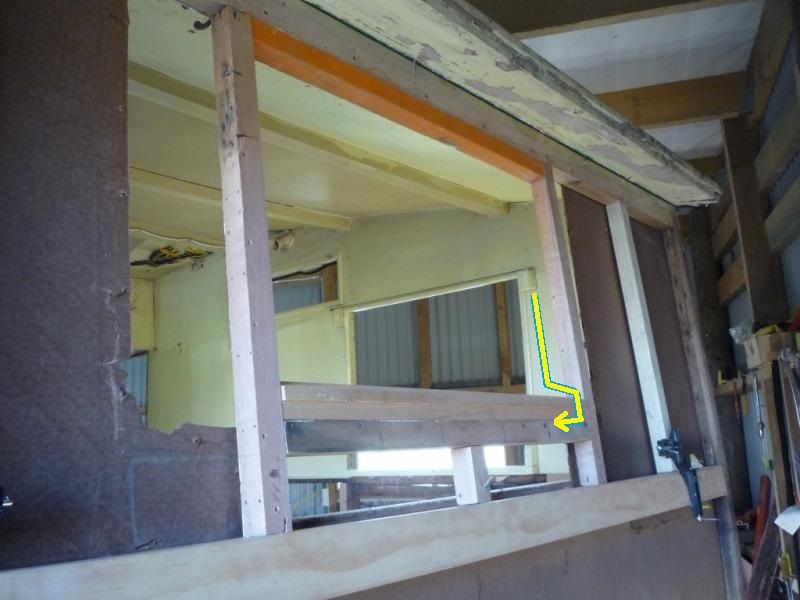 The next standard size photo down is 600 x 450 pixels, and has a file size of around 100 kilobytes, or one-tenth of the attachment minimum:  Both the above sizes are more than adequate for the forum. If you can't see clearly what you're trying to show, stand closer! What's killing the attachments is that people are linking to photos taken at much larger sizes than either of the two sizes above. The monthly attachment bandwith allocation is based on the rest of us downloading those attachments to look at them. What's the answer? The Proboards Managing Attachments help sheet shows what our Admin can set. Perhaps we need to set a limit of one attachment per post, and a maximum of 1 megabyte per attachment. Once somebody puts up a post with one attachment, they shouldn't be allowed to put any more attachments in that thread, and should be encouraged to use the alternate methods of Photobucket et al. If they attempt to put up a second post in that thread with another attachment in it, I reckon it should be deleted. Otherwise we will likely find ourselves facing the same issue every month. Off my soapbox now...  cheers, Al. |
|
|
|
Post by Franklin1 on Feb 4, 2014 15:19:52 GMT 10
G'day sgtl, You don't need to search for any other thread other than this one: Vintage Caravan Ice Boxes, which is currently stickied third from the top of this Techo index list. Scientific principle is that cold air falls, and hot air rises. Ice in the top compartment cools air down, which descends into the lower section of the cabinet, displacing any warm air. Doesn't matter whether you have a single door chest, or a 2-door chest, the principle is the same. Insulation is a bonus, but is often not found in the original set-ups. No insulation means the ice is likely to melt more quickly than if there was insulation. Opening the door too often will also lead to the cool air escaping, and the ice melting more quickly to keep the air in the chest cooled. cheers, Al. |
|