|
|
Post by seeshell on Jan 18, 2016 20:13:48 GMT 10
Congratulations on such a successful and charming restoration! How wonderful that you've been able to retain many of the interesting features such as cleverly reusing the cushion vinyl with new toppers. I think that the fabric and colour choices are spot on. I went back and had a look at where you started only 13 weeks ago - and she was certainly looking a bit sad and neglected. The effort with the windows, polish, even the flooring has been well worth it, and will put her well on her way to the next 50 years of fun. And since you have a little one, he might "inherit" the van...  Really a very lovely restoration which respected the old van's charm (including that ingenious privacy blind! I'm filing that idea away...). Great work, now go out and enjoy yourselves this Australia Day weekend. Best regards Seeshell |
|
|
|
Post by seeshell on Jan 18, 2016 20:01:12 GMT 10
Good evening all, I know that a goodly number of vans have 'jelly mould' ceiling lights in them, and finding one for a restoration can be an exercise in patience, and then condition! If you aren't having any luck finding a second hand light in good nick and you're getting desperate, they are still made new with the same machinery by Davey and Co. of London (who have made them for 60+ years). Classic Boat Supplies (www.classic-boat-supplies.com.au) offer these marine lights with or without a switch in brass or chrome. They are brass not pot metal. Good quality - and not cheap - but at least they are obtainable! Here's the link to the marine lights page. 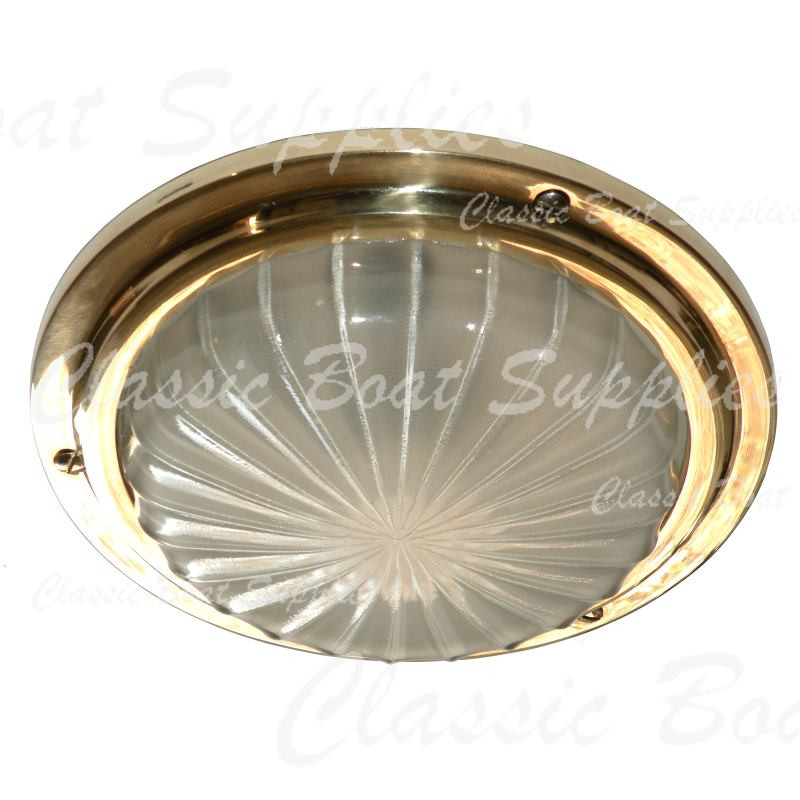 |
|
|
|
Post by seeshell on Jan 18, 2016 19:42:49 GMT 10
Update: While working on a project, I have come across two "linen style" formicas that basically replicate very early laminates (if slightly less slubby). Laminex Australia have Clay Textile Natural Finish, and White Textile Natural Finish. The Clay is probably most authentic, and looks like the Tan Linen Formica some of the product in the Dons as far as I can tell. However, if you need another colour, you will still have to print your own (see past posts). The Clay Colourway:  The White Colourway:  I got samples of both - and they are very nice. Cheers Seeshell |
|
|
|
Post by seeshell on Jan 15, 2016 20:12:13 GMT 10
Hi All
I'm after a sink - there's one in Sydney (Coogee) which would do me if someone would be good enough to pick up until I could arrange transport. Anyone who could help me out?
It's about 1m long by 455mm deep.
Alternatively does anyone else have a good second hand sink for purchase? I'd prefer a setup with a right hand bowl and very right hand side drain, but I can work with anything about that size.
Thanks in advance!
Seeshell
|
|
|
|
Post by seeshell on Jan 11, 2016 10:10:36 GMT 10
Hi All
I agree that some of the light truck tyres are a bit agricultural looking (as if I'll be driving through paddocks in The Blue Flyer!), but do be careful sacrificing looks for performance. A lot of medium size cars will have a curb weight of around 1400 kgs - but this is carried over four tyres, so each only has to manage about 300-350kg from that distribution.
In contrast, many vans are single not tandem axle and carry similar weights laden (and should be able carry to the limit of the axle rating), so may need to do from 700kg to 900kg or more each! It's easy to see how the higher load ratings and stiffer sidewalls can really help with a smoother safer tow.
Check out some of the older style Bridgestone tyres - still commercially available, and not too nobbly/SUV-ey looking. The 613V is not too bad. GT Radials make a Maxmiller range, and KargoMax which simulate older looks, and Firestone do a CV4000 which is ok as well. Most rate around 900kg each, so in pairs safely manage a single axle arrangement (1800kg overall) at around 45psi.
Safety first!
Seeshell
|
|
|
|
Post by seeshell on Jan 9, 2016 12:51:20 GMT 10
Hi Sutcacs
You will be pleased to know that we saw "Fugly" at the Portarlington Caravan Park in Vic on our annual holiday down the Bellarine. Didn't manage to catch the owners at home, but she was looking as well preserved and loved as ever.
Cheers
Seeshell
|
|
|
|
Post by seeshell on Dec 22, 2015 6:30:29 GMT 10
Hi All What a nifty van you have - much enjoyment to come I am sure as you get out and use it. We have a Jones Wheel (as above on this van). We do regularly use our van, so we tow with it. However, be prepared to be pulled over often by the Police, as from behind I suppose it looks as if you're driving with your dolly wheel down. It is very helpful when pulling into a tight caravan park: unhook and we can push our van around and into place. Also an excellent conversation starter with people at the camp. I love it. As for the braking system - we changed to electric brakes on the van with a controller in the car (tekonsha). The front wheel has no brake of course, it is free floating. I have seen others with what looked like a hydraulic system but not sure if it was still in use that way. Enjoy Seeshell (The Blue Flyer) |
|
|
|
Post by seeshell on Nov 12, 2015 20:10:39 GMT 10
Hi All
Heffron's which sell the boomerang formica have an agent in Australia - A Moment in Time Retro Designs (http://retrospaces.com.au/) which is the site I mentioned earlier in the thread. Also worth noting, is that they sell the very hard to obtain nice edging for tables in many styles from Eagle Mouldings in the USA.
Cheers
Seeshell
|
|
|
|
Post by seeshell on Nov 11, 2015 15:12:31 GMT 10
Hi Mel
White is not the easiest colour to match. There are dozens of shades of white. Yours looks slightly grey but it's always hard to tell from photos. You will need some Selleys white epoxy porcelain repair. I'm hoping that it will be a good match but it may look a little on the ivory side compared to the white in your table.
If I was repairing it I would take these steps...
1. Where you can, lay the pieces together and glue them down so they are stable. Where there are gaps, clean out the base of the hole and trim the jagged edges of the formica at 45° using a Stanley knife. Make sure there's no grime left in the hole.
2. Place 50mm long parallel strips of masking tape either side of the hole / breaks - about 2mm clear of the edges.
3. Mix the resin as per instructions. You might like to try a small blob first for colour match. Metho on a soft cloth will remove it will it's still wet.
4. Overfill the hole with the white epoxy. Scrape of the excess with a paint scraper or spatula by bridging over the masking tape. This should then give you a level surface that is slightly proud (depth of the tape) of the formica surface. It may be necessary to put more layers of masking tape down to achieve a slightly elevated level.
5. Allow to set overnight.
6. When hard sand back using wet 1200 grit paper with a flat backing block. This can tack some time - it's slow going with such a fine grade of paper. Stop sanding when it's within a hair's breadth of being flush.
now for the tricky bit....
7. If the colour is a reasonable match using a steel straight edge and a sharp stanley knife cut some fine V shaped disecting lines into the patched section. The idea is to replicate one of those asterisk paterns - perhaps make fine crisscross V shaped grooves go slightly deeper than the formica surface. You could also make a few little random craters with a small drill bit (hand held) to replicate the speckle in the pattern.
8. Mix up some more epoxy (you can use either white or clear) and add some coloured powdered cement colouring, or black paint tint, or finely crushed graphite (from an old pencil) or black pepper, or whatever dark pigment you can find to get the white to grey - try other colours if you're going for the other colour in the pattern. Only add a small amount of tint add a time. Trowel the colour mixture over the top of the white patch making sure it penetrates into the V groves.
9. Leave overnight to set.
10. Sand back until it's all flush with the formica and all excess has disappeared. You should now have a filled hole or pattern area with the right colour!
11.Polish and/or buff to suit using VERY fine car polish.
Presumably if the background colour were different the advice above would involve you tinting the white Selley's material before using it. The other advice about the graphite was to tint the material to match in a little asterisk pattern - if that didn't apply to your situation, or the broken areas don't need it, skip it!
Cheers
Seeshell
|
|
|
|
Post by seeshell on Nov 11, 2015 15:00:36 GMT 10
|
|
|
|
Post by seeshell on Nov 8, 2015 19:36:10 GMT 10
Hi Melani
Depending on where you live you might have luck at the Hughes Renovators Paradise in Hughesdale, VIC. I was there only the other day and they had a lot of stuff that looks similar. You could call them and send a snapshot and see if they can help. Alternatively, there's a renovator's warehouse in Castlemaine, VIC as well. Check to see if there is a salvage place near you - take yours with and see how you go on a match.
Just be careful of old switches which will not be double pole and may not pass code - which is less important than not being dead! Middys Electrical (found all over Australia) have a big Clipsal catalogue and you can get a lot more through that than is often on the shelf. You can buy old looking dual/double pole plugs and switches which will keep you both fashionable and safe!
Cheers
Seeshell
|
|
|
|
Post by seeshell on Nov 7, 2015 19:19:58 GMT 10
Andrew, I could say something about the "nice" hairnet but I have restrained myself. I bet you know all the staff there because of your work. cheers Murray Oh dear! I hope you wear hairnets and know the staff because you're a healthcare worker, not a "frequent flyer" as we used to call certain visitors to the ER. Get well soon Andrew - Seeshell |
|
|
|
Post by seeshell on Nov 1, 2015 16:05:34 GMT 10
|
|
|
|
Post by seeshell on Oct 28, 2015 17:28:26 GMT 10
Hi jp63
Another option for fabric, if you do want something that will stand up to a bit of work, and be vintage appropriate is to search for old curtain drops. Usually heavier fabric, and will be in the unusual patterns that just don't seem to be repeated in modern fabric.
Best of luck!
Seeshell
|
|
|
|
Post by seeshell on Oct 28, 2015 14:13:10 GMT 10
Larry has got written instructions from a professional and one square cushion is done in three pieces and a zipper the length of the cushion. He says they are really easy instructions and anyone can do it on a household machine if it is upholstery material not canvas. He is away at the moment so if anyone is interested in a copy please send a pm in about 2 weeks and we will see if we can arrange a scan of it. Cheers Lyn Hi Lyn Do you think I could get a copy of that pattern? That would be amazing. Cheers Carley |
|
|
|
Post by seeshell on Oct 1, 2015 9:33:23 GMT 10
Hi Rodney
Two years ago I had a sad situation with my Olympic, and it died. However I gave the roof to AtouchofGlass (ATOG) here on the forum, who knows a thing or two about fibreglass. He would have it to copy, so you might talk to him - or you might be able to get one made.
Cheers
Seeshell
|
|
|
|
Post by seeshell on Sept 26, 2015 22:51:51 GMT 10
Hi Adam - Found my books, hurray! Old dimensions were as you say 1 3/8" by 3/8" which was 42mmx19mm. The plan specifies Oregon, and glue and screw, so I can continue with planning. FYI - apparently I have a local source of slow growth oregon - www.simplyoregon.com.au in Dandenong, VIC. They will cut to any size/dimension. Thanks for your help. Cheers Carley |
|
|
|
Post by seeshell on Sept 26, 2015 21:33:10 GMT 10
Hi Adam
Thanks for that confirmation on the Oregon - apparently the key with it is making sure it is older growth, and not plantation or it's too porous. Can you recall any dimensions? for standard framing timber?
Cheers
Carley
|
|
|
|
Post by seeshell on Sept 25, 2015 21:50:38 GMT 10
Good evening All I've had a clean up and at the moment I can't lay my hands on my Winser books, so I'm hoping some intrepid restorers can help me. Imagine its 1951 and you're starting to build your van in your backyard workshop. What type and species of wood is used for strong frames? Hardwood, meranti? What dimension of wood is used for van framing? Al, I'm looking at you!  And can someone confirm glue and screw? If you have pictures to share that would be super! Cheers Seeshell |
|
|
|
Post by seeshell on Sept 24, 2015 21:43:11 GMT 10
Hi Justanotheramy
Boron was (and still is) used to treat wood to avoid wood bacteria which ends in rot. It's antimicrobial, but has very low toxicity for people and pets - similar to salt.
Can't speak about the paint on it though!
Cheers
Seeshell
|
|
|
|
Post by seeshell on Sept 11, 2015 8:14:00 GMT 10
Hi All
Based on the flooring, pine doors, the quilted padded (plastic?) fabric and the colours you'd have to say some time in the very late 1950s/early 1960s to as late as the 1970s. But again, all of these things could have been replaced or modernised. By no means definitive.
Cheers
Seeshell
|
|
|
|
Post by seeshell on Sept 11, 2015 5:02:45 GMT 10
|
|
|
|
Post by seeshell on Sept 10, 2015 17:15:22 GMT 10
Hi Oldcarharry Also one last thing - an awning rail spreader is not a bad tool to have handy for a few dollars. Helps straighten out the channel and make it round again if it gets a bit wonky - just ease it through with a hammer gently.  I think you can get them at Carac or Caravansplus - but you can definitely order them online. Cheers Seeshell |
|
|
|
Post by seeshell on Sept 10, 2015 17:05:32 GMT 10
Hi Oldcarharry Having bent our track around the curves of a bondwood, I can say no it won't be too soft when you are done. But when you go to do the bend, to stop the channel from collapsing in on itself thread in some sacrificial rope, and use a rubber mallet to ease it around. Only fix it down when you are well past the bend, and it's well behaved. When you bring it around the curve it has a tendency to want to twist inward or out, and you will need to gently persuade it to remain parallel to the van edge. Depending on the tightness of your curve you don't really need to anneal it, just get the softest available. I think we got ours at Action Aluminium too from memory. Just take it very slow - patience is pretty important! Also found it useful to slowly spring the end down (in a soft bouncing way) as it was being brought over the curve of the roof - this seems to keep the right pressure and begin the bend without so much pressure that it folds up and fails. Use the roof or body to help you! I stuffed it a few times before I got the hang of it, so can I say, get a few spare bits of channel - it's cheap insurance for when you're doing a job on Saturday, and you break it, and there's no place open.  After you bend it around you will probably have to take it off again (maintaining the shape) and then put some sealant down before replacing it and fixing it down permanently. Good luck, and let us know how you get on. Seeshell |
|
|
|
Post by seeshell on Sept 10, 2015 16:02:20 GMT 10
Hi Geoff
Thanks for that. It is a bit odd that none of them list these kind of blinds on their sites, but still offer them. Perhaps it's too much trouble to put things up on the web when there's so many individual decisions and choices to be made to prepare them. Let's face it, they're probably on the nose as too old fashioned for most.
I appreciate the heads up, and I'll head out to the shops.
Cheers
Carley
|
|


