|
|
Post by Franklin1 on May 27, 2014 20:23:40 GMT 10
In the Australian Womens Weekly magazine dated 25 June 1952, there is an advertisement for Carapark caravans... 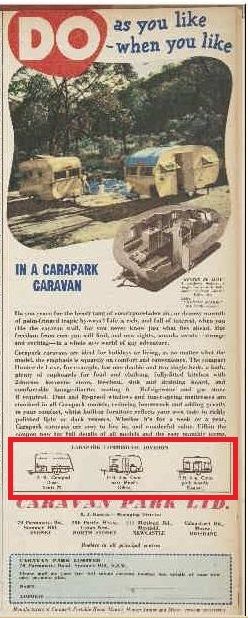 I've put a red border around a section of that advertisement, which when enlarged shows the commercial vans available from Carapark at that time... 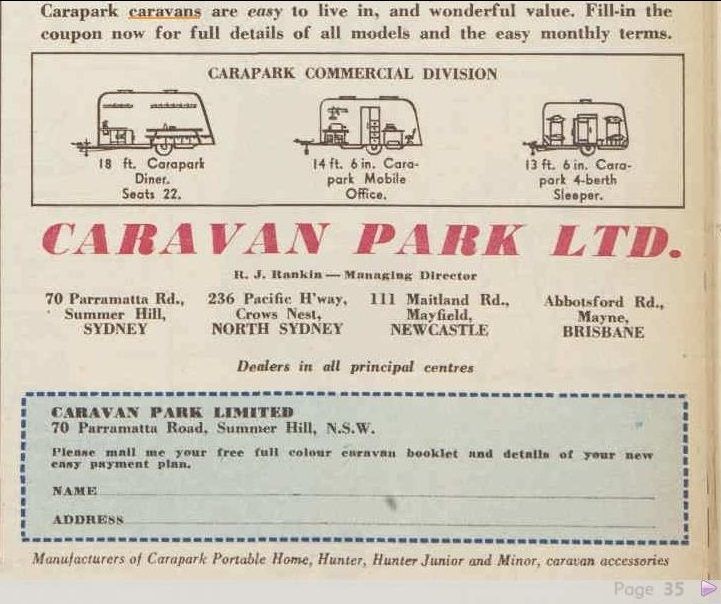 |
|
|
|
Post by Franklin1 on May 27, 2014 8:11:38 GMT 10
Just confirming that my monthly bandwidth allowance does reset to zero on my "monthly anniversary date" of the 26th of each month.
It didn't show as zero when I checked on the morning of the 26th, but it was showing zero when I checked again late that night. I presume it must reset when the time wherever the Photobucket computer servers are located in the US ticks over past midnight their time.
cheers,
Al.
|
|
|
|
Post by Franklin1 on May 26, 2014 21:49:24 GMT 10
Oops, you snuck a post in while I was creating mine.  See this thread in the DHL section, and see if it answers your question about the cladding: Aluminium cladding "library"cheers, Al. |
|
|
|
Post by Franklin1 on May 26, 2014 21:46:17 GMT 10
Don't feel too down about it, vandalay.  There have been countless people on this forum over the years who never found out the origin of their van accurately (me included). Sometimes you just have hope that one day someone will come on the forum with information that makes you go, "Bloody heck!! That's the same as my van!!"
In the meantime, start planning on rebuilding your van to match something like a 1960 van. You won't be too far off the mark when it's all said and done. Keep posting updates as you work your way through it.  cheers, Al. |
|
|
|
Post by Franklin1 on May 25, 2014 23:39:00 GMT 10
Not based on the shape of its cabin, it doesn't. The main part of your cabin that I find unusual is the sharp radius at the top of the front. Most vans you look at have a much more generous radius at that point. Consider the side-on photos of the Roma van in this thread (4th and 7th photos showing each side): Groovygramps 50's Roma Bondwood? If you were to overlay your side-on pictures over the top of the Roma pictures, notice how the front top and rear top corners of your van have a much sharper radii than the Roma? It looks the same difference when I compare the Baravan as well. It's that shape of the cabin of yours that I find distinctive, and that will ultimately be the thing that helps you match it to another van one day in the future, I reckon. cheers, Al. |
|
|
|
Post by Franklin1 on May 25, 2014 23:07:52 GMT 10
|
|
|
|
Post by Franklin1 on May 25, 2014 13:01:32 GMT 10
The following photo sold recently on ebay, and is a Fairfax media photo from Sydney, dated 23/6/42, showing "Investors in the 2nd Liberty Loan crowded around officials in charge of the Loan Caravan in Martin Place today..." [have no idea why the fella is arrowed] 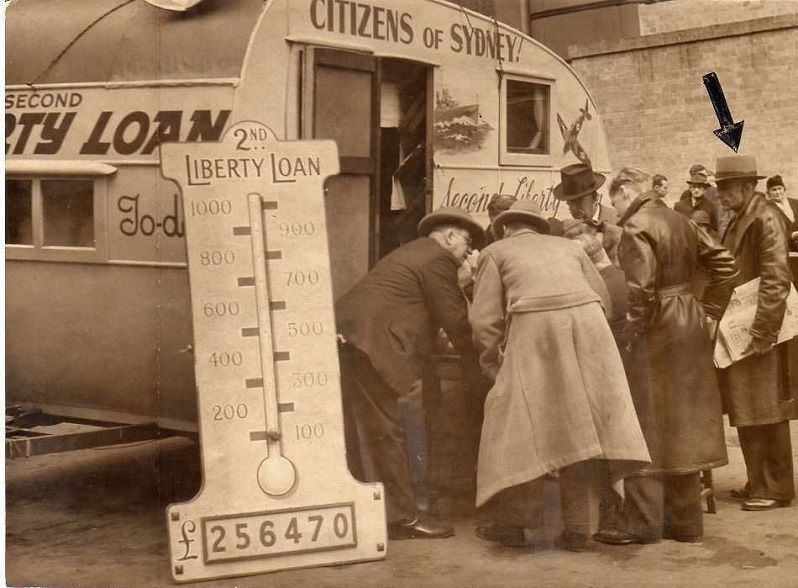 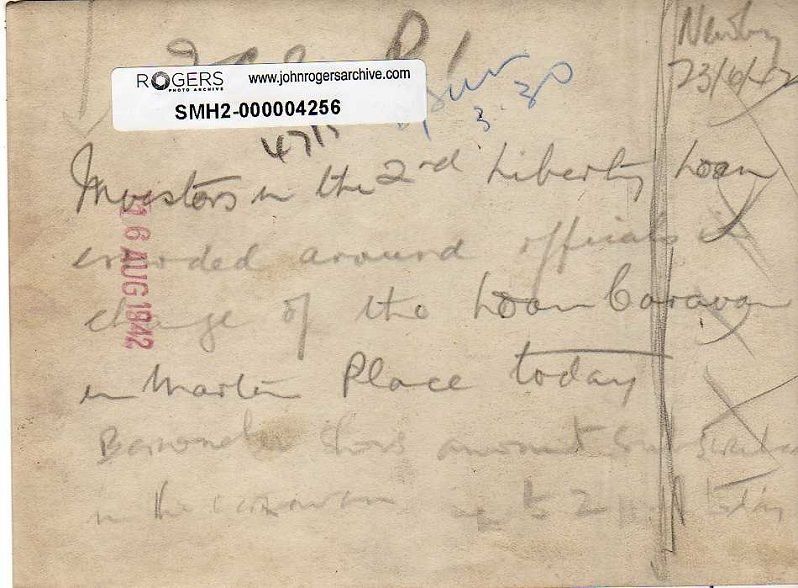 And this news archive item explains a bit about the 2nd Liberty Loan to fund the World War 2 effort... 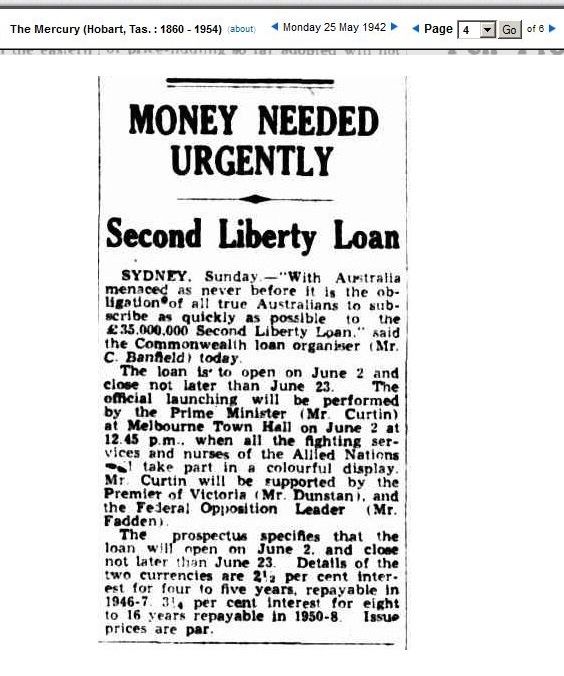 |
|
|
|
Post by Franklin1 on May 25, 2014 9:28:11 GMT 10
G'day cobber, Is this thread just for "mobile eateries" vans, or does it include all other vans that were originally built for commercial purposes? I remember minicamper's Highway van he got hold of back in 2007, which was originally built for the Victorian Country Roads Board (CRB): Highway caravancheers, Al. |
|
|
|
Post by Franklin1 on May 24, 2014 20:45:55 GMT 10
A few years back I spent a couple of months researching the Sydney Morning Herald newspaper archives, collecting information relating to caravans. When I look through everything I collected, I see that Qualicraft first got a mention in late 1959, where they were advertised as now being fitted to the Tennyson brand of caravan (and by coincidence, the address for the Qualicraft factory was the same as the address for the Tennyson factory, so I presume there was a connection there). There were a couple of Qualicraft adverts during 1960, and this one from October 1960 might offer some leads for you to chase up... 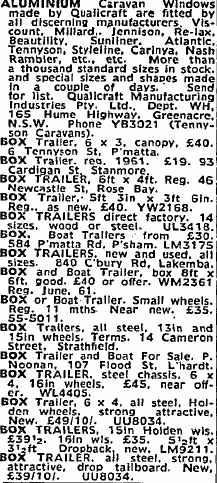 All of those brands should be in the Index for the Down History Lane section, and I'll leave it to you to check them out and see if there's anything similar to yours. I honestly don't know whether Qualicraft windows were used by interstate manufacturers, or only by NSW builders. You may not get any closer to the truth about your van with what I've given you, but you'll be more certain about what it isn't.  cheers, Al. |
|
|
|
Post by Franklin1 on May 24, 2014 15:25:02 GMT 10
G'day vandalay, Well, I've had a go at doing some forensic work on the identity of your van, but I've come up empty handed. The Dymwood name is readily known, but the Trailezy name is not so well known. It gets a mention in this other thread, but that's all I could find on another van on the forum. The "Fred Holman Caravans" name came to nothing when I searched the online archives (Trove). The Flavel stove is fairly common to old vans. When I look at the cabin shape of your van, that high vertical flat face at the front is pretty distinctive. I can't recall seeing other vans that have such a high flat face as yours does. It can't have been a great design for towing against headwinds. I searched through all the WA brands in the index in our Down History Lane section, and nothing showed up that looks similar to yours. The aluminium windows seem to be from around the 1960-ish mark. Is there any sticker on any of the frames on the outside of the frame at the bottom, to say who made them? (eg. Qualicraft or Alfab) Do you know what sort of wheels are on the van? That might help with estimating the age of your van. I'm thinking your van is likely to be from around the early part of the 1960s. The window frame appearance looks to be the later version that has the rubber dust seal included in the opening frame. Other than that, and the fact that the jack stand holding the drawbar up is a Supercheap Auto brand purchased in May 2013, I'm not much help.   (ok - just guessing about the purchase date for the jack stand  ). cheers, Al. |
|
|
|
Post by Franklin1 on May 22, 2014 20:03:35 GMT 10
Gilbert, I've used Oz-made exterior grade plywood with B-B grade facings throughout my project van. The exterior grade has hoop pine on the top and bottom surfaces, which is a reasonably soft softwood. I've cut the majority of my ply using a jigsaw with a metal cutting blade in it. Along the grain, the cuts have very finely furred edges which are sanded smooth quite easily. Across the grain, the blade will produce a slightly coarser cut, and splinter the edge of the cut by up to a millimetre. But I can sand those cuts back fairly smoothly as well, leaving just the occasional chipped appearance along the cut.
I've found that not rushing the jigsaw through the cut helps to minimise the damage on the cut edge. Not rushing and not having the jigsaw speed too high works wonders for me.
My metal blades allow me to cut around a radius down to 40mm. If the radius is smaller than that, I have to switch to a scroll saw blade.
cheers,
Al.
|
|
|
|
Re ply
May 22, 2014 10:05:01 GMT 10
Post by Franklin1 on May 22, 2014 10:05:01 GMT 10
Wouldn't you use the same thickness ply as the masonite, gilbert? Especially if you end up with a join between any existing masonite and the new ply sheeting? 6mm ply will only bend around a certain radius, but I guess the typical rear end radius on a van should be generous enough to allow the use of 6mm. Thinner 4mm ply will bend around a much tighter radius. My project van originally had 5mm ply on the roof and ends, but you can't buy that thickness anymore. I bought 6mm sheets but they won't bend around the tight 500mm radius above the front windows. I had to go buy 4mm sheets for the job instead.
Buy decent Australian-made ply, which has a fairly even thickness of veneer layers in the ply. Imported ply, such as that sold in Bunnings, has a much thicker internal veneer layer than the two surface layers, and won't bend as tightly. For example, some 3mm imported ply I bought won't bend around as tight a radius as thicker 4mm ply made in Oz.
cheers,
Al.
ps. I meant to add that you can generally tell whether plywood is imported or Oz-made by the dimensions of the sheet. Imported stuff is cut to the old imperial standard size of 8ft x 4ft sheet, which is then branded as 2440 x 1220 mm. Oz-made ply is cut to the standard metric size of 2400 x 1200mm.
|
|
|
|
Post by Franklin1 on May 20, 2014 10:51:40 GMT 10
G'day Mike, Very nice progress on the van so far!  A couple of photos posted on the forum just don't show the hours and hours of slaving away on a project, do they, but I can see the level of effort that you've put into the job. In regards to the painted design on the sides of your van, I'm thinking that your van might actually be a 1966 model, based on information about other Valiants with chassis numbers just either side of yours, eg. B2233 and B2307 discussed above. One way to perhaps determine the original paint design could be to very carefully strip back the white paint on the exterior cladding of your van, in the position circled in this photo... 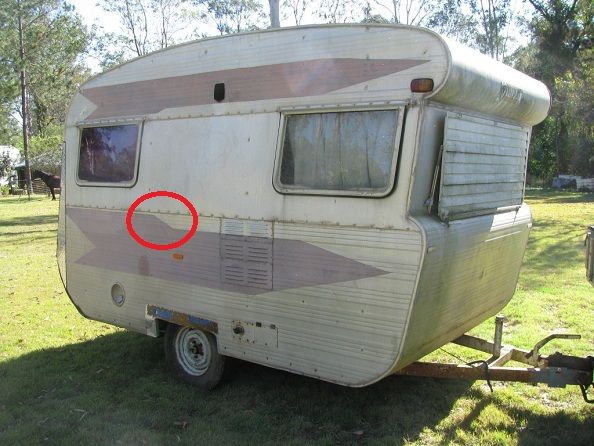 If you discover a stepped outline that matches the design in the photo, then I reckon you can safely assume it's the 1966 design. cheers, Al. |
|
|
|
Post by Franklin1 on May 17, 2014 21:06:41 GMT 10
Yes, I saw that listing, and it reminded me of Paul and Yoko's Hunter Minor all those years ago (and which I see in this recent seqvintagecaravanmob post [about halfway down in another one of Doug's very colourful posts] that Paul and Yoko's van is now yellow). What has always stuck with me about P & Y's van is how they found the build date written on the underside of the aluminium drip strip above the window. Made me realise you can't discount anything in your search for the origins of your van.  The listed one would be a handy size for you Ray. No worries about having to store this one outside. Park it under your bed, I reckon.   cheers, Al. |
|
|
|
Post by Franklin1 on May 17, 2014 20:25:37 GMT 10
I'm thinking it might possibly be an early Coronet. At the first opportunity, you need to lie on your back and slide in under the drawbar where it starts to disappear under the front of the van on the door side. Have a look inside the drawbar channel and see if there is a number welded there. In the meantime, you can read the story about a Coronet with the chassis number of 9, and you can compare the layout of your van with this one, including the layout/number/placement of the kitchen cupboards. I suspect there's been some remodelling done on the front windows of your van, because those windows seem to be somewhat later than the side windows. The inside rear photo in the listing also appears to show something has been done with the rear window as well. Another thread showing Coronet No.9 and Coronet No.10 is here.See how you go with a Coronet comparison, and if that doesn't stack up, you might like to explore the Huntsman brand in our Down History Lane section. The overall shape of the cabin of your van suggests to me that it has a Ballarat, Vic. origin, and the manufacturers we're aware of in that regard are: Coronet, Franklin, Huntsman, Panorama, and Vacation. You will find all of these brands in the Index of the Down History Lane section. I can't see enough evidence to suggest it's an early Franklin, and I don't think the Vacation brand was around at the time yours was likely built. I've copied the listing photographs into my computer, so I'm keen to see if you find anything on the drawbar. cheers, Al. |
|
|
|
Post by Franklin1 on May 14, 2014 22:40:21 GMT 10
The chrome leg is fairly commonly used in outdoor cafe tables (see images ). When they are set into the 3 or 4-arm base, they seem to be pretty stable, so they must be ok for that sort of thing. I presume you will anchor the square end of the table top to the front wall, which will give it some more security. You might need to put a screw through the base collar so the tapered leg at the floor doesn't jump out of the collar on bumpy roads. cheers, Al. |
|
|
|
Post by Franklin1 on May 14, 2014 11:16:30 GMT 10
Your monthly Photobucket bandwidth allowance resets on your "monthly anniversary date", which is the date you opened up your P/b account. To find that date, log into your P/b album and click on your username over on the right of the screen, and then click [User Settings] in the drop down box...  When the screen reloads, click on the [Account] heading on the right...  When that screen reloads, you'll see your start date, and you can also see how your account is going so far in your monthly allowance...  If you are getting emails about exceeding your monthly allowance, and you don't want to fork out any extra money for more bandwidth, you have to look at what you post on the forum towards the end of your monthly time period. Don't post big trip reports with large photos near the end of your month, otherwise 40 people reading your trip report will chew up your remaining bandwidth fairly quickly. I guess the trick is to post lots of photos at the start of your monthly allowance, and hope that people have "moved on" from looking at your photos after a week or so. ---------------------------------------------------------------------------------------------------------------- You can read the following information copied from the Photobucket Help system, if your eyes don't glaze over first... Bandwidth Exceeded (Look Who's Popular)Free users have limited bandwidth for their accounts, and that limit is set to 10GBs of bandwidth per month. If you need more bandwidth (or storage) Click Here for steps on how to upgrade your account. Bandwidth consumption is counted by the amount of data that is transferred from your account to other sites across the web. The size of the image or video will increase the amount of bandwidth you are using when linking them out to other sites. Examples of bandwidth usage:-Lets say you have 100 photos that are 1MB in size each, and you are linking every single one of them out to your blog/website. 100 images at 1MB in size means that you are linking out just under 100MBs in data size for all those images. Those photos would need to be viewed 100 times a piece to reach the 10GB bandwidth limit for a free Photobucket account. -If you only linked out 10 photos that are 1MB in size, those 10 photo would need to be viewed over 10,000 times before you would reach the 10GB bandwidth cap. -If you had 10 videos on your blog/website that were 100MBs in size, that would equal out to just under 1GB in file size. If those videos were viewed 100 times total, you would reach the 10GB bandwidth cap. If you do reach the bandwidth cap for the free account, your linked out photos will be replaced by the above Photobucket image that states "this image exceeds bandwidth". To have this removed you will need to upgrade to a Plus subscription, or wait for your bandwidth to reset for the month. Your bandwidth will reset to zero every month on the day you registered your account. You can find this date in your User Settings, under the Account tab. If you upgrade to a Plus account, you will no longer have to worry about the bandwidth exceeded message, as all Plus accounts have unlimited bandwidth. Upgrading your account to a Plus account will only remove that message from photos that are linked out from your upgraded account. It will not remove the bandwidth exceeded message from images that are linked out from another users account. Having users return to the site to view your photos through direct links does not use any bandwidth. Bandwidth is only used when the image is embedded on another site to be viewed. |
|
|
|
Post by Franklin1 on May 12, 2014 21:07:36 GMT 10
G'day reddo, I occasionally get emails from Photobucket telling me I've almost exceeded my allowance. It's a load of crap! I think they might work on the same principle as the Nigerian scammers...if a few out of a thousand get scared and pay up for more space, then P/b has got a bit of extra money in their kick for nothing. I also have a gazillion photos in all of my albums under the one log-in name - somewhere up around 2500 photos after a quick tally. The vast majority of those 2500 photos are scattered around this forum somewhere. However, even with that large number of photos, when I log into my P/b album it tells me I am currently using only 10% of my allowable free storage... 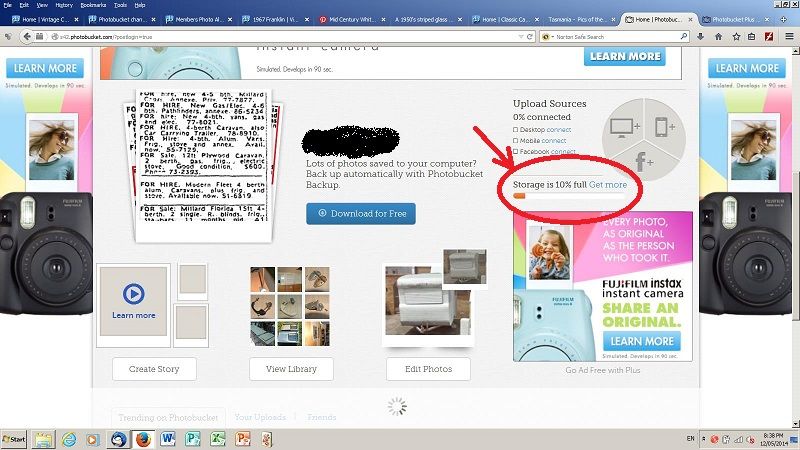 If I click on the "Get more" link in the red circle above, I can see more info about my current usage...  So, any emails from P/b to me are a load of baloney. I just ignore them and "Keep calm and carry on".  Even the bandwidth showing above is well below what I'm allowed, and I can't control that because it's based on how many of my photos are looked at by other people on this forum, not how many times I look at them myself. cheers, Al. |
|
|
|
Post by Franklin1 on May 12, 2014 20:30:00 GMT 10
G'day onesneverenough,
Nice job on all the framework repairs. You've basically done the corner bits the same way they were done in the factory. I think steam-bending of timber had been pretty well phased out of the industry by the mid-60s, due to mass-production methods taking over. The other Franklin vans we've seen stripped bare on the forum have the same large chunks of timber in the top and bottom corners cut to shape the way you've done it.
Just out of curiosity, can you tell me the chassis number welded on the drawbar next to the jockey wheel please? The painted stripes on the sides of your van is the design used on the 1966 Freeway models, so I'm thinking your van might be a year earlier than you've typed in the heading of this thread.
I presume you are now well past all the work you are showing us, so it will be interesting to see how the job progressed.
cheers,
Al.
|
|
|
|
Post by Franklin1 on Apr 18, 2014 17:27:19 GMT 10
G'day Thomas, it's coming along nicely.  Having watched untold numbers of these types of Viscounts being worked on over in the Classic Caravans forum over the last six years, there are some common problems with the design of these vans: 1. Where the aluminium frame butts against the steel chassis, you will likely find severe corrosion, particularly in the rear corners, but also in the front corners and where the door frame is. Check these areas thoroughly before you put the new flooring back in. It is wise to think about installing a barrier between the aluminium frame and the steel chassis, to prevent corrosion from any leaks in the future. One option is to place polyethylene flashing down between the two and then bend the top half of the flashing to 90 degrees so it sits under the perimeter of the floor. This is done after you've completed any repairs and painting of the chassis, obviously. 2. Viscount roofs from this time period are a great shape to make rainwater disappear off the roof quickly. Unfortunately, Viscount let themselves down badly by not having a deflector strip at the front and rear where the roof curves around above the windows. Water rushing off the roof will curve around and be directed towards the windows, rather than away from them. This is why the most common fault seen in Viscounts is rotten timber ledges under both front and rear windows. Have a think about how you can pop-rivet a deflector strip above both sets of windows so water is directed away from the van. 3. Many caravan manufacturers run an earth lead to the first 12V light fitting (usually the nearest clearance light to the tow coupling), and then rely on the aluminium cladding and the chassis to provide the earth to all the other 12V lights (ie. the other clearance lights and the rear lights, etc.). When a van has been stripped back to the condition that yours is now in, it's a great opportunity to look at running an earth lead to each individual light and linking all those earth leads back to one lead into the tow coupling plug. You will eliminate the dreaded faulty light syndrome that happens when corroded screws in light fittings lead to dodgy earth connections. Hope this helps, cheers, Al. |
|
|
|
Post by Franklin1 on Apr 18, 2014 16:44:49 GMT 10
G'day Jen, and welcome to the forum!  Can't tell you anything about a brand. I can't say I've seen that type of cabin shape before, so it could very well be a home-built jobby. The timber frame windows suggest it was built prior to the mid-1950s. Some photos of the interior might help narrow down a building date. cheers, Al. |
|
|
|
Post by Franklin1 on Apr 17, 2014 19:48:59 GMT 10
G'day siesta, and welcome to the forum!  If you are trying to post photos via the "Attachment" method, you can no longer do that, and you have to post photos via one of the other methods. See the first few threads at the top of this index: Forum Guidelines & Helpful Forum HintsIs it a coincidence that we have had two posts so close together asking about a Siesta caravan, or are the two posts talking about the same van?? Siesta caravanI can't add any more than what I wrote in the other thread. cheers, Al. ------------------------------------------- Note to Admin/Mods: is it possible to remove the Attachment option so people can't even try to post photos via that method? We get the same problem on the Classic forum - people can still try and then they get told the forum has exceeded its allowance, or something like that. They are left scratching their heads and wondering what they are doing wrong. Can it be totally removed from both forums so that people don't even know it exists? |
|
|
|
Post by Franklin1 on Apr 17, 2014 18:29:50 GMT 10
|
|
|
|
Post by Franklin1 on Apr 16, 2014 20:35:31 GMT 10
Yeah, very impressive piece of work there, Gay!  I can see it fitting very nicely on the bed of my project van. It's sad that there can be only one winner in this raffle, but hey, people can always come and see it on my bed if they want to see what they missed out on.  [but no drooling on the quilt, ok?!] Saving my pennies for some tickets as we speak...  cheers, Al. |
|
|
|
Post by Franklin1 on Apr 16, 2014 20:12:05 GMT 10
Dirk, I actually have a little in-joke with myself that perhaps I should stop calling my van a "Newcastle" van and start calling it a "Maitland" van - something that is not exactly Newcastle but is reasonably close to it.   |
|