kiwijim
New Member
 Nuffin like fixin an Old van
Posts: 14 
|
Post by kiwijim on May 10, 2013 15:01:42 GMT 10
Howdy Al, As usual, a No 1 craftsman at work, the vans looking better by the Day. I am just wondering about that Mavis name you are trying to cut out of S/Steel, Would it be better to cut it out of Copper and then have it chrome plated later, just a thought. Cheers kiwijim  |
|
|
|
Post by Geoff & Jude on May 10, 2013 16:40:26 GMT 10
hi al
there's no reason the plasma cut should have a rough edge or arc burn.
one of the great advantages of plasma and laser cutting is that there is almost no need to dress the component after the cut.
have a look at this video - no need for trimming or surface grinding.
not trying to be smart, but maybe the machine isn't quite good enough for the job.
geoff 'n jude
|
|
|
|
Post by hilldweller on May 10, 2013 18:18:31 GMT 10
Boy you're motoring along now! Portholes look great  Like the name too. |
|
|
|
Post by Franklin1 on May 10, 2013 20:12:52 GMT 10
G'day Geoff, Maybe the plasma machine is not in as peak condition as it could be, but according to this information on the internet, cutting stainless is not as straight forward as cutting plain steel as shown in your video link. It seems that the type of gas used is crucial to successful stainless cutting. The cutter over in the Shed is amazing on black steel (as demonstrated by the discs cut for my table bracket) but I'm guessing they don't have the appropriate gas for stainless. I might make some enquiries to find out who else in my region does plasma cutting of stainless, and see what they can do for me. Thanks for your help.  -------------------------------- And thanks to kiwijim and hilldweller for their feedback. cheers, Al. |
|
|
|
Post by Geoff & Jude on May 10, 2013 20:52:44 GMT 10
Hi al
sorry about that, i thought it was a stainless plate but see now i was wrong, it's mild steel.
Geoff 'n Jude
|
|
|
|
Post by Roehm3108 on May 11, 2013 19:47:21 GMT 10
Well Al, I dips me hat to you again! Been looking for days for a spade bit for my soldering iron, as you suggested. They don't sell them separately here, so I ended up buying a cheapie 80 watt iron with a spare spade bit. Plugged her in and hey presto, before you could say "make me a cuppa coffee" I had clean portholes frames.
Really made the job easy!
Now what can you recommend about pitted ali??? ;D ;D ;D
Ray
|
|
|
|
Post by Franklin1 on Jun 7, 2013 22:10:33 GMT 10
Time for another update... The project is in a bit of a shambles at the moment. Lots being done, but nothing being finished. Seems I'm always waiting for another bit to be done before I can complete anything.  I've built a new table... 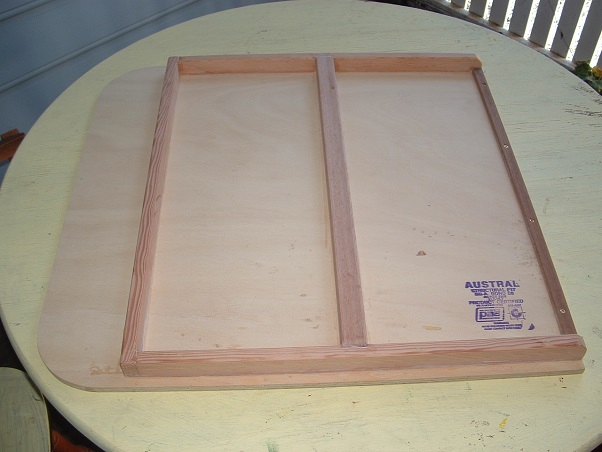 ...and cut the laminex for it... 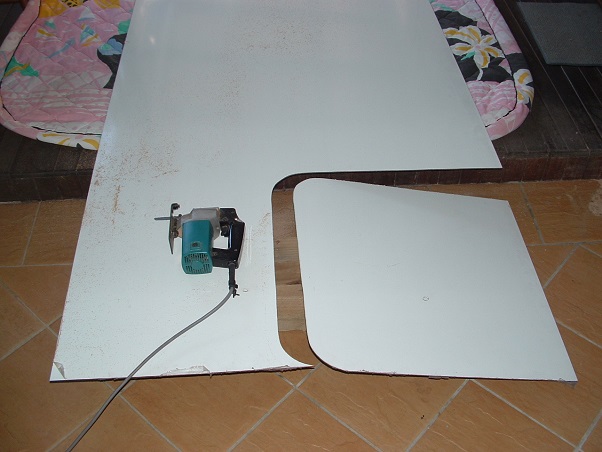 ...but I still have to glue the laminex on. The white side is the back of the sheet. I can't show you the top because it isn't vintage, but it's the least worst of anything I've come across in the last two years. It's a sheet of superceded "Lamipanel" (now known as 'Aquapanel') that I had in the shed. The table being test fitted...  ...and the original leg being test fitted... 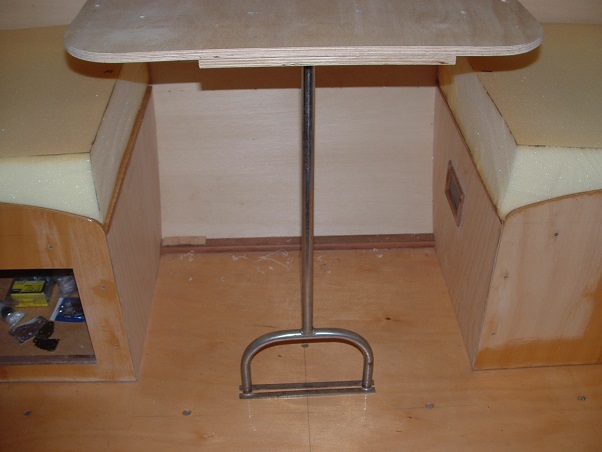 The seat boxes have essentially been made, but I have to fit the bits together to complete them. Some important slot head screws arrived from the UK this week that were needed for the new hinges for the seat tops. I made a start on cutting up a double bed foam mattress for the seat cushions... 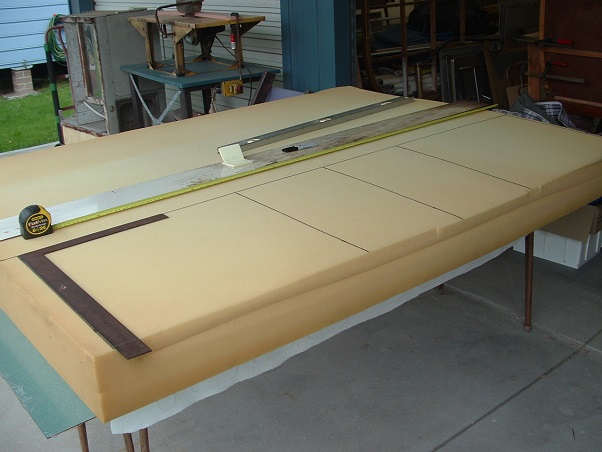 It's no fun when your electric knife carks it after cutting only 2 foot along the first line. At 3pm on a Saturday, there's not a lot of options to allow the job to continue. I had to raid the kitchen drawer for a serrated knife to hack up the rest of the foam blocks. Funnily enough, I'd been in a local Salvo's store a few days before and saw three of the electric knives on the shelf. "Huh, don't need 'em", I says. Well...guess who went back to the Salvo's the following week? Test fitting the hacked foam blocks...  I've got the vinyl and the upholstery, but I have to get around to cranking up my Singer jumbo sewing machine and make the covers. I've mentioned earlier in this thread about the rusty old sink from the van... 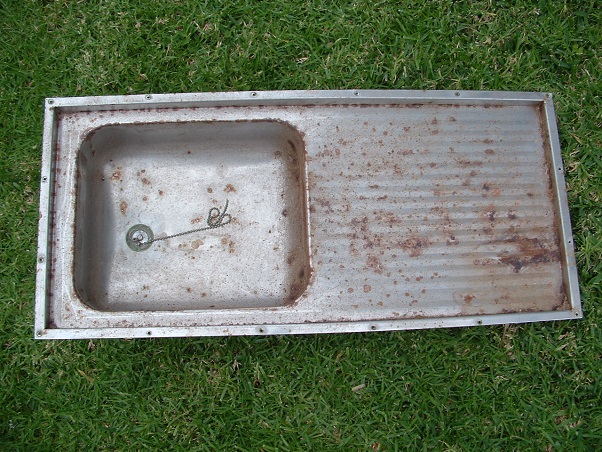 When I had a close look at that sink yesterday, I realised that not only was it really rusty, but it had two cracks in two corners of the bowl. This is one of the corners... 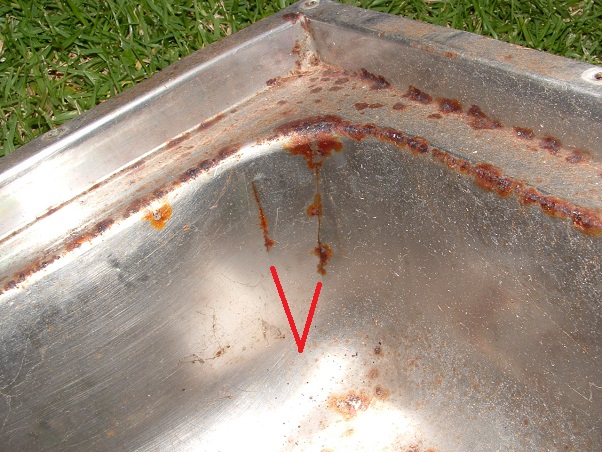 No wonder a lot of the timber in the kitchen cupboards was rotted. I ended up having to demolish the old kitchen cupboards so I could get the ice chest out. Way back at the start of this thread I showed how the ice chest had been converted to a fridge. I'd originally cut the compressor off the drawbar, and now it was time to cut the freezer section out of the ice chest... 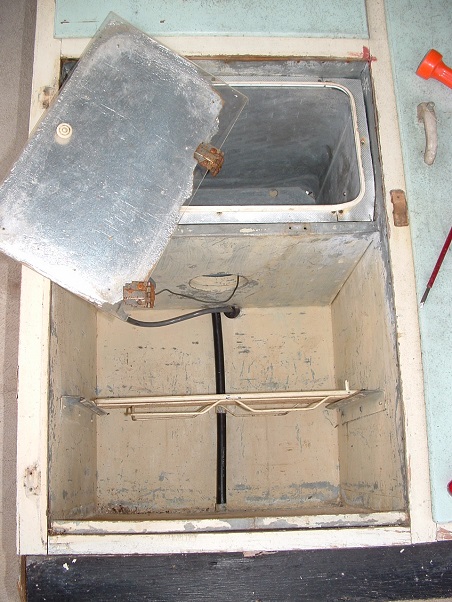 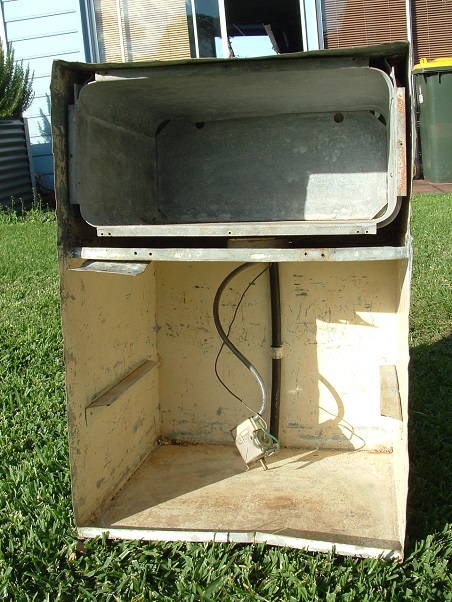 ...which wasn't that easy with all the bolts that had been used to hold it in position, and the fact that they'd all been soldered over as well...  After a bit of time with my gas burner and my angle grinder, I managed to cut all the necessary bits off, and remove the freezer unit... 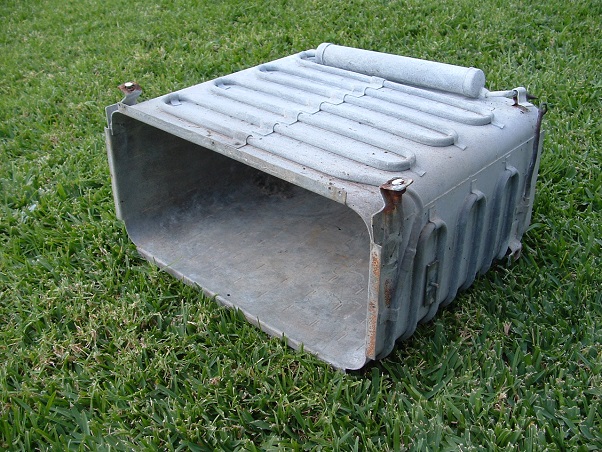 ...which left a heap of holes in the ice chest cabinet (and which now looks more like a piece of Swiss cheese  )...  Not sure what to do with it now. Can't use it as an ice chest the way it is. Will have to think about it for a bit, and decide whether to try and repair this one, or make a replacement ice chest out of the galv sheeting that came off the roof of my Franklin van. Something that might interest the likes of cobber is the large Lysaght stamp on the side of the cabinet... 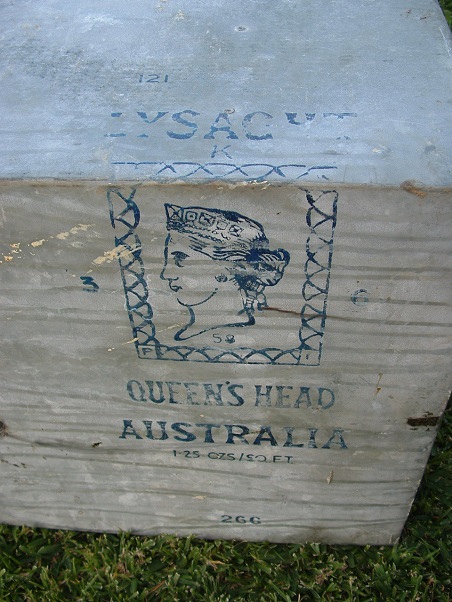 Hopefully a lot of the various jobs will come together over the next couple of weeks. cheers, Al. |
|
|
|
Post by hilldweller on Jun 8, 2013 9:20:28 GMT 10
Looking good That table leg is awesome. It's funny how sometimes it's impossible to get anything finished, and then suddenly it all comes together at once. Keep going.... |
|
|
|
Post by cobber on Jun 8, 2013 9:28:03 GMT 10
C'mon Al..... everybody would be excited if they found a beaut piece of 26 gauge Lysaght Works Pty Ltd galvanised iron made at Port Kembla on the 3rd of June 1958 in their caravan........ wouldn't they ?  That sheet is a pretty good example, do you mind if I put the photo in the appropriate thread ?And tell me Al........ are you intending to install an ICE CHEST in this monster project you are doing ?............ can't imagine why not Cobber. |
|
|
|
Post by Surf Tragic on Jun 8, 2013 13:28:13 GMT 10
Can't use it as an ice chest the way it is. Will have to think about it for a bit, and decide whether to try and repair this one, cheers,Al. Hi Al, would you consider patching & some good old fashioned soldering to fill the holes ? I am sure you could make a good job of it. The rest of the project is coming along well. One thing I have noticed with the tables on the Dons I have, is that there is a huge dish in them, because they only have laminate on the one side. Nowadays all laminated boards have the same laminate each side so tension is the same, stops warping. I have to take the old laminate off mine & start again Cheers...ST |
|
|
|
Post by seeshell on Jun 8, 2013 17:16:19 GMT 10
Hi Al Another thing you can use to patch the holes might be this stuff called Quick Steel - I've used it to patch engine parts, and do other repairs. It is water tight. You just knead it together then you can sand or work it - pretty easy, and sets up hard as the hobs of... www.dual-star.com/index2/Service/quiksteel_epoxy_putty.htmCheers Seehell |
|
|
|
Post by Franklin1 on Jun 8, 2013 20:02:02 GMT 10
Thankyou for the comments and hints hilldweller, it does seem like you're just treading water at times, ay! cobber, thanks for decoding the manufacturing details on the Lysaght brand mark. I never thought of checking with your Techo info, so I've given myself a good uppercut.  The date gives me more confidence that the van is from around 1960. You would think any galv would be used up within a year or so of it being made, eh? (Unless that cheapskate Walshy bought it at an auction a number of years later [cheapskate = refer sink]) I didn't find any other date markings anywhere in the kitchen cupboards, so the ice chest is really the only thing to verify the approximate age of the van. Needless to say, now that I know the significance of the ice chest, the decision on what to do with it is a no-brainer. Leave it to me to post the photos in the other galv thread. I'll take a better photo of the date marks so they are easier to see (although I congratulate you on your abilitiy to pick them up from the photo I posted). ST, I remember you saying in the past about laminating both surfaces of the table. The original table in the project van was only covered on the top surface and seems to have stood up to time fairly well, with only a slight bow. By coincidence, the flip-up lid over the cooking area is laminated on both surfaces and is still as flat as a tack, but unfortunately the ply layers between are shot to bits from water ingress. For the replacement table I made, the framework underneath is 30mm thick, so I'm hoping that is enough to prevent any significant bowing. I do take your point though, and if I was making a table out of just the sheet ply, I would follow your advice and laminate both surfaces. seeshell, thanks for the info on the Quick Steel stuff. Sounds pretty impressive! Will keep it in mind when the time comes to actually do something about fixing this ice chest.  I meant to clarify in my previous post above why I'm using new laminex. It's all because of that crappy old sink not being usable. It means I have to use another vintage sink of a different size and shape, which means a slightly larger kitchen cupboard is needed, and the old laminex can't be reused. The original table and the larger splashback sheet have been salvaged and are going to another forum member who needs a good clip under the ear (and that's a cryptic clue, not a nasty comment ). We "think" it goes close to matching what's in his van at the moment, and he wants to make a table to match the existing laminex. cheers, Al. |
|
|
|
Post by Franklin1 on Jun 27, 2013 10:45:31 GMT 10
G'day again, I've been toying with the ice chest lately, trying to come up with a way of making an ice tray for the top of the chest. I went over to the local "Shed", looking for some mini-orb/ripple iron, and some galvanised C-channel. Blow me down if I didn't almost trip over a small pile of C-channel offcuts when I walked in the gate...  Usually two of these channels interlock together to make part of the frame for a steel-framed house... 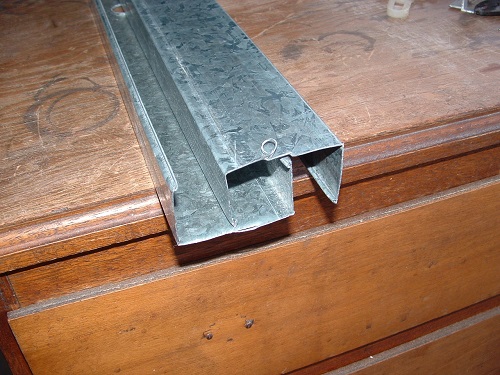 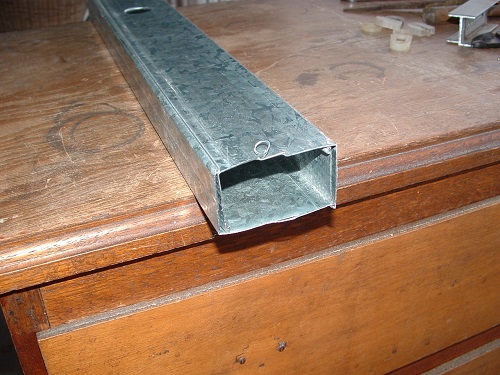 With a bit of cutting and rearranging, I (very amateurishly) soldered two pieces together to make the end stands... 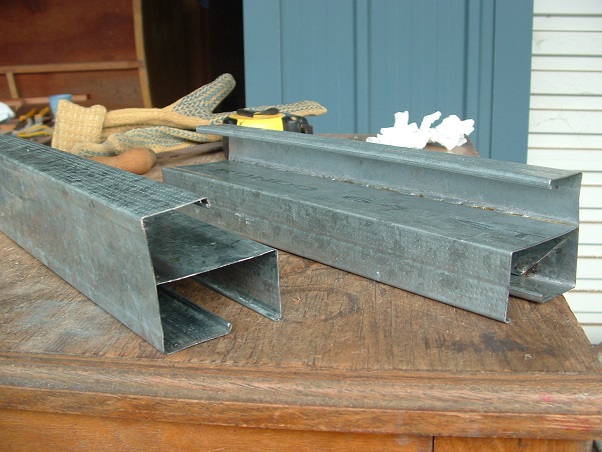 I didn't find any ripple iron, but I did notice some old aluminium roof sheeting that had some potential, so I cut a couple of metres of that and took it home with me. This is the roofing... 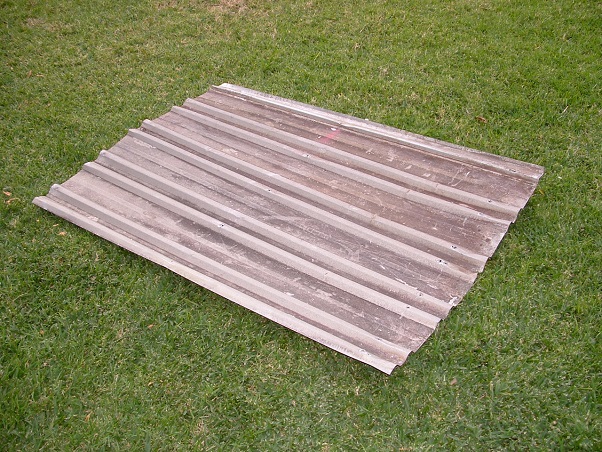 ...but when it's cleaned up and looked at more closely, it has a surface appearance that some people might recognise... 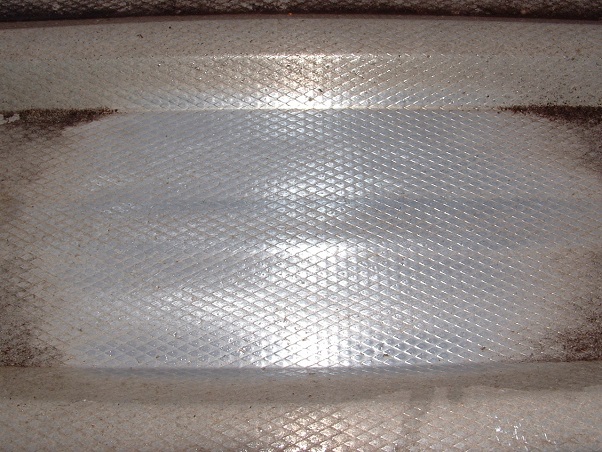 It wouldn't surprise me to know this roofing is actually from the 1960s. Next step was to cut a panel out of the sheet, plus one extra rib... 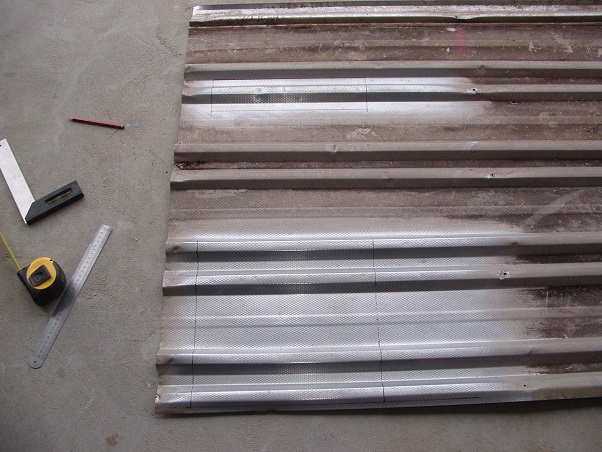 ...and the extra rib sits on the flat section on the large panel... 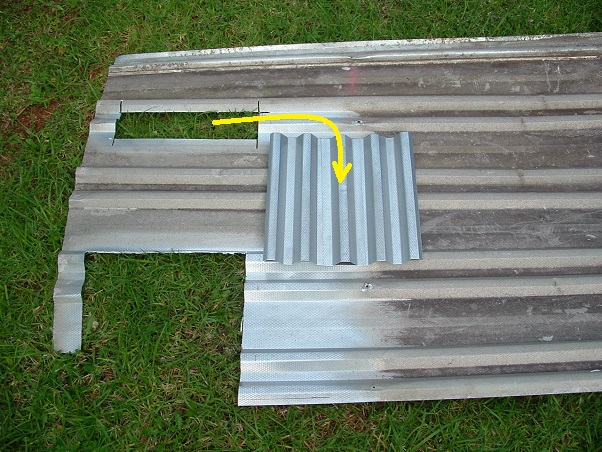 A pop rivet in every roofing valley tied it all together...  And there you have it...one genuine fake vintage ice chest tray... 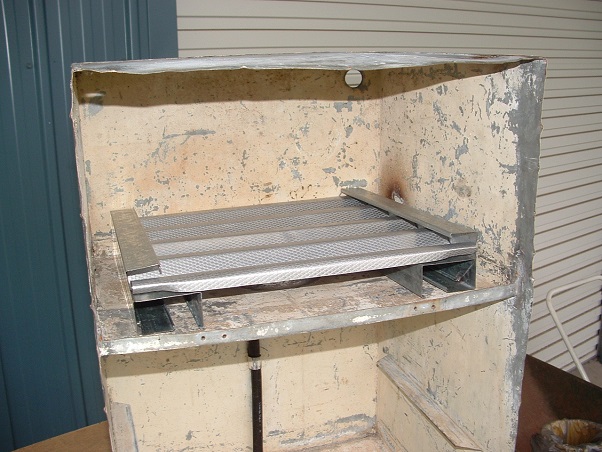  I had also recently found a large-ish aluminium catering tray/dish at another local recycling centre...  ...which by coincidence fits neatly into the ice chest tray section (talk about a lucky find!  )...  I figure if I can freeze water in that tray, it will make a block of ice that's just the right size for the ice chest. Now to get the actual chest sorted out. cheers, Al. |
|
Deleted
Deleted Member
Posts: 0
|
Post by Deleted on Jun 27, 2013 18:58:50 GMT 10
Hi F1 That looks cool.. pardon the pun. Just don't forget to punch a hole in the bottom of the big ice tray to let the water out as the it melts. Otherwise you will have water sloshing around all over the place and defeat the purpose of chilling things down with the cold air... If ya freeze the meat before you stick it up in the top of the ice box the meat will help keep the ice cold /frozen for longer... and... vice versa. Cheers Reddo |
|
|
|
Post by Franklin1 on Jun 27, 2013 20:19:45 GMT 10
Thanks for the tips, reddo I did wonder about whether it needed holes for the water to drain away, but I couldn't see any in the professional one Belinda had made for her van, so I figured the water must just flow to the end of the channels and seep down the stands to the floor tray. I'll put a couple of holes in each valley to allow the water to escape and the cold air to circulate better. Funnily enough, I was exploring the option of using an aluminium pizza tray before the roofing came on the scene. Plenty of holes to let the water and cold air through...  Working out how to make the stands for it was throwing me for a bit of a loop, though. cheers, Al. |
|
|
|
Post by sportsman 1 on Jun 27, 2013 21:51:23 GMT 10
A clue from me if I may. Go down to the local pub, and after you have had a few coldies and got in good with the barmaid ask her if you can have an empty cask bladder. The ones they have the house wine in are usually around 15 to 20 litres capacity. If you clean it out and fill to suit the ice tray size/capacity you can put the tray and filled bladder into the freezer and freeze it solid. It will then go into the ice chest ok, takes ages to thaw and best of all it doesnt all go down the drain hole when it thaws, it just sits there waiting for another freeze. From the bloke who needs his ear clipped? |
|
|
|
Post by Franklin1 on Jun 27, 2013 22:08:06 GMT 10
G'day Leigh, Yeah, it was a pretty woeful attempt at a cryptic clue, but clip...ear = Clipper, so it must be you. Thanks for the tip on the wine cask bladder. Will have to make friends with the local bar staff. The other tip from smiles elsewhere on the forum about using the empty 10 litre spring water containers was helpful too. All of the tips seem to be great ideas. cheers, Al. |
|
|
|
Post by Franklin1 on Jul 11, 2013 14:42:07 GMT 10
Ok, I've been a bit slack with updating this project, so here's heaps of photos... Table leg brackets...The first attempt at making copies of the brackets was a disaster. As we suspected, the wall thickness of the tubing was too thin, and the arc just blew through the wall... 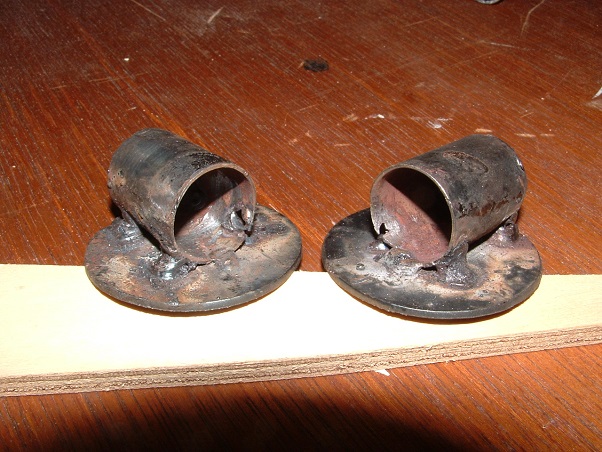 Back to the plasma cutter I went, and got the fella to cut me two sets of discs this time. The "Shed" business is up for sale so the current owners can retire, and the plasma cutter is being packed up and taken with them. I thought it would be 'smart' to get a couple of sets of discs cut before it was packed up. I also had to go hunting for some thicker wall tubing, and found it on the leg of an old aged-care chair (...and if the little old lady from the retirement village is reading this, you can still use your chair as a 3-legged stool, dearie...you just have to sort of lean to one side a bit more ). For our second attempt at making bracket copies, we decided that brazing the parts together might be a safer option, so we went with that... 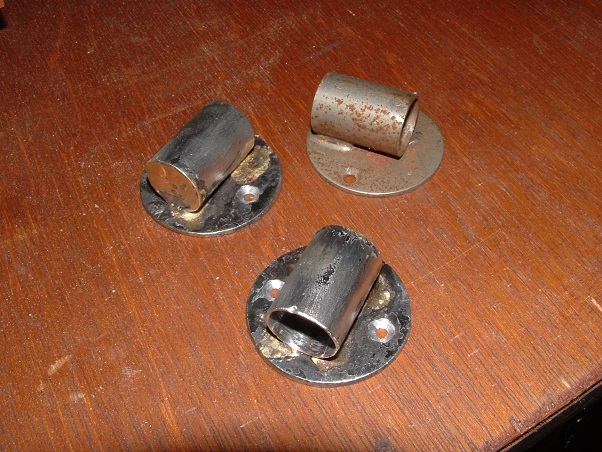 I was pretty happy with that effort, and after a couple of coats of silver paint, they now look like this (with the original bracket in the background)...  Wiring... Wiring...Wiring has commenced, and here's a bit of nostalgia for ya...genuine old-style brass cable clips...   Too bad you'll never see them in the finished van. The only way I could think of getting wiring from the roof down to the floor was via the side of the front window frame... 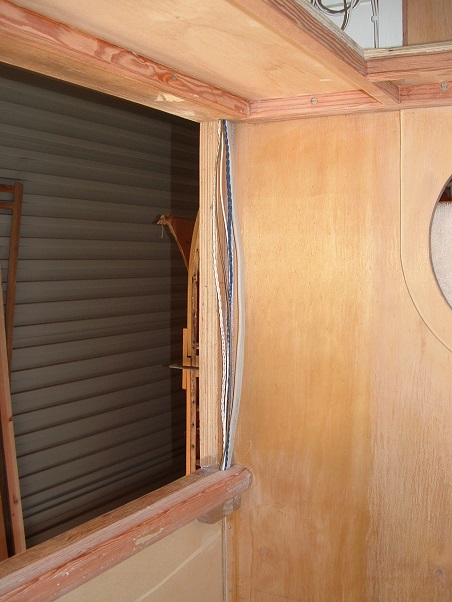 That wiring will be boxed in once the window frame is completed. The wiring for the clearance lights up in the top cupboard has been completed, and extra lengths of wire were installed to allow the connectors to be pulled across to the cupboard door opening for any maintenance...  I'm trying to design the 12V wiring so it is fairly easily accessible for any future repairs or maintenance. Edge cover mouldings...I'm making my own cover mouldings out of 25mm-wide strips of ply, with a routered edge on one side... 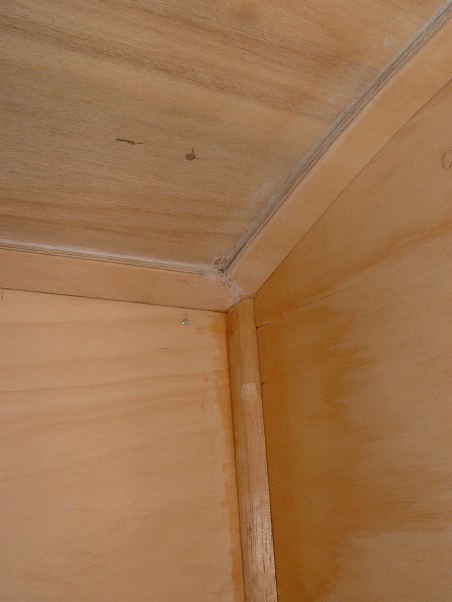 Sometimes I have to remember my high school geometry to get the moulding to go round the framework... 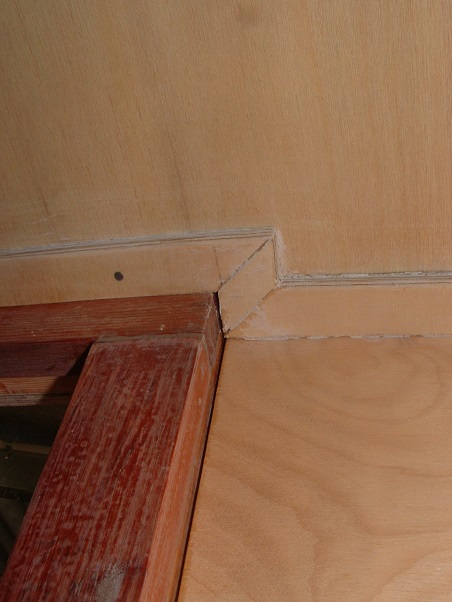 Back with more of the update shortly... |
|
|
|
Post by Franklin1 on Jul 11, 2013 15:39:01 GMT 10
To continue... Wardrobe...The second ceiling sheet of ply was fitted and the hatch opening cut... 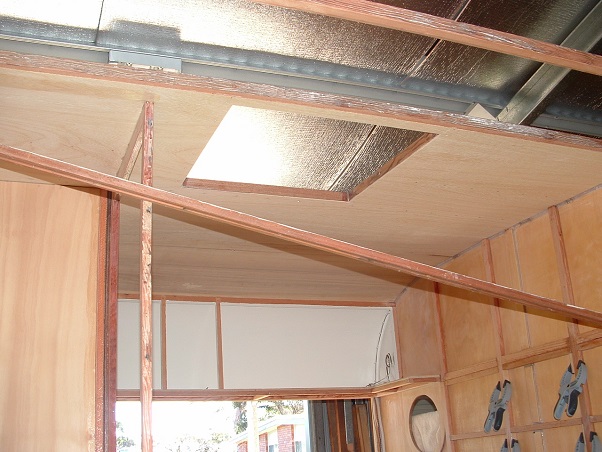 This allowed building of the new wardrobe to commence. You can see in this photo how the new wardrobe is narrower in width than the original wardrobe front... 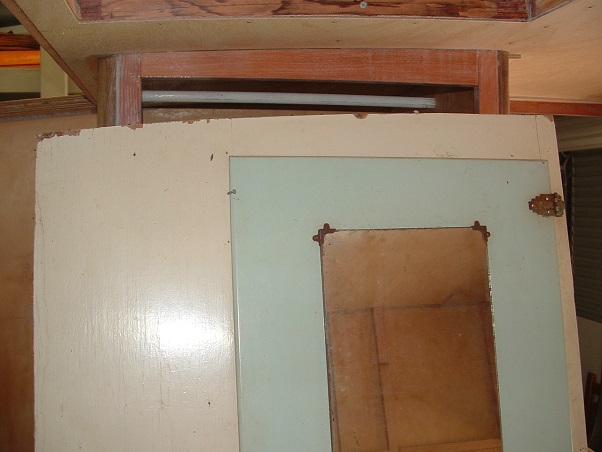 I'll explain shortly why I did it this way. Framing of the wardrobe commenced... 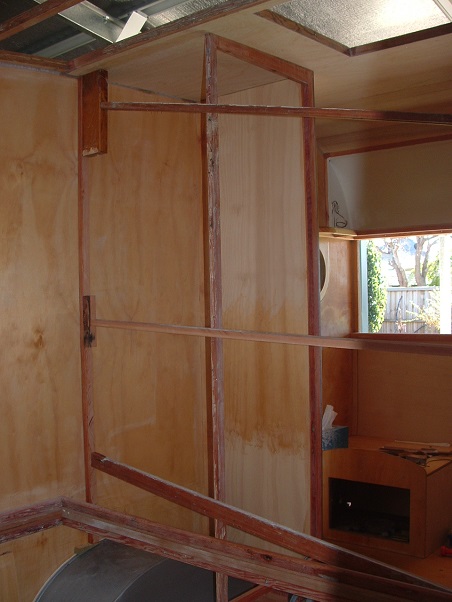 Four drawers were salvaged from a built-in wardrobe from my son's 1960-built house, so they are age-correct for the van...  I had to cut the drawers shorter in length, and rebuild the rear ends of them... 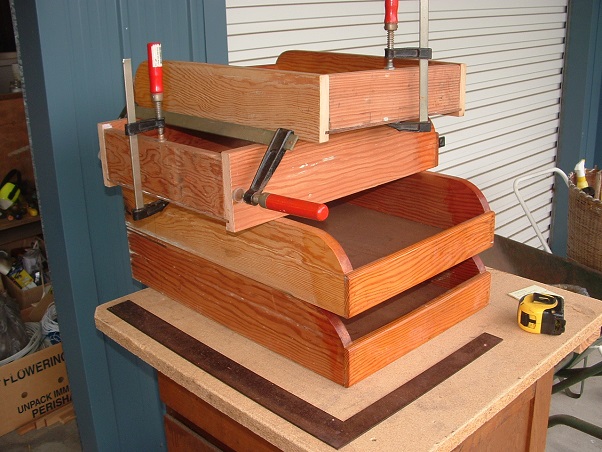 The drawers were fitted into framework built in the wardrobe... 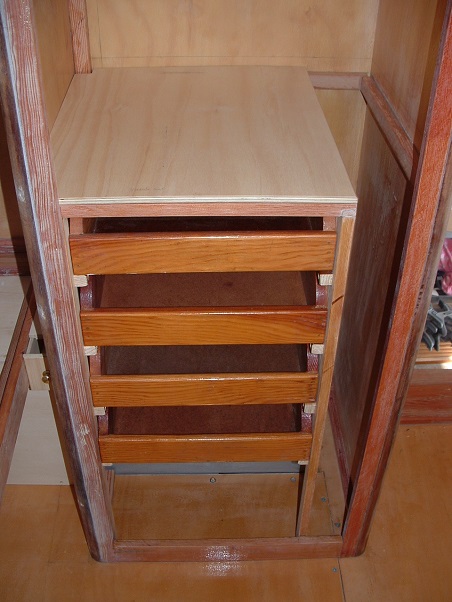 The top half is hanging space, with a few inches of long-drop hanging space on the right hand side (eg. for dressing gowns)... 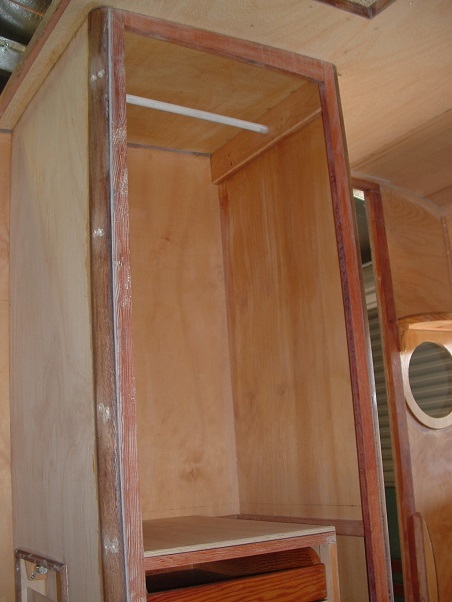 Now to explain the narrower width... In our recent poptop experience, trying to make a transverse bed was a pain in the butt when getting sheets to go into the two back corners. Kneeling on the mattress while reefing the corners of the mattress up with one hand, and tucking sheets over the mattress with the other hand, was too much fun and games for our liking. Thinking there had to be a better way, I decided to have a small gap between the bed and the wardrobe for two reasons: one, it allows the mattress to be pulled forward a few inches to make a gap in the two back corners, and two, it lessens the claustrophobic feeling of sleeping with your nose pressed against the wall of the wardrobe. That small gap will also now function as a night-time shelf for glasses/jewellery/etc... 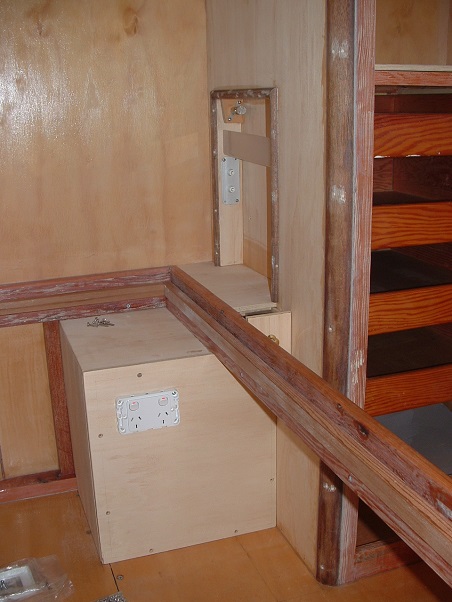 (You'll also note in the photo above the boxed-in mudguard cover, complete with hidden double-pole power point, but I'll avoid talking about that. ). There was also a small amount of space in the wardrobe that was being wasted beside the drawers frame, so I cut an alcove into the side of the wardrobe and installed a bedlamp... 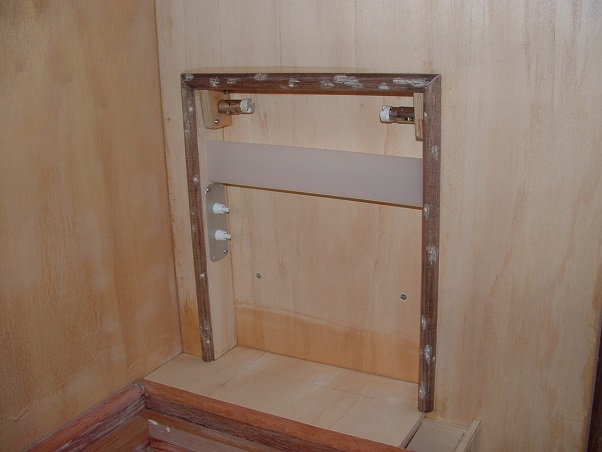 The bedlamp has two light fittings, one for a reading lamp, and one for a nightlight, and they are operated by the two push-button switches fitted below them. The acrylic light cover was cut from a fluorescent light cover that I found at the 'Shed'... 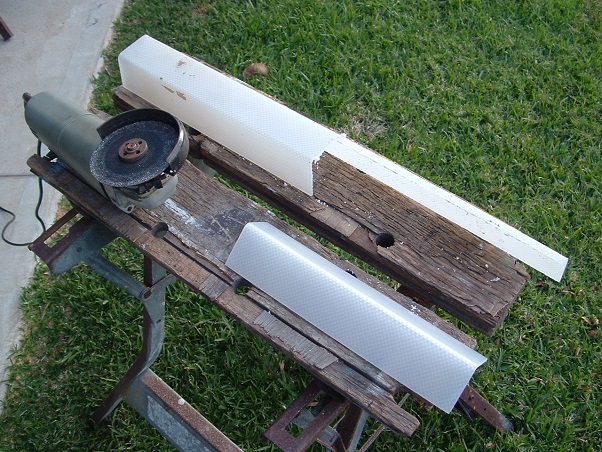 When the acrylic cover is fitted into position, it all looks like this... 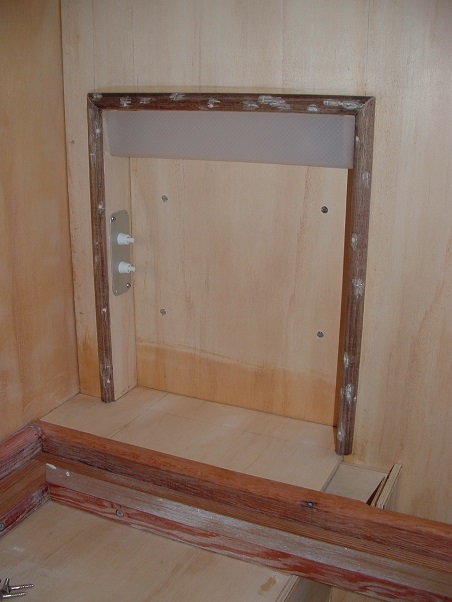 There was a gap under the night-time shelf, so I made a little trinket box that slides into that gap... 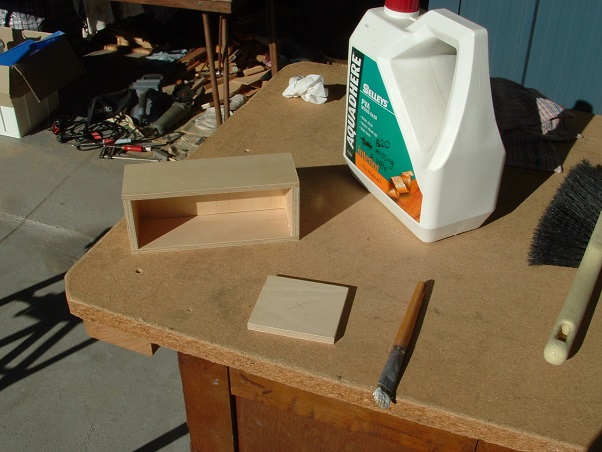 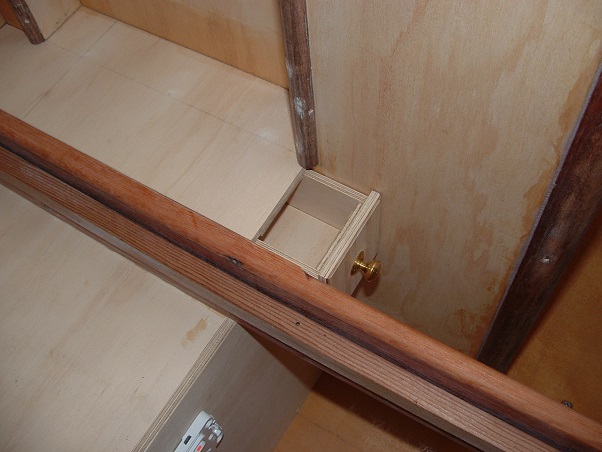 And that's just about the wardrobe section completed. I still have to make the new door for it though, so there's a job for another day. Kitchen...I'm still working on the design of the new kitchen, based on the larger replacement sink I now have to use. I haven't quite got the detail sorted out yet, so that's a work-in-progress. All I've done so far is glued some framework to the walls in readiness for the cupboards...  What's next?... What's next?...Yesterday I fitted the fourth sheet of internal ply to the rear, and cut the window opening out this morning...  I can now start to put the framework on the sides and rear for the windows and the rear overhead cupboards. (The third ceiling sheet hasn't been fitted yet because it allows the lighting in the shed to get into the van, otherwise I can't see what I'm doing easily.) Till next time, cheers, Al. |
|
|
|
Post by Don Ricardo on Jul 14, 2013 0:21:42 GMT 10
Hi Franklin1, Another great set of photos. Thanks for posting them. Wonderful craftsmanship is going into the van (as we've come to expect), and some of the ideas you're incorporating as you go are fantastic - the long hanging space for your dressing gowns (or perhaps your better half's ball gowns?), the bedlamp, the trinket drawer...and the solution to many a caravanners nightmare - making the bed without having to do contortions! There's so much built into that van of yours that it reminds me of Colonel Pewter's Holdall bag. You may remember the Colonel Pewter comic strip from years ago? Colonel Pewter had a travel bag in which all sorts of large objects could be carried - flying bicycles, etc - well beyond the apparent capacity of a travel bag. Your van is going in the same direction - it will hold much more than a self-respecting 10 ft 8 in caravan normally should! I love your work! Don Ricardo |
|
|
|
Post by cruisindoug on Jul 15, 2013 7:27:42 GMT 10
Good to see you back into it Al, and loving the ideas and quality of your work, will be a great van when done.
|
|
|
|
Post by shesgotthelook on Jul 15, 2013 9:08:21 GMT 10
I have refrained from commenting so far for fear of repeating myself, but.... I am just blown away by your work. Every time there's a new post, you have done something incredible. Feel like coming & living with us for a while? Plenty of jobs |
|
|
|
Post by Franklin1 on Jul 15, 2013 18:06:41 GMT 10
Thanks folks for your supportive comments. ;D This project has sure been a major mental effort todate. It's one thing to have a picture in my mind of how I want it to look, but it's quite a different story translating that picture into pencilmarks on plywood. Not a day goes by without me having an "Oops!" moment where I stuff something up. Fortunately I've been able to remedy all those senior moments so far, and fix the errors up to make them look presentable. Hopefully people are being suitably entertained reading about the project as it unfolds. cheers, Al. |
|
|
|
Post by Franklin1 on Jul 25, 2013 19:41:58 GMT 10
Wardrobe door: The new door has been made. It is a couple of inches wider than the original door, so it made sense to build it via the "drum-built" method (ie. inner and outer skins with a frame between them). This method will stop a door this size from warping or bowing out of shape. First step was to router a shallow rebate around the perimeter of the backside of the face ply...  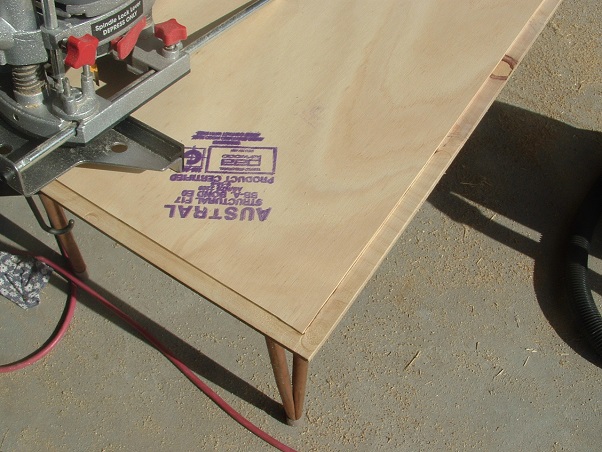 Then a layer of thin timber framing was glued to the back, including extra bits for all the hinges and other bits of hardware... 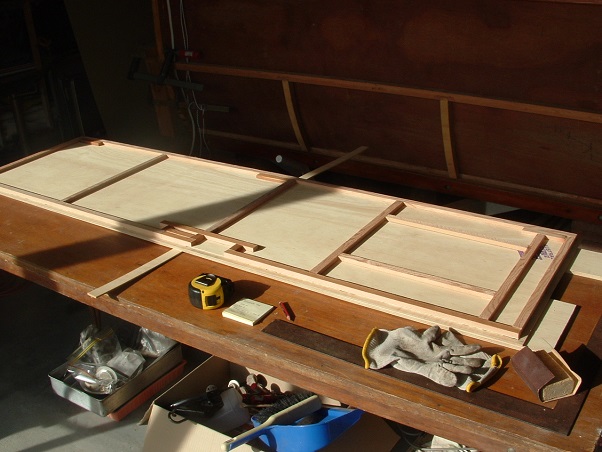 And then a 3mm skin was glued on top of that framing, and everything trimmed up... 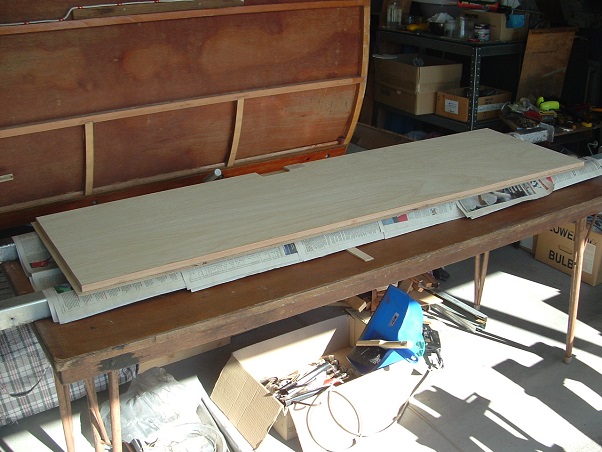 The door when fitted with all the original hardware now looks like this...  When I took the mirror off the original door, it showed the original paint colour, which is green and not blue as I had previously thought (green must fade to blue after 50 years)... 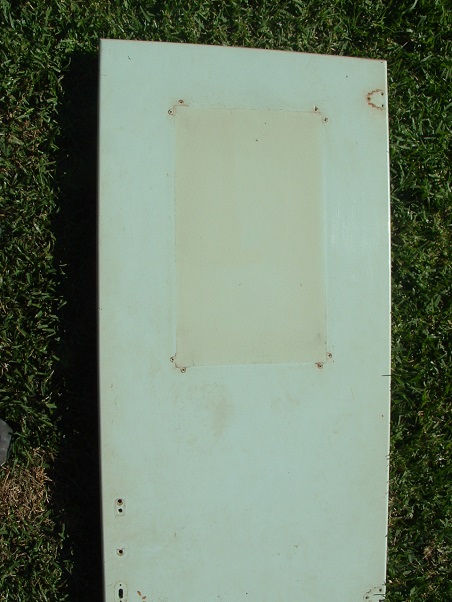 There was a plywood backing sheet behind the mirror, which I thought might have had some information about the history of the van scribbled on it...  ...but sadly there was nothing...on either side...  I intend to remedy that wasted opportunity and write what I know about the history of the van, plus what I've done to it, on that plywood backing. All the cupboard handles in the van are held in place with a threaded bolt and two different size nuts on the ends (...just to make life difficult )... 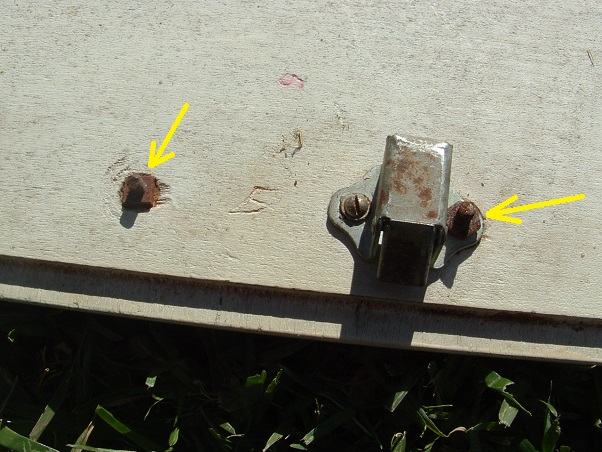 After a bit of experimenting, and some careful measuring and cutting, I was able to replace these threaded bolts with the slot-head cabinet screws that a forum member sent me (...and thanks again to that member ). The cabinet screws have the same thread size... 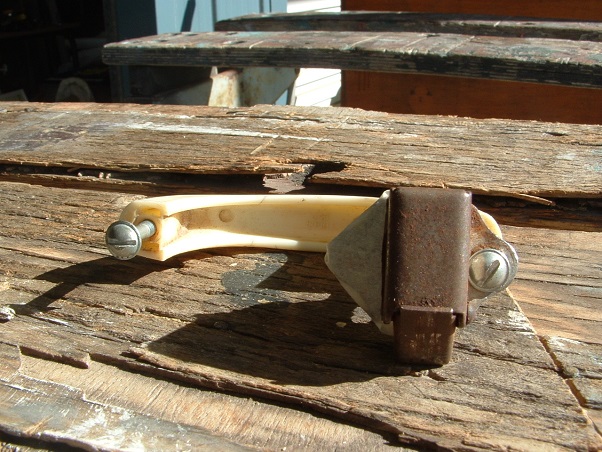 And that's a load of waffle about one bloody wardrobe door, ay?!! cheers, Al.
|
|
|
|
Post by Franklin1 on Jul 31, 2013 11:42:27 GMT 10
Clipsal power inlet socket: Do you have one of these Clipsal power sockets on your van?...  Have you ever had yours checked to see if it's: (a) in good condition (b) working correctly, and (c) electrically safe? I had a good look at mine yesterday, and noticed a couple of things that troubled me. This is the back of mine... 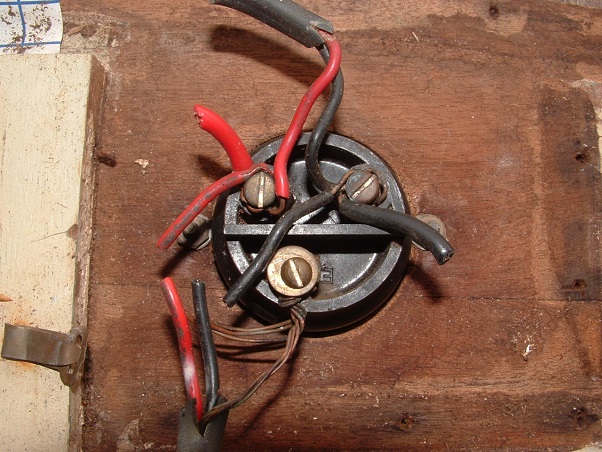 When I looked carefully at the design of these things, I came to the conclusion that the terminal screws are really only long enough to secure one wire at each terminal, and not three wires like those connected at the terminals on mine. I think these would work far better if one 3-core wiring was connected to the socket, and then that wiring goes to a junction box to separate out into the power and light circuits. I also noticed on mine that somebody had changed the Earth terminal screw so that thicker earth wiring could be secured... 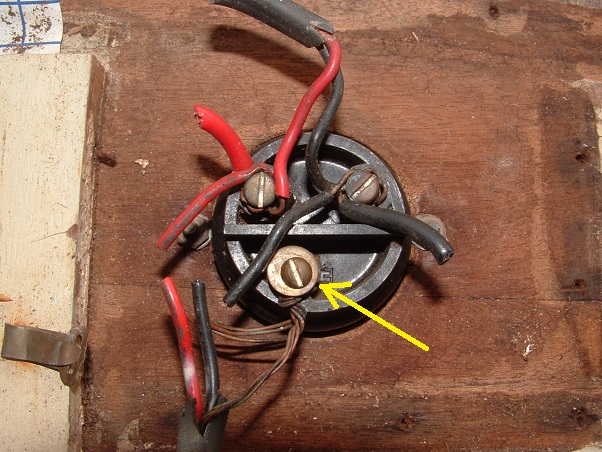 The problem with doing this was that the wiring actually now sat on top of the bakelite fitting, and not down in the recess against the terminal pin. In fact, the earth wire didn't actually touch the pin, so the van was not earthed through this socket. I removed the terminal screws, and pushed the terminal pins out of the socket (they are pushed out easily from the front of the socket)...  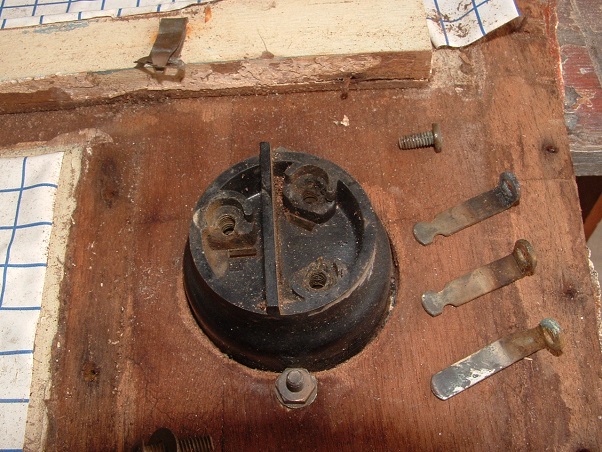 It was then that I noticed the bakelite around the Active (positive) terminal had been "cooked" at some stage, most likely due to a loose connection causing arcing... 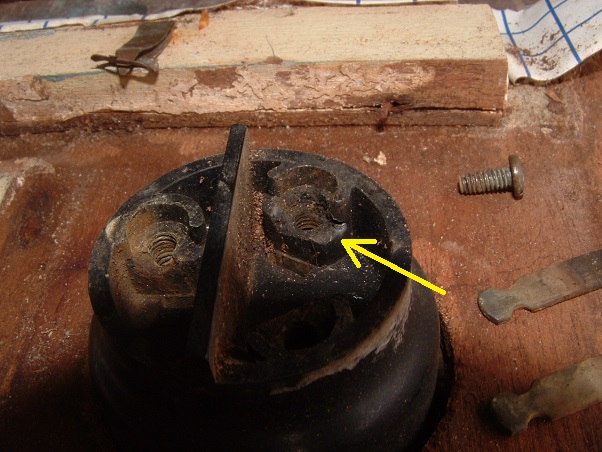 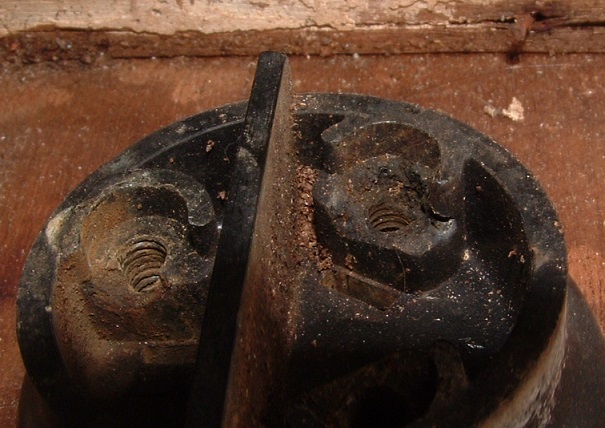 You can see in these photos how corroded the terminal pins are, particularly the Earth pin on the right, which shows no real evidence of any contact with the copper wiring... 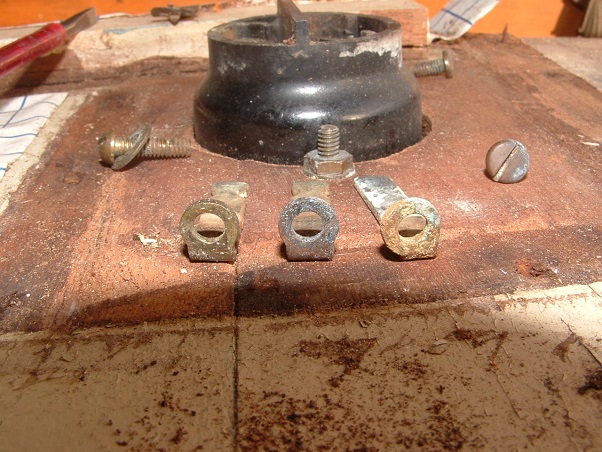 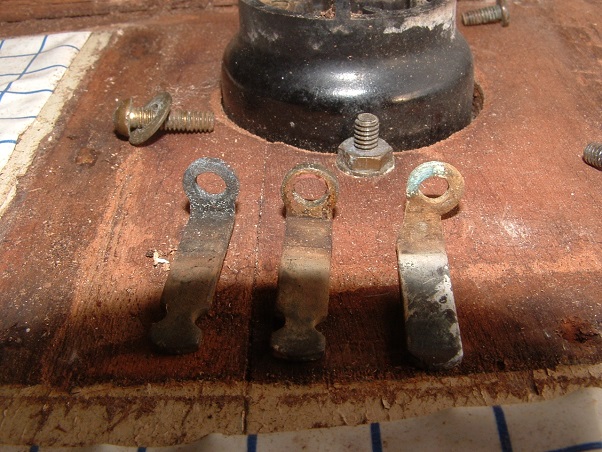 I've decided I won't be re-using this power socket, and will consign it to the "show and tell" memorabilia basket. It would make me too nervous having this on a van. cheers, Al.
|
|


 Like the name too.


 )...
)...


 )...
)...


