|
|
Post by Franklin1 on Aug 2, 2013 17:40:08 GMT 10
Rear side windows: I completed these windows today, after a few weeks of painstaking woodwork. Lots of timber props used to hold bits of timber in position while the glue cured...  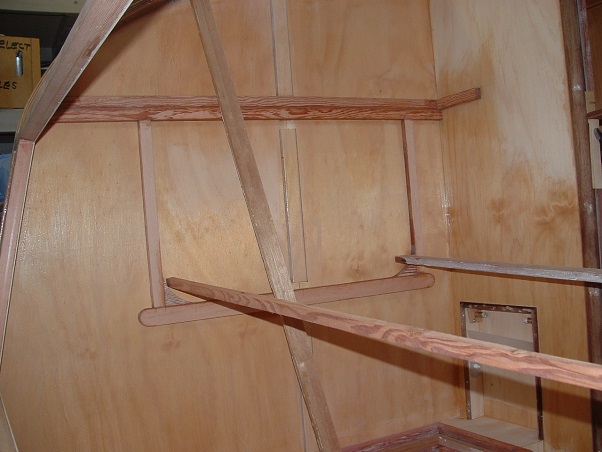  This morning I got the router going, and cut the window openings out...  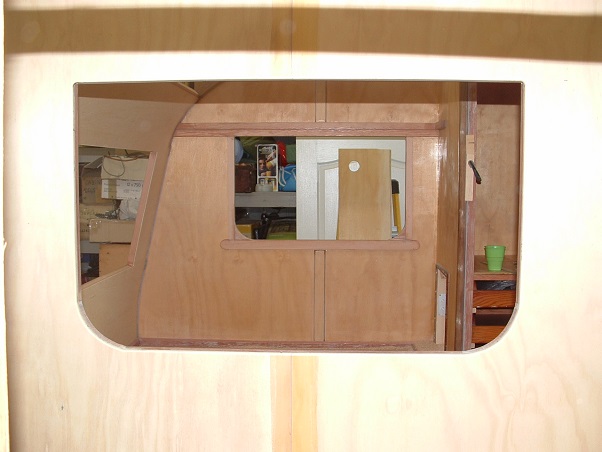 ...and then test fitted the windows... 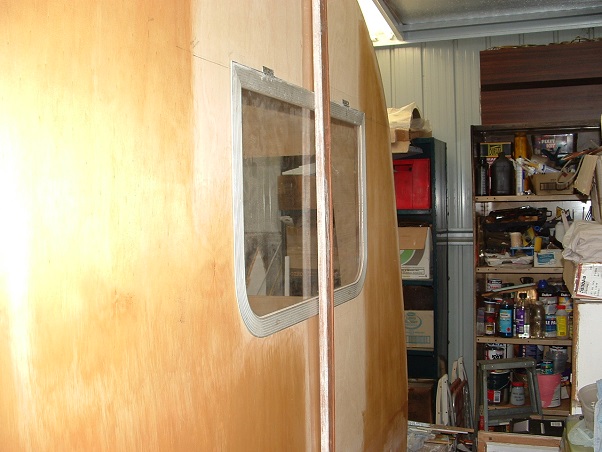 I almost had a major "Eek!" moment during the router job. I had to pause the router movement for a short period of time on both sides so the cutout didn't fall out and damage something. During the pause, the whizzing cutter scorched the surrounding ply. After cutting both windows out, I was going to go and have a well-earned cuppa, but decided to check the inside of the van first. Lucky I did, because there was a pile of smouldering sawdust inside the van under the first window I cut, started by the scorched plywood. I could have easily gone straight off the job and had the cuppa, only to wonder half an hour later what that burning timber smell was.  Luckily the damage was confined to a small burn mark on the wheel arch ply covering... 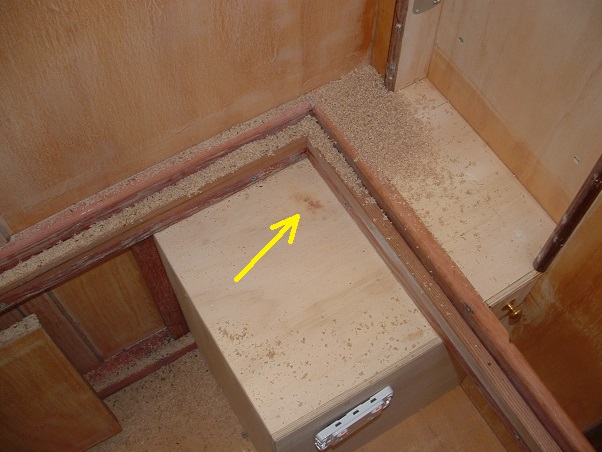 Whew!!  cheers, Al.
|
|
|
|
Post by Gypsy 10 on Aug 3, 2013 0:41:58 GMT 10
Franklin1. if you want another power inlet socket in better condition (2nd hand) I found a small bucket load of them at the caravan wreckers in Redhead NSW.
|
|
|
|
Post by Franklin1 on Aug 3, 2013 7:52:59 GMT 10
Thanks for the tip, Gypsy 10  , but it's probably just a tad too far for me to drive to get one. I've decided to use one of the (horror!) modern inlet sockets, and I'm in the process of working out how to disguise it on the van and at the same time making it easily accessible. Have almost got the 'plan' worked out.  cheers, Al. |
|
|
|
Post by hilldweller on Aug 3, 2013 11:21:24 GMT 10
Wow those windows look great. Bet they smell good too with all that fresh timber (other than the burning of course!) Will be interested to see how you disguise the modern power inlet.
|
|
|
|
Post by Franklin1 on Aug 14, 2013 9:47:59 GMT 10
Rear overhead cupboard...You can see in these photos of the original van that there were overhead cupboards down the kitchen side, but nothing across the back. There was a small overhead shelf along the door side... 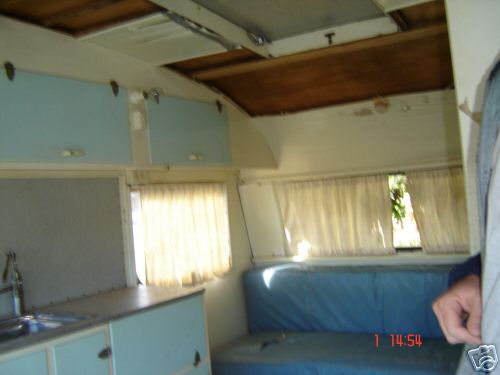 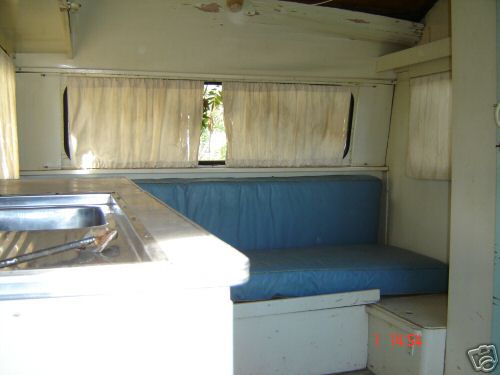 Well, times have changed...and so has the design in the rear of the van... The final ceiling sheet of plywood was fitted... 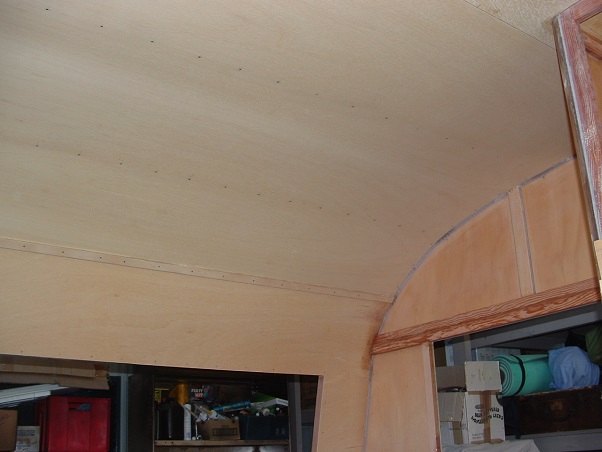 Some framework started across the back... 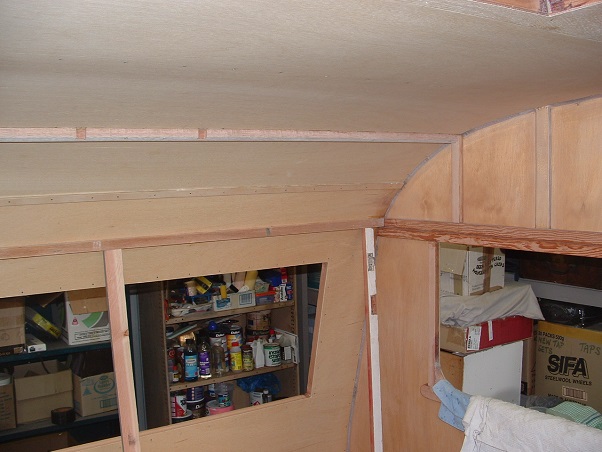 And then a bit more framework...  And then some paint... 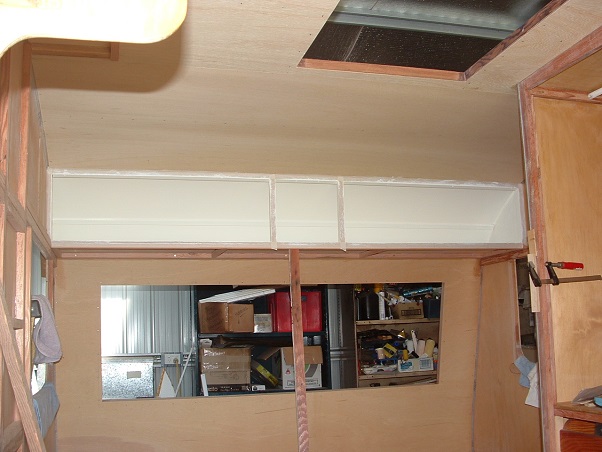 And lastly, a front cover...  You'll be pleased to know that I put that little side shelf in, just like it was originally ... 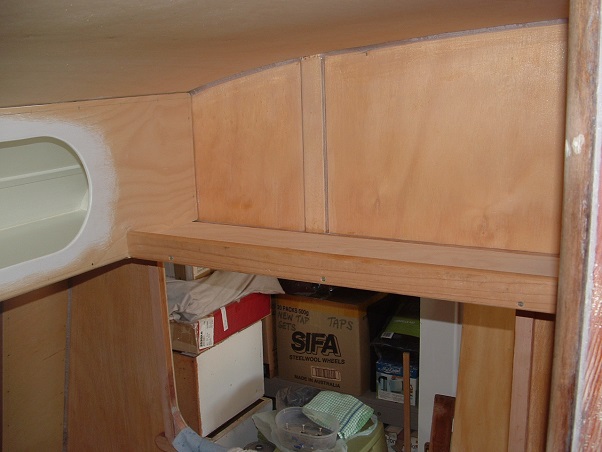 cheers, Al.
|
|
|
|
Post by humpyboy on Aug 14, 2013 12:49:15 GMT 10
That cupboard under the shelf must be HUGE look at all the stuff you've packed in there. ;D
|
|
|
|
Post by Franklin1 on Aug 14, 2013 16:57:35 GMT 10
Ha ha ha, humpyboy  ...that's actually the self-serving window into the warehouse stocks. Just reach in and get anything you need... |
|
|
|
Post by Franklin1 on Aug 31, 2013 18:55:56 GMT 10
Table lamp:I spent a few hours drilling, cutting, filing, and rivetting...and converted a rusty ol' redundant Primus gas lamp into a 12V table lamp to use with the van... 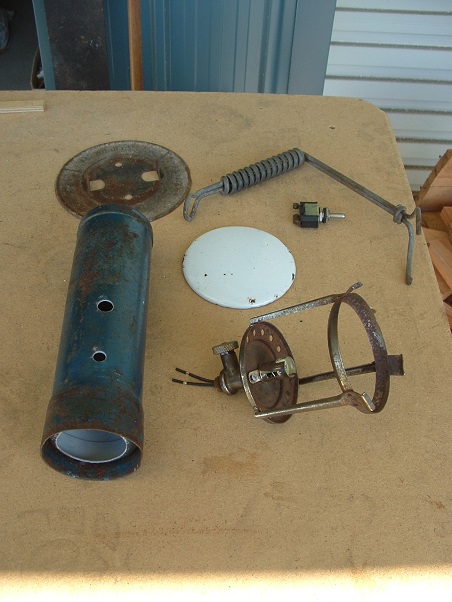 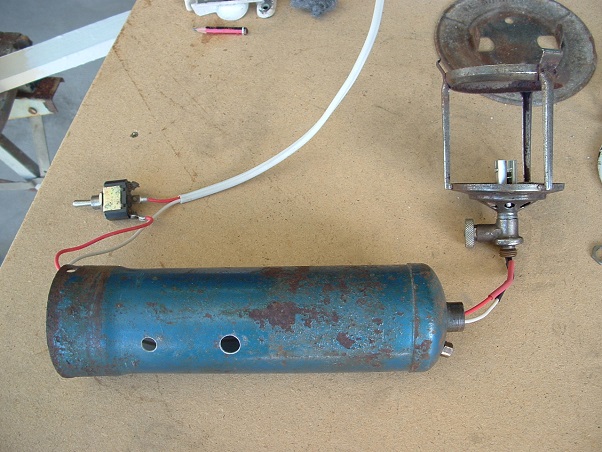 The moment of truth... 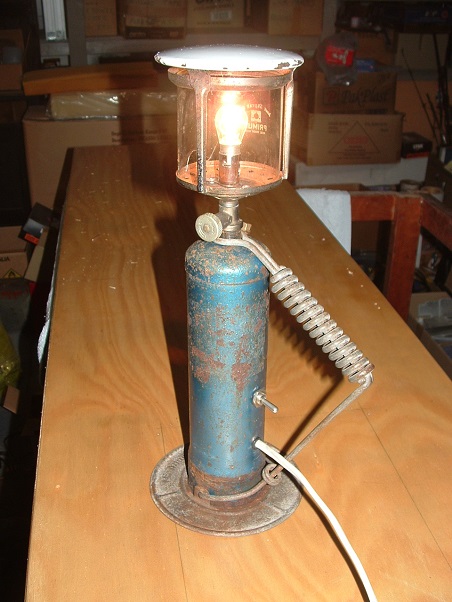 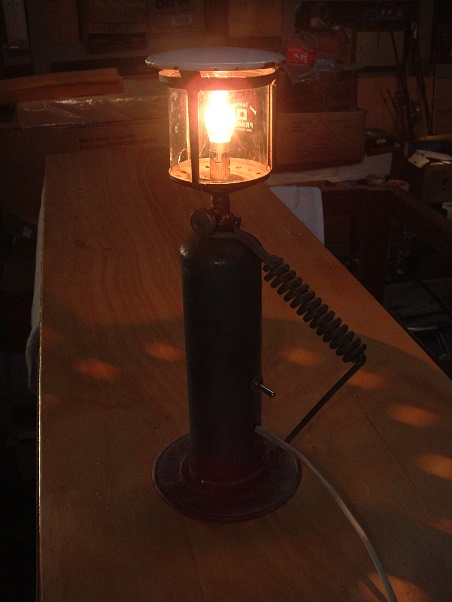 It's even got a dimmer switch...  Ok, ok...I'm pullin' yer leg about the dimmer switch... Ahhh, the things you do while you're waiting for glue to cure... cheers, Al.
|
|
|
|
Post by Franklin1 on Aug 31, 2013 21:32:59 GMT 10
12 Volt socket outlet for the annexe lamps:I did a test run to see if my idea on how to conceal the new Clipsal power inlet socket was a possibility or not. Rather than do the power inlet first, I experimented with the annexe side of the van, and had a go at concealing a 12V lighter socket on that side. First I cut a flap opening, and glued some framework behind it. The bottom piece of the framework timber has a 15 o slope cut on it, to deflect any water to the outside of the van... 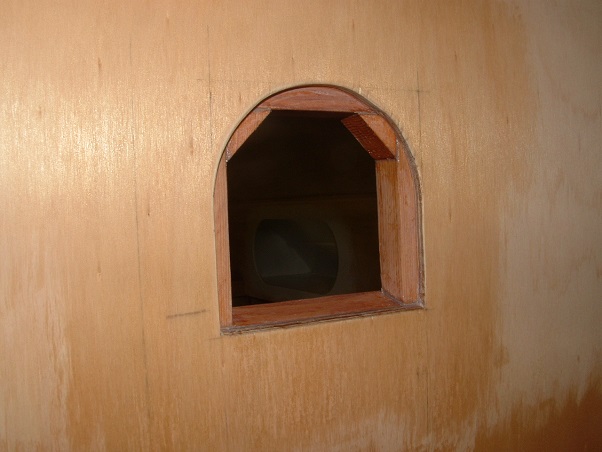 The framework looks like this from the inside...  The flap got an extra layer of plywood glued to the back of it, to give more "meat" for the hinge screws to bite into. The bottom of the flap has also been cut with a 15 o slope... 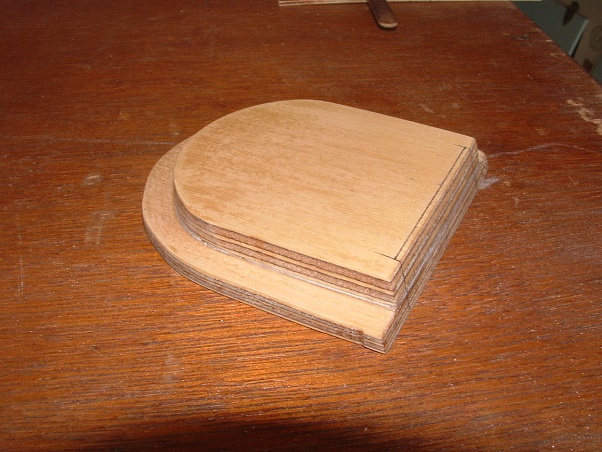 The 12V socket needed a specially shaped hole cut into the plywood it was being attached to... 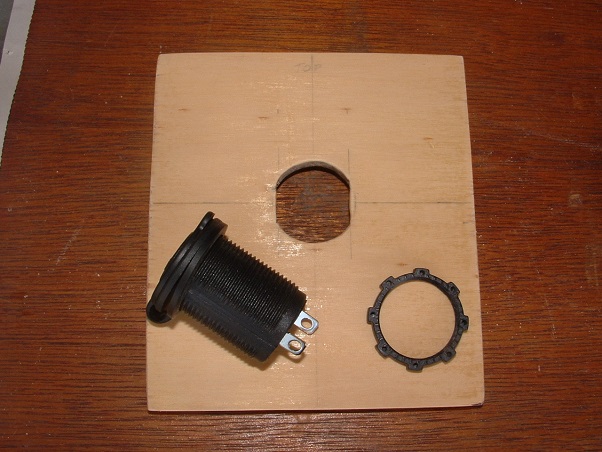 With everything fitted in position, including a ball catch and brass pull knob, it all looks like this...  Here are some aluminium trays I've collected from various Op Shop visits. Each tray showed some potential at the time of purchase, to be used on a caravan in some fashion...  I don't know what the gizmo on the right was used for, but it looks a bit like those drip trays that fit under the coil element on the old-style stove tops. Whatever it was, it ain't that no more, because it got chopped up...  ...and one half of it was test fitted above the flap door to see how it looked...   I've decided I can live with the look of it. At least it gives good coverage over the flap door, even if it does look a bit "dorky". I can now go ahead and copy the process onto the other side of the van for the Clipsal power inlet. cheers, Al.
|
|
MRFJ55
Full Member
 " KEEP HOLDEN ON "
Posts: 441
|
Post by MRFJ55 on Sept 1, 2013 9:09:44 GMT 10
G'DAY UNCLE AL, LOVE YOUR WORKMANSHIP, VERY INSPIRATIONAL. THE REWORKED LAMP IS GUNNA BE A TALKING POINT . REGARDS, 8-)MAURIE
|
|
|
|
Post by Don Ricardo on Sept 1, 2013 22:11:43 GMT 10
Hi F1,
I love your work - as usual! Some more really nice touches to your van.
Will it be ready for Broken Hill? (You've probably said somewhere on the thread what your goal is, but I'll ask the question anyway.)
Don Ricardo
|
|
|
|
Post by Franklin1 on Oct 28, 2013 17:41:51 GMT 10
G'day All, Well, it's been a couple of months since I updated this thread, but I haven't been bludging. Over the next day or so, I will try and get the thread up to date. Overhead kitchen cupboards:The original overhead cupboards looked like this...  ...but in the redesign along that side of the van, I couldn't fit the three doors back in the way they were. In fact, I couldn't even fit two of them side by side in the space allocated. After a bit of thinking, a bit of measuring, and a bit of calculating, I ended up cutting the three doors shorter...  ...and turned them 90 degrees...   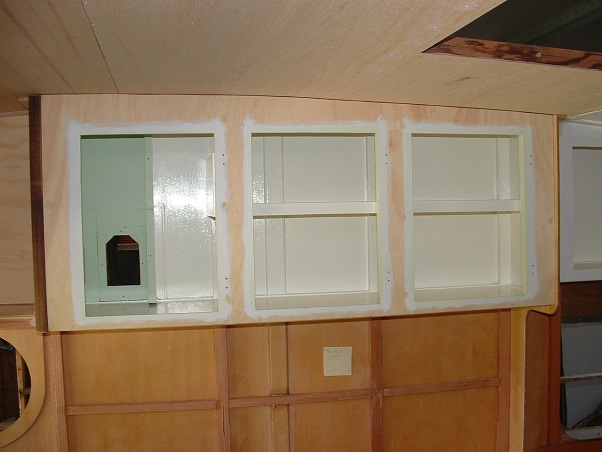  I think they allow much better access to the shelves in the cupboard, compared with how it was originally. At the end of the kitchen section, I've installed a partition wall...  I like the idea of these partitions, because they lock the roof, wall, and floor together, and help reduce any sagging in the roof around the hatch area. Wardrobe:This has been completed... 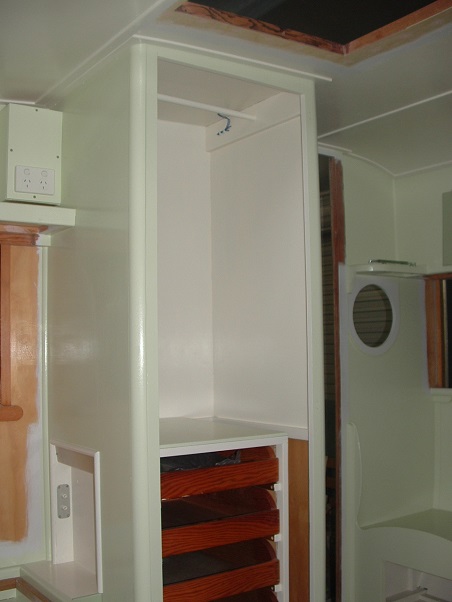 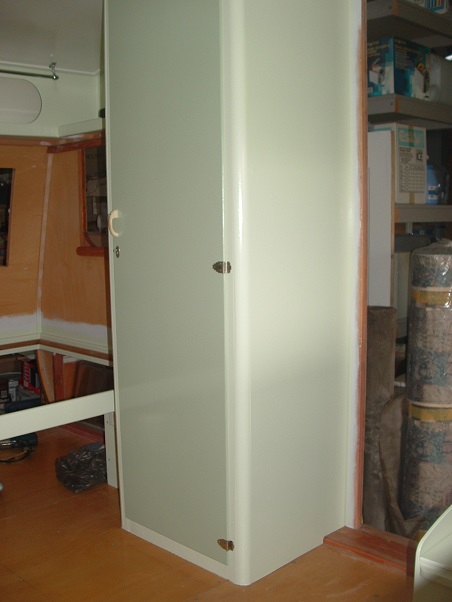 The original wardrobe door became surplus to requirements, so I cut it up to make two smaller doors... 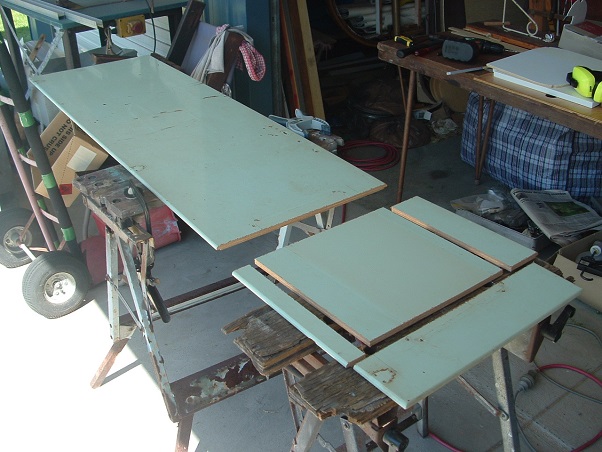 One of the smaller doors was fitted here... 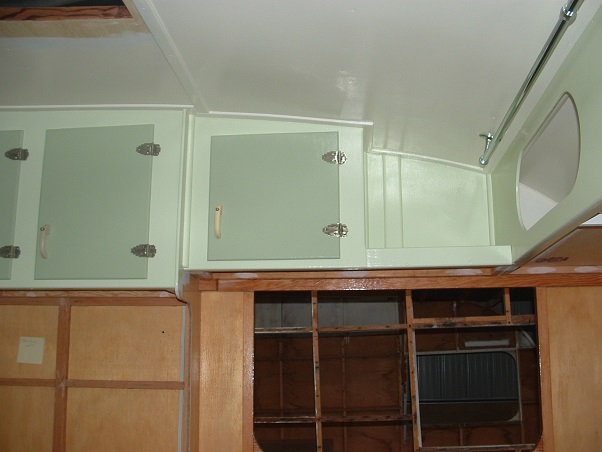 ...and thanks to forum member jg33 for some hinges, the other one was fitted in the seat box... 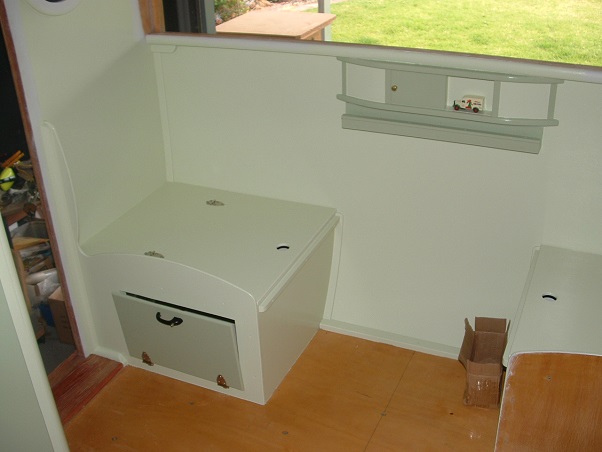 When I stripped the paint off the doors, there was a coating of varnish underneath, so maybe these doors weren't painted originally...  And here is my "paint curing oven", where all the painted bits were left for a week to allow the paint to cure properly...  Back with more later... cheers, Al. |
|
|
|
Post by JBJ on Oct 28, 2013 18:24:16 GMT 10
Hi Al,
Looks like you're enjoying yourself there. Like you, I enjoy rebuilding old vans.
I reckon I've had more enjoyment in the last 10 years that I have been involved with rebuilding vintage vans,being part of this Forum, going to vintage van events, meeting (mostly) real genuine nice people, than I have had in the earlier part of my life.
I find as I get older, the options to enjoying life are to create an interest, & keep your brain active. We dont have a lot of control over how our bodies function, but we can push our mental state.
My Dad gave up when he retired, & became a lawn bowler/drinker. Never did anything else. But when he was young he took us on long caravan trips, so I owe him for my interest I guess.
But unless you afford, or want , to travel full time, you have to do something to keep yourself active.
Hence your van rebuild. Its great, & I hope it wont be your last.
I reckon about 3 weeks & I will start back on my Dodge rebuild. I'm mentally ready, & I've just about done all I need to on my Olympic rebuild. So we will get out & enjoy it as much as possible.
Keep up the good work
JBJ
|
|
|
|
Post by Franklin1 on Oct 28, 2013 20:20:01 GMT 10
Thanks for your comments, JBJ. This project has certainly given my brain a good workout, but it's immensely satisfying to see it start to come together the way I hoped it would. To continue the update... Lighting:In the original van there was a grand total of one 240V light, and one 12V light... 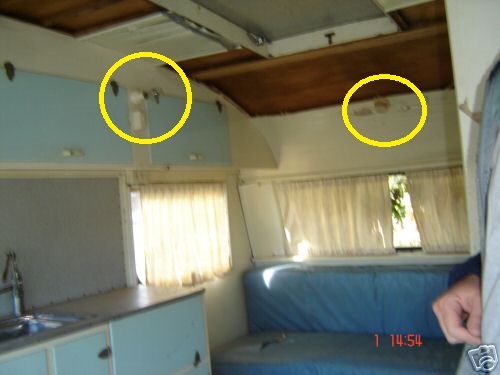 For this reincarnation, all the fixed lighting is 12V only, and I have finally... finally...been able to use some new bus/coach lamps that I bought from an ebay seller in the UK way back in 2007. (Who said I'm not a patient man?! )... 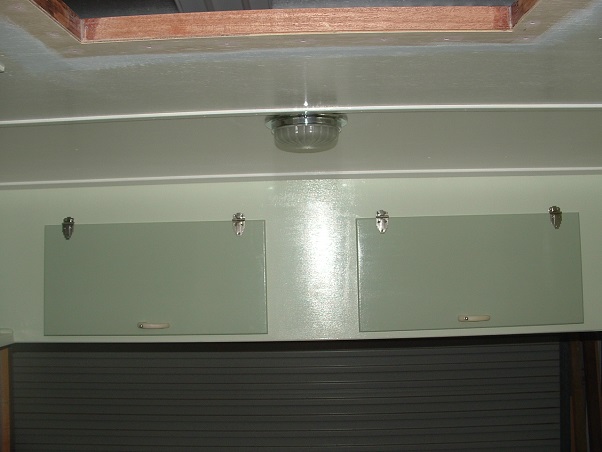 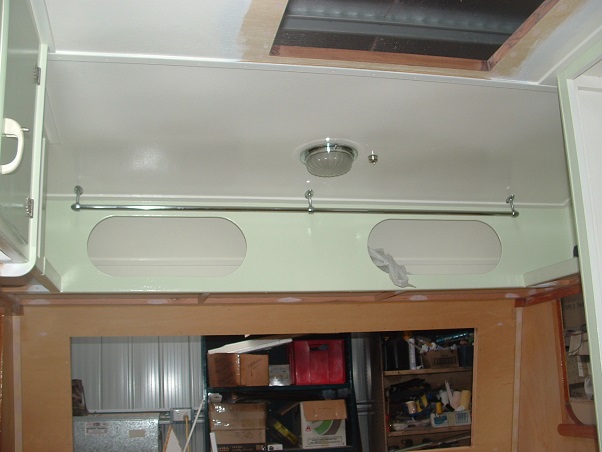 I also bought some little toggle switches from another ebay seller in the UK about a year ago, and each light is operated by a toggle switch...  These little toggle switches are still made in the UK, and they were the nearest I could find to match a toggle switch that is on the 12V power board in my 1956 Franklin...  The control panel for the lighting is in the front offside seatbox...  I have three options for operating the lights: 1. From the 240V mains through a 12V transformer 2. From the tow vehicle battery 3. From an onboard battery The bed lamp I fitted into the side of the wardrobe works really well, just the way I hoped it would...  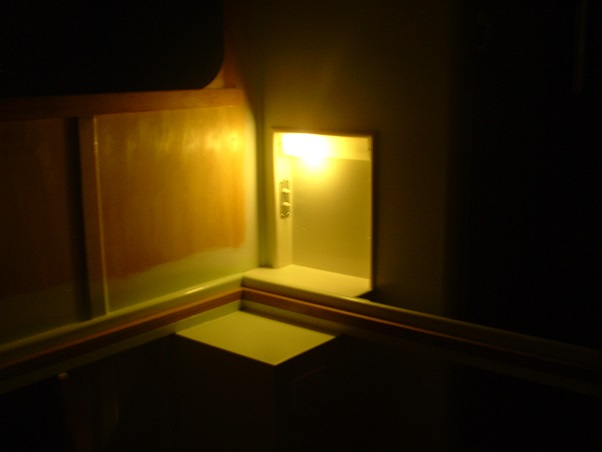 240V mains power: 240V mains power:I fitted the modern Clipsal power inlet to the van. It's a case of 'now you see it'... 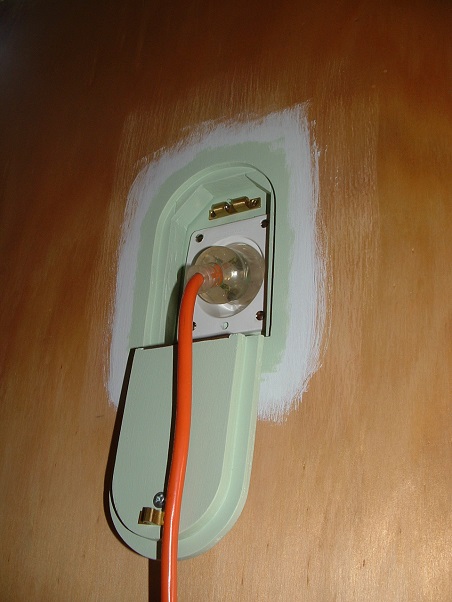 ...and now you don't...  At the back of the Clipsal socket, inside the overhead kitchen cupboard, is the main power board, complete with a safety switch/circuit breaker... 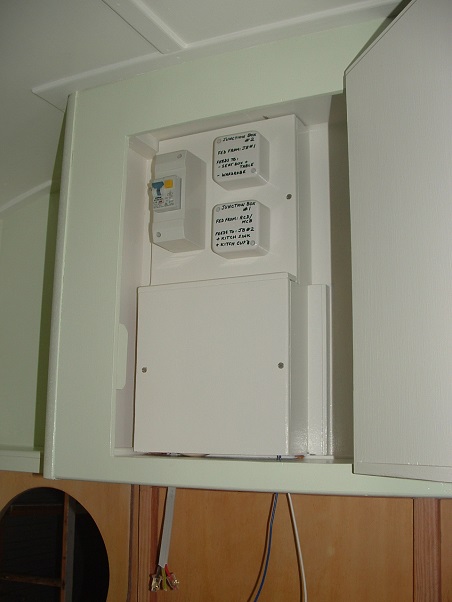 On the other side of the van, tucked in behind the wardrobe where it isn't easily seen, is another smaller power box covering the 12V socket for the annexe light... 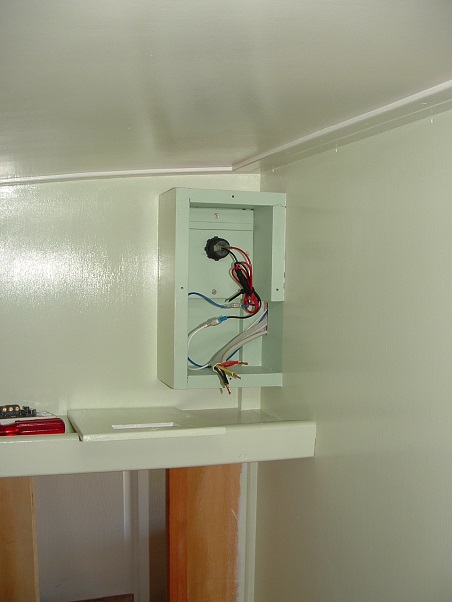  Kitchen sink cupboards: Kitchen sink cupboards:This part of the project has been the big sticking point out of the whole lot. Ever heard of the term "analysis paralysis"?? I have suffered from this badly as I try to get my head around how to build these cupboards. I know how I want it to be when it's finished, but I'm stuffed if I can work out where to start. The problem originates from having to use a larger sink in place of the rusty original... 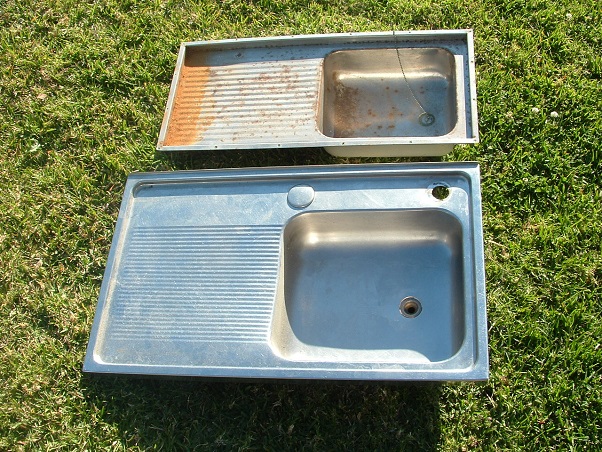 This means other parts of the cupboards have to be different sizes to the originals, but the ice chest still has to fit, and so do some of the other bits and pieces. I've been avoiding this part of the project for quite some time, but it's now the only major thing left inside the van to do. I could very well end up going to Broken Hill next year without a kitchen at all. Ah well, onward and upward... cheers, Al. |
|
|
|
Post by hilldweller on Nov 1, 2013 18:06:40 GMT 10
That's going to be the most spacious 10'8" vintage van ever  Ingenious use of space and I have no doubt the kitchen will be similarly inspiring. Really like the bus lamps |
|
|
|
Post by seeshell on Nov 3, 2013 11:45:02 GMT 10
Hi Al I love all the ingenious little touches - new storage across the back, the "warehouse access" , the bedside table/lamp area, reuse and re-purposing of old dresser drawers and gas lamps, and your trapdoor Clipsals. Nice! How long till she's on the road? Cheers Seeshell |
|
|
|
Post by Franklin1 on Nov 3, 2013 20:23:42 GMT 10
Thanks hilldweller and seeshell for your comments. It's always nice to see comments from others after posting updates. Seeshell, the master plan for the project shows completion not later than the end of March next year. That allows for a month of "road trials" before Broken Hill. 'Five months to go' sounds like a lot of time, but there's still a lot to do and enthusiasm is waning after a solid effort over recent months. Xmas and New Year might allow a break from it all. ------------------------------------------------------------ Does anybody know the brand of window that's in my van??... 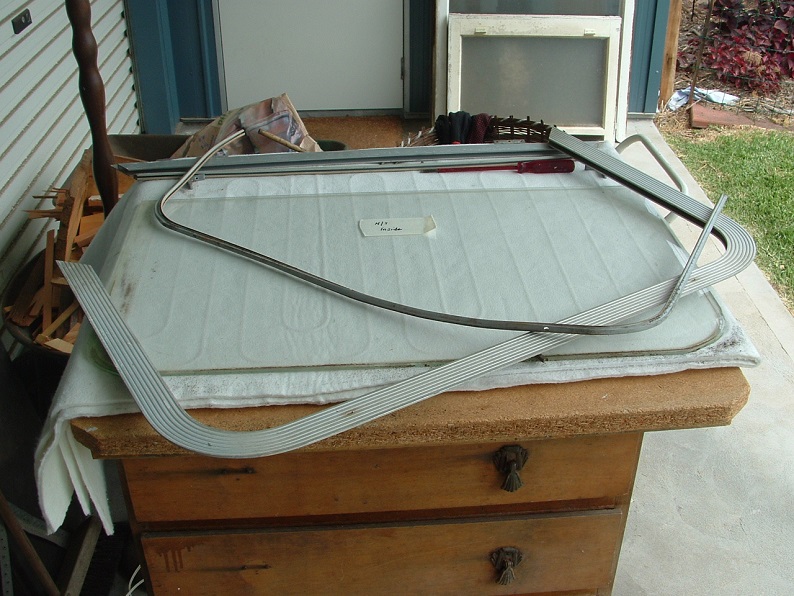 And more importantly, has anybody found the window seals for these windows? The profile looks like this...  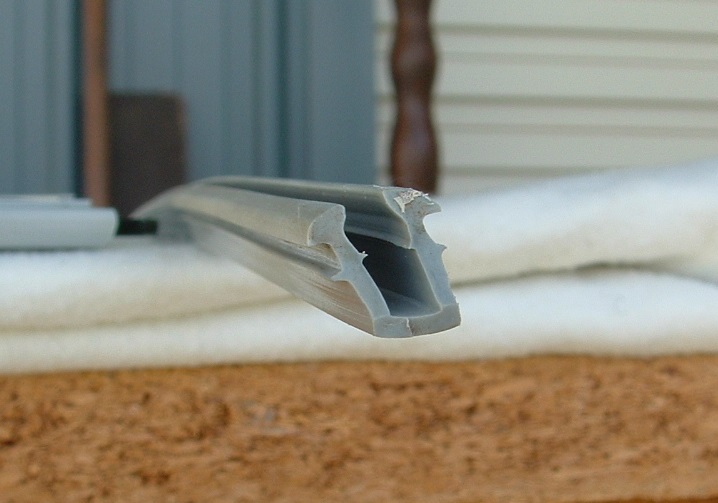 I've searched the forum, but only found info relating to the Sunliners, Olympics, and Franklins. I don't even know what brand of window I've got so I can search for that brand. Thanks for any pointers... cheers, Al. |
|
|
|
Post by humpyboy on Nov 3, 2013 20:39:33 GMT 10
Hi Al, looking at your pic of the window I'm thinking it could have been made by a company called Bro-ken ;D as for your seal try googling Spectrum rubber and have a look through thier profiles on line and see if they have what you are after, the only problem there though is not all thier stuff is for sale by the metre some times you need to buy the 25 metre roll and I'm guessing you don't have that many windows in your tardis.
|
|
|
|
Post by shesgotthelook on Nov 3, 2013 20:48:26 GMT 10
|
|
|
|
Post by Franklin1 on Nov 3, 2013 21:51:30 GMT 10
Bloody heck, sgtl... I think I must have fried too many memory cells in the hot weather lately!!  Thanks for the reminder that the other van in my shed (which is right beside the one I'm working on ) has got the same window rubbers in it, even though the windows are a different style. So, it's Alfab then, according to Sportsman1. Humpyboy, I did have a look through the Spectrum rubber website, and the Scottsautorubber website, but the problem I found with their listings is that they don't give the dimensions of all the profiles. I can find pictures that look the same, but I can't tell if the size is the same as what I've got. It would be good if they updated their photos to include the dimensions (such as what the ex-forum member did in this thread ) cheers, Al. |
|
|
|
Post by cruisindoug on Nov 4, 2013 6:51:00 GMT 10
Al you windows look the same as the Skylines, I have used the 6mm wedge available from Camec successfully in my front window, its totally different profile but has held there over a lot of miles no problem.
|
|
|
|
Post by Surf Tragic on Nov 5, 2013 8:09:23 GMT 10
And more importantly, has anybody found the window seals for these windows? The profile looks like this... Al. Hi Al What you are doing is rather amazing, I like it ;D As far as the vinyl channel you are looking for, we repair many caravan windows & have a large assortment of wedges & channels in the factory, usually find something to do the job. A small sample would help if you could send. I presume the glass thickness is 3mill ? The width of the aluminium channel the vinyl fits into ? the depth? Have sent a PM. Cheers, Ron |
|
willow5075
Full Member
Willow & the MOTH
Posts: 355
|
Post by willow5075 on Nov 7, 2013 20:59:42 GMT 10
Looking forward to seeing the finals results in Broken Hill, you've done a magnificent job!
|
|
|
|
Post by travelbug on Nov 30, 2013 5:35:43 GMT 10
Just read through the entire 10 pages and I have to say, great work! Really inspirational. I'm looking forward to seeing how you manage the kitchen and finally seeing the completed product.
Keep up the good work and thanks for the show!
|
|
|
|
Post by Franklin1 on Dec 16, 2013 20:12:47 GMT 10
G'day All, Due to a silly old fool injuring his hip a couple of weeks ago, all heavy duty work on this van has come to a stop. No climbing ladders. No manhandling sheets of plywood. No twisting the body into awkward positions. "Restricted light duties" gets me out of having to do any hard yakka. At least now I have plenty of time to write out 100 times, nay 1000 times, "I must not try to lift heavy items in my senior years...". As a result, I've pulled the plug on going to the Nationals. I doubt very much whether the van will be finished in time. In between visits to physio, walking and exercising, I've made a list of 'light duties' jobs that are required for the van, and have started working on that list. First job was to have an amateur go at making the vinyl covers for the seats. I've never made these things from scratch before, so off I went to watch a few videos on Youtube to see how the professionals do it. They make it look easy, which gave me an inflated opinion of my own abilities... First I made the vinyl piping...  Next, marking out the vinyl (including mistakes )... 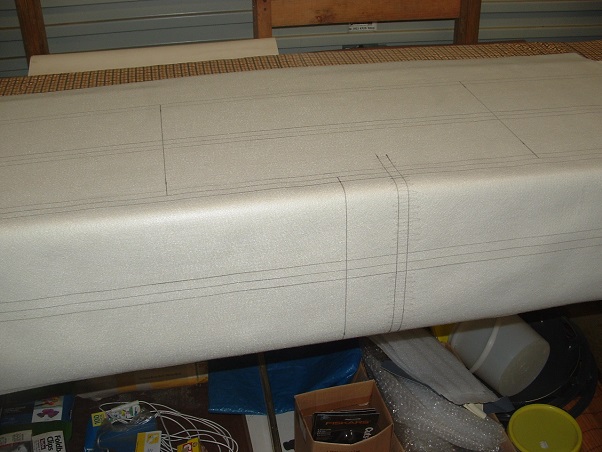 Sewing in the zippers... 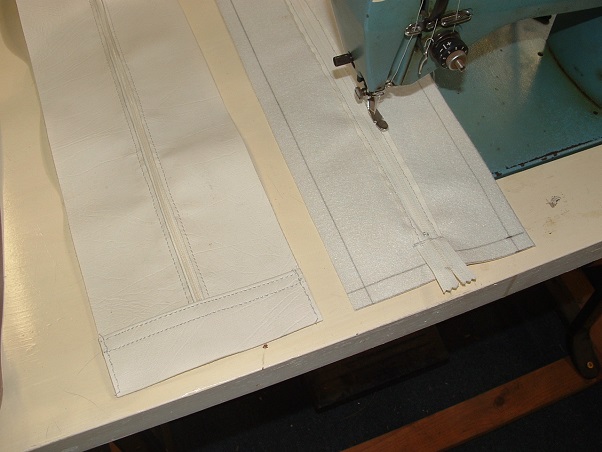 When I tried to pin multiple layers of vinyl together for sewing, the long pins (like hat pins) were bloody hard to get through the layers without putting all my pencil alignment marks out of whack. After a number of attempts, I spat the dummy and went and got my office stapler and stapled around the edges before sewing the line...  After sewing around the edges, I pulled the staples back out with a screwdriver (...a bloke's version of sewing... ) Bit by bit over a week or so, I finally got a cushion cover finished...  Once you get the first of something done, the rest follow pretty quickly afterwards... 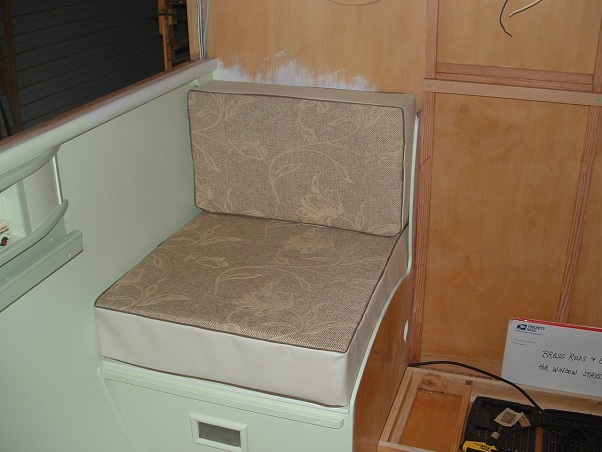 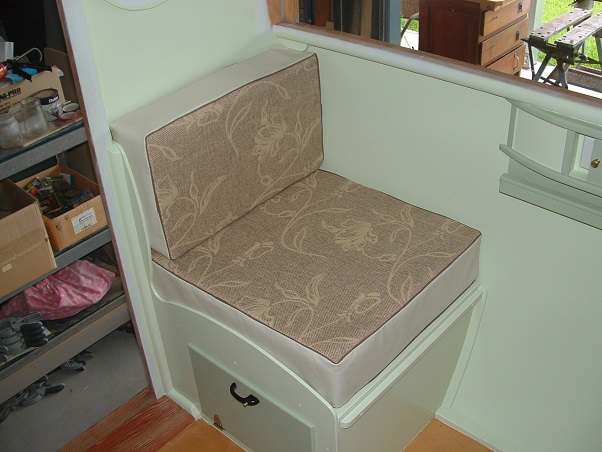 The fabric isn't vintage (it was $5 a metre at a Spotlight clearance sale last year), but it does have an interesting texture. It's very much like a hessian weave with other threads interwoven through it... 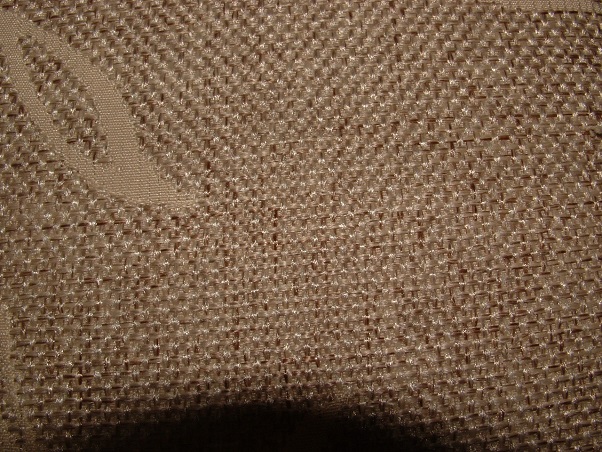 I quite like how the cushions look, and at least I can argue that the fabric is reminiscent of the potato sacks and wool bales of yesteryear. ----------------------------------------------------- Have you ever seen this trick for getting foam blocks into vinyl covers? I never knew of this until I saw it recently on a Youtube video... Here's a foam seat block... 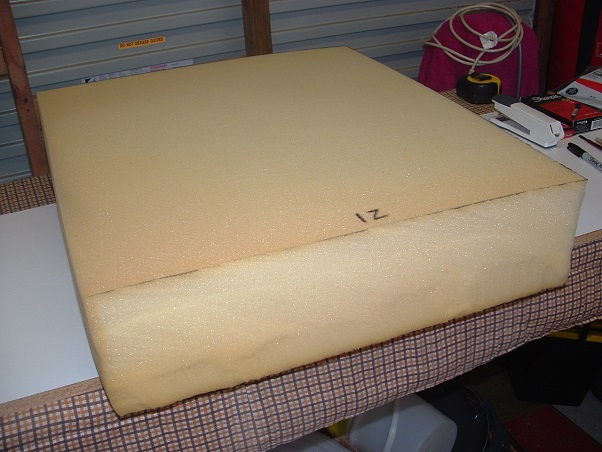 Cover it with a large plastic bag...  Put the nozzle of a vacuum cleaner against the foam, and wrap the plastic around the nozzle so no air can get in... 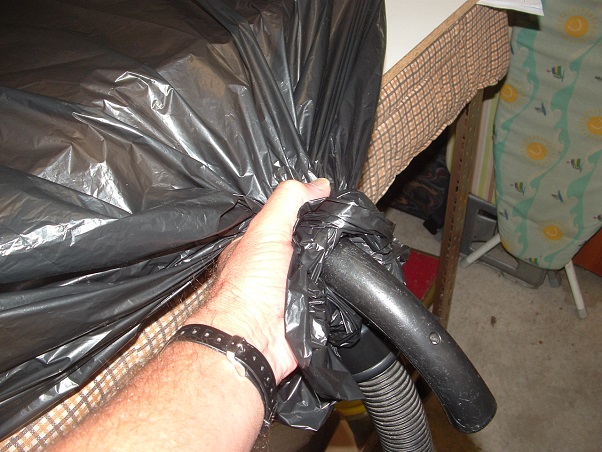 Turn the vacuum cleaner on, and ten seconds later the foam will shrink to a fraction of its size... 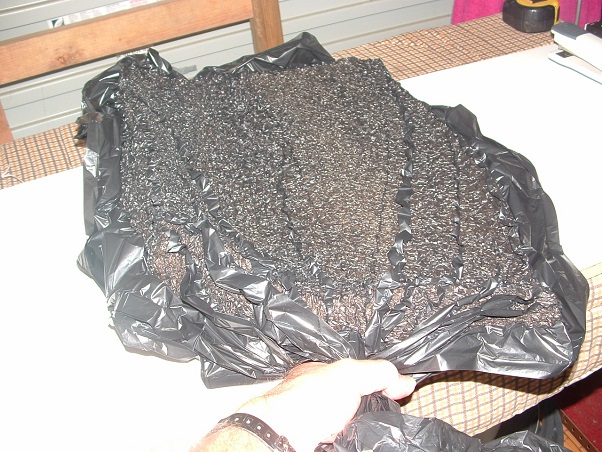 Pull the nozzle away and clamp that end of the bag with your hand. Put the shrunken foam into the vinyl cover - easy peasy... 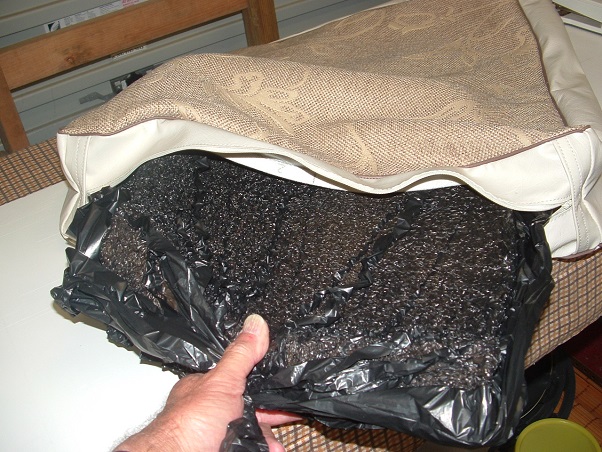 Release the end of the bag and let the air back in. The foam will expand to its original size. Reach into the cover and tear the plastic bag to shreds and pull all the plastic back out. It's heaps easier than the way I've done it in the past, puffing and wheezing trying to squeeze the foam into the cover by hand. See this 1-minute Youtube video if you want to see it done by the professionals: www.youtube.com/watch?v=K5lPw81UvcIcheers, Al. |
|


 , but it's probably just a tad too far for me to drive to get one. I've decided to use one of the (horror!) modern inlet sockets, and I'm in the process of working out how to disguise it on the van and at the same time making it easily accessible. Have almost got the 'plan' worked out.


 ...that's actually the self-serving window into the warehouse stocks. Just reach in and get anything you need...

 Ingenious use of space and I have no doubt the kitchen will be similarly inspiring. Really like the bus lamps