|
|
Post by grandad on Apr 16, 2013 18:49:19 GMT 10
Remember the "Skil Sher" brand of tools? It goes wayyy back. Burnt the motor out in it a few years ago, but can't bring myself to chuck it away, because you can't get this size anymore. Thought I might be able to get the motor rewound...one day...  I worked for Skil Sher back in the early 70's in their service department. Do get it rewound. Usually, it was the armature rather than the field that burns out. Armature rewinding is not a big deal. Just check the commutator. If its shot, you may be out of luck. Thank you. Yet another handy little tip to file away for the day its my turn. Cheers Jim |
|
|
|
Post by Franklin1 on Apr 21, 2013 21:05:09 GMT 10
Appreciate the comments, fellas  Last year a distant relative died, and I was asked a few months ago if I wanted some timber that was stacked in his shed. The property was being cleaned up for sale, and if I didn't want it, then it would go to the tip. The ol' fella was a painter at our local steelworks during his working life, and I'm guessing that when old buildings were demolished and new ones built at the Works, he must have been able to "acquire" whatever he wanted from the demolition (which usually meant getting the dump truck to make a 'detour' on its way to the tip  ). Obviously he thought it was "gonna come in handy one day", but unfortunately that didn't happen in his lifetime. Anyhoo, I ended up with a full box trailer load of vintage oregon timber. All of it still painted, but all of it as straight as a die. I spent a couple of hours during the week putting a number of the pieces through my trusty ol' table saw...  ...and ended up with this bee-yoo-teefull stash of oregon framing timber... 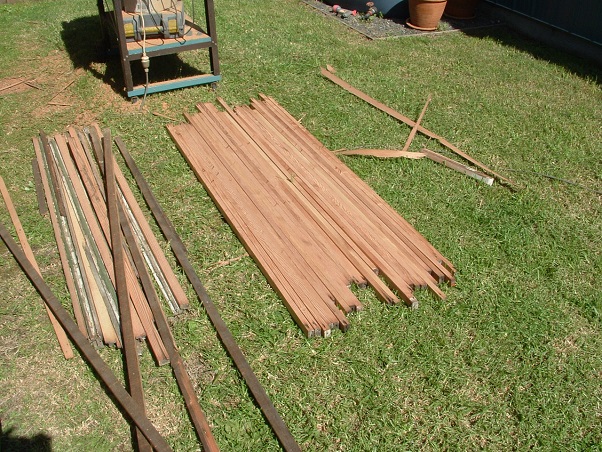 Apart from the new plywood being used in the project, the majority of the framing timber has been begged, bludged, salvaged, scavenged, rejuvenated and reused...including, for example, this door jamb that was cut down to size and now graces the top of the front window frame... 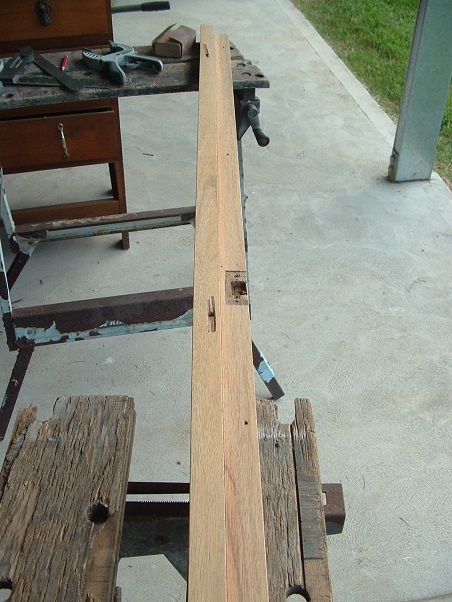 And so now the internal framing has commenced. It's a slow process while waiting for the different adhesives to cure properly, so that the next piece of timber can be prepared and put into position. I do have to get creative at times, and think of ways of holding bits of timber in position while the glue cures. Timber props are sometimes the only solution when clamps can't be applied... 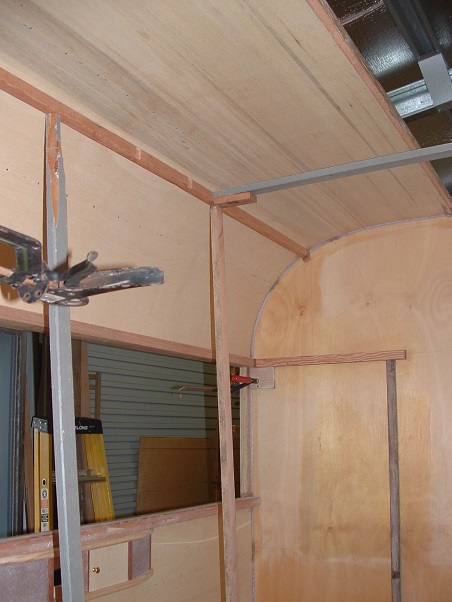 I got caught out with that piece of timber on the far side of the van... 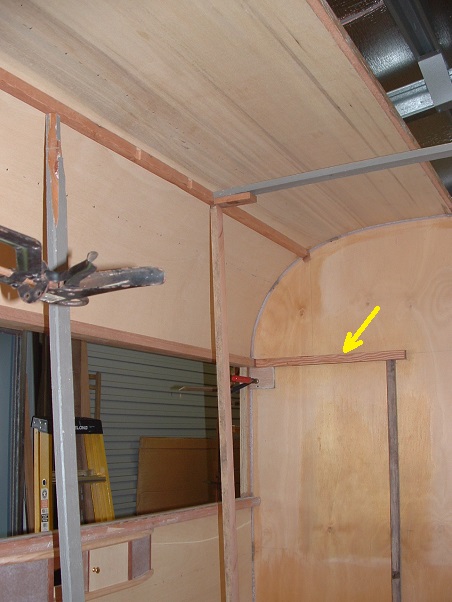 After letting the glue cure for a few hours, I took the prop and clamp away, and cleaned off the surplus glue with a chisel. I thought the glue would have cured enough to hold the timber in position, but when I checked another few hours later, the timber had actually sagged down the wall a couple of millimetres... 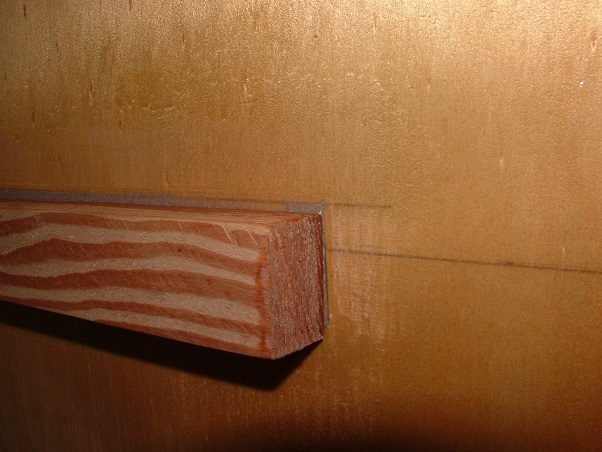 By the time I discovered it, the glue had actually cured completely, and it was too late. I couldn't budge it back up into position. Ah well, lesson learnt...leave all props in position for at least six hours. The overhead cupboards are going to have a slight "lean" in them on that far side.  Hopefully the ol' fella is looking down from above and nodding his approval at where his stash of timber ended up. ( "As long as that bastard Smithy over the road didn't get it!" ) cheers, Al. |
|
|
|
Post by cruisindoug on Apr 21, 2013 21:24:49 GMT 10
Reckon a bit of packing will stop the lean Al, little sealant will cover the gap
|
|
|
|
Post by seeshell on Apr 22, 2013 9:41:30 GMT 10
Hey Al As usual I love to watch your progress on the Newcastle - it's an absolute pleasure and masterclass to watch.  As for the wonky cupboards, I think you'll find that there's not a van that has everything plumb and square. If I recall rightly didn't you have trouble with the door to the van in the first place? Either you could shim or shavr the block on the wall to make good, or just chalk it up to character - which seems a much better idea. Love your work! Carley |
|
|
|
Post by Roehm3108 on Apr 22, 2013 12:49:34 GMT 10
|
|
|
|
Post by King Fisher on Apr 22, 2013 15:31:57 GMT 10
Or better still park on a slight slope... I doubt that it will be noticeable in the end. However as suggested a bit of packing if your worried should do the trick.
|
|
|
|
Post by Franklin1 on Apr 25, 2013 21:05:27 GMT 10
I've decided to live with the lean in the cupboards. I figured that if people's eyes can pick up the 2mm difference over a 2 metre length, I can plead the difficulty my failing eyesight has when trying to read a tape measure. Over the last few days, I've built this frame... 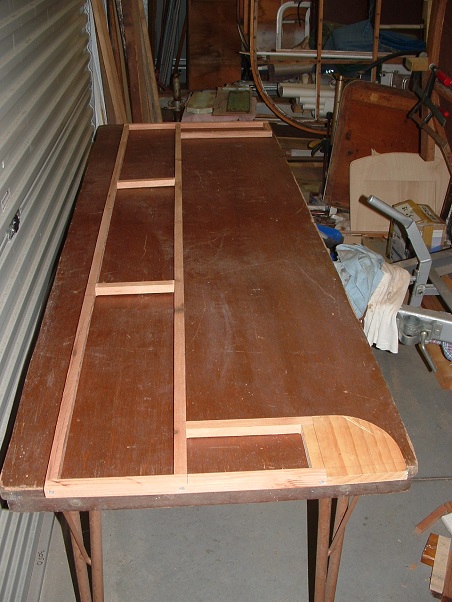 ...which goes here... 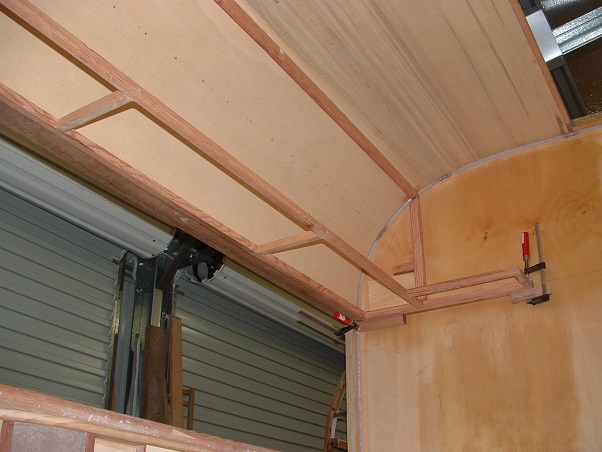 Then I traced around the frame onto some plywood and cut it out... 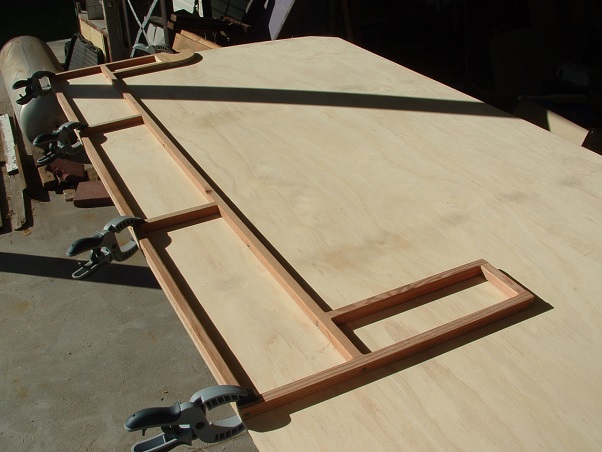 ...and that goes on top of the frame. Some additional bits of timber have also been glued to the side walls for the clearance/marker lamps... 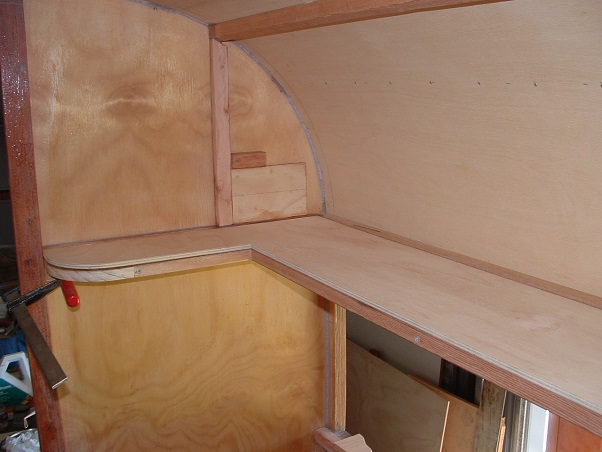 Next I cut the front face of the cupboard and the cut-outs for the doors...  ...and it all fits together like this... 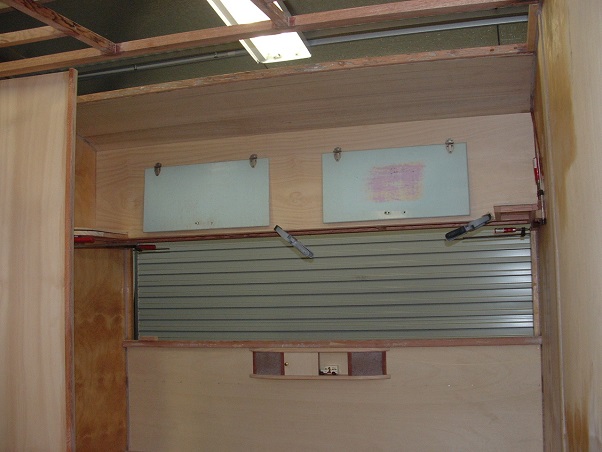 A little shelf has been incorporated on the door side. There was nothing there originally... 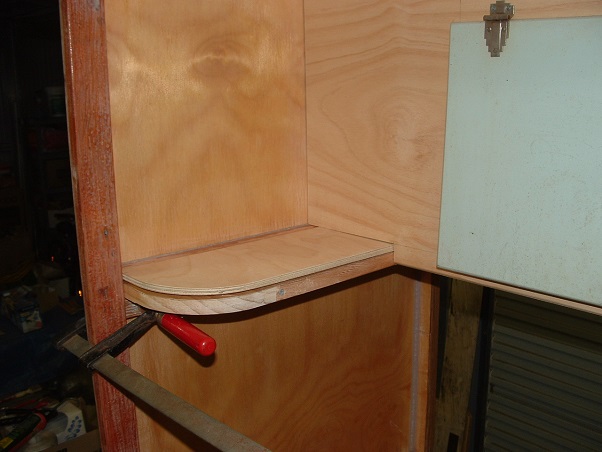 ...and another little shelf has been incorporated on the other side...  Earlier in this project, I made the door opening 100mm wider than the original door. It meant everything forward of the door had to lose 100mm off its dimension. The seats are now 100mm narrower in width (but are still 560mm) and the table is 100mm shorter. It also meant the overhead cupboard had to be pushed closer to the front window, and is not as deep as the original cupboard. The overhead cupboards originally were an L-shaped arrangement down the kitchen side and across the front...  ...but I decided that arrangement would make that front corner of the van too claustrophobic for the unlucky person who had to get in and out of that seat. That's why I've changed the layout and put a small shelf above that offside seat. Hopefully it will minimise the amount of forehead banging for a tall bloke like me. Anyway, now that I've test fitted all the components of the front cupboard, it's all been pulled apart again and is being finish-sanded ready for glueing and painting. cheers, Al. |
|
|
|
Post by hilldweller on Apr 26, 2013 12:57:18 GMT 10
Lovely Like that curved shelf above the door. Will be great for keys and wallet etc. You make it look so easy! |
|
|
|
Post by Roehm3108 on Apr 26, 2013 15:25:22 GMT 10
Al said: "...and that goes on top of the frame. Some additional bits of timber have also been glued to the side walls for the clearance/marker lamps..."I'm sure that was for my benefit ;D ;D ;D ;D ;D You've really got that MOJO back now Al  Lookin' good! Ray
|
|
|
|
Post by Geoff & Jude on Apr 26, 2013 17:14:42 GMT 10
Lovely Like that curved shelf above the door. Will be great for keys and wallet etc. hi hilldweller we have a shelves similar to al's in both our vans and we have always put our keys, purses and wallets up on it - that is until we were warned that all those objects can be easily seen and accessed by less scrupulous people than ourselves. we no longer do that - they're put in a drawer out of sight. geoff 'n jude |
|
|
|
Post by Franklin1 on Apr 28, 2013 13:20:57 GMT 10
The first part of this post is just a bit of nonsense about screws... To overcome the issue about tension in screws, if I have to back the screw off to get the slot lined up, I'm cheating and applying a dollop of adhesive to the screw hole first... 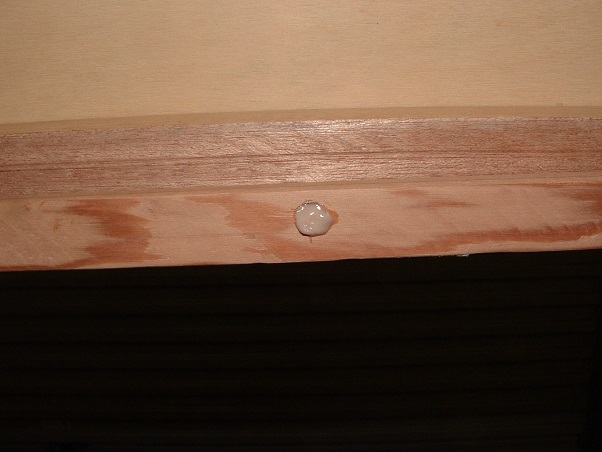 The beauty of the polyurethane adhesive is that it expands a bit as it cures, so any slight gap between the screw head and the timber is taken up by the adhesive. You can fiddle with the screw head until it's tight enough but lined up correctly... 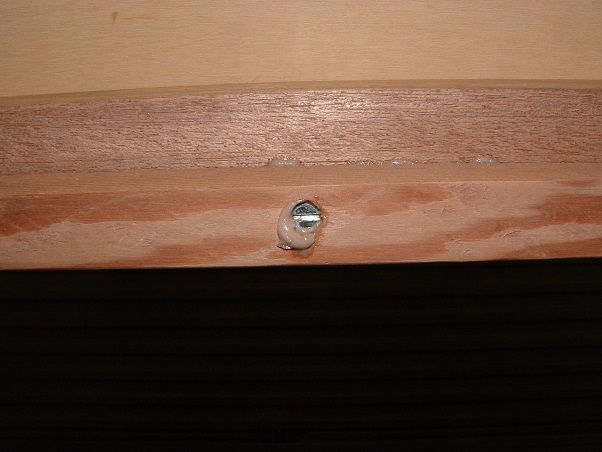 Then the excess glue is wiped away with a tissue... 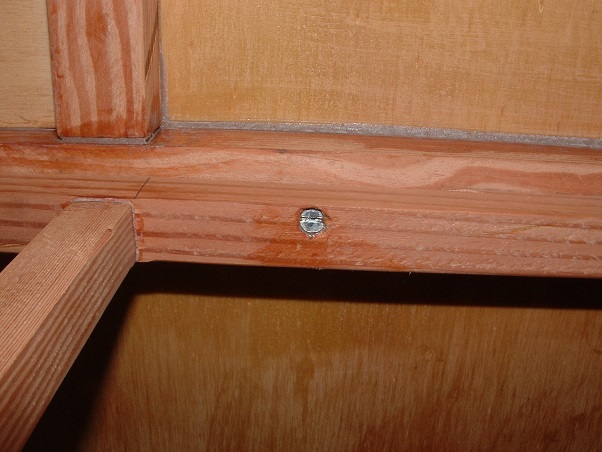 In fairness to the "Practicals" (as opposed to the "Purists"), I'm using phillips head screws in any framework that is out of sight, or is subsequently covered by plywood or other timber mouldings... 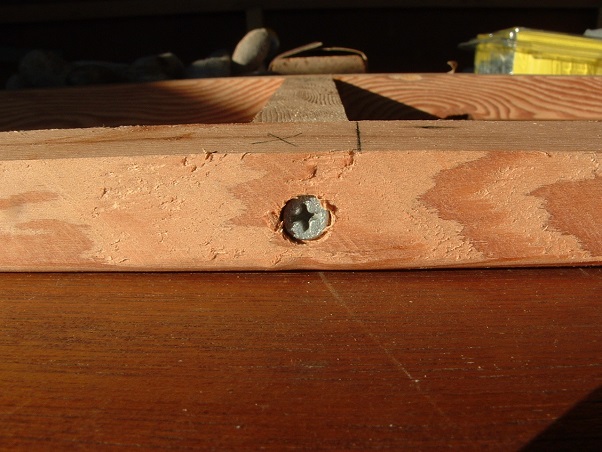 I've already wasted 10 slothead screws that ended up being covered by other timber strips that I decided to add in after a bit of thinking. I can't see the point in wasting them when they can't be seen in the finished project. ------------------------------------------- I've had a couple of wins this weekend with the project... I went over to the local Builders Recycling Shed yesterday, scrounging for the old-style cupboard handle screws with the slotted head... 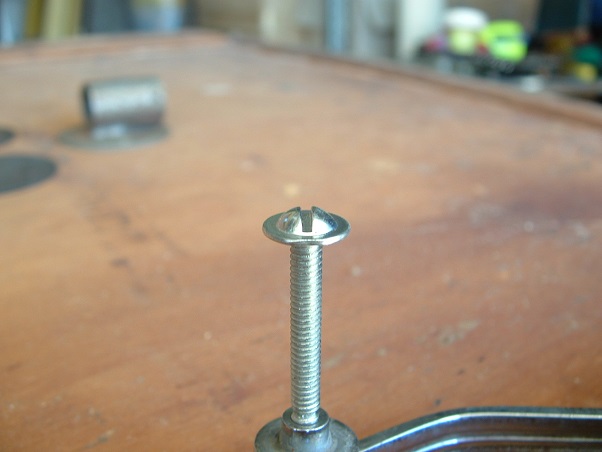 Didn't have any luck in that respect, but what I did discover as I looked through jars and jars of nails, screws, and you-name-it, was all these various slot head screws... 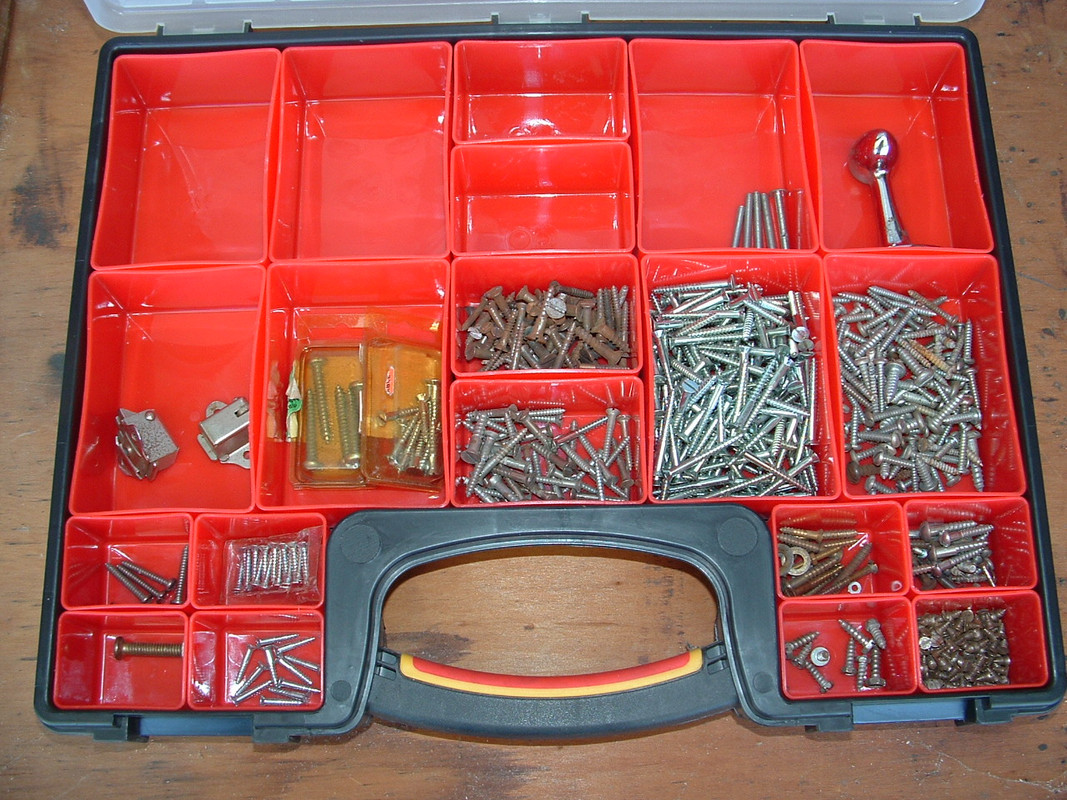 Not a bad haul for a few dollars. The other win relates to the table bracket I'm looking for... 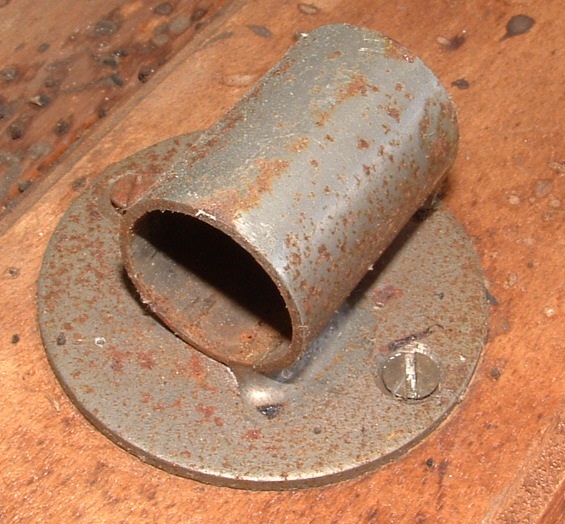 The ol' fellas that run the Shed used to be TAFE teachers in the Boilermaking Apprentices section. When they took over the Shed business last year, they also brought along with them a plasma cutting machine, and they'll do various things with it for customers. I happened to ask the operator fella whether the machine was capable of cutting the bits needed for the table bracket. "Should do", he says. This morning I went back over with the bracket, and after a few measurements, he plugged the dimensions into the computer and flicked the switch...  What an amazing bit of gear!! I want one! ;D Have a look at how good the cutting is for the small disc that fits into the back of the pipe. This is the original... 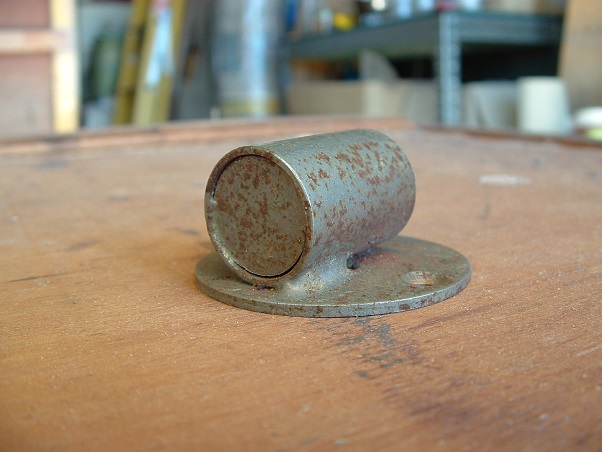 ...and this is today's effort... 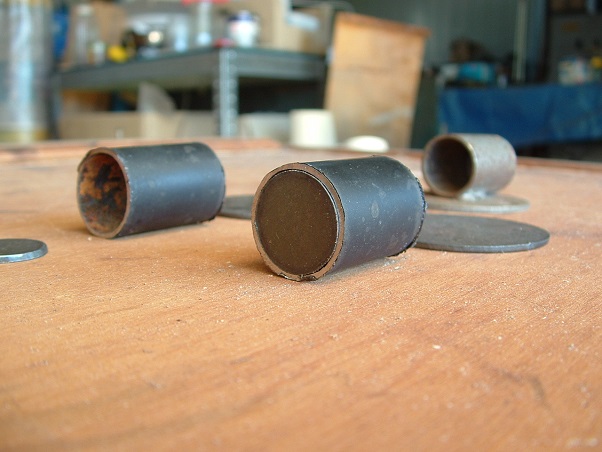 Now my brother has to do a bit of precision welding to match what this machine did. One happy chappy here... cheers, Al. |
|
|
|
Post by cobber on Apr 28, 2013 16:48:14 GMT 10
G'day Al, As with all of your posts in this tread I see no nonsense in this one .... Only good inspirational information on how to do things, how you find the time to do the work and keep the progress posts coming I don't know The flanged machine thread screws will be a bit of a problem I reckon because they're usually found attached to a handle ..... maybe somebody who doesn't care about these things can separate their slot headed flanged screws from the handles and donate them to you..... or you could just put a washer under the head of round/pan head screws..... as some say, most people won't know the difference That builders recycling shed sounds like a good place to visit..... often  Cobber. |
|
|
|
Post by Franklin1 on Apr 30, 2013 12:54:34 GMT 10
Has anybody actually dismantled a porthole window into its components, perhaps to get the glass replaced, or to reseal the window? How did you do it without damaging the aluminium rings?? I'm having a cow of a time trying to work out how to pull mine apart without damaging them. These are the two windows, as salvaged from the demolition... 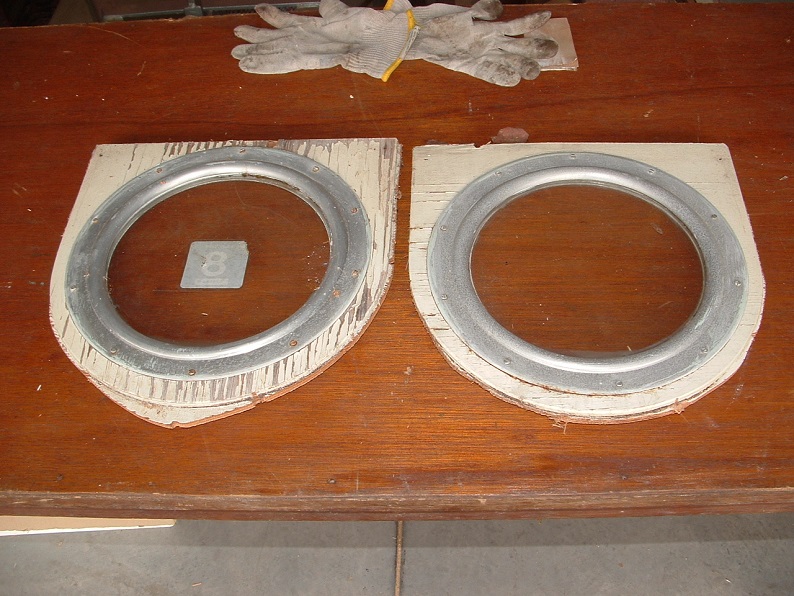 On the inside wall there is a dress rim... 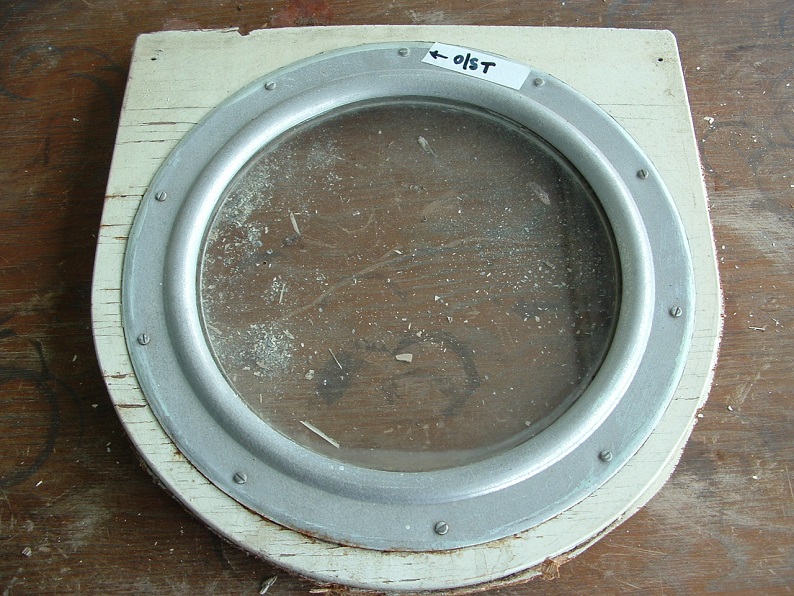 Undo all the screws, and that dress rim easily lifts off the ply... 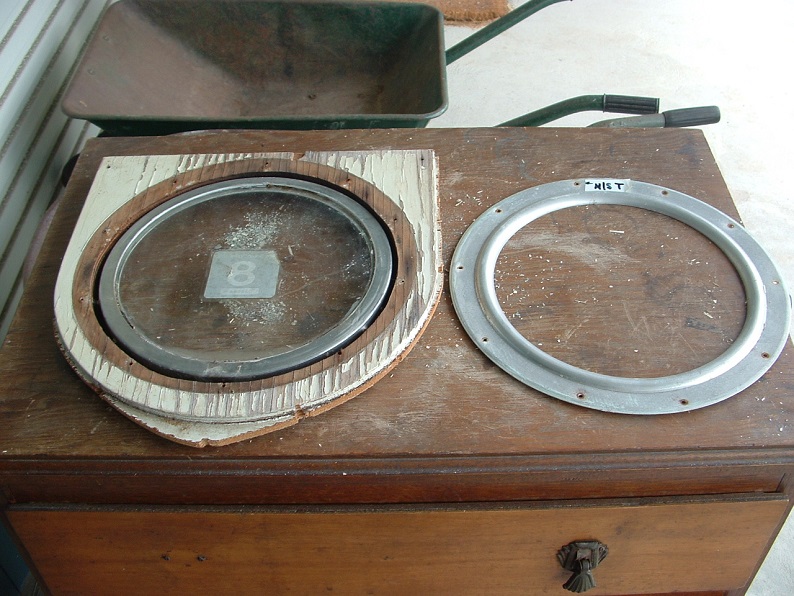 The dress rim is there purely for decoration, and plays no part in the structural integrity of the window (so we'll ignore it for the rest of this discussion). The outer part of the window consists of 3 main parts - an outer ring; the glass; and an inner ring. From what I can see, the outer ring is fitted first into the hole in the ply wall, and then nailed into the ply. If you can understand my cross-section diagrams, this is how I think it was done... 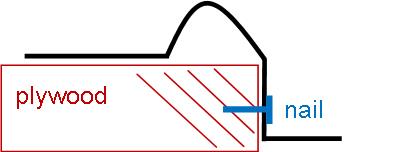 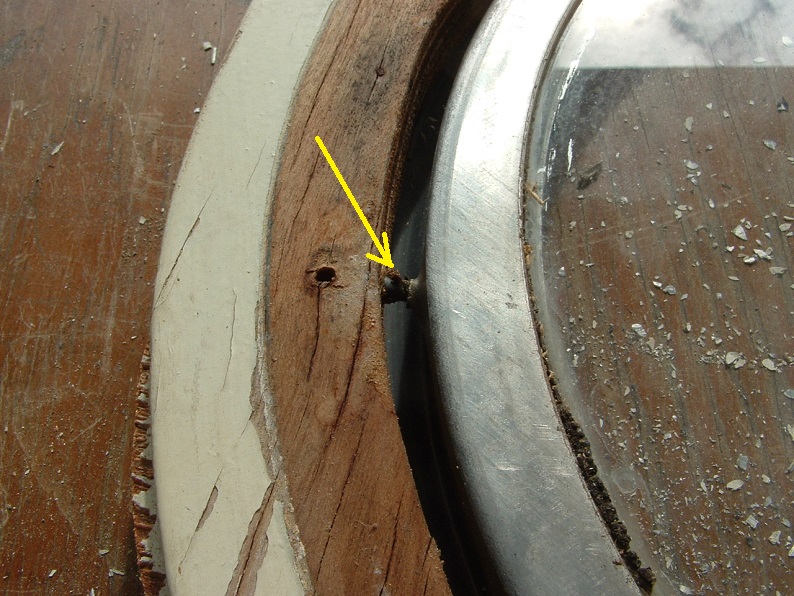 Once the outer ring was nailed in two places, a bed of putty was applied, followed by the pane of glass, and lastly followed by the inner ring, which is held in place with three pan-head screws... 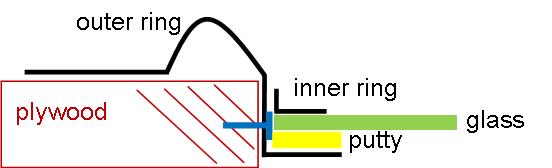 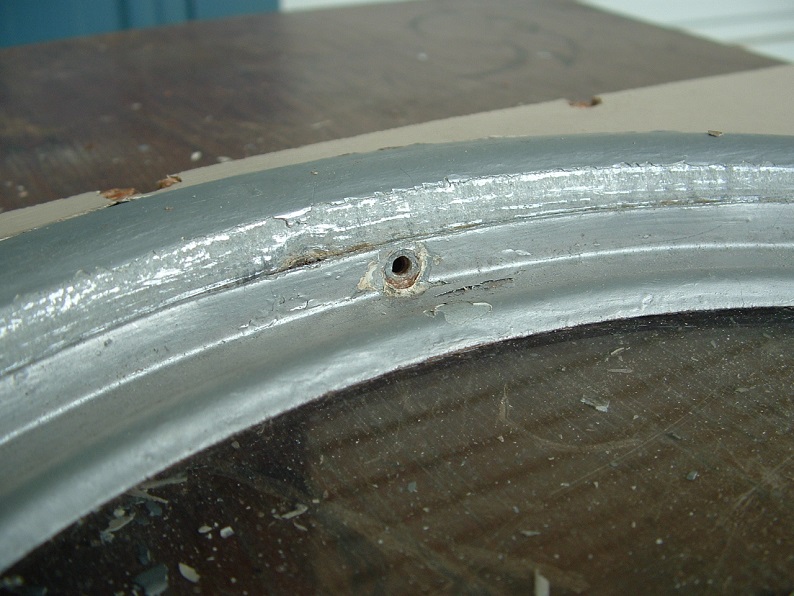 I've got the three pan-head screws out (which took some careful effort to achieve), and now I need to get the inner ring out. I've tried using a sharp chisel to carefully break the bond between the inner and outer ring... 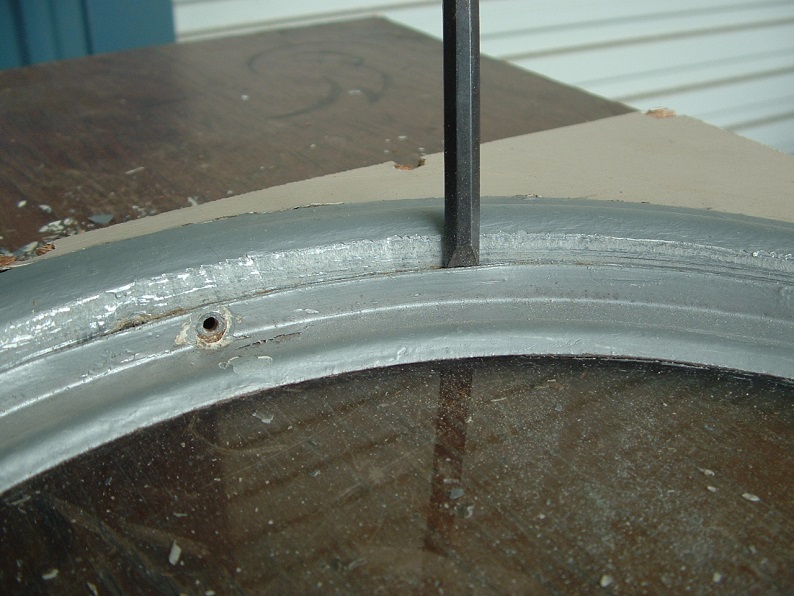 ...but all I'm really doing is bending the inner ring out of shape and leaving chisel blade marks on the aluminium... 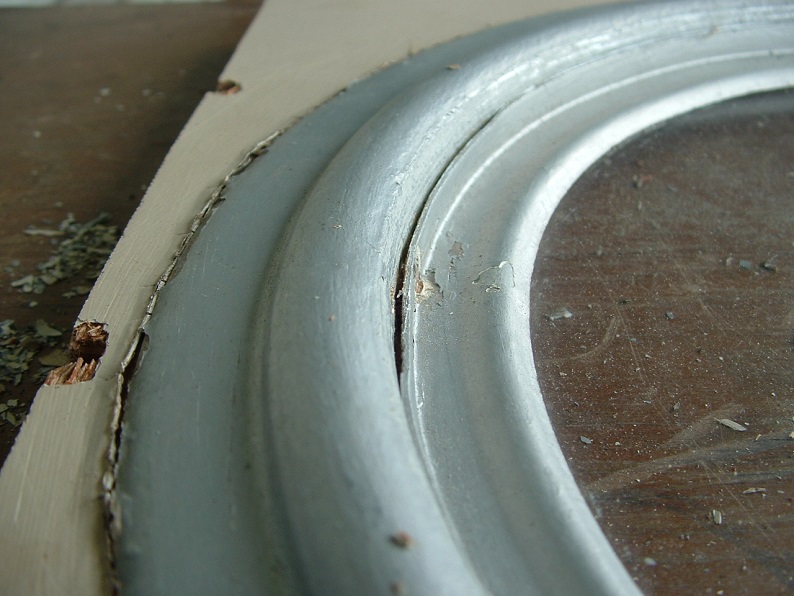 Would there be some sort of special tool I need, to be able to break the bond between the two rings? It almost seems like I need a good strong feeler gauge that I could force down between the two rings without damaging the aluminium. Any ideas, anyone??  cheers, Al. |
|
|
|
Post by kaybee on Apr 30, 2013 16:10:59 GMT 10
...yep...did ours in the Hawthorn. Found the best way to do it without trashing the aluminium was to cut out a timber block to fit inside the glassed area and support the outer frame,then smack the new timber block until it either came apart or the glass broke......figuring that glass is dirt cheap,portholes are not..... ;D
|
|
|
|
Post by Roehm3108 on Apr 30, 2013 17:36:34 GMT 10
|
|
|
|
Post by humpyboy on Apr 30, 2013 18:33:34 GMT 10
G'day Al, just reading your last post and looking at your pics and sketches I'm wondering if maybe they have put putty on both sides of the glass?? if so you may like to try getting a blade and laying it flat on the glass and try cutting into it that way, what you are doing with the chisel will only create damage as I see it, just my thoughts if they are of no use to you let me know and I'll come back later and delete them ;D |
|
|
|
Post by Franklin1 on May 1, 2013 17:07:39 GMT 10
Success! Praise be to the "kaybee porthole dismantling process"! Thought I might as well document the step-by-step process, in case other people are like me, and have no idea... I cut a circle out of 12mm scrap ply to cover the glass diameter...  Got out my heavy duty timber base, and laid one of those cutting mats on it to cushion the aluminium a bit. Then put the window on the mat... 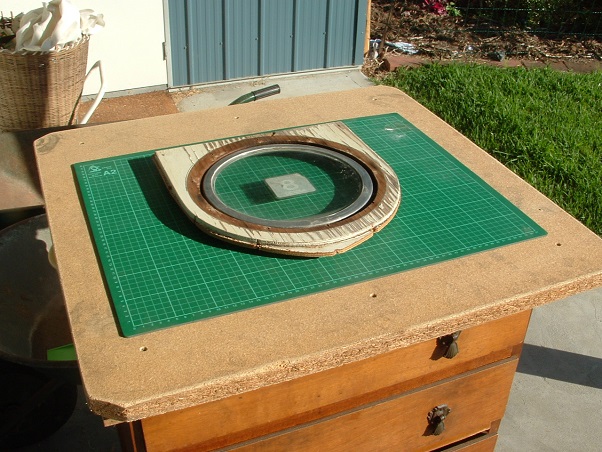 Put the ply circle on the glass, and a couple of tea towels around the perimeter to stop any shattered glass flying around... 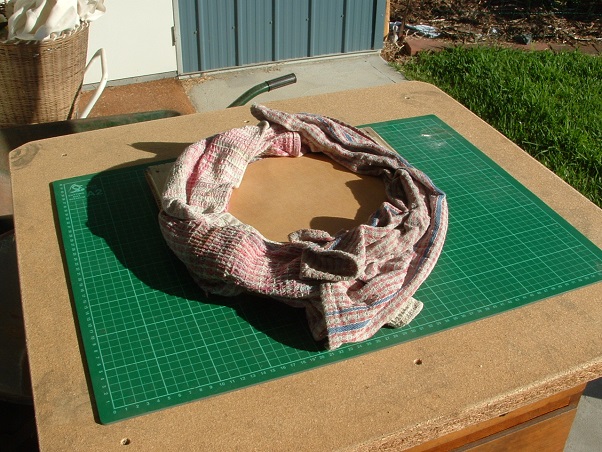 Close eyes, hold breath, count to three...and WHAMMO with the rubber mallet... 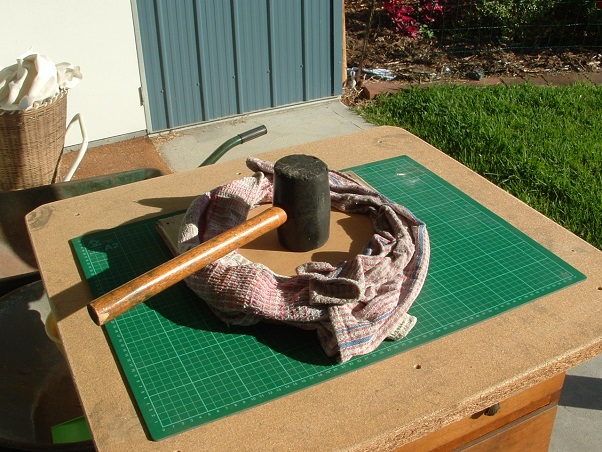 One belt dislodged most of the inner ring. Two more softer thumps with the hammer made sure the ply had gone right through. 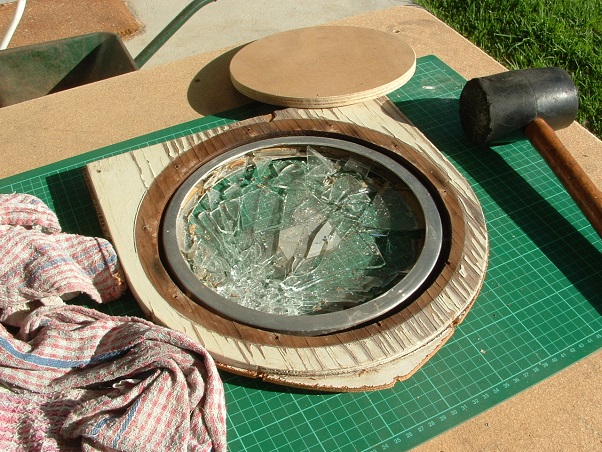 Open one eye and squint out of the corner, to see if a major disaster occurred  . Lift outer ring away from inner ring... 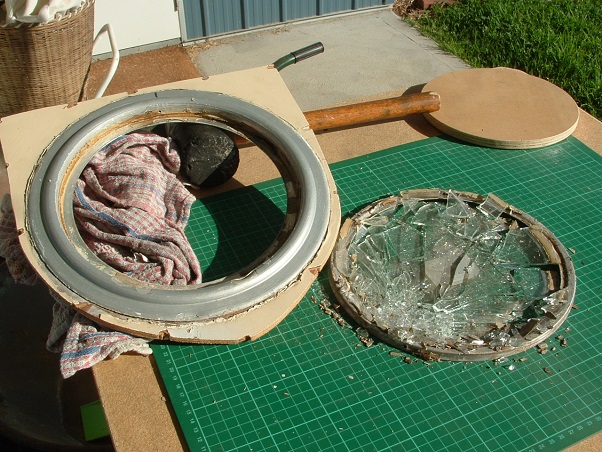 Note how the putty was originally applied, both to the base and the wall of the outer ring...  The outer ring is fixed to the ply with three brass screws, and not two nails as I first thought... 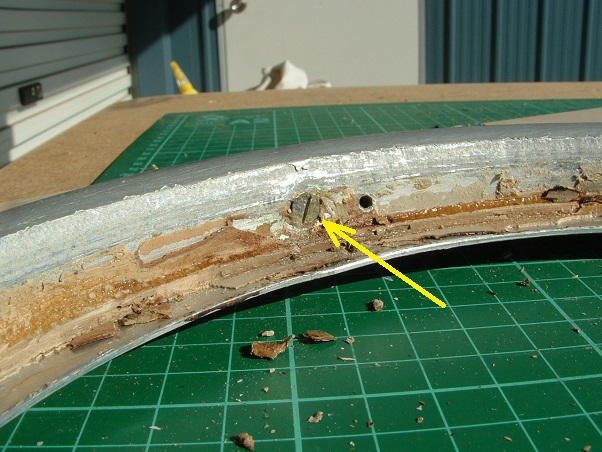 Undo the three screws and lift the outer ring off the ply. Note the crusty, crumbly old putty that was under the outer ring... 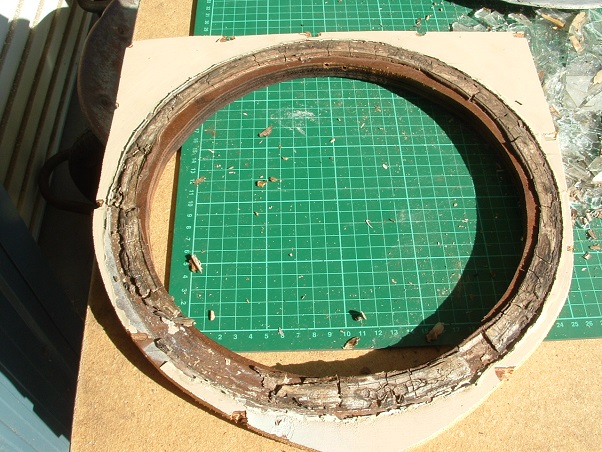 This old putty just flaked off the ply easily when flicked with my finger... 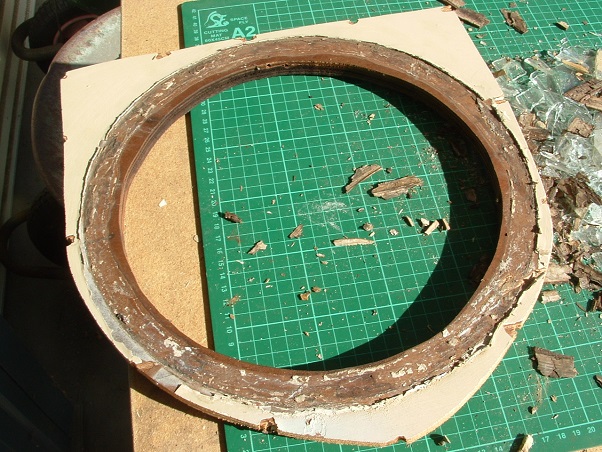 The inner ring is distorted a little bit when the hammer blow occurs, and now won't sit flat on the surface... 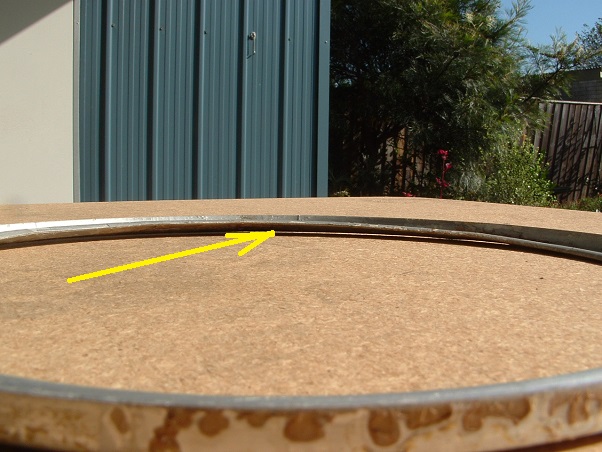 I used the same ply circle and rubber hammer to try and flatten that down again. Not completely successful, but it gets back to being "near enough"... 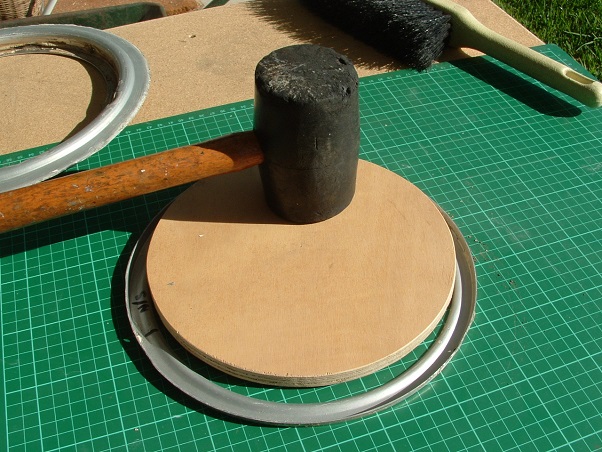 And that's really about all that happens. Have to clean all the old putty off the aluminium rings, and get new glass, but the steps above are the main steps involved. ------------------------------------------------------ Some observations: - Notice how there is no paint on the ply under the outer ring or the inner dress rim. I guess the bare ply on the outside wall is relying on the linseed oil in the putty to stop it weathering. - Neither of the inner or outer ring is a perfect circle of exact dimensions all round. Width will vary, so it makes good sense to mark the top position of both rings so you can put them back together again how they were originally... 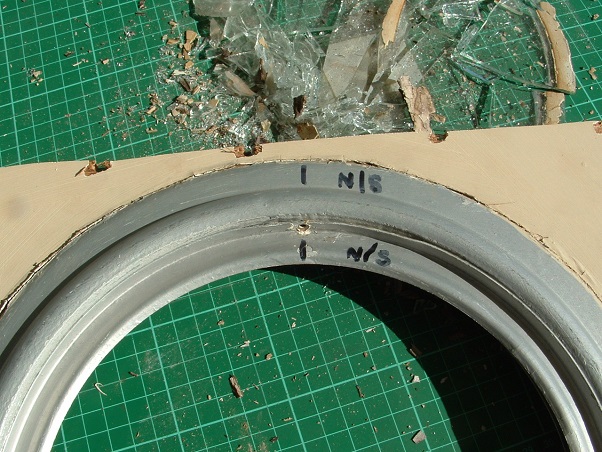 - I wouldn't try and get "too cute" and try to belt the inner ring out of the window while the window is still fixed in the wall of the van. As kaybee has said elsewhere on this forum recently, the aluminium in the outer ring is very thin and fragile, particularly where it curves from the outside down into the wall opening. I think this is the sort of job where it's best to have the complete window lying on a bench. To do that, you have to cut the three screws anchoring it into the wall ply. Maybe small boltcutters, or a hand hacksaw, can help with cutting the screws... 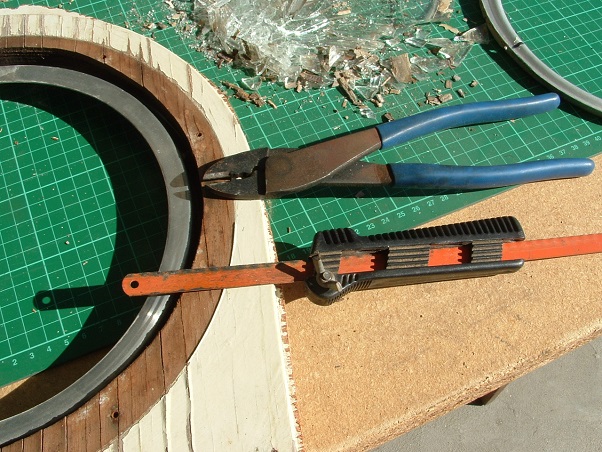 - I pity anyone with glass in their porthole window that has an etched picture on it. Don't know how it could ever survive this process. - The little screws used to fix the inner ring to the outer ring, and the inner dress rim to the wall, are pretty well rusted out over the years. These will be replaced with stainless steel screws in the final van... 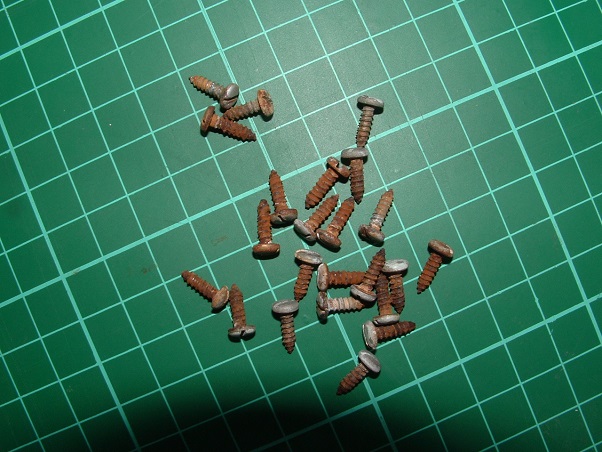 And lastly, I had a go at panelbeating a couple of dents out of the outer ring... 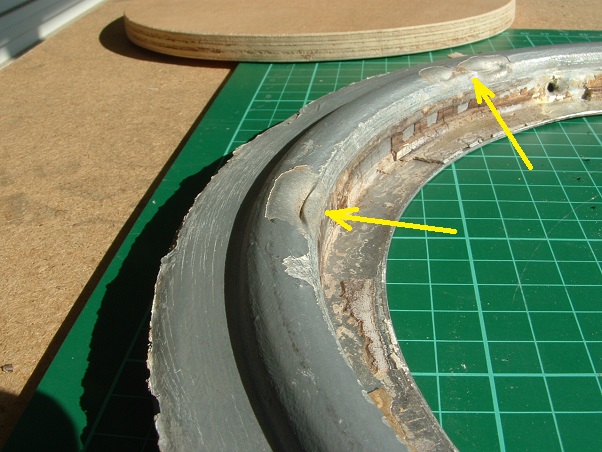 Almost succeeded, but the first timber "punch" I used to knock the dent out had a sharp edge on it...which split the thin aluminium. Oops! I carefully hammered the two sides of the split back together and will fill the backside with sealant. I switched to another smoother timber punch for the other dents, and that worked better... 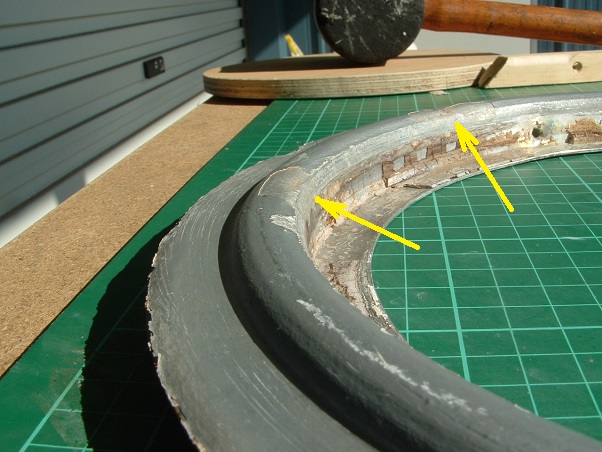 Hope this helps any "newbies" planning on doing something similar. cheers, Al. |
|
|
|
Post by Roehm3108 on May 1, 2013 18:25:12 GMT 10
|
|
|
|
Post by Franklin1 on May 2, 2013 8:44:06 GMT 10
G'day Ray, The internet says the application of heat will soften old putty and make it easier to remove. Some say a hot air gun will do (but watch out for the glass cracking if it's still in position). Knowing that a 40 Watt soldering iron will soften and remove cured Bote Cote glue, I tested whether that would also work on old putty. Yep, piece of cake... 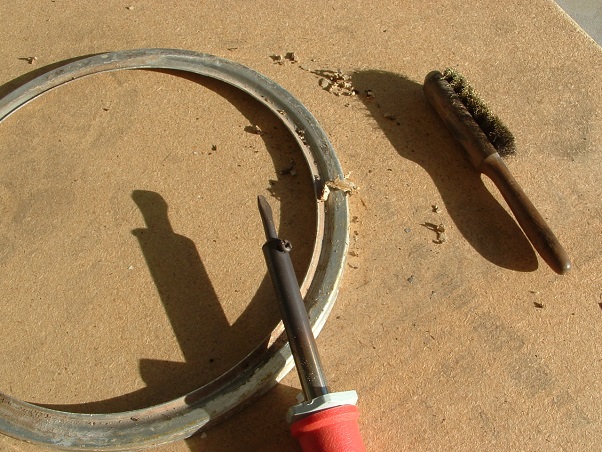 You do need to have a square edge on the end of the solder tip, to act as like a bulldozer blade. A rounded tip will keep wanting to slide over the top of the putty. Above all, let the heat do the work for you. Don't force the soldering iron through the putty. Just gently push into the putty. Remember how fragile the aluminium is underneath - very easily marked/damaged. Go for it! cheers, Al. |
|
|
|
Post by Franklin1 on May 2, 2013 10:35:02 GMT 10
Here ya go, Ray... It took me less than an hour to clean up both rings with the soldering iron... 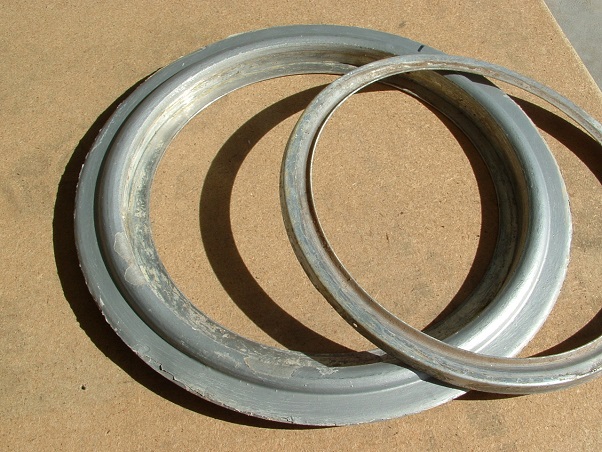 A square edge on the soldering tip is a key point. If the edge starts to round off during the job, you'll have to stop and file it square again. Keep thinking "bulldozer blade" and it works well. cheers, Al. |
|
MRFJ55
Full Member
 " KEEP HOLDEN ON "
Posts: 441
|
Post by MRFJ55 on May 2, 2013 17:41:46 GMT 10
G'DAY AL, HOW YOU GOING . THANKS FOR THIS COMPREHENSIVE GUIDE FOR REFURBISHING PORTHOLES . IF I'AM EVER IN NEED ITS GREAT TO KNOW WHERE TO TURN FOR HELP . A GREAT POINT OF REFERENCE . HAPPY DAYS, THANKS FOR SHARING . ENCYCLOPEDIA PORTHOLE-BRITTANICA ! CHEERS, 8-)MAURIE
|
|
|
|
Post by Roehm3108 on May 2, 2013 20:20:23 GMT 10
IF I'AM EVER IN NEED ITS GREAT TO KNOW WHERE TO TURN FOR HELP . . Yep, send the whole porthole to Franklin1 ;D ;D ;D ;D |
|
|
|
Post by Franklin1 on May 2, 2013 20:47:40 GMT 10
Nup, send 'em to kaybee. It's all HIS fault! |
|
|
|
Post by Franklin1 on May 6, 2013 16:26:12 GMT 10
A couple of photos first up to illustrate something for shesgotthelook. In these photos, I'm laminating three panels of plywood onto the top of the ceiling ply, to make a base for the light fitting to screw into. I'm using the laminating method because I have to bend them to follow the curve of the ceiling. I've brushed Selleys Aquadhere (a PVA) onto both surfaces that will be bonded together in each layer. You can see in the far panel in this first photo that the glue has already started to soak into the ply veneer layer (the darker yellow patches)... 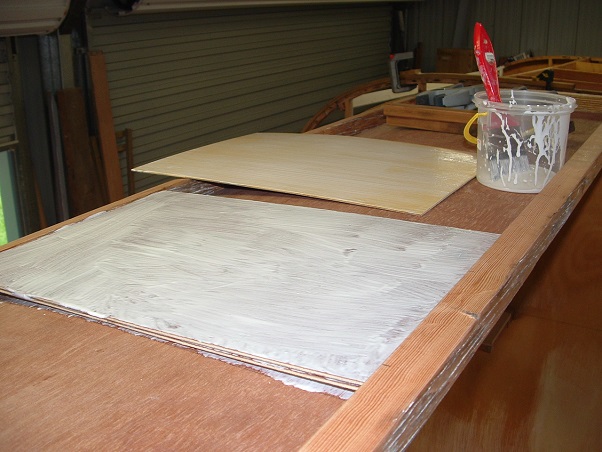 And even when I've sandwiched all the panels together and clamped the ends, there's very little PVA oozing out of the joints, so it shows how much you need to apply to make sure of a good bond when laminating plywood... 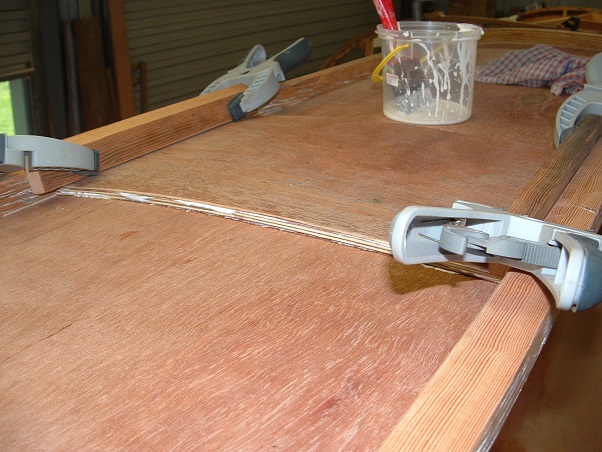 Hopefully this will help your son in his project. In other news, the seat boxes are progressing well. I've put a stainless steel gauze vent in the front of the offside seat box, to allow air to circulate in that compartment for battery requirements. A small 12V computer fan will be installed at the side of the seat box, at the back, to draw air through the box... 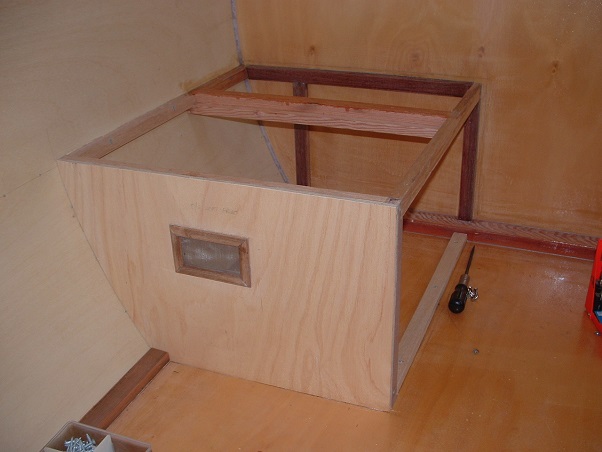 The front overhead cupboard has been painted up. I'm using water-based enamel paint. It works for me for the finish I want... 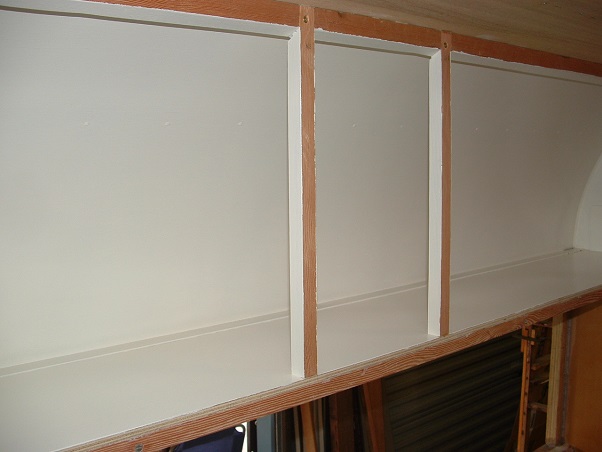 Even in my senior years, I can still paint a straight line when I need to ...  Many moons ago, I bought a small "Ranleigh" serving tray from the Op Shop for two bucks. The Trove archives suggest this particular model/design was manufactured during the 1950s... 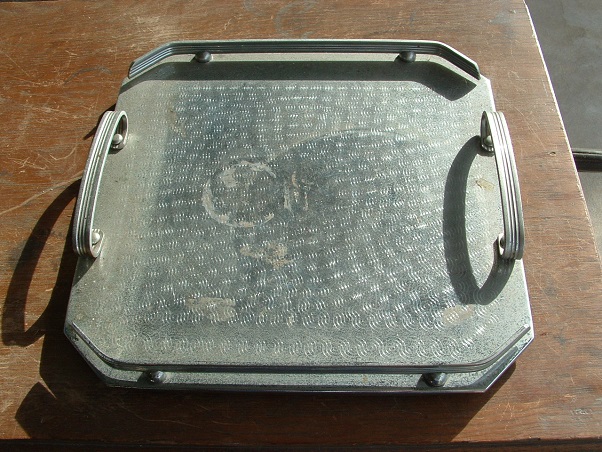 But I didn't buy it to use as a tray. I've got more trays than I can poke a stick at. Instead, I bought it so I could pinch the side rails for a special use in the van... 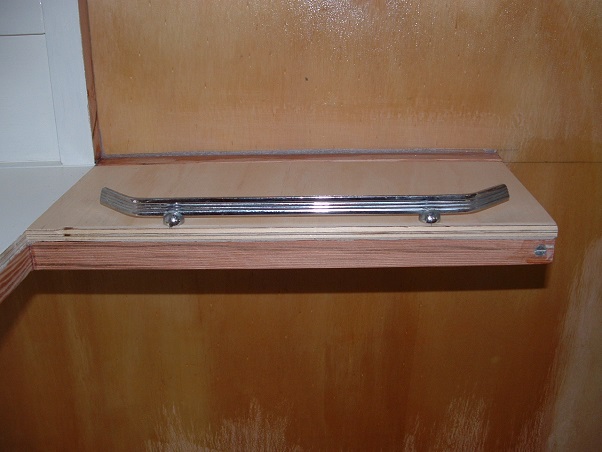 t'other side...  And just a little tip to share: Whenever I need to drill a hole that's as perpendicular as possible to the surface (eg. for cabinet screws), I cut a right-angle notch out of scrap timber...  ...and then hold that against the drill bit while I'm drilling, to use as a guide... 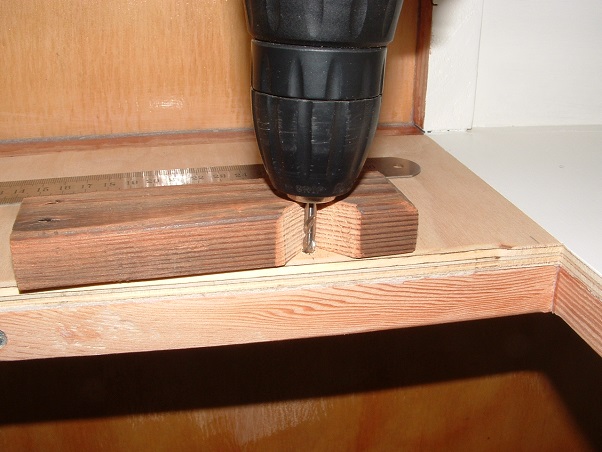 And lastly, a HUGE thankyou to the forum member who contacted me privately about the slot head cabinet screws. He generously offered to mail me 32 of them, and they arrived today. Four of them have already been put into service for the "bling" shelf rails above. ... 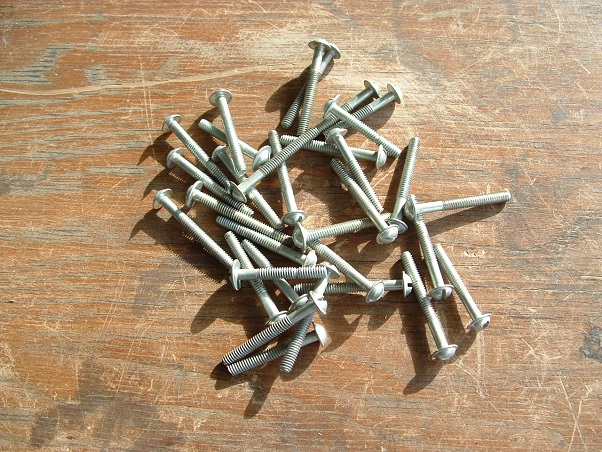 cheers, Al. |
|
|
|
Post by Franklin1 on May 10, 2013 14:38:12 GMT 10
Back ag'in ... Porthole windows: the frames have been glued in position, and this time I left the timber props in place overnight... 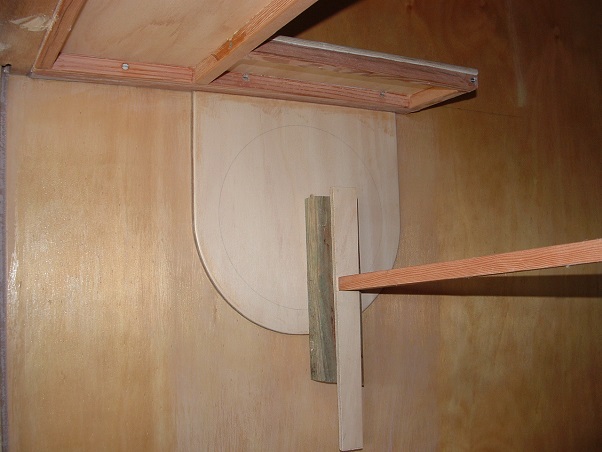  ...and then today I cut the holes out... 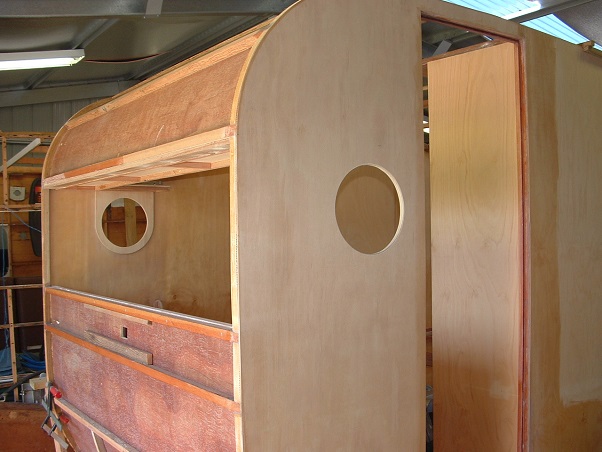 If the one on the nearside looks to be too close to the door, it's just an illusion , and is partly because the door opening is now 100mm wider, and partly because I wanted to be able to swivel my head when sitting in the seat, and have a view towards the rear of the van. There are enough windows across the front to cover the forward view. Naming the van: I've decided to name the van after my late, great, Mum, 'Mavis'. With my thinking cap on, I've had some discussions recently with the fella over in the Shed about what the plasma cutter could do. The short story is that we decided to see how it went with cutting a nameplate out of stainless steel. I designed the look of the wording on my computer...  He then scanned that into the plasma computer and did a few test runs on galvanised sheet metal... 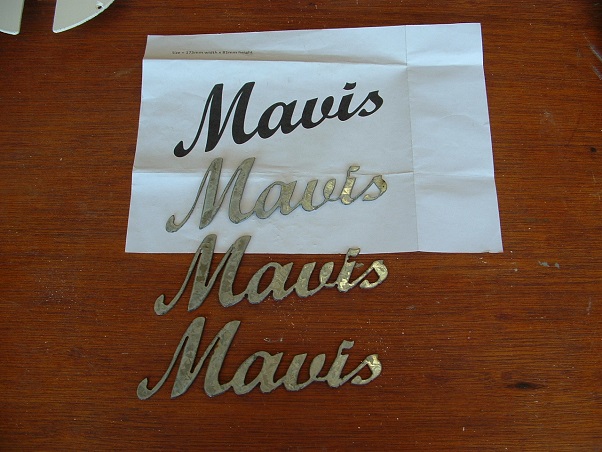 ...and then took the plunge and did it on a couple of blanks of stainless that I had lying around in my shed... 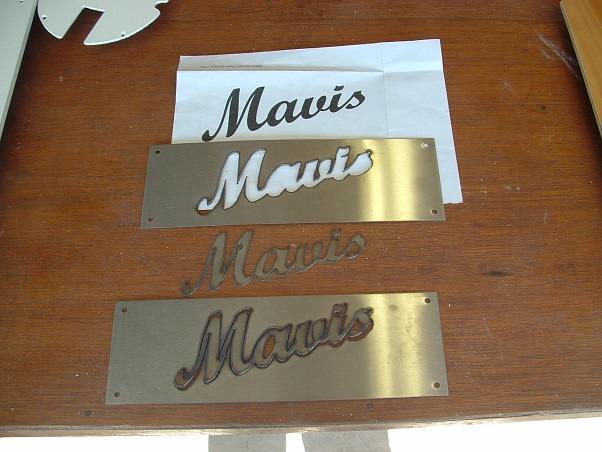 Unfortunately, the plasma cutter doesn't cut through stainless anywhere near as neatly as it does through other metals, so there's a really rough edge left, along with a lot of arc burn...  I have to now educate myself on how to clean up all the rough stuff to make the nameplate look presentable. If anybody has got any tips on how to do that, I'd be most appreciative. The fella did do a bit of light surface grinding on the underside to see how it cleaned up, and that looks better than the topside... 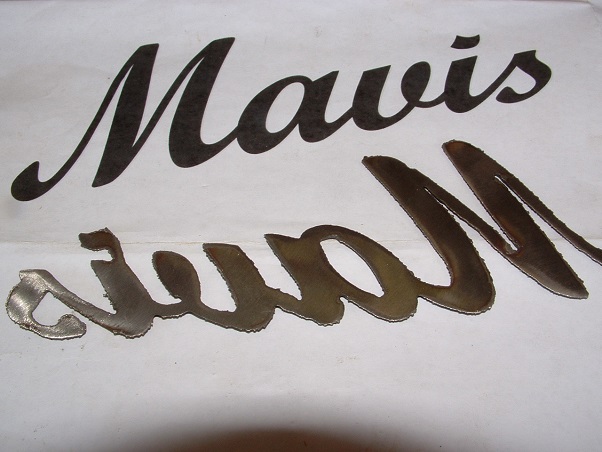 I'm not looking for a perfect mirror finish, just something that looks more presentable than what it does at the moment. If it doesn't work out, my 'Plan B' is to use one of the galvanised versions and paint it. Flyscreens: When I went over yesterday to pick up the nameplates, I was milling around waiting and I spotted out the corner of my eye some timber framed flyscreens. I went back over today to suss them out properly, and ended up getting them. They have the old-style metal mesh in them, which will come in handy for making the screens for the hatch in the van. All the timber framework will be put to good use in the van somewhere, as well... 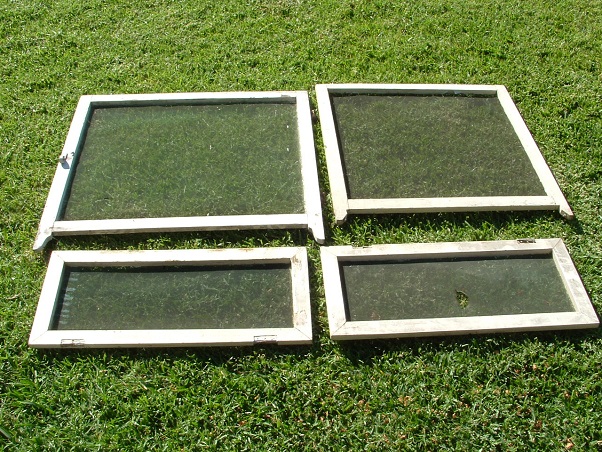 When I sorted through all the other flyscreen frames they have stacked up, I came across a couple of aluminium-framed screens... 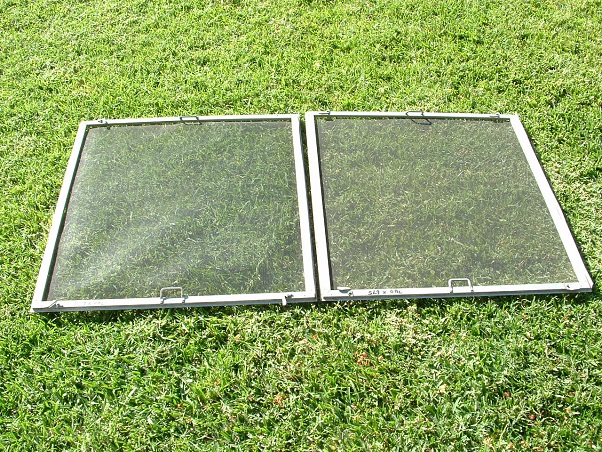 ...which have an interesting little locking lever in all four corners of each screen... 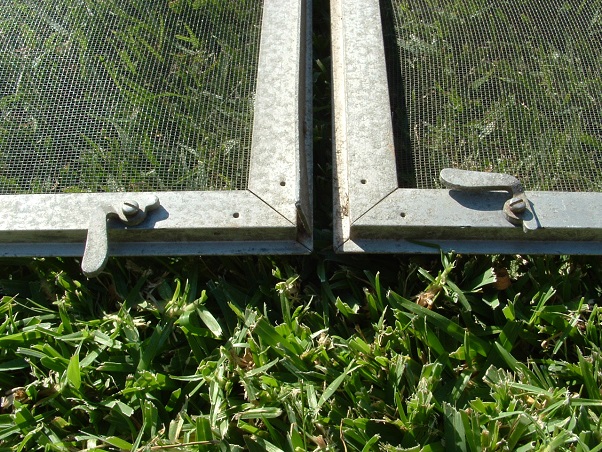 I started to think how that locking lever could be adapted for the screens in the van, so now I have another job to put on the Project list.  cheers, Al. |
|


 . Lift outer ring away from inner ring...