|
|
Post by Franklin1 on Mar 23, 2013 11:14:30 GMT 10
Ok, so there's been a bit of progress on this project over the last month.  I've completed the framework that ties the walls together, as well as the framework for the hatch and the rear window. This is the front... 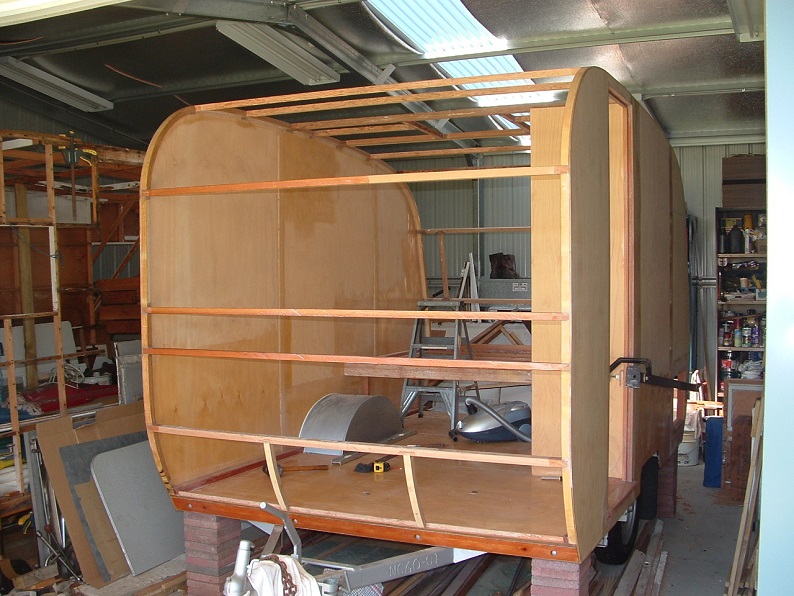 ...and this is the rear...  All the joints are based on notching the timber...  ...and then glueing with Bote-Cote... 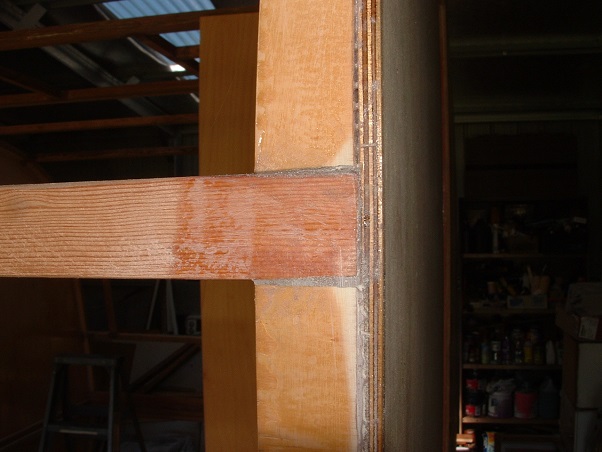 I haven't used any screws in any of the joints. I might put a screw in a few of the joints that would benefit due to flexing during travel, but most of the joints will rely on the Bote-Cote. This stuff is so tenacious, you need a sledgehammer to break it. Time for a cup o' tea (ok, hilldweller??  ) cheers, Al. |
|
|
|
Post by hilldweller on Mar 23, 2013 14:08:00 GMT 10
Now that's more like it! ;D ;D ;D ;D Yep you've earned your cuppa. Love those joints - thanks for the close ups. Can I ask how you get them so neat?  Looking forward to the next installment |
|
|
|
Post by Franklin1 on Mar 23, 2013 19:26:17 GMT 10
G'day hilldweller, You wouldn't believe how hard it was to hunt around all the joints I made, to find one that was "presentable enough" to show on the forum.  One of the great things about Bote-Cote when you mix the powdered filler into the mix, is its fantastic gap-filling abilities (...quite apart from its fantastic adhesive abilities  ). Any joints that aren't cut exactly 'square' can be bogged up no worries with the mix. Then you wait a few hours until it's cured a bit, and you can chisel off any excess glue to leave a very neat joint. I love the stuff! ;D cheers, Al. |
|
|
|
Post by seeshell on Mar 23, 2013 21:09:54 GMT 10
Hey Al
Wonderful to see that your Newcastle is back under steam!
That bote-cote stuff is great. You're absolutely correct saying it works as well as a glue OR a filler. I reckon the wood will fall apart before the joints do.
Once you have it all together, are you coating the timber all over with bote-cote? I was wondering if you were going with their full system, or just using it for the construction phase.
Looking good!
Cheers
Seeshell
|
|
|
|
Post by Franklin1 on Mar 23, 2013 21:53:24 GMT 10
G'day Seeshell,
Eventually, yes. It will all get the first coat where you add the timber preservative additive to the resin/hardener mix to thin it out and let it soak into the bare timber. Then it will get a second coat all over of straight resin/hardener mix. That's the way it's recommended in the Bote-Cote handbook.
Final paint coats over the resin will be Dulux Weathershield.
cheers,
Al.
|
|
|
|
Post by hilldweller on Mar 24, 2013 8:43:56 GMT 10
G'day hilldweller, You wouldn't believe how hard it was to hunt around all the joints I made, to find one that was "presentable enough" to show on the forum. One of the great things about Bote-Cote when you mix the powdered filler into the mix, is its fantastic gap-filling abilities (...quite apart from its fantastic adhesive abilities ). Any joints that aren't cut exactly 'square' can be bogged up no worries with the mix. Then you wait a few hours until it's cured a bit, and you can chisel off any excess glue to leave a very neat joint. I love the stuff! ;D cheers, Al. Thanks Al. [...adds Bote Cote to the 'Mabel' shopping list...]What do you cut the notches with? Tenon saw and chisel? ? |
|
|
|
Post by Surf Tragic on Mar 24, 2013 14:53:10 GMT 10
, At last.... I have time to read this thread from start to finish  You are sure having a great time Franklin1, actually building a van from a to z, it is a fair bit like building a boat, very satisfying! There are no fastenings required in the boat I am building except SS bolts at the Transom - Keel joint to take the thrust of the outboard . You are doing a superb job. The beauty with BoteCote is that it needs a thickness of glue in the joint to make a successful bond. A good tight fit pushes the glue out & it will fail, so in fact, a loose fitting joint is best with this product. Could easily make me into a sloppy carpenter ;D ;D Some woodworking glues require the opposite, a fairly perfect fit, & tight clamping. My Dad used to instruct me that "it isn't the glue you apply, but the glue you squeeze out" that did the job, well, he knew nothing about BoteCote those days ST |
|
|
|
Post by hilldweller on Mar 24, 2013 15:33:41 GMT 10
Some of us may need both types of glue LOL!
|
|
|
|
Post by Roehm3108 on Mar 24, 2013 16:09:55 GMT 10
|
|
|
|
Post by Franklin1 on Mar 24, 2013 21:18:11 GMT 10
G'day hilldweller, I started off using a tenon saw but quickly discovered the saw binds in the cut because there's no off-set in the teeth. I ended up switching to the standard cross-cut saw that has ten teeth to the inch, and has some off-set in the teeth. You're not looking for a nice neat cut like they use in cabinetmaking anyway. Like Surf Tragic says, you need a gap between the timbers being glued with Bote Cote, so a 'rough enough' cut is good enough. The cross beams I used to span the sides were each 30mm wide, so I cut the notch about 32mm wide to give a 1mm gap each side for the glue. If I cut slightly wider than 32mm due to slack sawing, then it didn't matter - the Bote Cote fills the extra gap nicely and still makes the joint strong. The more cuts you make between the outside pencil lines of the notch, the better. For a 32mm wide notch, I would make a cut at every 8mm spacing (5 cuts total for the width). It makes it heaps easier to cut out the waste timber with a chisel, and makes the overall notched-out section look a lot neater. --------------------- G'day Ray, Yep, I think a number of vans on this forum will be able to bolt an outboard motor on the back when climate change really kicks in and sea levels rise. Funnily enough, the first coat of thinned Bote Cote applied to bare plywood is probably creating a surface similar to the Ralph Symonds "Rescote" product from the old days. cheers, Al. |
|
|
|
Post by hilldweller on Mar 25, 2013 16:35:28 GMT 10
Thanks Al. Looking forward to the next pics. You can really see the shape starting to emerge now.
|
|
|
|
Post by Franklin1 on Apr 10, 2013 13:30:38 GMT 10
G'day All, Just putting the feelers out for a couple of parts for this project. The original sink is a rusty ol' relic. I think John Walsh might have got hold of some factory seconds to keep his vans in the budget price range. Needless to say, this grotty old sink can't be accepted into the 'new' van, so I'm looking for an exact replacement in good condition. 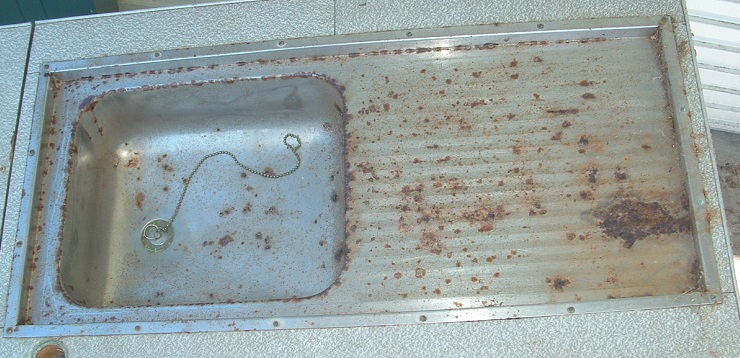 The other item I'm looking for is the bracket for one side of the table leg. One of them has gone missing over the years, and a cheap plumber's pipe bracket was used as a substitute... 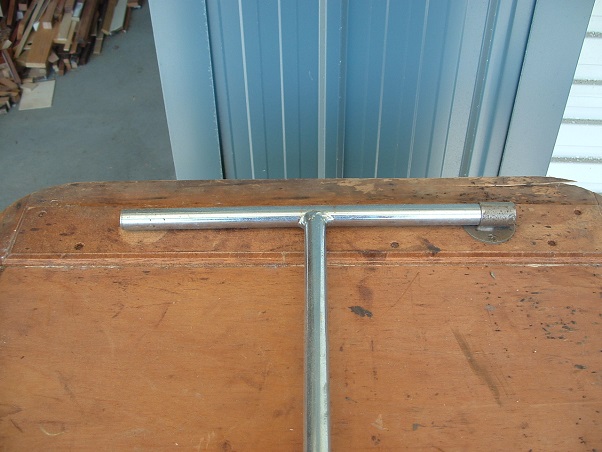 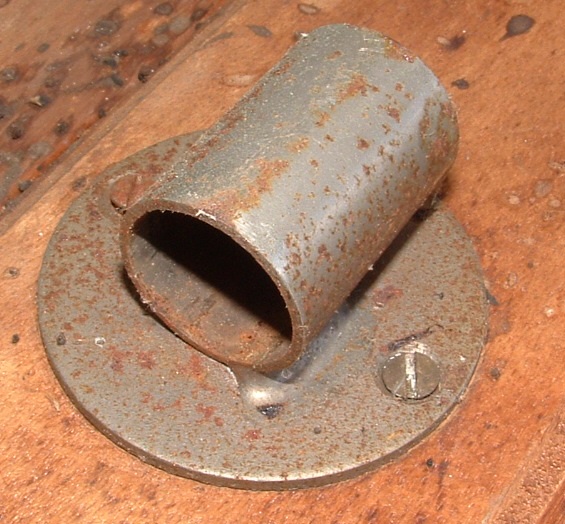 I know many of you have a few of each of these items sitting in your shed, so now is the time to have a cleanout (I wish...). I do have a Plan B for both items, so it's not the end of the world if I don't find replacements. cheers, Al. |
|
|
|
Post by Roehm3108 on Apr 10, 2013 17:14:26 GMT 10
As much as I like you, Al, you CAN'T have one of my table brackets. Interesting that they are the same actually  So Plan B is pipe conduit clips??? ;D ;D ;D Surely the steel city has some handy metal welders who could knock one up for you, if all else fails? Ray |
|
|
|
Post by grandad on Apr 10, 2013 19:08:56 GMT 10
What a fantastic build Al,
You've given me several good ideas and a lot of inspiration.
Can't help you with either item but the bracket looks like something you could knock together.
A disc of steel. Just mark the circle on some flat sheet and cut roughly up to it with a cutting disc in your angle grinder.
Then swap to a grinding disc to sneak up on your circle.
Finish with a handfile to smooth things out.
Tack a bit of pipe to it and Bob's your uncle.
Looking forward to the next installment.
Cheers
Jim
|
|
|
|
Post by Franklin1 on Apr 11, 2013 10:05:09 GMT 10
Thanks guys for the responses. I'm sure my brother can make one of the table brackets for me, but I just thought I'd put it out there before going to that trouble. I might as well do a little update while I'm here... The first internal ply sheet has been fitted, and the seat boxes inside are being built... 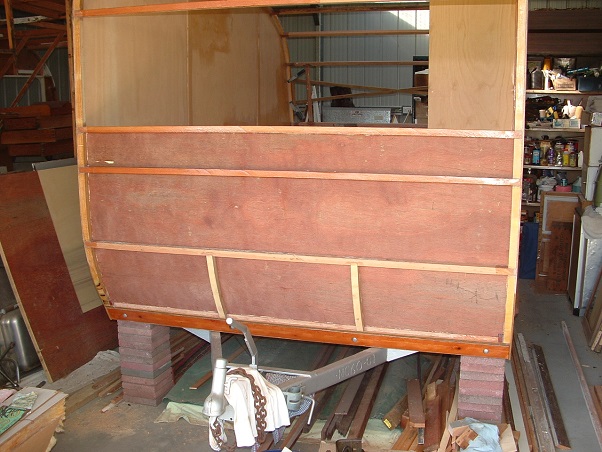 I'm giving the Selleys Liquid Nails Platinum a go during the internal construction...  It seems to be working well. It's a polyurethane glue, and claims to be waterproof (but not fully immersible for long periods). Darn stuff turns your fingers black if you get it on them, and then it takes a couple of days to wear off. You can clean up any excess on the job immediately (but it's a messy way of doing it) or you can wait 3 hours until it's cured a bit and then chisel off the excess with a blunt chisel (an easier and neater way of doing it). Costs $10.44 per cartridge at Bunnings. But, today I wanted to brag a bit about a little job I completed. But only because I'm chuffed with how it turned out. I built a little cabinet thingy to fit above the front table, under the window. It was progressively built over four days, which means you couldn't call me a fast cabinetmaker by any stretch of the imagination. When the Historical Inspection Team comes around with their white coats and clipboards, to check on authenticity (commonly known in Vintage caravan circles as "copping a HIT" ) they'll see a little cabinet that looks like a trinket box with a nik-nak shelf...  Complete with a Kellogg's delivery truck on one side... 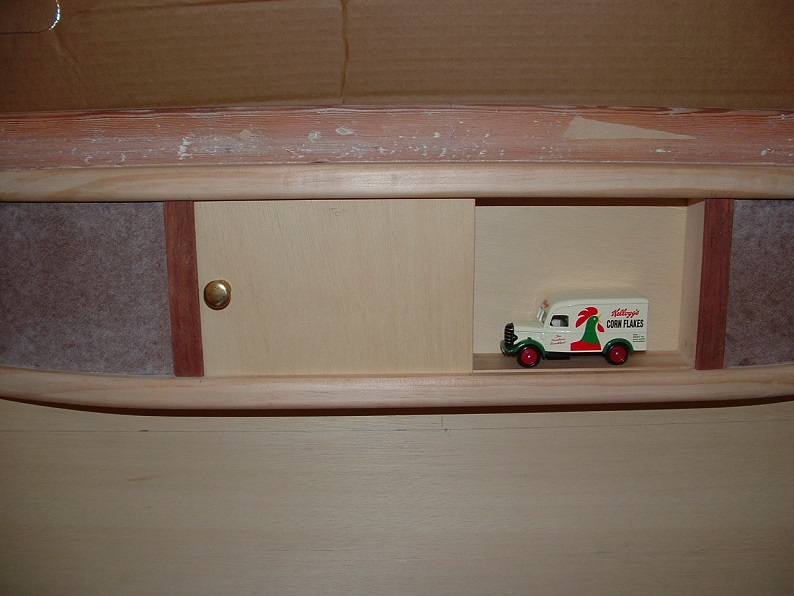 Then, as soon as their backs are turned, the door is slid across to reveal a modern-day double pole power outlet ... 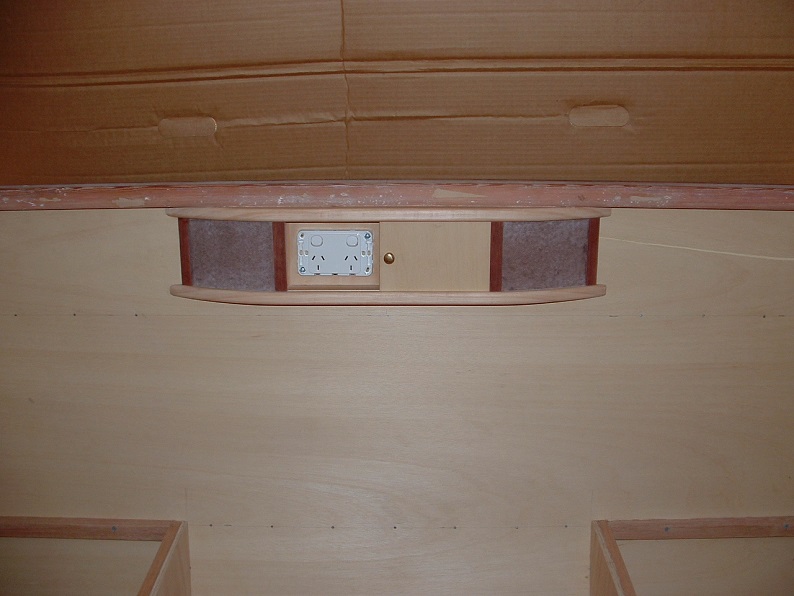 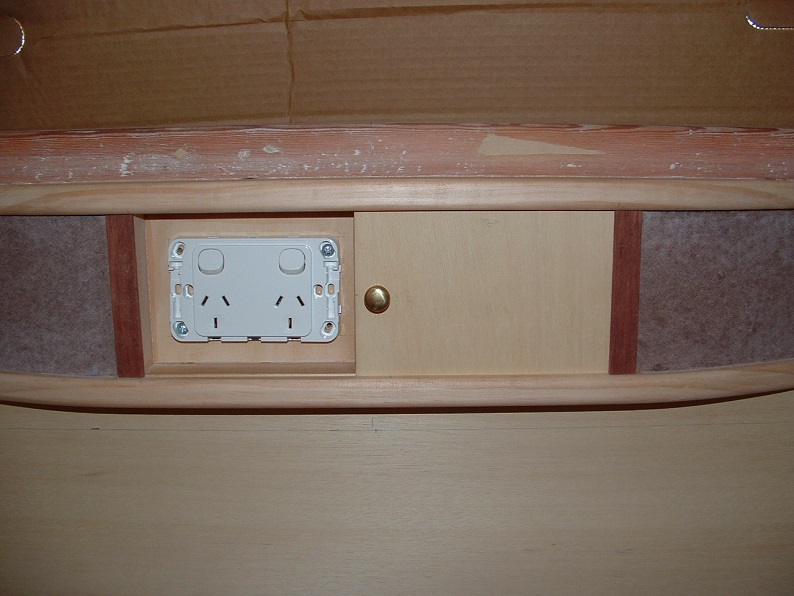 Sneaky, huh?!! There's been many a time we've travelled in a caravan, and wished there was a power outlet at the table, for laptops/phone chargers/etc. I've always had the thought that if I ever built a van, I'd put one in, and so I thought "Hmmm...how could I disguise one in the project van?"cheers, Al. |
|
|
|
Post by Roehm3108 on Apr 11, 2013 12:34:29 GMT 10
Hi Al. As they say on F/B "like" the trinket/power point box ;D ;D Now just don't forget to do your wiring BEFORE laying the outer skin!! By the way, speaking of wiring, are you having side clearance lights? What are your plans on camouflaging that wiring? Ray |
|
|
|
Post by Franklin1 on Apr 11, 2013 13:34:12 GMT 10
Thanks for the 'Like', Ray (you ol' hip internet user, you  ). As a little side story, I actually invested in a small internet start-up company last year. They were developing a new social platform which was a cross between Facebook and Twitter. It looked promising, but for some reason the name Twitface never took off. Clearance lights? Yep, it doesn't need them legally (only 6' 7" wide), but it had them originally up on the top front sides, so they'll go back there in the rebuild. I can guarantee I won't miss any wiring, and nor will you be able to see any of it once the project is completed. cheers, Al. |
|
|
|
Post by cruisindoug on Apr 12, 2013 7:40:23 GMT 10
|
|
|
|
Post by Franklin1 on Apr 12, 2013 11:03:14 GMT 10
This'll fool 'em Doug, ay?! They'll think it's a safe deposit box ... 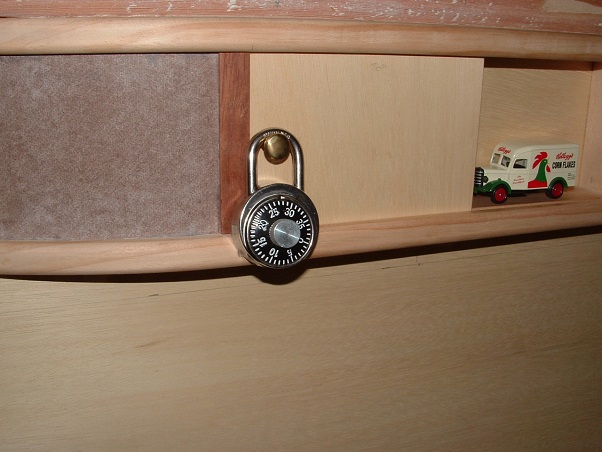 Meanwhile, elsewhere in the project... I like to make elongated holes for the cables rather than round holes...  Two holes drilled side by side and joined together is better than one large diameter hole. It means less timber is taken out and minimises the timber weakening factor that holes cause. Here is the start of the seat box framework, and also showing a power board in the background... 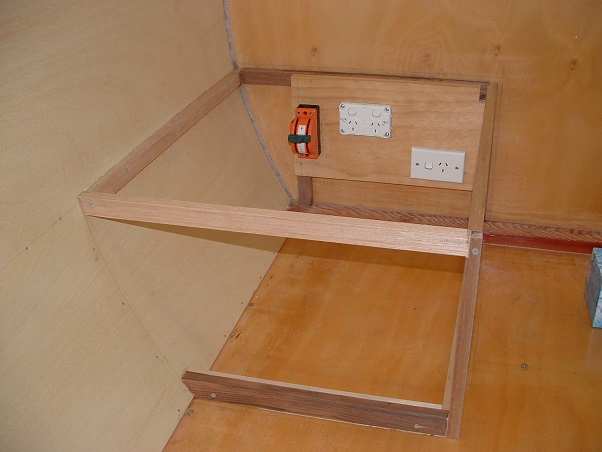 The orange gizmo on the board is a double pole knife switch, which allows two power sources in, and one out. It's for the 12V lights, and allows power to come from a 240V:12V transformer option, or 12V battery option. The curve of the seat box at the front was a bit tricky to create. I ended up cutting a template out of scrap masonite, and using it to mark out the plywood...  There were no ends on the original seat boxes, so I don't know what kept the cushions in place on bouncy roads. This time around, it's getting some fancy ends that have an outline that looks like a 1960s TV chair that would have been in the loungeroom... 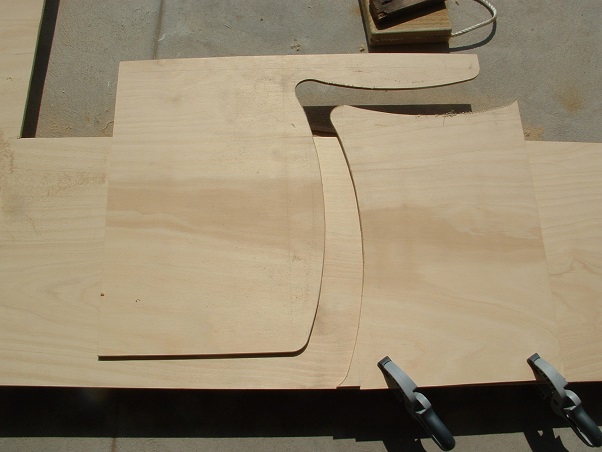 You can roll the edges of the ply by hand-sanding...or you can cheat and use a router like I did ... 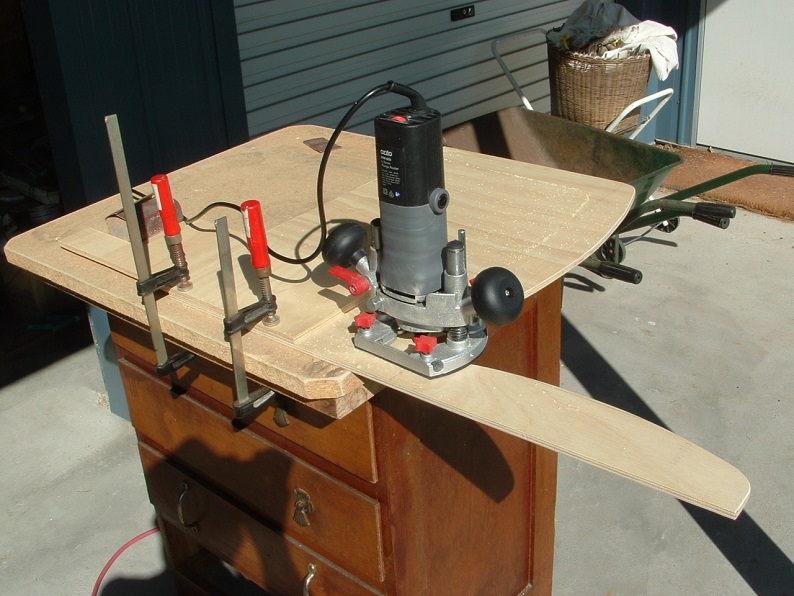 See you next time... cheers, Al. |
|
|
|
Post by hilldweller on Apr 12, 2013 14:29:00 GMT 10
Looking good Keep going! And posting |
|
|
|
Post by Roehm3108 on Apr 13, 2013 11:11:24 GMT 10
|
|
|
|
Post by Franklin1 on Apr 15, 2013 18:05:13 GMT 10
G'day Ray, You can come over to my shed and practice anytime. I've got four of the blessed things that I've accumulated over time. One is fitted in a router table, another is a jumbo Makita 1/2" bit size, and I recently bought a cheapy Ozito from Bunnings for freehand routing with 1/4" bits. The fourth one is an old palm router. Remember the "Skil Sher" brand of tools? It goes wayyy back. Burnt the motor out in it a few years ago, but can't bring myself to chuck it away, because you can't get this size anymore. Thought I might be able to get the motor rewound...one day... I scored an old fold-up table off the footpath the other day. "Free to any home", it was... 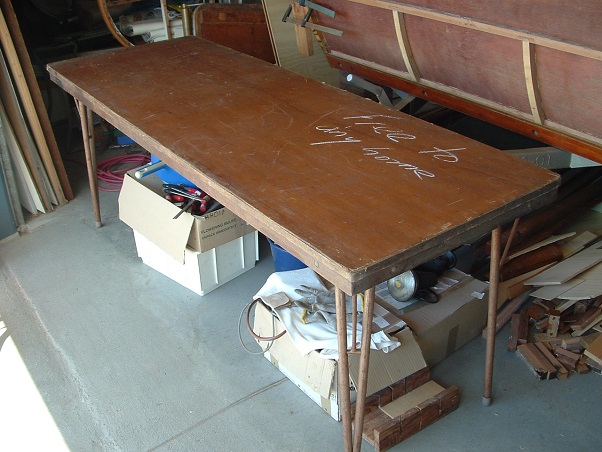 It's been put into service for the project as a "painting table" ... 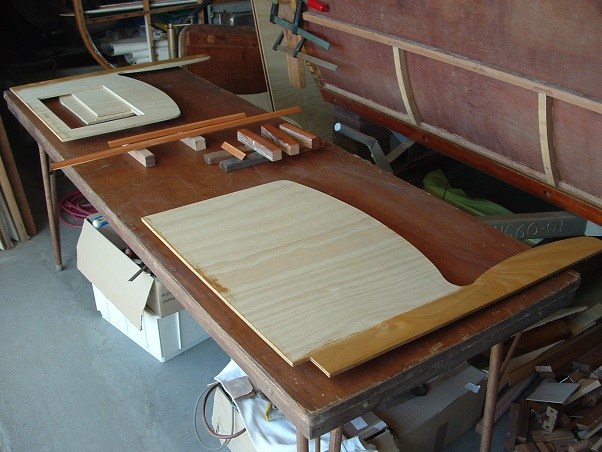 Over the weekend, I prepared the next sheet of internal ply for above the front window, and fitted it today. Man, what a drama! The radius of the bend was just about on the breaking point for the 3mm ply. Have you ever had a situation where you try and fit something that's under tension, and you get one end in, and then you go to the other end to fit that end, and the first end pops out of position? This sheet was the same, but four corners popping out all over. After trying to test fit it a few times, I gave up and went and had a cuppa while I thought of a "smarter" way of doing it. I ended up putting some "end stops" in the four corners, and getting two adjacent corners in position to start with, followed by much grunting and groaning with the other side of the sheet to force it up and on the other two adjacent end stops. Two hands heaving on the edge of the sheet, and my head pushing the sheet up into the bend curve. What a sight...and such language!! This is the sheet finally in position, showing the two end-stops on the bottom edge... 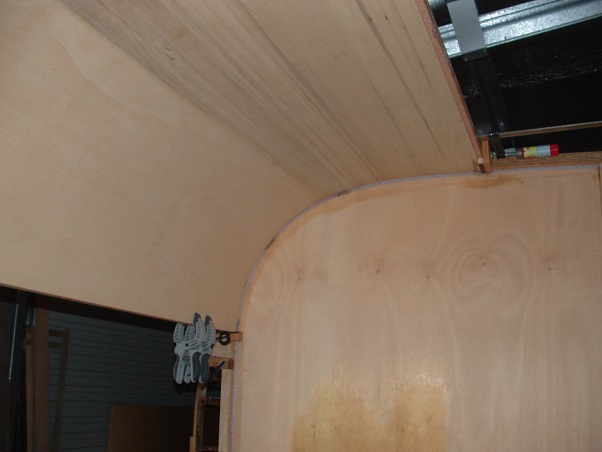  I had to make some special end-stops out of scrap timber for the other side, to make sure the ply edge ended up halfway on the cross-beam timber... 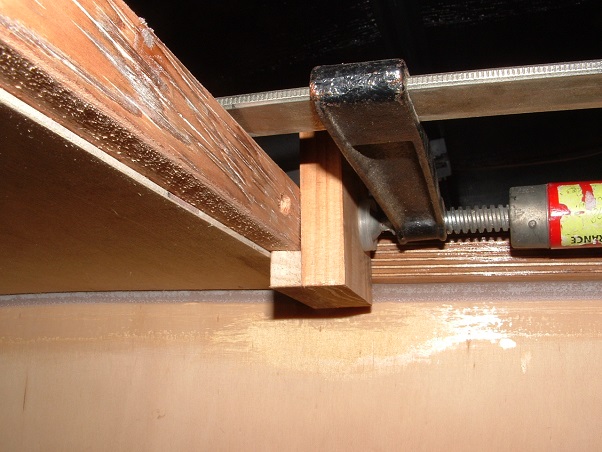 Gotta go have a shower and go out for a social event. Will come back later and finish this off... |
|
|
|
Post by Franklin1 on Apr 15, 2013 22:29:01 GMT 10
As I was saying... After an hour or two of fitting and glueing all the contact points, and nailing the ply to the cross-beams, I was able to stand back and admire the result... 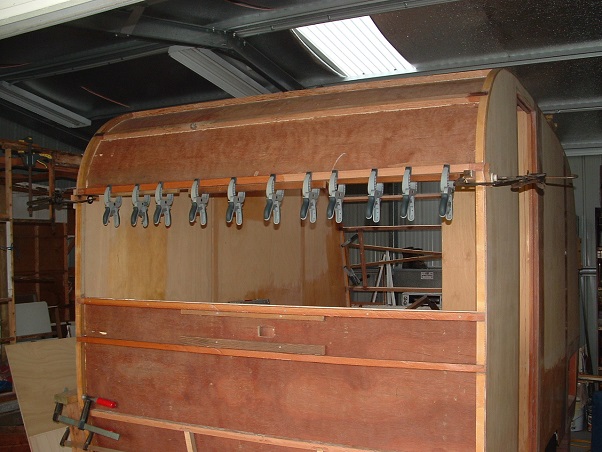 Now comes the rebuild of the front overhead cupboards. I salvaged the front face of the original cupboards in the demolition, so at least I've got some measurements to work with... 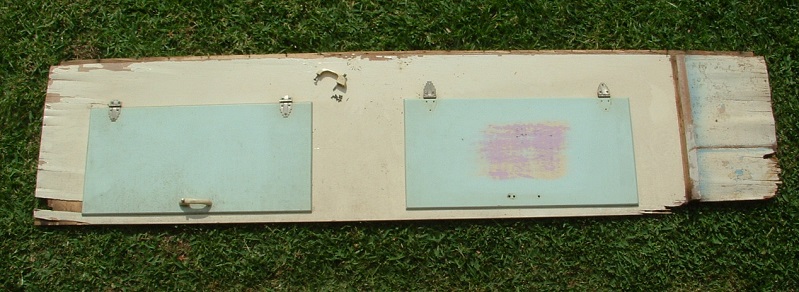 I'd previously carefully rubbed back the paint on one of the doors with soapy steel wool, to see what the various layers of paint showed. It would appear the blue paint is the original top coat, and is now 53 years old. I could only detect three different colours - a purple primer, a yellow undercoat, and the blue top coat... 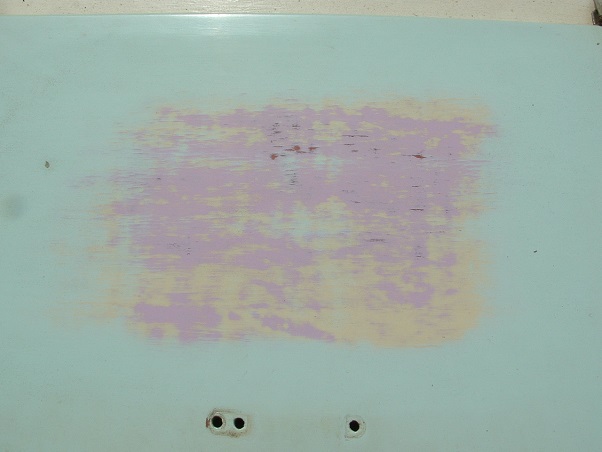 More fun and games tomorrow ... cheers, Al. |
|
|
|
Post by humpyboy on Apr 16, 2013 9:19:40 GMT 10
I like what you are doing AL, I find it very inspirational almost to the point of wanting to start building my "OWN" van but should I decide that it would have to wait till I have my other projects out of the way first. ;D
|
|
foxy
Full Member
 Talent is God given. Be thankful. Praise is Man given. Be humble. Conceit is Self given. Be Careful
Posts: 160
|
Post by foxy on Apr 16, 2013 10:52:46 GMT 10
I stand in awe of the the work you have done , the way in which you have approached and planned this enormous challenge is to be admired. Are you bald yet , but the joy of seeing each stage come together would out way any frustrations you have had. As "humpyboy" said" he feels he could do the same" I' sure there are a few out there who feel they could do the same. I love the way you are documenting you progress , just keep the photos coming. I nominate you for an "Oscar" for your outstanding performance.  Cheers Foxy |
|


 )
)


 ). Any joints that aren't cut exactly 'square' can be bogged up no worries with the mix. Then you wait a few hours until it's cured a bit, and you can chisel off any excess glue to leave a very neat joint.

 You are sure having a great time Franklin1, actually building a van from a to z, it is a fair bit like building a boat, very satisfying!


