|
|
Post by griffin on Dec 18, 2013 13:39:21 GMT 10
Hi Al Sorry to see you on the sick list, but can fully sympathise having spent many hours on 'restricted duty' with back problems so hope you have a speedy recovery. Pleased to see you are using your time to acquire some new skill sets, good looking result. Are you confident enough yet to be taking orders for covers?  An interesting tip for inserting the cushions, there are some clever sods out there. I recently had to wrestle mine back in for the Olympic after we washed the covers. Unfortunately that tip wouldn't work as they still has the vinyl covers too! Speedy recovery George |
|
|
|
Post by Franklin1 on Jan 1, 2014 15:18:42 GMT 10
I think I might have got the ice chest sorted out. I spent a fair bit of time stripping the paint coating off the inside of the chest, using my time-honoured method of paint stripper... 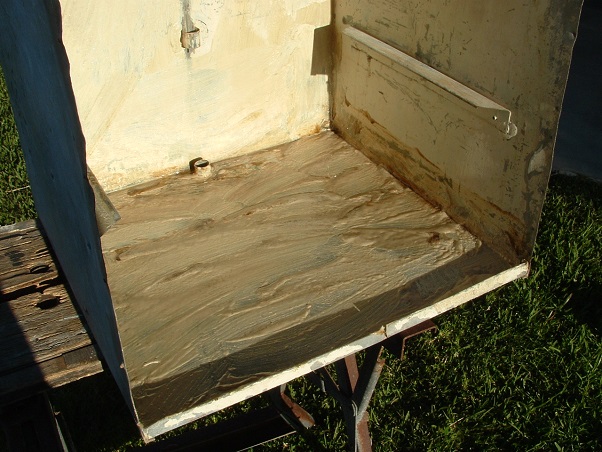 ...followed by sawdust to scour the sloppy paint off the metal... 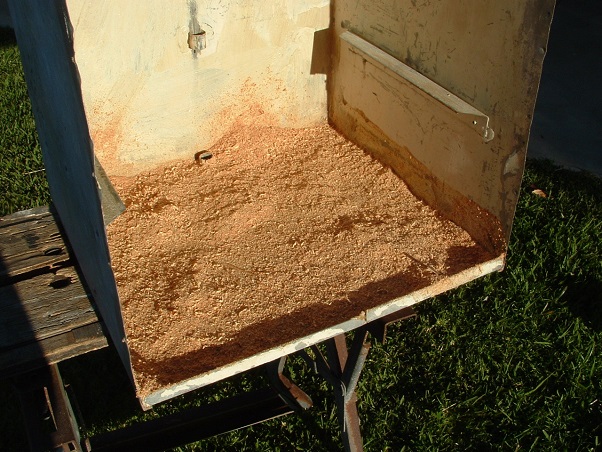 ...and a wad of coconut fibre to shift the sawdust around... 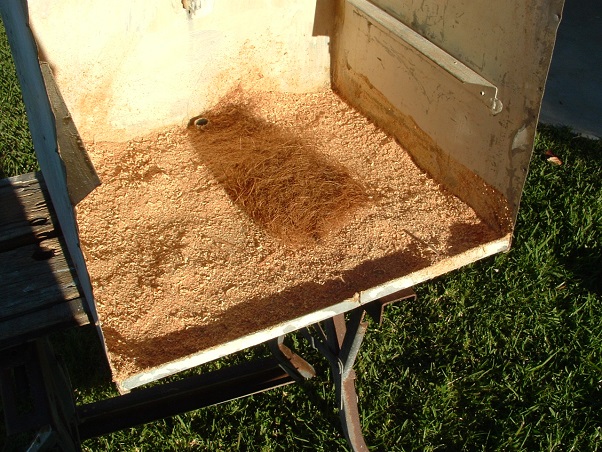 You might remember all the holes that were in the ice chest cabinet... 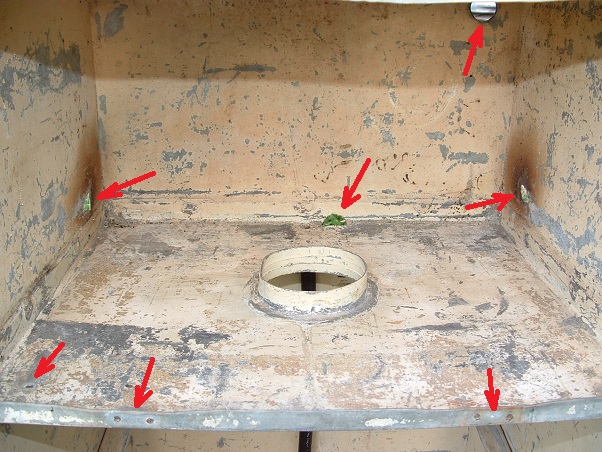 I couldn't get a soldering iron into the confined spaces of the cabinet to solder patches over the holes, so I cheated and stuck them into position using Sikaflex-Pro sealant... 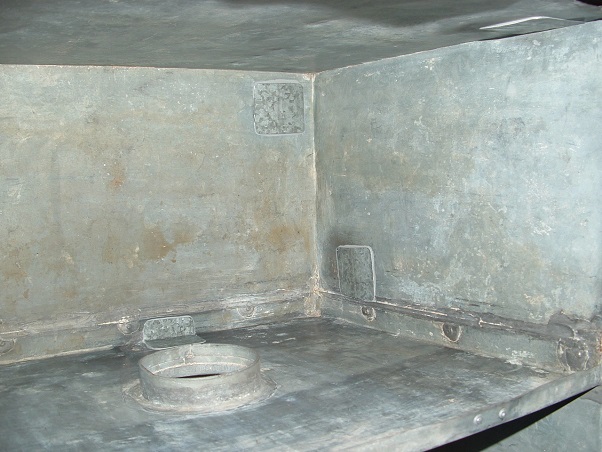 Smaller patches and pop rivets covered a few other smaller holes and a split... 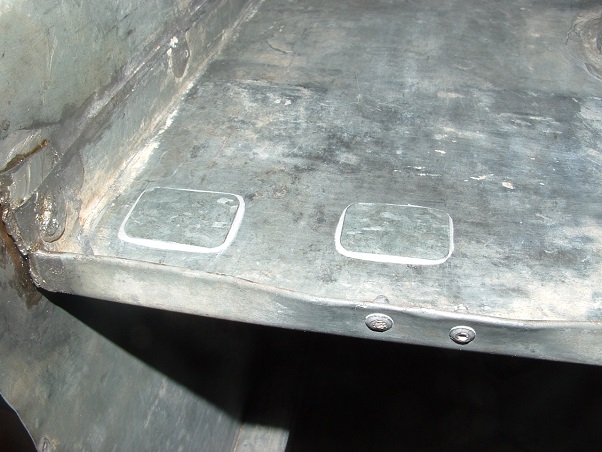 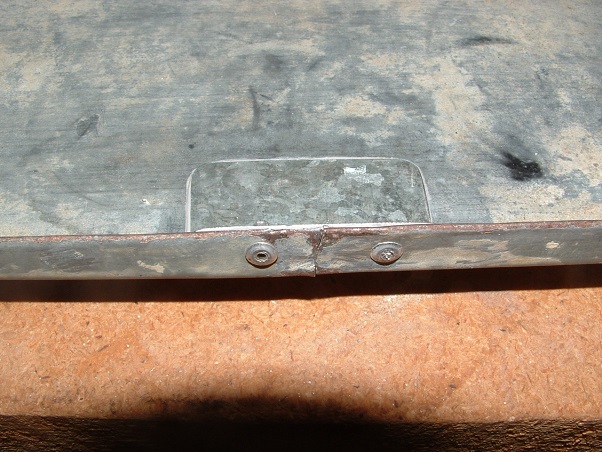 A couple of coats of zinc-rich paint protected the outside of the holes against any further rusting...  It's certainly not the prettiest ice chest you'll come across. Probably the kindest thing you could say about it now is that it "looks reasonable"  ... 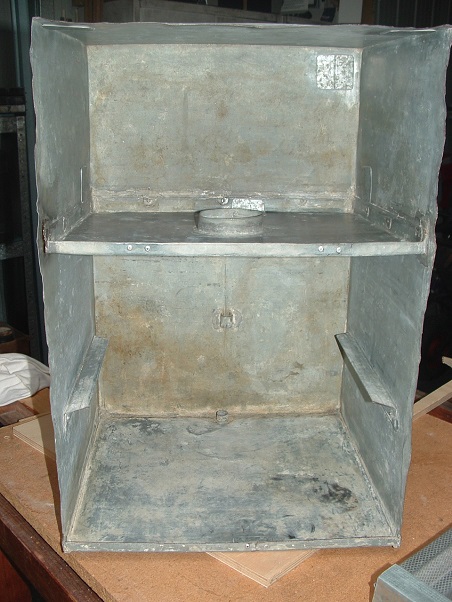 There was no shelf for the bottom half of the chest, but as luck would have it, a fella around the corner put a small electric fridge out on the footpath for collection. A quick trip home to get a tape measure, and back to check the size of the shelves in it. Bingo! Just what the doctor ordered  ... 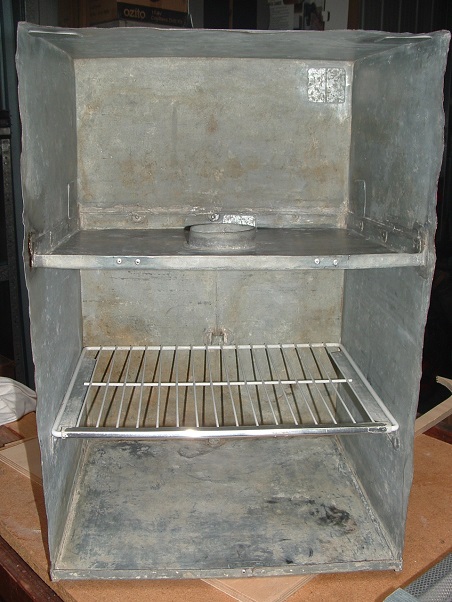 At least now I have an ice chest that is functional again  ...  And just by the by... I discovered part of a Lysaght's brand mark on the underside of the ice tray shelf. Enough of the brand to see the year number (1958) and the month number (11 = November). That surely means the ice chest and van were built after November 1958... 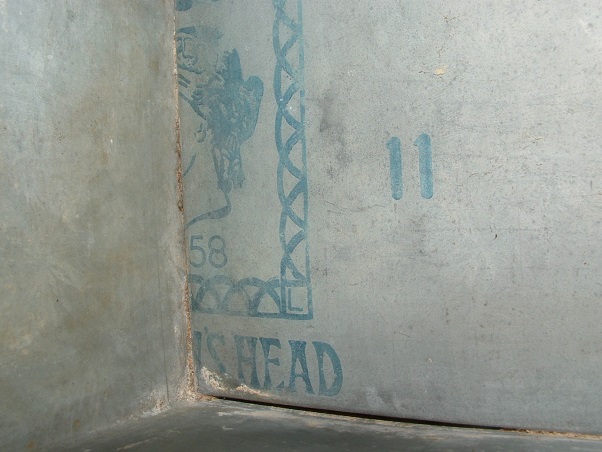 cheers, Al. |
|
|
|
Post by cobber on Jan 1, 2014 18:33:28 GMT 10
G'day Al, You said, "It's certainly not the prettiest ice chest you'll come across. Probably the kindest thing you could say about it now is that it "looks reasonable" ..."You're kidding  ..... it looks beautiful. At least you won't have to worry about it catching fire when you refuel your generator Good to hear you are getting stuck into it again. Cobber. |
|
|
|
Post by hilldweller on Jan 7, 2014 18:07:40 GMT 10
Looks great. I like those patches  Very impressed with the upholstery too! Keep going.... |
|
|
|
Post by Franklin1 on Jan 17, 2014 15:47:39 GMT 10
I've been spending a bit of time stripping paint off some of the fixtures used around the outside of the van... 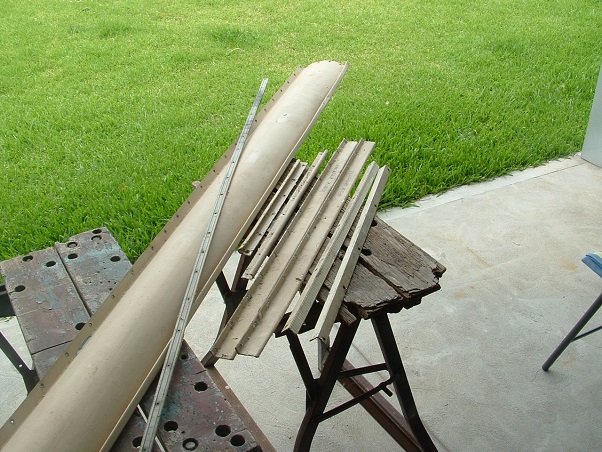 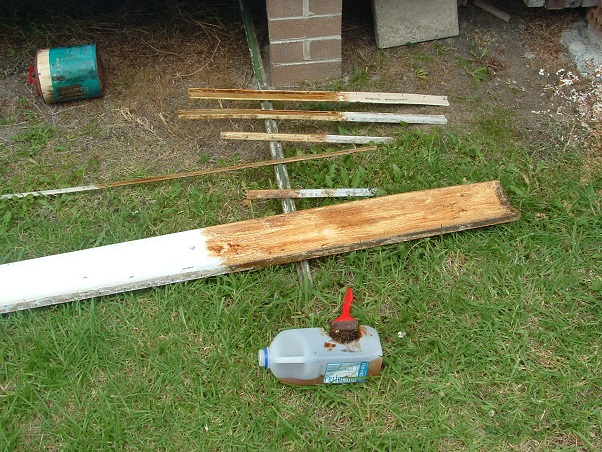 Once they were stripped, I had to do a bit of panelbeating to get 60 years of bumps and bruises back out of them, followed by a cleanup with soapy steel wool...  I even threw all the brass screws into a container with a bit of paint stripper, and swished the screws around to clean the paint off them... 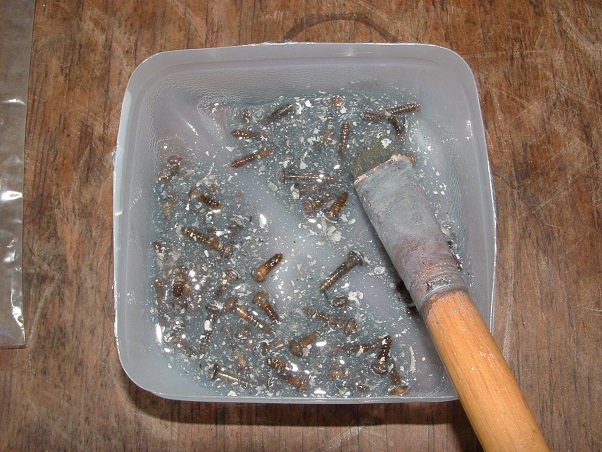 Kitchen sink cupboard: Kitchen sink cupboard:I've made a start on this, but I'm very much winging it as I go. I just keep adding another bit of timber and then stand back and see if it looks ok. It's early days yet, but so far I've made the top bench part... 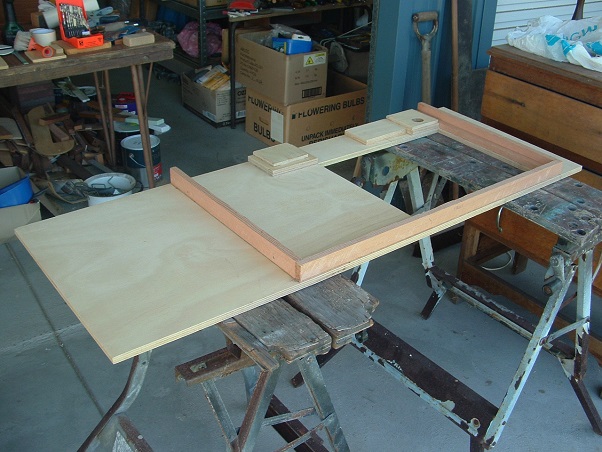 Test fitted the sink... 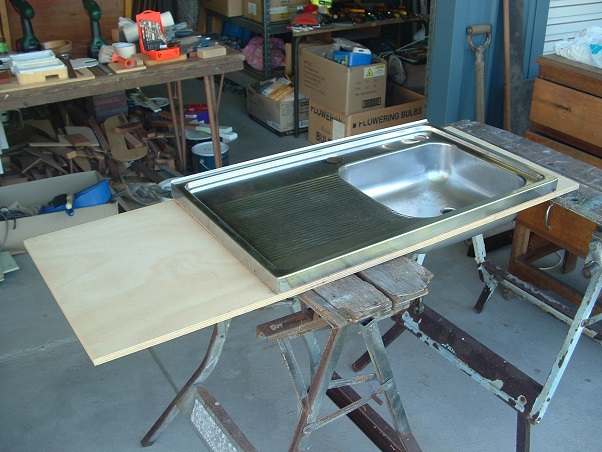 ...and the tap...  I still don't have much flexibility in my hip, so this job will be slowly-slowly...  cheers, Al. |
|
|
|
Post by humpyboy on Jan 17, 2014 18:42:56 GMT 10
Now you be careful young fella don't go doing anything silly.
|
|
|
|
Post by mausie on Feb 8, 2014 13:29:27 GMT 10
Hi Al
Really love your work You seats turned out top class - Joe said he is impressed and that is a big complement
Cheers from this side of the fence Mausie |
|
|
|
Post by shesgotthelook on Feb 8, 2014 14:06:17 GMT 10
Great work Al, I think you will be a bit lost when it is all finished. |
|
|
|
Post by Franklin1 on Feb 13, 2014 16:59:21 GMT 10
I've managed to make a bit of progress with the kitchen sink cupboard. After agonizing about how to do it, I had to bite the bullet and put some timber down otherwise the project would never keep moving. First came the base parts... 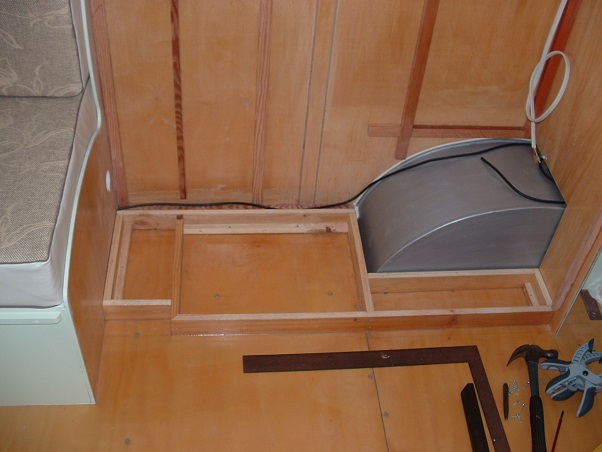 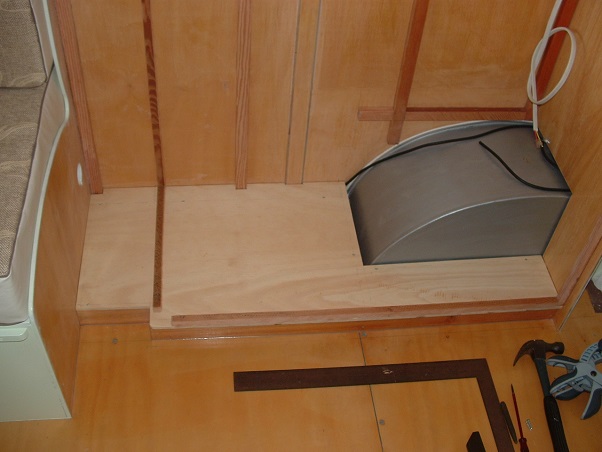 ...and then a couple of open shelves on the left hand end, for reasons I'll explain shortly... 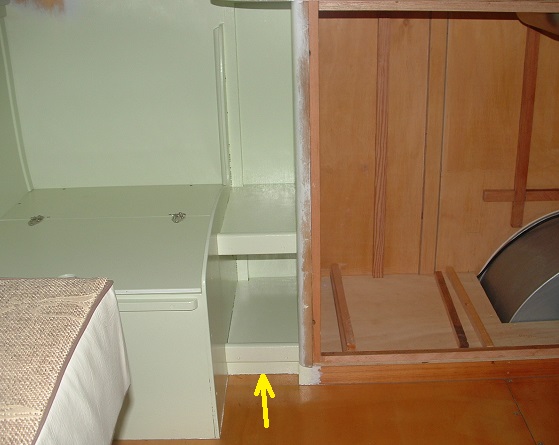 Then everything above the sink was completed. Unfortunately, the replacement laminex is not your vintage cracked ice pattern - more like cracked pepper.  But at least it blends in with the green colours of the paint. Along with the new laminex, a light fitting, a vintage tea-towel rail, and a power point were also fitted... 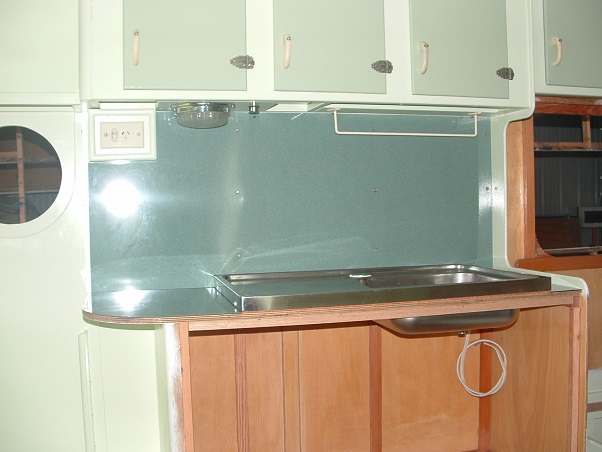 The open shelves at the left hand end were necessary so the benchtop could be curved at that end. That allows more access room into the offside seat...  The power point showing above the bench is one of the two original power points in the van. Both of them had some melting in the plastic face due to electrical arcing in the positive terminal at some time in the past... 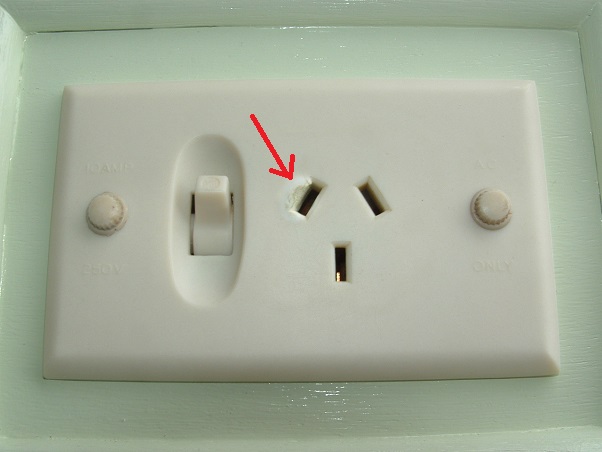 I didn't want to use these power points, but I did want to include one of them as a "show and tell" piece of history, so I worked out a way of doing that. The old power point is actually fitted to a box lid, which pulls away from the wall to reveal a modern double pole power outlet behind it. Sneaky, hey!?... 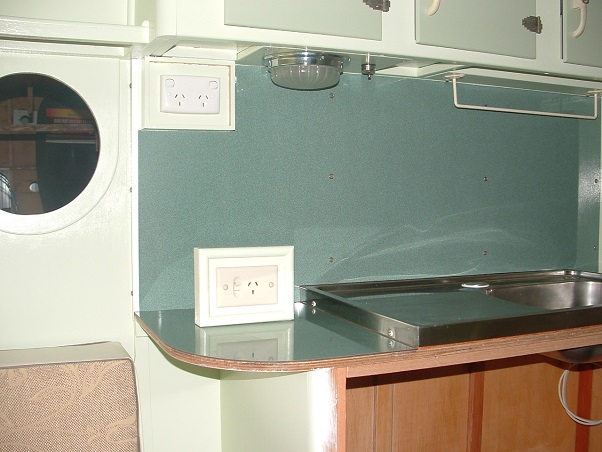 -------------------------------------------------------------------------------------- If you ever have to fit a piece of laminex or plywood into a border, and do it fairly accurately, this method worked well for me when I cut the laminex splashback... 1. Save a number of empty breakfast cereal boxes... 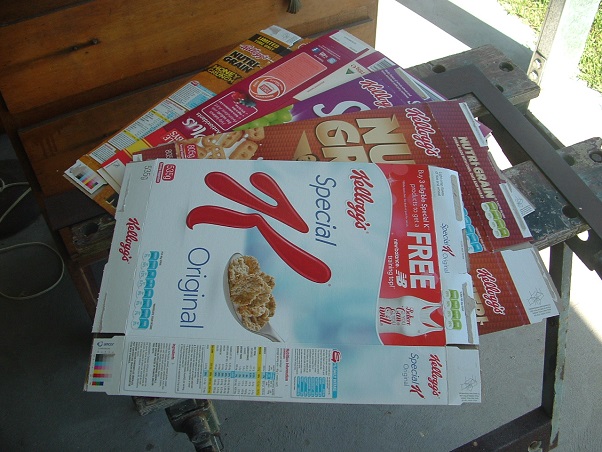 2. Cut pieces of cardboard using a straight edge and a sharp knife, and tack those pieces around the perimeter of the border. Tape any overlapping joints as you go... 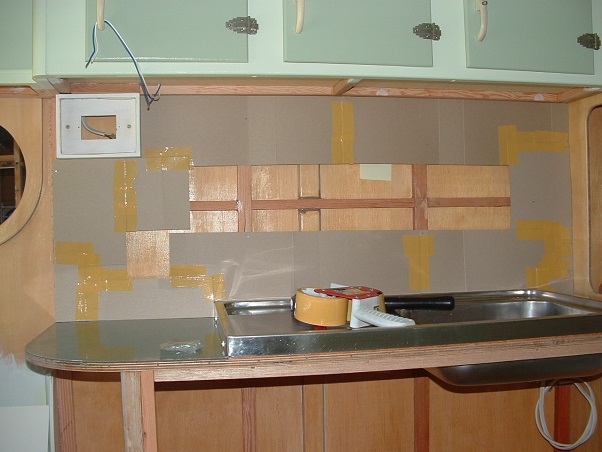 3. Fill in the centre gap with more cardboard, and tape every joint... 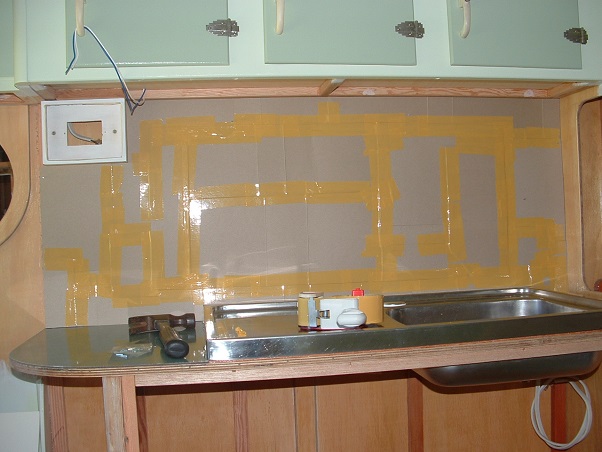 4. Pull out any nails/tacks, and lay the cardboard on the floor and tape all the joints on the other side...  5. You now have a template that you can trace around. Lay the template on the material you have to cut, making sure you have the correct side of the template facing the material, and clamp it to the material. Then trace around the template... 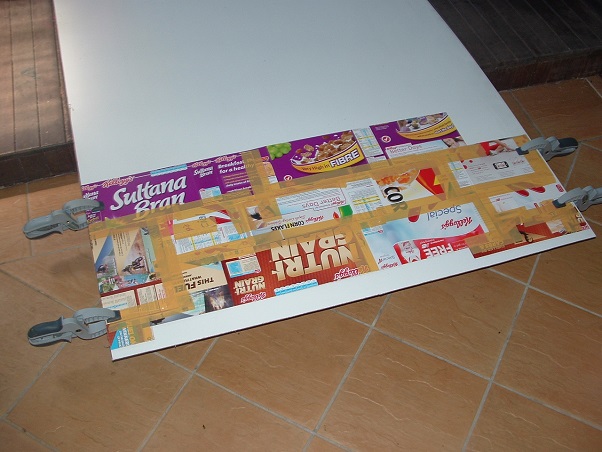 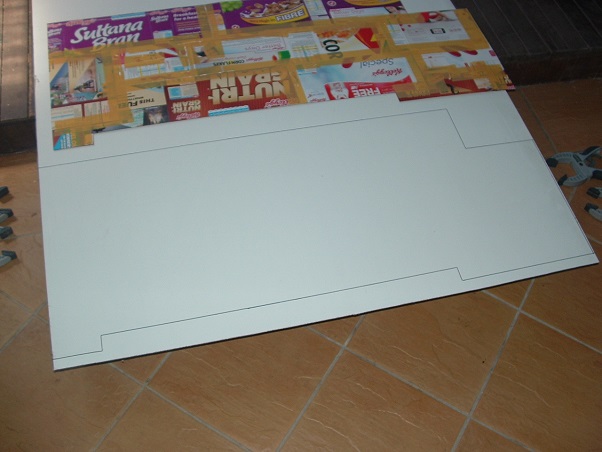 6. Cut around the outline, just on the inside of the tracing line, and you should end up with a "perfect fit"... 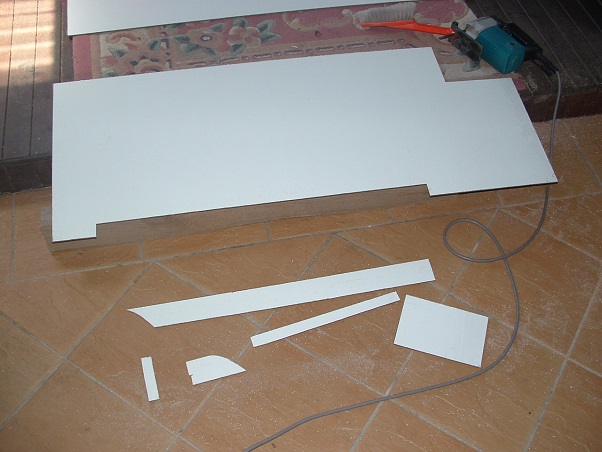 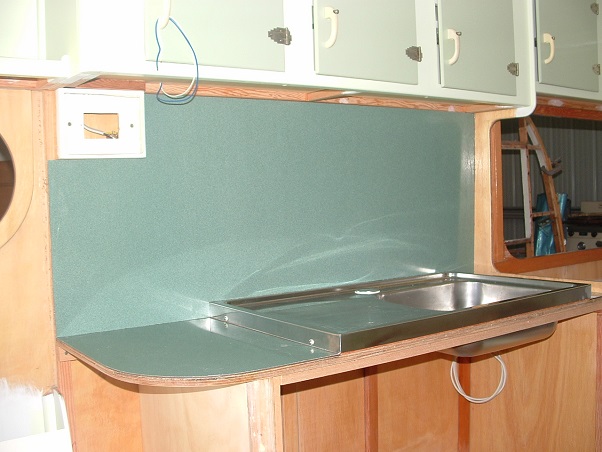 till next time, cheers, Al. |
|
|
|
Post by hilldweller on Feb 13, 2014 17:27:59 GMT 10
Lovely job, as usual. It is good of you to share how you get things so neat and tidy Looking forward to the next instalment. |
|
Deleted
Deleted Member
Posts: 0
|
Post by Deleted on Feb 13, 2014 19:35:51 GMT 10
Hi Al Been silently lurking on your posts for a damn long time now. As everyone has already said... I admire your attention to detail and it is paying off in the quality of finish. All along I have been trying to remember where I hade seen a similar van in the past... Then I remembered .. The van that got me started here on the forum was ... what I think... a Newcastle van built by John Walsh of Mayfield.... Mine had a one piece front window. Take no notice of the dates on the photos .. it was back in 2004 when I bought the van.. vintagecaravans.proboards.com/thread/34/reddos-first-post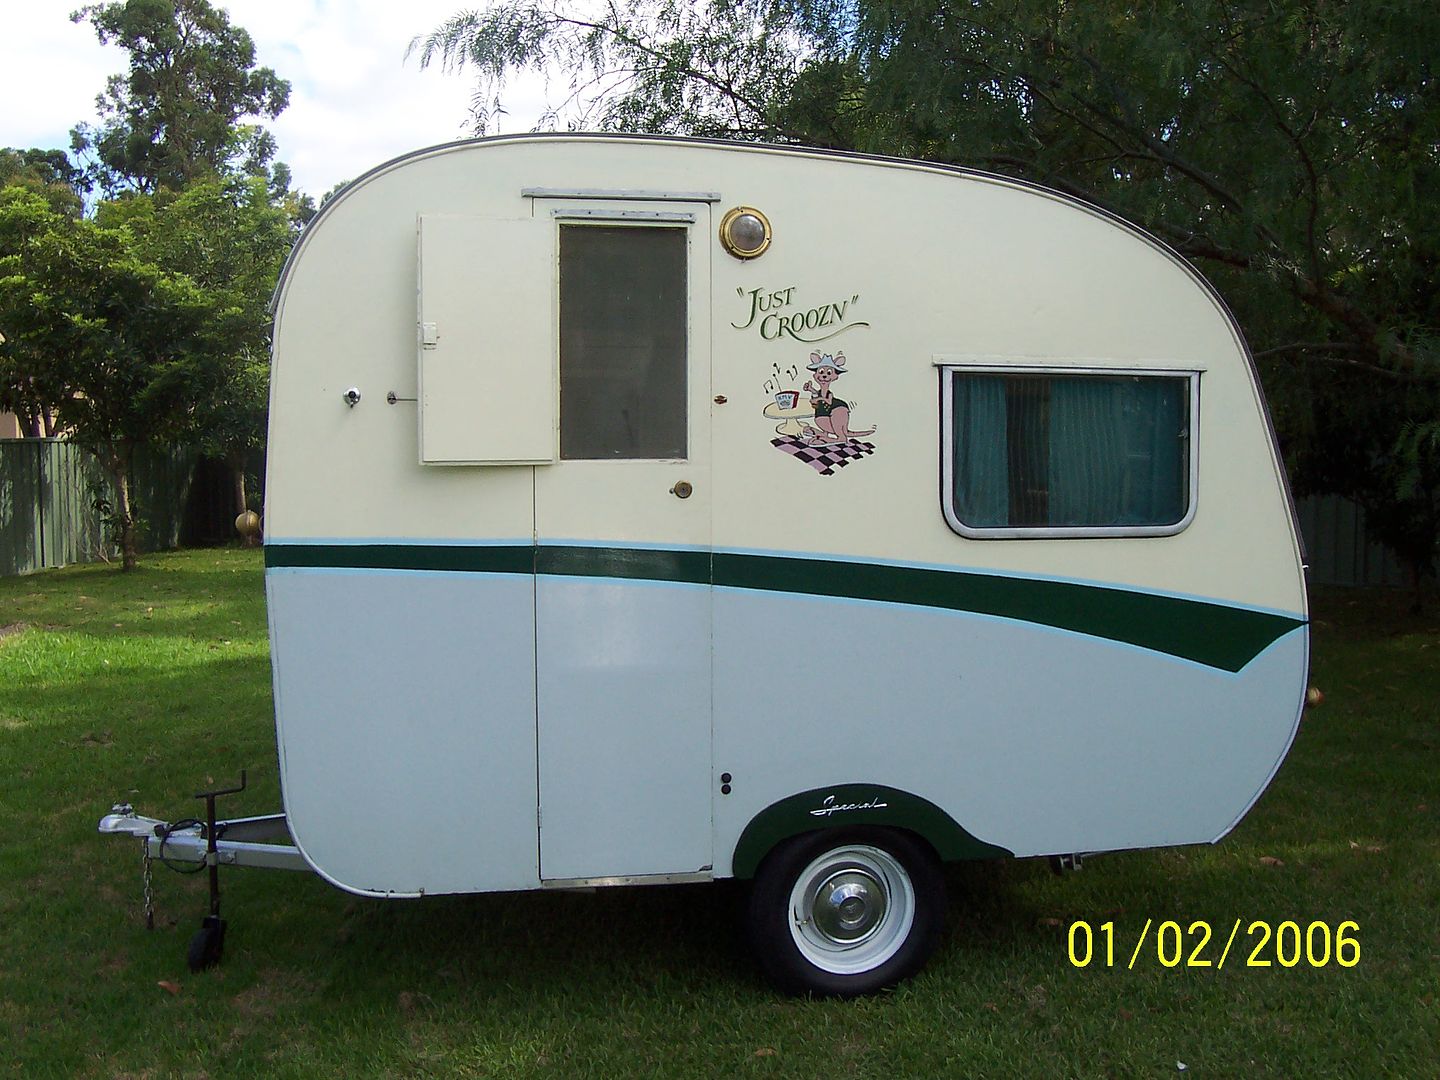   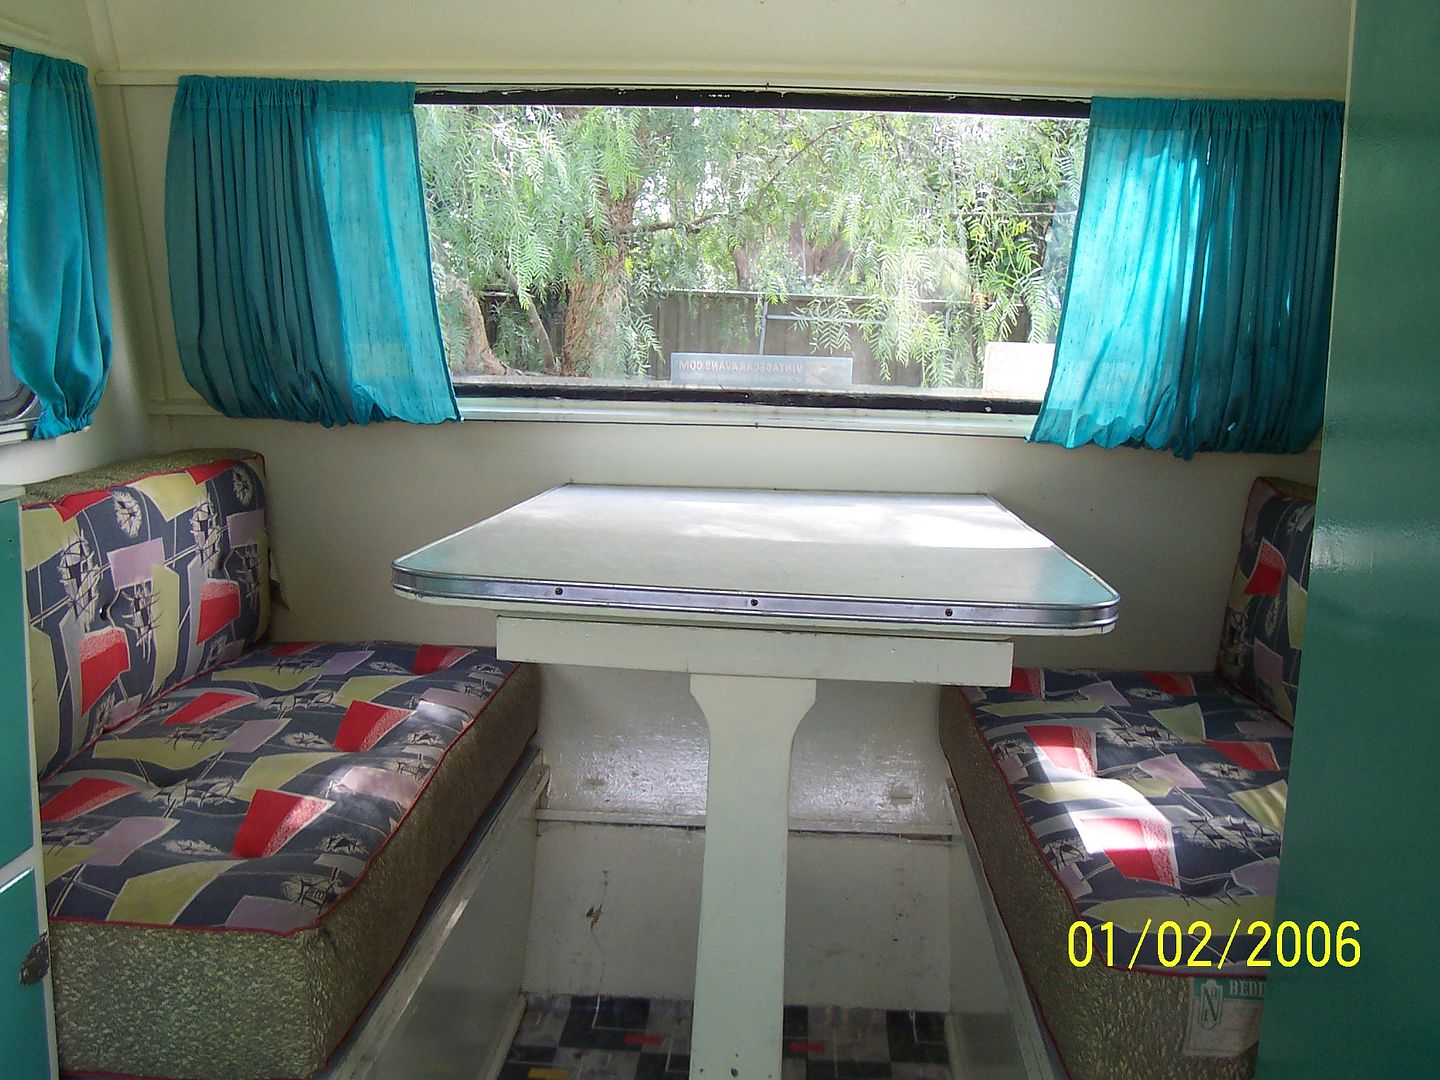 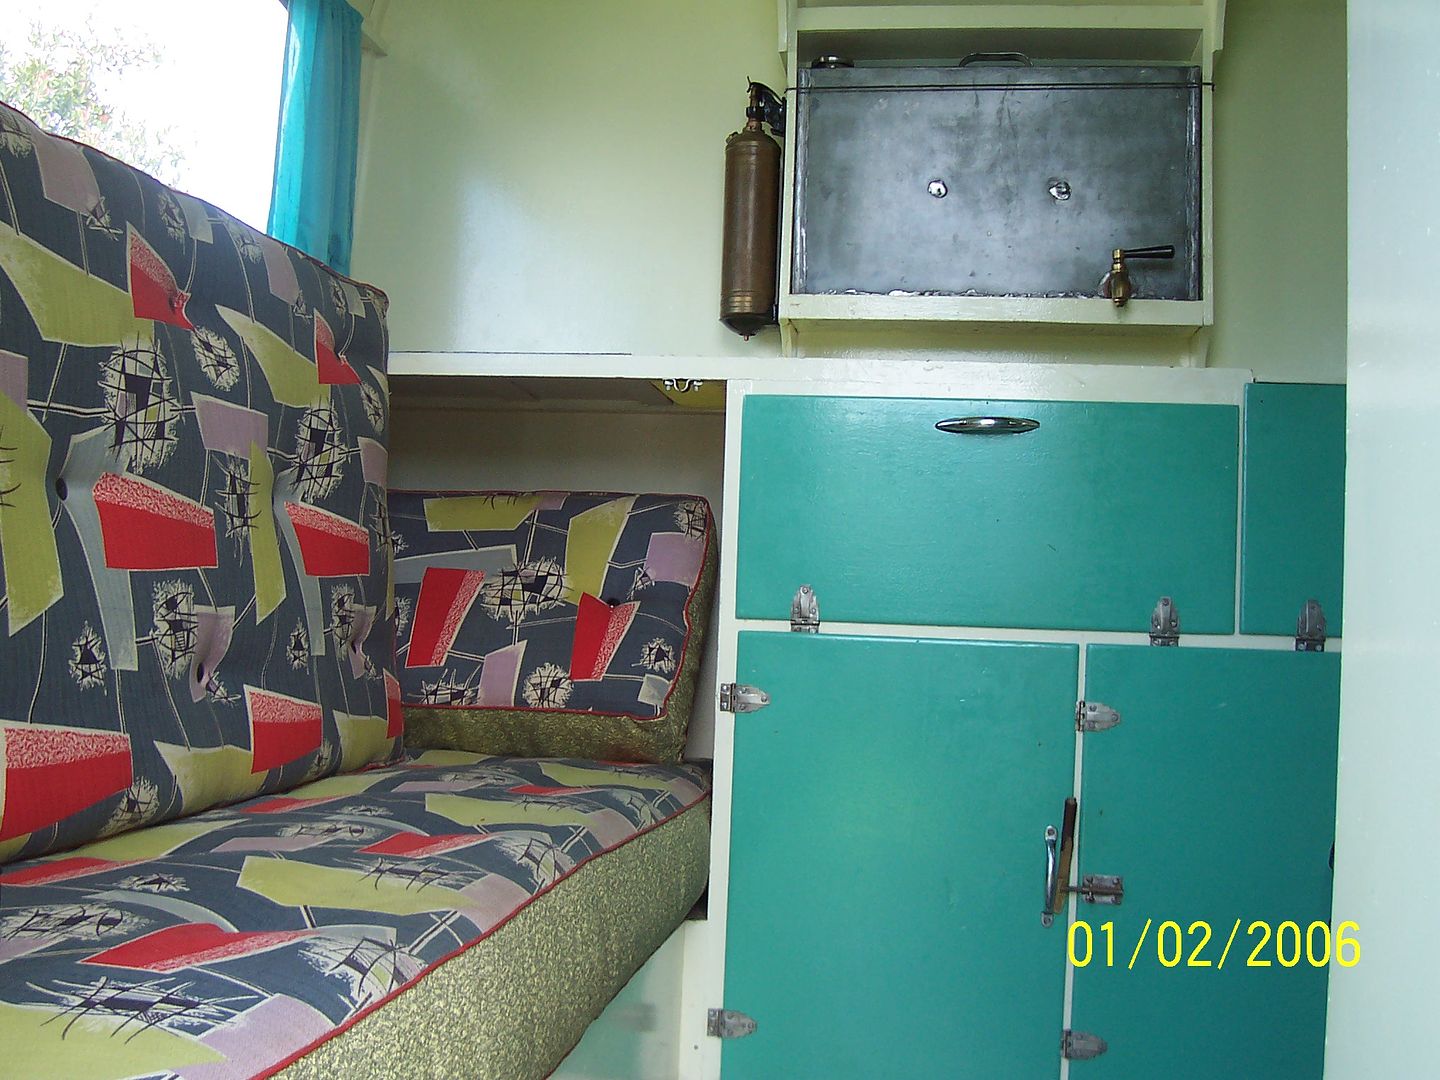 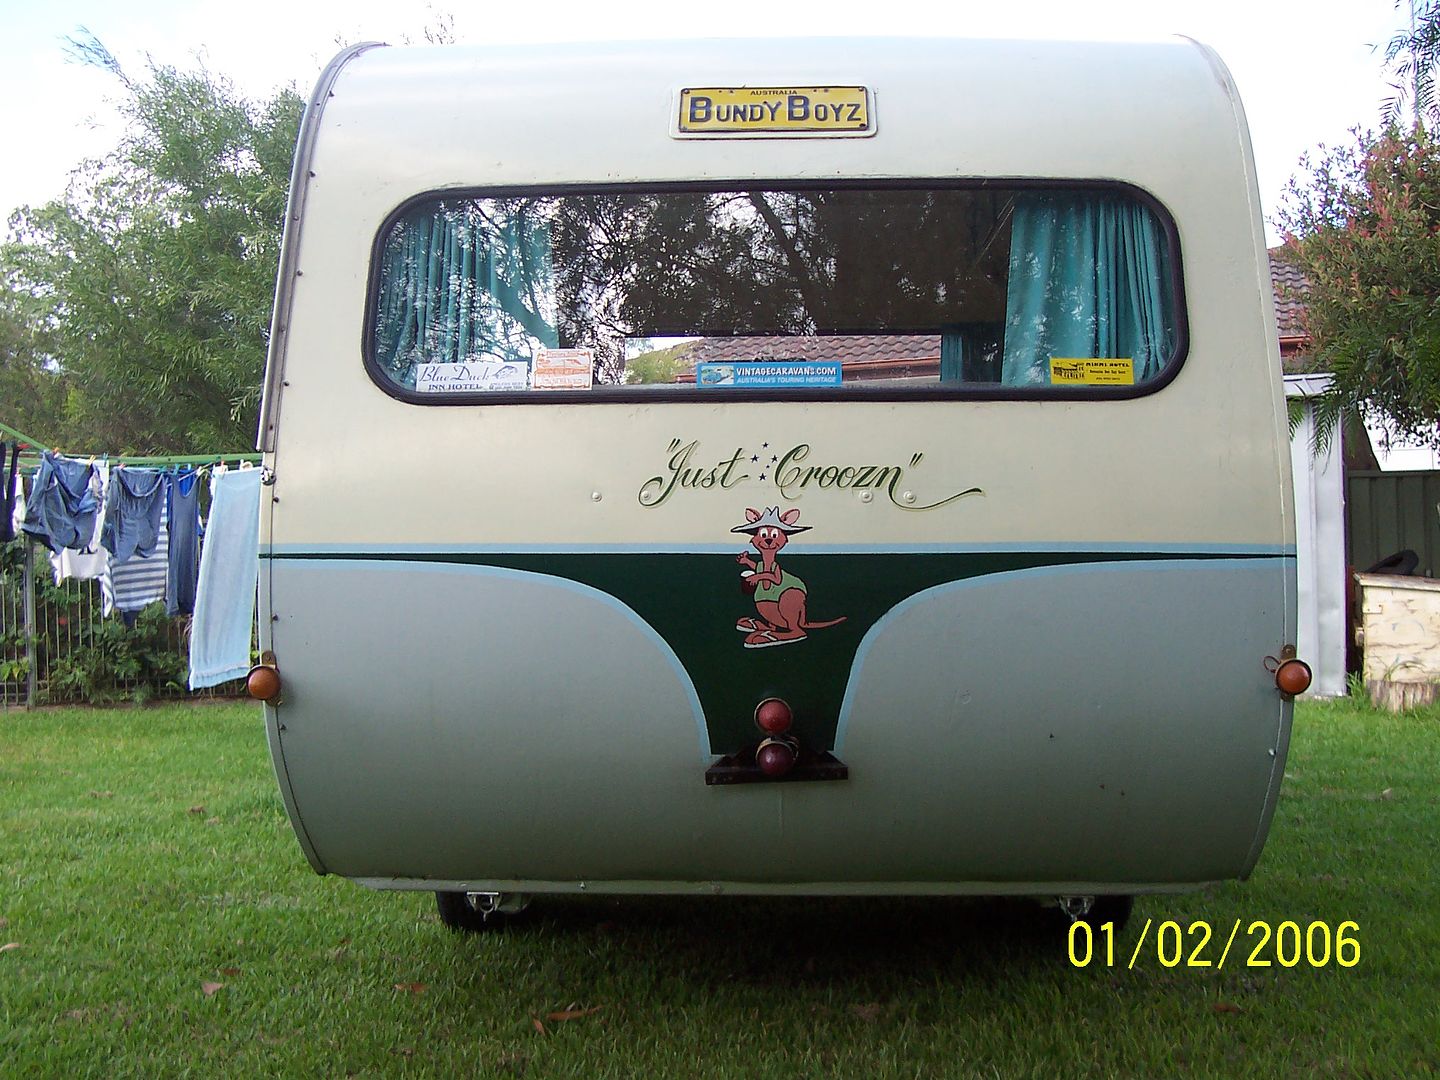 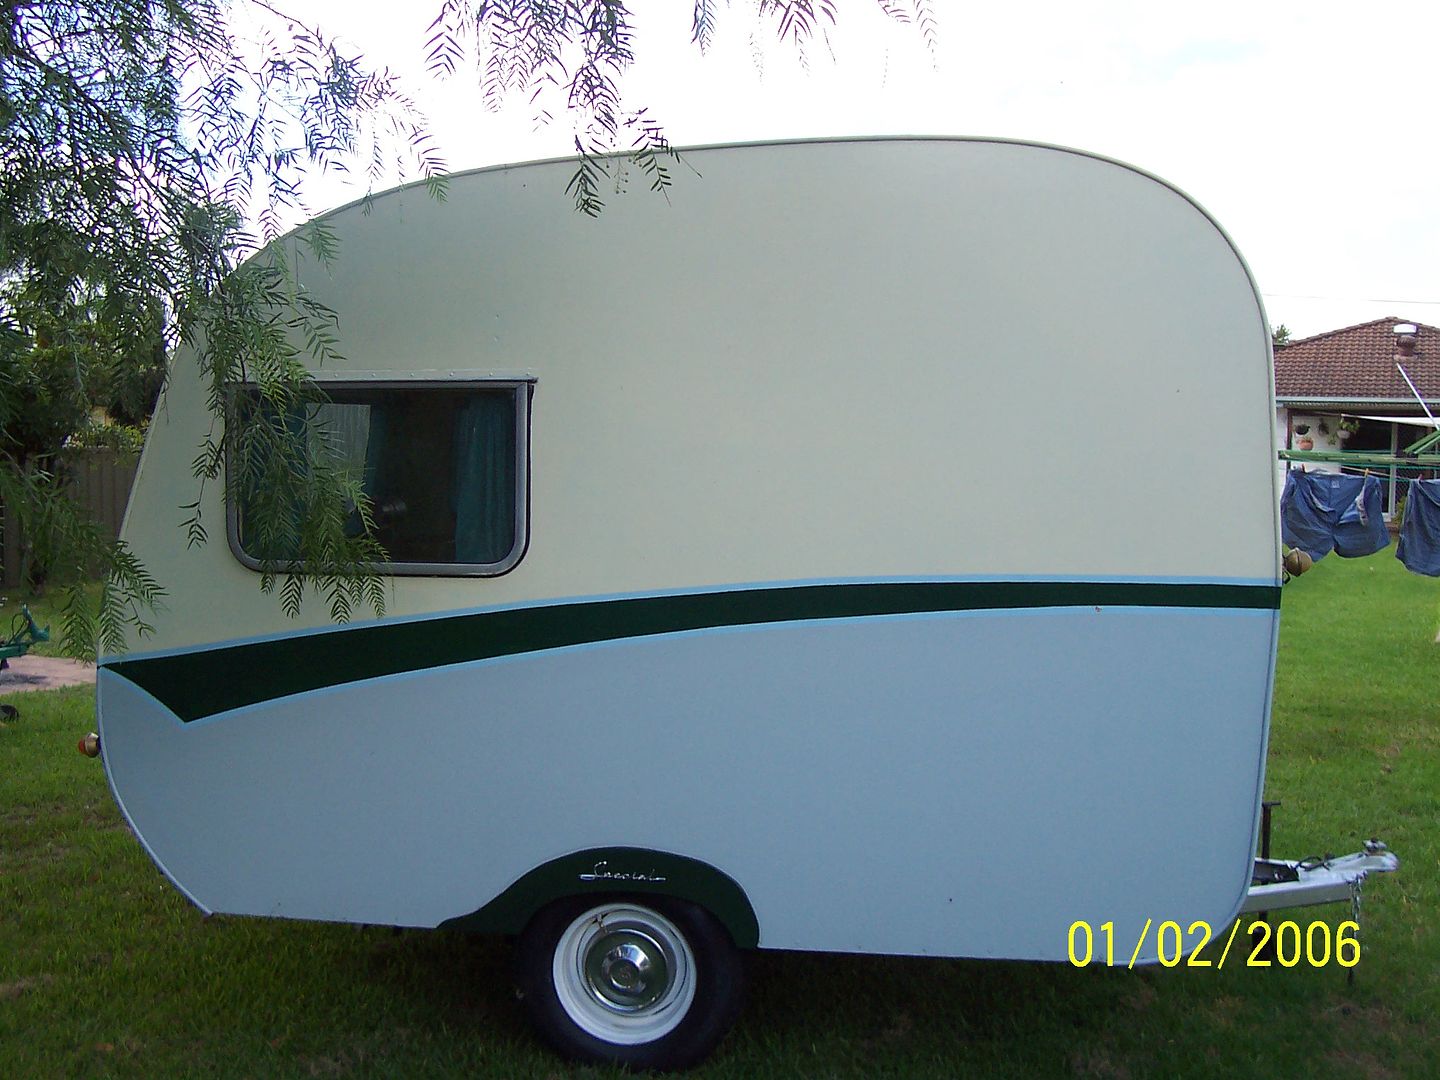 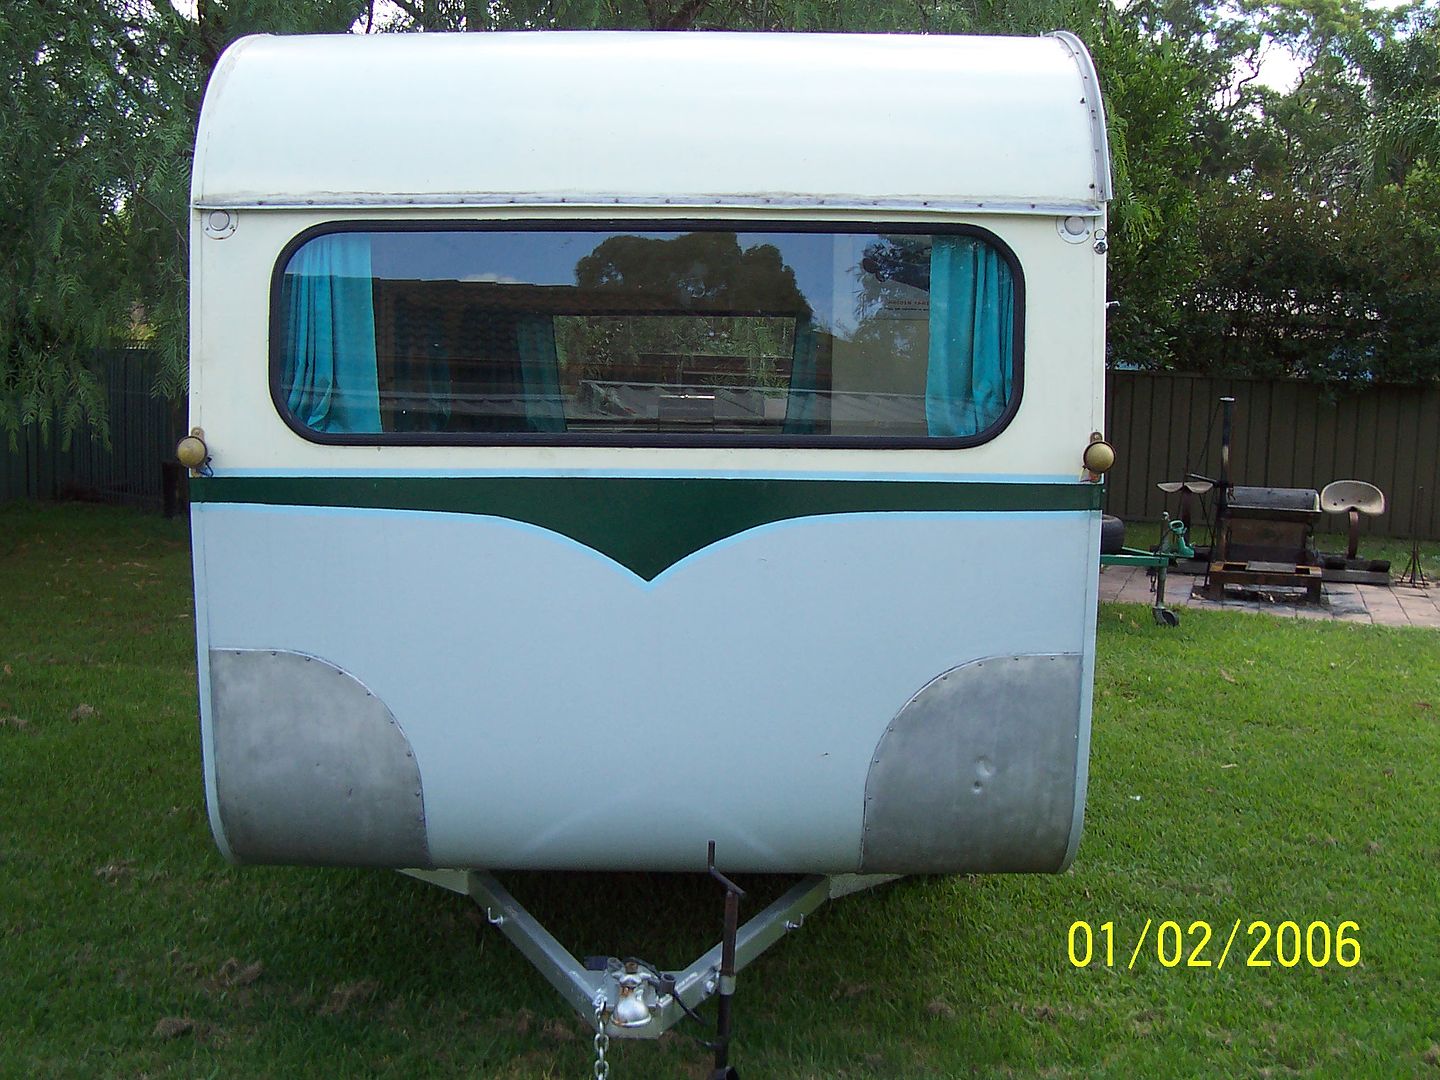 I sold tryhe van to a bloke up around Grafton... never seen it again?? Keep up the good work...... your well and truly on the way to finishing off a lovely van Reddo |
|
|
|
Post by Franklin1 on Feb 13, 2014 20:56:32 GMT 10
Thanks for your comments, hilldweller and reddo. Funny you should say this, reddo: "Been silently lurking on your posts for a damn long time now." We've just passed the third anniversary since I made a fair dinkum start on this project, so it has been a damn long time now.  After mucking around fixing up various vans since early 2008 (the others weren't vintage), I think I need a rest from all this restoration stuff, and I reckon I might go get a life when this project is finished. In the meantime, I'm happy to put my heart and soul into this project, just so I can say I've completed ONE vintage restoration, after being on this forum for eight years. You others who have churned them out like loaves of bread over the years have left me well and truly for dead. Time to get back to the hammer and keep plugging on... cheers, Al. |
|
|
|
Post by Surf Tragic on Feb 13, 2014 22:09:55 GMT 10
G'day Al Nice bit of construction with the sink cupboard, the whole project is coming along very well & you should be pleased with it all, it does look good. That is another great idea to file away for future reference, how you fitted the Laminex splashback, I like it Cheers...............ST |
|
|
|
Post by akeepsake on Feb 14, 2014 7:25:21 GMT 10
Franklin 1, Well done! Taking the time out to do things right rather than just a patch up job brings much more satisfaction! I to admire your attention to detail and it is so great that you are sharing it with us all! Looking forward to seeing it all done and dusted!!! Cheers Andrew |
|
Deleted
Deleted Member
Posts: 0
|
Post by Deleted on Feb 14, 2014 15:32:39 GMT 10
|
|
|
|
Post by Franklin1 on Feb 14, 2014 18:37:25 GMT 10
Ice chest: I finished another job today that I've been progressively working on over the last week or so. I cut up some more of my stash of second-hand timber, and made some frames... 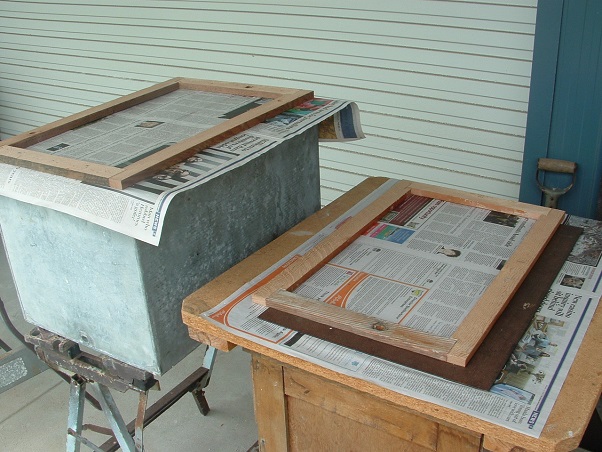 ...and then boxed in the ice chest... 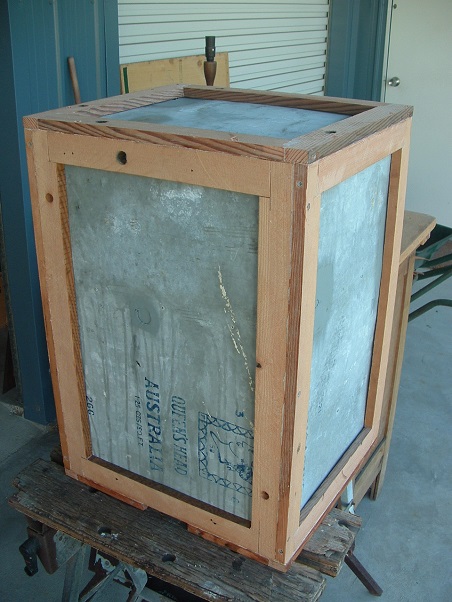 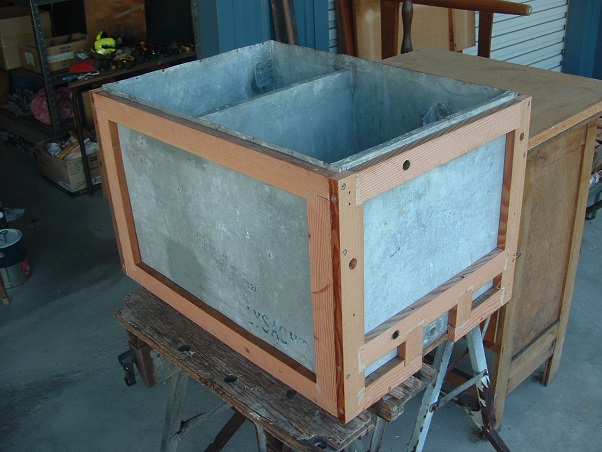 I had some metal roofing insulation left over from a house project, so I cut that up and fitted it into the frames... 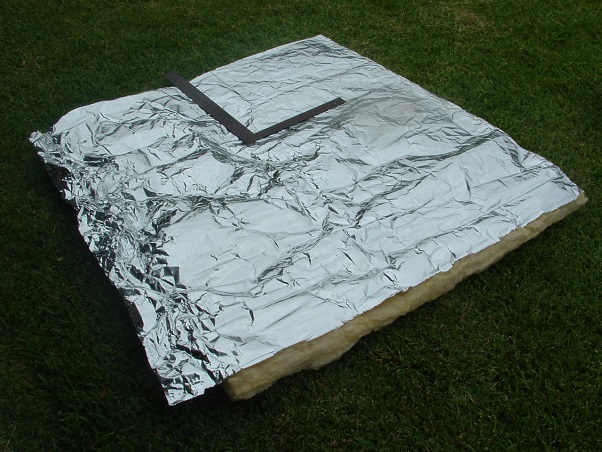 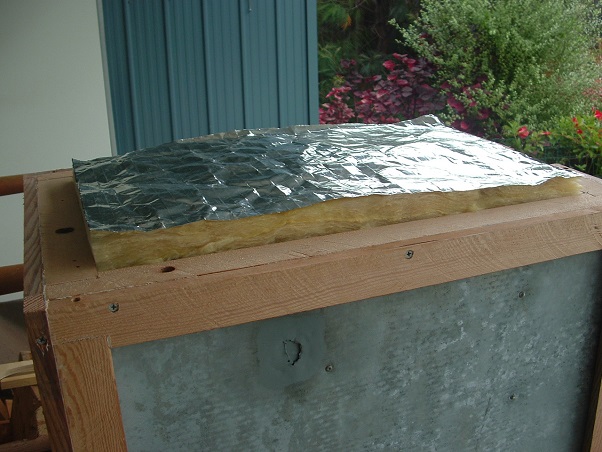 Then it was a matter of cutting up some 3mm plywood and glueing it around the outside of the framework, compressing the insulation in the process... 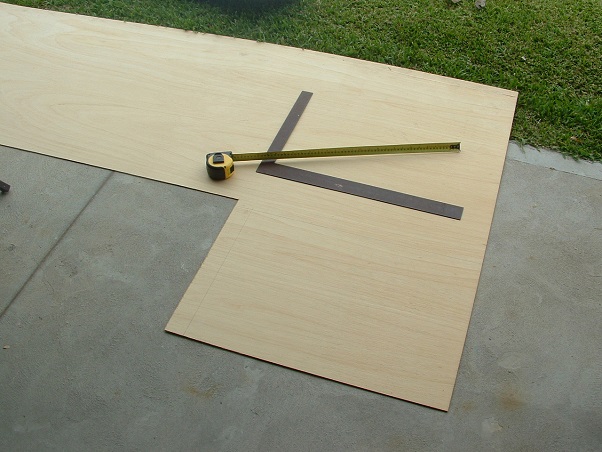 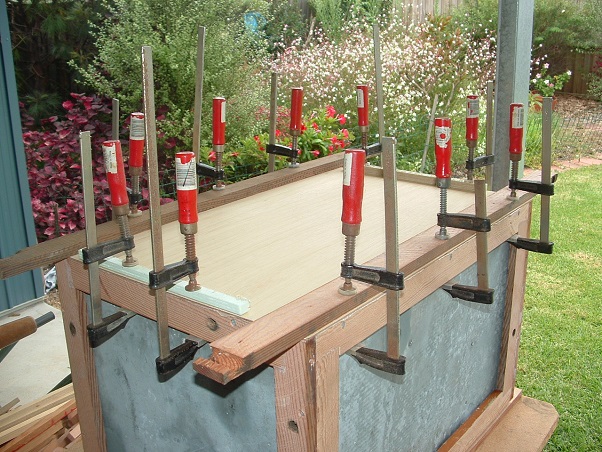 Today I gave the finished cabinet a coat of Bote-Cote resin to seal the plywood... 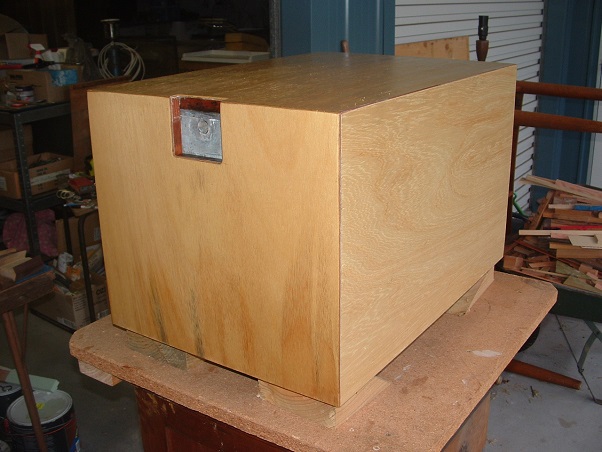 Funnily enough, the cabinet looks heaps nicer than the inside of the ice chest, but you won't see the cabinet once it's fitted into the kitchen cupboard.  I'll let the resin cure for a couple of days, and then I can start to see what's required in the kitchen cupboard to allow the ice chest cabinet to be installed. cheers, Al.
|
|
|
|
Post by Don Ricardo on Feb 16, 2014 15:30:21 GMT 10
Hi Franklin1 Another excellent piece of work with your ice box. The thought and preparation as well as precise work that are going into this van are wonders to behold and an example to us all. I also appreciate the fact that you are so carefully documenting things as you go along. I am sure your thread is - and will be - both instructive and an inspiration to those who read it now and in the future. I've just checked and this thread has had 18,744 views, which shows how many people are watching you as you work. Like they say..."Work fascinates me, I can watch it for hours". I can't wait to see the finished van, but perhaps not as much as you can't wait! However, you are creating a work of art, and works of art take time! Don Ricardo |
|
|
|
Post by humpyboy on Feb 16, 2014 15:49:36 GMT 10
Your right DR, the work is imak emacu imucku Really Really good, a craftsman at work should never be rushed, take your time Al otherwise you will do something that years down the track will come back and haunt you.
|
|
|
|
Post by seeshell on Feb 16, 2014 20:02:03 GMT 10
Hi Al Again I marvel at the detail - and all that Bote Cote sealant should mean she's well and truly water tight as your ice melts. No rotten floorboards underneath for you! As usual (which can really go unsaid!), a marvelous job! Cheers Seeshell Go the Cote! |
|
|
|
Post by Franklin1 on Feb 19, 2014 15:43:50 GMT 10
Many thanks for the wonderful feedback. Hopefully this thread will provide some useful information for other people in the future. I finished another little project today, and one which I was never confident would turn out ok, but fortunately it did. I wanted to put a drain funnel into the floor of the kitchen cupboard, to allow the ice chest to drain to the ground. After thinking about various options and possibilities, I happened to come across a square galvanised fence post cap in Bunnings one day, and thought it could be the start of something good... 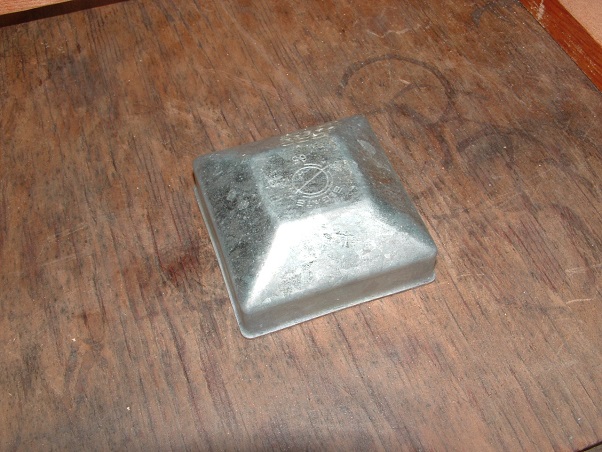 I drilled a hole into the centre of the cap, and flared that hole out a little bit using a larger bolt... 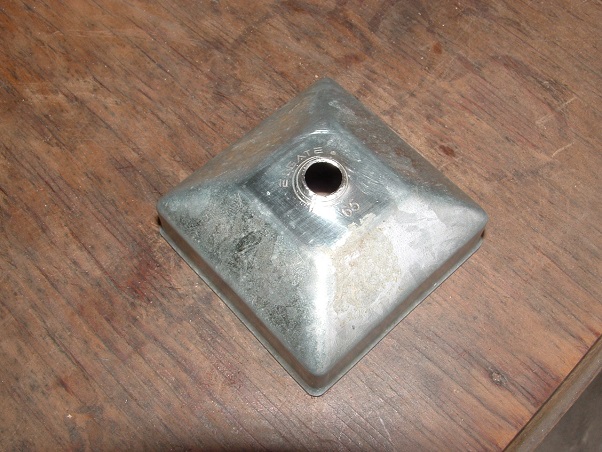 Then I found some copper pipe with a flared end on it, and soldered that flared end to the cap... 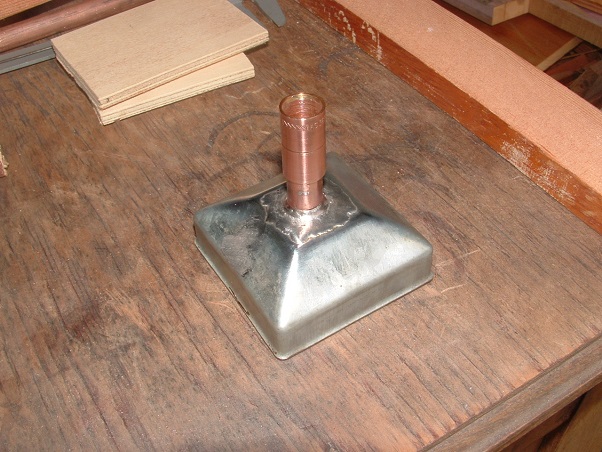 A little bit more copper pipe was soldered onto the fitting, and I finished up with this... 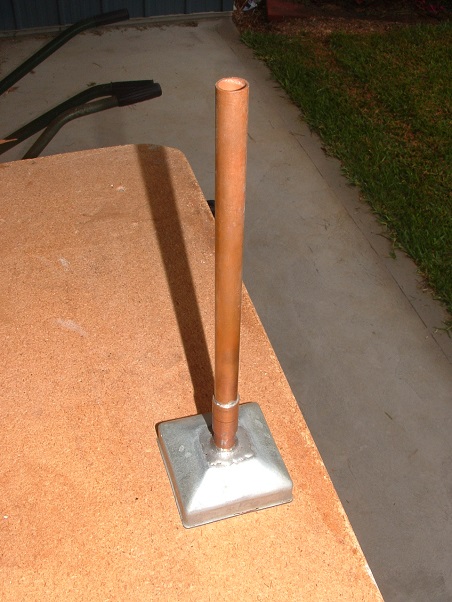 Inside the kitchen cupboard, I cut a square hole in the floor and another drain hole in the lower floor, and put some framework around the square hole... 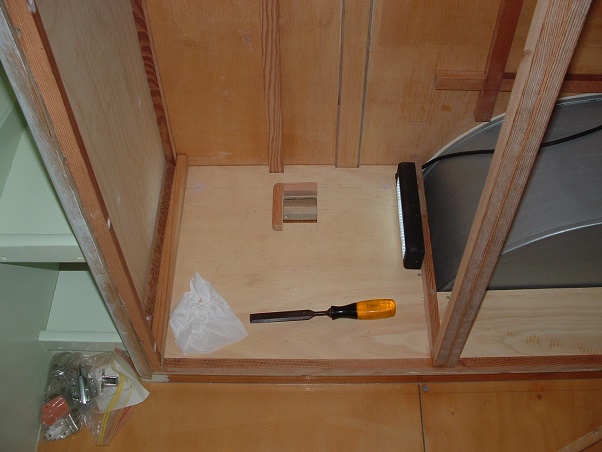 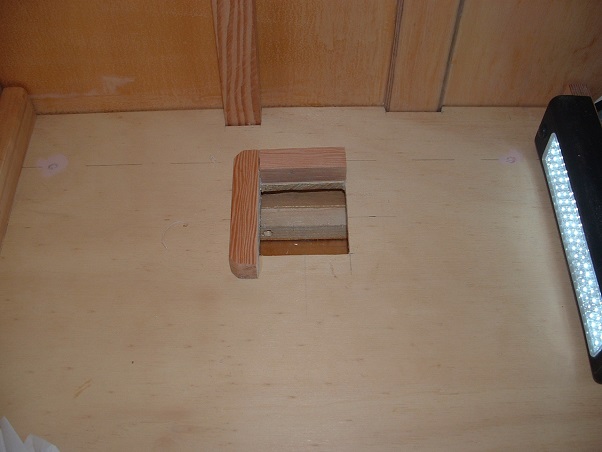 ...and then fitted the funnel... 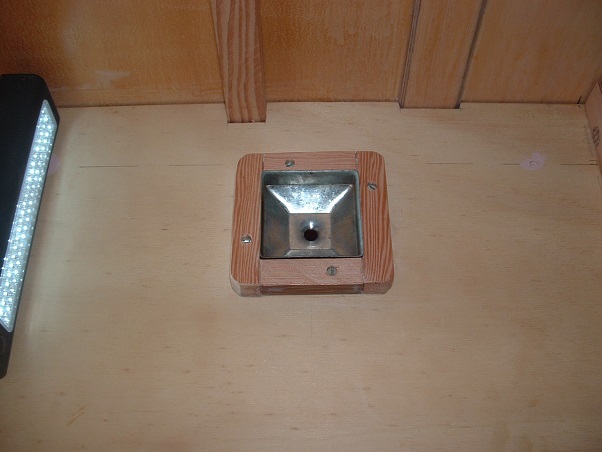 You'll have to trust me when I say that when the ice chest cabinet is slid into the kitchen cupboard, the ice chest drain pipe lines up directly above the funnel... 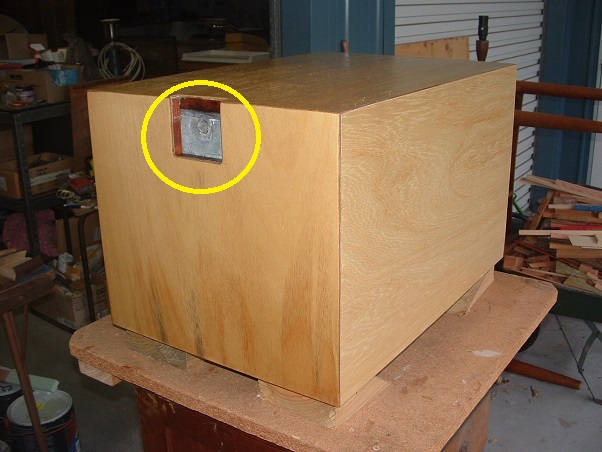 Well, it had better line up or I'll have one soggy caravan...  cheers, Al. |
|
Deleted
Deleted Member
Posts: 0
|
Post by Deleted on Feb 19, 2014 16:57:31 GMT 10
Hi Al..
An Icechest "Potty"... I am going to induct you into the "Shed of Invention " Hall of fame.... well done mate.
Reddo
|
|
|
|
Post by hilldweller on Feb 19, 2014 18:30:19 GMT 10
If you say it lines up Al, I have no doubt that it does.
So, prior to your invention of the Icechest Potty, and consequent induction into the SoI Hall of Fame, what was the traditional way of dealing with melted ice?
I have a feeling ice chests may not have been as much of a feature of early vans this side of the ditch, perhaps due to the presence of freezing cold refreshingly cool streams in which to cool one's bevvies, pretty much everywhere one would wish to camp.
|
|
|
|
Post by humpyboy on Feb 19, 2014 18:32:02 GMT 10
What can I say? a man of ideas, very clever use of bits that were designed for another purpose.
|
|
|
|
Post by Franklin1 on Feb 19, 2014 19:04:29 GMT 10
G'day hilldweller, Usually there is a tube that runs from inside the ice chest all the way through the floor in one go. For certain reasons, I had to do it differently, and this is the idea that came into my head. reddo, not many people have been inducted into your Shed Of Invention Hall of Fame, so I am really honoured. There are still a few more ideas I'm working on for this van, so hopefully I continue to satisfy your rigorous selection process. humpyboy, I was chuffed with the way this worked out. Sometimes things go really well in our projects, so we've gotta celebrate the 'wins', hey?!! cheers, Al. |
|
|
|
Post by humpyboy on Feb 19, 2014 19:37:49 GMT 10
humpyboy, I was chuffed with the way this worked out. Sometimes things go really well in our projects, so we've gotta celebrate the 'wins', hey?!! cheers, Al. To true Al. |
|


 ...
...
 ..... it looks beautiful.
 Very impressed with the upholstery too! Keep going....


 After mucking around fixing up various vans since early 2008 (the others weren't vintage), I think I need a rest from all this restoration stuff, and I reckon I might go get a life when this project is finished.


