|
|
Post by earlee on May 28, 2007 19:45:45 GMT 10
looking good jbj - and I reckon its worth the extra effort to have the curved cupboards etc bits that you do. earlee.  |
|
|
|
Post by tinnie on May 28, 2007 21:34:08 GMT 10
Hey JBJ the Sunliner is lookin great. Very well thought out interior. I am a big fan of rounded corners on cupboards - very fifties. The wardrobe / pantry set up is very smart too, practical storage. Can't wait to see the final product in the flesh next March - thoroughly enjoying watching the restoration progress. Cheers, Tinnie  |
|
|
|
Post by JBJ on May 29, 2007 6:40:59 GMT 10
A Question for Humpty ( & anyone else that knows the answer)
What glass do you put in the side windows of the early Sunliners with the fibreglass frames?
It looks like ordinary thin glass, but I didnt have any decent pieces of windows when I bought the van. I dont really want to put perspex in on the sides unless you feel I should.
Have you any experience with fitting metal flyscreens into the fibreglass screen surround? Would it be best to use epoxy or humble bog to set them into place?
I'm thinking or maybe using stainless steel screens at this stage, but cost might dictate a cheaper option. it will be a while till I get to the screens, but the windows hopefully will be needed soon.
Jailbarjuice
|
|
|
|
Post by JBJ on May 29, 2007 6:49:28 GMT 10
Hi All,
I'm starting to get a few surplus internal bits left over.
So if anyone is looking for an original fibreglass water tank, the internal rotary wall vent cover & flyscreen, water pump, several of the removeable roof internal cover strips, a hatch, a set of wheel spats, & more for the early Sunliner, send me a PM & we'll work a deal(cheap)
Jailbarjuice.
|
|
|
|
Post by cobber on May 29, 2007 10:19:16 GMT 10
Blimey Den, your a legend mate, You really have put some thought, effort and dollars into how you want this van to end up eh? It's looking great.  I don't need any of your surplus bits but Harold might take 'em.. he's always finding fibreglass hulls that need a bit here, and a bit there  . Cobber. |
|
Deleted
Deleted Member
Posts: 0
|
Post by Deleted on May 29, 2007 12:14:56 GMT 10
Sorry about all this Dennis and i do really think you have done a great job on your van so far. but..... it is with a forced typing hand that i reply...... Cobber rot: "I don't need any of your surplus bits but Harold might take 'em.. he's always finding fibreglass hulls that need a bit here, and a bit there . Cobber. " Someone left the gate open at the nursing home again......  Ho Ho .. "a wrinkely joke" ... ya still got it Albert ;D You dirty old man Your lovin' son 'arold. |
|
|
|
Post by Geoff & Jude on May 29, 2007 14:27:19 GMT 10
hi dennis i forgot to ask you. are you running al the hidden wiring for the tv, set-top box, dvd and 5.1 surround sound before you put all the skins on the inside? ;D ;D ;D geoff 'n jude |
|
|
|
Post by JBJ on May 29, 2007 14:44:44 GMT 10
Hi Geoff & Jude,
Not too sure about the TV position yet. I've planned on running hidden wiring for everything, but at this stage I'm leaning towards having a couple of plugs that will allow me to put our small LCD screen on the kitchen bench to view,as the van isnt big enough for a really large unit. I will have enough space for everything without any worries.
Jailbarjuice
|
|
|
|
Post by Roehm3108 on May 29, 2007 16:51:04 GMT 10
V E R Y nice JBJ, this will be the most "personalsed" van on the site. What is that round thing in the outside wall in the wardrobe??? I reckon that if you're lining the ceiling in ply (which should look really sic (that means "cool" in our language)) why not have a huge flatscreen TV hanging from the ceiling while you're there. Then you can watch telly while you're horizontal JBJ!!! ;D ;D Earlee, the reason for the rounded corners is cos JBJ learnt his lesson from Esk - corners are too sharp when you come to bed late at night! Ray |
|
|
|
Post by JBJ on May 29, 2007 17:36:09 GMT 10
Hi Ray,
I've fitted an external light ( the round thing) & an external power point, in the wall behind the cupboard, to provide power & light to the annex area, which is where we do all our cooking, eating, washing up, etc. Caravan then doesnt smell of dinner all night.
I'll create a lean to roof along the lines of the one I made for Groovin, but thats gotta wait till I get the van fitted with its annex sail track, & thats gotta wait until I get the van in final paint, & thats..........................
Jailbarjuice
|
|
|
|
Post by humpty2 on May 29, 2007 18:41:25 GMT 10
I had a window done JBJ, in 3mm normal glass...it was one of the opening windows at the front......have seen one like yours with the window surrounds done in aluminium.........you would do a better job!!! they just ground the corners round.
The fly screens on my van are detachable.
|
|
|
|
Post by JBJ on May 29, 2007 19:45:49 GMT 10
Hi Humpty.,
I've thought about aluminium framed windows, but decided that the fibreglass ones are part of the vans character, so I'm keeping them.
My flyscreen frame is a fibreglass C section. When I got the van there were remains of plastic flyscreens set into the frames, using a combination of what appeared to be epoxy ( like araldite ) & body filler, also some of them had what felt like a semi hardened putty.
The frame appears to just screw onto the inside of the van, & I'm thinking of using knurled head screws, with nutserts set into the van walls. I suppose I could be different & set them up like Belinda showed, and maybe that would be the easiest. The window prop open mechanism could be difficult doing it with rollup screens.
I guess I'll come up with something that works without too much trouble. But theres not a lot of early Sunliners up this end of the world to look at.
I'll have a good look at Sutcac's van when he loans it to us next week.
jailbarjuice
|
|
|
|
Post by JBJ on Jun 2, 2007 17:37:07 GMT 10
hi all, More progress pix. Got my first section of new ply roof lining in, & first of the 2 new overhead cupboards. Its going together pretty well now. Not that much construction to do, & then the internal finishing gets serious.  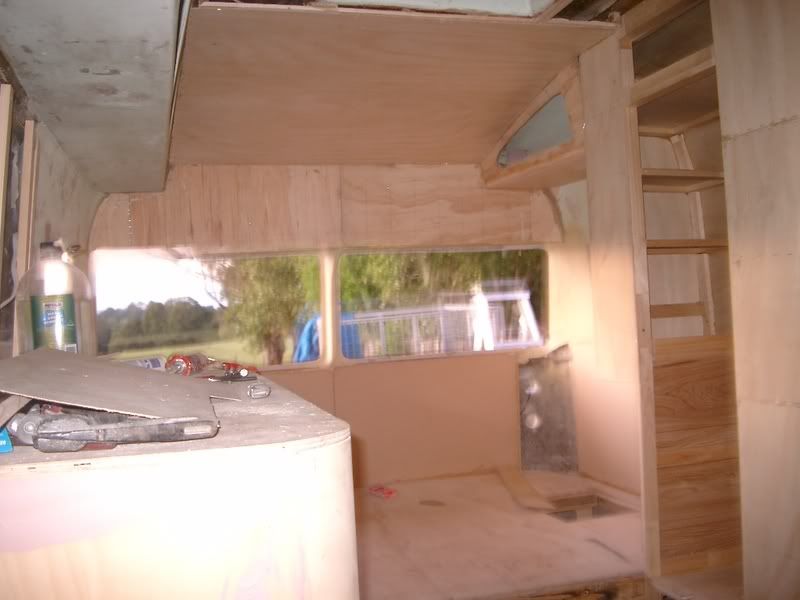  We found a mob in Brisbane that custom make innerspring mattresses, so we'll be ordering one soon . They're not cheap, but a good bed is the most important thing there is when I travel, so i'll pay a premium for one. Jailbarjuice |
|
|
|
Post by humpty2 on Jun 2, 2007 18:22:18 GMT 10
Keep a watch out for another Sunliner arriving soon.........I'm not gunna do anymore to mine now and let you finish it off MASTER!!!! GO Dennis ;D |
|
|
|
Post by JBJ on Jun 2, 2007 19:25:57 GMT 10
Hi humps,
I'll send it back by return (E) mail
Its scarey when you add up the cost of getting someone to work on your van.
Bob the builder is $30 per hour, & so far has run up over $2400 in labour in the interior. Interior materials are well over $1000 , & its nowhere near finished. I've put in a lot of my own time, as I've actually done a lot of the internal work myself.
I dont think many people would rebuild a van using paid labour. I only do it because I can still earn a reasonable living working, & Bobs a far better tradesman than I am.
After nearly 2 1/2 years since I bought the Sunliner, I guess its getting pretty close to completion, but I'd hate to think what I've spent in monetary terms & materials, let alone my labour.
Tucky's van at $9000 was a steal, compared to what I'll have put in when its completed.
But I'm going to have a brand new ( almost) van, that is classic in style & appearance, & caters for everything Boots & I want in a van. And still have a lot of money left over from what a relatively new second hand mass produced van would cost to buy.
I guess if you dont want to run with the crowd, it can cost to be an individual.
Jailbarjuice
|
|
|
|
Post by Swellwillys on Jun 3, 2007 17:22:38 GMT 10
Dear Mr Jailbar,
The van is looking great - well done!
Our bubble is coming along guns as well - though we are taking different roads I expect ours to completed for use in late July. 07 that is !
I'd love to start sharing some photos and facts about the rebuild with the members. Can you help me please as I have had no success with uploading the files to bucket.
I also have had to call on the expertise of my own Bob the Builder for the internals due to limited ability with carpentary skills and a great desire to have a Job Well Done.
He is a cabinet maker - boat builder and highly skilled.
Look forward to hearing form you.
|
|
|
|
Post by will and Lyn on Jun 3, 2007 17:59:53 GMT 10
|
|
|
|
Post by JBJ on Jun 3, 2007 19:17:42 GMT 10
8-)Hi Swellwillys, Photobucket isnt that hard, but I'll try to explain it simply.   Firstly you have to store the photos somewhere on your computer so you can easily find them to post.  Next you have to log on to www.photobucket.com & register as a member. Thats pretty easy. Then you go to the right hand side of the screen & click on browse. This is where you go & find your picture you want to post, in your computer files that come up on the screen. When you find your file you want, click on open. It will come up on the photobucket screen. Repeat this proces of browse/ open, for all the pictures you want to store in photobucket. When you've done that, hit "upload", then the pictures will transfer to photobucket. Then when you scroll down the page, you will see the images. Next thing to do is minimize the photobucket screen by hitting the middle box in the extreme upper right of your screen. Then log on to Vintage Caravans, & go to the thread you wish to reply to. You will get a box that opens for a reply. Click in the box, & type in your message. I find its best to leave spaces in between the lines, where I want to insert a picture. Type your message, & leave the screen open. Click back onto photobucket screen. Scroll down to the picture you want to post. Left click on the bottom row of text under the pix. It will show "copied". Then right click again, & copy should come up in a window. Click on that. Then reopen vintage Caravans window, go to where you want the pix, & click on it. Then click paste. The pix text will transfer to where you want it. Repeat as desired for each pix. Then click on preview at the bottom of the text box. This will bring up on your screen what you are trying to post. If your happy with it, click on post reply. If not you can edit while in preview, or even after you've posted something you can click on "modify" (at the top RH corner of each thread). The person that posts any thread can modify there own thread. I find it easiest to print the instructions out, then try it. It really is simple once you've done it a few times. ;D ;D ;D Or else email me the pix, & a word document of what you want to say, with the desired postions of the pix indicated, & I'll do it for you. Jailbarjuice PS Why not throw some shots of your Willys in under towcars? PPS Always close Vintage Caravans after you post a message or reply, then reopen the site. Or else you stand a good chance of deleting your posts if you hit return. |
|
|
|
Post by Swellwillys on Jun 4, 2007 11:40:54 GMT 10
You da man!
Thanks Mr Jailbarjuice.
I've got some time to kill so will have a shot at posting some details during the week and yep happy to place "SWELL" in the towcars section.
Swellwillys
|
|
|
|
Post by JBJ on Jun 24, 2007 18:57:49 GMT 10
Hi All Another hectic couple of weeks on our Sunliner. Cold dale is getting closer, & I’ve gotta have it registered by early September, to test it out before its big trip. Its maiden voyage will be to our next SE Qld run at Kingscliff in mid September, so its all out now to get there. BUT I WILL MAKE IT. ( Somehow) The Interior has just about reached completion of the construction stage. Just a couple of doors, 2 small bits of the new roof lining, & half a dozen handles & catches to be fitted, & that’s it for Bob the Builder. He’s done a great job, but I didn’t expect it to cost quite as much as it has to do what he did. His workmanship is very good, & you forget the cost after the payment. I’ve actually done a lot of the interior myself. I’ve made the bed structure, the entire roof lining, the end roof cupboards, & the panelling around the sides. What we’ve done is basically replaced the entire interior, just maintaining several bits of wall & roof linings as back panels for some overhead cupboards. We retained the entire overhead cupboard structure on the RHS of the van, but modified door shapes & divided it up, with new raised floor to clear our new lighting. All doors have been remade in MDF, with new hinges & catches. All catches are courtesy Kaybee’s scrounging, & they are perfect for the van. A guided tour. I apologise for some of the photo quality, but my camera is suffering from the same thing that makes my body ache at the end of a days work. As you enter the van, on the left above your head is a new overhead cupboard. The roof lining is still to be done above the door. 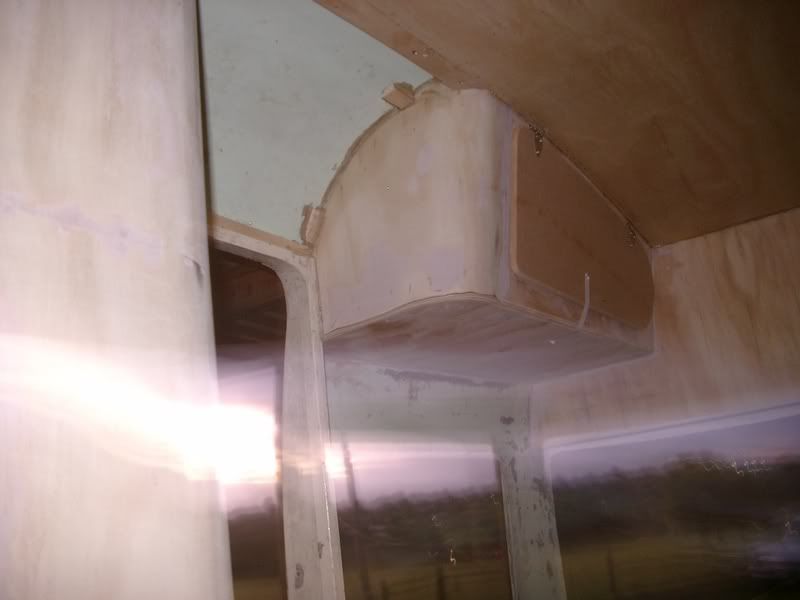 The seating has been reconstructed, with annex storage, etc under. It will have a removeable panel & separate seat cushions to allow use as double bed for family visitors. 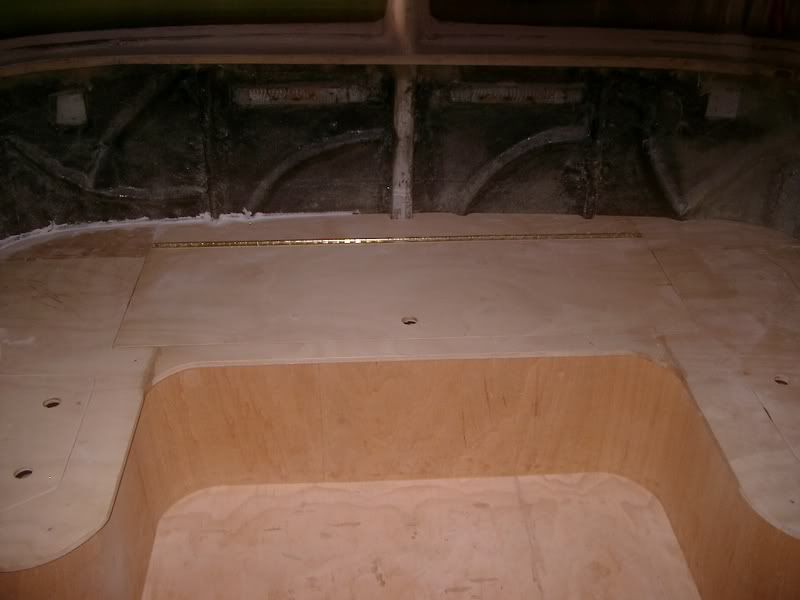 Above is an overhead cupboard across front of van, which will be finished off with a sound system, speakers, & storage doors. 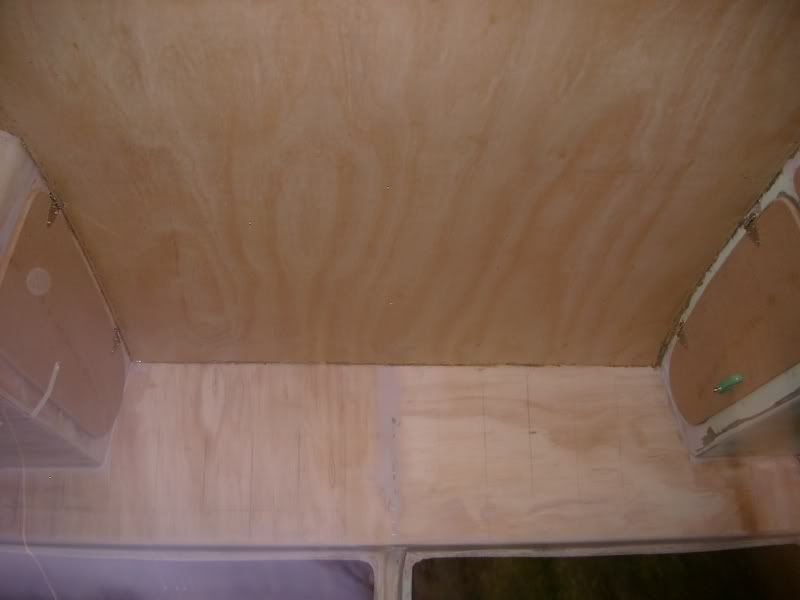 On the right is a new cupboard (replacing the original glass one) containing a 2 door pantry, a clothes cupboard with hanging space & shelves, & a storage drawer. I got the idea for these bottom hinged doors from Ray Roehm's Caravan Park Limited late 1940's van. 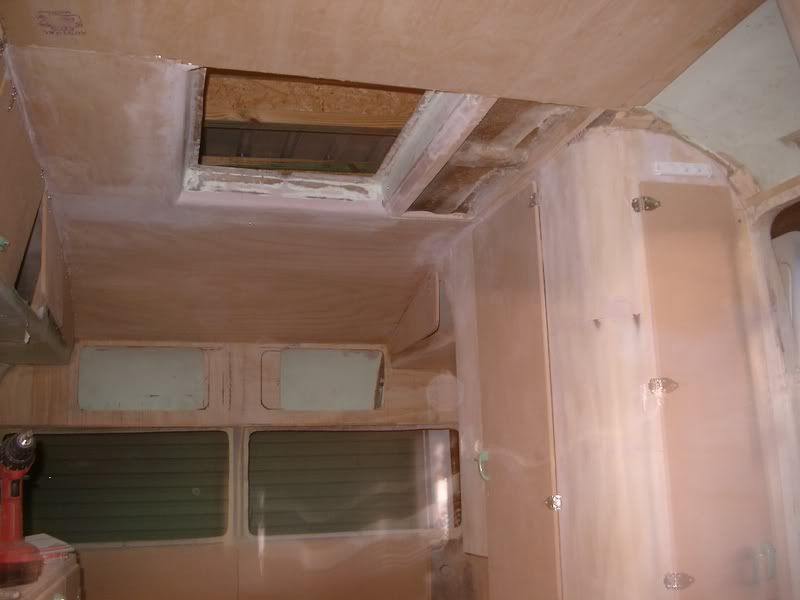   Continuing around the left side is a new cupboard unit, & fridge space. There will not be a sink or cooking in the van. We bought a small microwave that stores in the bottom of the clothes hanging space to use. 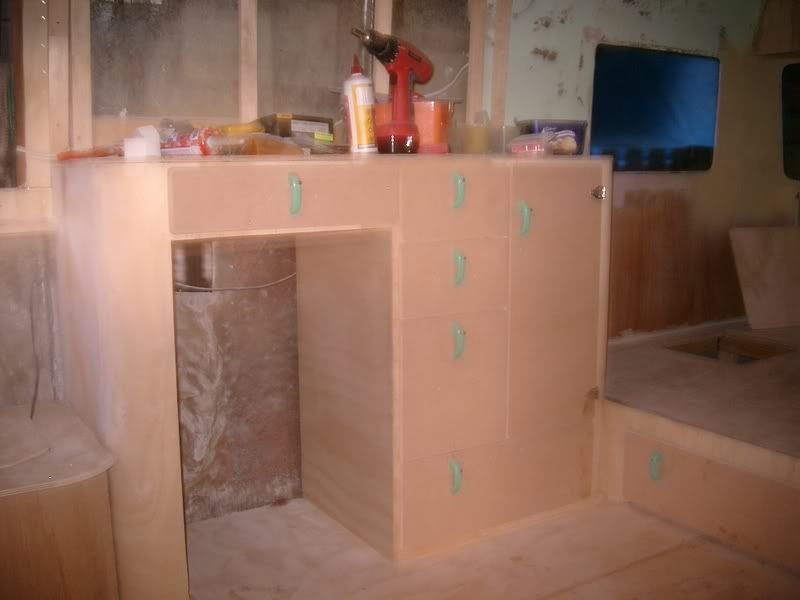 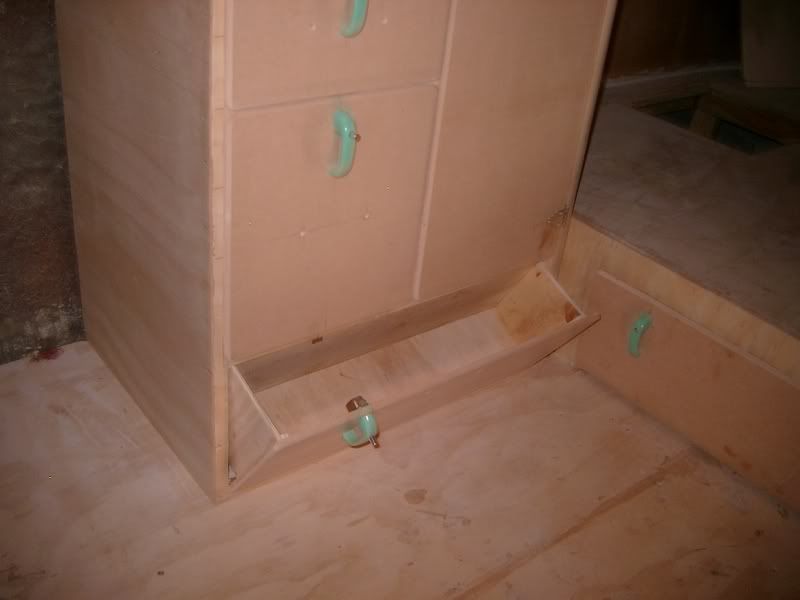 The original overhead cupboard unit has had lots of rework, with new doors, hinges & catches.  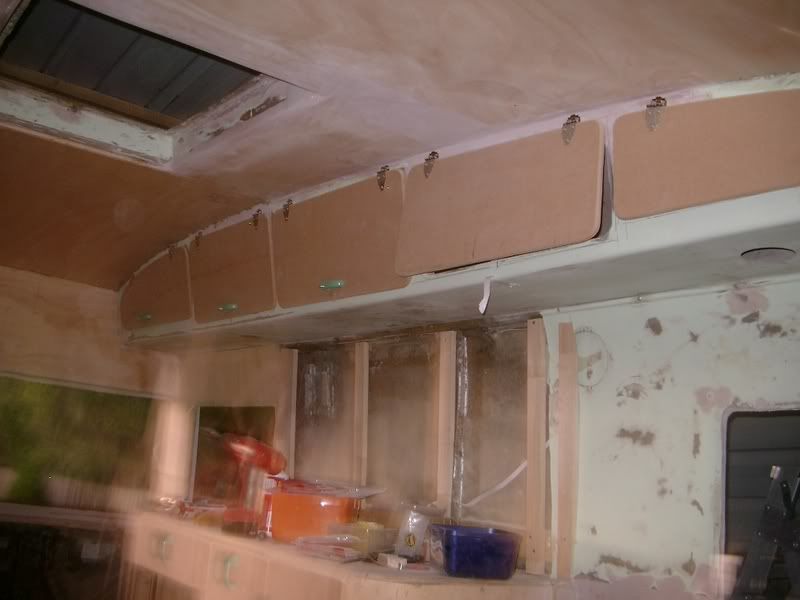 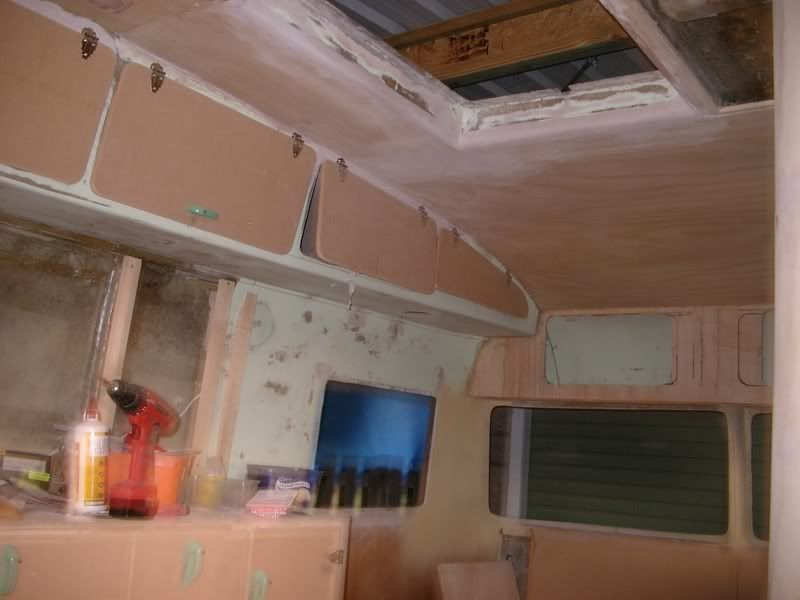 The electrical controls are in one cupboard, & the van is being entirely rewired. All lighting will be by downlights fitted under the overhead cupboards. There will be more switches on this panel as work progresses, as I want a master over ride control switch on each circuit. 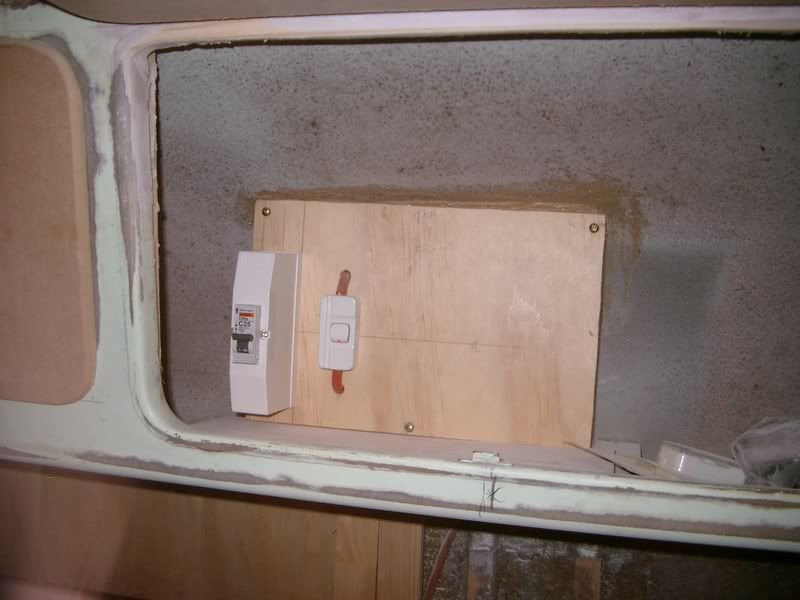 Across the back is a new overhead cupboard, with space for an art deco style clock between the doors. 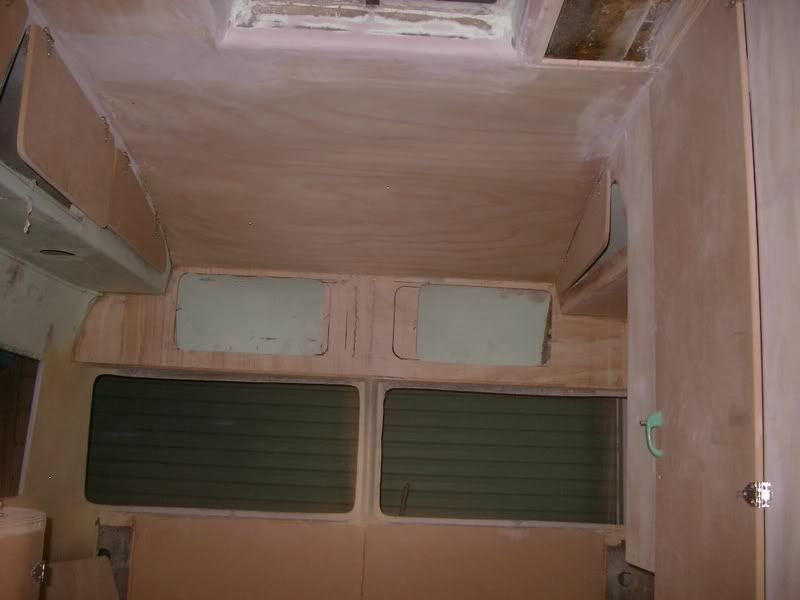 The bed has been reconstructed to accept a queen size custom made innerspring mattress, as I LOVE a comfortable bed. 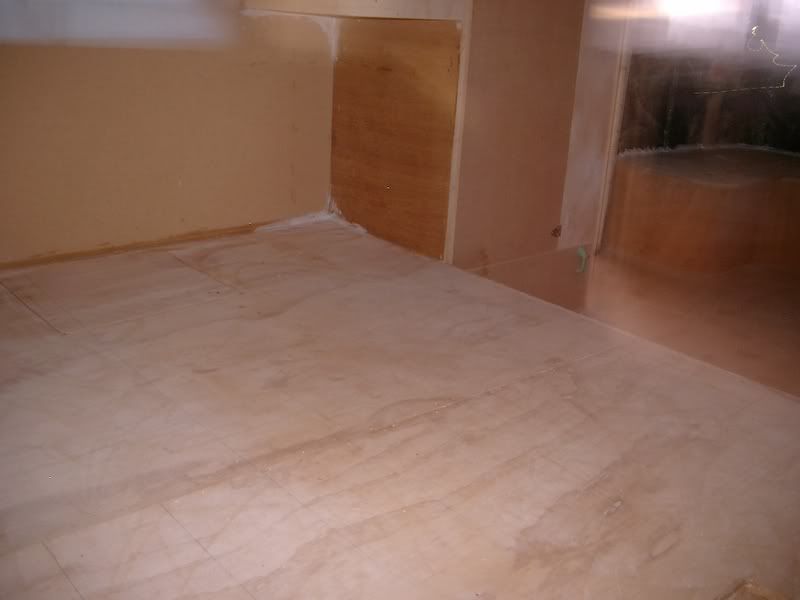 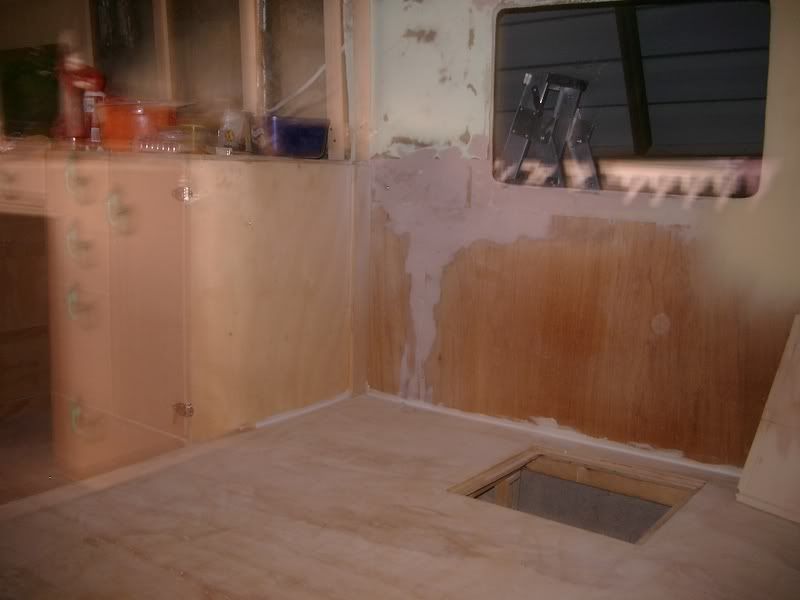 Under the bed is a BIG storage drawer 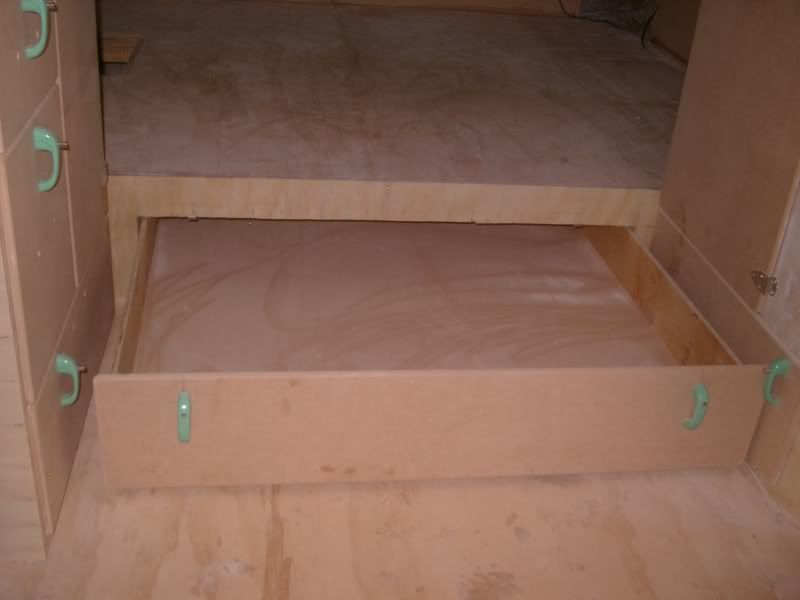 Above the bed on the LHS is another new overhead cupboard. 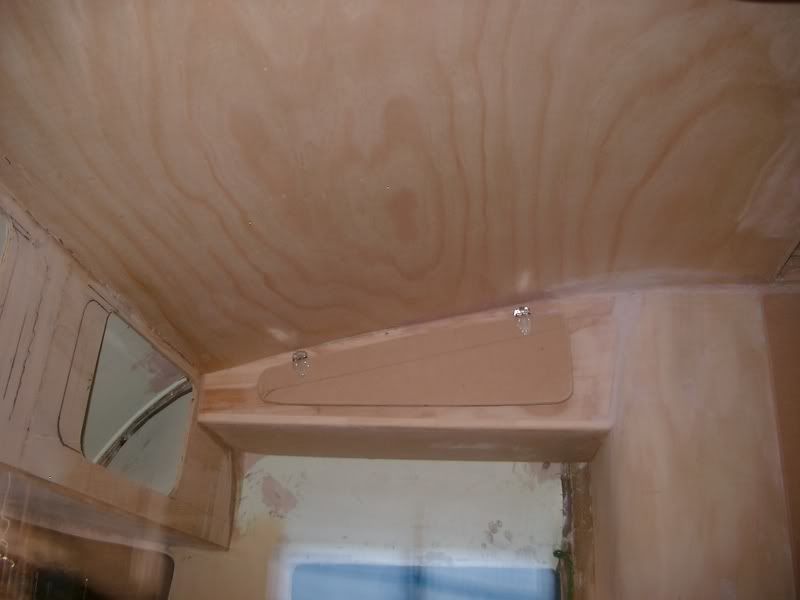 Below all of that is a new 19mm ply floor layed over the existing, & screwed to the chassis members. Above all of that is a new ply roof lining. I suppose after all that I’ve got a Plyliner, but we want to use this van to travel Australia with when we get around to it. Hope you enjoyed the tour Jailbarjuice & Boots |
|
|
|
Post by kingy on Jun 24, 2007 21:28:17 GMT 10
Wow, you've done heaps in such a short time JBJ since we saw it recently, it's certainly taking shape, at this rate it'll be finished in no time. looking forward to the next lot of pics (does'nt all that wood stuff make for a great interior ;D ) Kingy |
|
|
|
Post by JBJ on Jun 25, 2007 6:46:52 GMT 10
Hi Kaybee,
The handles worked out fine. Its take around a half hour a door/drawer for Bob the Builder to fit them, which is more cost than you charged for the handles. I think I'm going to have a couple left from the batch I bought off you, but if I need any more I'll let you know. They certainly are good quality, & quite cheap compared to the (unsatisfactory) alternatives I looked at.
Jailbarjuice
|
|
Deleted
Deleted Member
Posts: 0
|
Post by Deleted on Jun 25, 2007 8:06:12 GMT 10
Hi JBJ As Kingy has mentioned you are making great progress since we stayed there a few weeks back. Looks great On the way home from wintersun . I pulled up at "The ferry Park" to go to "The kitty litter Tray"and have a nano nap for 1/2hr. I nodded off against the car door and was halfway through "dealing with" Elle McPherson in my dream when....... Tap, tap, tap on the window.."hey mate .. oweryadoin?? It was none other than "Bob.. your caravan Builder" he was heading down to Hat Head for a week or so. I was surprised he reckognised me. Only waved hooray to him as we where arriving at your place. Keep at your van mate. I reckon you will have her ready for the next outing up your way. Will be good to get afew K's under her wheels and enjoy the fruits of your labour. ;D Reddo. |
|
|
|
Post by JBJ on Jul 5, 2007 21:11:46 GMT 10
Hi All, This is getting to be more enjoyable as I get closer to achieving something. 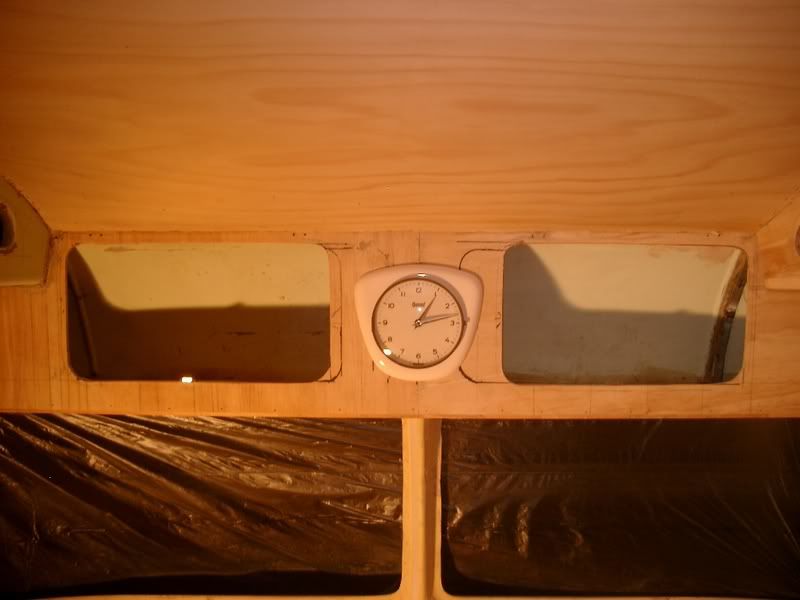 We picked up a wall hung battery operated clock on Ebay, quite cheaply. A few home made brackets, a hole cut into the panel its fitted to, & hey presto we have a flush mounted porcelain bodied clock, that I think looks pretty right for the van. I've pretty much finished the ceiling, except for final filling & sanding. Again I'm happy with the lines we ended up with. 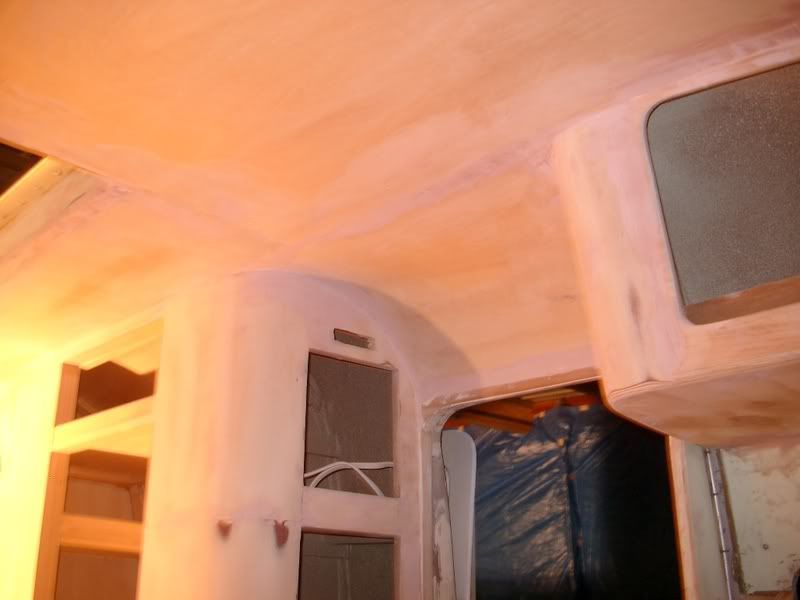  One of the few things that were complete when I bought the Sunliner was the hatch flyscreen, & a box of hinge bits. 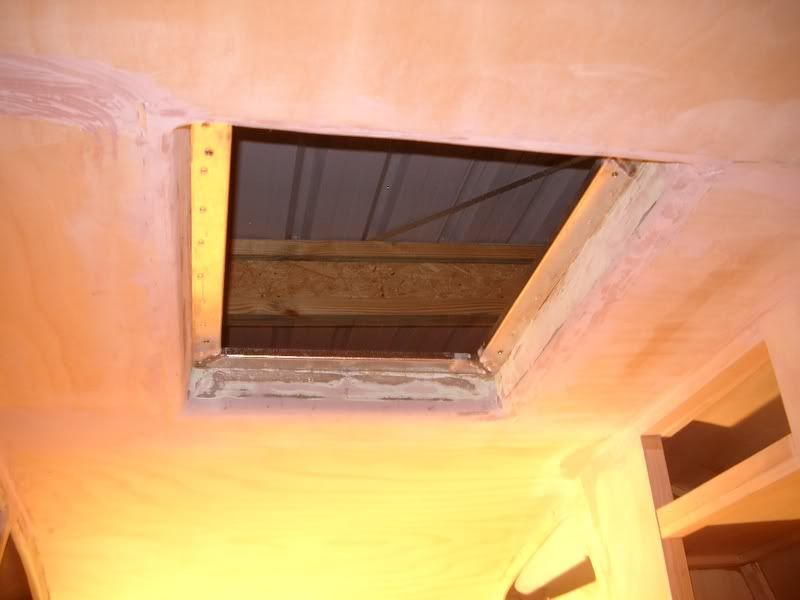  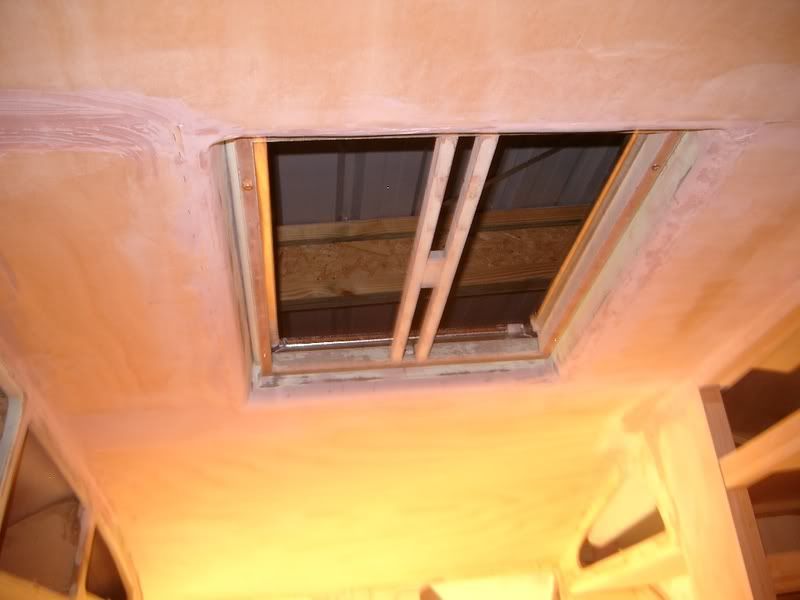 I tried to fit the screen, but found that the hatch opening was off centre. Also the screenhad nuts that needed fitting from on the roof. I decided to make a metal frame, which I glued & pop rivetted into the opening. I've used 6mm nutserts in the frame, which allows me to fit & secure the screen from inside the van. It also gives me the ability to fasten the hatch hinge mechanism to something more secure than a couple of layers of 60 year old fibreglass. I also now can neatly finish ther top of the hatch opening, but I suppose no one but me will ever see that part. Its all fun. I'm looking forward to the next few weeks of working on it, aas I reckon I'll have the interior in primer by then, then Sue can start finish painting, & we'll start to see a (semi) finished product Jailbarjuice |
|
|
|
Post by Geoff & Jude on Jul 6, 2007 8:10:29 GMT 10
hi jailbar i'm loving your work. ;D ;D ;D look forward to seeing it in the flesh at coledale - it's gotta be the best sunny in aus. geoff 'n jude |
|


 .
.