|
|
Post by Roehm3108 on Nov 15, 2023 11:53:54 GMT 10
For the sake of keeping things together, I thought I would post my seating/bed fix here. If you scroll back you will see the couch/bed I originally built. After the maiden holiday, I was not happy with the creature comfort of the bed itself and not being able to access the rear floor locker. I found a set of brand new, never used caravan seat/bed cushions on Marketplace. What looks like it might be dirt is really the nape of the material. The seat part is a heavy duty velvet:  I also found a convertor dining table. Unfortunately some of the arm fittings were missing and the leg was too short  So I had to work out another way of attaching the table to the wall in the upright position  Seems to work OK. I utilised an old car jack stand and annexe pole for the adjustable leg.  A top view  A view of the bed base after adding another section in the front  Hopefully, this will be better than what I had. I've tried to also keep that "vintagey" feel about the van by recycling what I could. Just have to do a bit of filling and painting. |
|
|
|
Post by Roehm3108 on Nov 9, 2023 8:31:24 GMT 10
Have a chat with these people on the Brisbane northside www.revolutionwoodpanels.com.au/ I found them very helpful and if they can't help, they will more than likely steer you in the right direction. |
|
|
|
Post by Roehm3108 on Nov 4, 2023 7:12:02 GMT 10
Hi Stevefranklin. I think I'll use lift-off hinges at the wall end with some sort of stopper to prevent it accidentally sliding out during travel.
nickd, don't worry about taking pics, I have checked the fitting out on caravansplus site and now know what you're talking about. Thanks!
|
|
|
|
Post by Roehm3108 on Nov 3, 2023 12:50:20 GMT 10
Thanks for your input DonR and Nickd Here are pics of the table I am trying to utilise and the arm fitting that swings up/down to eating/sleeping levels. Unfortunately there are some bits missing for the section that attaches to the wall, so I have to think around that a bit.    DonR - I would really appreciate a pic of the wall section of the fitting, if you wouldn't mind. Nickd. is that a sail track on the wall? Would you mind showing me a pic of the bit that sits at the end of the tabletop which goes into this track. |
|
|
|
Post by Roehm3108 on Nov 2, 2023 19:02:43 GMT 10
That's what I'm looking at. Would it be possible to see pics of the wall fitting please?
|
|
|
|
Post by Roehm3108 on Oct 29, 2023 16:41:24 GMT 10
Hi all
I want to convert my couch/bed to a cafe dinette where the table top goes down between the sitting cushions to form part of the bed base for the remaining cushions. I've seen various ways of doing this but am looking for forum input and ideas on what you might have that's simple/cheap to make and works without major effort. If you have a pic or two, so much the better! Cheers
|
|
|
|
Post by Roehm3108 on Oct 2, 2023 7:30:05 GMT 10
Mustang said "I would paint the toolbox."
I'm inclined to agree with you. I actually hadn't planned to use this toolbox, as I also had a black metal travel trunk. Unfortunately it was just a bit too large. Eventually this one will get painted.
|
|
|
|
Post by Roehm3108 on Oct 1, 2023 7:19:35 GMT 10
Never heard of one this huge! Mr koala will be having palpitations 😀😀
|
|
|
|
Post by Roehm3108 on Sept 28, 2023 10:46:15 GMT 10
Well folks, this journey has come to an end! Officially my little build is now called "Thistle-Doo". Hopefully she will have a nameplate done, in due course. Below are some pics of the first trip away, accumulating about 2000 klms through central Qld, doing what caravanning is all about - enjoying the great outdoors!     Thank you for having joined me on this construction journey and your encouragement and advise along the way. Hopefully, you've also been encouraged in your own restoration or build along the way. |
|
|
|
Post by Roehm3108 on Sept 12, 2023 21:05:39 GMT 10
Can you give us some context? You've started a new conversation and we can't tell what you are referring to.
|
|
|
|
Post by Roehm3108 on Sept 12, 2023 20:55:52 GMT 10
I doubt that you will have much success getting what you want - that's a real longshot. Best to treat the re-registration as a new one and organise a new chassis number. Best to chech with Tas Motor Registry for the best direction to go.
|
|
|
|
Post by Roehm3108 on Sept 12, 2023 20:25:36 GMT 10
If your side sheets are 25mm short, why not have longer roof Ali and fold it over the sides walls - which is what you should be doing for drainage? If necessary you could insert a piece of beading in that gap, before the Ali covering.
|
|
|
|
Post by Roehm3108 on Sept 7, 2023 11:59:22 GMT 10
Some final pics of the interior fitout. Heading off for some time out next week, so will post pics of her outside the carport after that. View from entry door:  View towards front 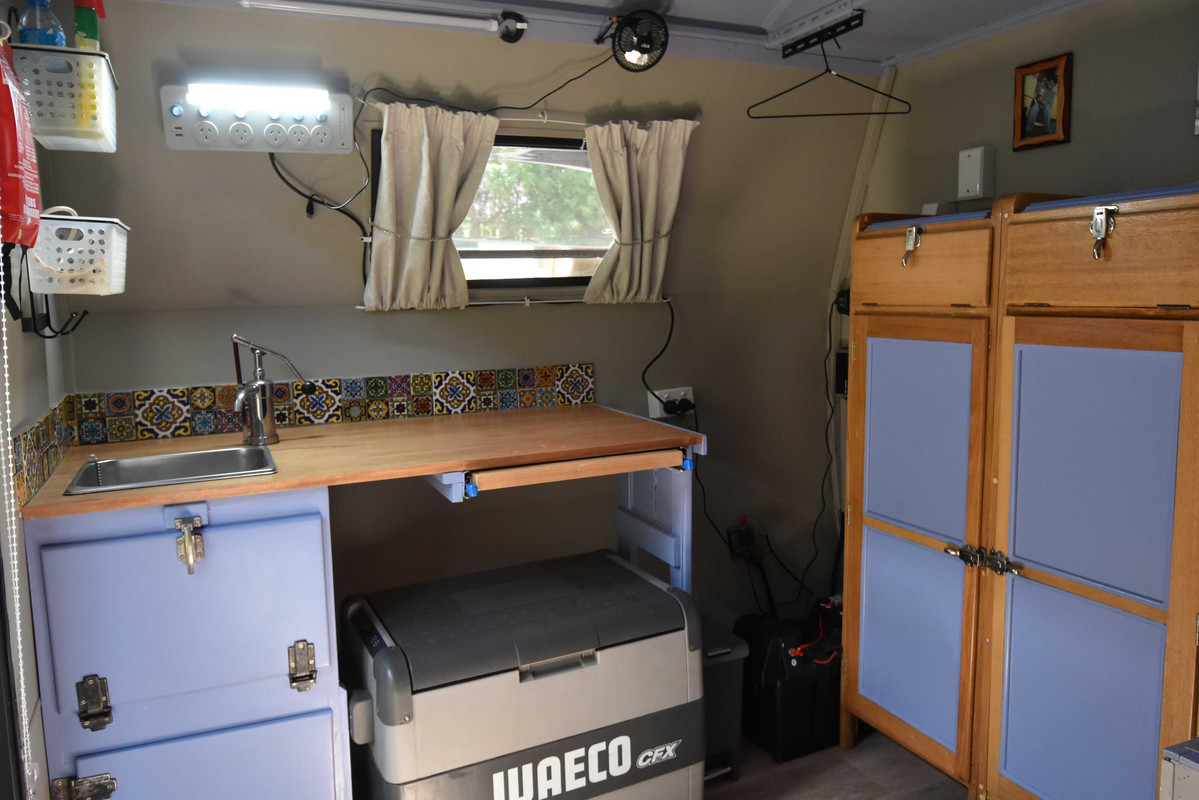 View to rear 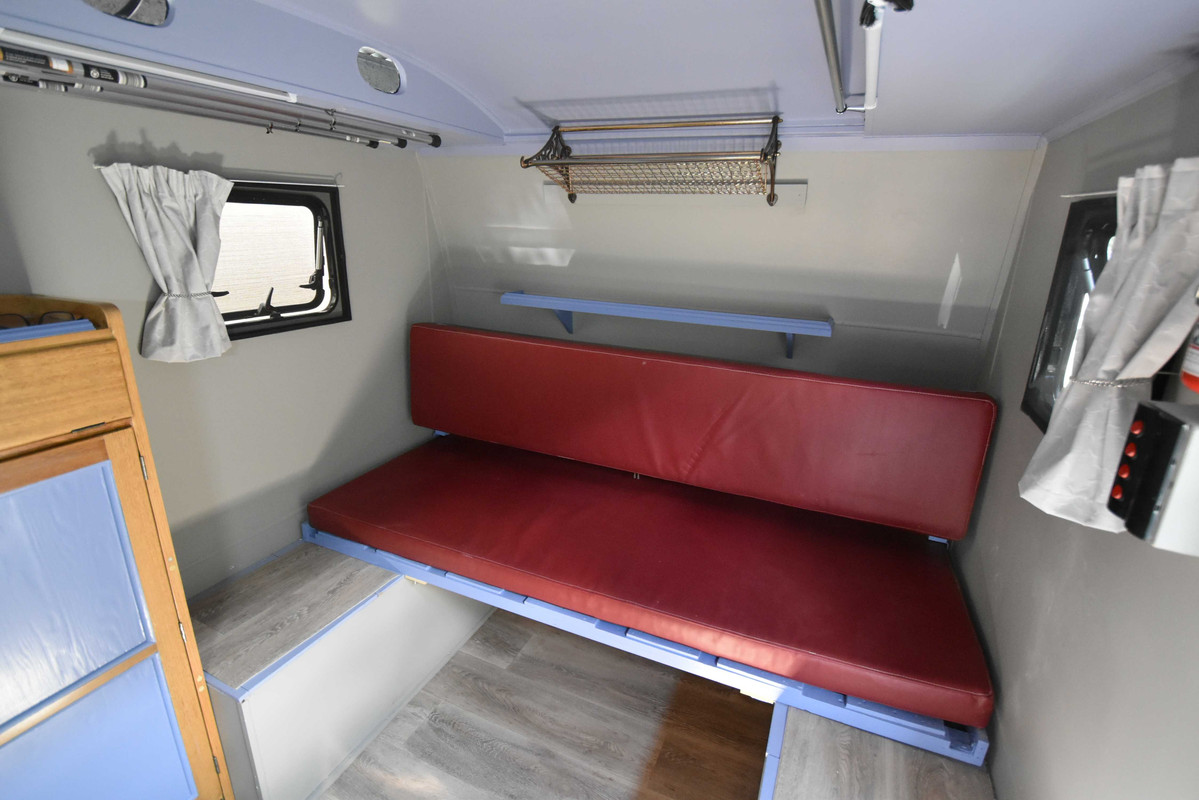 The old is but a memory!  |
|
|
|
Post by Roehm3108 on Sept 2, 2023 9:21:38 GMT 10
Interesting to find out where Ditzy's van has ended up. I remember the whole debate about it at the time she found it. Unfortunately, I think there won't be much more (if any) information apart from what you have here, about its origins. Good luck with the restoration.
|
|
|
|
Post by Roehm3108 on Aug 31, 2023 7:42:31 GMT 10
Hi all No, the project hasn't been mothballed! Been a bit distracted with other work the past couple of months and much of the work really didn't warrant photos. I now have AC and DC power on board and it all seems to be working as expected. It's a minimalist system but will run lights and fridge. The battery box has sufficient connection points for charging input as well as USB and lighter socket connections. Charging for the 120ah lithium battery is via DC/DC charger from car alternator and 160 watt solar panel. I've added a 5amp AC/DC charger to maintain the battery when under the carport. I've also built magnetic flyscreens to the side windows (the front window came with flyscreen installed). The door was originally right-hand hinged, which I flipped to a left-hand hinge, as well as adding the security screen to the window section. The white panel is yet to be painted to match the wall. I'm on the home stretch and the "to do" list is now much shorter. Some touch-up painting inside and out, fitting curtains and door blind and new tyres will pretty much mean it's usable. Heading out west in a couple of weeks for a shakedown trip. Yay!!   |
|
|
|
Post by Roehm3108 on Aug 4, 2023 22:36:18 GMT 10
|
|
|
|
Post by Roehm3108 on Jul 29, 2023 20:40:44 GMT 10
Congrats ST that you've got those vans out of the workshop. I'm sure it has taken a lot of worry off your shoulders. It can get a bit overwhelming with so many projects staring at you. Now focus on that family labour of love. Cheers. Ray
|
|
|
|
Post by Roehm3108 on Jun 23, 2023 8:57:27 GMT 10
Another member of this forum had and restored one of these some years back, and it came up beautifully! With the lack of pics and description, on this ad, you'd think the seller wasn't interested in selling it!!
|
|
|
|
Post by Roehm3108 on Jun 20, 2023 18:29:06 GMT 10
Hi All The heavy duty velcro for the sofa back cushion seems to be working. A couple of pics of the finished look, with the rail luggage rack above. Today I installed the front and side windows. No, I didn't make them!! Got them from Marketplace. Bed position  Sofa position  Front Window  One of the side windows  |
|
|
|
Post by Roehm3108 on Jun 20, 2023 18:24:59 GMT 10
Hi SGTL Nice to hear from you and thanks for your input. Very early in the build, I actually considered outside hatch doors with a tunnel boot in the back section. I put it into the "too hard" basket!! The bigger 800mm wide mattress will always sit where it is, regardless of whether used as sofa or bed. The backrest part is quite light (even for this old codger) and sits in front of the bigger mattress. The front hatch lids are very easy to access and will contain items I want to use regularly. The back hatch is slightly problematic but will only have stuff stored there which I won't need to access that regularly. Granted that once the bed is made it becomes more difficult. Having a door vertically still means crawling under the bed, which is virtually impossible for me these days. It can be a project for the next person   . |
|
|
|
Post by Roehm3108 on Jun 17, 2023 13:59:15 GMT 10
Hi All The past few weeks have given me little time to spend on the build, but I have now finished the hatches over the wheel arches as well as building the sofabed frame. The larger squab is 800mm wide and the smaller one I had cut down to 400mm . It was always going to be a challenge working out a way to have the backrest only 500mm from the front when in the sofa position. The futon click-clack hinges wouldn't work so I developed a simple sliding post for the backrest, which seems to work. The pics show what it will look like. I will be fitting very heavy duty Velcro to fix the backrest squab to the frame next week. Hatches (lids made using the plywood base of the old camper beds):   Sofabed in bed position  Sofabed in sofa position  I don't expect the backrest posts to be a head-hitting problem where they are, as the mattress is actually 1900mm long. There will be sufficient storage space for the bedding, behind the backrest when the bed is not in use. |
|
|
|
Post by Roehm3108 on Jun 2, 2023 18:17:27 GMT 10
Hi all Managed to get a bit more building done this past week. Built storage bins around each wheel arch (yes there will be lids added later).   The framing for these will also act as support for the sofa/bed. I have two mattresses I bought out of a doctor's surgery after they remodelled it to a different corporate colours. They were 1900mm x 800mm, with high quality vinyl covers. I had an upholsterer friend halve the width of one to 400mm wide and resew it for me. I've now built two frames to the size of the mattresses, recycling the sliding bed-base ply from the original camper.  Here's what the bed will look like with the mattresses on.  I have yet to work out how to convert this to a sofa, bearing in mind I have that shelf in the way behind it. It can't be moved as it has a structural purpose as well. I'm hoping to work out a way to gain a bit more floor space (2-300mm) when the bed is in the sofa position. Any suggestions on how to go about doing that are welcome! The cupboard shape you see beside the bed may be familiar to some people. I had planned to put it into Cino Vardo but decided to build similar replicas instead at that time. This time, these 1930's cupboards will be built in the position it sits at the moment. They're oak too, so this is becoming a rather precious caravan! It gives me great storage for a small van. Maybe this addition plus the sink cupboard with vintage tap plus the luggage rack qualifies this build as a vintage caravan!! |
|
|
|
Post by Roehm3108 on Jun 2, 2023 17:51:17 GMT 10
Hi Lewis
Are you related to Abraham Lewis? Just be aware that rivella hasn't been in the site for over a year and his profile information doesn't have a personal email address that you could write to either. Keep yu fingers crossed that he may come on at some point.
|
|
|
|
Post by Roehm3108 on May 31, 2023 19:42:46 GMT 10
Sold now
|
|
|
|
Post by Roehm3108 on May 23, 2023 15:13:00 GMT 10
This is an old thread. We really can't answer the questions you pose about passing rego. You need to work with them and they will help. If you want more ID info, you need to put up a photo or two.
|
|


 .
.