|
|
Post by drifter on Jul 28, 2009 13:44:26 GMT 10
Hi. I require a bit of advice & guidance with a job I am doing.
I'm having to replace a couple of frame members in my van due to dry rot. Originally the frame was put together using what look like very oversized staples at each joint in the frame.
I've read that you should not glue wooden frame members together, so they don't split or break with movement when you're travelling.
I can't seem to be able to get these types of fasteners where I live, & was wondering what else I could use. I'd thought of those wavey metal strips that you hammer into 2 pieces of wood to hold them together.
Any ideas would be greatly appreciated. Thanks.
|
|
|
|
Post by Franklin1 on Jul 28, 2009 23:30:05 GMT 10
Hi drifter, the information you've read about not glueing frame members seems to be a bit odd. From your description, I gather you are talking about the vertical and horizontal framework struts on the side wall?? My advice is to glue and screw the joint. Use brass screws if you can afford them (expensive!!) but any bright galvanised screw is ok. The really fussy people (like me...  ) will pre-drill the screw hole and then dip the galv screw thread into enamel pink primer paint before screwing it in the hole. The pink primer helps to seal the screw from moisture and also helps to lock the screw in position when the paint dries (...a bit like the old Locktite product). Don't go using any fancy staples or corrugated nails...a lot of these old vans were just nailed together with ordinary nails and they haven't fallen apart yet. The problem I've found with the old nails on my vans is that they were plain steel, and have rusted solid in the timber due to moisture levels over the years. Try to pull them out now and they just snap. Keep the job simple, otherwise you go nuts!! ;D ;D cheers, Al. |
|
|
|
Post by drifter on Jul 29, 2009 9:30:51 GMT 10
Thanks for the info, Al. I'm still a bit lost on how to screw these bits together. They are 40mm x 20mm frame bits that are butted together. The main piece I have to replace is the vertical frame member in the right corner, & it butts in between the horizontal pieces that run across the back above & below it. Then there's the horizontal bits that run the length of the van that join the front face (wide part) of this corner piece.
Thinking about it while typing this, I presume I could drill the holes at a 45 degree angle, & after gluing, use longish screws so they go through both pieces of wood to hold the vertical piece in place. Is that how it should be done? My other thought was using angle brackets to hold it together. I don't want to have to remove any of the outside cladding if I can help it, & only want to be able to fix it from the inside.
By the way, this is not the Franklin I posted pics of in my New Member thread. It's my other van that I use on my frequent trips out into the bush. It's not quite old enough to qualify for this website, but I already have a photo of what needs to be repaired if it would be ok to post that so you can see exactly what I'm talking about.
Cheers mate.
|
|
|
|
Post by minicamper on Jul 29, 2009 10:04:07 GMT 10
|
|
|
|
Post by Franklin1 on Jul 29, 2009 10:30:39 GMT 10
Hi Andrew, yep...post some photos. A lot of the repair techniques are similar for both young and old vans, so people might get some good ideas from your situation that they can apply to their own vans.
The more pictures the merrier! ;D ;D
cheers,
Al.
|
|
|
|
Post by drifter on Jul 29, 2009 12:59:17 GMT 10
Ok, here's the damage. There was another horizontal frame member at the left along the side wall about where the wiring is. This was rotted also & will be replaced.  And here's the van. A 1980 11 foot Hi-Lite poptop.  |
|
|
|
Post by Franklin1 on Jul 29, 2009 22:36:42 GMT 10
Hi Andrew, I get the gist of your problem from your photograph. There are a number of different ways of repairing/replacing the timber, including your idea about metal brackets. However, I always promote the glue-and-screw timber option wherever possible, so my ideas are based on that. Following are some sketches of butt joints with different methods of getting a good solid joint. All of them can be achieved working from inside the van. Have a look at these and see if any of them might suit your requirements, or they may prompt you to think about other alternative ways of getting the job done... 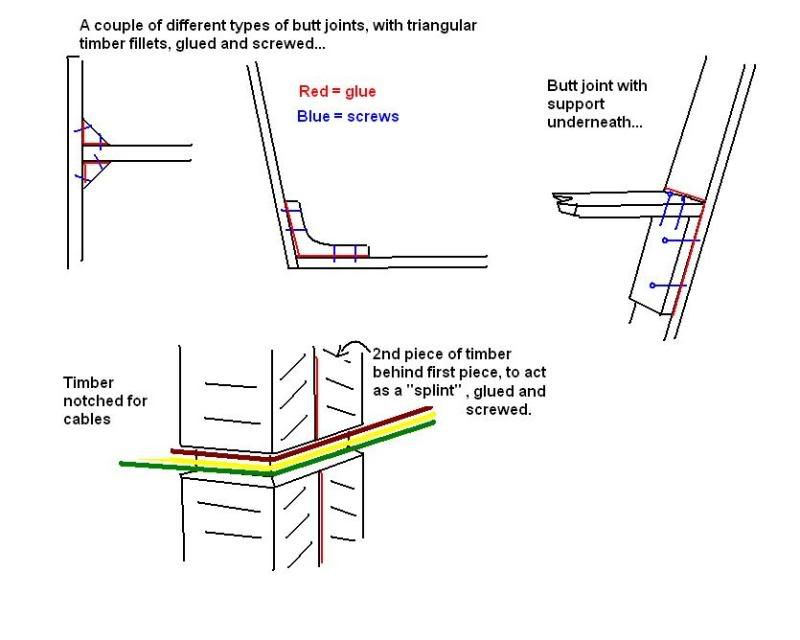 The bottom left hand sketch relates to the wiring in the back corner. This method replaces the need to try and drill holes in the timber and poke the wiring through. It means you can leave the wiring all hooked up in position as it is, and just fit the timber into position with the wiring slotting into the notched section. The notched out section MUST be the minimum width and depth possible, just enough to sit the wires in comfortably, otherwise you'll weaken the timber if you go too deep. A notch 8mm wide x 8mm deep should be more than adequate. Whatever you do will be a vast improvement on what's there at the moment , so just keep adding bits of timber and glue and screws and swear words, and eventually you'll end up with something as solid as a rock! ;D ;D And it's all good practice for when you tackle the Franklin. Ask more questions if you still need more info. cheers, Al. |
|
|
|
Post by drifter on Jul 30, 2009 8:39:18 GMT 10
Al, you're brilliant, thank you. I never thought of doing it that way.
Interesting idea for the wiring also. I was just going to disconnect the wiring from the back of the lights, drill the holes to feed the wires through the new wood & reconnect them to the lights...or...cut the wires in a staggered pattern to the left of the rotten piece of wood, drill the holes & feed them through as original. Then solder them together & use shrink tubing to seal the joins.
Doing it the way you've shown means doubling up on every frame member on the lower half of the back wall so the wall lining sits flush across the van. But that means it won't be flush with, & will stick out from, the wall lining on the top half of the back wall. Can't double up all the top half frame members because then the lining won't sit flush around the window.
Ahhh, lightbulb moment. I think I've just figured out a way of doing this & have everything line up flush. When I get around to doing it I'll post the result.
|
|
|
|
Post by drifter on Aug 9, 2009 13:16:21 GMT 10
Sorry for the delay in showing this as I've been busy with other things. Got the rotten frame members replaced. I decided not to go with the lightbulb moment I had in the last post. I found I could easily take the wiring off the backing plate contacts in the lights, so I put the wiring in the same place as original, through the frame members. Next job is replacing the wall lining, which I got on Friday & is still laying on the trailer, in the garage next to the van. Here's the replaced frame members.  |
|
|
|
Post by Franklin1 on Aug 9, 2009 15:42:24 GMT 10
And what a nice, neat job you've done too!! Good on you, Andrew, you're a credit to the caravan restoration fraternity! ;D ;D One other suggestion I'd like to give, if I may. While you've got access to the rear wiring, have a think about putting in a dedicated earth lead to at least the two rear tail-light fittings. At the moment the earth return from all your lights (bar one) is actually the aluminium cladding, with all the associated problems of joins, sealants, corroded screws, etc, getting in the way of a continuous circuit back to the car battery. The manufacturers put an earth lead from the tow plug to the nearest clearance light at the front (cheapskates!), and then rely on the cladding as the earth for the rest of the van's traffic lights. Grab a spool of white automotive cable, and at least hook up the two rear light fittings and then feed the cable down the back wall cavity through to the chassis below. Anchor the cable to clean chassis metal. You'll then need to anchor a short length of white wire to the front drawbar and connect it into the tow plug to complete the circuit. 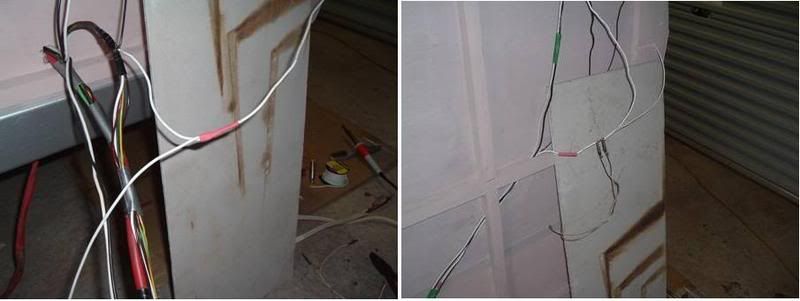 I was in the fortunate situation with my van that I was able to cut and splice a new earth lead to all my lights, however in your situation at present, you'd be covering off the two most important light fittings on the van. Worth a thought. You keep going with the good work you're doing, Andrew!! ;D ;D ;D cheers, Al. |
|
|
|
Post by drifter on Aug 9, 2009 16:40:28 GMT 10
And what a nice, neat job you've done too!! Good on you, Andrew, you're a credit to the caravan restoration fraternity! ;D ;D Thanks Al. It's amazing what a little bit of knowledge can do, & I even surprise myself at times what can I do with wood. Grab a spool of white automotive cable, and at least hook up the two rear light fittings and then feed the cable down the back wall cavity through to the chassis below. Anchor the cable to clean chassis metal. You'll then need to anchor a short length of white wire to the front drawbar and connect it into the tow plug to complete the circuit. cheers, Al. Yep, thanks for that info of the earth lead from the rear lights too.  Don't have to do the last bit from the front drawbar to the plug, as I've already done that. When I first got the van, the lights wern't working correctly, & after a bit of probing, I found they were not earthing properly. So I pulled the original earth wire out of the plug & ran a new wire from there to the chassis where I secured it about where the front right seat is. |
|
|
|
Post by younglover on Oct 23, 2009 0:14:39 GMT 10
helpful tips Al, thanks a lot! I'll keep them in mind when I start my restorations.
YL.
|
|


 ) will pre-drill the screw hole and then dip the galv screw thread into enamel pink primer paint before screwing it in the hole. The pink primer helps to seal the screw from moisture and also helps to lock the screw in position when the paint dries (...a bit like the old Locktite product). Don't go using any fancy staples or corrugated nails...a lot of these old vans were just nailed together with ordinary nails and they haven't fallen apart yet. The problem I've found with the old nails on my vans is that they were plain steel, and have rusted solid in the timber due to moisture levels over the years. Try to pull them out now and they just snap.
 that are hammered into the joined timbers...