|
|
Post by Surf Tragic on Jun 14, 2021 0:22:36 GMT 10
I have decided to start a separate thread for this van & post the retrieval from Harrietville, the reason is that I have started to do some work on it. I think if I do some of the major work that needs doing, I will have a better chance of finding a new home for it. Some have shown interest saying they are familiar with restoration work, but this one needs more than a paint job & new curtains !  1 1 by Surf Tragic, on Flickr This is the entry to the property where the Don 133 is hidden, beside this nice little stone cottage.  20 20 by Surf Tragic, on Flickr When I 1st walked up to this van I thought it was too much for me, but after seeing the badges & brass plate with Serial Number, I couldn't walk away !!, so checked the stabilizer legs to see if they'd wind up, & they did. The van had been sitting here for the last 35 years or so, the Ovens River right there had flooded, the wheels were sunk to the hubcaps. Amazingly both tyres pumped up. One really good thing is that there was a roof over the van, but the front LHS & back LHS corners were exposed to the weather, so there's a bit of rot there.  24 24 by Surf Tragic, on Flickr  25 25 by Surf Tragic, on Flickr Now doesn't that look like dedication ?   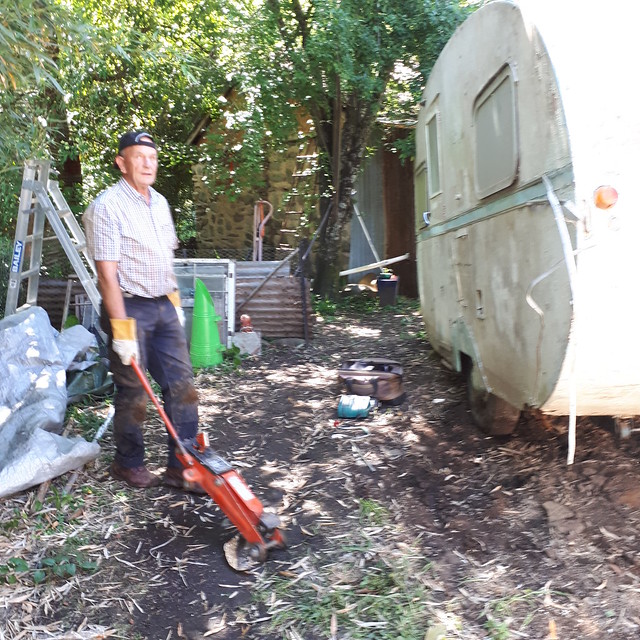 26 26 by Surf Tragic, on Flickr Had to raise the van & fill in the ruts where the wheels had sunk in  28 28 by Surf Tragic, on Flickr  29 29 by Surf Tragic, on Flickr The front was deep in the mud, and the van was very close to the shed, had to crawl along sideways with the powerpack/compressor to pump that tyre, nearly too much for an old bloke.  31 31 by Surf Tragic, on Flickr The only way to drag it out was backwards, there was only a car length from the back of the van to the neighbours fence, so had to drag it around the corner, it only just missed the edge of the roof. The wheels wouldn't turn easy even with 5 of us trying to push it, but eventually got it there.  32 32 by Surf Tragic, on Flickr  56 56 by Surf Tragic, on Flickr Now the usual set of wheels bolted on the "A" frame, loaded it on the trailer, boarded up some loose sheets & loose windows, Door, the Hatch. This was the 3rd trip up from Wodonga so took a mate to help load up. Negotiating two rightangle corners & low hanging branches took some time. The guy who was renting this property wasn't the guy I bought the van from and he had a Toyota closed in van in the driveway with no battery, so I supplied him with one so he could move it, and it was interesting to see he had trays of seedlings growing in it !! Like a mini hothouse. I didn't ask any questions.  Off we went after a nice local pie & Coffee at the shop/post office right next door. Later...........Surf Tragic |
|
|
|
Post by sportsman 1 on Jun 14, 2021 0:25:15 GMT 10
Love your work and dedication ST.
|
|
|
|
Post by Surf Tragic on Jun 14, 2021 20:55:13 GMT 10
This part was previously posted under another thread so have shifted it here to link up the story. Serial Number Don 133 became available a while ago so drove to Harrietville to have a look, couldn't resist because it had the 'Don' badge front & back, also the serial Number 1108 The one I already had was 1107, I nearly walked away from this van but seeing I had traveled up, decided to check it out properly, it was full of junk & impossible to get a good look inside. Jammed hard against a shed wall with skillion roof over, it was exposed on one corner at the front. It took 2 trips to prepare, 3rd one to bring it home.  5 5 by Surf Tragic, on Flickr  20 20 by Surf Tragic, on Flickr  8 8 by Surf Tragic, on Flickr  6 6 by Surf Tragic, on Flickr The original tow coupling, but slightly different to all others I have, in that the thread is a smaller diameter.  19 19 by Surf Tragic, on Flickr  10 10 by Surf Tragic, on Flickr Everything inside is in good order as far as ceiling & cupboards go, rot in the front LHS corner & damage to one leaf or the double bed at back.  17 17 by Surf Tragic, on Flickr  16 16 by Surf Tragic, on Flickr  18 18 by Surf Tragic, on Flickr  13 13 by Surf Tragic, on Flickr  7 7 by Surf Tragic, on Flickr The extent of the rot on the exposed corner, I cut away the sheet to purposely expose what needs to be done, a fairly basic repair for anyone with woodworking ability. One window is missing, can't get an answer on that even though I pressured the owner, ( the van has been in that spot for at least 35 years but know how to (reasonably simply) make one similar. I think ..........  |
|
|
|
Post by Roehm3108 on Jun 16, 2021 9:59:19 GMT 10
Gee ST, and here I thought you were going to move onto a more interesting project like building that gypsy style caravan!!! No doubt about your tenacity at retrieval! Good luck with it all. Ray
|
|
|
|
Post by Surf Tragic on Jun 17, 2021 18:15:50 GMT 10
G'day Ray, it would indeed be a great interest to be building a Gypsy outfit like yours, I would love to do one
|
|
|
|
Post by Roehm3108 on Jun 18, 2021 7:34:51 GMT 10
Very pretty ST!! That would have put a dint into the pension cheque!!!  |
|
|
|
Post by Surf Tragic on Jun 20, 2021 22:26:49 GMT 10
Well, here goes.  52 52 by Surf Tragic, on Flickr This is what is in my mind to make the missing window, the corners are too tight a radius to bend, so used some 3mm flat sheet Aluminium from work factory. Scribed around an existing window for the outside profile, then scribed around for the inside profile. cut with a Jigsaw using WD40 made it cut easily.  44 44 by Surf Tragic, on Flickr  43 43 by Surf Tragic, on Flickr Hard to see the line. (for me anyway) 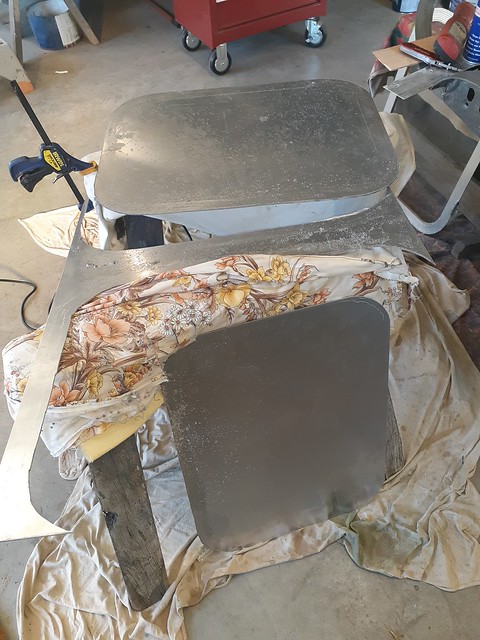 53 53 by Surf Tragic, on Flickr Big offcuts seem a waste, but Can't see any other way to do this.  45 45 by Surf Tragic, on Flickr Some hand planing with the wood plane !! then filing, got the lines straight. More to come ! Surf Tragic |
|
|
|
Post by Roehm3108 on Jun 21, 2021 7:14:30 GMT 10
Are you going to scribe the grooves in too ST??
|
|
|
|
Post by Surf Tragic on Jun 21, 2021 11:29:17 GMT 10
G'day Ray. Trust you to notice the details !!!!! I really think that is too hard to do, unless you have some clues ? You can only see one window at a time you know.  Give me another week & see what we come up with. The last 133 I restored didn't have the grooves in the frame face . ST |
|
|
|
Post by Roehm3108 on Jun 21, 2021 12:17:36 GMT 10
Nah, ST. Not that clever 🙂. My thought would be that the original would have been made from aluminium that was extruded with the grooves. What will you use for behind that front face to hold the glass? I take me hat off for ingenuity with what you've done already.
|
|
|
|
Post by Surf Tragic on Jun 21, 2021 22:08:45 GMT 10
Grooves could have been cut in the face to be exact replicas of the original by having all this Laser cut, but this is a very agricultural home made window using basic tools & elbow grease.! 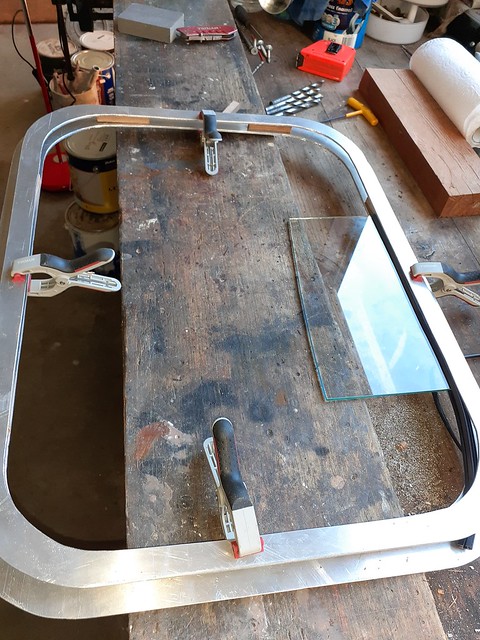 46 46 by Surf Tragic, on Flickr The inside & outside faces are spaced about 9mm apart same as channel & glass as seen in this photo, I used wooden blocks as spacers, then cut a strip of the 3mm aluminium sheet as the final spacer, welded between the two to form the bottom of the alum channel to hold the glazing vinyl & glass.  47 47 by Surf Tragic, on Flickr After all welding is done & hinges fitted like original, it has to be cut in half to enable glazing, a really bizzare way to glaze a window, no wonder they didn't follow on with this type of manufacture.  48 48 by Surf Tragic, on Flickr This is a bad photo but I haven't got another, it shows the channel. It's a crude way to make a window compared with an extruded profile & machine rolled corners, but it will work & function as it's supposed to, keep the wind & water out.  49 49 by Surf Tragic, on Flickr Maybe this shows a better idea of the profile , the channel is extra deep to allow for metal threads on the joint, also for stays & catches fitted later. This is the method to re-join the frame after glazing. The only Vinyl glazing channel that was suitable, is used on shower screens at work. Cheers, Surf Tragic |
|
|
|
Post by Surf Tragic on Jun 22, 2021 18:38:59 GMT 10
 51 51 by Surf Tragic, on Flickr Clarke Rubber had this closed cell foam, it sure has a very sticky back which is great, the original windows had a Felt strip, this would seem a better seal.  50 50 by Surf Tragic, on Flickr that's it done, I'm pleased that's out of the road.  50a 50a by Surf Tragic, on Flickr The bigger front window had cracks in the glass, so that's all re-glazing finished, the vinyl channel had to be replaced as it was crumbling in that one too.  54 54 by Surf Tragic, on Flickr the flywire in this big front flyscreen was 1/2 pulled out at some stage, the pelmet has to be completely dismantled, nails cut off & prised apart on glued parts to get to the flybead, so it will be screwed together for easy access if needs be in the future. same as last Don 133. At least they were constant in their error !!. I'll rewire in black stainless steel. Better leave this van & get back to the 140 Family van for a spell. Surf Tragic |
|
|
|
Post by Franklin1 on Jun 25, 2021 21:24:42 GMT 10
G'day surftragic, Firstly let me say how much admiration I have for the effort you put into all aspects of Vintage Caravan preservation - from the recovery process to the final restoration process. You certainly put in a 150% effort in everything you put your hand to!  ------
I had a major failure with the closed-cell foam that I put on my windows initially. The surface of the foam wanted to keep sticking to the gloss paint on the van, so that when I tried to open the window, the foam ended up ripping from the window surround... I had no choice but to go back to the felt strip that was on the windows originally. The difficulty was trying to track down suitable felt for the job, and I ended up searching, searching to eventually discover it in Far North Queensland. I bought my 10m roll about 7 years ago, and from memory it was about $30 posted to my address in NSW (about $20 for the 12mm wide felt roll, and $10 postage). It was much cheaper to buy the felt roll in the USA, but the postage costs from there were horrendous. My van has now been finished for six years this month, and the felt strips have withstood the test of time so far. You may find you end up with a similar problem with your foam strips sticking, particularly if you use the high gloss oil-based paint on your van (whereas mine was only gloss acrylic paint). Sending continued good wishes as you work your way through your list of Don caravans! cheers, Al.
|
|
|
|
Post by Surf Tragic on Jun 26, 2021 20:33:15 GMT 10
G'day Franklin!, Always great to hear from you, & i'm very glad for your advice as I know you are right. So thank you a lot for that as I was going to renew the felt on the large window. I didn't even think that it was possible to buy felt, didn't even try. It would have left a mess on the outside wall too. Now to get some felt, man it's hard to get that foam completely off ! I really am enjoying the shed again, had a long absense but can get pretty cosy down there with heater going . I want to move some vans along but realize this Don 133 needs a few major repairs before anyone would be interested in taking it on, trouble is, It will be hard to not finish it myself! I appreciate your good wishes, keep safe yourself. Cheers........Surf Tragic |
|
|
|
Post by Don Ricardo on Jul 1, 2021 16:12:41 GMT 10
Hi Surf Tragic, I've loved reading through the thread showing your work on No 1108 just now. As always I am just fascinated and so admiring of the work you do and the clever ways you develop to overcome hurdles. The production of the window frame is just amazing to someone like me that would have no idea of even where to start. I'm pleased that No 1108 is going to be brought to the point where someone can acquire it, finish it off and enjoy it. The 133's are a good looking van, in my eyes anyway. I think it's pretty amazing that it has survived in the relatively good condition it has, and the inside looks really quite good. I noted your comment about the thread on the tow coupling being a smaller diameter. Some time ago Winterwood gave me the wingnut for the coupling from his Don 150 (no 1050) to use on our 140, but I found that it was a smaller diameter than the thread on our van, so it appears that at around the time 1050 and 1108 were built Don started using a smaller diameter thread for the coupling bolt? One other slightly intriguing note about serial number 1108, is that I actually have two vans with that number on my Don register. One is your 133, and the other is a 121. The photo I have of the serial number for the 121 is slightly fuzzy. It looks like 1108, but I suspect that since your 133 clearly has the serial number 1108, then the apparent '1108' for the 121 is actually something slightly different - perhaps 1106 or something like that. In any case it seems likely to be amongst the last lead light window vans produced, and was possibly built as a special order. I'm looking forward to seeing more developments in the restoration of the real 1108.  Don Ricardo |
|
|
|
Post by Roehm3108 on Jul 2, 2021 8:47:55 GMT 10
Hey DonR. Why not use this rebuild as an opportunity for you to visit ST, become his apprentice and learn the wonderful skill of vintage caravan restoration??? I'm sure he could do with a hand!!! It even takes you away from a Covid hotspot and out of DonnaR's hair!
|
|
|
|
Post by Don Ricardo on Jul 2, 2021 11:37:25 GMT 10
Hi Roehm, Nice idea, but I think I'd be more of a hindrance than a help! But I am really good at admiring other people's incredible work. That's a skill all on its own! Don Ricardo |
|
|
|
Post by Surf Tragic on Jul 2, 2021 11:54:42 GMT 10
Hello Don Ricardo
Great to hear from you. With No 1108 it would be easy to continue with restoring it as it is a relatively straightforward process, but will concentrate on the Family 140 again, I just had
to' try the window as it was niggling away in my mind. The 140 is fairly intense & some photos soon will show you why. It's good to have a break & do a bit on the 1108 occasionly, the floor of which is 100% ok, all inside is very good , just one corner needs a new sheet in the Dining area.
The smaller thread on 1108's coupling seemed a backward step, but steels may have been improving in strength as things do over progressing years, maybe a decade ?? between our model & #1108.
Yes this van is clearly # 1108 so find it intriguing to hear of the 121 'maybe' having the same number, there could be several reasons that could happen because of the different models or even human error, that would make the 121 really unique as a minted coin with an error on it !
Surf Tragic
|
|
|
|
Post by Surf Tragic on Sept 11, 2021 20:02:42 GMT 10
 58 58 by Surf Tragic, on Flickr the large front Flyscreen completely dismantled, corners re-glued, pelmet joins pried apart as all had been glued & nailed to the frame. 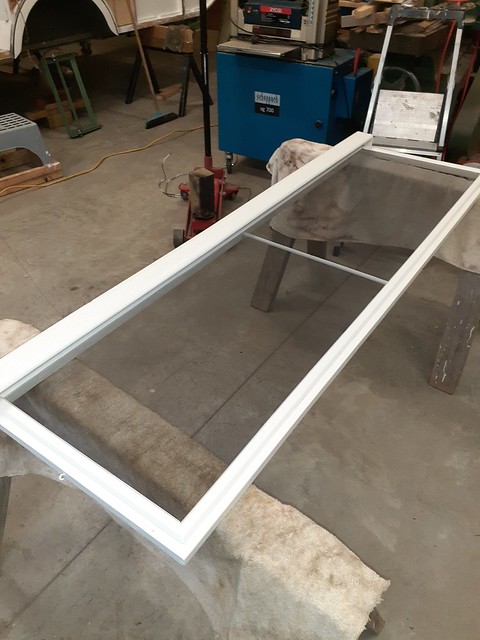 59 59 by Surf Tragic, on Flickr New Charcoal Stainless Steel Flywire, pelmet screwed in place so easy to do maintenance if needed in the future.  61 61 by Surf Tragic, on Flickr This is mainly to show Franklin1 that I followed his advice, purchased sticky backed FELT, trashed the Closed Cell Foam tape I had fitted, & replaced it with this. It came from same place in Nth Qld. Thanks again Franklin1. Surf Tragic |
|
|
|
Post by Mustang on Sept 13, 2021 8:08:15 GMT 10
This appears to be what I need as well, as the foam I have now compresses around the window hardware too easily.
|
|
|
|
Post by Surf Tragic on Oct 25, 2021 21:14:03 GMT 10
 63 63 by Surf Tragic, on Flickr There was movement at the Station ! The owner of Don # 1107 looks on helping..  65 65 by Surf Tragic, on Flickr Helping to haul Don #1108 out of it's temporary home.  66 66 by Surf Tragic, on Flickr The new owner of #1108 on the right, Ken, my good neighbour in red on left, always ready to lend a hand.  67 67 by Surf Tragic, on Flickr the gaps hoarded up for the trip to Corryong.  69 69 by Surf Tragic, on Flickr  71b 71b by Surf Tragic, on Flickr There she goes to a good home, two mates each with a Don 133. |
|


 Off we went after a nice local pie & Coffee at the shop/post office right next door.


 Give me another week & see what we come up with. The last 133 I restored didn't have the grooves in the frame face .


