|
|
Post by seeshell on Jun 8, 2011 19:41:37 GMT 10
Well Mr and Mrs Swellwillys What can I say - you never fail to disappoint!  Swanky! Cheers Seeshell |
|
|
|
Post by seeshell on Jun 8, 2011 12:26:16 GMT 10
Hmmm Will we use ground up Franklin shelves as the filler/stabilizer?  ;D Seeshell |
|
|
|
Post by seeshell on Jun 8, 2011 11:20:49 GMT 10
Hi Cobber
Like first generation bakelite, carvanite is an early phenolic thermoplastic. These early plastics included shredded fibres (sometimes paper or sawdust) to provide filler and stablize it. Some of it goes back to post WWI!
Apparently the public didn't immediately understand the limitations of early plastics - that hot water liquified them! Really early items didn't carry warnings, and there are stories of melting coasters, and items turning to slag. And of course they weren't very "plastic" at all - quite brittle.
Catalin was the epitome of the early thermosets because it was almost clear and was a more refined product that could be dyed (think later deco radios, home goods, jewelry).
Second generation Bakelite began more practical and heavy use in electrical and other manufacturing applications and ultimately became very popular of course for many products
Specifically, carvanite forayed into household goods and was a bit more delicate that corresponding bakelite of the time. There were many similar brands like Bristolite, Duperite, etc, all of which had similar but not exactly the same plastic properties and were used for all kinds of home goods.
From the Graduate: "I want to say just one word to you, Son. Plastics!"
Cheers
Seeshell
|
|
|
|
Post by seeshell on Jun 7, 2011 23:10:27 GMT 10
Hi Hughdeani
We managed to do the underside of our van with wire brushes on drills and angle grinders, and it only took about two days (not really pushing that hard). It's a messy horrid job, but unless your rust is really bad, I think you would get by for a lot less agro (and possibly money) than sandblasting. We were really pleasantly surprised how well the chassis came up under that treatment.
Like others, POR15 or another rust conversion paint will cap the job off nicely for years to come.
Other people have had the chassis off and sent it away to be sanded and in some cases dipped - depends how your van is constructed I guess.
Best of luck with whatever you decide -
Seeshell
|
|
|
|
Post by seeshell on Jun 7, 2011 22:45:42 GMT 10
A credit to the whole family (remembering your little helpers!) - it's turned out absolutely lovely. I particularly like the curtains and pinky cupboards. Enjoy the fruits of your labours! Seeshell |
|
|
|
Post by seeshell on Jun 7, 2011 22:43:03 GMT 10
Hi Jenny and Darren Congratulations on finding the WA van of your dreams, and for setting a rather cracking pace for renovations. It's very satisfying doing all the work yourself, even those tedious jobs that in the end no-one will know were done but you. What do they say, character building? At least you'll know it was all done properly, and that there are no "undiscovered surprises" for you in future. Again, well done! Seeshell |
|
|
|
Post by seeshell on Jun 7, 2011 20:59:33 GMT 10
Hi All A few more bits for your viewing pleasure - surely there are others with some cute wares to share? Some carvanite salt and pepper shakers from the mid 1930s - don't they look like little buildings? Push the S and P buttons and they dispense from underneath. 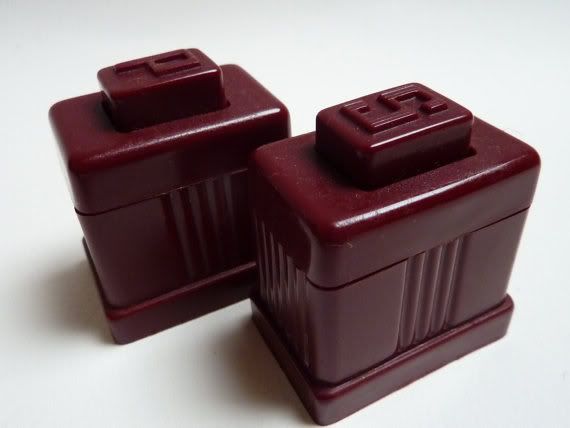 And a few cute Scotty accessories - ashtrays - don't smoke but they are so adorable I might just take it up! 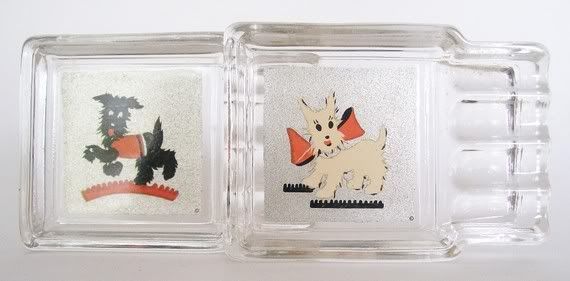 Cheers Seeshell |
|
|
|
Post by seeshell on Jun 7, 2011 8:20:58 GMT 10
Hi Rodnet What a great looking van - it almost looks like it's taken a mould off a transport truck of the period. Well spotted! Cheers Seehell |
|
|
|
Post by seeshell on Jun 5, 2011 21:18:39 GMT 10
Hi ATOG Luckily just the ply needs replacing - what wasn't rotten had just completely de-laminated. The floor has a small raised channel about 6" in from the edge which runs around the outside of the van. The bearers and stringers sit inside this in recessed sections and in our case were protected from moisture and rot. Thank god for small mercies. We're carefully working away the talc/resin, but it sure is slow. I think we will coat the bearers and stringers to protect them into the future. Appreciate the moral support. Seeshell |
|
|
|
Post by seeshell on Jun 5, 2011 19:38:54 GMT 10
Good evening all Well after some distractions (work, university) we've resumed work on Seeshell, the Olympic. You might remember that the floor had rotted out – unfortunately, unlike ATOG, we are in for the full repair. Tonyh’s log proved excellent as a guide about what to expect underneath – though nothing could have prepared us for the evil black resin. Out came the kitchen and the wardrobe, and removal of the floor started this weekend. The back of the floor is out through to the raised fibreglass where the axle and watertank sit under the body. And, as was feared, the only way to remove the resin was with an angle grinder. The job's killed one already (admittedly it was old). When it started throwing sparks it was off to Mitre10 for a new one – no-one wants a Viking funeral in the van. Out comes the kitchen….  Goodbye to the wardrobe…  The back floor is out and resin ground away…it's a winter wonderland!  The raised fibreglass area where the axle and watertank are located underneath. Left and right resin gone with the centre resin blobs still to go…  And the dear Husband looking the worse for wear….  This coming weekend is Queen’s Birthday, and both Aaron and I are taking a few extra days off as well. Five days should mean getting the balance of the floor out and grinding away the resin, templating and cutting the new floor. Finishing the floor will probably be another week or two past that. The floor can't be fibreglassed back to the body until we “bellyband” the girl and bring in the side wall – which seems very doable. Then the belly seams will be reinforced inside and the cabinet frames rebuilt before those are let go – with luck, it will be like a tummy tuck!  We might make Christmas after all! Seeshell |
|
|
|
Post by seeshell on Jun 5, 2011 14:30:13 GMT 10
Thanks Geoff and Jude -
Except for very small vans (except the teeny Jellybean) most of us would be subject to these regulations - though I for one had no idea!
I appreciate you passing on the information -
Seeshell
|
|
|
|
Post by seeshell on Jun 5, 2011 3:58:36 GMT 10
Hi Chubi
Your Carapark Zestline is in remarkable condition I must say! In no time at all you'll be off enjoying it - what a lucky duck!
Cheers
Seeshell
|
|
|
|
Post by seeshell on Jun 4, 2011 12:21:33 GMT 10
Hi Joey I agree - it is interesting not only to see what people wore but the cost of items. At the time (at least in the USA) the average wage was about $2200, which puts some of the cost in perspective. Your $5 pair of shoes equated to about 0.02% of salary. Today with the average wage at $52k, the same pair of shoes that now cost about $120 still represent 0.02% of your salary. So things did cost less in the past, Nanna, but you just forgot how much you earned.  But, people did have a lot less "everything" than we have now. Probably the last vestiges of the war time austerity. Cobber - what a hoot! I can just picture Charles Atlas out there pulling a train to demonstrate his virility... Cheers Seeshell |
|
|
|
Post by seeshell on Jun 3, 2011 20:33:09 GMT 10
Good evening All Well I thought I'd start off with one that might prompt a giggle. This is a bit of light reading for the caravan - a simple clothes catalogue that any lady might peruse with a cup of tea. This is the Fall/Winter Catalogue for 1948/49 from Lane Bryant, a store for women's clothing (or what some call "plus sized"!). But back then the appropriate terminology was "stout".... Behold..."Slenderizing Fasions - Everything for Stout Women". Well, everything except comfortable undergarments...don't those girdles look super comfy?       Cheers Seeshell |
|
|
|
Post by seeshell on Jun 3, 2011 15:16:15 GMT 10
Good afternoon all -
I know we all love our vans to pieces. But I've had just as much fun looking for all the vintage bits to go inside it to "live the dream". It got me to thinking about what little treasures people had unearthed, and how it compliments our van hobby.
Post a picture, and show everyone your favorite vintage find to kit out and compliment your van.
I can hardly wait!
Seeshell
|
|
|
|
Post by seeshell on Jun 2, 2011 13:28:47 GMT 10
Ace! Seeshell |
|
|
|
Post by seeshell on May 31, 2011 21:03:31 GMT 10
It's starting to look like the lead car might have to be a DeLorean, with some sort of flux capacitor, to go ahead/back to ensure there is an oil leak to follow...
1.21 gigawatts? 1.21 gigawatts? Great Scott!
Seeshell
|
|
|
|
Post by seeshell on May 31, 2011 20:54:30 GMT 10
Hi Griffin Regarding the clock for an Olympic: My Riviera doesn't really have the same cupboard configuration with the space in the middle as the viscount pictured - though I'm not sure about your Debonair. To get a clock mounted that is a decent size, you can do it near the door (and just around the corner as well) where there is a space about 7" by 7" in the old money. Or alternatively you can always mount it on a bulkhead or wardrobe door. I've been searching for a clock as well. Some of the old kitchen clocks look like they will work a treat (the GE telechrons were smallish, but of course you'll want something age appropriate). Just find a shape and size you like and don't worry if it is electric powered (which extends your options to 120V clocks as well). It's a simple enough matter to *ahem* improve it by de-guts-ing and replacing it with a quartz movement - for practicality sake. It's not that I'm against electric kitchen clocks (which are charming), it's just a bit of a bastard resetting them every time you pull away from the power grid. Alternatively you can go with a wind up clock - plenty had key mechanisms and would also suit the vintage. Happy hunting! Seeshell |
|
|
|
Post by seeshell on May 31, 2011 5:43:38 GMT 10
Welcome chubi! There are a number of Carapark lovers here - notably retro64. Check out some of the Member Pages for pictures of current project vans, and the Down History Lane section for more information on Caraparks and other vans. Seeshell |
|
|
|
Post by seeshell on May 30, 2011 11:35:16 GMT 10
Hi Richard
Nope - they are like the DHL '63 Wayfarers ones in the Wayfarer thread. Has the word Wayfarer in a box with a Knight's head above it - letters don't really curve. Not enameled with colour though, just chrome.
Cheers
Seeshell
|
|
|
|
Post by seeshell on May 30, 2011 9:48:16 GMT 10
Hi Richard Hadn't you realised that that is why there is a part number for the oil leak? Rust prevention! Just kidding. Sounds like a great project, and I'm a bit envious! Cheers Seeshell |
|
|
|
Post by seeshell on May 29, 2011 23:41:11 GMT 10
Hi richard Yes - there's a Lucas part number for both the smoke and the oil leak. And I'm allowed to say it, because I've rebuilt one! Love your work! Seeshell |
|
|
|
Post by seeshell on May 29, 2011 22:22:02 GMT 10
Hmm - must have seen them on Down History Lane then...
Similar to the Roadliner 63 emblem, but without the blue and red enamel.
Cheers
Seeshell
|
|
|
|
Post by seeshell on May 29, 2011 21:55:29 GMT 10
Hi Jondi55 What a darling little van your Jellybean is! While you say the aluminum on your van isn't original, it still is very charming to say the least. No doubt like a few others, I'm keen to see some pictures of the inside - kitting it out will be a lot of fun. Might be time to have a good look at the Propert link - those folks sure do know how to pack all the luxuries into tight spaces. Congratulations on your new acquisition! Seeshell |
|
|
|
Post by seeshell on May 29, 2011 21:50:07 GMT 10
Hi Curtis What a tidy bit of work you did there - ingenious! Full marks. Cheers Seeshell |
|


 Swanky!
 ;D
;D
 But, people did have a lot less "everything" than we have now. Probably the last vestiges of the war time austerity.