|
|
Post by jamieson on Aug 27, 2011 19:12:58 GMT 10
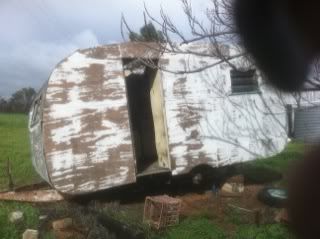
Hi all new to the whole vv scene. I have seem to have stumbled over this old girl at a farm just outside of northam. As I have owned an FJ Holden for a number of years and this van basically fell in my lap I though why not. I know that "modern" was a wa company and this looks similar to some of there's in history lane. Just not sure what year it would be, late 40's early 50's? Have already started getting stuck into it, so a progress report won't be far away.
|
|
|
|
Post by jamieson on Aug 27, 2011 19:34:25 GMT 10
Dinning.
|
|
|
|
Post by jamieson on Aug 27, 2011 19:35:46 GMT 10
Bedroom
|
|
|
|
Post by jamieson on Aug 27, 2011 19:42:10 GMT 10
Poor old van, totally gutted. As the top two sheets of roof ply were missing and the van was open to the elements the floor boards and some of the cupboards had seen better days. No point doing a half job!
|
|
|
|
Post by jamieson on Aug 27, 2011 19:48:08 GMT 10
Let the renewal begin. With all the cupboards, wall lining and floor boards stripped I found that the joists were not that crash hot either. Chassi exposed the whole lot was given the once over with a wire wheel until it sparkled then out came the welder and new rhs joists installed. The whole lot was then given a coat of fisholine rust inhibitor and painted. Not a bad subfloor to start from.
|
|
millsy
Junior Member

Posts: 52
|
Post by millsy on Aug 27, 2011 21:30:01 GMT 10
Great work there jamieson. Shows me the sort of things I could be doing to one of my old vans next year. I hope I don't need to pull the floor out though! I think it has a really solid steel frame under the floor, and I know it has a good solid wooden floor. Well it did 25 years ago when I ripped up the lino and replaced it with carpet.  But I am going to have a go at reinstalling some furniture. And I definitely want to put the back wall back on. I had knocked out all the original, quite perfect, wardrobes, cupboards, beds etc. to turn it into a closed trailer. Now I don't need a trailer and so the plan is to do a rebuild. But I will make a decent sized bed up the side. The original bed was too short across the van. Maybe I should just go and buy another VV. Am going to have a look at one tomorrow morning in fact. But that would make three in the front yard! The neighbours will love it! |
|
noblesgarage
Full Member
 A Man with many projects Dosen't have a lot of time."Cause He Walks Round In Circles"
Posts: 363
|
Post by noblesgarage on Aug 28, 2011 10:25:19 GMT 10
;D ;D ;D Good to see an early louver windowed Modern  Not to many of those left around the place  Will be watching your progress eagerly ;D ;D Very simple construction inside these vans and tow well.  clocked up some 20,000 ks plus in our old girl so far and still going strong . Keep up the good work. Fellow Modern Enthusiast Brian. |
|
|
|
Post by jamieson on Aug 29, 2011 10:00:44 GMT 10
Thanks for the words of encouragement. Hopefully I can do the old girl justice. The next step will be to relay the floor, install the new springs, axle and hubs. Which I am renewing so the stud pattern can be changed to suit the FJ. Also electric drums have been ordered which will hopefully take the pressure off the j. Also I have a query regarding the external ply. Was that coated in a resin or what was the standard form of protection from the elements? Help would be most appreciated. |
|
|
|
Post by jamieson on Sept 1, 2011 0:22:41 GMT 10
New flooring. Pine t&g boards, not bad for free. Second hand off a job site. Oh and thanks to Mark T for calling back, it is a very good feeling to know there is help at hand. Might even take the j for a wrap and catch some of the vvers on the spring tour. All be it vanless at the moment. I am working hard to get it ready as soon as possible. after mid October all sport is finished, then full steam ahead. Have new suspension and all new external/marine grade ply ready for pick up this Friday!! A lot of work I know but u do enjoy it. Even have the missus buying the paint for the exterior for my b'day on sun. How romantic! I wonder if she knows that includes the psu as well!
|
|
|
|
Post by jamieson on Sept 1, 2011 0:24:53 GMT 10
Nearly there.
|
|
|
|
Post by jamieson on Sept 3, 2011 19:26:03 GMT 10
New hubs, suspension axel and electric brakes.
|
|
|
|
Post by jamieson on Sept 3, 2011 19:30:09 GMT 10
New floor has come up a treat! Next stage is to build the wheel arches then it will be time to reclad the exterior. The marine ply looks so good it's tempting to just clear coat it.
|
|
|
|
Post by jamieson on Sept 3, 2011 19:34:46 GMT 10
Even looks the goods from the underside. I'm sure it will still look good after it's coated in under body protector.
|
|
|
|
Post by vernon on Sept 5, 2011 12:53:04 GMT 10
Looking really good there jamieson, you seen to be making good progress.
Cheers Des and Kel
|
|
|
|
Post by jamieson on Sept 7, 2011 22:17:51 GMT 10
Wheel arches done!
|
|
|
|
Post by jamieson on Sept 8, 2011 1:19:11 GMT 10
I wonder how many beers it takes to restore a vintage van?
|
|
|
|
Post by jamieson on Sept 24, 2011 16:23:52 GMT 10
Been a while since an update. Achieved a little more, suspension is all finished and the FJ rims painted. The new tyres should be in next week. Also have finished covering myself in under body paint. Painting with tar upside down is not all that fun.  |
|
|
|
Post by jamieson on Sept 25, 2011 21:16:38 GMT 10
The time has come to begin the exterior and work on the frame. All of the joints have been strengthened by drilling a hole and injecting an epoxy adhesive via syringe into the joint. Also a big thanks to Charlie and the crew at fiber glass and resin sales for all there info and assistance.
I thought this was a good photo, it really shows of the construction of the van.
|
|
|
|
Post by lovshack on Sept 26, 2011 10:37:16 GMT 10
superb work there jamieson. will look great when all done
be sure to join us for the 'spring tour'.[ coming to a town near you ] lol.
would be good to meet n greet newbie in the wacky world of v.v.ing
cheers
|
|
|
|
Post by jamieson on Oct 30, 2011 15:43:44 GMT 10
Well it's been a little while, but I have finally had some time to spend on the van:). Starting the exterior, using the old ply as a template to cut the new it should be plain sailing.
|
|
|
|
Post by jamieson on Oct 30, 2011 15:48:56 GMT 10
Progress
|
|
|
|
Post by jamieson on Oct 30, 2011 15:54:27 GMT 10
With both side walls lined it was time to trim and sand the ply to the exact frame size. The ply was laminated to the frame with west systems resin so it shouldn't be coming off in a hurry.
|
|
|
|
Post by jamieson on Oct 30, 2011 15:59:39 GMT 10
The front section over the windows was a little tricky as the old ply didn't allow the louvres to open so some adjustments were made.
|
|
|
|
Post by jamieson on Oct 30, 2011 16:03:32 GMT 10
Yay!! All the ply is on. Man she looks pretty, still a little rough around the edges though. Run around with the trimmer router will sort that out.
|
|
|
|
Post by Franklin1 on Oct 30, 2011 20:11:40 GMT 10
G'day jamieson, Well, you certainly haven't mucked around getting all that work done in such a short time!  The van has really come up looking pretty neat. Great work! They certainly didn't skimp on framework for these vans, ay?! I'm guessing you wouldn't need very thick ply with all that framework supporting the cabin. What thickness plywood did you end up using for the walls and the roof? And what did you do to make the joints waterproof, where the plywood sheets join together? Did you just use the resin/hardener? I'm a few steps behind you with my project, so I'm interested in knowing how other people have done the same job that I've got ahead of me. cheers, Al. |
|


 Not to many of those left around the place
  Will be watching your progress eagerly ;D ;D Very simple construction inside these vans and tow well.
  clocked up some 20,000 ks plus in our old girl so far and still going strong . Keep up the good work. Fellow Modern Enthusiast Brian.


