|
|
Post by barbarab on Feb 28, 2011 9:44:43 GMT 10
Hi,
we have just about completed the inside of our van and are looking at the exterior now. Tony took off the front right hand corner panel to look behind it. It's been repaired in a pretty businesslike way - that's fine. We'd like to recut the front edge of the side panel and move it up to the front a little because the panel has damage on its edge. The front edge was previously sealed with what looks like a coarse cloth impregnated with a tarry substance. I've sent a photo of that.
When we've cleaned it all out and recut the panel, what do we seal the corner with? We don't use silicone, do we? Do we use Sikaflex? Tony was wondering if he could put a thin strip of weatherstrip behind the trim.
Any advice gratefully accepted.
Barbara B
|
|
|
|
Post by barbarab on Feb 28, 2011 9:45:27 GMT 10
Hi,
this is the corner panel I'm talking about.
Barbara B
|
|
|
|
Post by Franklin1 on Feb 28, 2011 10:52:21 GMT 10
G'day barbarab, 1. The panel: Do you really need to shift this forward? Can you panelbeat the damage out? This ali cladding is fairly forgiving, and will take a bit of bashing about to get it flat and looking reasonable. If you shift the panel forward, you'll have a strip of the rear overlap now exposed. From a visual point of view, it will be a case of deciding which is the lesser of two 'evils'...how bad the damage looks, versus how prominent the overlap strip will look when it's exposed. If the damage doesn't include holes and splits, I'd be preferring to panelbeat the sheet and fit it back on in the original position. 2. Sealant: definitely not silicone. Only because it's a real pain in the butt to remove if you have to later. If the amount of sealing you have to do is just that section of coverstrip, I would recommend you get the Selleys Butyl Mastic product (available in black, grey, and off-white). It's about $18 per cartridge at the Big Green Shed, so it's not cheap. You'd only need one cartridge to do the section in your photo. Of course, if you're doing a whole van with the stuff, the cost becomes a bit prohibitive, and there are cheaper Sika products that would suffice. Masking tape from the cheap $2 shop is good enough to mask off the sides of the edge moulding. A plastic scraper to scrape the excess oozing out of the gap onto the masking tape. Turps will clean up any unwanted residue before the mastic surface cures. Folded up toilet paper, or tissues, make good pads when dipped in turps to clean up any residues. Do a small section, chuck the pad in the bin, do another small section, chuck the pad in the bin, and so on. A couple of pictures that might help... 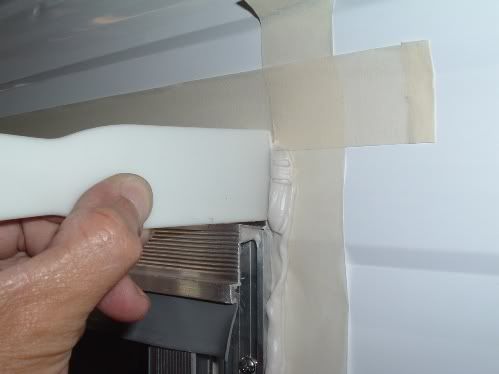  At $18 per cartridge, you'd want to use it 'sparingly', while at the same time making sure you've fully filled the gap under the cover strip. It's a bit of trial and error to get the balance between 'too little' and 'too much'. My pictures show too much wastage. Make sure the surfaces getting the mastic are as clean as possible. Is the tarred cloth immediately under the cover strip as well, or only under the ali cladding? cheers, Al. |
|
|
|
Post by barbarab on Feb 28, 2011 11:22:29 GMT 10
Hi,
thanks for your reply. We'll follow that advice.
Yes, the cloth strip is directly under the cover strip that goes on the leading edge of the van.
We're having trouble getting the residue of the old mastic/glue/whatever that is remaining between the old panels. Can't shift it with petrol, or oil, or kerosene or paint stripper. Any suggestions?
Barbara B
|
|
|
|
Post by Franklin1 on Feb 28, 2011 12:09:13 GMT 10
No, you won't shift it with any chemical means. Not that I've found yet, anyway. They seem to have used a creamy-coloured sealant in those days that has set rock-hard over the years since. Beats me how the stuff continues to provide a seal in the joint. To remove it will have to be via mechanical means. I ended up using a chisel and a rubber mallet, but you have to be VERY carefull you don't accidentally dig the chisel into the aluminium. (bloody impossible, though  ). You might be able to cut it back using a rotary disc sander in a drill, using a coarse disc, but when you're talking about an inch-wide strip under the cover strip, a rotary disc is too wide and cumbersome to do an accurate job. The rotary disc would be ok for cutting back the sealant under the overlap section, because that section is a lot wider. I just carefully went along the cover strip section and tried to remove enough old sealant to give the new sealant sufficient metal to grab onto. You won't be able to remove the whole lot of the old stuff. Not enough time left in your lifetime.  Pictures 1 & 2 show the best I could get my edge strip to... 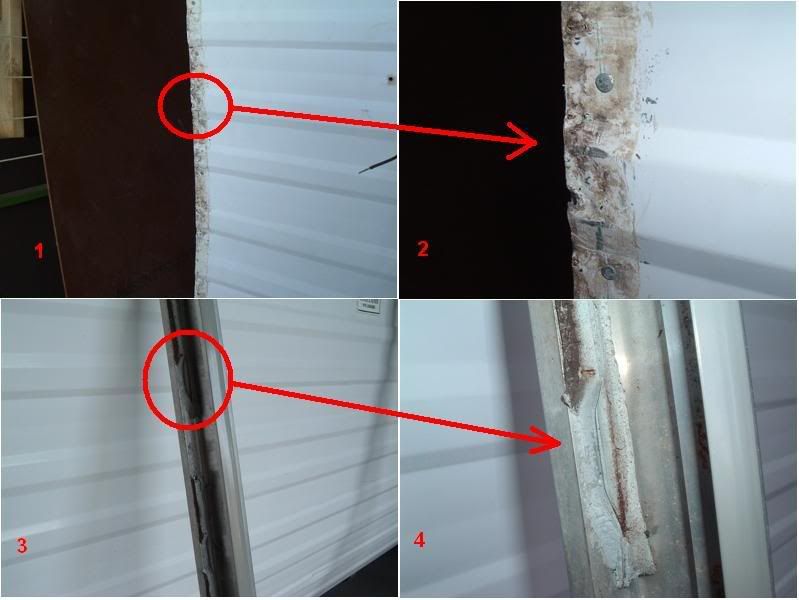 Pictures 3 & 4 show the blue-grey butyl mastic that was used around the door and window frames, and how it was still soft and pliable after 35 years. Why they didn't use the butyl mastic around the whole van has got me beat. This next photo shows how the manufacturing process can get a bit slack sometimes. The bead of sealant suddenly narrows at one point, as shown between the red lines. You can see the rusty staple holes where water has got in under the cover strip. Maybe the guy sneezed and the cartridge wobbled at that point. No wonder vans leak ... 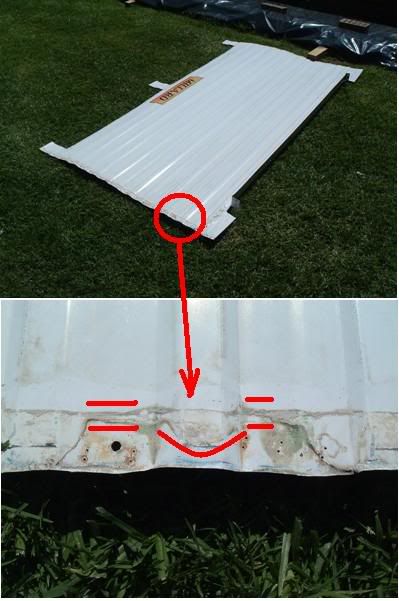 cheers, Al. |
|
|
|
Post by barbarab on Feb 28, 2011 20:45:14 GMT 10
Hi, OK, Tony has cleaned off most of the old creamy coloured, hardened sealant. He's screwed a couple of pieces of framing into the bottom of the wall cavities showing in my second photo, not because it was rotten but just for some added strength to screw into when he puts it together again. He's cleaned all the gunk off the aluminium panel and is going to reuse it with the Butyl Mastic as you suggested. I was a bit concerned about the corner before we started on it, but it's better than we thought. It's fixable.  Thank you. Barbara B |
|
|
|
Post by maddatto on Mar 9, 2011 20:59:18 GMT 10
Hey Guys i know it might be a bit late but if you ever need to remove old mastic/sikkaflex buy a rubber wheel kit for your drill at bunnings or paint shops. It will remove the old stuff without doing damage. Usually about $10.... Also try Acetone to remove the old glue and fibres that might do the trick..
|
|
|
|
Post by barbarab on Apr 2, 2011 18:02:40 GMT 10
Hi,
the corner is all fixed today. We used Sikaflex under the corner panel and under the trim as well to make doubly sure. Tony put a couple of new pieces of timber in too so he had something solid to screw into.
Seeshell, you asked about the Butyl mastic putty - we ended up not using it. It wasn't as compressible as the Sikaflex. We will be using it but only along the upper edge of the bottom wall trims - just pushing it into place with our fingers.
Barbara B
|
|
|
|
Post by Franklin1 on Apr 2, 2011 20:53:04 GMT 10
G'day Barbara, Sounds like you've got the Franklin sorted out well and truly! It's a great idea to put some sealant under the cladding as well as under the moulding. That's TWO barriers the water has to try and get through before it reaches the inside.  Good on you and Tony for taking the time and trouble to make the van as watertight as possible. Whoever inherits your van in 50 years time will be grateful for the work you've done today. ;D ;D cheers, Al. |
|


 ). You might be able to cut it back using a rotary disc sander in a drill, using a coarse disc, but when you're talking about an inch-wide strip under the cover strip, a rotary disc is too wide and cumbersome to do an accurate job. The rotary disc would be ok for cutting back the sealant under the overlap section, because that section is a lot wider.

