|
|
Post by JBJ on Feb 27, 2011 19:37:39 GMT 10
Hi All, Probably a wierd way to approach this topic, but as we look more at Deejay, we realise its not as original as first appears. Sometime in the 70's ( I Guess) someone made heaps of changes. Repainted, different Fridge, stove (I think), windscreen protectors front & rear, Lots of internal bits, tailights,side bunks, side window over bunk,& other bits. We want to keep it as close as we can, but need more storage & useable space than there is, I also wont operate without a spare, or carry it inside the van. To this end, I've made a carrier frame at the rear. Hopefully it will stay in place & be safe. I've kept original (  ) tailights.    Thats about all I'll get done befors Lennox Head next weekend JBJ |
|
|
|
Post by seeshell on Feb 27, 2011 20:10:06 GMT 10
Hi JBJ
I agree with you about the spare - I won't go without one. I like your welding job too. Will the tyre swing down or out of the way to use your (presumably original!) towel racks?
God, I really need to take a night course on welding - look how handy a skill it is!
Cheers
Seeshell
|
|
|
|
Post by JBJ on Mar 8, 2011 18:49:17 GMT 10
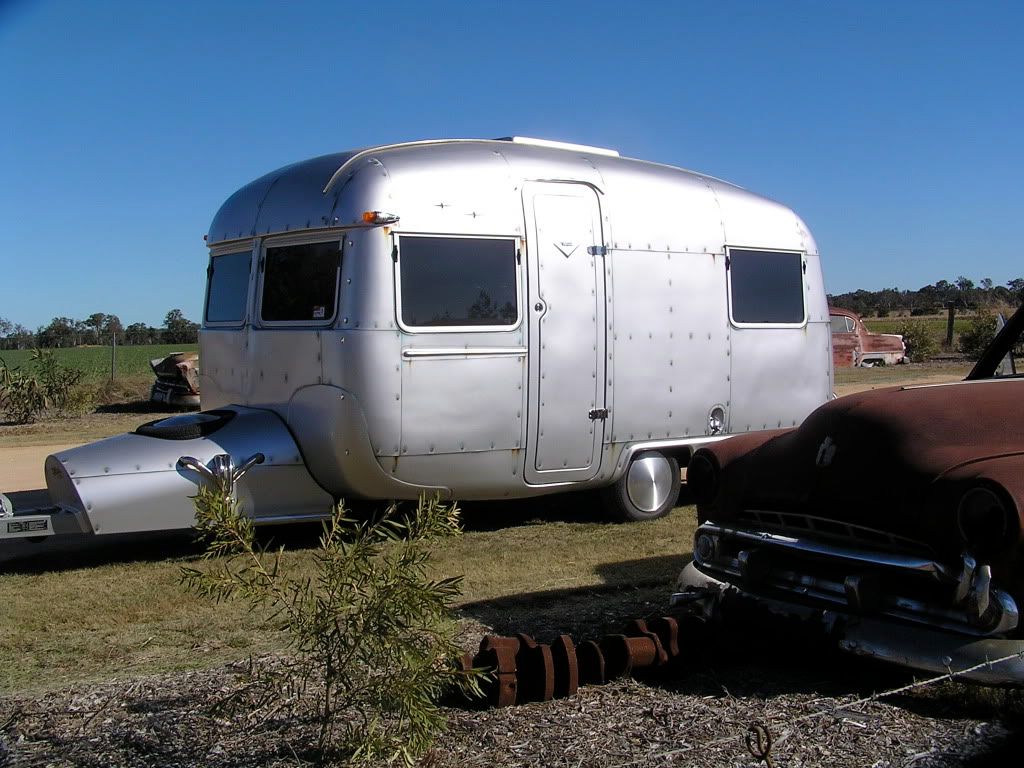
hi All, Looked under Deejay in the storage space at the rear. Its as big as a box trailer. So I decided to build a storage box on caster wheels, to carry all the loose bits. I made it 1200x500x300, & set it up to fix in place on the rhs underneath. That allows pegs & stuff behind it, & annex etc on the LHS in front of it.    Its an enormous space, & with this setup I'll be able to use most of the space. This is one well thought out vintage van. JBJ |
|
|
|
Post by cruisindoug on Mar 9, 2011 7:48:16 GMT 10
G'day Dennis, nice work on that storage box.
This is probably a bit of a rookie question, but ...
Will putting the weight of the pegs, poles, and annex right at the back of the van have much effect on the stability?
I ask because I have a very strong memory of our van getting up a huge sway on the road as a kid (and I mean a SERIOUS sway) caused by changing where the annex was stored from over the axle on the floor to under the bunk.
This was in a much smaller van however so I am guessing with the additional weight of your van it will not be an issue?
Cheers, Doug.
|
|
|
|
Post by Franklin1 on Mar 9, 2011 8:36:34 GMT 10
G'day JBJ, Those Hella tail lights started to be used on factory vans from 1965 onwards. I've got old newpaper adverts of Hella advertising for employess in 1964, so I think that must have been when they first set up in Australia. Thanks for posting pics of the slide-away unit in the back. I'm going to pinch that idea because it solves a problem I've got with the van I'm working on.  cheers, Al. |
|
|
|
Post by JBJ on Mar 9, 2011 8:57:42 GMT 10
Hi Doug,
I made a storage bay under the back on Lucille, & put everything in it. I never noticed any problems with swaying, & I towed with 2 different vehicles. Neither used sway bars.
But I remember Mum & Dad towing old vans that swayed everywhere. I think Mum packed too much up in the overhead cupboards, according to Dad. I know we repacked the van regularly a mile or so from home on each trip.
But as Deejay is tandem axle, & the storage area was built in at manufacture, I dont believe any noticeable difference will be made . What I've built is more a space organiser, than extra storage.
But I guess I'll never know until I load up & tow it.
My hot rod weighs nearly 2000Kg, & its rated to tow 3.5 tonnes(as far as I know). A lot of the swaying is caused (I believe) by towing too much weight with a lighter tow car. I know sway bars werent around when I was younger. Even though I dont use them, I think they are essential with a lighter towcar.
JBJ
|
|
|
|
Post by Roehm3108 on Mar 9, 2011 21:02:28 GMT 10
Great job you're doing there Dennis, and a much less back-breaking idea for storage. Was the hatch already there, or did you put that in as well?
Ray
|
|
|
|
Post by cruisindoug on Mar 10, 2011 7:36:40 GMT 10
G'day Dennis Thanks for that I had wondered - and if you don't ask you don't know ... Cheers doug. |
|
|
|
Post by JBJ on Mar 10, 2011 7:47:22 GMT 10
Hi Ray,
The hatch appears to have been put there by the original builders. The only serious external alteration I can see on it that doesnt appear original is the square window over the side bunk.
JBJ
|
|
|
|
Post by JBJ on Mar 30, 2011 18:37:03 GMT 10
Hi All,
Just took Deejay to the gas plumber to get the fridge checked & make fully working.
They have just tested & stamped the gas bottles, plumbed a new gas outlet onto the rear under the future annex with a bayonet plug ( thanks Chippy Dave), serviced the fridge gas totally, & got the 240 volt element replaced in the fridge.
$650 total, & its all working 100 %.
But unfortunately I didnt close the rear access hatch to the underfloor storage properly. It got ripped off on the way down to Ballina, so I have to make new door tommorrow. No big deal.
BUT I discovered that Deejay is a Masonite clad van on the sides , not ply like we thought. Probably thats the reason the sides are covered with calico/canvas under the paint.
It never stops being fun.
JBJ
|
|
|
|
Post by JBJ on Mar 17, 2012 18:27:14 GMT 10
hi All, Well Boots gave a few things I had to do before we tow Deejay to Cowra. She always wanted a dividing strip between the paint colours on the sides, & as much of the aluminium that had been painted over the years brought back to a polished finish. (Amongst lots of little items I've been too slack to do) So I got some aluminium D mould, drilled & bent it to shape, then polished it. Then fitted it to sides.  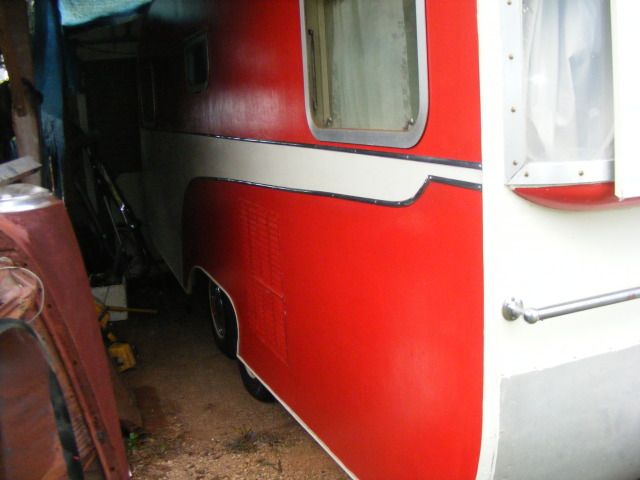 I discovered that the best way to polish long lengths of aluminium stock, is to lay it on a piece of timber or aluminium, then rub the marks out using a wet rag & cutting compound. This really cleans it up. Then a rub with purple polish lifts it a little to its final shiney finish. So I then got ambitious, & pulled one of the rear side windows out. Tried to clean them up the same way, but discovered the aluminium frames appear to have been finished with clear paint many years ago. Not really prepared to strip them back at this stage, so they just are getting a good clean up, paint added to stays/fittings, & new felt seals. Its all fun JBJ |
|
|
|
Post by Swellwillys on Mar 18, 2012 7:51:52 GMT 10
You got a good eye Boots !  I like the addition, and well done JBJ for the execution! Swellwillys |
|
noblesgarage
Full Member
 A Man with many projects Dosen't have a lot of time."Cause He Walks Round In Circles"
Posts: 363
|
Post by noblesgarage on Mar 18, 2012 9:49:15 GMT 10
;D ;D Talk about BOOTS ;D ;D  Need more storage there Dennis  This was under the back of the Sunny and even young Larry didn't discover it while he had her in tow. Ideal for hose , sullage pipe etc. Could have been made deeper to incorporate the spare Like the alim stripe adds that little bit of class to the old girl.  Not Boots that is Looking forward to catching up again with you'se at Cowra. Brian. |
|
|
|
Post by JBJ on Mar 19, 2012 20:37:57 GMT 10
hi All,
Looked at removing & repolishing some of the J mould bits used above doors, etc.
Found out they are nailed on , with what looks like bronze nails. Not real easy to get off & re use.
So now I'm chasing the old style J mould strips. If I can get new stuff, I'll grind the nail heads off, then instal new using plated slot head countersunk screws alongside the nail positions.
Lets see what can be found, because if I can get it up here in the bush, anyone can in the bigger towns.
|
|
|
|
Post by Franklin1 on Mar 19, 2012 21:58:24 GMT 10
G'day JBJ, When you say "Not real easy to get off & re use.", I know that means you've tried, but it reminded me of when I took all the J-mould fittings off my '56 Franklin (which is still maturing in my shed). Every piece of J-mould on the van was nailed on with stainless steel "nails", which are actually more like the pins you'd find in Granny's sewing box. They all came out of the timberwork pretty easily from memory (I did that about 5 years ago...Done stuff-all to that van since ). Nice job on the decorative metal striping. cheers, Al. |
|
|
|
Post by JBJ on Mar 20, 2012 13:26:34 GMT 10
Hi All,
Well the J mould is available ex stock from Ballina, in 4 metre lengths. $12 length, & $15 delivery for 10 lengths.
$13.50 for 4 metres delivered, which is good compared to Green Shed $15.50 for 3 metre length, you pick up.
So I can start replacing the J mould at my leisure now. Might even get a couple of bits done before Cowra.
JBJ
|
|
|
|
Post by JBJ on Mar 20, 2012 19:21:03 GMT 10
Hi All,
Just a follow up to the J mould. Kaybee let me know there are soft & hard aluminium tempers in commercially available J mould.
So I looked at the bits I bought today from the green shed. Hard as hell. Wouldn't bend it without heating.
Then found an offcut I had from when I put some on Lucille a few years back, which I bought locally. It bends beautifully. So I'm going to check the local suppliers stock tomorrow before I pay for what I ordered. If its the same as what he previously sold me, I'm OK. If not, at least I know what to ask for before I get unuseable stuff.
You need to be aware of different tempers ( grades of aluminium heat treatment) when you order aluminium stock, & I guess I was lucky I only bought $15 worth of the wrong stuff. I cant return it because I had them cut the 3 metre length to fit in my car for transport. One other thing, the softer the aluminum generally the better it polishes I've found.
Its still all fun.
JBJ
|
|
|
|
Post by JBJ on Mar 21, 2012 6:48:15 GMT 10
Hi Dave,
Havent tried, but heating most metals allows them to be bent.
I guess it would be difficult to get the good smooth bends I get bending the section around my stomach, especially after I heated the section.
But I'm not going to try to bend the hard J mould. It can go on my aluminium rack for when I need to make something using that section.
JBJ
|
|
|
|
Post by JBJ on Mar 21, 2012 18:32:51 GMT 10
Hi All, Looking at fixing up the clearance lights. Again over the years they have been painted, so I pulled one off to see what it is like.   After cleaning, I found the metal body has rusted & pitted remnants of chrome, & the plastic lenses are badly faded & broken attachment flanges. Sort of what you would expect for 56 years in the weather. I remember seeing some of these posted on here somewhere. 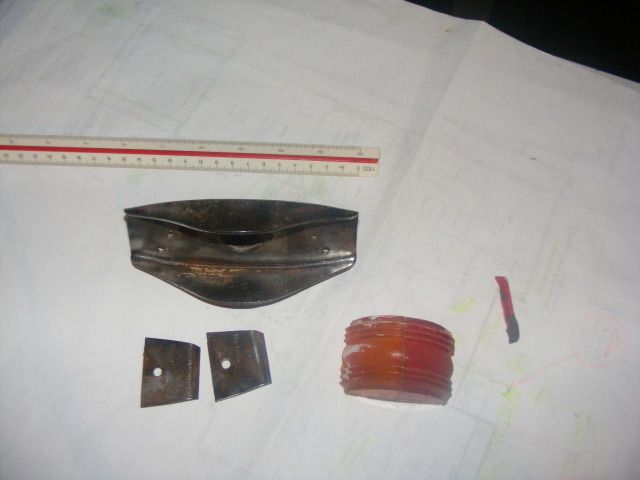 They are a Campbell model CC8, & are 135 long x 50 wide, & 35 high. Does anyone have any?? I need 4. I can probably get the metal body rechromed, but as the plastic lenses are 2 colours I dont think I can get them reproduced easily. But I have approached Dale at Classic plastic to see if he can make me some lenses. He's normally pretty good at reproducing stuff, but I dont know how he will go with the 2 colours in a fairly small lens. I'm happy to pay a reasonable price, even if I only get the lenses. Send me a PM if you have anything. In the meantime, I'm going to try a combination of paint finish on the metal bits, & a bit of silastic to hold the lenses in place. Cant see enough time to rebuild all of them properly before Cowra. I should have started fixing things sooner, & not left them to just before we go away. JBJ |
|
|
|
Post by kaybee on Mar 21, 2012 21:54:46 GMT 10
Hi Dennis ,pretty sure I've got new lenses.....I'll have a look tomorrow and let you know ,cheers....
|
|
|
|
Post by JBJ on Mar 22, 2012 1:03:59 GMT 10
Hi Denirapark,
Thanks for that. I've looked at the ones on Ebay in USA, they are similar in size & style, but the US ones have only one light colour on a lens, either red or amber.
To be legal, we have to have red showing to rear & amber to front, so the US lenses arent any use in Australia.
Incidentally when I got Deejay registered in NSW recently, it was the first van I had with clearance lights. When the rego check was done, the inspector commented on the faded lenses. He wanted them replaced/repainted before next rego, so this exercise will solve that.
Hopefully Kaybee's collection of NOS bits might yield a set of lenses.
If I cant find NOS or good used lenses or lights, I think Dale at Classic Plastic will be able to help out.
JBJ
|
|
|
|
Post by kaybee on Mar 22, 2012 8:27:46 GMT 10
OK...here's what I've got.....1-red/orange used but mint lens, 1 r/o lens used and a bit dull but should shine up with some T-cut and elbow grease ( probably wouldn't notice it if it's up near roof height)......and one NOS orange lens and a bulk amount or NOS red lenses. These 2 colour lenses are 2 piece construction from new...so....if you run the new orange lens thru the bandsaw or very carefully slice it with a coping saw , then do the same with a new red lens.....glue 'em up and they ought to look just like the originals, and that'll give you a set of four. I can post them all up to you along with a couple of spare reds to practice on and you can see what you think, then if you like them and are brave enough to do the cut n'shut.....fix me up when we see you next. Better PM your addy though, reckon I've lost it since last time....cheers.....
|
|
|
|
Post by JBJ on Mar 22, 2012 8:56:35 GMT 10
Hi Kaybee,
Sounds good to me.
I'll PM my adress to you now.
Thanks again
JBJ
|
|
|
|
Post by JBJ on Mar 22, 2012 19:00:01 GMT 10
Hi All,
Thanks for all the contact info.
I've bought a set of lenses from Kaybee's New Old Stock Store.
So I should be right now.
I'm going to paint the metal bits silver, & that will do until I decide whether to redo them in chrome .
Just got to find the time to put them together before Cowra.,
JBJ
|
|
|
|
Post by JBJ on Mar 25, 2012 18:46:05 GMT 10
Hi All, Well I've been madly polishing & replacing bits externally in preparation for Cowra. Cleaned up around window & cleaned & painted removeable bits, fitted new seals 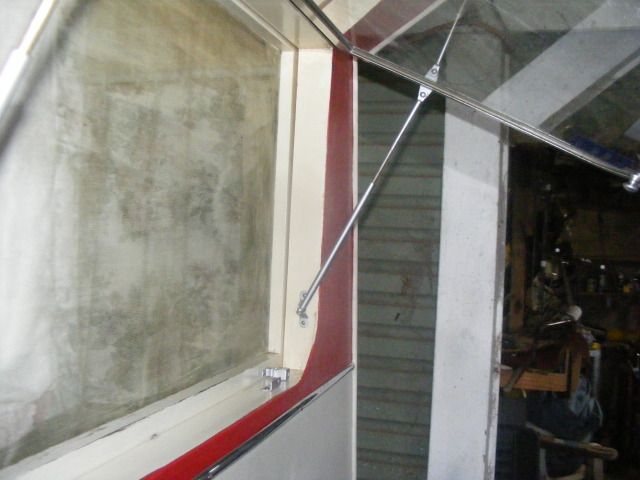 Remade trim over rear storage door. 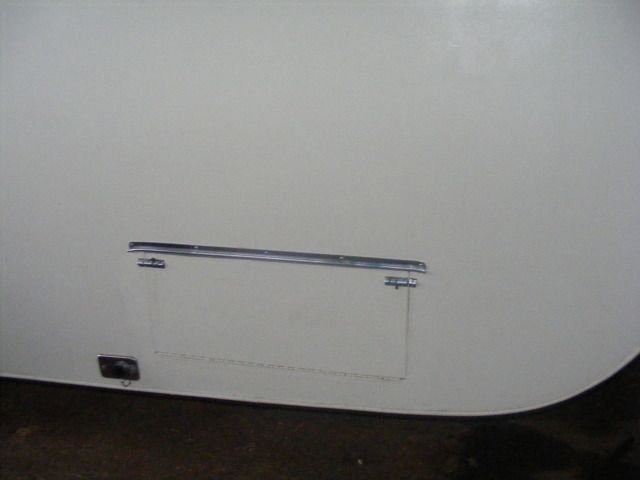 Remade trim over door, & polished exterior light.  Started polishing front stone guard panel. Its aluminium, & hasnt been tidied up for a while. So I got into it with a polisher & purple polish.  Struck a real problem polishing it, as it is very badly pitted from stones over the years. \ 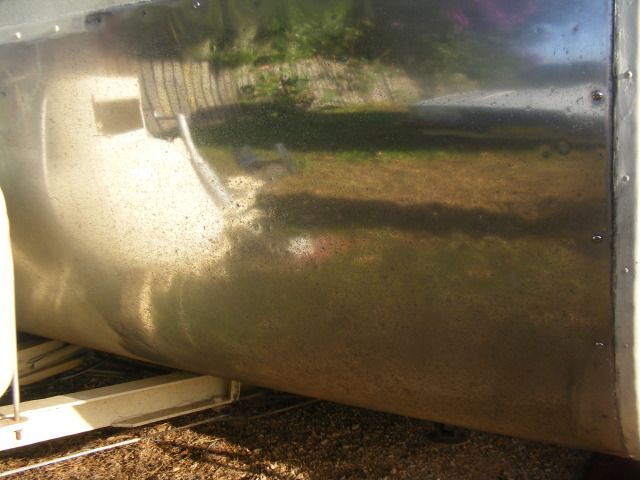 Polish wont work. So I'm trying tomorrow to rub it back with sandpaper, starting with probably 180, then working down to 2000. Then I'll buff it with cutting compound I guess, then Purple. Its pretty badly chipped. Anyone got any better ideas??? This bit isnt fun JBJ |
|


 ) tailights.


 Not Boots that is