|
|
Post by jenniewren on Feb 22, 2011 21:43:10 GMT 10
Have a slight problem peoples  I need a flexible moulding that will curve - to go at the bottom of the dinette seats/flooring. There is a 1/4" gap between lino and bottom of seat. It curves towards the front window....under the table. I tried a triangular slim wooden shaped pce of moulding/architrave...even soaked it for ages but it snapped when I tried curving it! Is there anything out there that will blend in with vv's? Tried looking for an adhesive flexible soft moulding...like what you put around windows to stop drafts?? But I gave up as they all were ribbed and looked too modern! Don't know if I have explained it well enough for you all to understand...but maybe you know what I am rambling on about! ;D Hope someone can help....it is annoying me profoundly as that will complete the van! Sweet dreams J |
|
|
|
Post by Franklin1 on Feb 22, 2011 23:00:18 GMT 10
G'day Jennie, You mean except for the genuine Franklin shelf above the sink...   I presume you mean the vinyl flooring has been cut too narrow, and doesn't fit snugly against the seat base? Is the problem on one side only, or both sides? Do you know how thick the vinyl flooring is? A strip of 1/4" thick 3-ply should be able to be bent to the shape you require. You would need a strip say 1/2" wide. Just make sure you cut the strip so the top and bottom ply layers are at right angles to the length of the strip. (it's bendier in that direction). You sandpaper a rolled edge on one side of the strip. Fix into position with contact adhesive. Hold in position with panel pins until adhesive cures. Paint with a narrow artist's brush. 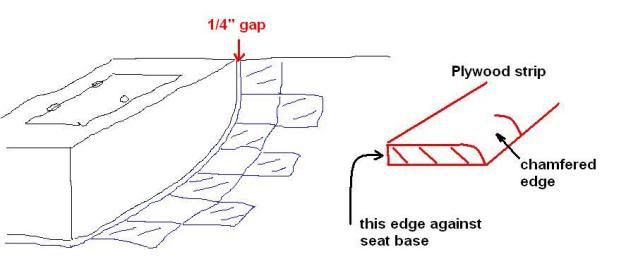 But don't rush out just yet! I'm sure someone will have a simpler solution.  cheers, Al. |
|
|
|
Post by atouchofglass on Feb 23, 2011 6:32:32 GMT 10
|
|
|
|
Post by jenniewren on Feb 23, 2011 18:49:22 GMT 10
Good grief Atog - that bottom shot! Are you a plumber by trade? Do I look like that whilst scrambling around the van on hands and knees? You have done a wonderful job on the flooring and the finished on the benches & tables are excellent....I used strips of alum to hide a couple of joins in the lino I had laid down as the width of lino was not wide enough! Damn it...but it looks professionally finished & nice and flat...I will read your thread again as I don't think it has solved my problem...maybe I missed something! Thank you for your knowledge! J
|
|
|
|
Post by jenniewren on Feb 23, 2011 19:09:14 GMT 10
Hello Al Pal....you have understood exactly what I was waffling about! Even the diagram is pretty cool! Don R was correct when he said you were a man of many talents & modest too! The previous owner has chiseled the bottom of seats to slide the fluffy carpet under that I pulled out! So there is 1/4" gap between seat and flooring...I have some 3ply...that is the slimmest you can get isn't it? Man...it is going to take me a while to cut slim lengths! Arrrgh! But wood is going to look better! And that damn shelf is going to be the death of me! Knew I should have nicked one when we were at Cora-lyn last year as there was no-one around! When is Cora-lyn on again? Hee hee...maybe I should post a "wanted" notice, you never know! I want that CERTIFICATE! The moulding is the last dilemma then it is off to the registration office! I owe you a nice cold beer for that wonderful diagram. The least I can do as you have gone to so much trouble! Shall give it a go this weekend & pick up cushions! If you hear curses & yelling across the miles, it will be me trying to cut the strips! Thank you J
|
|
|
|
Post by jenniewren on Feb 23, 2011 19:44:13 GMT 10
Hold on a sec....read the 2 threads and Atog....YES....that looks easy! Caulking eh? I thought Al's method was a great idea as well but that caulking is even easier! What happens if I don't get that nice smooth finish in one go? Does it come off easily to retry or will I cry (like a girl!)? Your butt shot must have put me off as I didn't notice your second thread! It is about a 1/4" gap I have to fill so here goes on the week-end! If I botch it I guess I can cover it with Al's method! Thank you so much for the advice...appreciate it! See how I go....J
|
|
|
|
Post by jenniewren on Feb 23, 2011 19:47:15 GMT 10
I think I owe you a beer also Atog...but you may have to wait till I see whether your method will work for me! Har....J
|
|
|
|
Post by Franklin1 on Feb 23, 2011 21:54:47 GMT 10
G'day Jennie, Err...no, I didn't.  I thought the gap was on the horizontal floor between the seat base and the edge of the lino. Now I understand you're saying it's on the vertical face of the seat. Hmmm...I now have to agree with atog's idea. Gap fillers are the best solution for your problem. If you'd like to paint the gap filler to match the seat timber colour, get a cheap cartridge of white gap filler. About, umm, $2.50 for the Bostik or Parfix brand from the Big Green Shed. Buy the cheapest cartridge hand gun (about, umm, $4 from same). Don't forget the screw-on nozzle (one free per cartridge), which is usually in a basket near the cartridges. With these gap fillers you can fill gaps up to about 10mm width. You can paint over them once the suface skins over (give it at least half an hour if you're in a hurry to paint, otherwise give it 24 hours). The beauty of acrylic fillers is that you can clean up in water, which also means you can "sculpt" the surface with a wet finger, or a wet cloth, or a wet knife, before the surface skins over. Clean up any spills with a wet cloth as well, before the filler skins over (about 10 minutes). If you stuff it up and the surface isn't as smooth as you'd like, just wait half an hour until it skins over and you can add another coating over the top. Peel your masking tape away CAREFULLY after you've completed the job. Forget my first suggestion in the post above. That one was only worth half a beer. cheers, Al. |
|
|
|
Post by atouchofglass on Feb 23, 2011 22:18:02 GMT 10
Atog....YES....that looks easy! Caulking eh? What happens if I don't get that nice smooth finish in one go? Does it come off easily to retry or will I cry (like a girl!)? Your butt shot must have put me off as I didn't notice your second thread! It is about a 1/4" gap I have to fill so here goes on the week-end! If I botch it I guess I can cover it with Al's method! Thank you so much for the advice...appreciate it! See how I go....J You will get it first try. It is easy enough using some kind of curve to shape it. For wider gaps (over 10mm in the garden rocks/steps) I have used the ball on a ball pein hammer. If you are worried just dampen the stick or whatever you use to shape the caulking compound. Using ya wet finger is often just as good. Ohhh and quit starin' at my butt ;D ;D ;D You will have nightmares for weeks now ;D ;D ;D Cheers Atog |
|
|
|
Post by jenniewren on Feb 24, 2011 19:29:38 GMT 10
What can I say Atog....the butt shot had me smiling (a lot) then horrified I would have looked the same no doubt over the months I have been on my knees with head down! I will try and erase the image from my memory! See how I go on the weekend! J
|
|
|
|
Post by jenniewren on Feb 24, 2011 19:33:04 GMT 10
Al...am going to the big green shed in the morning & purchase some caulking....you did get it right however...bit hard to explain without a photo I know. I still owe you a coldie however! J
|
|
|
|
Post by jenniewren on Feb 28, 2011 22:02:26 GMT 10
Urghhhh.....caulking, not my forfeit, along with carpentry, electrical, lino floor laying, painting etc etc....BUT it doesn't look too bad. Thank goodness it is under the table I say! Just need to hard wire switch for fridge & it's off to register...yeay...about time. Seems like I have been renovating this vv for years! Pic's shortly folks.....have I told you I LOVE wondering the corridors of the big green shed!!! Thought I may have found that Franklin shelf there but alas! Thanks for your input Atog & Al very much appreciated.....J
|
|
|
|
Post by Franklin1 on Feb 28, 2011 22:20:28 GMT 10
Onya Jennie, Good to see you came up with a 'win'. Nobody will ever notice the job is 'less than perfect'. D@mn shame the Big Green Shed doesn't stock genuine Franklin shelves. You would think they'd get their stock-ordering priorities right... Now, how about some pictures to prove you've been doing fantastic work on the van? ;D cheers, Al. |
|
|
|
Post by jenniewren on Mar 1, 2011 21:17:29 GMT 10
Soon Al Pal...Verrry soon...just waiting on something special to arrive to add to the final photo shoot! VV has to look just right for the final shoot! But I am quite pleased with myself & the overall look even if there is a SHELF missing! (and a few modifications that I did NOT do) Booked in to register vv on 8th March....AND they had the vv on file in the archives...so chassis # 565 seems at this stage ok! Phew! The lady said I did not have to have a weighbridge certificate!!?? Better not rock up there and the inspector says otherwise!! And yes, the big green shed disappointed me.....like you...they know & have everything usually! Have a good one...J
|
|


 I need a flexible moulding that will curve - to go at the bottom of the dinette seats/flooring. There is a 1/4" gap between lino and bottom of seat. It curves towards the front window....under the table. I tried a triangular slim wooden shaped pce of moulding/architrave...even soaked it for ages but it snapped when I tried curving it! Is there anything out there that will blend in with vv's? Tried looking for an adhesive flexible soft moulding...like what you put around windows to stop drafts?? But I gave up as they all were ribbed and looked too modern! Don't know if I have explained it well enough for you all to understand...but maybe you know what I am rambling on about! ;D Hope someone can help....it is annoying me profoundly as that will complete the van! Sweet dreams J


 I thought the gap was on the horizontal floor between the seat base and the edge of the lino. Now I understand you're saying it's on the vertical face of the seat.