|
|
Post by barbarab on Oct 2, 2010 17:44:19 GMT 10
Hi, we're up to checking out the roof hatches on our "Betsy". I noticed that there is a piece of fabric around the top of the vertical timbers that the hatch sits down on. I assume it's to stop rattles or draughts?  Any ideas? I was thinking of replacing it with some sort of stick on felt - would this be suitable? We're going to remove the hatches and strip and repaint them and check out the timber surrounding the opening when we do. Anything in particular to look out for? All tips appreciated. Barbara B |
|
|
|
Post by curtis on Oct 4, 2010 14:13:50 GMT 10
Hi Barbara, Not sure what the fabric is - do you have a photo?? With the hatch on Curtis, I took it off and stripped and painted it. I think originally it was just the galvanised finish, but our is white now - looks fine to me. I fitted a stick on weather seal (just a cheap on from Bunnings) to the top of the opening and when closed the hatch sits against it giving a non-scratch surface and sealing any droughts. We did have a bit of rot in the ceiling around the opening - nothing too serious, had to remove the ply from the ceiling, fit some brackets and re fit the ply. I was not too sure where the water came from until we went away the other week. The nights were cold and each morning I had to dry the condensation off the hatch!! If you have a look in this post vintagecaravans.proboards.com/index.cgi?board=photo&action=display&thread=5771&page=1 you can see what we had to do with the roof in ours. Good luck Dave |
|
|
|
Post by barbarab on Oct 4, 2010 14:48:48 GMT 10
Hi Dave,
I've checked out your restoration (several times) - fantastic. It's a great reference.
We've taken the hatches off. They're painted white and we'll sand them back and repaint them. We just bought a few rolls of adhesive backed felt, and we're going to put that around the top edge of the hatches. Bunnings had weather seals but they were mostly rubber or silicone based and we thought it might end up sticking to the metal hatch.
We haven't found any rot so far in our work on the van. There were three patches internally where we could have found it but each time when we removed the plywood, it was just in the lining, not the frame and Tony just replaced the panels with new ply.
He's placing a strip of Flashtack on the external vertical corners of the hatch openings just in case.
Thanks for your reply.
Barbara B
|
|
|
|
Post by barbarab on Oct 5, 2010 7:08:32 GMT 10
Hi,
I woke up in the night thinking about that hatch and putting adhesive felt around it. It won't do. I was thinking that if the main problem with hatches is condensation on the inside of it, then that felt is going to get waterlogged and stay wet and in contact with painted wood. For sure, we'd get rot there. I think we'll look for a weather-seal like you said.
Thanks.
Barbara B
|
|
|
|
Post by curtis on Oct 5, 2010 9:24:36 GMT 10
Hi Barbara,
We actually used a foam stick on seal. It squashed really well to stop leaks and rattles. Any water it does hold (and I didn't notice any) would dry out really easily as it is an open cell foam.
We painted the inside of the hatch with the same paint as the inside of the van to make it match. The foam has not done anything to the acrylic paint.
Dave
|
|
|
|
Post by Franklin1 on Oct 5, 2010 10:35:50 GMT 10
G'day Barbara, From all that I've read about caravans over the last four years, hatches are one of the primary areas in a van for water leaks, so it's worthwhile spending a bit of time in making sure these areas are really watertight for years to come. I'm currently working on an aluminium clad van that has some serious water leaking problems around the hatch. When I scraped away all the successive layers of sealant that people had applied over the years, I discovered the basic reason for the water problems. The original design and manufacturing techniques used to make the hatch opening were quite "sloppy", to put it kindly, and it's no wonder it's been a constant source of leaking. This photo shows one corner of the hatch opening, with a rather "butchered" corner cut-out. You can also see wisps of the wax coated cloth tape you are talking about in your hatch (arrowed)... 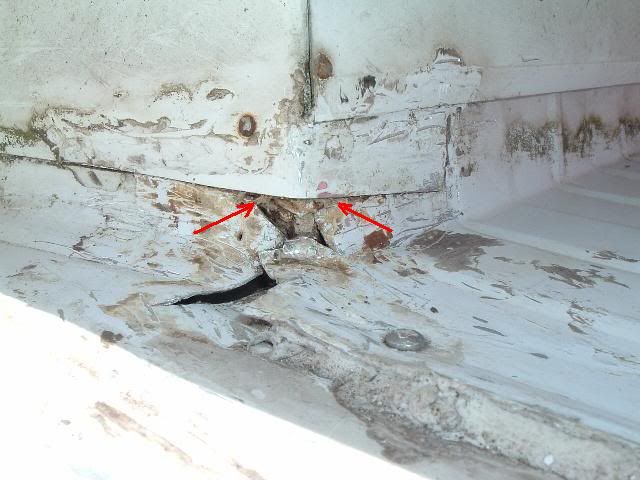 I will be making some corner caps out of aluminium sheeting to try and cover the corner splits and tears that are showing in the photo. A bit of decent sealant and a few pop rivets will go a long way to making sure it will still be waterproof in ten years time. Instead of the wax coated tape (which you can't buy any more), I'll be using some Laserlite "Noise Stop Tape", which is used on corrugated polycarbonate roofing to stop noise when it flaps in strong winds. Available from Bunnings for around $27 for a roll of 24 metres. Probably be far more than you'll ever use in a lifetime for the hatch, however it can also be used for another important area on your van. Down on the chassis side rails where the aluminium cladding overlaps the rails, you can often get corrosion between the two metals when water leaks down the internal wall cavities. On a van I recently restored, I put strips of the Noise Stop Tape on the chassis rails to keep the aluminium cladding away from the steel chassis... 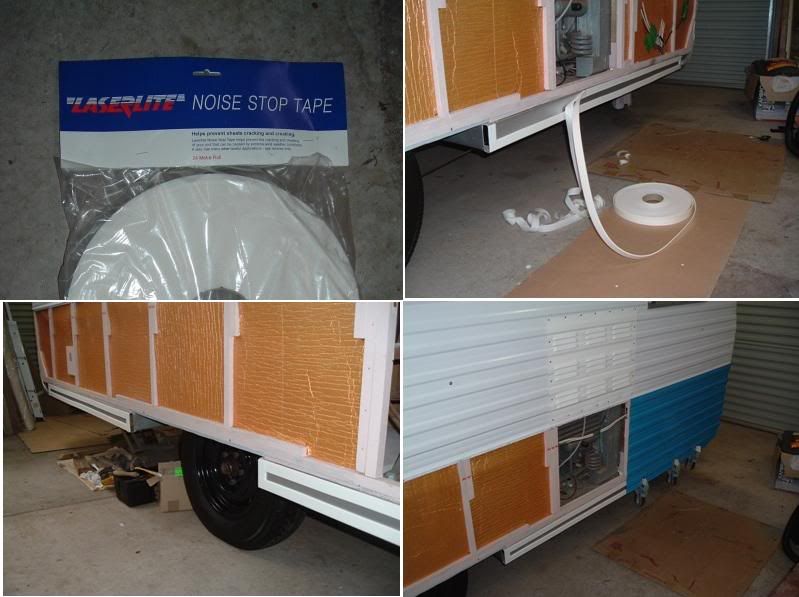 So you could always keep the unused roll of tape for future use on the chassis. cheers, Al. |
|
|
|
Post by Surf Tragic on Oct 5, 2010 17:37:19 GMT 10
G'day Franklin1  Thanks for this useful hint with the 'Noise Stop Tape', another good piece of advice to put in my special file. ST |
|
|
|
Post by barbarab on Oct 5, 2010 18:32:04 GMT 10
Thanks Al,
Tony's getting some of the tape tomorrow.
I hadn't realised there could be a problem where aluminium meets steel - we'll have a look tomorrow.
Barbara B
|
|
|
|
Post by sportsman 1 on Oct 7, 2010 12:29:10 GMT 10
Hello,
You can use felt to seal around windows, hatches, etc as long as it is "waterproof" felt. I recently redid all the aluminium windows on the Clipper and got some waterproof felt cut to size for the job from J J Davies and Son in Huntingdale. Ph 03 9544 3255.
Good luck with the resto.
Cheers, Leigh.
|
|
|
|
Post by barbarab on Oct 7, 2010 15:25:42 GMT 10
Hi, we got the Laserlite tape. Tony took the hatches off to sand back the paint on the inside and one of them looks like it was new and whoever had it before, didn't prime it before they painted it. The paint just flaked off so now Tony's gone to get some primer for galvanised iron. One thing leads to another, doesn't it? Barbara B |
|
|
|
Post by Franklin1 on Oct 7, 2010 17:32:49 GMT 10
G'day Barbara, Yep, it sure does.  One step forward and two steps back, at times. Sometimes even one step forward, and three steps sideways. Restorations are never the shortest straight line possible. One outcome of the work you are doing is that you accumulate a fantastic amount of knowledge about your van, and caravans in general, and you work out what you would do "differently" next time you were thinking of buying a van.  Now some tips about the Laserlite tape. The adhesive is one of the strongest I've come across in these sorts of foam tapes, so you need a keen eye and a steady hand when applying it into position. No second goes with this stuff. It's probably worthwhile if you cut a couple of inches off the roll and stick part of that piece to a painted surface, or even to something like the blade of a kitchen knife. Then try and peel the tape back off, and you'll see the foam separate from the adhesive. Therefore, when you are going to do the proper job, make sure everything is ready before sticking the tape in position. You'll want to lay each strip of tape down in position in one continuous move. No stops and starts. No sneezing.   If you need to trim the tape down narrower, do this before fixing the tape in position. Unroll the length of tape you need, leaving the backing paper in position, and cut with scissors or a sharp knife (one of those retractable blade types). If you try and trim the tape after the backing paper is removed, the adhesive just gums up the scissor blades or the knife blade. If you have a mishap, mineral turpentine (turps) will clean any adhesive residue off, after a bit of rubbing. Be aware that as soon as the adhesive makes contact with something, it will stick. Skin, fingernails, paint, metal, etc., are all fair game for this stuff. The tape itself is good stuff. It's the application process that can be a bit fiddly. Don't rush. Prepare everything. Luck will be on your side. ;D cheers, Al. |
|


 Any ideas? I was thinking of replacing it with some sort of stick on felt - would this be suitable?


 Thanks for this useful hint with the 'Noise Stop Tape', another good piece of advice to put in my special file.

 One step forward and two steps back, at times. Sometimes even one step forward, and three steps sideways. Restorations are never the shortest straight line possible.

