|
|
Post by minicamper on Jul 7, 2008 7:42:28 GMT 10
Thought I'd add another plywood thread to make it a trio... I started to work on the outsie of Alby on the weekend and bit the bullet, stripping the paint almost entirely. There were only a few sections that were sound that could be left. I figured that we would get a better finish this way.. My question is, pretty much everytime i found a crack in the enamel, there was a fine crack in the ply surface beneath, usually from the edges or in other places, from around a small nail. In the past i've worked with some old plywood and found that paint seems to recede around these cracks when you try to paint them over. What have others done to prep these before repainting? Also, having moved things around, putting the modern out in the open, shifting a long term Model T project, Alby is now undercover, so i climbed up to investigate the roof which is pretty sound, with only one crack in the paint up top, BUT... On the front of the van roof where the previous owner had a canvas sheet protecting it, water or rat "fluids" had caused the protective sheet to stick and a small piece of canvan, about 2" is missing. I have some old tent canvas to patch, but was wondering what sealant or glue to use? I'll take some detailed shots this afternoon as it was too late yesterday (and dark) In the pic below, the paint peel began around a plywood join. 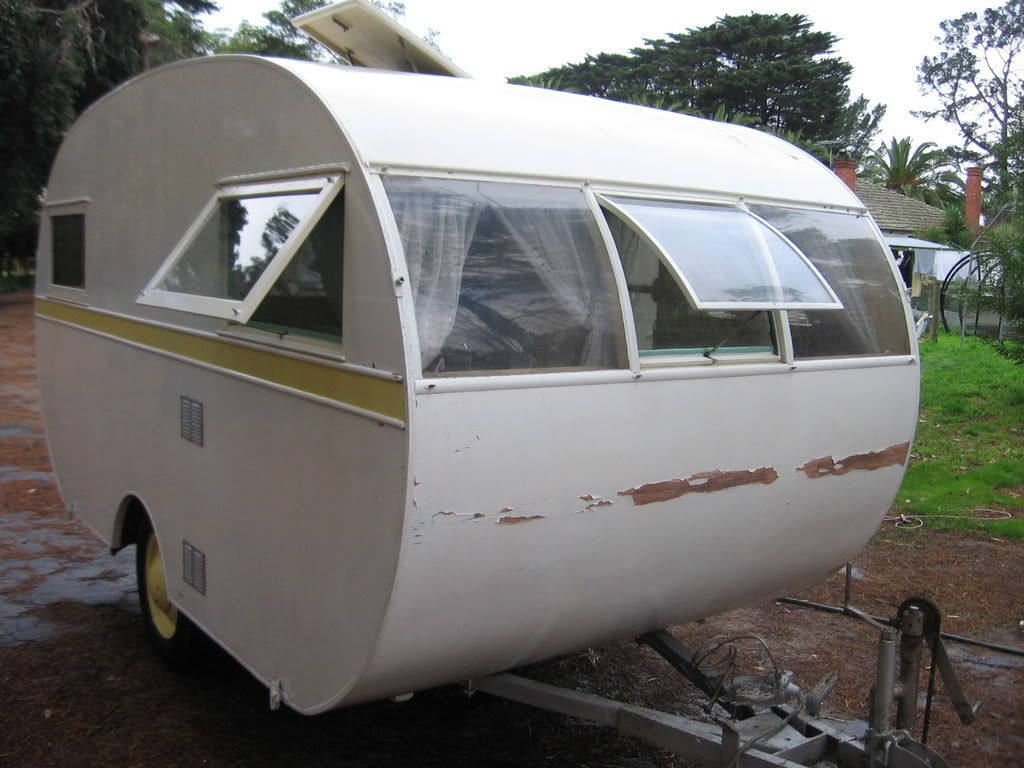 Cheers Chris |
|
Deleted
Deleted Member
Posts: 0
|
Post by Deleted on Jul 7, 2008 8:09:13 GMT 10
Hi M/C
Sand around cracks and clean thoroughly. Use builders bog ( sort of like a white spackle paste) to fill cracks. Paint with oil based primer.
Should be right then.
You could also wipe normal car body filler in there.
All depends how much the van flexes when on the road, and that depends on how solid the van was built and how stiff your springs are.
Reddo
|
|
|
|
Post by minicamper on Jul 7, 2008 8:20:23 GMT 10
Thanks Reddo,
Should have guessed you'd know the answer. No sure about the springs as I haven't really ever towed it anywhere, but it has been built to a very high standard, very solid so hopefully there's very little movement.
I have some powder builders bog, just add water! It sets like concrete and has a very fine sanding finish so will try that.
Any hints on the canvas repair? Weren't you doing something similar a while ago?
I also seem to recall you making comment about Solarguard recently... I have already bought the paint, so have to use what i bought now, but do you find much of a difference in the lifespan of exterior enamel gloss to the Solarguard?
Cheers
Chris
|
|
Deleted
Deleted Member
Posts: 0
|
Post by Deleted on Jul 7, 2008 10:16:50 GMT 10
Hi Chris
"I also seem to recall you making comment about Solarguard recently... I have already bought the paint, so have to use what i bought now, but do you find much of a difference in the lifespan of exterior enamel gloss to the Solarguard?
Cheers
Chris "
Dunno...Cant tell ya... i dont keep the bloody things long enough to find out . ;D ;D ;D ;D
I didnt go ahead with the canvas over the roof idea. But i would imagine that any sort of waterproof adhesive would do the job. so long as it doesnt leach through the patch material.
I would trim the torn area on the roof to get rid of any fraid edges and then cut a patch about 5mm bigger then glue it on.
Slap a coat of paint over it and no one will know the difference.
Better to have an overlap to ensure waterproofing than try and do a million dollar 10 out of 10 "exact fit patch" invisible repair and find it isnt waterproof.
Reddo
|
|
|
|
Post by Franklin1 on Jul 7, 2008 22:54:37 GMT 10
Hi Chris,
I'm having just a little difficulty accepting that a filler that "sets like concrete" is a good fit with a plywood that swells and shrinks. I would be more inclined to go with a flexible filler that can be painted over. My general knowledge of plywood (I'm not an expert) over the years is that the cracks you are seeing in the ply are the first indication of weathering damage. You can paint over the cracks, but because 'microscopic' damage has already occurred in the ply, then the cracks will reappear.
As reddo says, sand around the cracks and then clean, but then I would paint the cracks with enamel primer before I filled the cracks with a filler. With the constant swelling and shrinking of the ply, I think any filler would have to be pretty bl**dy good to cope with that. At least the primed ply underneath the filler will provide an additional level of protection (...think puttied window frames. Primed before the putty is applied. After many years, putty goes hard and brittle and cracks in places. Unprimed frames start to get woodrot, whereas primed frames resist the moisture for a while longer.)
My thoughts only...
cheers,
Al.
|
|
|
|
Post by yellowuki on Jul 28, 2008 7:05:01 GMT 10
Just a suggestion, but before you paint, consider applying a rot off or no rot formula. This helps keep the moisture out of the whole show..... Yellowuki
|
|
|
|
Post by bindilou on Sept 1, 2008 20:30:06 GMT 10
hi there
i know this is an old posting but could you tell me what make and model your van is. Im just starting out doing my home work an all and love the look of you van. Thanks Julie
|
|
|
|
Post by minicamper on Sept 3, 2008 6:54:56 GMT 10
Hi Julie,
There is no make for my van. It's a homemade from around 1948 to 1950. The elderly owner i bought it from couldn't recall exactly as he is 95 and his father built it (his father lived to 93)
Of the old books i have read, i have seen a similar style in a plans book (no plan- just in a photo) but it is very "Don-esque"
If you look in the members album for a thread called Ladies & Gentlemen, please welcome..." you can see the other photo's which i'm about to update as he has now had a new paint job to repair the cracked and peeling paint.
Cheers
Chris
|
|