|
|
Post by retrogal on Jan 22, 2018 7:47:36 GMT 10
Can I have some advise please
i have removed all the paint , sanded, filled & under coated X 3 and now for the pant design.
i have drawn onto the side a curved two tone design.
Should I freehand the curve? Even though I’m pretty ok with a brush, I’m also a perfectionist
Or add wood beading how do I do this ?
i would really appreciate some advise. I do not want to ruin the job after all the hard work.
|
|
|
|
Post by shesgotthelook on Jan 22, 2018 8:01:20 GMT 10
Hi RetroGal, I taped the design on my 1955 Viscount. The blue tape was better than the yellow which tended to lift the paint off.   With my Phoenix caravan, I used aluminium crescent moulding on the colour change lines but there was also a join along one of them that needed to be covered up. This could equally have been done with timber beading which in hindsight may have looked better.  |
|
|
|
Post by Roehm3108 on Jan 22, 2018 8:49:33 GMT 10
Note though that the moulding on the Phoenix went on after the painting was done.
|
|
|
|
Post by Franklin1 on Jan 22, 2018 17:47:23 GMT 10
G'day retrogal, I created the stripe around my van by painting freehand with a 15mm-wide flat artist's paintbrush. Using a normal paintbrush, I painted enough coverage in white paint on the van to allow for the stripe, and then marked out the stripe outline in pencil, using a straight-edge for the long lines, and cardboard templates for the curves. Then I painted the green and beige colours with the artist's brush, so that I just covered the pencil lines. Once I'd got the border either side of the stripe sorted, I switched back to a normal paintbrush to do the rest of that colour. Took a while to do the stripe borders, and needed a steady hand, but the end result looks like it's been done by a "qualified home handyman", which is what I was trying to achieve.  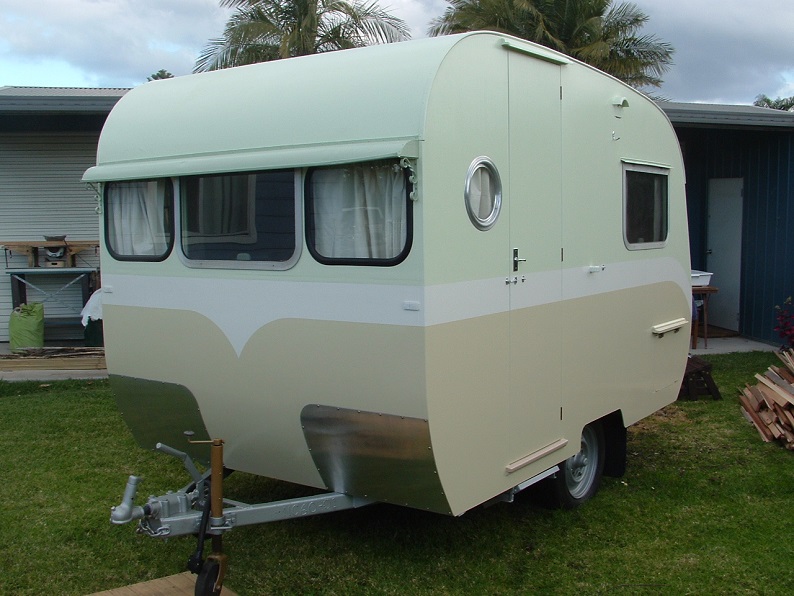 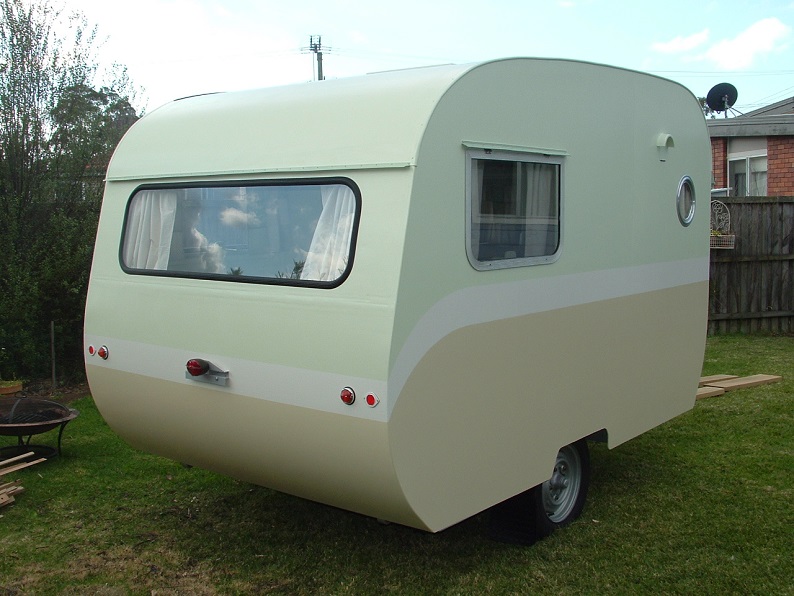 Nobody's ever commented that the paint job looks crap, so I've managed to fool a lot of people about the "qualified home handyman" tag.  cheers, Al. |
|
|
|
Post by retrogal on Jan 23, 2018 8:09:40 GMT 10
Thanks true blue and Al ,
My reply was delayed by my endless hours of painting yesterday !!
Both your posts are appreciated and valuable in my learning and confirm my original thoughts of how to paint a design.
All three vans are impressive and I hope I can get a similar result.
If I can ask another question
What paint did you use?
Back to the brush
|
|
|
|
Post by Roehm3108 on Jan 23, 2018 8:37:36 GMT 10
Franklin said " Nobody's ever commented that the paint job looks crap, so I've managed to fool a lot of people about the "qualified home handyman" tag.
cheers,
Al." Now Al, what it tells you is that we are all such nice people that we don't become critics!!!   |
|
|
|
Post by Franklin1 on Jan 23, 2018 8:41:19 GMT 10
retrogal, the subject of "which paint" has been a long-standing debate on this forum, and has created some angst among members over time. The debate about 'oil-based' or 'water-based' is similar to the debate about Holden vs Ford...it depends on which camp you belong to.
My van was painted in exterior grade acrylic paint - British Paints 4-Seasons for the green, and Dulux Weathershield for the white and beige. The only reason I used those brands is that the paint was on the clearance trolley at Bunnings, and I progressively collected them during the rebuild project. All the paint I used was mistinted stuff, but I collected cans where I thought the colour was something that would relate to the vintage era.
cheers,
Al.
|
|
|
|
Post by ian1963 on Jan 30, 2018 20:55:52 GMT 10
Hi, I have recently purchased a Wilson Wheel Works bond wood van. I am currently in the process of adding stripes down both sides. Just wondering if anyone has used timber beading to cover the edge lines. If so what is the best side and type of timber is good to use. I am planning to make the strip curved, therefore I need the timber to be able to be bent into shape. Also what is a good way to secure the beading to the side walls.
Many thanks
Ian
|
|
|
|
Post by Roehm3108 on Jan 31, 2018 10:45:16 GMT 10
Hi Ian1953. I used tassie oak timber crescent shape beading on the Rowvan that I restored some years back. I think from memory it was about 18mm wide.There is quite a degree of lateral fleck to give you a curve without breaking it. I used liquid nails and bullet head tack pins to keep the bend in place, while the liquid nails set..
|
|
|
|
Post by ian1963 on Jan 31, 2018 18:05:54 GMT 10
Hi Roehm, I appreciate your advise. I will buy some Tassie Oak beading and try it. Thanks for the tip on the small nails to keep the beading in place while the liquid nails set. Regards Ian
|
|
|
|
Post by Don Ricardo on Feb 5, 2018 16:01:32 GMT 10
Hi Ian1953,
I'll leave providing advice on adding stripes/flashes to your van to others that have done it. But I would like to welcome you to the forum, and say how great it is that you've got yourself a Wilson Wheelworks van. There's not many around. Is yours the one that was on Ebuy late last year?
It would be great to see some photos of your van when you're ready. There are instructions on how to post photos in the 'Forum Guidelines & Helpful Hints' section of the forum.
Good luck with the stripes.
Don Ricardo
|
|


