|
|
Post by shelly on Jul 1, 2015 21:11:01 GMT 10
 So, this is my first post. Bare with me please while I navigate my way around the forum. So, this is my first post. Bare with me please while I navigate my way around the forum.
I have a love of all things vintage, the open road and like working with my hands restoring things. All these things naturally bought me and my new Franklin together!
I don't know if I have gotten myself in too deep, but I am ready for the adventure.
I intend to restore my Franklin and stay as true to her original features and form as possible.
I figure I should start with making sure she is as watertight as a ducks...Resealing edges, fixing reattaching trimming, replacing windows and seals.
Looks like the wood around the roof hatch has been a little wet in the past - not sure what can be done to better seal the hatch or prevent water getting in here?
Any advice during these early stages on generally dealing with leaks and waterproofing would be incredibly appreciated - by both Franklin and myself!
|
|
|
|
Post by adamcharch on Jul 1, 2015 21:53:59 GMT 10
Hi Shelly if you have any questions or dramas send me an email. I build new caravans aswell as restore old ones I share the same appreciation for vintage as yourself. adcharch@hotmail.com
Regards Adam
|
|
|
|
Post by retro64 on Jul 3, 2015 19:01:03 GMT 10
Hi there Shelly,
We're not posting to offer you much in the way of advice but rather a hearty welcome.
You certainly have come to the right place for information on "how to" do just about anything in regards to your treasured new van.
We have always found the members here to be a great help with a pat on the back as you go along.
We'd like to wish you all the luck you need in restoring your Caravelle.
Cheers retro64
|
|
|
|
Post by shelly on Jul 5, 2015 10:54:00 GMT 10
Hi retro64, Thank you for the hearty and lovely welcome and well wishes! I have started with the restorations this weekend, pulling up rotten ply, removing external trims and to look underneath the cladding etc and something tells me I may be in need of more than just luck...
I certainly am finding the forum great and the wealth of information, expertise and knowledge is going to be the biggest help!
Cheers, Shelly
|
|
|
|
Post by shelly on Jul 5, 2015 11:23:06 GMT 10
And so, let this journey begin!
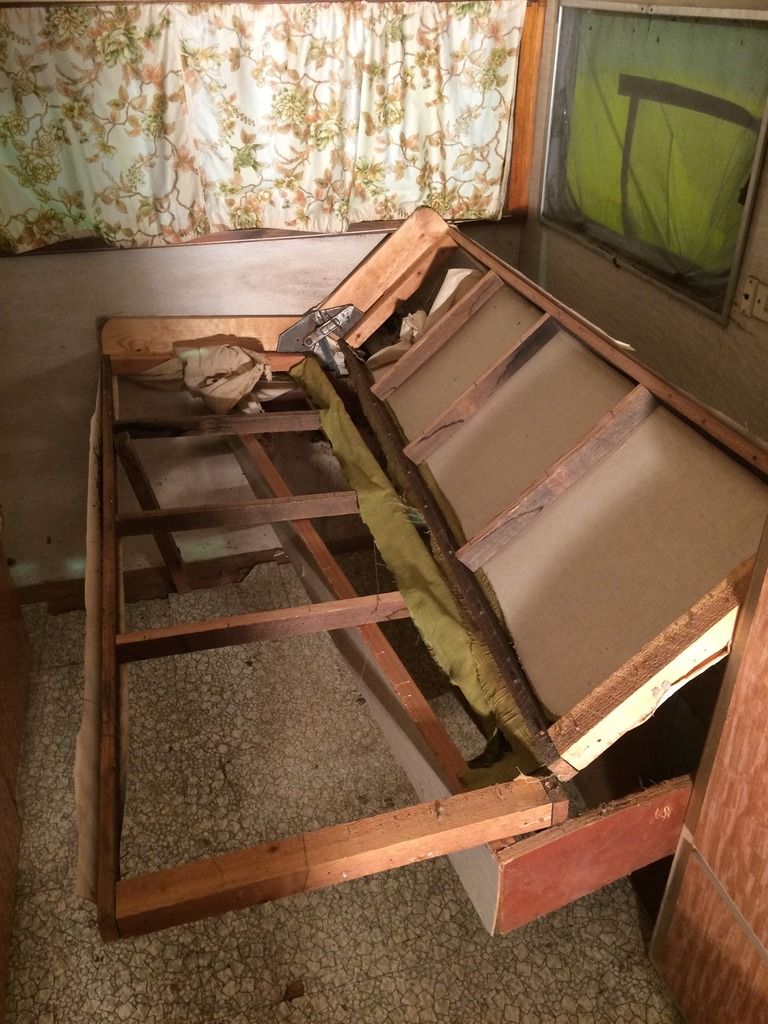
To assess the water damage and find out what joys await me I have started with removing the bed (which I believe had been relocated from its original position) so that I can get to the rear section, lifting floor tiles (which may or may not have asbestos?!), removing some of the external trimming...
As I eased off some of the external aluminum cladding, my heart dropped to the ground along with rotten bits of the wooden frame!
But I am determined to keep my spirits and energy high regardless of what hurdles may lay ahead
 
|
|
|
|
Post by frankidownunder on Jul 6, 2015 22:43:29 GMT 10
Hi shelly, know how you feel when having removed a Franklin Caravelle's cladding, been there, done that. A complete rebuild and full update of interior for our touring needs. Ours is a 1967 model. Have a look at this thread for some ideas re repairing your van. vintagecaravans.proboards.com/thread/4729/franki-finished-lastIf you need any assistance do not hesitate to PM me. Frankidownunder. (Denis) |
|
|
|
Post by shelly on Jul 8, 2015 11:13:43 GMT 10
Hi Frankiedownunder Denis,
Thanks for your kind empathy and direction! I had come across your Franki thread - Franki looks to be pretty much the twin of ours. You had done an absolutely amazing job - you are truly an inspiration.
I have been spending all my spare hours on Frankie - and have gotten to steaming a new wood piece to replace the rotten curved frame. Soon to pop this in and then onto replacing the old rotten section of ply flooring.
What is the blue paint I notice on your Franki framework?
Will post some new pics shortly to show my progress.
Thanks for sharing!
Shelly
|
|
|
|
Post by shelly on Jul 8, 2015 11:49:01 GMT 10
The restoration journey with Frankie continues at full steam. Every spare minute that I am not working on her, I am researching or thinking about her. Obsession may understate it... But I am loving every moment.
Cladding is off (and all nails painstakingly removed and with some skin and nail) to expose culprit water rot. Wood rot has been assessed.
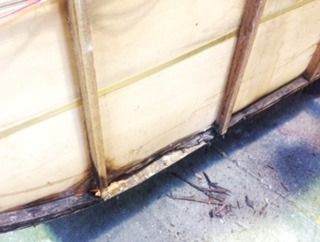 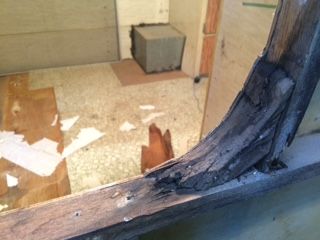
Initially, replacing the curved, rotted out frame had me losing sleep. I was tossing up gluing together strips of ply and bending to suit. A little angel boatbuilder has come to my rescue with a wood steamer and invaluable guidance. A lovely piece of Huon and Qld red is ready to be fitted when the moment comes. I will also need to replace the bottom of some of the parallel framing and may just put in some additional horizontal pieces for added strength and good measure (and as this is is the section that the double bed will eventually be placed).  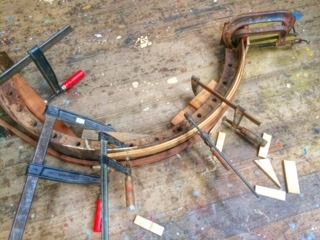
|
|
|
|
Post by frankidownunder on Jul 8, 2015 16:52:54 GMT 10
Hi shelly,
Now you have me envious, Huon pine and use of a steam bender!!, I could only dream of such. No way will that piece ever rot out again.
The blue paint is just that, Dulux weathershield that I had left over from a painting job I did years ago. Used it to try to prevent any further rot starting in the new framework I had made. I also installed sisal foil insulation which is tucked under the roof insulation so that if the wall to roof "J"moulds should ever leak again (they are installed with silicon sealant between the roof /wall skins and the "J"mould),the water should not come in contact with the wooden frame.
As these Franklin vans are built on the monocoque principle, Ie. the curved shape of the body provides rigidity to the van,(the chassis is too weak to provide twisting strength), it is important to glue the inside skin to the framing timber as well as nailing it, also ensure all cupboards etc are firmly attached to both the floor and the wall frames as this is how Franklin and other van makers strengthened the bodywork.
Hope this is of help to you. It is a rewarding task restoring old vans and you have come to the right place for help and information.
Denis.
|
|
|
|
Post by shelly on Jul 9, 2015 11:42:20 GMT 10
Hi Denis,
Thanks so much for your invaluable advice. I am not intending to pull off the roof or end skin, so the sisal may not work for me - though I may use some flashing tape around the edges, and will most certainly paint all frame with a weatherproof/ bitumen waterproofing paint.
The monocoque principle hey! This piece of knowledge is gold! Thanks again for sharing. This is going to really help guide me when putting in the double bed and replacing the internal ply. I think I am lucky in that all of the existing cabinetry is really well maintained and solid.
Cheers,
Shelly
|
|
annienpete
New Member
 Email now Ammt1961@gmail.com Old address doesnt work. System won't accept new address!!!
Posts: 34 
|
Post by annienpete on Jul 27, 2015 0:17:47 GMT 10
Keep swimming as Nemo says!! Its 18 months later and we're within sight of a holiday in ours! Annie
|
|


