|
|
Post by scootman on Dec 4, 2008 23:20:58 GMT 10
Looks great JBJ and an untidy shed is the sign of a man who has better things to do than clean.
|
|
|
|
Post by atouchofglass on Dec 5, 2008 6:09:31 GMT 10
Hey JBJ The vans coming along real nice I'm sure your kids will be comfortable at Wintersun  Just a thought on the panel saw.. The blade shouldn't extend out of the bench more than is needed to cut the timber or panel being cut. Too much blade and the chances of loosing a digit or catching the work are increased...  Worked for a shipwright that after 40 years still has all his fingers... That has to count for something Keep up the great work Atog |
|
|
|
Post by JBJ on Dec 5, 2008 7:27:20 GMT 10
Hi Atog,
I had just fished turning a length of 75x38 cheap pine into 2
75 x15 strips. I normally would adjust the blade height each job, & not often work with it so high.
If you dont exercise care you cut yourself no matter how high the blade is set.
JBJ
|
|
|
|
Post by Jennison on Dec 5, 2008 8:10:11 GMT 10
I feel right at home looking at that shed photo, thought it was mine for a moment!
regards...........
|
|
|
|
Post by atouchofglass on Dec 5, 2008 17:15:07 GMT 10
Hey JBJ
Always better safe than sorry
Lost fingers stay lost for a verrrrryyyyy loooonngggg time
cheers
Atog
|
|
|
|
Post by Surf Tragic on Dec 11, 2008 15:13:04 GMT 10
Hi JBJ,
love the sort of work you do on the vans, & your cars, its a real inspiration.
You just hafta be in the mood, sometimes I walk away for weeks til the motivation re-surfaces.
Cheers, rh
|
|
|
|
Post by JBJ on Dec 11, 2008 18:08:02 GMT 10
Thanks RH,
Motivation is sometimes difficult, and often is controlled by influences you would never think would have any effect.
I'm going thru a period where I often have difficulty getting going. Some days are easier than others, but we all have ups & downs unfortunately. I still generally get a bit done several afternoons & one weekend day each week.
The deadline I've set myself of June for Lucille to be registered & capable of being slept in will be achieved, without too much worry.
Your project will be satisfying to work on. Its good restoring a van in its original style. we did that with Groovin, a 10' Purdon ply van we did a few years back.
Again thanks for the compliment. They always are good to receive.
JBJ
|
|
|
|
Post by sportsman 1 on Dec 12, 2008 9:37:39 GMT 10
Keep plugging away JBJ,
It can be a lonely and frustrating job restoring stuff.
The benefit is what you will finish with at the end of the day and the satisfaction in knowing you did it.
Thats what I try to tell myself every day (does not always work out that way I know)
Great job so far.
cheers, Leigh.
|
|
|
|
Post by JBJ on Dec 13, 2008 20:34:57 GMT 10
Hi All, Well I decided to instal a couple of 12 volt 1950’s interior lights that Reddo graciously let me have. One was complete, and working, & the other was damaged inside in the globe holder area. So the good one went to the rear, over the double bed, with a switch on the wall. The other went at the front, next to the front of the hatch. As I’m going to only have 12 volt lighting inside, I thought about how to get a good bright light for the front. So I bought an LED assembly on Ebay. I proceeded to cut the outer cover/mounting base down & fix it to the old base. It really was quite simple. When I wire it in I may use a rheostat as well as an on/off, so I can dim it if I want. I think the 18 LED’s may be too bright, but I’ll wait & see when I get a bit further with the wiring, Original damaged light mounting socket 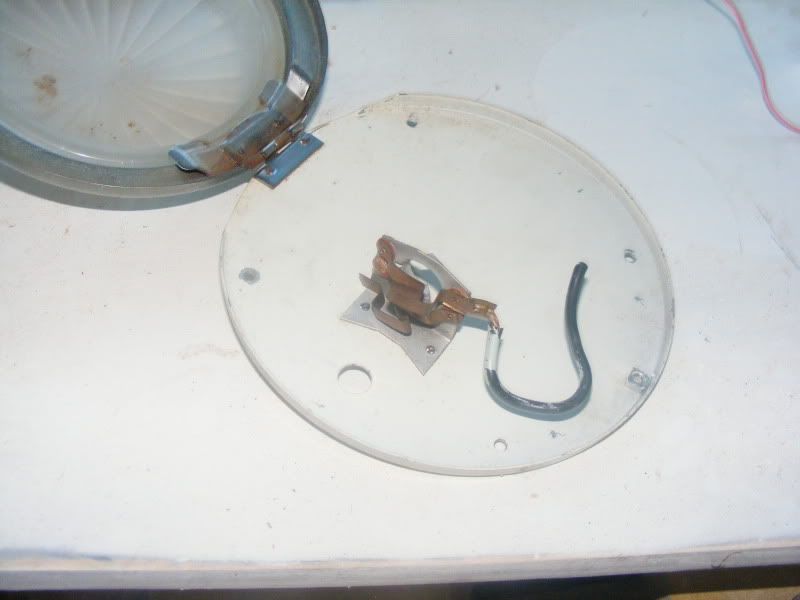 New LED assembly. Cost me $32 delivered 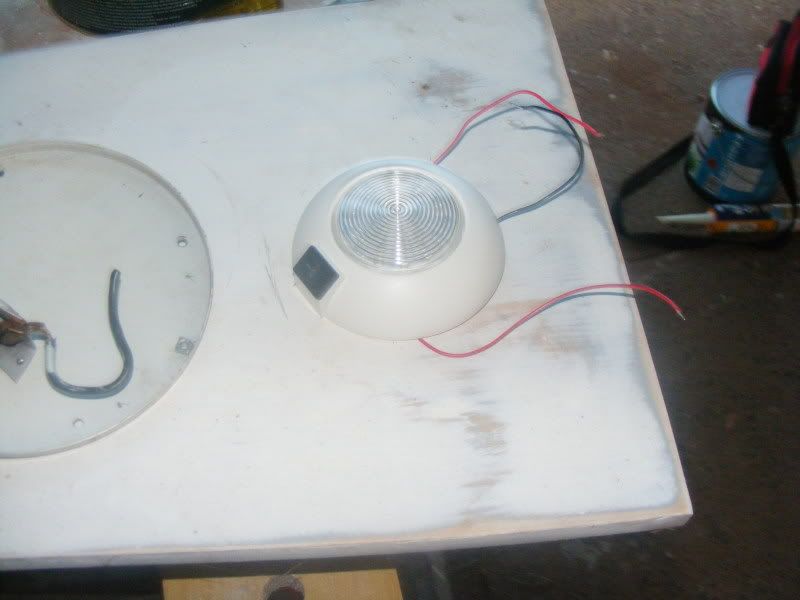 New LED disassembled 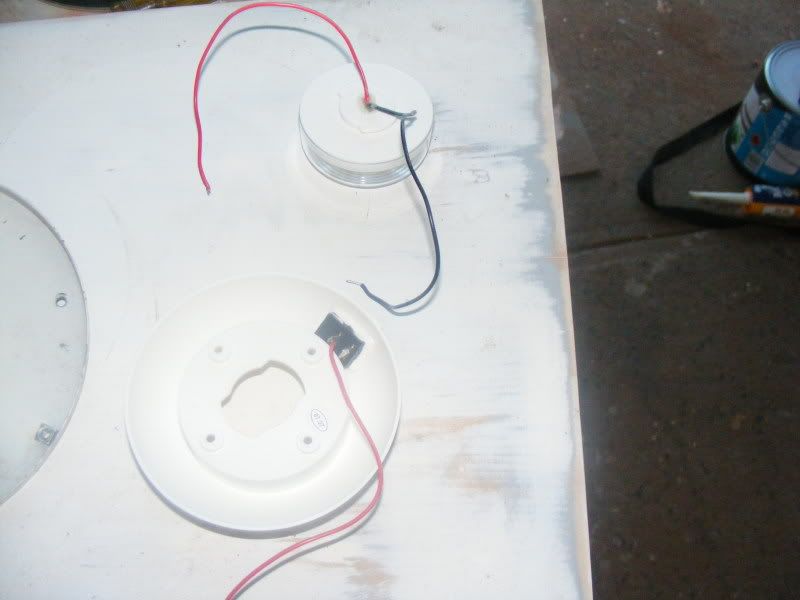 New LED base mounted to original 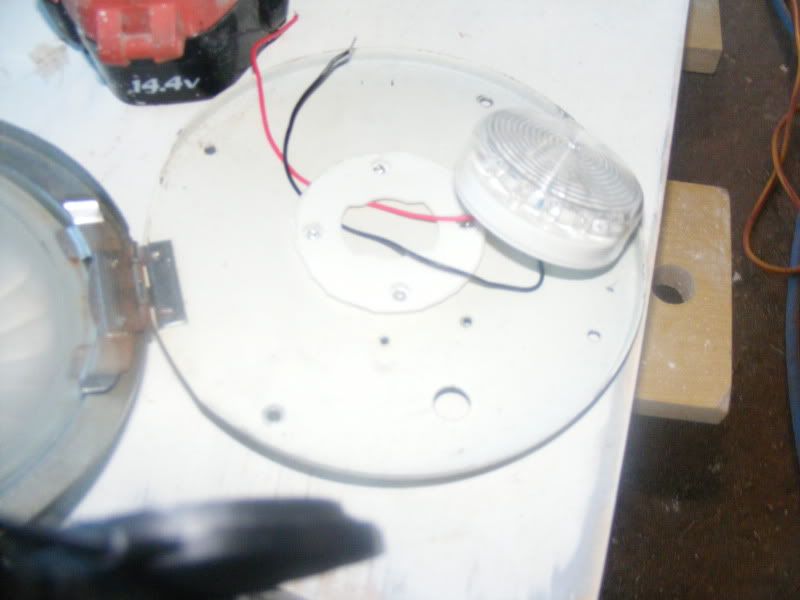 New LED mounted & assembled. The assembly fits easily inside the original hinged glass cover. 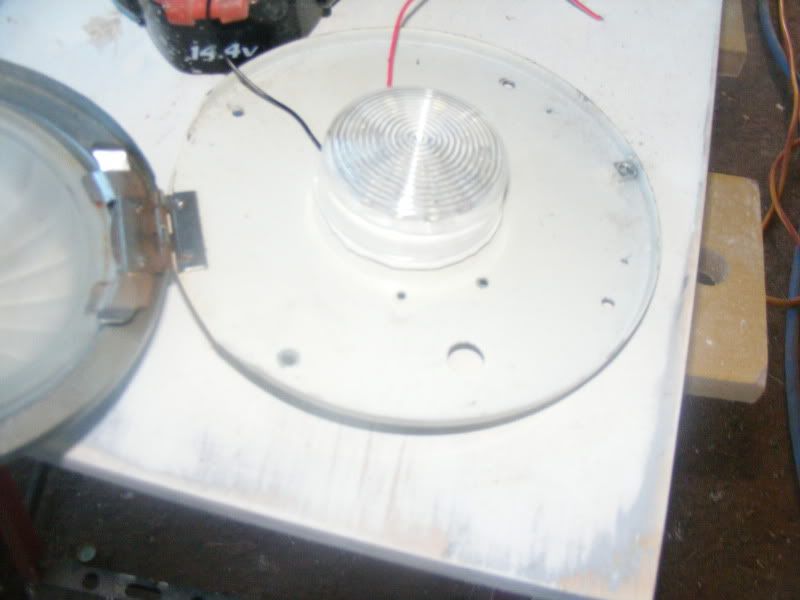 I’ve been rebuilding the door frame. Originally it was just piece of 25x3 steel angle, with the ply sides bolted in place with primitive nuts & screws. So I ripped a couple of lengths of pine down on my saw bench,& glued, screwed & nailed it together, using a bit of quad, & some ply packer strips. A bit of sanding, some putty, & I now have a timber jamb that blends into my new interior linings. Rear jamb existing  Front jamb existing  Front jamb rebuilt. 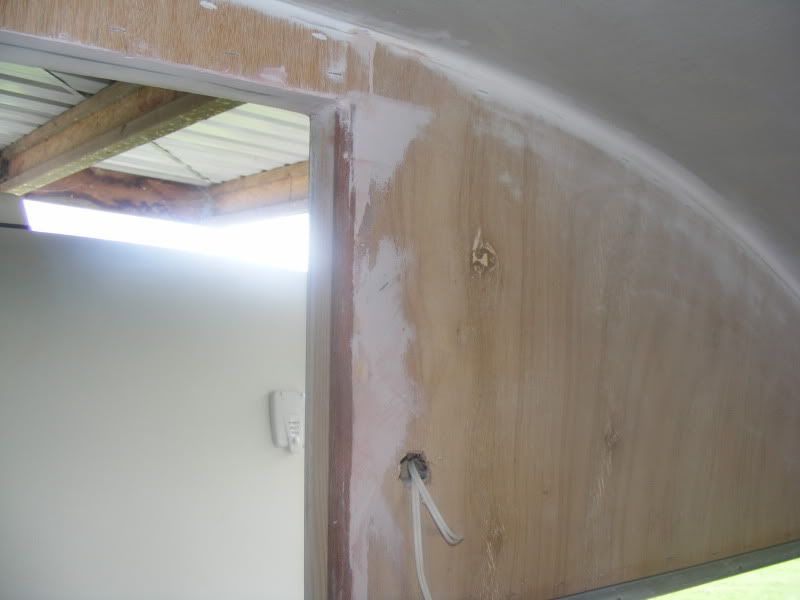 I finished the framing around the new (soon to be leadlight) front window) 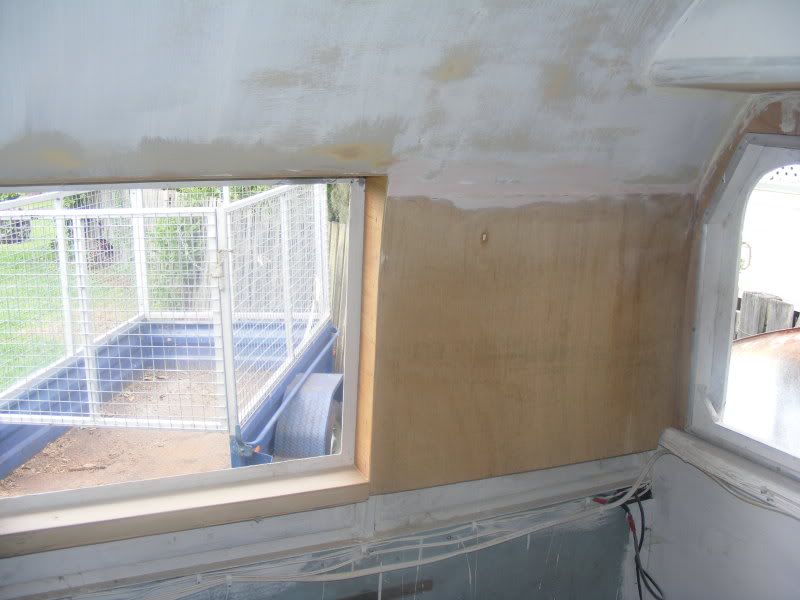 There also was a big cutout section next to the door, in the clothes cupboard. This is where I intend to instal the 12 volt car stereo/cd player. So I glued & stapled some 3mm ply panels in place, then a coat of putty & some sanding gave a reasonable surface.  Its all fun. JBJ |
|
|
|
Post by Daggsey on Dec 13, 2008 21:15:11 GMT 10
Hi JBJ,
Looks like you're making steady progress since I saw "Lucille" 2 months ago.......I like your innovation with the LED light.
Keep up the good work
Daggsey
|
|
|
|
Post by JBJ on Jan 5, 2009 10:00:58 GMT 10
hi All, Well 12 months has gone since I bought this van & started this rebuild. I've had a slack attack over the last few months, but still managing to do a bit .Refresher to what I towed home  Towed it out of the carport last weekend as part of a clean up the shed & carport exercise.( I filled my box trailer & its cage with junk, & didnt touch half of what I wanted to re organise in 2 days)  This is the first time I've had it hooked on to a car since I lowered the chassis over the suspension. I deliberately refrained from finishing that part until I was happy with how it sat. Its also the first time I had a good look at how the longer drawbar I rebuilt has placed the van compared to tow car. I think it should be good to tow. Using the same tow hitch on my rod as I use towing the Sunliner, lucille sits too high at the front now. That suits me, as by simply flopping over the hitch ( Hayman Reese square tube) I can drop the front of the van about 3 inches , & by getting a different hitch I can sit it even lower at front. 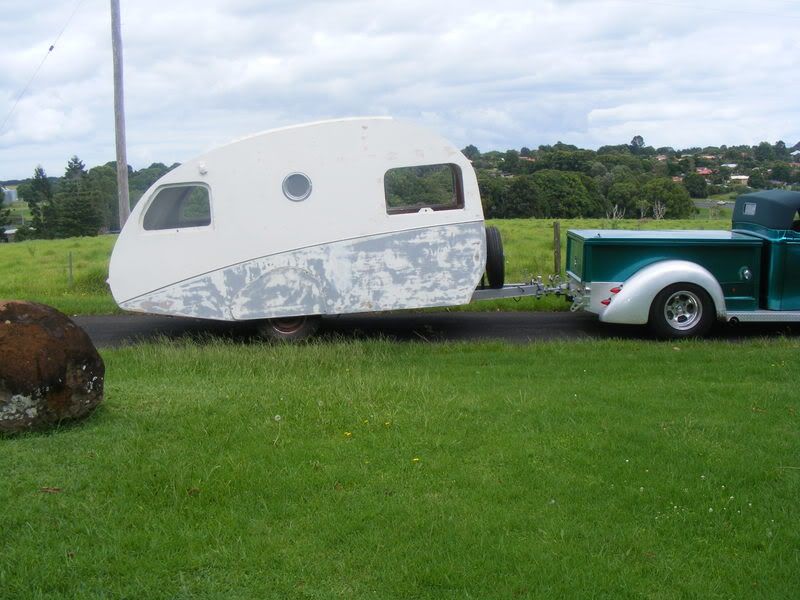 That looks about right for me, so I put it back into carport, mentally ready to finish off chassis work soon. Thinking about electrical, I need some advice on setting up the van the way I want it to work. I would appreciate help in finding a competent electrician that can provide me ( I'm happy to pay) with wiring diagram/instructions to set it up properly. My plan is to have the van lighting all 12 volt, & power 240 volt except 12 volt to radio & TV. I thought of mounting dual deep cycle batteries( if neccessary). I intend installing solar charging panels on my roof hatch, as well as a 240 supply to a charger/tender at the batteries. I've wired 240 volt from my external inlet point , thru to various power outlet point positions & to the battery area. I've also wired 12 volt wiring to my lights, radio & tv outlets. I would like to be able to operate on 240 volt in caravan parks, with battery supplying everything when away from 240 volt. Charging of batteries by solar, 12 volt from tow vehicle ( if neccessary with the solar), & 240 volt. I have a 2400 watt inverter to run a microwave & other 240 volt appliances off battery. My fridge is 240/12 . Is it possible to get all this to work the way I hope.  ?? JBJ |
|
Deleted
Deleted Member
Posts: 0
|
Post by Deleted on Jan 5, 2009 11:07:01 GMT 10
G'Day JBJ. All the electrical gizzmos seem feasible. Although out of my league nowadays. I would aim at an auto electrician first up. One thing i would suggest is running the supply from the van inlet to a small double pole circuit breaker board ... maybe in a cupboard corner somewhere. Then dividing off into seperate circuits to odds and ends. I have seen some caravan park outlets that i would seriously doubt have any earth leakage ( safety switch) protection on them. better to have your own set up in the van and know that you are safe every time you hook the 240V up to your van. no matter where you stay.  Reddo |
|
|
|
Post by minicamper on Jan 6, 2009 6:56:29 GMT 10
Hi JBJ, On the electrical side of things... I had a look over my brothers modern van, although about 5 yrs old now, the tack they took then, was a "dial switch" that controls the power for lighting, the fridge and the water pump and other 12v accesories. You turn it one way for 12v and the other for 240v. Needless to say that the power points are only operational on 240v. The same set up has a charger that automatically charges the batteries when its on 240v. Apparently now they just make everything inside 12v and you don't have dual light switches etc. On 240v a transformer powers the 12v needs, on 12v, the batteries do the work. A switch still exists to shift the power points from mains to an inverter from the batteries. As far as charging the batteries, solar, car or both, I'd go with both. Deep Cycle batteries although tolerant of being discharged, still must be fully recharged to preserve their lifespan. If say you were touring, with access to 12v only, the solar couldn't keep up with usage and recharging unless you had a BIG panel. Go for a dual charging circuit system from the car. I got one from Carac here in Melbourne, used quite a bit by 4wd's. Don't be tempted to use normal car batteries, they'll only tolerate 2 or 3 full discharges before imminent death... That and they're not the quality they once were...  Cheers Chris |
|
|
|
Post by Surf Tragic on Jan 6, 2009 19:00:02 GMT 10
Thanks for a good look at that beautiful Rod too JBJ. ;D ;D ;D The electrical setup you speak about is the ultimate, as thats what is on my 'mod' van, solar is the way to go for frig, water pump, lights, radio, tv & other small appliances, then with gas for hw & cooking, you can be in a remote spot til the water & gas run out no generators Don't know how the system works, just told the people what I wanted, it works There were some Gel batteries (imported) that werent gel batteries , I was the receipiant of 2 for my van, but the van manufacturer replaced both after 2 years . rh |
|
|
|
Post by JBJ on Jan 7, 2009 6:03:28 GMT 10
Hi All,
Thanks for the comments. One of best parts of this Forum is the large base of experience out there that contributes. Its also the canvas upon which anyone can put the pictures & thoughts relative to their particular caravan rebuild or restoration.
That itself provides inspiration & thoughts/ideas to others. I know a lot of the crap that happens here is irrellevant, but it can't all be serious, just as it all can't be all idiotic or stupid.
It takes a lot of both extremes to make a good mix at times.
As I live away from cities, its quite often difficult to get information that I find credible on a lot of topics related to building cars & vans.
I've already determined after talking to several auto sparkies that what you mentioned about deep cycle batteries is very true Chris. Just got to bite the bullet & spend big bucks just before I need to use them.
Likewise the amount of storage in the batteries seems to be quite important, but that will be relevant to how the van is planned to be used. I think I'll probably set it up for 2 deep cycles batteries, but maybe only instal one first up to see how good it is on its own.
I have room on my roof hatch for about 3 solar panels it appears, but I'm waiting on my local specialist to come back to work after holiday break to determine what I need.
I realise its very important to keep the deep cycle batteries fully charged, & the solar contribution should do that. I'll probably have to install heavier strut mechanisms than normal, but that shouldn't be too hard.
At this stage we are planning on not using gas at all, but maybe carry a small gas bottle/light/cooktop in the tow vehicle boot for emergency.
Cooking will be microwave & electric cooktop. The inverter I have will run them OK.
The only real difficulty I see is how I hook it all together. The two auto sparkies I know have given me different opinons on how it should work. Both agree it can be done, but quite different hookups.
That scares me, because unless its really simple, both their comments conflict.
Thats why I'm trying to get a concensus of opinion, so I can HOPEFULLY decide what will work best in Lucille.
JBJ
|
|
Deleted
Deleted Member
Posts: 0
|
Post by Deleted on Jan 7, 2009 6:29:36 GMT 10
Hi JBJ Heres a thought.  Why not contact one of the new van manufacturers and ask to speak to one of the 'leckos that wire the vans. If ya can get one of them "on side" then they might be able to fax /email you a schematic wiring diagram that they work to when wiring the vans up with a solar/inverter/12V/240V system. Like most electrical installations nowadays they would have to be working to an Australian Standard .. or at least an industry standard. You might get a few knockbacks but persistence might pay off  . Either that or speak to a local.. Ballina/Lismore caravan sales outlet and see who they use for installation of special order/ extras/ warranty electrical stuff in their new vans. At least that way you will be referred to an auto electrician who is familiar with what you want to do. One thing for sure ....Lucille is gunna be a far cry from her former self when she hits the road. Reddo |
|
|
|
Post by JBJ on Jan 7, 2009 7:44:15 GMT 10
Hi Reddo,
Not a bad idea about contacting new van builders. I'll try to take a day off soon & drive up to Brisbane & discuss with the bigger suppliers/builders of new vans. Also got to pick up an ice chest at same time I hope.
With the second thought about local auto sparkies, the two I spoke to do most of the local work on vans.
I've got a bit of time up my sleeve before this info becomes critical, so I reckon I'll be able to work it out OK.
Even though Lucille will function like a modern van in several ways, it will look pretty original style overall, especially on the outside. Colour will be red base & cream top ( at this stage)
Wheels will remain the 1940's 6 stud Chev now fitted, with hubcaps & dress rings, but probably in cream colour, not the browny red they are at present.
Internally will be little different from the original period built, just finished off a tad better. Lighting will be the correct lights you graciously gave me, & general fitout/catches/handles will be right.
Vinyl will be on floor, in a suitable period style. It WILL NOT be black & white checked, & will reflect the late 50's/early 60's I remember ( not USA TV's version)
You gotta dream while you build, & hopefully think it out correctly before you need to make a decision.
JBJ
|
|
Deleted
Deleted Member
Posts: 0
|
Post by Deleted on Jan 7, 2009 10:07:04 GMT 10
 Go luck with the hunt for old pattern vinyl. Glad to hear that someone else is trying to come up with something other than tiled or tiled look black and white chequers for thier old van floor. Nothing against the Black and white look. ... but it seems extremely common. I suppose everyone has been down the same path while restoring / doing a make over and have drawn a blank on other period patterned vinyl flooring. Hmmm .. i wander how 50mm thick exposed concrete would look on the floor.... or maybe stencilled would look bright and cheery ;D ;D.. OK, Ok .. i'll leave quietly.. ya dont have ta toss me down the stairs. Reddo
|
|
|
|
Post by JBJ on Jan 24, 2009 19:18:16 GMT 10
Hi All, Well its about time for more progress pix. I' ve been playing around with the flyscreens that were originally fitted. With a few mods I got them working, & in tune with how I want the interior to look. They are painted gloss black, with black metal screens & polished aluminium D mould retaining pieces. as I progressively finish the inside, the gloss black will cover around the screens, to give an uniform appearance when finished. 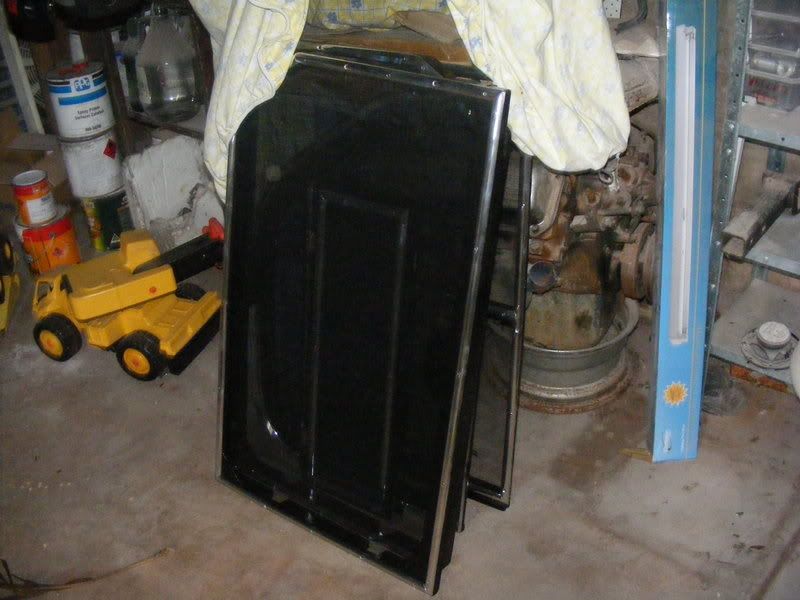 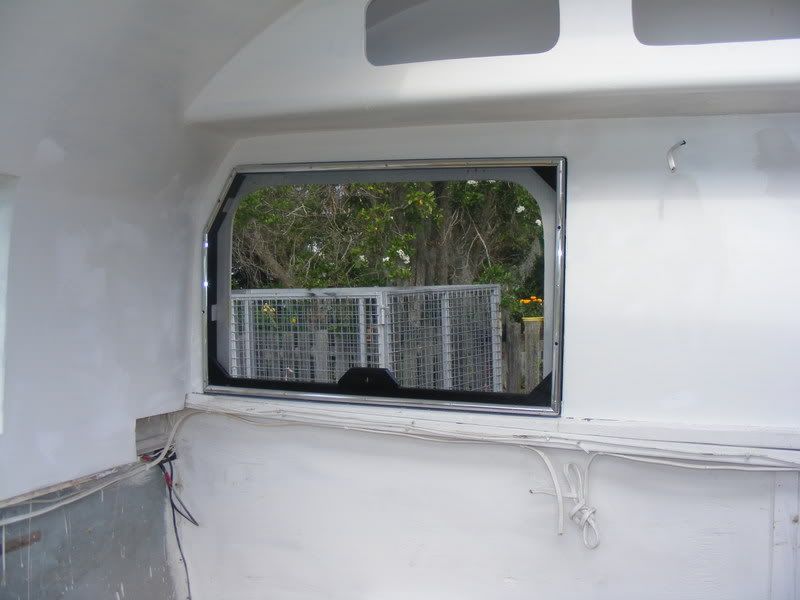 Most of the interior is getting closer, with uniform coloured primer starting to take over.  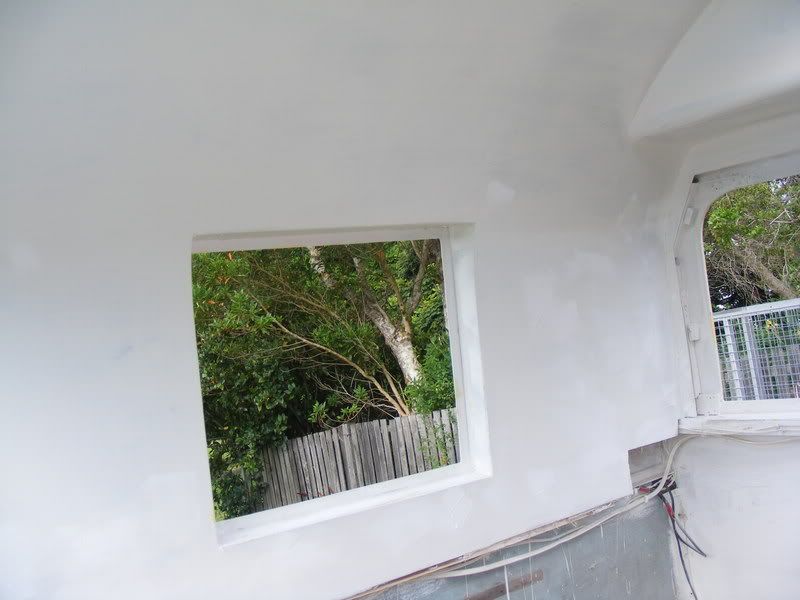 Finally bit the bullet , & put some final oil based enamel on today. It will sit in the sun several days, before a light sand & final second coat. I'm using a roller, & so far I'm happy with how the finish is coming. The vans had about 4 coats of oil based primer, sanded after each coat.  Still got a few repairs happening, but its getting better. I polished the D mould at front, & refitted LED lights. Gonna replace them when I find some small pommie lights like Austin A30 parkers or similar. More pix as the weekend progresses. JBJ |
|
Deleted
Deleted Member
Posts: 0
|
Post by Deleted on Jan 24, 2009 19:50:32 GMT 10
|
|
|
|
Post by JBJ on Jan 26, 2009 17:40:18 GMT 10
Hi All, Looking for door catch/handles, similar to the ones that are in a lot of vans, like the blue ones in the photo below from Groovin when we rebuilt it.  BUT Boots wants red, & we want quite a few. I think I'll probably end up using around 20, so would like to get 24 or so . I'm happy to buy whatever is available, & will consider something else as long as its red, & available in the quantity I need. I vaguely remember Retro knowing where we could get some like this. Sure it was a couple of years back. Seeing your getting older Retro, I hope Old Timers hasn't affected your memory. Any help out there??? JBJ |
|
|
|
Post by JBJ on Jan 27, 2009 19:59:39 GMT 10
Hi All, Well I quickly searched thru my piles of crap & assorted caravan bits that adorn various parts of my shed, & found I have 7 blue handles & push rods, & 12 real good push catches. They are Turner Improved Catches, but I have several types that perform the same function.   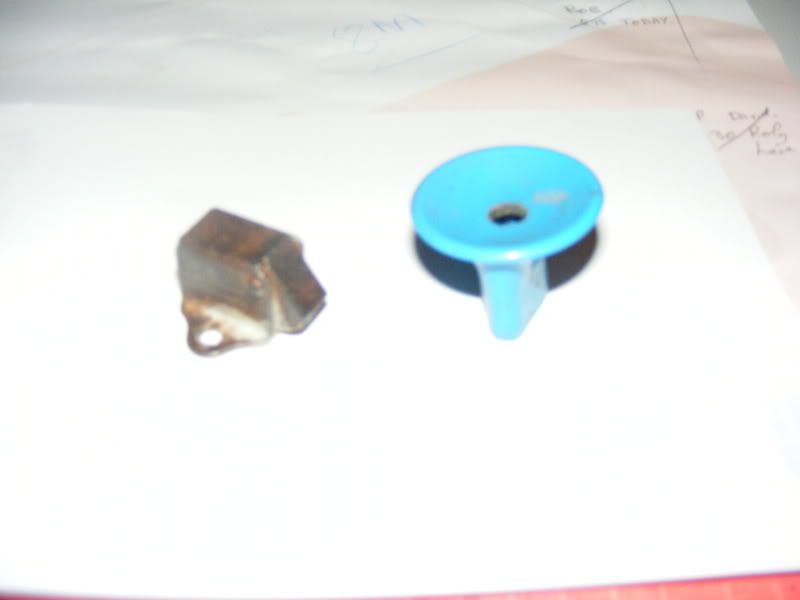 I'm thinking I can spray paint the plastic part of the handle, which is 40mm od x 35 mm high, with a central hole about 8mm dia. If anyone has any of these, whatever colour, I'm happy to pay a fair price to get them, both the plastic handles, chrome pushrods(with mushroom type top) & the catches. thanks in advance. JBJ |
|
|
|
Post by minicamper on Jan 28, 2009 6:05:07 GMT 10
Hey JBJ, well done so far.. You're a few steps ahead of me in the exterior finishing stakes... Can you tell me what roller you're using? So far, everyone I've tried (incl the one recommended for gloss enamels) wasn't much chop..
I'm rapidly approaching the need to start using one again..
Cheers
Chris
|
|
|
|
Post by JBJ on Jan 28, 2009 7:16:15 GMT 10
Hi Chris,
I've used a 5mm nap in 180mm( I think ) length, with 75mm (the same nap) for corners. Also brush for real tight bits. Rollers have been different brands, but I find Accent is as good as any I've used.
Not real impressed with the amount of fluffy bits in the finished paint, but the shine is OK. I'm rubbing lightly with 150 grit orbital sander after the paint dries to remove some marks that I hadnt noticed were still there.
One thing I have done is put lots of coats of primer on, sanding with 150 grit orbital between coats. The timber is now finished with a surface that feels like glass, so the final enamel doesnt have to fill up pitting & marks before setting to its final gloss. That does make a big difference to the final surface. After all paint just covers the surface you put it on. Its not ( generally) good at levelling out rough surfaces.
I've accepted that its going to always have some marks I cant remove, & I'll live with the hairy/fluffy bits in the final coat.
I'm only putting 2 coats of gloss enamel on. I've also bought the dearer of the product range each time.
I'm sick of rubbing the timber to get it smooth.
JBJ
|
|
|
|
Post by JBJ on Jan 28, 2009 19:44:13 GMT 10
Hi All,
Thanks for the comments on foam rollers. I'll trade the mohair one I bought last for a foam one, & try it on the spats that need a second coat. Hopefully all will end up smooth & shiny..
Thanks to Kaybee, I've now got enough door catches & pushrods.
So I thought, who can cast me door handles in plastic??
Remembered the name of Dale McShane on the Gold Coast, who made me new lenses for Groovins lights several years back. Looked him up in phone book, he thinks he can reproduce from a sample.
They dont need to be perfect reproductions, just all be similar size & colour.
I shall show you the results when I get them back.
I have my windows being glazed at present, & the leadlight for the front window under way.
One side of the chassis rework welding is done, & looking good.
Its all fun
JBJ
|
|


 ??
??


 .
.
