|
|
Post by JBJ on Apr 13, 2008 19:37:46 GMT 10
Hi Earlee,
Lucille has a copper water tank, full width of van , right at the tail inside the van & under the bed. Its about 150 deep at front & 50 deep at rear. Like most of the van, its unique & pretty well thought out, just a bit rough in execution. We'll be keeping it, along with the foot pump, & set it all up to work OK.
I will definitely post pix of what I do on the van. Its going to be one very unique van when its finished, hopefully a current technology old van.
Hopefully I can post the details of this rebuild & keep the agro & shit away from this thread. I've deleted all of my previous posts except those relating to my vans & runs I've been on. But still the crap happens.
We are not coming up to the next SE Qld run. Its too far for us for a weekend run, & I'm not ready for a bush caravan park at this time.
Hope everyone enjoys themselves, & we'll catch up soon hopefully.
Jailbarjuice
|
|
|
|
Post by Roehm3108 on Apr 13, 2008 21:24:13 GMT 10
Hi Dennis Is that just a primer you're using or a primer/sealer/undercoat? As a point of interest, would really like to know which is the better. You're certainly doing another fine job. Worth every minute/quarter hour of waiting for the downloads on dialup ;D  Any joy with your fridge yet? Ray |
|
|
|
Post by JBJ on Apr 14, 2008 7:16:31 GMT 10
Hi Ray,
I'm using oil based primer/sealer, & it seems to be soaking right into the cracked surface layer of the ply. I'm sanding every second coat pretty well with my orbital sander, & trying to level out the chips & scratches & brush marks a bit. The surface has weathered a lot over the years, but this seems to be doing the job OK
To me the purpose of the paint is to keep the weather out of the external surface of the timber. thats the main reason I'm using the primer/sealer, as well as the fact it will build a bit of thickness in the low spots/cracks. By letting it dry for a few days between coats, & then letting it sit for a fair while as I do the interior, I believe most of the shrinkage in the paint will be gone before final top coats
The guy with the fridge never replied to my email, so I guess I wasnt meant to get that one. I'll find one one day.
Jailbarjuice
|
|
Deleted
Deleted Member
Posts: 0
|
Post by Deleted on Apr 14, 2008 7:51:23 GMT 10
Hi JBJ Your doing a great job there mate. Certainly a different style to most other vans we have seen. Without insulting you i reckon the style from the wheels backwards look very similar to those "swept up" lines in the same spot on the new Teardrops - Reo's. .. Whats that you say  .. I have insulted you. Sorry mate i didnt mean to  . It just looks like that to me.  Has the primer done much in the way of filling the grain of the plywood. ?? I have applied 2 coats of oil based pink primer to Mildred and gave it a very light sand. The roof sheets have the grain running "east west" across the van. Even with 2 coats on it the grain looks like the wrinkles across my knuckles  Maybe this is why old van builders use to apply canvas over the top. to protect the open grain of the top layer of ply ? It appears i am going to have to live with it as the 50 year old ply just keeps swallowing the primer. I suppose it adds "Character" to the old vans but looks like crocidile skin  I thought about talking to the mate who is a spray painter . They use a lot of Hi fill primers nowadays that are "self levelling " and can hide a lot of "evils". I feel it would take a bloody lot of paint to make it smooth. Keep up the good work. Just wish i could be as motivated as you are. ;D Slacko Reddo |
|
|
|
Post by JBJ on Apr 14, 2008 8:14:30 GMT 10
Hi Reddo,
I've got about 6 coats in places, but using primer/sealer not just primer. I dont know if its much different, but it seems a bit heavier to brush than straight primer. I'm using 150 grit orbital discs, & heaps of them because they clog quickly. I think the modern day household paints will provide better protection than the 50 year old ones did.
You'd like to think that all of the research & development in 50 years achieved something.
Jailbarjuice
|
|
|
|
Post by minicamper on Apr 14, 2008 9:42:34 GMT 10
Gents,
one of the benefits of primer sealer is that it not only primes, but seals the surface (hence the name) so that you can paint with modern paints like acrylics over enamels without side effects. when i say seal, the intention is to seal what its applied over, to protect what is painted over it. it not a weather sealer as such..
It is commonly used in older houses to seal calcimine that was used to paint ceilings. The lime in this old solution "burns" through all paints and makes them peel in a couple of years.
having said that, unless the paint your painting over is very sound, it's better to get it off, so the new paint has a good surface to bond to.
Cheers
Chris
|
|
Deleted
Deleted Member
Posts: 0
|
Post by Deleted on Apr 14, 2008 9:58:00 GMT 10
Hi Chris Without hijacking JBJs thread I guess what i was really trying to find out is what is out there that has good "Filling" quailtys. I sanded Mildred entirely back to raw timber and have applied 2 coats of oil based pink primer. So i feel i have done an adequate job of prepping and sealing it . Just would like to find something that can be sprayed, rolled, brushed or slopped on that will level the surface up before the top coats go on.  Once again...Sorry Dennis, i feel this is a topic that might benefit both of us ( and i suspect others) . Maybe it has been dealt with somewhere here before. Reddo |
|
|
|
Post by JBJ on Apr 23, 2008 20:34:10 GMT 10
Hi All, I picked up a good old 3 way 60 litre fridge the other day for $200, it will fit & work as I want it. Finished off the backing panels for the Hillman tail lights & number plate.  Slowly getting the ply primed & rubbed smooth, so final prime & paint don’t have marks in them. Theres about 4 to 5 coats of oil based primer needed so far to fill the weathering/ply grain. But its coming up as smooth as glass. The window frames are made from brass T section framing, & hold the glass in using automotive H section rubber. There's a 12mm square foam section s that holds the window off the van wall. Then there's an aluminium eyebrow moulding goes above window to reduce water.  Its not the prettiest set up, buts its so unique I’m going to keep it. At the front there was a 150 deep section of ply above the windows that was full of rot ( & ants) I’ve decided after much looking at the van, to remove the front windows as they were & instal one central fixed window. I’ve made a steel frame, raised it up to the level of the side windows , & welded it in. It will end up looking like most vans of its era.  I then made some timber packers, ground to fit the lines of the van side, that I fixed to the steel van frames, to allow a new ply front panel to fit & conform to the shape of the van. 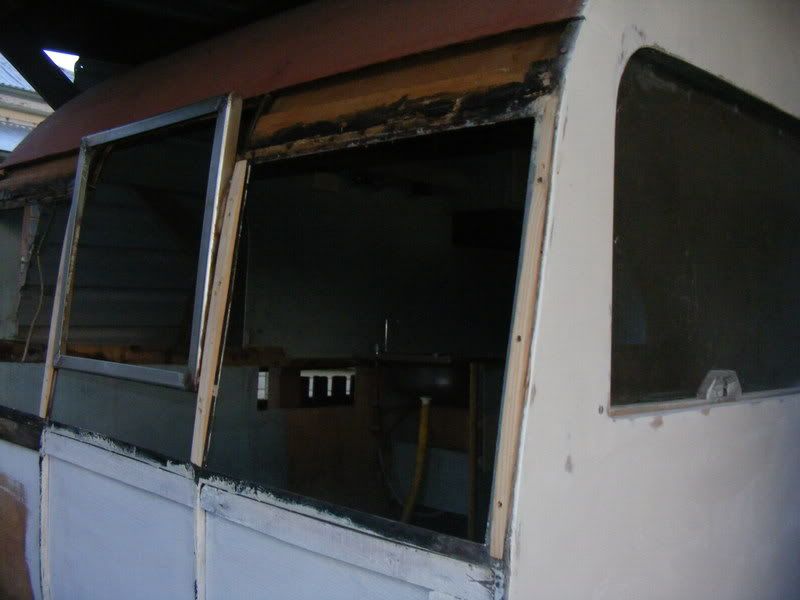 That will do for this week Its all fun Jailbarjuice |
|
|
|
Post by willyn on Apr 24, 2008 6:51:32 GMT 10
 ;D The van is looking spot on I like the mouldings at the rear adds something to it well one thing is for sure Jailbar you will not see vans that are look alike it is the first one I have seen in that style which makes it unique Lookin good Go for it Will and Lyn
|
|
Deleted
Deleted Member
Posts: 0
|
Post by Deleted on Apr 24, 2008 19:42:37 GMT 10
|
|
|
|
Post by Franklin1 on Apr 24, 2008 20:17:01 GMT 10
jbj, you really do amazing work on your vans...110 percent effort...no cutting corners...if it's not right, then it gets fixed right.
As a person who has a keen eye for quality handiwork, I think you are right up there with the best. And no, this is not supposed to sound like a "suck-up", rather it is me taking my hat off to you. I am very very impressed with how you can turn these vans from 'has-beens' into 'showroom condition'.
Blokes like you ought to be teaching classes so you can pass on your skills and knowledge...and I mean that sincerely.
cheers,
Al.
|
|
Deleted
Deleted Member
Posts: 0
|
Post by Deleted on Apr 24, 2008 20:40:55 GMT 10
|
|
|
|
Post by JBJ on Apr 26, 2008 20:13:27 GMT 10
Hi All, Got a bit more done. I’ve fitted the ply panel over the left hand window, & tidied it up a bit. I’m very happy with the result. 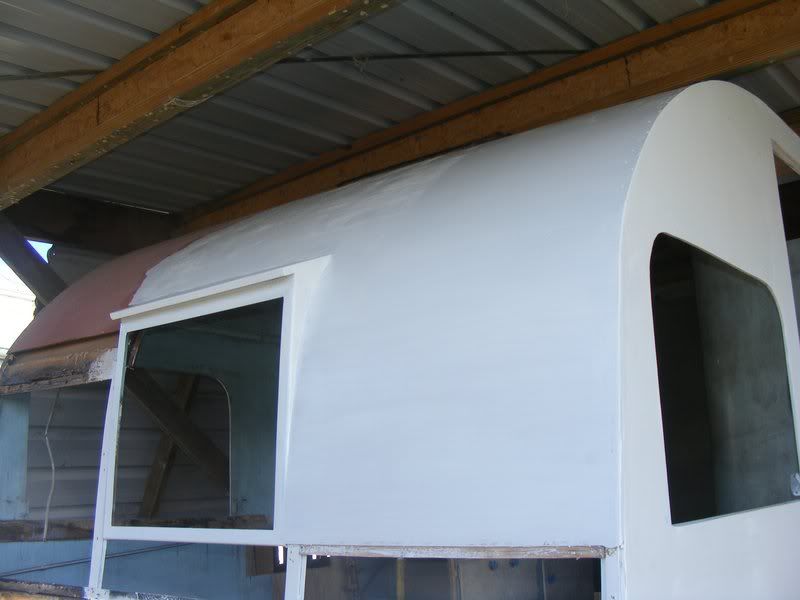 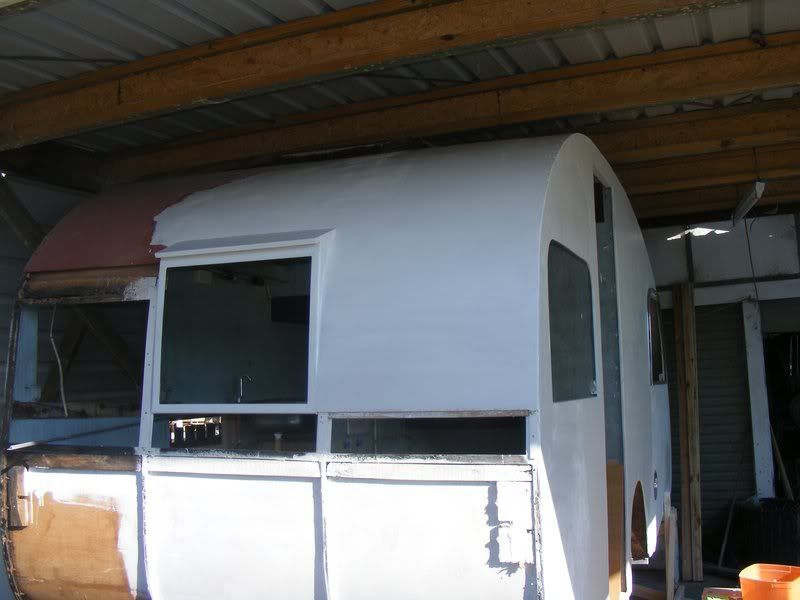 Started repairing the door frame. Its rotten at the bottom, but I’ve worked out a repair. I also need to shorten the bottom of the door, to allow for the new floor sheet I'm going to lay over the existing.  Interestingly enough, the door is 2 metres high, that’s 6’6”. I thought it was tall. My Sunliner door is 1.67 metres high. That’s 5’6”. this shows the rotten bit. the door is solid oregon. 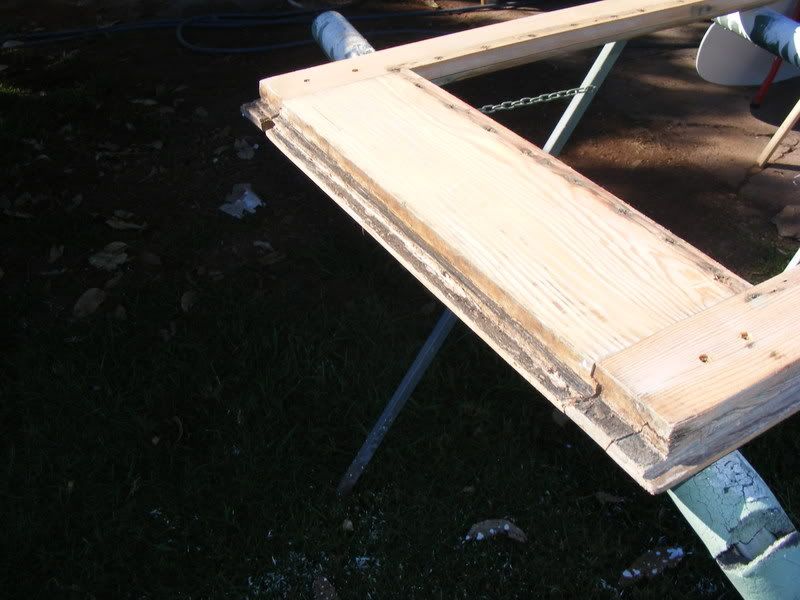 ![]() img.photobucket.com/albums/v309/jailbarjuice/DSCF0019.jpg[/IMG] img.photobucket.com/albums/v309/jailbarjuice/DSCF0019.jpg[/IMG]I found this pine angle section a year or so back when I was working on the Sunliner interior. I figured I'd use it somewhere. Its almost perfect for this job. just glued & screwed to door, then I'll trim it later. 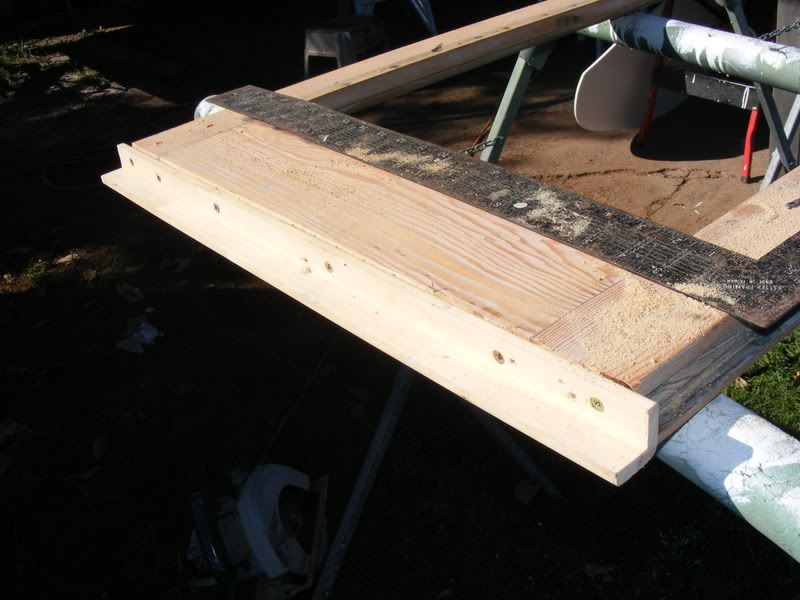 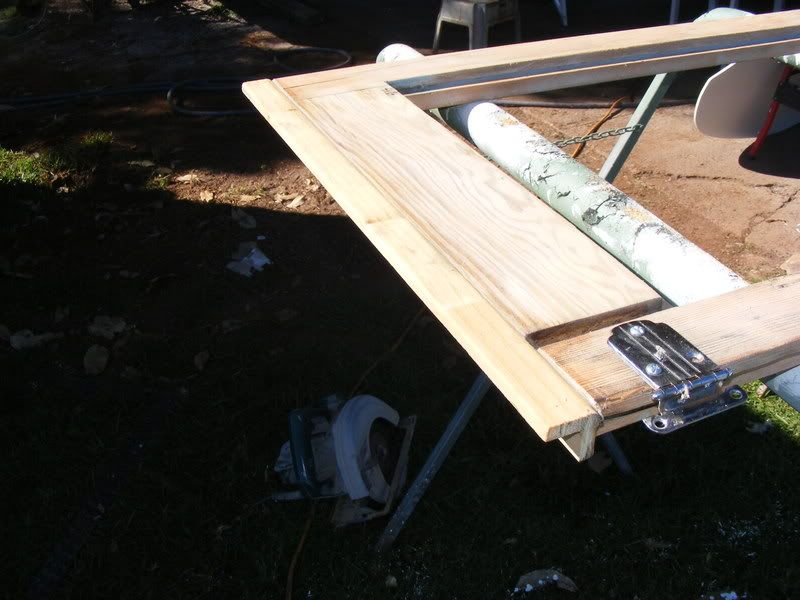 Geez Morrie could fit into Lucille without ducking his head. Jailbarjuice |
|
|
|
Post by JBJ on May 18, 2008 21:23:16 GMT 10
hi All, Slowly making progress. This is totally a one person job, I can Boots to help a bit if I need her, but otherwise it'll be me on my own ( unless someone is unlucky enough to turn up just as I could use some help). I've been waiting on my new axle top arrive. I just paid Al-Ko $95 to arrange delivery to my door with IPEC. After 4 days still no axle, so rang up IPEC, to be told that delivery driver refuses to bring his pantech up my driveway to deliver, so I've got to go to their depot (20KM) & they will load the 60kg pallet on my trailer. Interestingly double deck cattle semis come up the same driveway every year or so to pick & deliver cattle, & the new mattress for the Sunliner turned up in a big pantech no worries, but with IPEC I have no say. I've replaced the damaged 50mm bottom section of ply at the front left side of the van, & deepened the section to line up with & cover the metal framework at the bottom of the door. That gives a neat line from front corner to middle of spats. The spats will eventually have a cut out to show the hubcaps, but not until its on wheels & loaded to final weight. 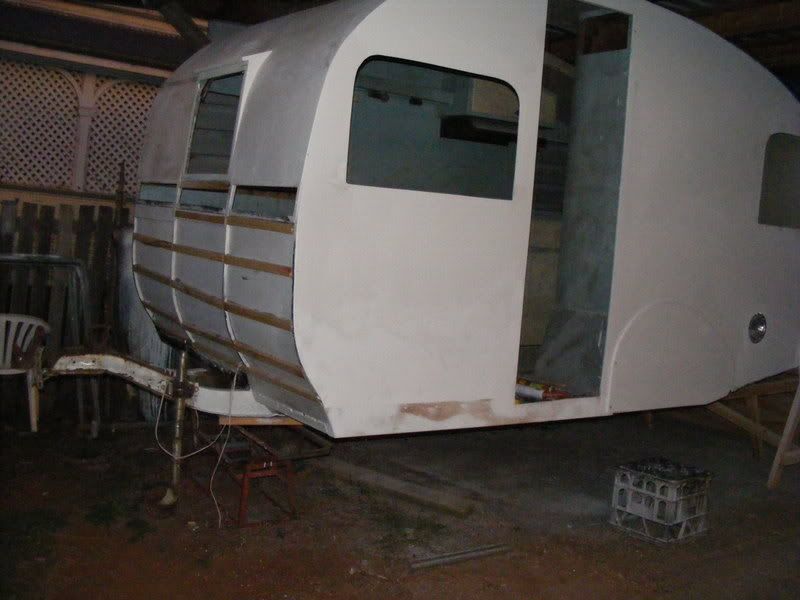 To match, I've added the same 70 deep section across the front of the van. This will also allow easier fixing of the new front sheet of ply. Originally the van had a sheet of 1/8" aluminium screwed & folded over the steel framework, but it was pretty sad & had to go. So now I'm fixing battens across to glue the ply to when I fit it. they didn't end up as straight as I'd hoped, but with working in the dark at night by leadlight that can happen. Wont make any difference when the sheet is glued over the top 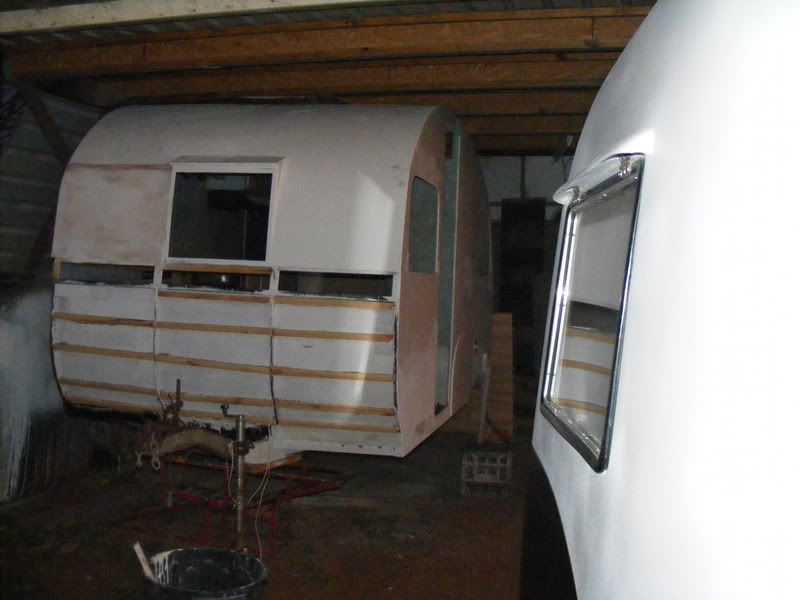 I'm happy with the lines the front is taking on now. The fun starts soon, fitting the new axle under the van. Hopefully with a couple of floor jacks I should be able to lift it up to where it needs to go. Its looks not that much worse than changing a diff & rear suspension (I hope) Jailbarjuice |
|
|
|
Post by willyn on May 19, 2008 9:55:43 GMT 10
 starting to take some shape now Jailbar!!! when I first saw it I was thinking strange shape the cutaway at the back now its got some paint starting to look the goods amazing what a cleanup and paint can do keep on keepin on good buddy!!!  Will
|
|
|
|
Post by JBJ on May 24, 2008 19:43:17 GMT 10
Hi All, Finally got my axle delivered. Only took 9 days for an overnight delivery by IPEC, from Brisbane To Northern NSW, ( about 2 ½ hours by car), at a delivery cost of $104.50. I definitely wouldn’t use them again if I was in a hurry. So my custom made axle & brakes ended up costing me $879.50 delivered, which in reality isn’t bad, considering I have new hubs, bearings , & hydraulic drum brakes included. 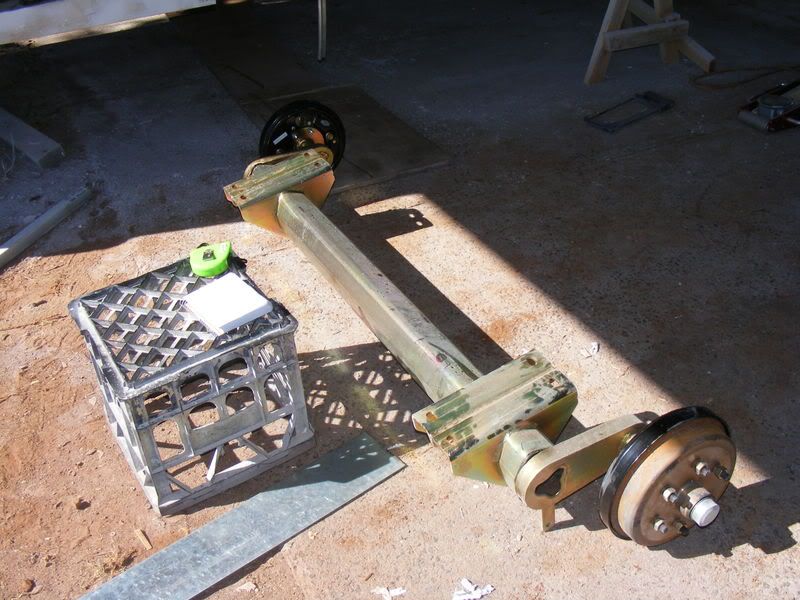 So I thought I would attach the axle to my chassis by fitting& welding a new plate on the underside of the Chev truck chassis. Made the plate, from 120x3 plate, fit with 2 x ½” bolts each side. I ordered the axle to allow the bolts to be outside my chassis rails, with a second set of brackets on the axle to allow the load of the van to fully bear on a set of axle support plates 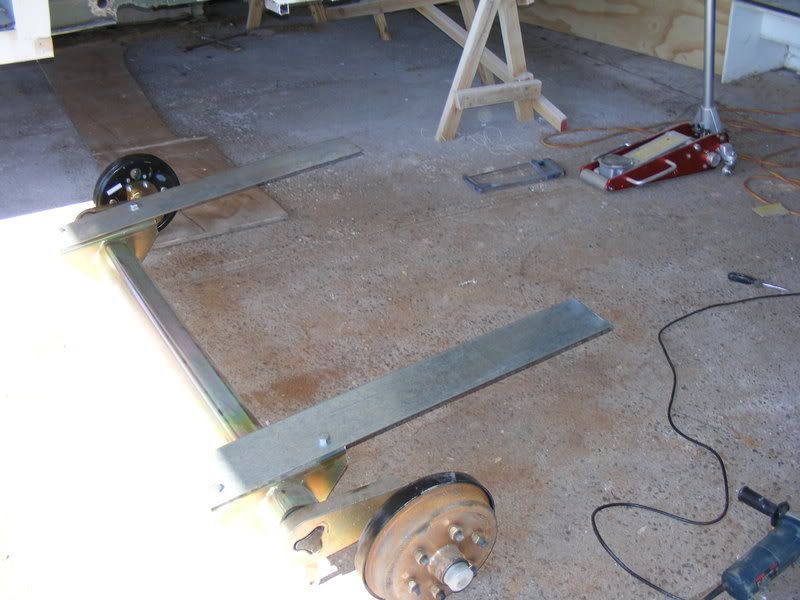 The chassis plates are made longer to allow me to tidy up the messy existing chassis ends. I’ll get plates cut to allow me to construct a neater chassis assembly behind the axle. I then measured up where the centre of the axle should sit, based on original axle position. I temporarily screwed a couple of bits of sail track ( cause I had them) to the sides of the van in the position of the axle centreline. I then ran a string line under & marked the axle centreline on the underside of the chassis.  Sat the axle on a sheet of plywood. This allowed me to slide the axle across the concrete floor to roughly the position I wanted it to sit. Then pushed my you beaut alloy jack under the axle, & lifted the assembly until it touched the underside of the chassis. Raced around & checked measurements, & got assembly in right spot.   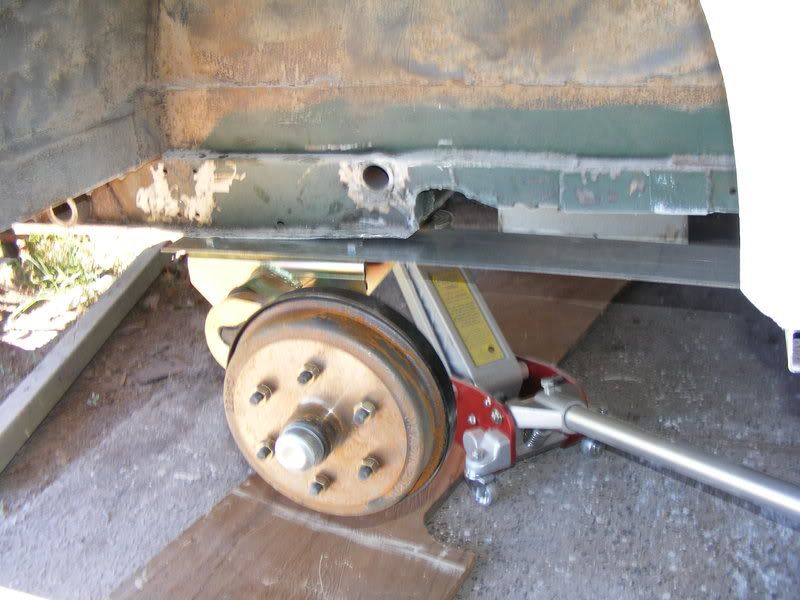 Then tack welded in position, & rechecked measurements. All looked OK, so welded plates to chassis both sides.  Finally put wheels on. Remember I set the axle in the original position, so when it looked slightly too far forward ( for what I would like) I decided to accept it. If it gets to me I can drill more holes in the plates on the chassis & move it back as I want.  Next job is to get the infill plates cut next week, & refill my gas bottles. Then another 4 or so hours welding & grinding will have that part done. More fun than you’d think rebuilding vans. Jailbarjuice |
|
Deleted
Deleted Member
Posts: 0
|
Post by Deleted on May 24, 2008 20:59:45 GMT 10
Hi Dennis. Just thinking..... I reckon that your wheel centre will move back to about where it should sit/look right when you let the weight of the van come down on it.... I know the al-ko axle only has short "trailing arms " but by the time it takes the weight of the van and drops and inch or two the wheel looks like it might centre up in the wheel arch Or do my eyes decieve me and the weight is already on the axle Keep at it old mate... its all fun.... ... I think  9 days to travel 200Ks  ...IPEC sux Reddo |
|
|
|
Post by JBJ on May 25, 2008 2:30:11 GMT 10
Hi Reddo,
Its still on the stands until I finish the welding & grinding underneath, on the insides of the chassis rails. Thats why I set it up as high as I did, so I can crawl around under it to finish it.
Its a bit rough on the body crawling on concrete, but I dont have any other way to do the neccessary repairs.
For those of you purists out there that think I'm cutting up a perfectly good old van that should have been rebuilt as it was, the previous suspension was terribly complex & out of alignment, as well as being ugly as 2 hatfuls.
The rest of the van is a very unusual home made unit, that has suffered from weathering badly in spots. My reworking it will have little bearing on its character & originality, as no one but myself & its previous owner know how it was meant to be assembled.
I defend anyones right to alter something they own as they wish. But just as strongly I defend the right of others to want things kept as they were.
Go out & get your own van & rebuild it if you disagree with what I, & any other person is doing while saving another vintage van from the demolition derby, or rotting away under a tree, or whatever.
The appearance of the finished product will be vintage to everyone except the purist, & they can never be happy with anything that doesnt fit perfectly in their narrow field of vision.
Jailbarjuice
|
|
Deleted
Deleted Member
Posts: 0
|
Post by Deleted on May 25, 2008 7:10:41 GMT 10
Hi Dennis Yeah i can sympathise with the bit about crawling around under things. especially when we are getting on in years. It doesnt get any easier . Someone once said to me...."You can tell when your getting old. When you bend down to pick something up, you find yourself saying ... now what else needs doing while i am down here" I applaud your handiwork and determination with this resto of "Lucelle". Anything that is so unique in the old caravan world deserves a bit of TLC... To twist a quoted line from "The worlds fastest Indian" Movie....."Even dirty old caravans need loving too". What we need to remember here was that vans like Lucelle where a one off van and the extension of the builders thoughts and ideas at the time of building. No matter what variations you make to it , we must remember that it was created way back when , There was no blue print ... just what was in the builders mind. He built it the way he wanted it ... and probably to the best of his ability. All you are doing is improving on the original constructors ideas and making the van safer and more "Livable"... no harm in doing that to anything in our lives. Cant help but think what you may have been able to do with the old Fugly van i had. It would have required a full new chassis and suspension. I thought long and hard about demolishing another old "One Off" piece of australias touring heritage but in the end i decided i could build one in the same style and one day it too would become a piece of history. If its good enough for restorer clubs to call cars / bikes made in 1978 a historic vehicle ( Rolling 30 years qualifys your car as a historic vehicle in NSW.... but not on this website. Note: i have no problem with the 1970 cut off point here in this group) Then it will be good enough to call a van made in this year of 2008 a historic vehicle when 2038 rolls around Keep at it.... and keep the updates coming. your shots and blow by blow account of your restoration give good detail on "how to" and will be a good reference to anyone looking to install similar features on there vans. Gunna be a tough decision what to bring on this years tour /Coledale run.. ;D Reddo |
|
|
|
Post by Don Ricardo on May 25, 2008 7:41:07 GMT 10
Hi JBJ,
I love your work! And I love the pics you post along the way! Thanks for keeping us in the loop - that's one of the great things about this forum as far as I'm concerned - being able to watch over people's shoulders as they do some minor tidying up of their vans or a major reco, as you are doing.
Not being technically minded or practically skilled, I learn a lot from the way you carry out various tasks and solve problems which arise along the way.
As I've said before, I reckon that once she's finished, Lucille will be another object of great beauty from the house of Jailbar. Go for it!
Yours in admiration,
Don Ricardo
|
|
|
|
Post by atouchofglass on May 25, 2008 8:35:44 GMT 10
Hey JBJ This is a good teaching thread as well as a look at a unique van Some how I've missed this thread until today... Read the lot and am amazed and delighted with the effort you have put into the old dear over such a short time. There is food for thought for anyone doing up a van all through your rebuild. As for anyone giving negative comments on how you choose to rework your van...... Lets just say they can go..... jump in the lake Your van your say I only see positives from the original builders ingenuity and yours. Keep up the great work Atog PS I was going to put some comment in about glass vans to dig at Reddo but I'm not that type..... ;D ;D |
|
|
|
Post by JBJ on May 25, 2008 8:43:50 GMT 10
Hi Reddo,
Cant see Lucille completed for Coledale this year.
We want to get the interior layout right & in place before we paint the outside. As I'm doing it all myself this time & not paying Bob the builder, it will take longer to do. But it will end up totally the way Boots & I want it ( I hope)
Hopefully putting the front ply sheet on today.
Thanks everyone for the positive feedback. I always hope that something I can describe & show might inspire someone to do a bit more than they might have been able to previously.
Sorta like passing on a bit of knowledge &/or experience where you can.
Jailbarjuice
|
|
|
|
Post by JBJ on May 25, 2008 17:21:36 GMT 10
Hi All, More progress today. Actually got to instal the front ply sheet. Remember this van has a steel frame, & had an aluminium sheet & 3 fixed windows across the front, set lower than the side windows. As I’m changing the interior a bit, I wanted a single window, up at the same level as the side windows, which are at the level of the top of the kitchen benches. I had to instal timber strips to give something for the new ply sheet to fix to. So that completed, I layed heaps of liquid nails onto the strips, after I trimmed the ply to fit in place. Had to get Boots to help a bit, but we managed well as a team. 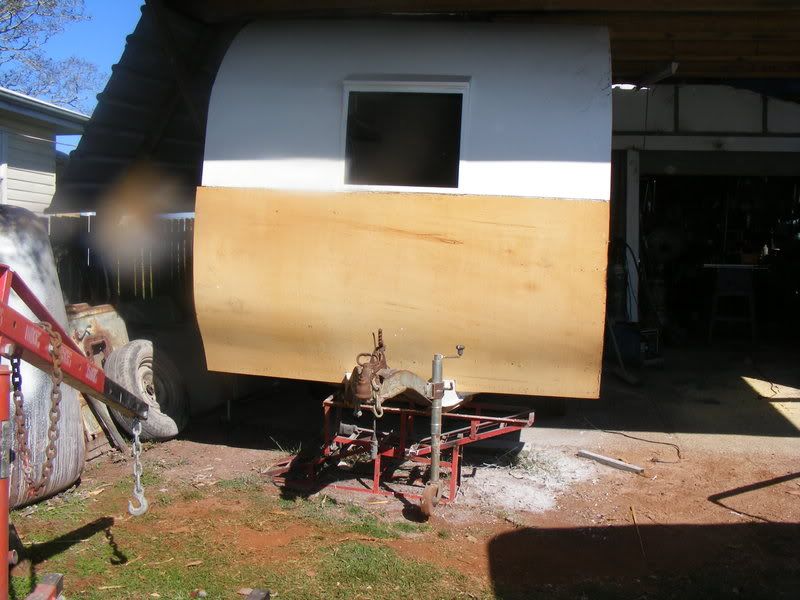 Out with some screws, & my air stapler. Easier than I expected to fit & fix.  Put a couple of coats of primer on, then when dry layed a bit of Polyfilla over the joins/gaps. 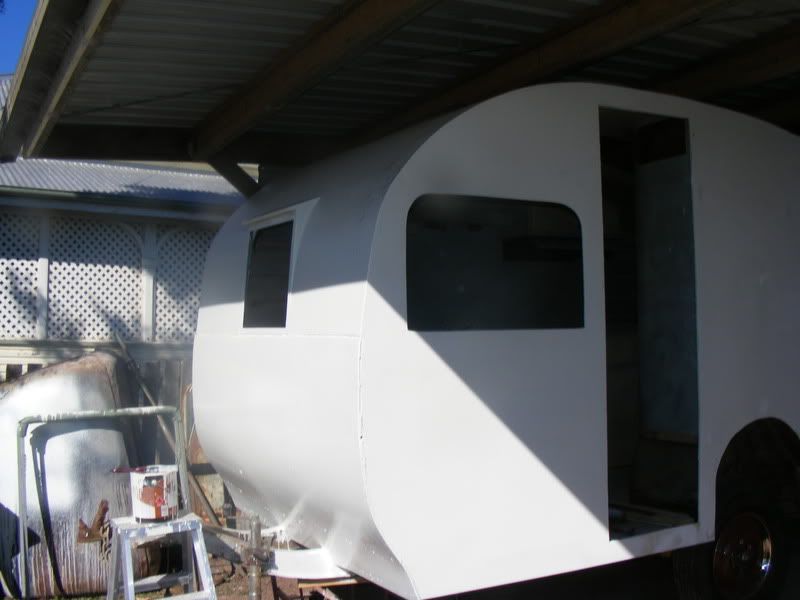 I think the van looks a lot better at the front than the original 3 windows. 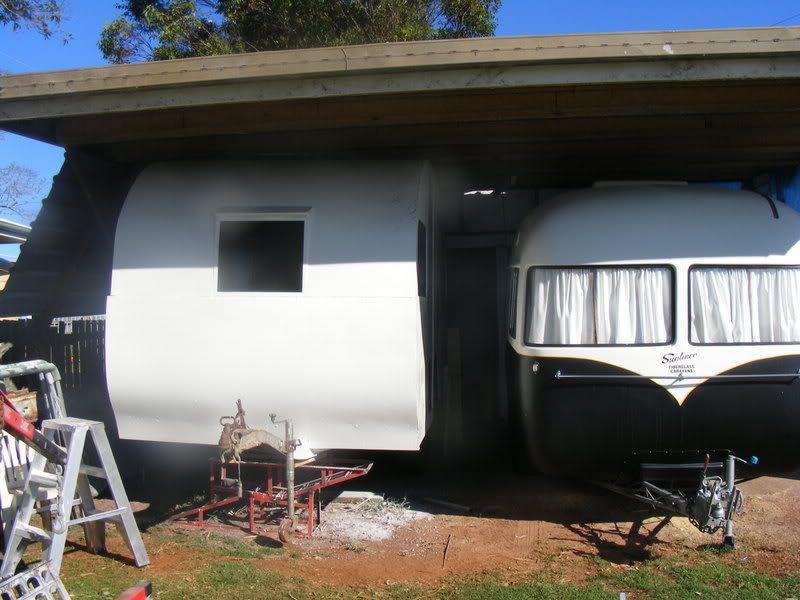  I'm planning on mounting the spare wheel vertically at front, in the middle of the A frame, just in front of the body. That will hide the slight twist in the front ply panel that has happened, caused by the steel framework being out of square, as happens with old vans Jailbarjuice |
|
|
|
Post by JBJ on May 31, 2008 19:22:44 GMT 10
Hi All, 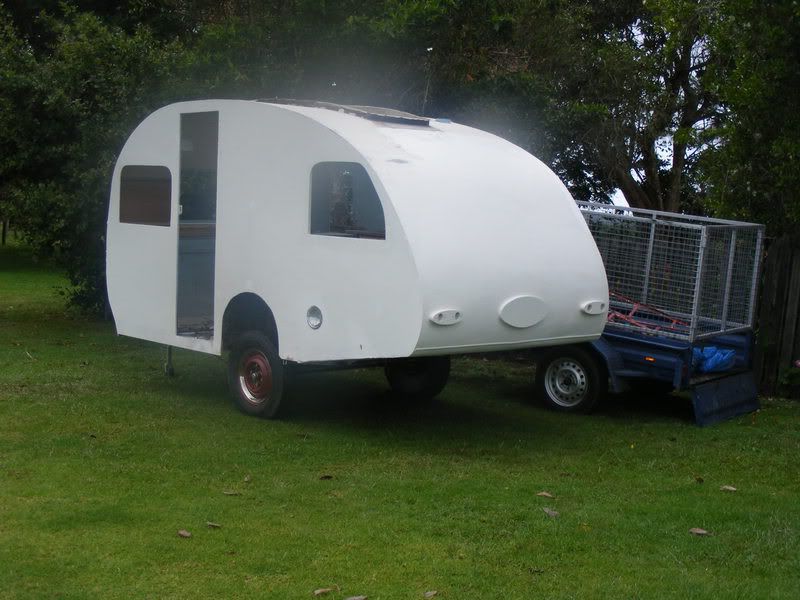 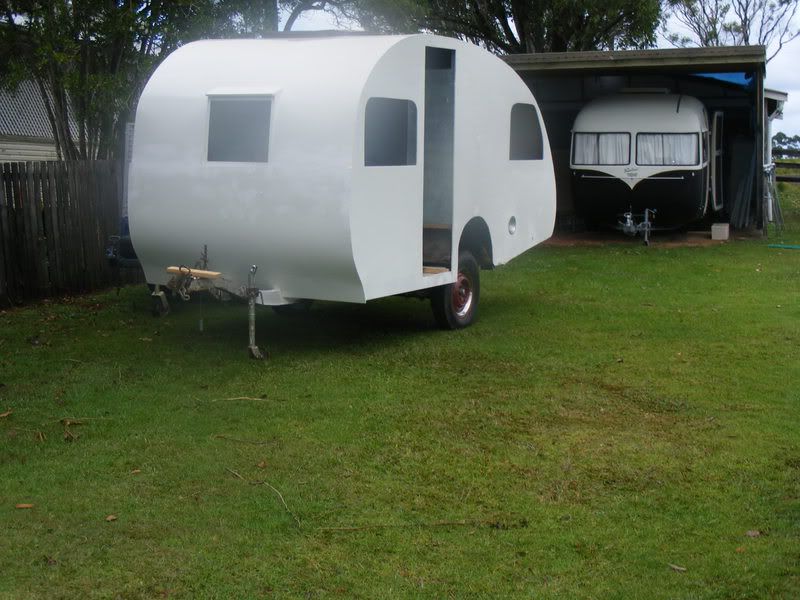 Well I put Lucille back on wheels today. I had some doubts about how high it would sit. But I couldn’t get a new axle assembly other than the Al-Ko ( or similar) that I bought that would fit under the chassis the van has. In reality the existing chassis ends at the axle centreline, so I couldn’t fit a dropped axle & leaf springs, which would have been the only way I could set it down low. The present chassis had nothing to mount the rear of a leaf spring to. I finished welding the chassis rails, to try to cover the crappy way they were, as well as add some strength. 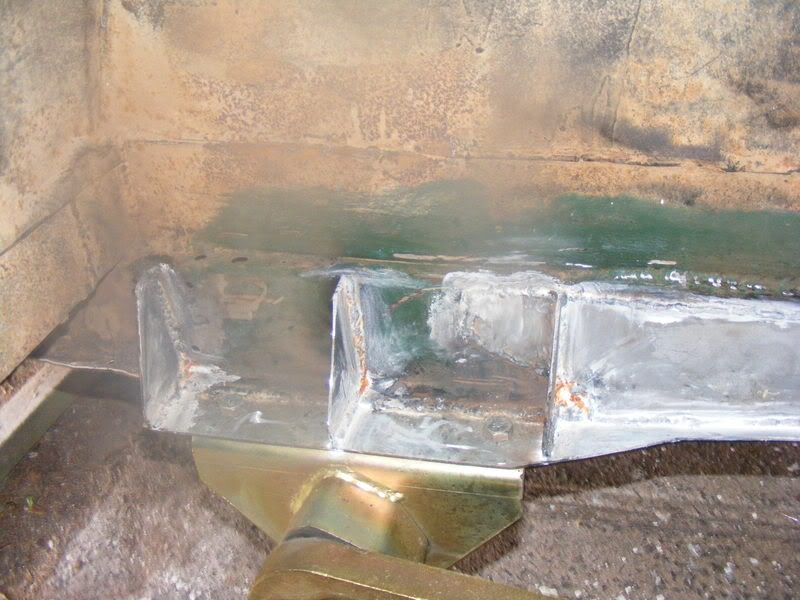  The guy I bought it of ( son of the original builder) brought around the old rego papers a while back. It seems he got it re registered 3 or 4 years ago , & towed it from Blayney where his dad lives, up to here on the North Coast. He kept paying the rego until last year, when he handed the plates in. But I have proof of rego, so don’t have to get it weighed. This leads me to when I had ordered the new axle. The rego paper states tare weight of 740 kg, & gross weight 2000 kg. I think the gross is little gross, but the tare should be reasonably realistic. So I ordered an axle, with the lowest ride height Al-Ko could make, with 900kg loaded weight. When I got it I checked & was told it should deflect around 100 mm maximum loaded, & have 25mm movement on bumps. I got in the van today, I’m close to 120kg, & the suspension deflected about 15mm. The van is basically a bare shell at present I’m hoping that when the new floor, new cupboards, fridge, bed etc are fitted, that it will go down around 100mm. I’ve always expected to have to reconstruct the drawbar to lower the mounting point. I reckon if I install a straight chassis front section, I can make it look like the Chev chassis rails & set the van level behind my dodge. Its just a tad high now, but the shape looks good behind the Dodge. I reckon I can raise the tow hitch around 125mm from where it is without much problems. 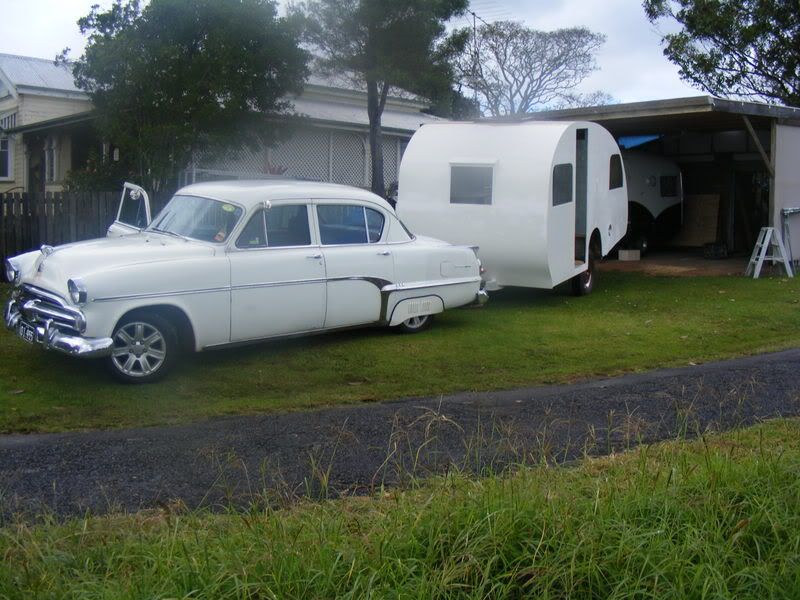 I also had a problem with a D mould across the rear of the body where the ply meets the aluminium under body panel at the rear. No way I could remove it without major surgery. So I made an aluminium bar & polished it, to cover the D mould, & look sorta like a bumper bar. It will be the colour change point, with red under & cream over the bar. 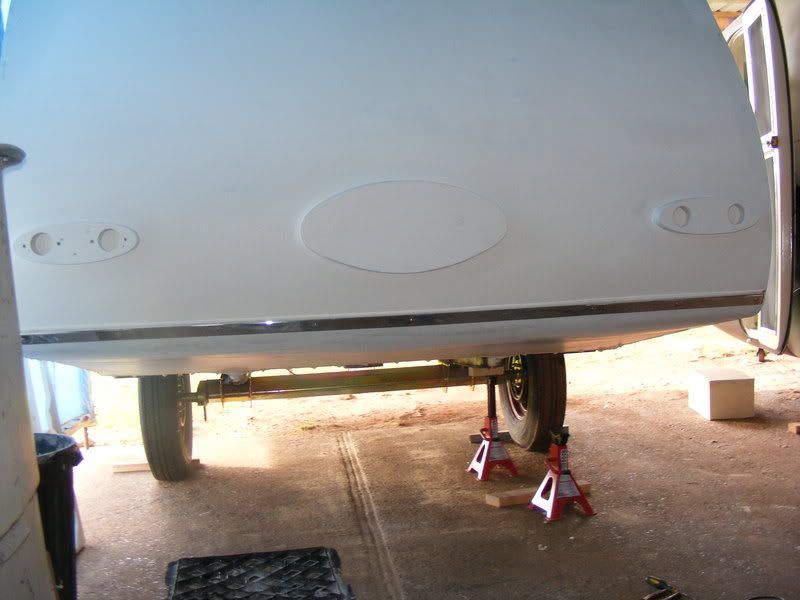 I re arranged the vans in my carport, to allow me to work on the RHS of Lucille. I can now replace the rotten corner, that is visible here in grey.  Jailbarjuice |
|
|
|
Post by Roehm3108 on May 31, 2008 20:13:04 GMT 10
Hi JBJ Comin' on nicely now! That upswept bum is more noticable when the van is outside than when I saw it in the shed. All you need now it put a couple of skid at that bum end, hook it up to my "you beaut" Nissan XTrail and it would be set for the Cape York trip ;D ;D ;D Ray |
|


 .. I have insulted you. Sorry mate i didnt mean to
  . It just looks like that to me.


 ;D
;D


 ...IPEC sux