|
|
Post by ourgirllannie on Apr 2, 2013 14:10:52 GMT 10
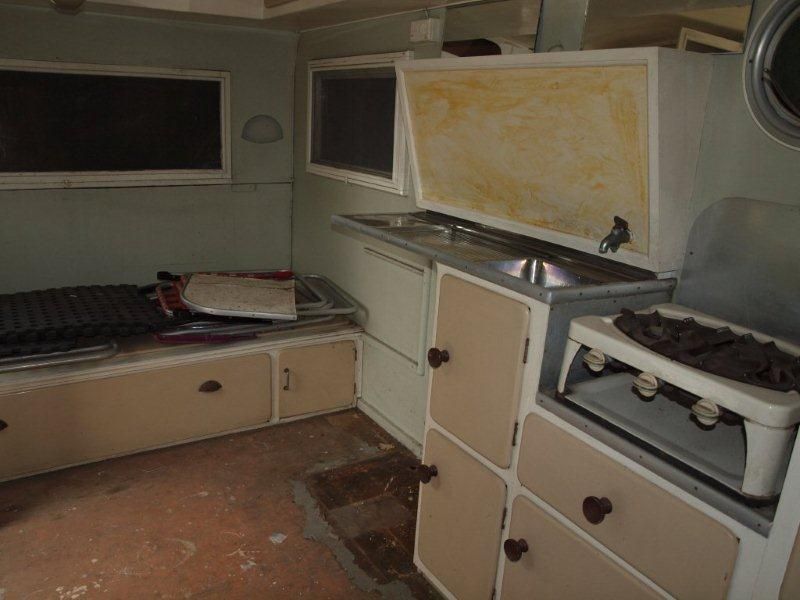
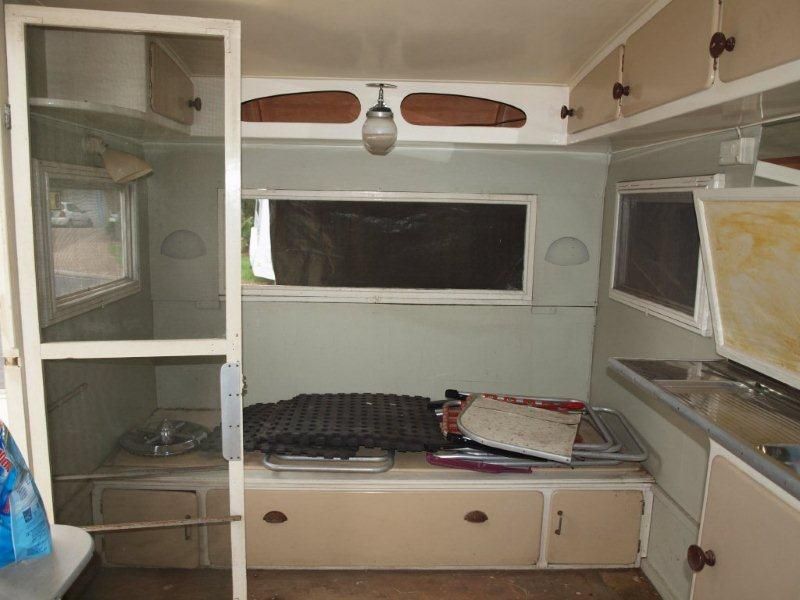
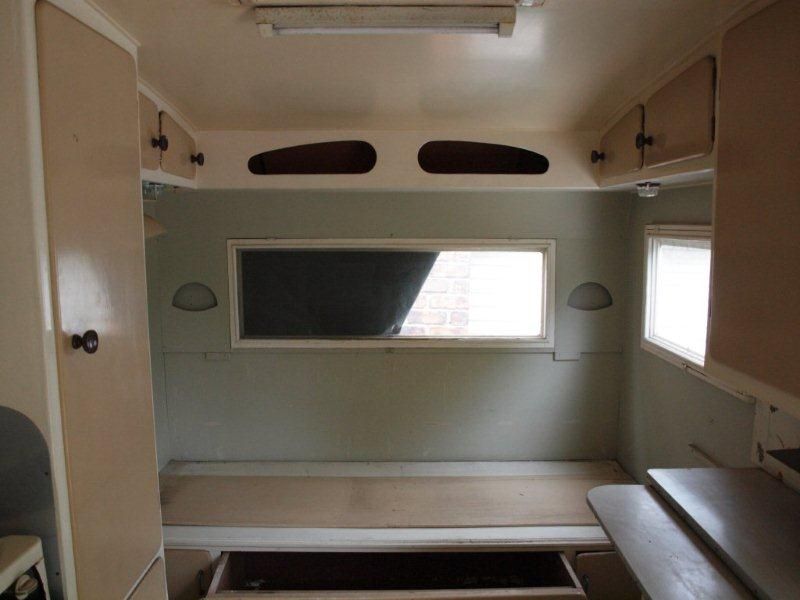
Hi there everyone! I am a newbie vintage van owner and have been reading this website with much excitement and enthusiasm since we bought ours in February. I have been searching to find out what her history is without any luck. I bought her from a guy who had purchased her from a Victorian deceased estate (along with a beautiful 1956 Chev as a package). I am presuming the caravan is homebuilt as there seem to be no numbers or clues of any type on her anywhere (not even welded on to the chassis). I spoke to the rego people in Victoria as there is a rego sticker that is dated 1983, but they could only say that it was last registered in 1993. I presumed it was a 1950’s caravan, but looking at others over the past two months I wonder if it could be earlier? We think she is a gorgeous van, inside and out with beautiful curves all over. We will do our best and hope she comes up like magic!
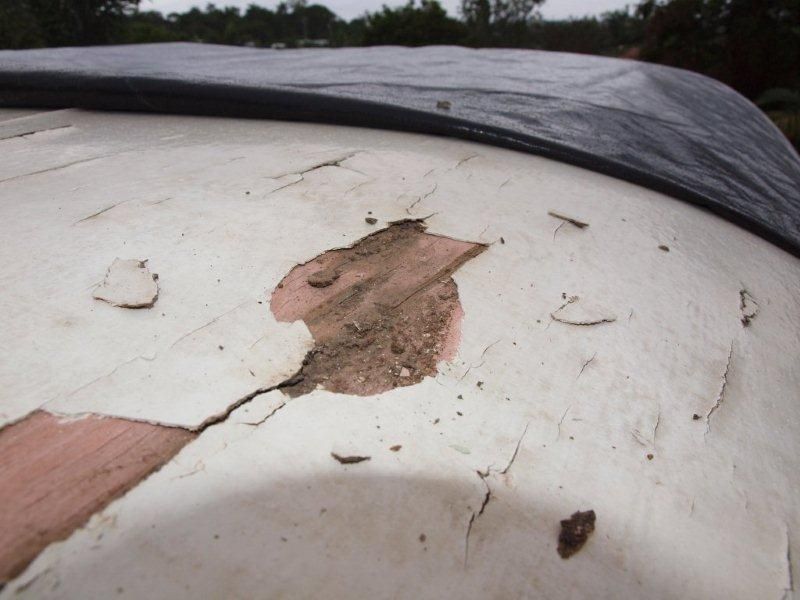
If there is anyone who has an idea, we’d appreciate your input. I am also searching how to restore her roof. The paint is flaking off down to the bare timber in parts, and by the look of the pattern through the paint it did have a canvas (?) liner sealed on at some stage. This is step one on our to-do list. She also lost her vent hole cover on the roof top as we drove her home after purchase. We lost the hinges as well. (The latch was obviously not closed as a haulage truck passed us on the highway creating a vacuum and sucking it right off. Thank goodness no vehicles were struck by the one metre long debris strewn on to the road. Lesson one for new caravan owners). So this is also an urgent repair that we are not sure how to tackle. Other than that she is in pretty good order as far as we can see. Look forward to being a part of your community!
|
|
|
|
Post by ourgirllannie on Apr 2, 2013 14:38:26 GMT 10
|
|
|
|
Post by Roehm3108 on Apr 2, 2013 15:49:27 GMT 10
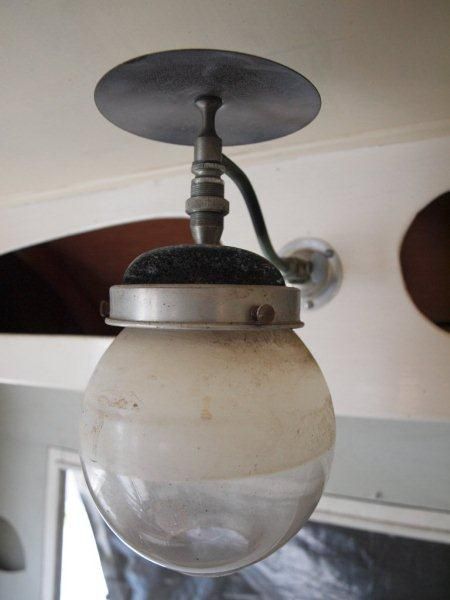
Wow! What a find - and a tow-car to boot  Congrats on your find. I reckon she's home-made, but that beading on the side looks familiar. I think I have seen a similar finish on the site somewhere. Perhaps someone else will remember whose van it is. You have all the desireable bits and bobs on that van - gas light, wall sconses, lovely light fittings, porthole window. Certainly looks to be early to mid fifties. You're being sensible attacking that roof first. A shame you don't have a roof over the whole van yet. Did you manage to salvage the hatch debris?? Would be helpful to use as a template for the new one. It shouldn't be too difficult to build a new one, as long as you get to roof curve into it. Only you can decide how you'll repair the roof. From what you've shown, it looks like the easiest would be to rip off the old ply and replace it with marine ply. My suggestion is that you also put the calico back on for authenticity's sake. With that sort of roof, it's not a difficult thing to do and you'll be pleased you did it, once it's on. Yell out when you're ready to do that. Humpty2 will direct you to his effort, which has great pictures of the steps. Enjoy the experience ;D ;D ;D |
|
|
|
Post by seeshell on Apr 2, 2013 16:12:55 GMT 10
|
|
|
|
Post by Roehm3108 on Apr 2, 2013 18:48:40 GMT 10
That's the one I was thinking of Seeshell!! Ta ;D ;D
|
|
|
|
Post by cobber on Apr 2, 2013 18:50:13 GMT 10
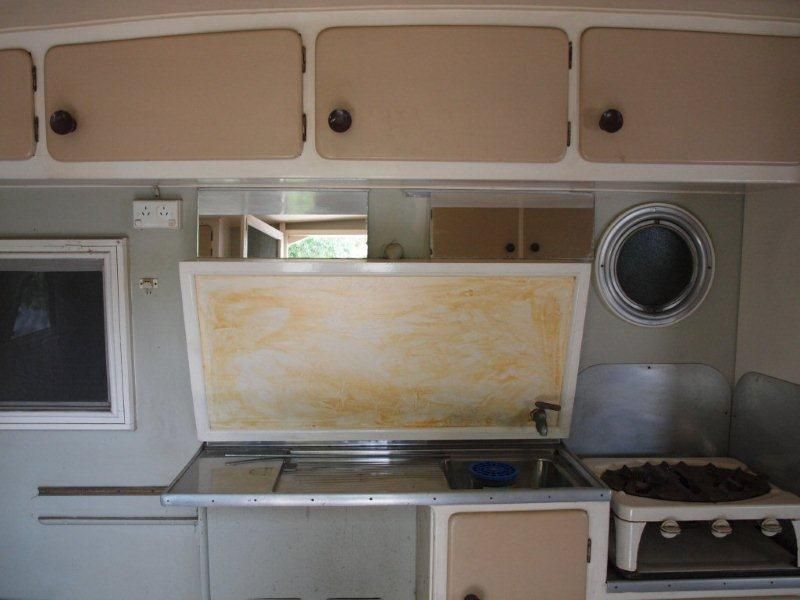
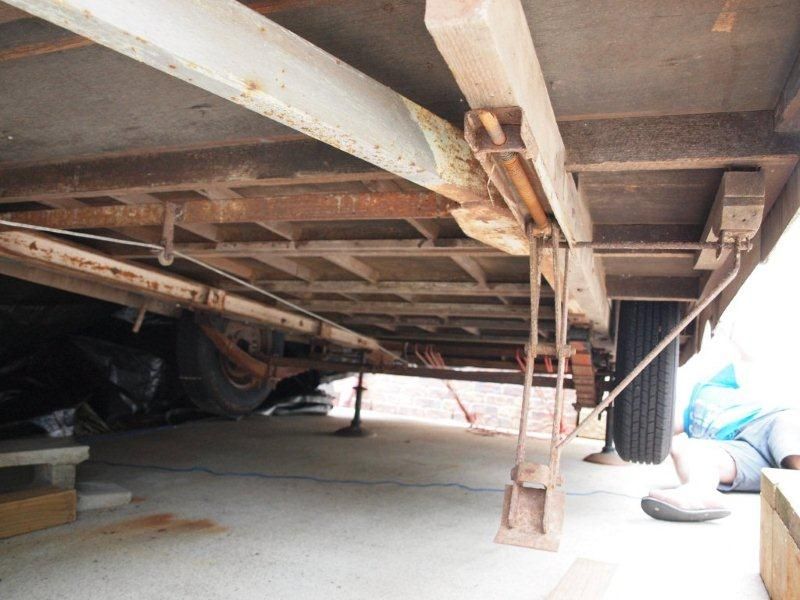
G'day Ourgirlliannie, That is one very nice original caravan, I hope you intend keeping it that way  I think it would be very early '50 or even more likely 1940s .... does it have an ice box, can you show us a photo of it if it does ? ... and a photo of the water tank (which looks like it might be a later addition) .... and the tow coupling Is the chassis all steel or are those timber bearers supporting the floor ? Another van with a similar side stripe is my Newcastle van ( which is really a Carapark van built in 1960 ) but Tend to agree that your van is home made, or possible one built from a kit supplied by    Was your roof hatch as large as the one on my van?..... Lots of questions, sorry Cobber. |
|
|
|
Post by Roehm3108 on Apr 2, 2013 18:56:15 GMT 10
Cobber, you reminded me - it looks like the icebox and drawers have been cut out from under the sink. Perhaps the previous owners had a "modern" fridge there instead? Would look great to build a "new" old icebox there wouldn't it? |
|
|
|
Post by seeshell on Apr 2, 2013 19:03:40 GMT 10
Hi Ourgirllannie
Another interesting feature seems to be the unusual bench seats/beds front and back. A lot of vans have a front (or back) banquette with a table, which doesn't seem to be the arrangement in your lovely van.
It looks as if both the the back and front benches converted to beds by pulling out the large drawer, and laying a plank across it to the supports nailed to the wall. Is that your assessment?
Also appears to have a table that slides out from the side counter opposite the sink - I've seen another van like that, but I can't put my finger on it...
Nifty!
Seeshell
|
|
|
|
Post by ourgirllannie on Apr 2, 2013 22:06:32 GMT 10
Thank you all so much for posting already!! You have made me feel so welcome  . Roehm, we are going to hook up a big tarp before we start the big job. Just waiting for the Brissy Autumn to start, and for the storms to go. From what I have seen and read here today, we will be taking on the calico. We want to keep her as original as we can (whatever that is! ) I wanted to take all the aluminium trimming off and scrape the paint away and give it a good polish, so there will be no excuses now! It was peak traffic when we collected the caravan. We stopped and then went back after we took her home but it was too dangerous to attempt to retrieve it. (I was more worried about the timber being litter all over the highway!!) There wasn’t much left of it. The large ply rectangle was flat into the road and the frame was splinters.  We will just have to start from scratch. My husband is thinking about replacing the hatch with a solar panel. Thank you for the links Seeshell. These have really helped and the roof doesn’t seem so daunting now.  I also thought that this van is unusual in that it doesn’t have a diner at one end. I haven’t seen another one like this yet. You are right too that the drawer pulls out and a piece of timber lies on the top to support the back seat cushion as it becomes part of the mattress. There is a pull out bench in the middle of the van to the right as you go through the door. It has two folding poles to support it. This leaves the caravan with a lot of room inside. 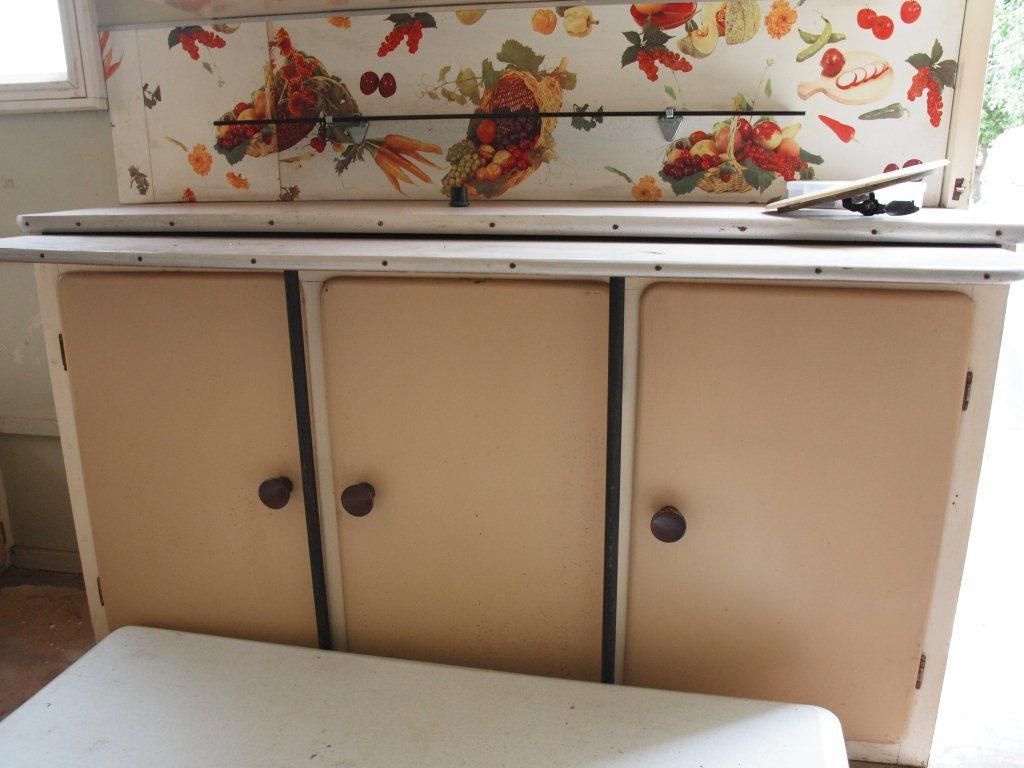 Hi Cobber, She didn’t come with an ice box, just a modern refrigerator (which my husband swiped for his shed). I was looking at getting something old or even old looking. Those Smegs are gorgeous, but cost a fortune and are too tall to fit under the bench (– unless we removed the tank and lifted the bench. (But that creates unnecessary work, and the tank is another unusual feature which I don’t mind at all. 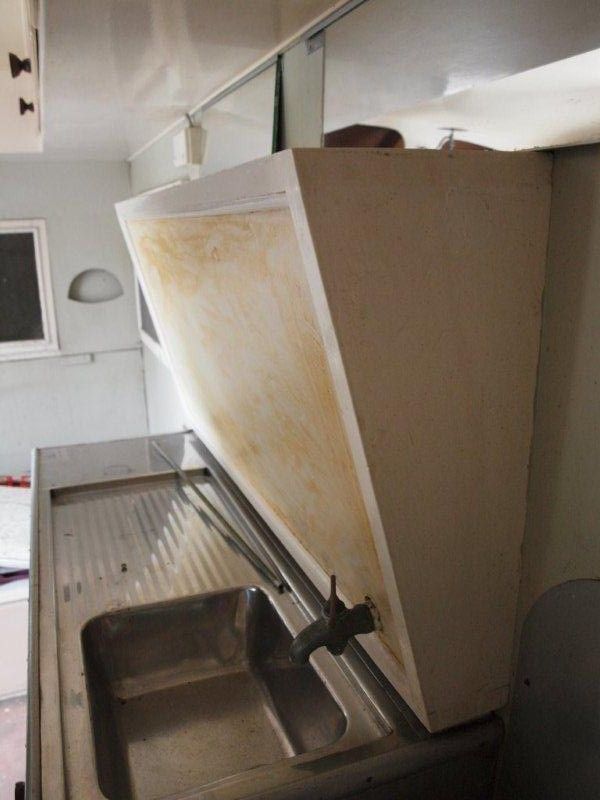 She has a lot of timber underneath; I do have a photo of this but not of the tow coupling. I will take one later and post it up. It is covered in layers of paint! 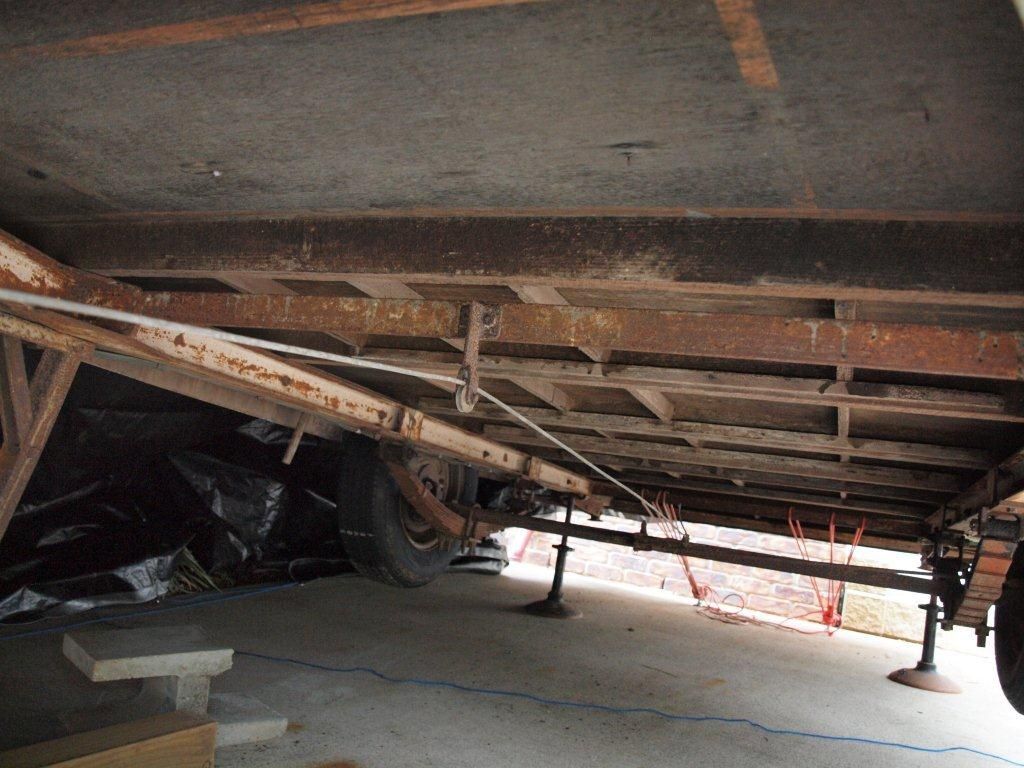 Thank you all so much for joining in on my excitement and for your helping hand with kind words and advice, it’s exactly what I need. |
|
|
|
Post by ourgirllannie on Apr 4, 2013 19:51:57 GMT 10
Hi Cobber, Here is a photo of the tow coupling. I would also think that our hatch would be just a little bit smaller than that on your Newcastle van. Has anyone photographed how they have made a new hatch and hinges? (Finger’s crossed). 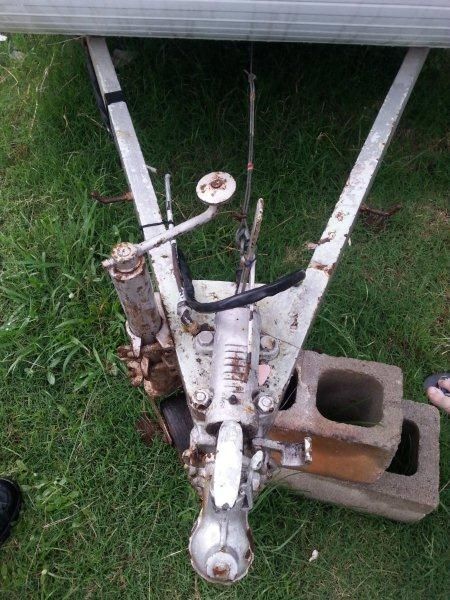 |
|
|
|
Post by seeshell on Apr 5, 2013 7:23:57 GMT 10
|
|
|
|
Post by ourgirllannie on Jun 1, 2013 11:49:44 GMT 10
Hi All, We have been busy on our little van. There seems to be lots of work happening, but doesn't look to others like much progress. It all takes time and we want her to be as perfect as can be. We have taken all the drawers and cupboard doors off and taken out all the hardware, electrics and lighting. Just cleaning was a mission with 60 or so years of built up....oooh what ever it was! But we found many treasures like paper VFL footy tables that had been twisted and used to light the gas light, a receipt from a van park in the 70's (which includes the owner's name and address), many cute curly shaves off the plane and even a pair of ladies silky very vintage knickers!!! Our girl sure has some stories to tell. Right now I have filled the many holes added over the years for lights and extra wiring, undercoated all the bare wood inside the cupboards and drawers, to make it fresh and bright. I have almost finished sanding the gloss and will be painting the undercoat over that next. Then we start with the colour!! Woo hoo! We bought a temporary car shelter and have her covered with that and a tarp and have been scraping off the layers of paint and canvas when the weather is good. It's a slow process, but the timber is looking very good underneath. We have found a small piece of rot and that is behind one of the rear lights. Very lucky as far as rot goes. Have spent a fortune in paint, but have taken advice from other members and are using the Northane paint system on the outside of the van, and Dulux water based on the internal walls and cupboards, but Dulux enamel on the drawers and doors (which I can paint outside). I look forward to the transformation paint brings! |
|
|
|
Post by murray on Jun 1, 2013 13:12:29 GMT 10
You are doing a wonderful job. Hope you are taking plenty of photos.
Really interesting to follow your reno,
Cheers
|
|
|
|
Post by ourgirllannie on Jun 1, 2013 14:35:14 GMT 10
Thanks Murray, We are really enjoying it - and taking loads of photos along the way. I will try and post some recent ones...if I can only work out the upload process again. |
|
|
|
Post by ourgirllannie on Jun 1, 2013 15:32:53 GMT 10
|
|
|
|
Post by Franklin1 on Jun 1, 2013 21:51:27 GMT 10
G'day ourgirlannie, The van is coming along nicely!  Can you tell us a bit more about the laminex that's being sold by the RV people, please? Were you able to look through the sheets and choose what you wanted? In your photo, it seems like it's all stacked on a number of pallets. What if you wanted to look at the stuff on the bottom? What sort of patterns are available? cheers, Al. |
|
|
|
Post by akeepsake on Jun 1, 2013 21:59:32 GMT 10
G'day ourgirlannie, The van is coming along nicely! Can you tell us a bit more about the laminex that's being sold by the RV people, please? Were you able to look through the sheets and choose what you wanted? In your photo, it seems like it's all stacked on a number of pallets. What if you wanted to look at the stuff on the bottom? What sort of patterns are available? cheers, Al. Ditto on that ! Retro laminex count me in Cheers Andrew |
|
|
|
Post by ourgirllannie on Jun 2, 2013 0:18:53 GMT 10
Retro Caravans are in Paling Court in Nerang on the Gold Coast. The contact number is 07- 5596 2846. He's a lovely young guy with a real passion for the old school gear. He has two pallets of laminate sheets. It was very difficult for us to go through the sheets as they weigh a ton, luckily for us ours was close to the top. He was planning on setting it up in a way so going through the sheets would be friendlier. From what I could see there were lots of colours, some with shimmer, but no true red in the pile. He said that there weren't many with patterns as far as he could tell so far. (That was about six weeks ago when we got our patterned blue). If you click on their Facebook page link below it will take you to photos, sheet sizing and prices. www.facebook.com/photo.php?fbid=530561826984387&set=a.530561133651123.113001.519518618088708&type=1&theaterIf anyone has seen the new laminate in Lisa's (from VCM) Betty Page Turner, this was done at Retro. There are photos of her van on the Facebook page too. Hope this helps. The secret's out Retro Caravans! ;D |
|
|
|
Post by akeepsake on Jun 2, 2013 0:50:27 GMT 10
Retro Caravans are in Paling Court in Nerang on the Gold Coast. The contact number is 07- 5596 2846. He's a lovely young guy with a real passion for the old school gear. He has two pallets of laminate sheets. It was very difficult for us to go through the sheets as they weigh a ton, luckily for us ours was close to the top. He was planning on setting it up in a way so going through the sheets would be friendlier. From what I could see there were lots of colours, some with shimmer, but no true red in the pile. He said that there weren't many with patterns as far as he could tell so far. (That was about six weeks ago when we got our patterned blue). If you click on their Facebook page link below it will take you to photos, sheet sizing and prices. www.facebook.com/photo.php?fbid=530561826984387&set=a.530561133651123.113001.519518618088708&type=1&theaterIf anyone has seen the new laminate in Lisa's (from VCM) Betty Page Turner, this was done at Retro. There are photos of her van on the Facebook page too. Hope this helps. The secret's out Retro Caravans! ;D Thanks for that OGL! |
|
|
|
Post by ourgirllannie on Aug 24, 2014 14:02:40 GMT 10
|
|
|
|
Post by ourgirllannie on Feb 9, 2015 23:10:39 GMT 10
Our Lannie is really coming together! We have booked a place at Cooly Rocks On in June - so we are committed, and have to have her ready for then. She is all painted and looking great. The windows are soon to go back in, once I have repainted the hinges. Yayyy! I need to build a new hatch and am looking at buying quadrant stays to lift the hatch, as I can't locate the same as what she originally had. The quadrant ones look nicer though, in my opinion. Can anyone tell me what I should use under the aluminium capping that goes on the edge where the timber meets. I remember reading about a tape? - but I can't find the post. Thank you in advance I will post some new progress photos soon. SO exciting!! |
|
|
|
Post by cobber on Feb 10, 2015 7:23:35 GMT 10
G'day Miranda & Dave, A thread from the dim dark distant past that covers a few alternatives ways of sealing under the edge mould can be found HERE it covers 'Pinking Tape '..Butyl Mastic' ... and 'Sikaflex' For what you want to do, at the stage you are at, van already painted and you just want to attach the mould, I would be going down the Butyl Mastic path You can read what various people think of that product if you click HERE Cobber. |
|
|
|
Post by ourgirllannie on Feb 10, 2015 10:12:57 GMT 10
Thank you Cobber, you really ARE a Legend. Butyl Mastic looks like the way to go. I'll use it under the weather guards that hang above the door and windows too. I'm off to paint the flashing strip red now - am seeing light at the end of the tunnel!! Thank you again Miranda |
|
|
|
Post by akeepsake on Feb 10, 2015 10:43:22 GMT 10
Great work happening here guys ! Looks like you are really having a crack! Well done!
Cobber is on the money with the Butyl Mastic which will give you a flexible seal under your mould!
Keep the picks coming!
Cheers Andrew
|
|
|
|
Post by ourgirllannie on Mar 12, 2015 12:53:33 GMT 10
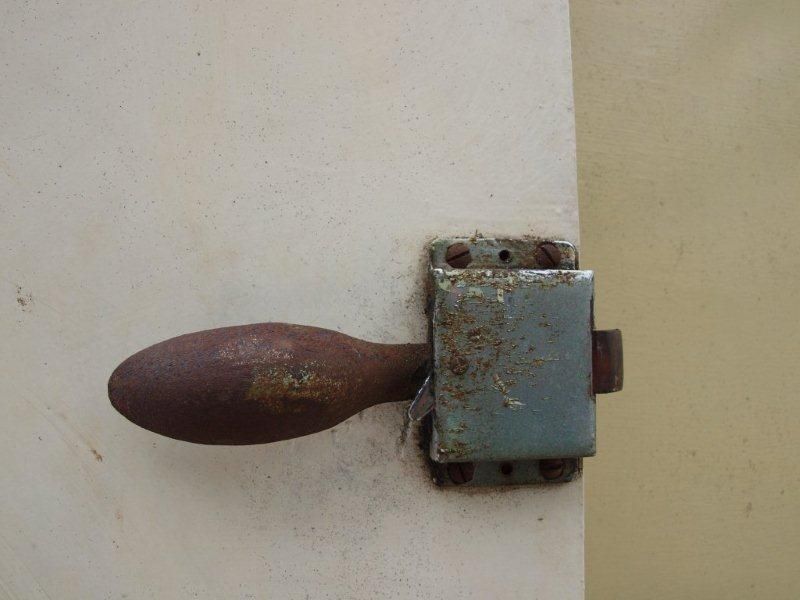
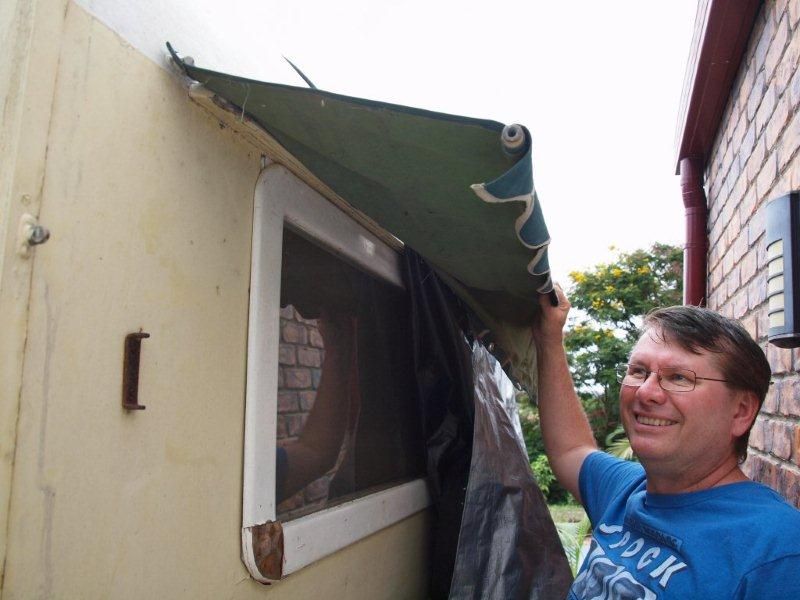
Painted! All but the red flash. The bumper is looking like it was always there. 1957 Chevrolet (after market) brake light Painted the floor - feeling fresh. Lots of paint stripped off the hinges. I'm going to leave them this way, 'ah la natural'. The brass details are lovely, and were a pleasant surprise. Windows and door on - almost at lockup!! (Still a giant hole in the roof, as the new hatch needs to be made). Wheels painted, trip painted and polished too. (Not sure what the wheels are originally from). What lovely surprises lay under all that paint. Is this hitch still legal to use? I think it's 1960's ( SJ Brown - Coburg Vic)Painted with silver hammer-tone to match the newly painted chassis We are making progress. All seems to be coming together now. Unfortunately I have 8 window and door screens that I am now stripping, disassembling, painting and re-screening which seems to take forever! Then we have the electrics to do, the floor to lay and reassembling or reattaching of many things like the skirts, cupboard latches towel rail  , flyscreens, door hardware, vents...the list goes on. BUT she is SO close. I have found an upholster to do the mattresses. They are doing them with two layers of foam, so that one side (soft) is a bed and the other firmer side is for seating. I have selected vinyl for the seat side, but am still undecided on the fabric for the bedding side. I have found someone to do the canvas awning. And with the help of Cobber, will be now able to retain the original Marconi track. I might look at getting another quote for comparison, as I have no idea what this is going to cost. (Just finding someone willing to do this job is hard work! My guy actually told me not to share his name around, and said he does only one of these jobs a year. I don't understand ). Attachment DeletedWe are going to put window awning on the four other windows too. They were originally held out on some kind of strut via this clip that was attached vertically next to the window. (There is a photo in my earlier posts above where Dave is holding out the original window awning (and the only one we have), where you can see it attached to the side of the caravan). I'd like to keep themand use them again, but I have no clue on what the rod looked like. Does anyone else know, or seen it before? Well...I had better get back to work. We are booked in to Cooly Rocks On at the beginning of June, and the months are flying by!! Miranda |
|


 .
.  We will just have to start from scratch. My husband is thinking about replacing the hatch with a solar panel.

 ....
....


 , flyscreens, door hardware, vents...the list goes on. BUT she is SO close.