|
|
Post by Franklin1 on May 3, 2006 23:34:12 GMT 10
G'day All, Today I officially christened my van "Franklin Freedom" in recognition of its Franklin Caravans heritage, and 'Freedom' for my new "open plan" design at the rear (and also for the freedom that vanning brings)...  As you can see, I've done away with all inconvenience relating to doors, locks, misplaced keys, etc. Now I can roll out of bed and immediately be in the Great Outdoors!! ;D ;D The blue tarpaulin in the photo is my new prototype awning, which can be dropped down and tied to the scissor jacks when the weather turns nasty, or it can be extended out and held up with tent-poles to provide shade on a hot sunny day. I'm also in the process of designing a slide-out rear deck which would recede under the van when travelling. Imagine being able to hop out of bed and plop straight into the deck-chair to start the day! Ahhh...This is the life!! This open-plan design has so far required the removal of only about a thousand nails and 300 screws. There is not one bit of glue anywhere to be seen (SLACK!!)... everything is held together with PLAIN STEEL NAILS, which of course after 50 years are all fairly stuffed!! When I start working towards the front of the van, I might end up with a convertible! Now THAT would be the ultimate in freedom...  _________________________________ My condolences to Will and Lyn on the loss of their close relative, Elvis. What a sad ending for such a magnificent van... My thoughts are with you both. _________________________________ Congratulations to Ditzy on her new baby. That is one spectacularly looking van! It looks like it is still in showroom condition! A beauty... _________________________________ cheers to all, Al. |
|
Deleted
Deleted Member
Posts: 0
|
Post by Deleted on May 4, 2006 11:17:22 GMT 10
Hi Al Your open air sundeck concept has already been trialled. Ref: 1960s movies/Ben Hur/ chariots. You could try starting a sequel to "dancing with the stars" and run with "sleeping under the stars" Remember. If the resto becomes too much ya can always get Wills mums partner to come around and torch it for ya. Might pay to give him a few weeks to heal up and get the stitches out. He also Could be a bit reluctant to perform the same trick twice.  Reddo |
|
|
|
Post by Franklin1 on May 4, 2006 22:15:47 GMT 10
Reddo, I wonder how much the old man charges to go arson about?! The fridge in my van is a 1971 Thorn 'Vogue' 240v fridge, still with the R12 gas in it as far as I can tell. It's currently up on the bench in the shed being checked out and tested, but it's working like a bewdy! Not bad for a 35 year old fridge. I can strip a bit more of the internals out of the van and pile them up on the floor and then put the fridge back in. Then get him over here on the June long weekend to reminisce about Cracker Nights of years gone by. I'm about to upgrade my carport to get the van fully under cover, so he could really make whoopee with the van, the carport, and the garage. I'll start filling out the paperwork for the bonfire permit now... (and if Will's old man is reading this, I'm KIDDING mate!! 17 stitches means you must have really copped a hiding from the blast. All jokes aside, I hope all goes well in your recovery and that it ain't too bloody painfull at the moment!) cheers, Al. |
|
|
|
Post by Franklin1 on May 7, 2006 22:10:24 GMT 10
Today's THRILLING instalment in the restoration of "Franklin Freedom"... Back when I bought the van the seller pointed out the sag in the roof, but said it didn't leak. No worries, I said. It's probably just sagging of the ceiling joists over 50 years (unsupported over 2 metres width, plus the weight of the hatch)...  But on Friday when I stripped back the vinyl lining covering the ceiling, this is what I found...  So, one more challenge to overcome! But wait!! There's more..! I was also told the van had been rewired for 15 amps. Oh, very good, I says. Then that's one thing I don't have to worry about. Not so! This photo shows the new socket, and the power board inside the van, as purchased...  All looks pretty neat and tidy, eh? But now let's look behind the scenes...  This is absolutely disgraceful!! Whoever did this wouldn't even make a Sparky's a-hole. I don't need any outside help to torch this van... it was wired to potentially self-ignite!! (Me and me best mate, "Hindsight", were sitting on the floor of the van on Friday and wondering how we could have discovered all the problems this van has at the time of sale. With all the cladding and coverings, we realised it would have been 'bluddy' difficult to get into every area for a full inspection.) The further I go with this van, the more I'm resigned to doing a full rebuild. One consolation of this is that it will satisfy two goals I had in life: One was to get an old van and do it up, and Two was to build a new plywood van completely from scratch. I'll combine the two goals in this project and re-use as much of the existing material as I can, and then re-new where necessary. "Franklin Freedom" will rise again, and be ready for the next 50 years!! I'll keep you posted... cheers, ( through gritted teeth) Al. |
|
|
|
Post by andrew on May 23, 2006 15:52:00 GMT 10
G'day Al,
Don't give up mate. I have just found that there seems to come a point when you really realize just how deep you have sunk in the smelly brown stuff and that you have to go to the lowest point you can ( seems to be the chassis) then you can start to come back up.
Good luck with the project and remember that a few quite contemplatories don't go astray.
Regards Andrew
|
|
|
|
Post by bigdidda on May 23, 2006 17:21:41 GMT 10
Hey, Al,
Buying old vans are like buying old houses.
If everything looks great,REWIRE.REWIRE.REWIRE.
You can almost guarantee that the wiring will make you hair curl
and that is BEFORE you switch on.
Best wishes,don.
|
|
|
|
Post by Franklin1 on May 23, 2006 23:14:38 GMT 10
Thanks for the encouragement, guys! Haven't been on the forum lately as I've been working my a*** off re-building my carport so the van can fit under cover. I built the carport about 15 years ago out of hardwood and when I lifted the pavers and shovelled the sand and gravel out of the way, the post were only about 2" diameter. Dunno what was still holding it up!! Spent last week dismantling the whole lot and starting from scratch again. This week, new posts are in and being painted. Roof will be raised 350mm higher to give some room above the van. Still plenty of work to be done, so the van is sitting out in the cold and rain at the moment (serves itself right!). Have stripped the inside of the van and found further woodrot beside the door and down at the bottom of both front sides. No doubt about it... this WILL be a full reno. Have been on the internet to find info about steam-bending timber. Got myself a 'brand new' pressure cooker from the Salvo's for $8 (1982 model - never been used - bargain!) Going to make up a steam box to bend the framing timber. In the meantime, I've been scrounging around various places for stuff that might be useful for the van. We've got three Bunnings stores in our area and they are always putting stuff on clearance, so I've got some lights that were made in Italy, originally $30 - down to $5; some 'old' push catches to match the existing ones on the doors, originally $20 each - down to $5; various other bits of hardware that was originally up to $12 - down to 50 cents/ $1. I've got heaps of stuff from the local Recycling Centres. Got me a really old hopper window for $10 with the most amazing old opaque glass with a basket-weave pattern in it. The dimensions are ideal for the rear window of the van, so I just need to make a lighter timber frame for it. Also got some stainless steel mesh to replace all the rusted flyscreens. Mesh is so fine a mozzie's DNA wouldn't fit through it! Got 10 curtain tracks for $2.56 each, on clearance at K-mart, originally about $16 each. Got some fleecy cotton fabric with a "Rock and Roll" words/guitars pattern on it, on clearance at Spotlight for $1.20 a metre. (Will be used for cushion covers and pillow slips.) ...the list is endless! ...the bargains are just rollin' in!!! ps. Also had 'new' tail lights and reflectors donated by lisian (Ian) from the van he purchased (what a Champ!) So all in all, it's lookin' like it will be one hell of a cheap reno, but a classy one nonetheless. My only complaint at the moment is that I can't use a power saw at 1am... ;D Catch yers... Al. |
|
Jim
New Member

Posts: 2
|
Post by Jim on May 25, 2006 12:26:32 GMT 10
Hi Al Your approach of combining two projects into one project is to be commended and should be required reading for all the dummy spitters around today who put on a hissy fit the moment things don’t go exactly the way they think they should. It’s also good to see that another scrounger is alive and well. Just think, if it wasn’t for all the magpies and bower birds, who can’t resist a bargain, all that stuff would probably end up in the tip. (As it is, it will probably be our kids who will have the job of deciding what to do with the collection when the big day comes.) That wiring is dreadful, it’ll pay to have it done properly and know it’s safe with a proper safety switch and earth leakage switch. But about this timber steam bending thing you’re contemplating.. I’d be the first to admit my woodworking skills are sadly lacking, but I’ve read on here a number of times how people have made curved sections by laminating strips of ply. It would seem to be easier to laminate curved ply than try to steam bend timber sections and you’ll get exactly the profile you want.. There are descriptions and pictures in previous threads – I just can’t find them at the moment. Maybe retro or someone who has previously put up info about the method can post the links. Here are some pictures from the UK showing curved sections being fabricated in a jig to fit into a restored caravan and how the pieces fit. The same principle would apply with longer sections laid around a mark out on a large board. Some time ago someone put up pictures showing curved sections on a large board using 6mm strips laminated together. I’ve also recently seen 9 ply sheet (about 18mm thick), profile cut to a tight curve and laminated sideways to make a load bearing frame. 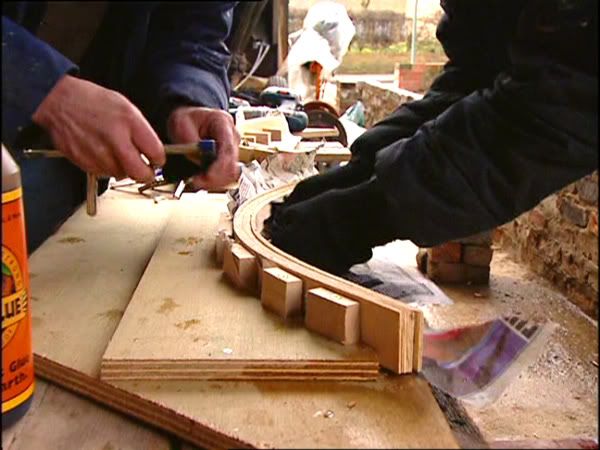 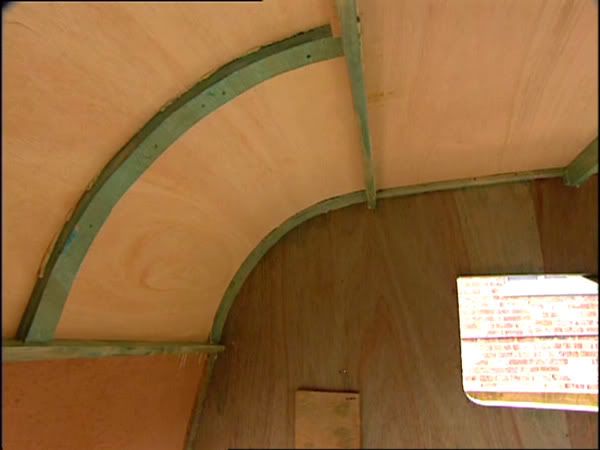  |
|
|
|
Post by Franklin1 on May 25, 2006 22:42:32 GMT 10
That's certainly some pretty interesting information you've posted there, Jim. I guess from all the years I've been restoring old furniture, I have a hankering to match how the timber was originally. I did post a request for timber info here... vintagecaravans.proboards30.com/index.cgi?board=technicalstuffboard&action=display&thread=1146146164and got some useful info about laminating ply. It seems that steaming is an old method not used much these days. I asked my son, who is a carpenter, what he learnt about steaming timber in his apprenticeship, and the answer was 'zip'. He only knows about 'kerfing' timber to bend it around corners. Anyways, I'm gonna push on and have a go at steaming. If it proves to be too hard, I'll go to Plan B and laminate some ply. If it works and is relatively easy to do, then I'll be able to charge more as a 'Vintage Caravan Consultant' ps. Got 4 small sliding doors yesterday from the Recycle Centre. Looks like they're from an old china cabinet. Made of oak, and have a very interesting patterned opaque glass in them. Frames will be ideal for replacing the windows in the front of the van. Glass will be ideal to complete an old kauri pine kitchen cabinet I'm restoring. The things people throw out...  Al. |
|
rodp
New Member
Posts: 30
|
Post by rodp on May 26, 2006 11:04:06 GMT 10
Hi all, I have had some experience steaming timber for boat ribs.It's not easy.I imagine it would be very difficult to get the desired amount of bend as the timber would straighten out to some degree once removed from the jig.This is not a problem with a boat rib as it is held by the stringers.
regards, RodP
|
|
|
|
Post by trodler on May 26, 2006 16:26:39 GMT 10
Hi Al
Timber bending is not as easy as it sounds, as you will need a continious stream of steam and not just hot water to bend the timber and it will need to be steamed for at least an hour.
Just a thought. You could try a steam cleaner conected to the end of a pipe that is big enough to put the timber inside while steaming with the end blocked off with a rag .
I have heard of a bloke in Sydney some where that still does steam bending, a friend of a friend had some hood bows bent for his vintage car.
Cheers.
Trodler.
|
|
|
|
Post by Franklin1 on Aug 11, 2006 12:40:41 GMT 10
G'day All!!! I'm baaaaaaaaaaaaack!! (Well, at least temporarily...) Gees, I've been busier than a rat at the annual Garbage Festival!! ;D When I bought the 'new' van home at Easter, I could only fit the back half of it under the carport. The hatch was too high for the rafters. Since the carport was over 20 years old and falling apart, there was only one thing to do... a knockdown and rebuild. So we went from this...  ...to this...  ...to this...  ...and there's still some work to be done to finish it off. But not bad for an ol' fella, eh?! Did it all myself (son helped with putting the roofing sheets on) from designing to cutting to painting to erecting. (Yeah...I know...I still goddit... ) Only disaster in the whole job was the day I dropped five litres of paint from the top of the ladder onto the pavers below. Not a pretty sight...and certainly a major drama with only 15 minutes to go before sundown! Had to invoke some emergency amendments to current water restrictions!! But now, "Franklin Freedom" is fully under cover, with some breathing space around her for when I get back to the 'reno-storation' (that's a cross between a renovation and a restoration, heh heh ) I bought one of these gizmos...  ...made it heaps easier for this ol' codger to manouvre the van around the pavers while the carport was being built around her. Got it from the local Engineering Supplies shop...$49 on special. Saves this fella's back from suffering any further strain!! The van is now just a shadow of its former self. I gutted the insides back in May, and haven't touched it since while I concentrated on other projects. I've received information on steam bending from the Timber Development Association, and I plan to experiment with that process once the weather warms up a bit. Hoping to have everything sorted out ready for Coledale 200? I was also getting on with cleaning and sorting out the garage to get some working space back again. Unfortunately, the local timber and hardware shop closed down recently after 33 years, and had a "40% off everything" sale for the final 3 weeks. So my Visa card copped a real hiding, and I've now filled the garage back up with enough stuff to build another 3 carports and 6 caravans!!! (D'oh!) I've also been VERY active on e-bay, buying magazines and books to help me in my research of caravans in the late fifties and early sixties. I now have a TRUCKLOAD of information, advertisements, stories, plans, etc, etc. Haven't worked out what to do with it all yet, nor how to make it available to this website for sharing and preservation, but I'll sort that out eventually. Anyway, gotta go paint some more timber. Making another set of shelves for storage in the garage. It just never ends... And you wouldn't believe it!!...after nine months of 'retirement', I've been contacted to go back to full-time work for maybe six months. Starting back on Monday. Everything else now goes into the 'pending file'... (Dilemma: money...caravan resto...money...caravan resto? Decisions, decisions!!) Good to be back with you all again... See you soon!!! Cheers, Al. |
|


