


1967 Franklin Caravelle Resto finally complete!
Sept 14, 2020 17:00:55 GMT 10
cobber, brucenan, and 3 more like this
Post by caravelle67 on Sept 14, 2020 17:00:55 GMT 10
Huge thanks to those who posted photos and tips on their restorations - it set me on the right path for this. We bought our 14 foot 1967 Franklin Caravelle in 2013 and used it on our block of land for 6 years. Last year at Easter I brought it home to rebuild and get ready to get on the road. Finally made it ; ). We also have a 1970 Airstream we are renovating and have set up a blog for both if you are interested in more details on the process here: vintagecaravanlife.com.au/ . But photos below of where we started and where we ended up ; ).
Original chassis number is 2297-7.
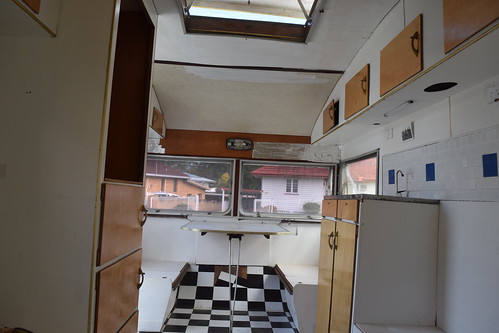
The previous owner had some dubious style choices we had to strip out when we first bought it - and we could tell at the time there was rot in the front and rear plywood and the ceiling, but didn't really know then how bad it was.
In the beginning:
 IMG_0341 2 by Meredith Dwyer, on Flickr
 Untitled 5 by Meredith Dwyer, on Flickr
The interior cupboards had been hacked about, but we cleaned it out, and turned it into a usable space to start with.
 DSC_1394 by Meredith Dwyer, on Flickr
 DSC_1386 by Meredith Dwyer, on Flickr
When we brought it home last year and I started to take the aluminium siding off, the scale of the problem became apparent. The side ply was rotten 2/3 of the way up. The timber base plates at the wall had rotted away to nothing so the walls had actually settled an inch or two. The floor cross beams were eaten out. The floor was spongy. Window sills were rotten. End timber blocks at the top of the walls on the ends were rotten. The ceiling ply was rotten....you get the idea...
 IMG_6788 by Meredith Dwyer, on Flickr
 IMG_6770 by Meredith Dwyer, on Flickr
 IMG_6769 by Meredith Dwyer, on Flickr
 IMG_6772 by Meredith Dwyer, on Flickr
 IMG_6771 by Meredith Dwyer, on Flickr
It kind of became a giant game of jenga, replacing one bit at a time so the whole lot didn't fall apart. And all work done under a tarp on the front lawn as we didn't have a shed.
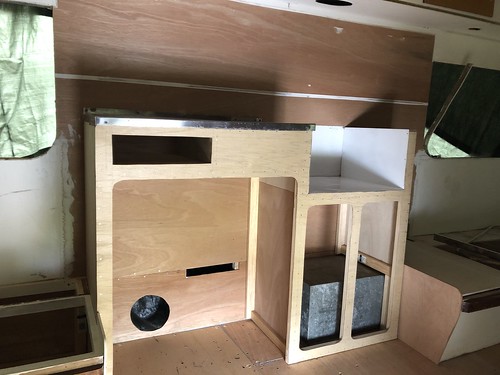
In the end, it now has new timber floor beams, new floor ply, new front and back end ply, new ply and framing 2/3 the way up each side, new ceiling ply, built a new kitchen cabinet, managed to save and reinforce the floor lockers. Oh and the drawbar was rusted out, so new drawbar, brakes, axle and wheels. I wire brushed and painted all of the original window fastenings, pulled all the windows apart and put new seals in. Here's some of the build process:
 IMG_0188 by Meredith Dwyer, on Flickr
 IMG_8931 by Meredith Dwyer, on Flickr
 IMG_3537 by Meredith Dwyer, on Flickr
Had to do the ceiling one panel at a time...
 IMG_2105 2 by Meredith Dwyer, on Flickr
 IMG_1381 2 by Meredith Dwyer, on Flickr
 IMG_1807 by Meredith Dwyer, on Flickr
 IMG_3164 by Meredith Dwyer, on Flickr
 IMG_3310 by Meredith Dwyer, on Flickr
 IMG_8821 by Meredith Dwyer, on Flickr
 IMG_3986 by Meredith Dwyer, on Flickr
 IMG_7788 by Meredith Dwyer, on Flickr
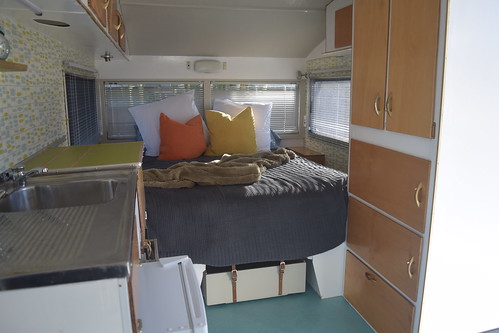
It's now completely rewired, and we've installed a mini-fridge. We made the fridge space over-sized so we can put an esky in there instead if we are going off grid. Rooftop solar installed. And we put a portable toilet in the front kerbside locker so we don't have to dash across the camp ground at night. We put wallpaper on the ceiling as it was the closest we could get to the original finish and some on the walls as well. The floor is marmoleum. Reconfigured the bed so we don't have to crawl over each other at night ; )
 bedroom by Meredith Dwyer, on Flickr
 dining by Meredith Dwyer, on Flickr
 IMG_1516 by Meredith Dwyer, on Flickr
 bath by Meredith Dwyer, on Flickr
 fan by Meredith Dwyer, on Flickr
We still have the original stove but are going to use our Weber for cooking....so we repurposed the original stove space (still had the tin liner so it could be converted back).
 cabinet by Meredith Dwyer, on Flickr
 IMG_8210 by Meredith Dwyer, on Flickr
 IMG_4052 2 by Meredith Dwyer, on Flickr
 Hula by Meredith Dwyer, on Flickr
 Profile by Meredith Dwyer, on Flickr
Roadworthy, re-registered and off for its first trip this weekend.
Original chassis number is 2297-7.
The previous owner had some dubious style choices we had to strip out when we first bought it - and we could tell at the time there was rot in the front and rear plywood and the ceiling, but didn't really know then how bad it was.
In the beginning:
IMG_0341 2 by Meredith Dwyer, on FlickrUntitled 5 by Meredith Dwyer, on FlickrThe interior cupboards had been hacked about, but we cleaned it out, and turned it into a usable space to start with.
DSC_1394 by Meredith Dwyer, on FlickrDSC_1386 by Meredith Dwyer, on FlickrWhen we brought it home last year and I started to take the aluminium siding off, the scale of the problem became apparent. The side ply was rotten 2/3 of the way up. The timber base plates at the wall had rotted away to nothing so the walls had actually settled an inch or two. The floor cross beams were eaten out. The floor was spongy. Window sills were rotten. End timber blocks at the top of the walls on the ends were rotten. The ceiling ply was rotten....you get the idea...
IMG_6788 by Meredith Dwyer, on FlickrIMG_6770 by Meredith Dwyer, on FlickrIMG_6769 by Meredith Dwyer, on FlickrIMG_6772 by Meredith Dwyer, on FlickrIMG_6771 by Meredith Dwyer, on FlickrIt kind of became a giant game of jenga, replacing one bit at a time so the whole lot didn't fall apart. And all work done under a tarp on the front lawn as we didn't have a shed.
In the end, it now has new timber floor beams, new floor ply, new front and back end ply, new ply and framing 2/3 the way up each side, new ceiling ply, built a new kitchen cabinet, managed to save and reinforce the floor lockers. Oh and the drawbar was rusted out, so new drawbar, brakes, axle and wheels. I wire brushed and painted all of the original window fastenings, pulled all the windows apart and put new seals in. Here's some of the build process:
IMG_0188 by Meredith Dwyer, on FlickrIMG_8931 by Meredith Dwyer, on FlickrIMG_3537 by Meredith Dwyer, on FlickrHad to do the ceiling one panel at a time...
IMG_2105 2 by Meredith Dwyer, on FlickrIMG_1381 2 by Meredith Dwyer, on FlickrIMG_1807 by Meredith Dwyer, on FlickrIMG_3164 by Meredith Dwyer, on FlickrIMG_3310 by Meredith Dwyer, on FlickrIMG_8821 by Meredith Dwyer, on FlickrIMG_3986 by Meredith Dwyer, on FlickrIMG_7788 by Meredith Dwyer, on FlickrIt's now completely rewired, and we've installed a mini-fridge. We made the fridge space over-sized so we can put an esky in there instead if we are going off grid. Rooftop solar installed. And we put a portable toilet in the front kerbside locker so we don't have to dash across the camp ground at night. We put wallpaper on the ceiling as it was the closest we could get to the original finish and some on the walls as well. The floor is marmoleum. Reconfigured the bed so we don't have to crawl over each other at night ; )
bedroom by Meredith Dwyer, on Flickrdining by Meredith Dwyer, on FlickrIMG_1516 by Meredith Dwyer, on Flickrbath by Meredith Dwyer, on Flickrfan by Meredith Dwyer, on FlickrWe still have the original stove but are going to use our Weber for cooking....so we repurposed the original stove space (still had the tin liner so it could be converted back).
cabinet by Meredith Dwyer, on FlickrIMG_8210 by Meredith Dwyer, on FlickrIMG_4052 2 by Meredith Dwyer, on FlickrHula by Meredith Dwyer, on FlickrProfile by Meredith Dwyer, on FlickrRoadworthy, re-registered and off for its first trip this weekend.


