

Post by Don Ricardo on Aug 16, 2018 20:37:38 GMT 10
This thread was recreated after the original thread was unintentionally deleted.
Post by Reddo on 3 September 2008:
Hi Guys.
I got a "pm" request from "Wildmanaus" the other day.
he was asking if i could chase up an overhaul kit for a fynspray pump for him.
I have just ordered one from Bias boating market at Belmont NSW....... None in stock but should be in within 7 to 10 days.
Kit costs $28.90 if anyone is chasing one. The one kit fits all sized pumps. There is about 4 different diameters and neck hieghts. But they assure me the same kit fits all.
If anyone get real fair dinkum and wants to buy a new complete pump then the chrome over brass pump part number is...
RWB70B...... wasnt game to ask what they where worth !!!!
So part is ordered and paid for Wildy. I will collect it and bring it to Coledale.. we might have a DYI morning and do a rebuild on your leaky pump...
Reddo
Post by Reddo on 6 September 2008:
Hello Wildmanaus..
Kit has turned up. i collected it yesterday from Bias.
As a matter of interest for those wandering what a new chrome over brass fynspray galley pump is worth ......
I made an enquiry while i was picking up Wildys rebuid kit...
Are ya sitting down.... Good...
  ..How does $248.90 effect ya bank account.
Heres me blowin' up that i paid $30 and $12 postage from QLD for the oversized pump in Rosie.......... worth thier weight in gold.
Reddo
Post by Franklin1 on 22 December 2013:
Having just spent some time refurbishing the Fynspray pump in my van, I thought I would collect all the relevant information about Fynspray pumps and post it into this thread.
Pump designs...
At first glance, all these pumps "look the same". It is only when you look at them closely that you realise there are subtle differences in the shape of the housing, or in the shape of the pouring spout, or even in the design of just the handle. Here are some photos I've collected from the forum:
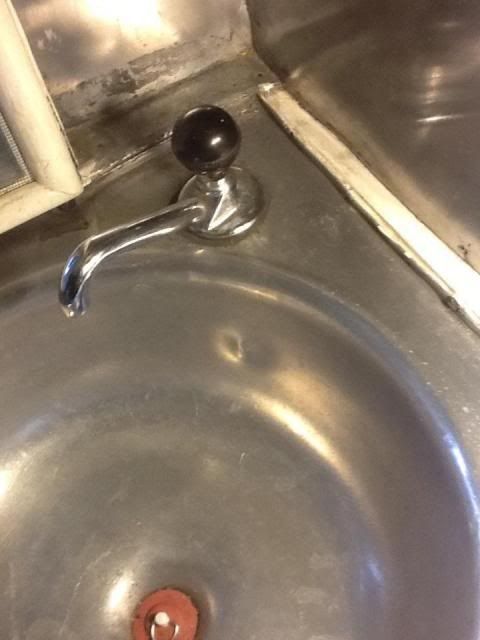
the pump in reddo's Rosie:
another pump posted by reddo:
a pump posted by stevej:
a pump posted by hilldweller:
the pump in my Newcastle van:
If all the above pumps are the Fynspray brand, there seems to be an awful lot of different designs for the one brand. Why would there be so many different "models" or versions? Maybe someone other than Fynspray was making these pumps as well??
------------------------------------------------------------------
How do they work?...
The basic operation of these pumps is that when you raise the plunger you suck water up into the pump housing, and when you push the plunger down the water in the housing is forced out of the spout into the sink. Pull up - suck water up; push down - spurt water into sink. There appears to be at least two different methods of how the sucking and spurting works. One uses a captive ball stopper method to open and close the outlets as you pump the handle, and another uses a tap washer type arrangement. One also has a cupped leather or nitrile washer at the bottom of the plunger, and the other uses a flat nitrile washer.
An example of the ball stopper type of pump, with the cupped leather washer, is the one hilldweller has...
This diagram shows the inner parts of the captive ball design...
The other method of making these work is to use stopper valves that look similar to tap washers, plus have a flat nitrile washer on the bottom of the plunger, as is shown in the tap in my Newcastle van...
----------------------------------------------------------------
Repair and maintenance...
Fynspray pumps are made and marketed by White Star Products in New Zealand ( www.whitestarproducts.co.nz/ ). The model number closely associated with the vintage taps we come across is the WS62 model (or W.S.62).
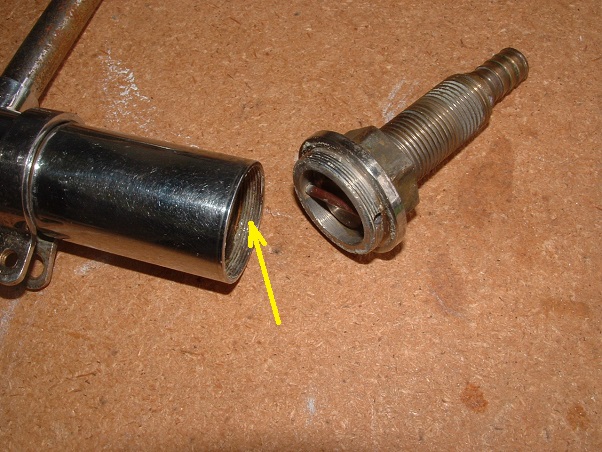
Before buying any replacement kits for your pump, I think you need to be sure they will fit the internal diameter of your pump housing. I honestly don't know what the standard internal diameter of a Fynspray pump is (if there is such a thing as a 'standard diameter').
For interest, the internal diameter of my 'Newcastle' van pump is 11/4"...
You can read all about the method for replacing the cup washer from the following information copied from the White Star Products website ( click here ):
WS62 - Repair Instructions
Please note: After receiving feedback from you our distributors, White Star Products have carried out a small improvement to our WS62 Classic Brass lever pump.
Main concerns were the sticking problems associated with the drying out of the leather cup washer when the pump was used infrequently.
After experimentation and testing the decision was made to replace the leather cup washer with a Nitrile alternative as it provided improved pumping performance and alleviated the leather washer problems.
From June 2011 all WS62 Hand pumps will be supplied with "Nitrile rubber" plunger washers.
We now offer a conversion kit (WS62/22) for retrofitting, upgrading the older leather washer versions. The conversion kits consist of a Brass valve seat and backing washer:
All Service kits will now include the Nitrile cup washer: WS62/17A
[Repair/Sevice kits can be purchased from a ship's chandler or boat spare parts shop, such as BIAS boating, who have stores in Qld, NSW, NT, and WA.]
Important: To replace a leather cup washer version you will need both a conversion kit WS62/22 and a Service Kit WS62/17A
Leather cup washers will no longer be available after current stocks run out.
All new WS62 pumps will be supplied with the new Nitrile cup washer.
To fit the Conversion Kit (#10A & 12A ): Discard existing part #'s 10 & 12 [See all these part numbers in the diagram below]. Replace with new part #'s 10A & 12A.
N.B.
1) Make sure to fit part #11A first before threading part #10A hard up to shoulder of part #12A.
2) Use Loctite to attach valve seat to plunger.
To replace the leather plunger washer (#11) or nitrile plunger washer (#11A): Unscrew the spout body & spout assembly (#14) from the barrel assembly (#15). (As sealant has been used on the thread, run the spout body under hot water and then tap it gently with a soft-headed mallet or a piece of soft wood. Place the pump vertically in a bench vice, gripping the barrel assembly below the flange.) DO NOT use too much force on the spout & DO NOT use any tools as they may cause damage to the barrel. The complete handle & plunger assembly can now be removed. By holding the plunger valve body (#13) in a bench vice, the valve seat (#12) can be unscrewed, enabling the Leather or Nitrile cup washer to be replaced.
To replace the felt packing (#18) & quad ring (#20) on Mk 2 model: The complete plunger valve assembly must be removed from the plunger tube (#8). Take care when fitting the quad ring so as not to damage its inside edge.
If your pump is not leaking at the gland, there is no necessity to replace either of the above.
Key words for search function: fynspray galley pump; hand pantry pump; lever pump; WS 62; W.S. 62
Post by Cobber on 22 December 2013:
G'day Al,
Thanks for a great update to this thread.
As requested I have added the links you provided in the Restoration parts suppliers list under a new section "Pumps, Galley/Water/Kitchen"
Other brands can be added to it as they become available.
You're worth your weight in gold
Cobber.
Post by Franklin1 on 5 April 2014:
Fynspray pump tap refurbishment:
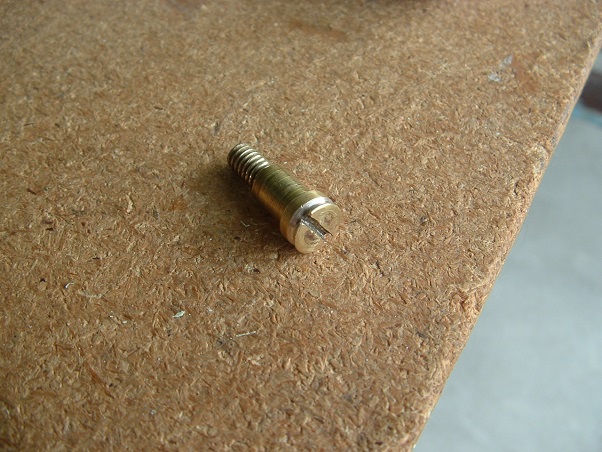
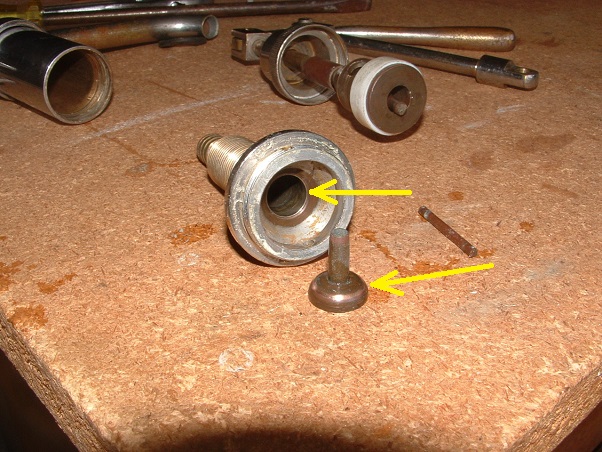
The first issue to be addressed with this pump was that one of the original brass bolts in the handle had disappeared, and a crappy steel bolt had been used as a replacement...
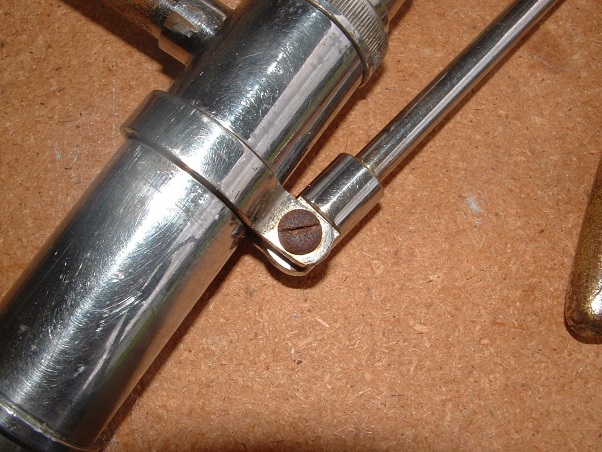
My brother found a brass bolt in his junk pile, and added a short length of brass tubing, plus a bit more brass got silver soldered onto the head of the bolt, and a reasonable likeness of the original bolt was achieved...
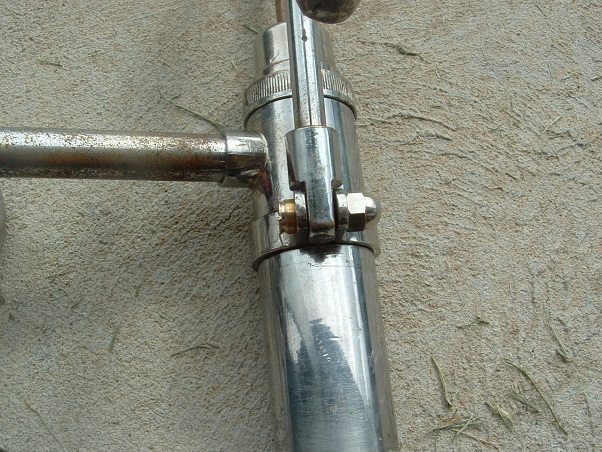
This picture shows the new bolt fitted, with one of those chrome-plated caps on the other side...
The second issue was the plunger washer, which was not in good condition...
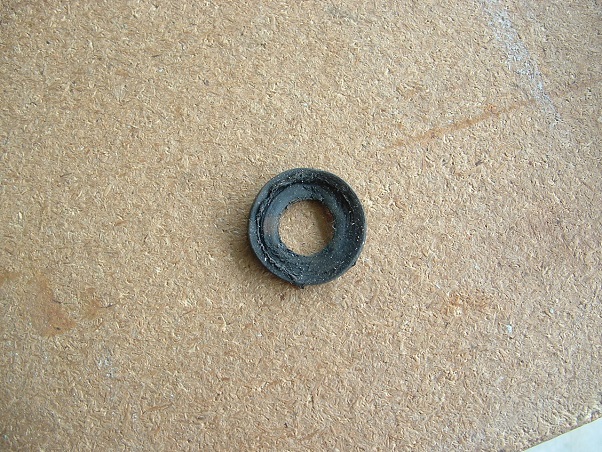
My brother machined up a new washer out of a product known as "Delrin"...
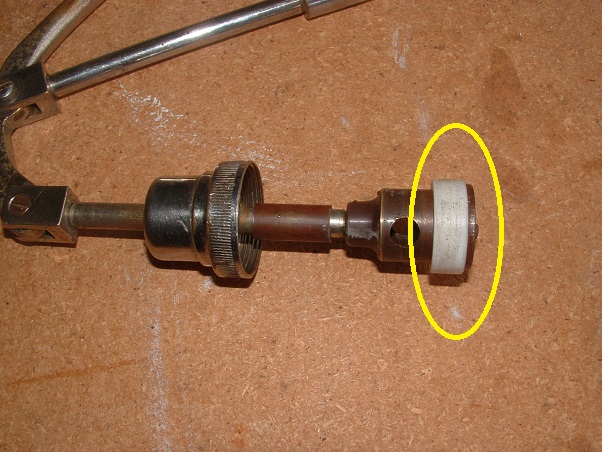
You can read all about Delrin here, but your eyes will glaze over very quickly. It's probably best to just accept that it's a high-tech plastic.
The bore of the pump housing was also "honed out" and made nice and smooth...
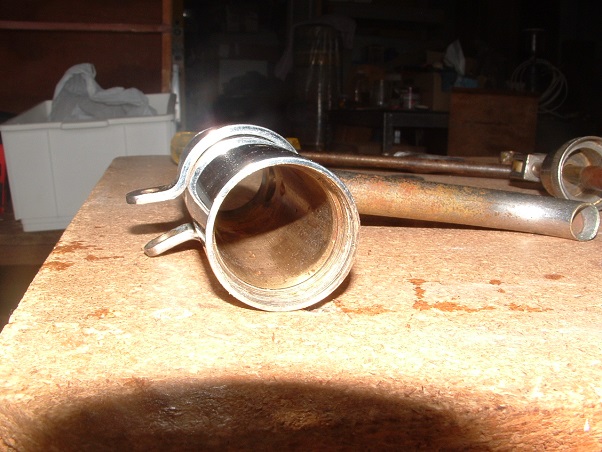
The tap was reassembled, and tested sitting in a sink full of water, and everything worked beautifully. I packed it all up and took it home and installed the tank and tap into the van. Pumped the handle, and pumped the handle...and pumped the handle some more...
Nothing...
Zip - nix - zilch...
Not even a drop showing...
I took it all back out of the van and set it up outside the workshop for testing. The pump had to be lowered to within 18 inches of the ground before it would suck up enough water to work properly. Any higher than that and it was a definite no-go...
I got in touch with my brother and discussed the problem further. He recommended I bring it back to him for a "warranty claim" (which was good because I was just inside the 5-day warranty he gives on any work he does ). When we looked into the pump design a bit further, we realised there needed to be a pretty good seal in both the top and bottom valves when they are in the 'closed' position. It meant polishing the valve and valve seat where they make contact, to remove the build-up of tarnish...
A smear of Loktite thread sealant was placed on the pump housing thread at both the bottom and top, to further help with creating a vacuum for the water sucking process...
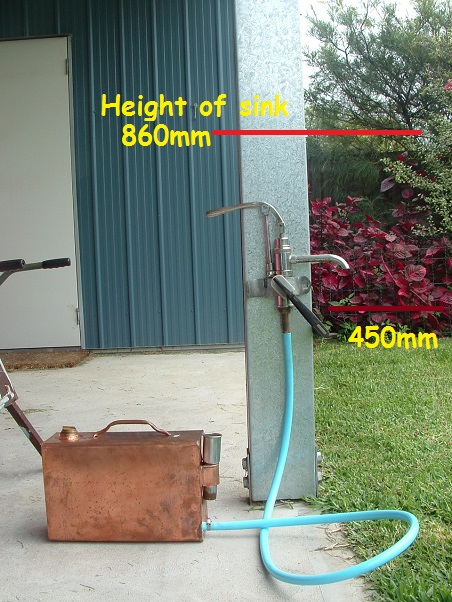
A preliminary test in his workshop showed the pump to work a lot better at higher heights, and a confirmation test outside my own workshop showed it will work well up to a height of 1150mm above ground...
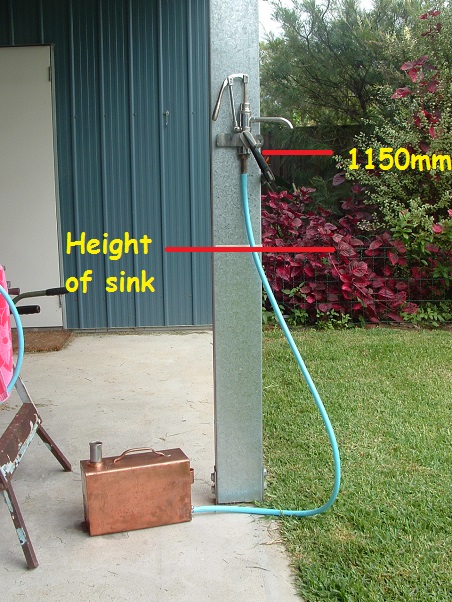
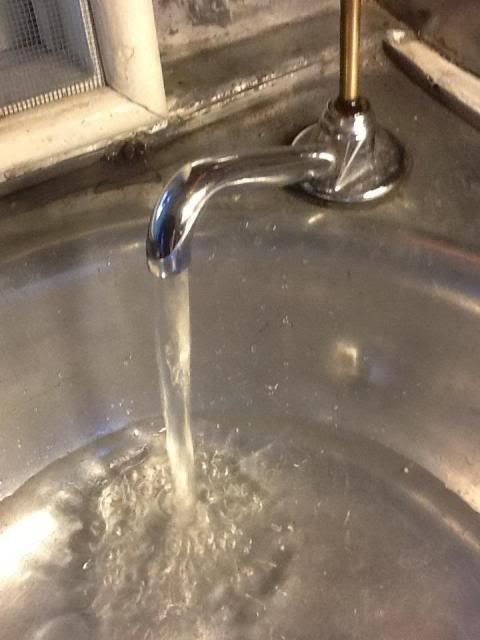
It's a bit hard to hold a camera steady and pump the tap at the same time, but here's proof of it working at 1150mm above ground...
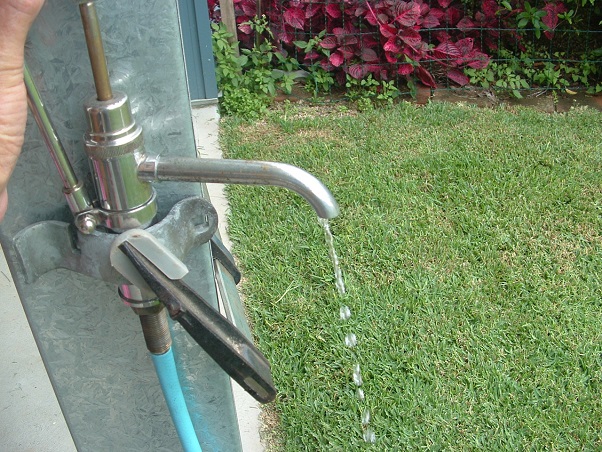
It takes 12 pump cycles (one cycle is pumping the handle up and back down again) to get the water up to the 1150mm height.
The moral of this story is that if your pump is not working all that crash hot, just putting a new washer kit in the pump may not solve all your problems. You may have to explore polishing the top and bottom valve stoppers to improve the seal in them (doesn't matter whether you've got a ball stopper arrangement, or a tap valve stopper arrangement like mine. The principle is the same.)
Hope this helps,
cheers,
Al.
Post by Reddo on 6 April 2014:
Hi Al
An easy fix for preventing the pump from draining water back to the tank ..and thus staying primed , is to fit a foot valve in the delivery pipe from the tank...
Basically just a spring and ball bearing inside a tube. or a flapper valve on the end of the tube in the tank. a one way valve that opens when water is drawn up and shuts on the back stroke of the pump.
Us old bike owners use them on our bikes in the oil line... it prevents oil draining from the oil tank back down into the crankcase when the bike is left sitting for a few weeks.
Everything you have said and done to improve your pumps function is correct. The inline ball valve in the delivery line is just insurance that the pump remains "charged" and all rubbers, seals etc remain moist when not in use.
Cheers
Reddo
Post by Franklin1 on 6 April 2014:
Yeah, reddo, my brother and I were starting to think about whether a non-return valve should be added into the hose under the tap. I can see they would be a worthwhile addition for these style of pumps. I'll have to look into them a bit more, but for an example there's this one available at CaravansPlus. Not cheap at $17.90 plus postage, though.
cheers,
Al.
Post by Cobber on 6 April 2014:
As you have mentioned Al Fynspray have a web site with repair instructions for most of their galley pumps that we can see if we click here[/url
As an example here are a few of the most likely pumps to interest vintage caravanners.
Worth looking at the site.
Cobber.
Post by Smiles on 7 April 2014:
Hi Al
Don't ask me to be technical about this but Rob put a non-return valve in the old pump we got off Ray Roehm. We put the pump in our Ramsay caravan & it works heaps better than without it. Of course it all depends whether you want to do an awful lot of arm exercise or a lot less exercise!
We got our NR valve from Whitworths.
We put a brand new Fynspray pump in the Propert ages ago & it works on both up & down action ...told you I'd get technical, unlike the older pumps which are not double acting , so they can do with a bit of help, such as a NR valve, so the water doesn't flow back completely down the pipe between arm exercises!
Cathie
Ps
I'm sure Rob could explain this better!
Post by Shesgotthelook on 7 April 2014:
Thanks for putting that link up Cobber. Good to know these type of taps are still available.
I had been watching this one on eBay;
www.ebay.com.au/itm/121292482735?ssPageName=STRK:MEWAX:IT&_trksid=p3984.m1423.l2649

Was unsure whether to put on here as it is modern. But i think it would look right at home in a 60's van.
Post by Franklin1 on 7 April 2014:
Hi Cathie,
Thanks for posting some first-hand info about the success of non-return valves. That sure helps people to know whether stuff "works" or not. Can you tell me where Rob located the NR valve - was it close to the pump, or close to the tank? There seems to be a bit of debate on the internet about where the best place to put them is.
-----------------------------------------------------------------------
Had a bit of a look around the internet yesterday for info about these non-return valves. Seems they are also known as "check valves" (I didn't know that... ), so if you are searching for them, use both terms for a complete search.
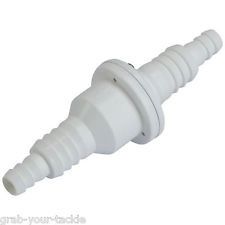
I found one on ebay in Sydney that looks like it is pretty good quality, listed as: 12mm (1/2") ALUMINIUM ONE WAY NON-RETURN CHECK VALVE - Fuel/Diesel/Water/Marine ( current link )
Current cost is $13.90 including postage.
One of the cheapest valves I came across was this plastic version listed by a Hong Kong seller: 0.5" Dia Port Non Return Check Valve Clear White Fitting ( current link )
Cost for this one was $4.08 including postage.
I might get one of the aluminium valves from JAG Online Trading and see how good they are.
cheers,
Al.
Post by Geoff & Jude on 7 April 2014:
hi all
just thought i'd join the discussion and let you all know that i have the same problem with our pump syphoning back to the tank after not being used for a while.
our pump is a fynnspray type design but made of plastic and cannot be dismantled to replace any seals.
at first it only took about an hour for it to loose it's priming fluid so i added a spring loaded in-line ball type non return valve from camec and that held the prime for a bit longer, maybe about 2 or 3 hours until it needed to be re-primed by sucking up from the tank.
so i went onto ebay and found the one below, a rubber flapper type that worked well on the bench (after i dismantled it and modified the sealing face) but still leaked when fitted, although it does take almost 10 hours now before it looses it's prime.
i've realised that the higher thetank pump is above the valve, the better the seal is, due to the weight of the water 'head' acting on the valve.
my pump is only about 300mm above the tank, so i'm not that confident i'll ever fully resolve the problem.
(the sealing effect can be increased by adding a stronger spring but it still has to be weak enough to open when the pump is operated.)
for the moment, i've put it into the 'why make too much of a fuss over it' basket, but might follow it up more later.
geoff 'n jude
Post by Franklin1 on 7 April 2014:
G'day GnJ,
I presume you meant to say, "the higher the pump is...", or am I not understanding what you are describing?
Crikey, if your pump/tap is only 300mm above the tank, that's not a lot of height for the tap to suck the water up, is it?! There must have been a lot of cursing and swearing in caravan parks in the '50s/'60s when people were trying to get a drink of water out of these fynspray pumps...
cheers,
Al.
Post by Geoff & Jude on 7 April 2014:
you're right al, 'the higher the pump is above the valve' is correct.
bit of a seniors moment (but worth it for $2.50 travel passes).
geoff 'n jude
Post by Smiles on 7 April 2014:
Rob will utter some Golden Words of Wisdom on this thread as soon as he's finished cooking dinner!
Post by Cobber on 7 April 2014:
MODIFYING MANIACS !!
I reckon sink pumps are like ice boxes.. tow couplings..Marconi track...and slot head screws.
If they work the way they did originally ( or can be restored to work that way ) they should not be replaced with modern junk.
Sad to hear Conti that your el cheapo Fynspray look-a-like can't be repaired because that's the secret aye ? If the seals and washers are in good nick the pump should not loose the prime for ages and ages.
I have the same problem with the no name pump in poor old Driftwood, it's got a leather washer in it that dries out after a couple of days, and she looses the prime
I find if I give it a drink by submerging the outlet in a cup full of water and pumping up and down she'll work.

Some people might ask "where do you get the water from to give it a drink" ?.....
As George Bernard Shaw said "Life is not meant to be easy, my child, especially if you love your vintage caravan"
This little pump only gives with water on the upward stroke.
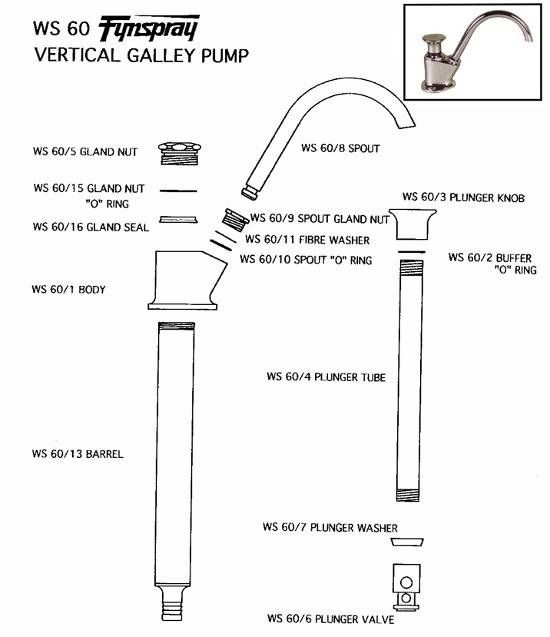
In the Swamp van we have another look-a-like Fynspray pump, sort of similar to the WS 60, but this one can be dismantled for restoration.
I discovered recently that my local caravan sales place ( who stock a fair range of Camec spare parts ) had only a couple of replacement washers, I bought two, one made by Breha that replaces the plunger washer and the other made by Trojan that fits at the top of the plunger.
They both fit which leads me to wonder if the internal dimensions of some of these pumps are a standard size.
This pump delivers fluid on both the upward and downward stroke ( the technical term you were looking for Smiles ?
Down stroke.

Up stroke
Restoration is the name of the game
Cobber.
Post by Smiles on 7 April 2014:
G'day Al
I've put 3 NR valves same as Jeff's white plastic non return valve (12~20 mm) in 3 different vans. They help but they don't seem to hold the water up permanently. If you use the pump again after you've done the initial pumping, the water will be there for about 15 minutes but otherwise it won't stay up.
Position does not seem to matter whether it's close to the pump or the tank. It holds water up for a few minutes but mostly you have to pump it up each time.
The Jag non return valve might be better than my one as it is also a check valve which means it can take pump back pressure, up to 100psi.
My pump in the Ramsay has a 2 inch bore and on the down stroke blew the rubber flap in the non return valve open. I had to open up the non return valve to reset the flap. Solved this by punching about 12 small holes in the homemade leather washer to let water through on the down stroke which then sealed down on a large washer on the up stroke. The non return valve part of the pump no longer existed so the inline non return valve is the only way the system works.
Rob
Post by Smiles on 7 April 2014:
Funnily enough those el-cheapo old Trojans actually work a treat. We have some "vintage" Trojans & they're double acting & pump perfectly & mostly hold the water up for ages.
But unfortunately coming from the mindset of 'Restoration at all costs' means we have replaced those little plastic darlings with more authentic old clunkers (also known generally as Fynsprays, although there seem to have been many different manufacturers). Despite their shortcomings (not holding the water up for long enough), I think there's something philosophically satisfying about working to get your water up the pipe & hangin' on to it! Sure beats taking a bucket to the well & carrying it back on your head!
Just my two drops full
Cathie
ps Rob says Neatesfoot Oil works well on the leather washers, & yes he does make his own leather washers (clever man).
Post by Franklin1 on 7 April 2014:
Yeah, but can he make leather washers AND cook dinner at the same time??! THAT would be real clever!!
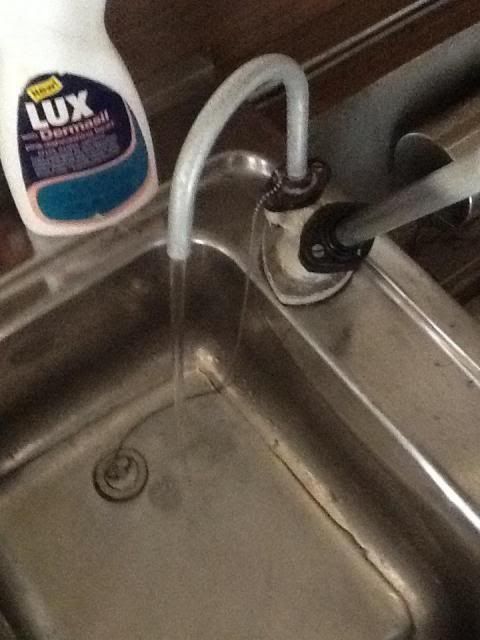
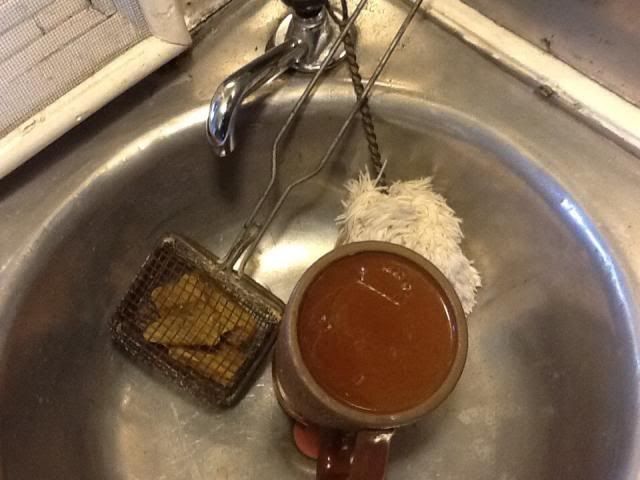
I notice cobber primed the pump in Driftwood with a non-vintage coffee cup. Hmmmm....
Post by Smiles on 7 April 2014:
Yes Al, I noticed the 70's pottery cup & what about the Lux container!!!!!!
Surely the pump should have been primed in a speckled bakelite beaker with a rusty iron soap shaker peeping out from behind the pump
Cobber, I fear your standards might be slipping!!
Post by Don Ricardo on 7 April 2014:
Apr 7, 2014 at 7:31pm cobber said:
MODIFYING MANIACS !!
Hi Smiles and Franklin1,
I'm a bit concerned about Cobber's standards slipping as well. He should know know that sink pumps are modern...stuff by definition. Real vintage means gravity fed taps...and carrying a heavy water tank from the tap which moves 100 metres further away every time you have to fill the tank. Isn't that right?
Don Ricardo
Post by Cobber on 8 April 2014:
Ah .. always hard to predict to what extent the guilty will go in order to divert attention away from their sins ( not you smiles, we are on the same wave length... sometimes , I think
  )
)
But I did expect some flak
So..the mug is genuine 1930s 'R.Fowler.Australia' ...'Lux Dermasil' is from the 1960s...(I think)
I didn't want to show everything on the first day of sitting
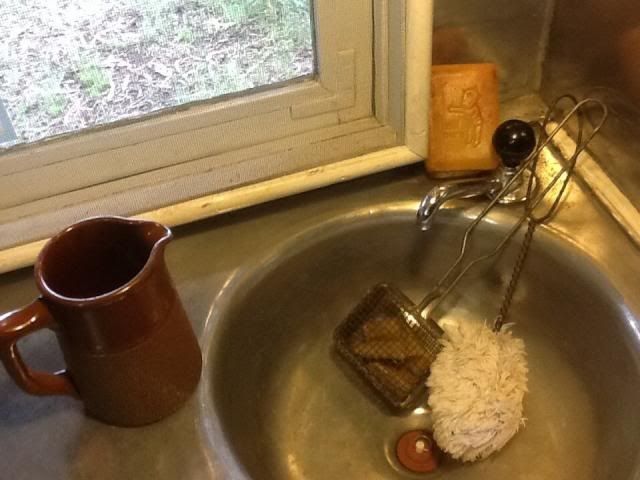
Cobber.
Post by Geoff & Jude on 8 April 2014:
you're right cobber, my research shows 1965, but this little gem is from 1971.
it's obvious why cobber's hands are so soft and supple. (thank heavens for dermasil).
geoff 'n jude
Post by Reddo on 3 September 2008:
Hi Guys.
I got a "pm" request from "Wildmanaus" the other day.
he was asking if i could chase up an overhaul kit for a fynspray pump for him.
I have just ordered one from Bias boating market at Belmont NSW....... None in stock but should be in within 7 to 10 days.
Kit costs $28.90 if anyone is chasing one. The one kit fits all sized pumps. There is about 4 different diameters and neck hieghts. But they assure me the same kit fits all.
If anyone get real fair dinkum and wants to buy a new complete pump then the chrome over brass pump part number is...
RWB70B...... wasnt game to ask what they where worth !!!!
So part is ordered and paid for Wildy. I will collect it and bring it to Coledale.. we might have a DYI morning and do a rebuild on your leaky pump...
Reddo
Post by Reddo on 6 September 2008:
Hello Wildmanaus..
Kit has turned up. i collected it yesterday from Bias.
As a matter of interest for those wandering what a new chrome over brass fynspray galley pump is worth ......
I made an enquiry while i was picking up Wildys rebuid kit...
Are ya sitting down....
 Good...
  ..How does $248.90 effect ya bank account.
Heres me blowin' up that i paid $30 and $12 postage from QLD for the oversized pump in Rosie.......... worth thier weight in gold.
Reddo
Post by Franklin1 on 22 December 2013:
Having just spent some time refurbishing the Fynspray pump in my van, I thought I would collect all the relevant information about Fynspray pumps and post it into this thread.
Pump designs...
At first glance, all these pumps "look the same". It is only when you look at them closely that you realise there are subtle differences in the shape of the housing, or in the shape of the pouring spout, or even in the design of just the handle. Here are some photos I've collected from the forum:
the pump in reddo's Rosie:
another pump posted by reddo:
a pump posted by stevej:
a pump posted by hilldweller:
the pump in my Newcastle van:
If all the above pumps are the Fynspray brand, there seems to be an awful lot of different designs for the one brand. Why would there be so many different "models" or versions? Maybe someone other than Fynspray was making these pumps as well??
------------------------------------------------------------------
How do they work?...
The basic operation of these pumps is that when you raise the plunger you suck water up into the pump housing, and when you push the plunger down the water in the housing is forced out of the spout into the sink. Pull up - suck water up; push down - spurt water into sink. There appears to be at least two different methods of how the sucking and spurting works. One uses a captive ball stopper method to open and close the outlets as you pump the handle, and another uses a tap washer type arrangement. One also has a cupped leather or nitrile washer at the bottom of the plunger, and the other uses a flat nitrile washer.
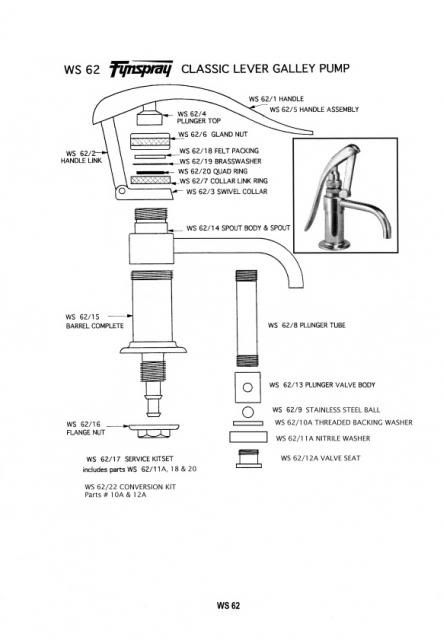
An example of the ball stopper type of pump, with the cupped leather washer, is the one hilldweller has...
This diagram shows the inner parts of the captive ball design...
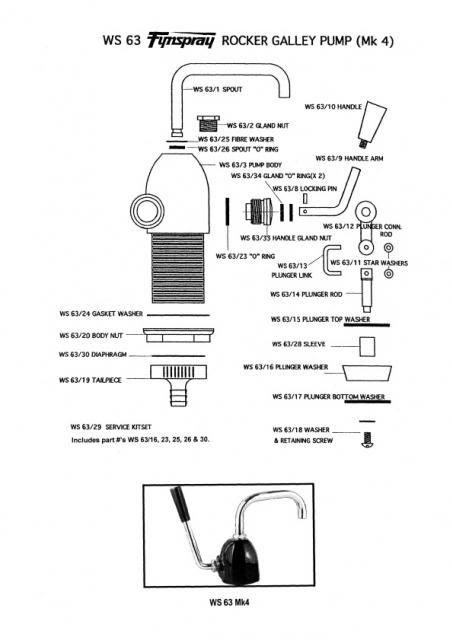
The other method of making these work is to use stopper valves that look similar to tap washers, plus have a flat nitrile washer on the bottom of the plunger, as is shown in the tap in my Newcastle van...
----------------------------------------------------------------
Repair and maintenance...
Fynspray pumps are made and marketed by White Star Products in New Zealand ( www.whitestarproducts.co.nz/ ). The model number closely associated with the vintage taps we come across is the WS62 model (or W.S.62).
Before buying any replacement kits for your pump, I think you need to be sure they will fit the internal diameter of your pump housing. I honestly don't know what the standard internal diameter of a Fynspray pump is (if there is such a thing as a 'standard diameter').
For interest, the internal diameter of my 'Newcastle' van pump is 11/4"...
You can read all about the method for replacing the cup washer from the following information copied from the White Star Products website ( click here ):
WS62 - Repair Instructions
Please note: After receiving feedback from you our distributors, White Star Products have carried out a small improvement to our WS62 Classic Brass lever pump.
Main concerns were the sticking problems associated with the drying out of the leather cup washer when the pump was used infrequently.
After experimentation and testing the decision was made to replace the leather cup washer with a Nitrile alternative as it provided improved pumping performance and alleviated the leather washer problems.
From June 2011 all WS62 Hand pumps will be supplied with "Nitrile rubber" plunger washers.
We now offer a conversion kit (WS62/22) for retrofitting, upgrading the older leather washer versions. The conversion kits consist of a Brass valve seat and backing washer:
All Service kits will now include the Nitrile cup washer: WS62/17A
[Repair/Sevice kits can be purchased from a ship's chandler or boat spare parts shop, such as BIAS boating, who have stores in Qld, NSW, NT, and WA.]
Important: To replace a leather cup washer version you will need both a conversion kit WS62/22 and a Service Kit WS62/17A
Leather cup washers will no longer be available after current stocks run out.
All new WS62 pumps will be supplied with the new Nitrile cup washer.
To fit the Conversion Kit (#10A & 12A ): Discard existing part #'s 10 & 12 [See all these part numbers in the diagram below]. Replace with new part #'s 10A & 12A.
N.B.
1) Make sure to fit part #11A first before threading part #10A hard up to shoulder of part #12A.
2) Use Loctite to attach valve seat to plunger.
To replace the leather plunger washer (#11) or nitrile plunger washer (#11A): Unscrew the spout body & spout assembly (#14) from the barrel assembly (#15). (As sealant has been used on the thread, run the spout body under hot water and then tap it gently with a soft-headed mallet or a piece of soft wood. Place the pump vertically in a bench vice, gripping the barrel assembly below the flange.) DO NOT use too much force on the spout & DO NOT use any tools as they may cause damage to the barrel. The complete handle & plunger assembly can now be removed. By holding the plunger valve body (#13) in a bench vice, the valve seat (#12) can be unscrewed, enabling the Leather or Nitrile cup washer to be replaced.
To replace the felt packing (#18) & quad ring (#20) on Mk 2 model: The complete plunger valve assembly must be removed from the plunger tube (#8). Take care when fitting the quad ring so as not to damage its inside edge.
If your pump is not leaking at the gland, there is no necessity to replace either of the above.
Key words for search function: fynspray galley pump; hand pantry pump; lever pump; WS 62; W.S. 62
Post by Cobber on 22 December 2013:
G'day Al,
Thanks for a great update to this thread.
As requested I have added the links you provided in the Restoration parts suppliers list under a new section "Pumps, Galley/Water/Kitchen"
Other brands can be added to it as they become available.
You're worth your weight in gold

Cobber.
Post by Franklin1 on 5 April 2014:
Fynspray pump tap refurbishment:
The first issue to be addressed with this pump was that one of the original brass bolts in the handle had disappeared, and a crappy steel bolt had been used as a replacement...
My brother found a brass bolt in his junk pile, and added a short length of brass tubing, plus a bit more brass got silver soldered onto the head of the bolt, and a reasonable likeness of the original bolt was achieved...
This picture shows the new bolt fitted, with one of those chrome-plated caps on the other side...
The second issue was the plunger washer, which was not in good condition...
My brother machined up a new washer out of a product known as "Delrin"...
You can read all about Delrin here, but your eyes will glaze over very quickly.
 It's probably best to just accept that it's a high-tech plastic.
The bore of the pump housing was also "honed out" and made nice and smooth...
The tap was reassembled, and tested sitting in a sink full of water, and everything worked beautifully. I packed it all up and took it home and installed the tank and tap into the van. Pumped the handle, and pumped the handle...and pumped the handle some more...
Nothing...
Zip - nix - zilch...
Not even a drop showing...

I took it all back out of the van and set it up outside the workshop for testing. The pump had to be lowered to within 18 inches of the ground before it would suck up enough water to work properly. Any higher than that and it was a definite no-go...
I got in touch with my brother and discussed the problem further. He recommended I bring it back to him for a "warranty claim" (which was good because I was just inside the 5-day warranty he gives on any work he does
 ). When we looked into the pump design a bit further, we realised there needed to be a pretty good seal in both the top and bottom valves when they are in the 'closed' position. It meant polishing the valve and valve seat where they make contact, to remove the build-up of tarnish...
A smear of Loktite thread sealant was placed on the pump housing thread at both the bottom and top, to further help with creating a vacuum for the water sucking process...
A preliminary test in his workshop showed the pump to work a lot better at higher heights, and a confirmation test outside my own workshop showed it will work well up to a height of 1150mm above ground...
It's a bit hard to hold a camera steady and pump the tap at the same time, but here's proof of it working at 1150mm above ground...
It takes 12 pump cycles (one cycle is pumping the handle up and back down again) to get the water up to the 1150mm height.
The moral of this story is that if your pump is not working all that crash hot, just putting a new washer kit in the pump may not solve all your problems. You may have to explore polishing the top and bottom valve stoppers to improve the seal in them (doesn't matter whether you've got a ball stopper arrangement, or a tap valve stopper arrangement like mine. The principle is the same.)
Hope this helps,
cheers,
Al.
Post by Reddo on 6 April 2014:
Hi Al
An easy fix for preventing the pump from draining water back to the tank ..and thus staying primed , is to fit a foot valve in the delivery pipe from the tank...
Basically just a spring and ball bearing inside a tube. or a flapper valve on the end of the tube in the tank. a one way valve that opens when water is drawn up and shuts on the back stroke of the pump.
Us old bike owners use them on our bikes in the oil line... it prevents oil draining from the oil tank back down into the crankcase when the bike is left sitting for a few weeks.
Everything you have said and done to improve your pumps function is correct. The inline ball valve in the delivery line is just insurance that the pump remains "charged" and all rubbers, seals etc remain moist when not in use.
Cheers
Reddo
Post by Franklin1 on 6 April 2014:
Yeah, reddo, my brother and I were starting to think about whether a non-return valve should be added into the hose under the tap. I can see they would be a worthwhile addition for these style of pumps. I'll have to look into them a bit more, but for an example there's this one available at CaravansPlus. Not cheap at $17.90 plus postage, though.

cheers,
Al.
Post by Cobber on 6 April 2014:
As you have mentioned Al Fynspray have a web site with repair instructions for most of their galley pumps that we can see if we click here[/url
As an example here are a few of the most likely pumps to interest vintage caravanners.


Worth looking at the site.
Cobber.
Post by Smiles on 7 April 2014:
Hi Al
Don't ask me to be technical about this but Rob put a non-return valve in the old pump we got off Ray Roehm. We put the pump in our Ramsay caravan & it works heaps better than without it. Of course it all depends whether you want to do an awful lot of arm exercise or a lot less exercise!
We got our NR valve from Whitworths.
We put a brand new Fynspray pump in the Propert ages ago & it works on both up & down action ...told you I'd get technical, unlike the older pumps which are not double acting , so they can do with a bit of help, such as a NR valve, so the water doesn't flow back completely down the pipe between arm exercises!
Cathie
Ps
I'm sure Rob could explain this better!
Post by Shesgotthelook on 7 April 2014:
Thanks for putting that link up Cobber. Good to know these type of taps are still available.
I had been watching this one on eBay;
www.ebay.com.au/itm/121292482735?ssPageName=STRK:MEWAX:IT&_trksid=p3984.m1423.l2649

Was unsure whether to put on here as it is modern. But i think it would look right at home in a 60's van.
Post by Franklin1 on 7 April 2014:
Hi Cathie,
Don't ask me to be technical about this but Rob put a non-return valve in the old pump we got off Ray Roehm...
Thanks for posting some first-hand info about the success of non-return valves. That sure helps people to know whether stuff "works" or not. Can you tell me where Rob located the NR valve - was it close to the pump, or close to the tank? There seems to be a bit of debate on the internet about where the best place to put them is.
-----------------------------------------------------------------------
Had a bit of a look around the internet yesterday for info about these non-return valves. Seems they are also known as "check valves" (I didn't know that...
), so if you are searching for them, use both terms for a complete search.I found one on ebay in Sydney that looks like it is pretty good quality, listed as: 12mm (1/2") ALUMINIUM ONE WAY NON-RETURN CHECK VALVE - Fuel/Diesel/Water/Marine ( current link )
Current cost is $13.90 including postage.
One of the cheapest valves I came across was this plastic version listed by a Hong Kong seller: 0.5" Dia Port Non Return Check Valve Clear White Fitting ( current link )
Cost for this one was $4.08 including postage.
I might get one of the aluminium valves from JAG Online Trading and see how good they are.
cheers,
Al.
Post by Geoff & Jude on 7 April 2014:
hi all
just thought i'd join the discussion and let you all know that i have the same problem with our pump syphoning back to the tank after not being used for a while.
our pump is a fynnspray type design but made of plastic and cannot be dismantled to replace any seals.
at first it only took about an hour for it to loose it's priming fluid so i added a spring loaded in-line ball type non return valve from camec and that held the prime for a bit longer, maybe about 2 or 3 hours until it needed to be re-primed by sucking up from the tank.

so i went onto ebay and found the one below, a rubber flapper type that worked well on the bench (after i dismantled it and modified the sealing face) but still leaked when fitted, although it does take almost 10 hours now before it looses it's prime.

i've realised that the higher the
my pump is only about 300mm above the tank, so i'm not that confident i'll ever fully resolve the problem.
(the sealing effect can be increased by adding a stronger spring but it still has to be weak enough to open when the pump is operated.)
for the moment, i've put it into the 'why make too much of a fuss over it' basket, but might follow it up more later.
geoff 'n jude
Post by Franklin1 on 7 April 2014:
G'day GnJ,
i've realised that the higher the tank is above the valve,...
I presume you meant to say, "the higher the pump is...", or am I not understanding what you are describing?
Crikey, if your pump/tap is only 300mm above the tank, that's not a lot of height for the tap to suck the water up, is it?! There must have been a lot of cursing and swearing in caravan parks in the '50s/'60s when people were trying to get a drink of water out of these fynspray pumps...
cheers,
Al.
Post by Geoff & Jude on 7 April 2014:
you're right al, 'the higher the pump is above the valve' is correct.
bit of a seniors moment (but worth it for $2.50 travel passes).
geoff 'n jude
Post by Smiles on 7 April 2014:
Rob will utter some Golden Words of Wisdom on this thread as soon as he's finished cooking dinner!
Post by Cobber on 7 April 2014:
MODIFYING MANIACS !!
I reckon sink pumps are like ice boxes.. tow couplings..Marconi track...and slot head screws.
If they work the way they did originally ( or can be restored to work that way ) they should not be replaced with modern junk.
Sad to hear Conti that your el cheapo Fynspray look-a-like can't be repaired because that's the secret aye ? If the seals and washers are in good nick the pump should not loose the prime for ages and ages.
I have the same problem with the no name pump in poor old Driftwood, it's got a leather washer in it that dries out after a couple of days, and she looses the prime

I find if I give it a drink by submerging the outlet in a cup full of water and pumping up and down she'll work.

Some people might ask "where do you get the water from to give it a drink" ?.....
As George Bernard Shaw said "Life is not meant to be easy, my child, especially if you love your vintage caravan"
This little pump only gives with water on the upward stroke.

In the Swamp van we have another look-a-like Fynspray pump, sort of similar to the WS 60, but this one can be dismantled for restoration.
I discovered recently that my local caravan sales place ( who stock a fair range of Camec spare parts ) had only a couple of replacement washers, I bought two, one made by Breha that replaces the plunger washer and the other made by Trojan that fits at the top of the plunger.
They both fit which leads me to wonder if the internal dimensions of some of these pumps are a standard size.
This pump delivers fluid on both the upward and downward stroke ( the technical term you were looking for Smiles ?
Down stroke.

Up stroke

Restoration is the name of the game

Cobber.
Post by Smiles on 7 April 2014:
G'day Al
I've put 3 NR valves same as Jeff's white plastic non return valve (12~20 mm) in 3 different vans. They help but they don't seem to hold the water up permanently. If you use the pump again after you've done the initial pumping, the water will be there for about 15 minutes but otherwise it won't stay up.
Position does not seem to matter whether it's close to the pump or the tank. It holds water up for a few minutes but mostly you have to pump it up each time.
The Jag non return valve might be better than my one as it is also a check valve which means it can take pump back pressure, up to 100psi.
My pump in the Ramsay has a 2 inch bore and on the down stroke blew the rubber flap in the non return valve open. I had to open up the non return valve to reset the flap. Solved this by punching about 12 small holes in the homemade leather washer to let water through on the down stroke which then sealed down on a large washer on the up stroke. The non return valve part of the pump no longer existed so the inline non return valve is the only way the system works.
Rob
Post by Smiles on 7 April 2014:
Funnily enough those el-cheapo old Trojans actually work a treat. We have some "vintage" Trojans & they're double acting & pump perfectly & mostly hold the water up for ages.
But unfortunately coming from the mindset of 'Restoration at all costs' means we have replaced those little plastic darlings with more authentic old clunkers (also known generally as Fynsprays, although there seem to have been many different manufacturers). Despite their shortcomings (not holding the water up for long enough), I think there's something philosophically satisfying about working to get your water up the pipe & hangin' on to it! Sure beats taking a bucket to the well & carrying it back on your head!
Just my two drops full
Cathie
ps Rob says Neatesfoot Oil works well on the leather washers, & yes he does make his own leather washers (clever man).
Post by Franklin1 on 7 April 2014:
& yes he does make his own leather washers
Yeah, but can he make leather washers AND cook dinner at the same time??!
THAT would be real clever!! I notice cobber primed the pump in Driftwood with a non-vintage coffee cup. Hmmmm....
Post by Smiles on 7 April 2014:
Yes Al, I noticed the 70's pottery cup & what about the Lux container!!!!!!
Surely the pump should have been primed in a speckled bakelite beaker with a rusty iron soap shaker peeping out from behind the pump
Cobber, I fear your standards might be slipping!!
Post by Don Ricardo on 7 April 2014:
Apr 7, 2014 at 7:31pm cobber said:
MODIFYING MANIACS !!
I reckon sink pumps are like ice boxes.. tow couplings..Marconi track...and slot head screws.
If they work the way they did originally ( or can be restored to work that way ) they should not be replaced with modern junk...
If they work the way they did originally ( or can be restored to work that way ) they should not be replaced with modern junk...
Hi Smiles and Franklin1,
I'm a bit concerned about Cobber's standards slipping as well. He should know know that sink pumps are modern...stuff by definition. Real vintage means gravity fed taps...and carrying a heavy water tank from the tap which moves 100 metres further away every time you have to fill the tank. Isn't that right?
Don Ricardo
Post by Cobber on 8 April 2014:
Yes Al, I noticed the 70's pottery cup & what about the Lux container!!!!!!
Surely the pump should have been primed in a speckled bakelite beaker with a rusty iron soap shaker peeping out from behind the pump
Cobber, I fear your standards might be slipping!!
Surely the pump should have been primed in a speckled bakelite beaker with a rusty iron soap shaker peeping out from behind the pump
Cobber, I fear your standards might be slipping!!
Ah
 .. always hard to predict to what extent the guilty will go in order to divert attention away from their sins ( not you smiles, we are on the same wave length... sometimes , I think
  )
)But I did expect some flak
So..the mug is genuine 1930s 'R.Fowler.Australia' ...'Lux Dermasil' is from the 1960s...(I think)

I didn't want to show everything on the first day of sitting

Cobber.
Post by Geoff & Jude on 8 April 2014:
...'Lux Dermasil' is from the 1960s...(I think)
you're right cobber, my research shows 1965, but this little gem is from 1971.
it's obvious why cobber's hands are so soft and supple. (thank heavens for dermasil).
geoff 'n jude