|
|
Post by hilldweller on Dec 8, 2013 15:08:39 GMT 10
Much less exciting progress this weekend. Been pulling out nails. Hundreds of them  . One-inch flat-head galvanised (?) nails holding the hardboard to the frame, badly rusted panel pins and nails with a square profile for the half-round trim over the joins, upholsterer’s tacks along the top edge where the canvas overhangs, and a random selection of whatever was handy for fix-up jobs over the years. No glue. I am assuming I will make full use of twenty-first century glues when it comes time to put the new cladding on but probably nails as well, since the rows and rows of painted-over flat-head nails are part of her original look. 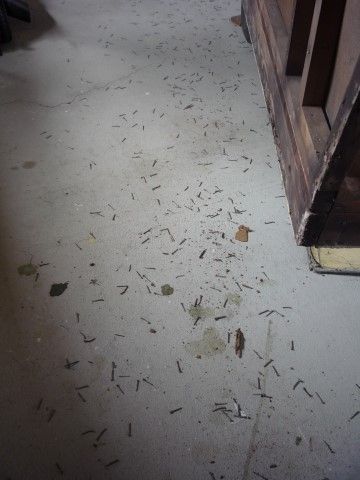 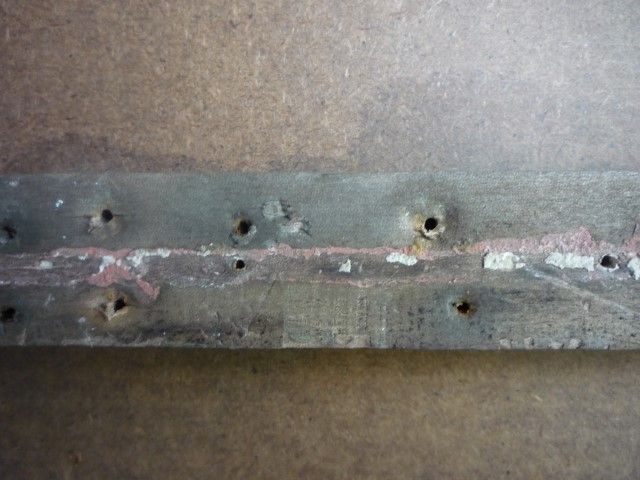 It is very fortunate that previous owners liked her enough to keep fixing her up over the years, even if the end result was a complete mess with random nails, dribbles of something hastily painted over the cladding, and great gobs of badly-applied sealant. She could so easily have dissolved into a weetbix-like mess, or ended her days as bonfire fuel  . Applied a bit of paint stripper to one of the window frames in an attempt to see what timber was used. So now I can see it but still don’t know what it is. Possibly rimu. Not cedar. I’m thinking I might check out a building recyclers for a 1940s-ish door to cut down to make front and back window frames, on the basis that if the timber is good and straight now I can be confident it will remain that way. I don’t think that would necessarily be the case with fresh pine from the big green and orange sheds, and that seems to be all they sell. Speak up if that’s a silly idea  |
|
|
|
Post by seeshell on Dec 8, 2013 17:43:34 GMT 10
Hi HD Well its all happening at your place. Look at all the nails on the floor - I guess that's what happens if you ignore the mani-pedi for as many years as Mabel has.  Fantastic work as usual - keep up with the pictures. I love to see her coming along. By the by, do you ever get a break to use your 1960s baby? Cheers Seeshell |
|
|
|
Post by grandad on Dec 9, 2013 8:32:50 GMT 10
I’m thinking I might check out a building recyclers for a 1940s-ish door to cut down to make front and back window frames, on the basis that if the timber is good and straight now I can be confident it will remain that way. I don’t think that would necessarily be the case with fresh pine from the big green and orange sheds, and that seems to be all they sell. Speak up if that’s a silly idea Not a silly idea at all. Most 40's era doors (The 3 panel ones) were made from what we used to call "Red Pine". Never did find out exactly what kind of tree it really came from. Do you have a recycling centre in your town? They can be a cheap source. Jim |
|
|
|
Post by hilldweller on Dec 15, 2013 8:16:58 GMT 10
No progress this weekend as, despite shorts and Tshirt weather, I've come down with a doozy of a headcold  . Did manage to go shopping, however, and came home with a solid old rimu door from a house demo/recycling place and then went a bit mad in the big orange shed and added 1x circular saw, 1x electric planer and 1x multitool plus coloured chalks and a few other bits and pieces including an imperial tape measure. (Mabel's measurements make so much more sense in imperial: she is 6'6" wide, 10'8" long at the base and the framing is one and a quarter inch square). The Caravelle's interior rebuild was done with a tenon saw and $39 jigsaw (worth its weight in gold) but I still can't cut a dead straight line and don't have the skill to attempt window frames with hand tools. Wondering if anyone on here has made a point of using only the tools that would have been in common usage at the time their van was built? Perhaps some of you pretty much do that anyway? |
|
donald80
Junior Member
 warwick q.l.d.
Posts: 59
|
Post by donald80 on Dec 15, 2013 11:06:52 GMT 10
to make windows i am going to use timber out of old silky oak windows that come on the market cheap
keep up the good work it will look great when you have it finished cheers don
|
|
|
|
Post by hilldweller on Dec 22, 2013 17:23:47 GMT 10
Sounds good Donald80  It's surprising how cheap the old timber is if you buy it that way. Small amount of further progress: deconstructed the kitchen window, which had some obvious rot on one bottom corner. As it turned out both bottom joints just fell apart once the glazing beads and glass were removed. 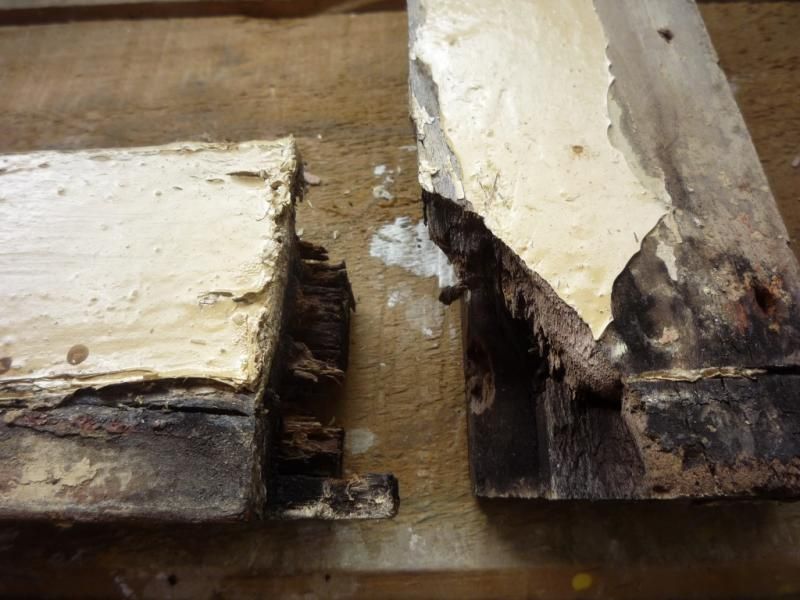 The top corners were good and solid and it took me a while to realise there was star-shaped bit of metal driven through motise and tenon, well hidden below the surface. Once those were out they came apart with a bit of persuasion from a rubber hammer. 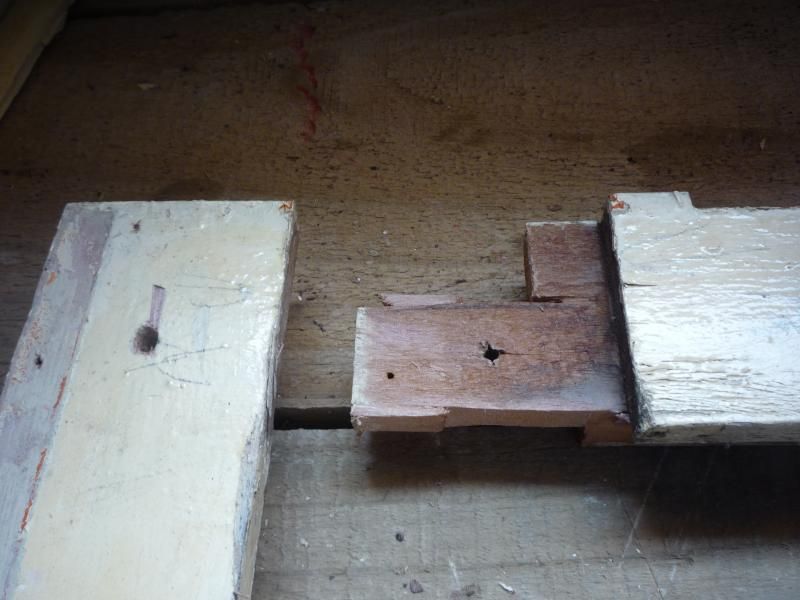 Hoping to be able to re-use the top piece for that window and might be able to cut the rotten bottom ends off the two side pieces and use those for the smaller front or rear window. Thought to measure the old framing marks on front and back and discovered the front was narrower than the back. It’s going to be very small indeed, with a pane about 12x14. The mortise and tenons look very complicated and I’m glad I’ll have these to copy. Oddly enough, since I hadn’t done any other sort of joints before the Caravelle, I have actually done mortise and tenons, but they were simpler than these ones and it was several years ago under strict supervision. 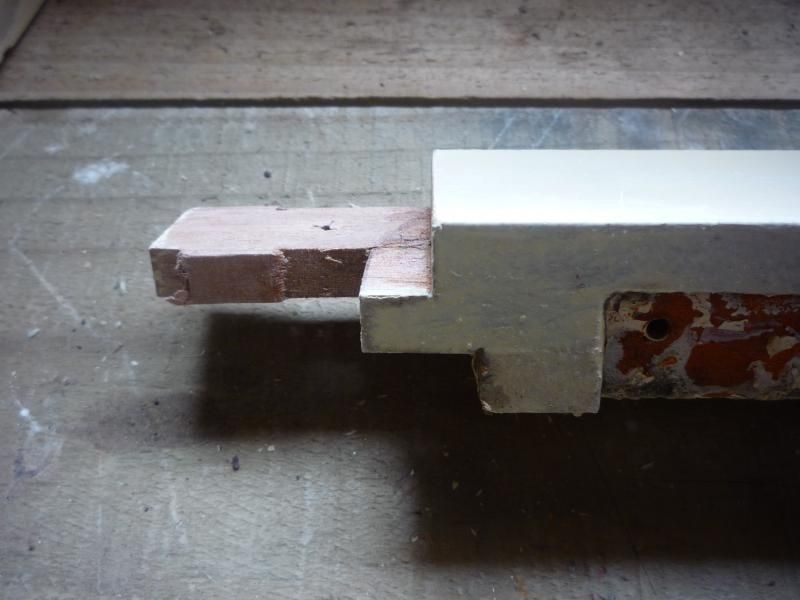 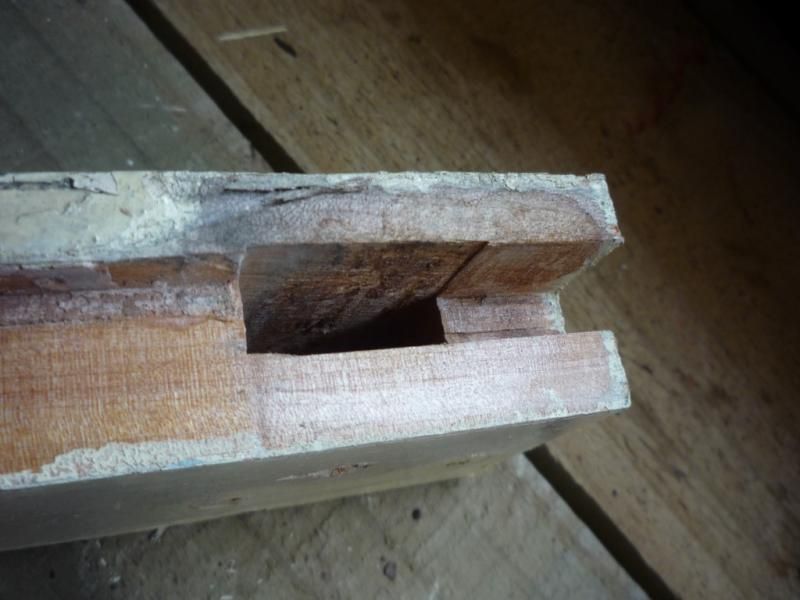 |
|
|
|
Post by hilldweller on Jan 13, 2014 12:23:20 GMT 10
Hello all Been away for a lovely holiday in the Caravelle but back home now and trying to fit in some Mabel time  It helps that other jobs like weed control keep getting rained off  I’ve marked up the framing with coloured chalk as per Al’s very helpful suggestion and – predictably – have another question : where only a short section of a longer length needs to be replaced, should I cut out and replace only that part or will that compromise strength? (Also various related questions about joining and glues etc). The pieces I’m most unsure about are the verticals either side of one window and the door (damage from fittings rather than water) and the two horizontals along the roof line which are both badly damaged at the ends but OK inbetween. All four vertical corner pieces have enough dodgy areas that I think they probably need to be replaced in their entirety so I’ve been reading up on how to bend timber. There's also a vertical on the offside that has bent itself, under pressure from warped hardboard on the inside, and will need to come right out. 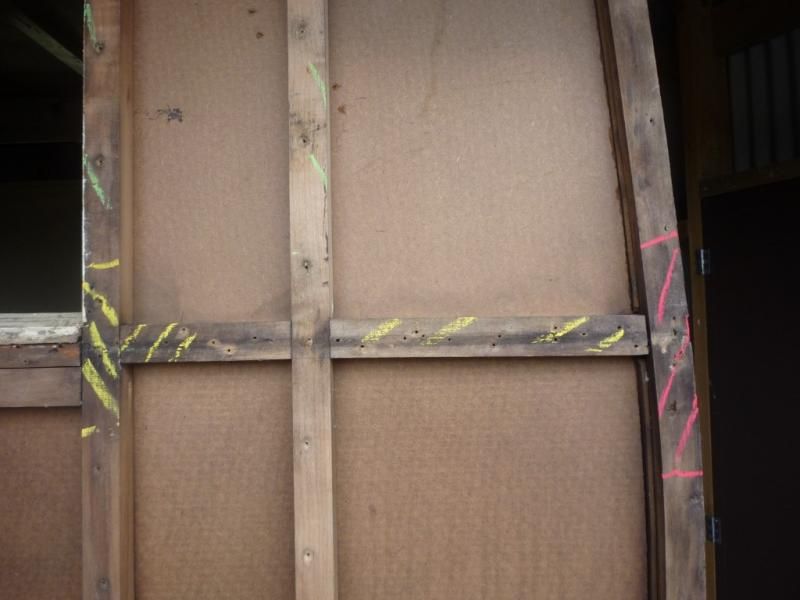 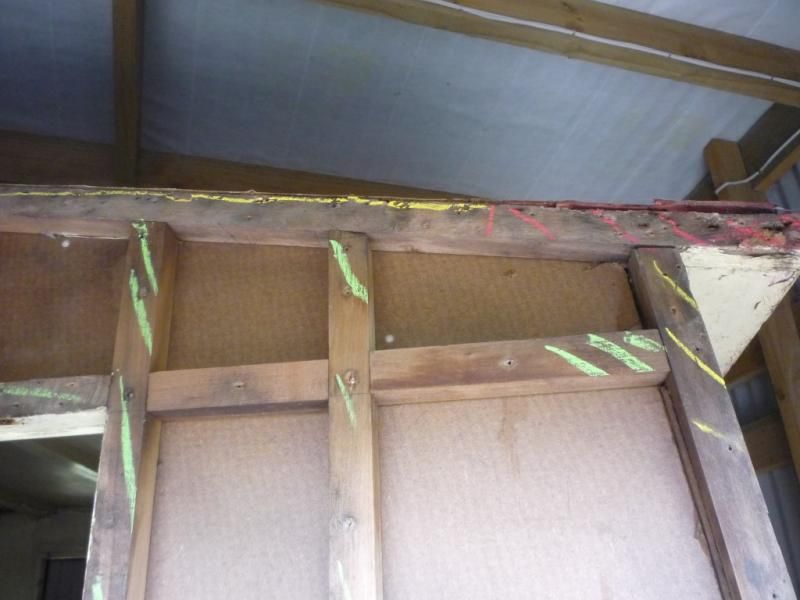 Have also been experimenting, rather nervously, with the new tools and the recycled door has disappeared. The longer lengths have been set aside for window framing and for practice I’ve been trying to turn the offcuts into 1 ¼ square lengths which can be used for framing repairs. None of the first batch are quite 1 ¼ square The door was 2 inches thick and weighed a ton but the rimu is absolutely beautiful and in perfect condition under the surface scratches. I need to get a second one to have enough for the windows. 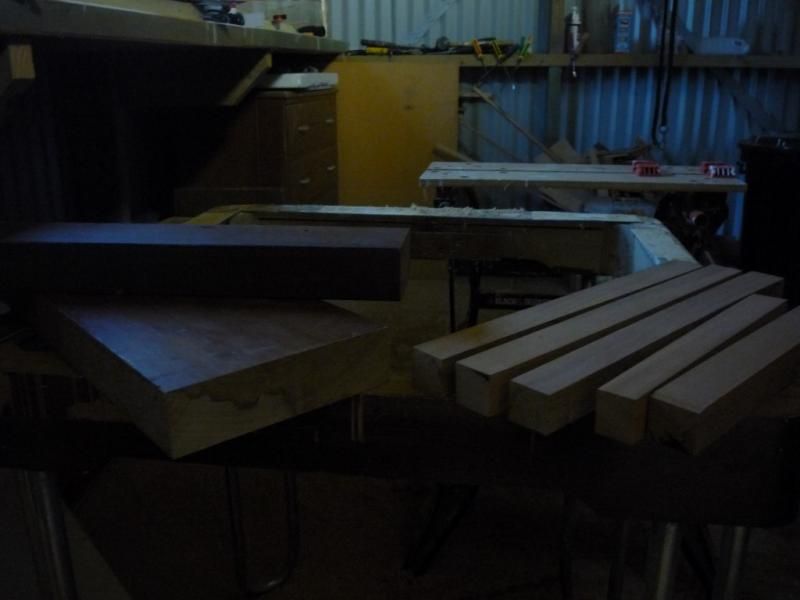 |
|
|
|
Post by Franklin1 on Jan 13, 2014 19:39:02 GMT 10
G'day Hilldweller, There are plenty of different ways of effecting appropriate repairs, so it's hard to prescribe one way or another. I think it's a matter of working out what's best for you to achieve, based on various things such as tools, time, and skills. I've successfully used short lengths of timber as "splints" to stop main pieces of timber from splitting... 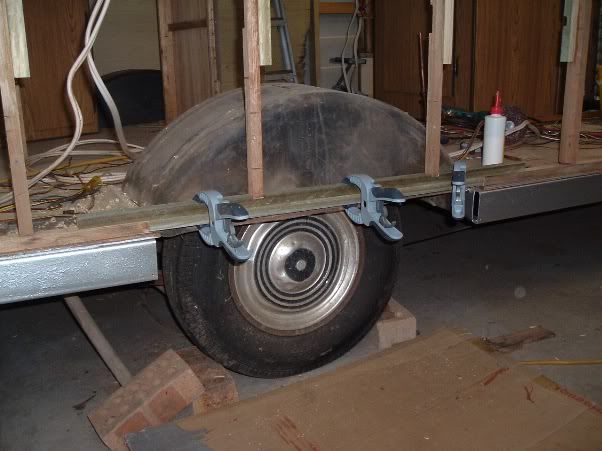 ...and I've also dug out some rotted timber and glued a patch into the cavity... 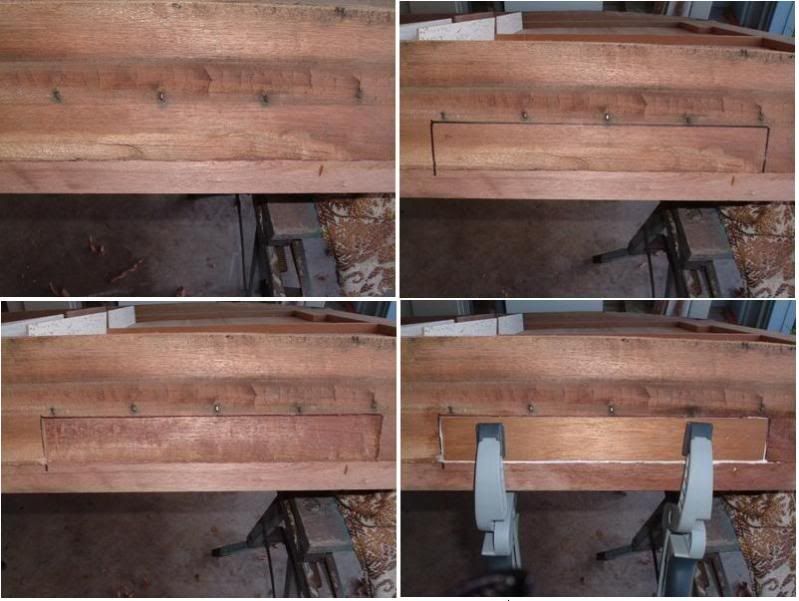 I think it's worth keeping in mind that any half-decent construction attempt will result in a van that can withstand a bit of knocking around. These vans don't fall apart in any great hurry if they've been repaired to a reasonable standard. And no, it doesn't have to be perfect. For bending timber, see if you can get 7mm-thick strips of timber and glue 4 strips on top of each other to give you the required timber thickness. Bend each strip around the curve before glueing the next strip on top of it. cheers, Al. |
|
|
|
Post by hilldweller on Jan 20, 2014 18:13:28 GMT 10
Eureka! You know when you do something and it’s not quite right and you do it again and it’s still not right and you do it again and it’s nearly right and you convince yourself it’s the best you can do, and you shut the garage and go inside and clean up, but it keeps bugging you so back out to the garage for another go and suddenly something shifts by a couple of millimetres and finally IT FITS! Or perhaps it’s just me LOL . But anyway, I just had one of those moments  Here is the offending piece, now sitting as it should (and don’t anyone dare suggest otherwise!). 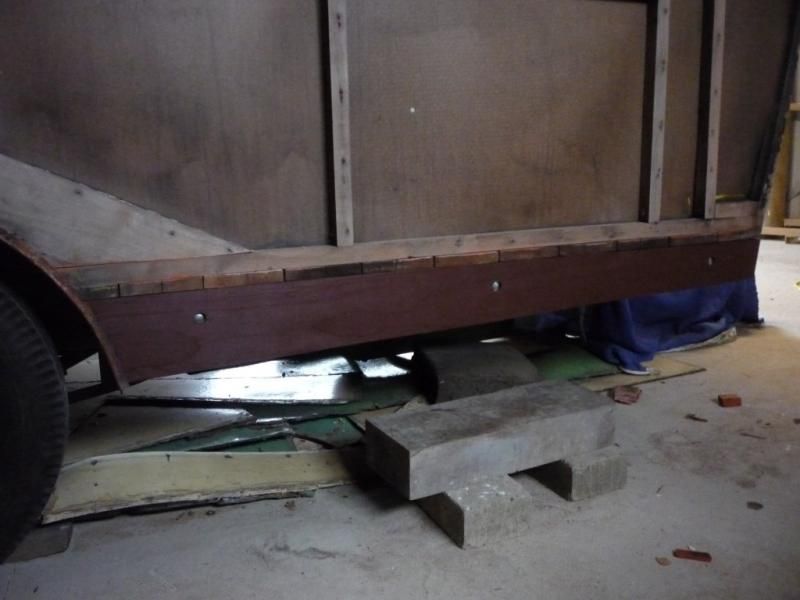 The issue was a tiny bit of ‘give’ in the chassis rail to which the timber is bolted, finally fixed by loosening the bolts and jacking the rail before re-tightening. When she’s towable again I’ll find a chassis engineering person to tell me whether some further reinforcement would be a good idea for modern towing speeds etc. That right front piece was the worst, with more rot evident once removed than was visible from the outside, and perhaps it hadn’t been providing quite the support it should have. The other three possibly could have been patched but they would have been big patches. I’m rather unreasonably anti pine at present but I’ve used treated pine for those lengths with a coat of paint for good measure and so the new timbers don’t stand out when viewed from underneath. Will try to stick to recycled rimu for the rest. This is the other side – those ones went on easily – and a shot showing new rust inhibiting paint on the briefly exposed metal underneath. The metal looked good with no flaking and the bolts were in pretty good condition considering their age but I’ve replaced them with galvanised. 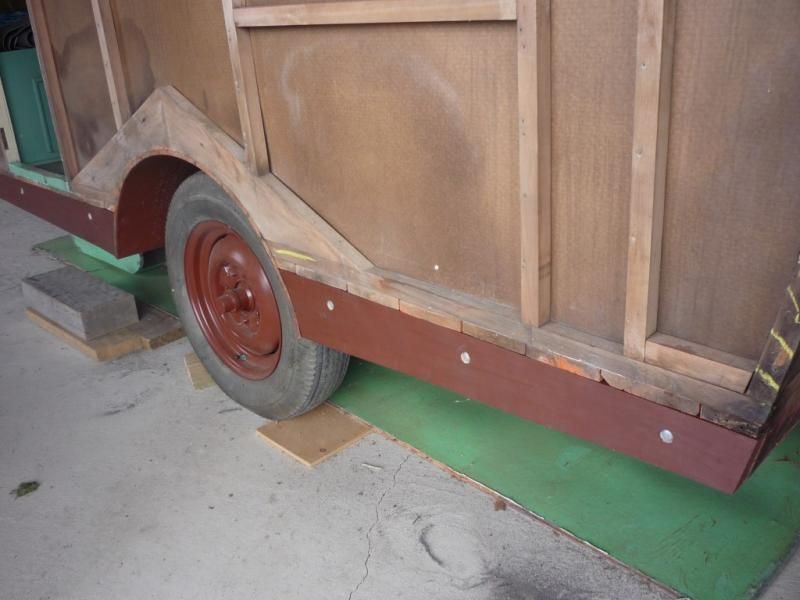 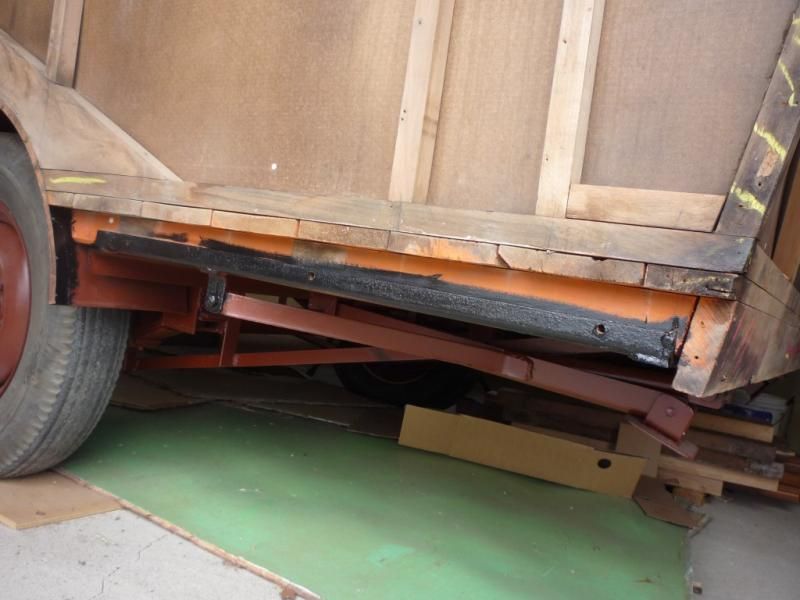 So that’s three pieces done (and a fourth ready to go on, hopefully tomorrow). Only about 397 to go . If Mabel hadn't been a vintage van at the beginning of this she certainly would be by the end! Thanks for your post Al. I think I’ve worked out a plan for the remaining ‘red’ areas, and I’ve sanded the green ones and hardened and filled (still need to sand) the yellow ones. |
|
|
|
Post by Franklin1 on Jan 20, 2014 19:48:20 GMT 10
G'day hilldweller, Nice repair job! I don't think you'll have any problems working your way around the van fixing things up. You seem to be able to weave some pretty good magic with your hands. The way I see the bits of timber you've bolted into position, is that they are just dress trims rather than structural pieces. Maybe I'm misreading your photos, but the floor timbers seem to be supported by a piece of timber (the orange coloured part in your photo) that's sitting on the steel angle of the chassis (the black part you bolted the timber to). I doubt whether you would need any additional support for the flooring, providing the existing support is in good condition (which it appears to be). cheers, Al. |
|
|
|
Post by hilldweller on Jan 27, 2014 17:52:19 GMT 10
A little more progress (and thanks Al for the advice on splinting etc) …. The framing has now been repaired, apart from the curved corner uprights which are next on the list, and the rails along the top which need to wait until I take a closer look at the damage from above. Although I’m trying not to do anything inside, the bowed linings needed a few ‘adjustments’ before the new straight framing could be fitted. The new framing is a mix of bits re-used from pieces removed from other parts of the van, cut down recycled house doors and new pine. 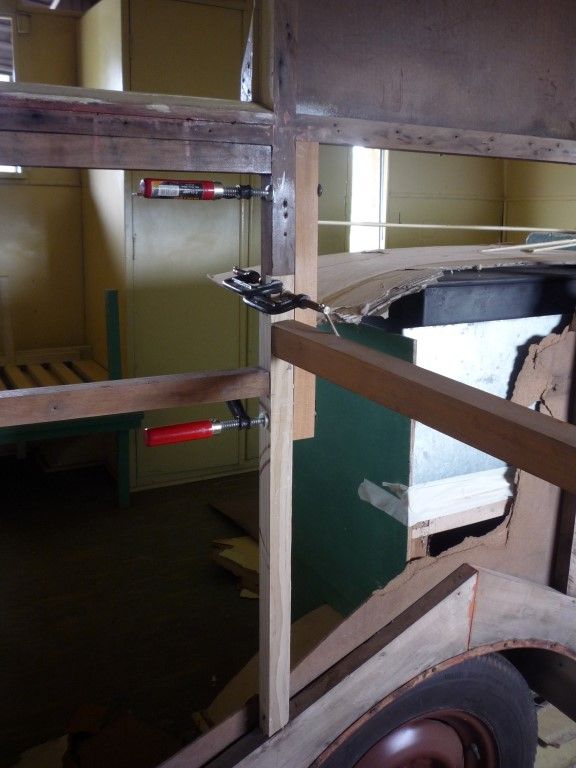 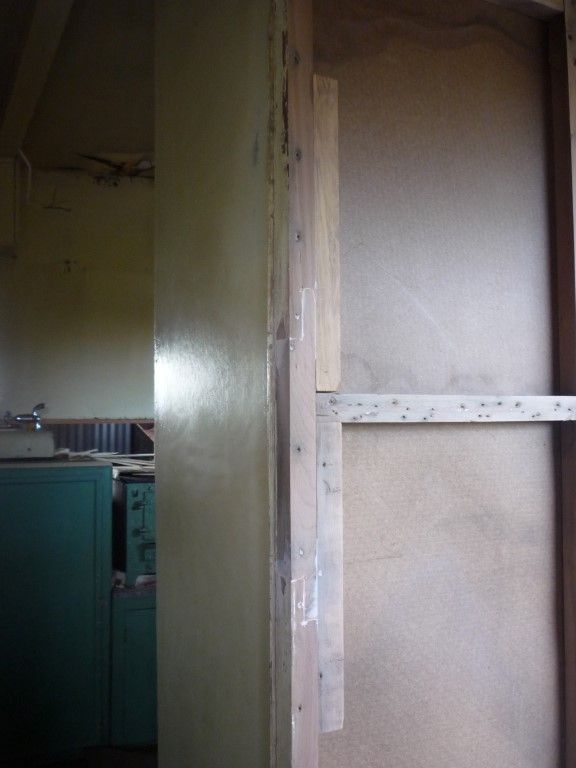 Front and back window openings have been reframed and the outer part of the sills is sitting in place but not yet attached. Very pleased with those two little pieces as they have a sloping top and a rebated bit on the outer edge where the cladding will sit, and looked rather daunting Would appreciate any comments on the size/placement of the front window as there were no clues as to the original height. I’ve been looking at pics on here of 30s and 40s vans - this site is such a great resource - but there’s a lot of variation. 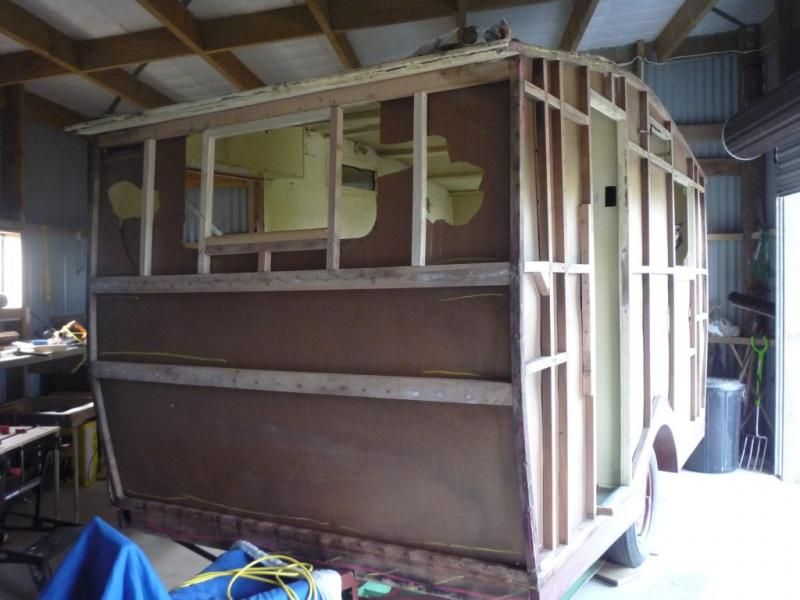 The back one is definitely the right width and the height is probably also about right given the shelf below. 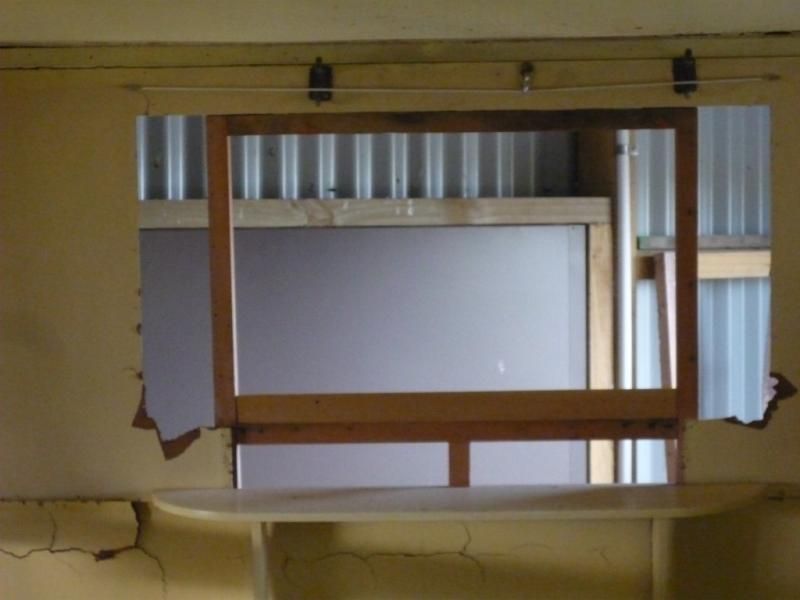 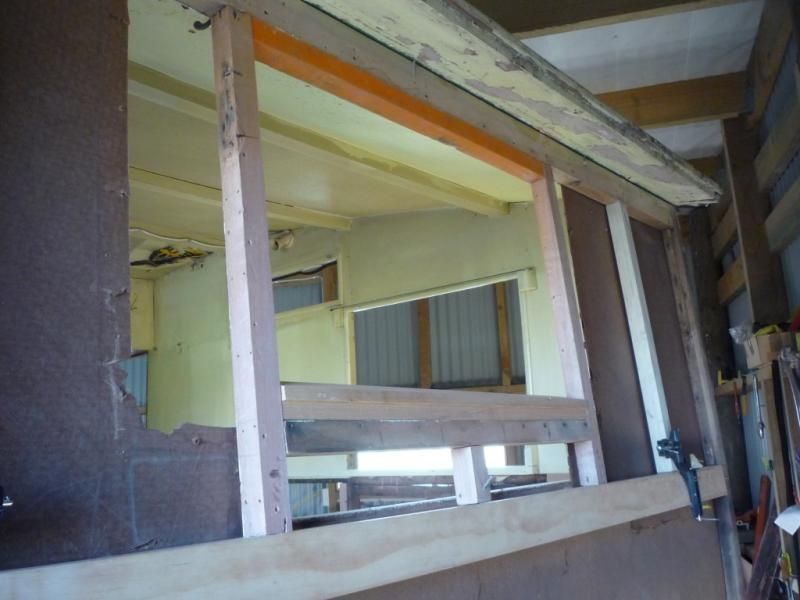 |
|
|
|
Post by Franklin1 on Jan 27, 2014 20:31:44 GMT 10
G'day Hilldweller, Great work on the frame repairs so far! As far as the window location goes, I would temporarily ignore the shelf under the back window for a moment, and stand at the corner of the van so you can see down one side, and across the front (or back) at the same time. From an appearance point of view, would the van look more appealing with the front and back windows at the same height as the side windows??... 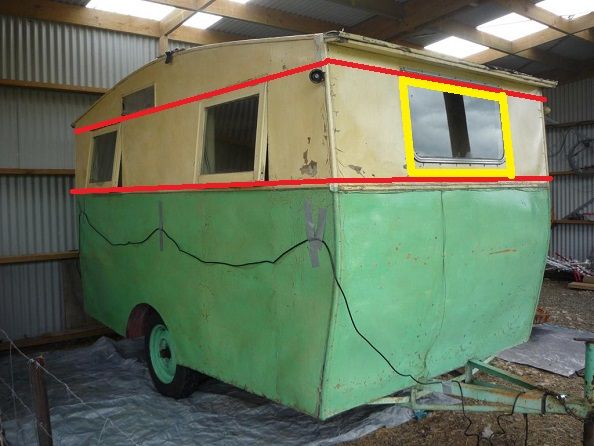 If your answer is "Yes", I would go that way, and work out what to do with that rear shelf to relocate it down lower as well. Unless there are compelling reasons for having the front and rear windows up higher, I personally think the van would look "more balanced" if the windows were at the same height all round. I gather you've cut the bottom sill of the front window to match the sills on the side windows, yes? I can also see in your early photos of the van that the side windows have a timber lip fixed to the bottom of the window to act as a water deflector. Assuming you are intending to make timber windows for the front and rear, it's important to have that "drip strip" along the bottom of the window to stop water wanting to get in behind the window sill rebate... 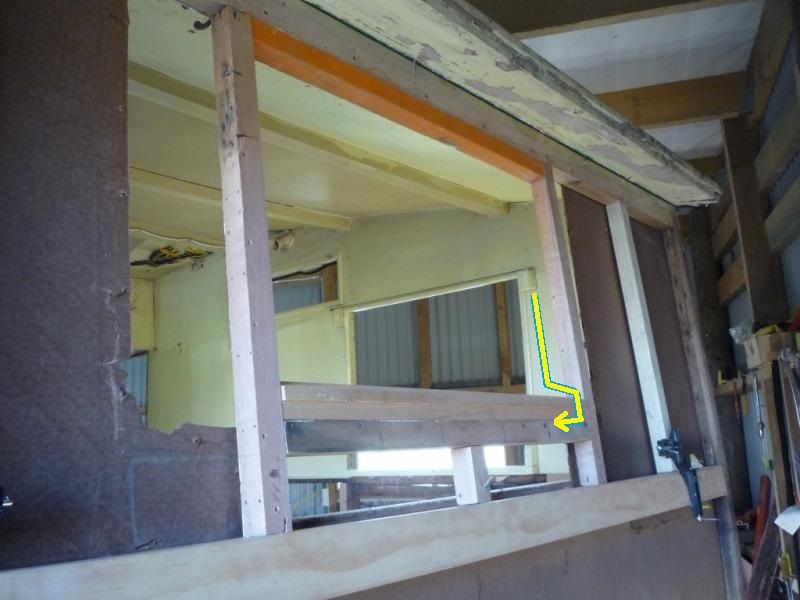 Good caravan design means that anything above should overlap anything below, otherwise you are asking for future woodrot problems. cheers, Al. |
|
|
|
Post by hilldweller on Jan 31, 2014 18:24:02 GMT 10
Hi Al Thanks for your encouragement with the framing My initial thoughts on the front window were the same as yours but on closer inspection the original framing doesn't allow it. The lowest the front window could go without moving that wide piece that runs across the front is 1 1/4" higher than the side windows. At one point I was quite definitely going to do that and I may yet, but I'm worried it might look as if it was supposed to be the same and just missed. I think what I'll do is try making a frame to fit the gap that's there and see how it looks. The back one really does need to stay at that height. I haven't posted a good pic of the shelf but what you can't see is that the brackets which support the shelf also support the table so there'd be a few things that would need to move, and as a general rule I don't want to change things that look original unless there's a good reason. Your comments on a 'balanced' look had me laughing because to my eye she's not remotely balanced in any respect. She's both really tall and really short so that when you stand next to her it seems as if she's taller than she is long, and her wheels are ridiculous All part of her quirky charm She must also be very heavy - it doesn't look as if any thought was given to either weight or aerodynamics. Nice explanation about the 'drip strip' on the windows - thanks. I'm intending to copy what is there on the other windows so will re-create that. I would have thought it would be sensible for the sill to protrude beyond the cladding but that's not the way it was. |
|
|
|
Post by Roehm3108 on Feb 1, 2014 7:43:52 GMT 10
Hi HD
I'm impressed by the way you're attacking this project and the enthusiasm behind it. As expected, you're maintaining your typical high standards, that even impress Franklin1 - not an easy task, I assure you. It's restoration project like this that's at the core of vintagecaravans.com, to my mind.
Be careful when using treated pine that carries structural loads, that you are using structural treated pine, rather than the garden type CCA stuff.
Keep up the good work
Ray
|
|
|
|
Post by hilldweller on Feb 1, 2014 12:32:13 GMT 10
Hello Ray Haven't seen you on here much lately. It's nice to have you back and I hope all is well in your world |
|
|
|
Post by Roehm3108 on Feb 3, 2014 6:31:47 GMT 10
Just being a bit of a voyeur HD, but don't worry, I'm keeping my eye on what you're doing here as well Ray |
|
|
|
Post by hilldweller on Feb 14, 2014 18:00:00 GMT 10
Hello all The four corner uprights need replacing and since the bend is a fairly gentle one I wanted to see if I could replicate the original bent timber. Laminating narrow strips of ply is Plan B. So, having read everything I could find on here and elsewhere, I expensively purchased some 32x40 rimu and cut it down to 32 square, hired a wallpaper stripper/steamer, and removed the first (and worst) of the old corners to experiment with. It came off in one piece but succumbed to a whack against the bench. 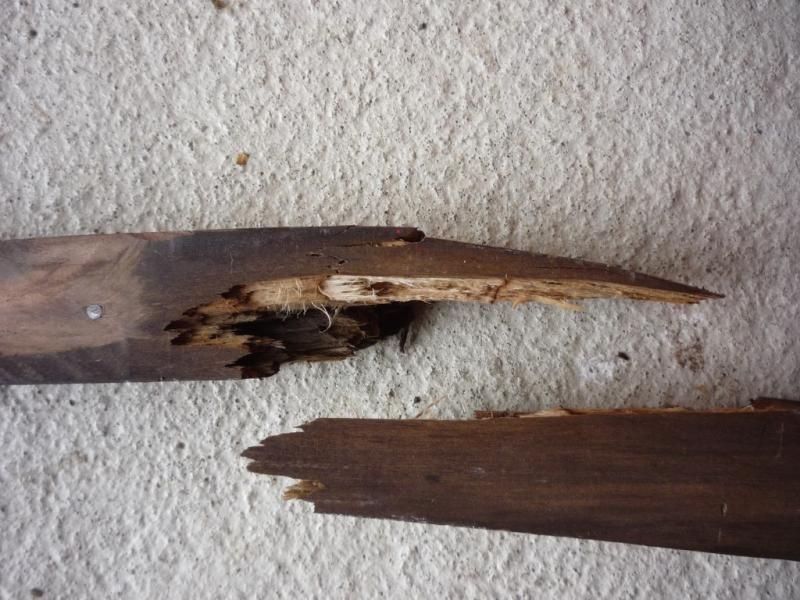 Nailed offcuts of the old doors to the bench using the original as a template. Bought more clamps. 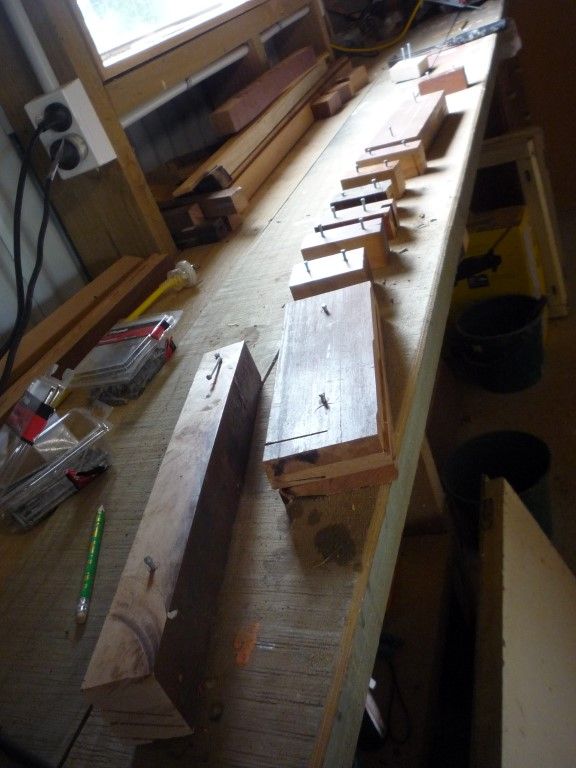 Happened to have a length of plastic downpipe so cut a circle of ply to plug one end, with a smaller circle in the middle to take the pipe from the wallpaper stripper, and found a bit of hessian for the other end. Put a couple of nails through to hold the timber off the bottom and when it went soft under the heat added a few more nails along the side to prevent it collapsing too badly. 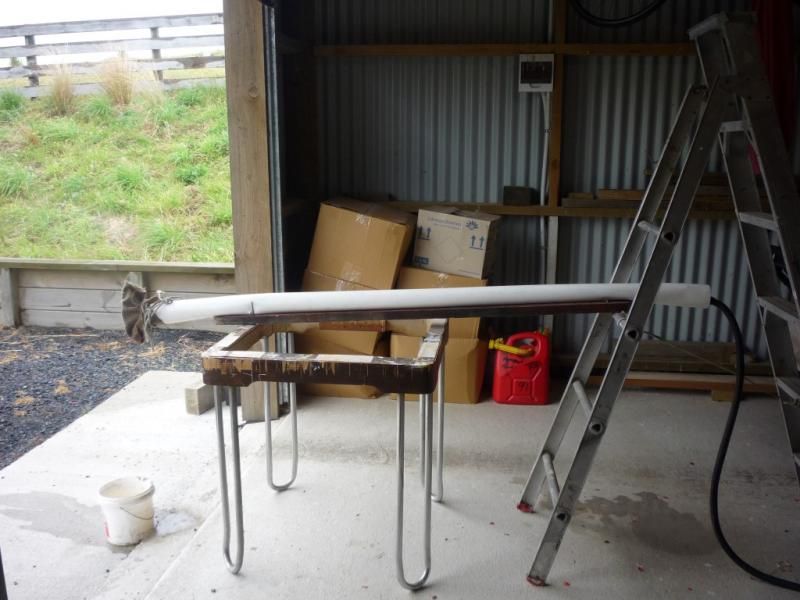 Left it an hour and a quarter (an hour per inch) then donned gloves to extract the rimu and clamped it as quickly as I could. The clamps that wind in with screws worked best. It took a bit of pressure but the timber bent smoothly with no sign of splitting. Left it overnight. 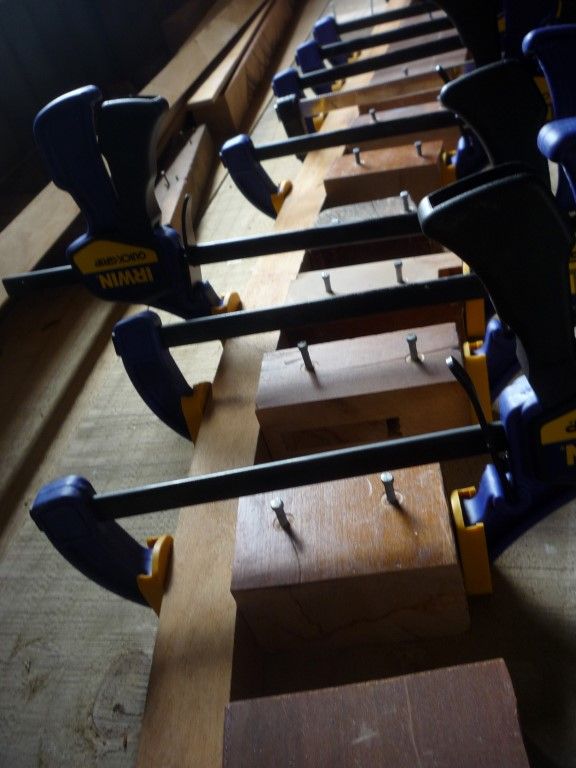 Day 2: Gingerly removed the clamps and it sprung back a little but definitely now a reasonable approximation of the original. Bought more, bigger, clamps. Did a trial fit to see if it would follow the curve on the caravan, which it did with a bit of pressure. Took it off again, pre-drilled some holes and put it back, this time with glue, nails into the endgrain on the front and side horizontals (as per the original) and screws into new blocks for a bit of extra support at the lower end. 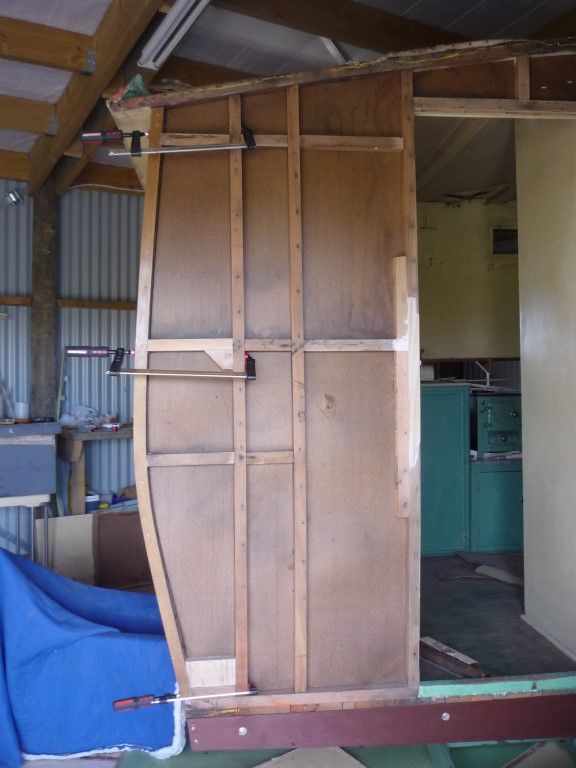 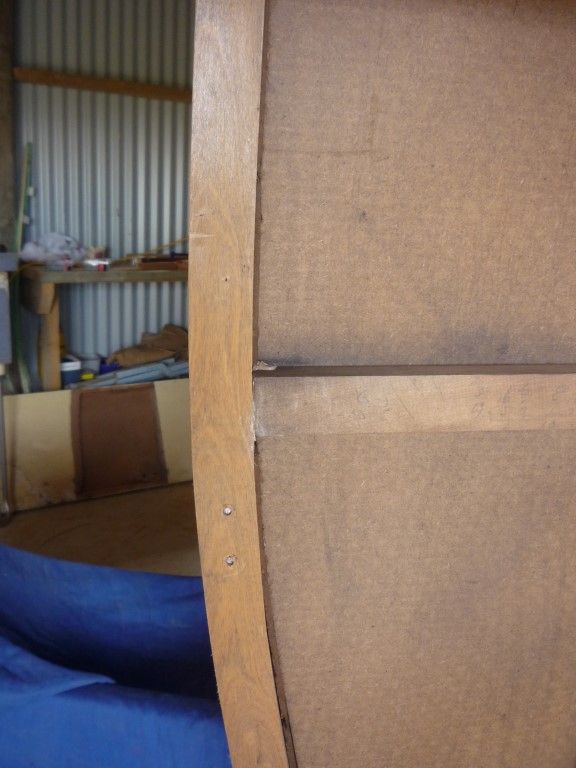 So that’s where I’m up to – a very interesting experience. I’m pleased with how it looks but a bit worried that since it took some pressure to get on because of the ‘springback’ when unclamped from the bench, there will presumably be pressure on the joints and all the adjoining rails. Can someone tell me whether it should now settle into its new curvy shape or do I need to do revert to plan B? |
|
|
|
Post by Franklin1 on Feb 14, 2014 20:20:22 GMT 10
Well, good on you, hilldweller, you old steambender, you! What a great effort! And you've used just the sort of ingenuity that these projects require from time to time. I'm giving you 10 out of 10 for this one! I don't think you'll have any problems with the bent timber, provided it is anchored properly to the adjacent framework, and it is glued to the internal lining (is it masonite on the inner wall of your van?). I've copied one of your photos, and with apologies for the multicolours, let me try and explain what I think would help... 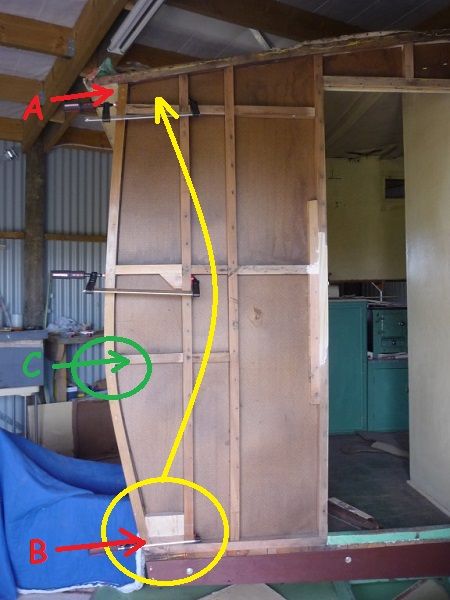 The highest stresses in the timber will be at points A and B. These are the two points that will want to try and straighten themselves out again. I would recommend you do a similar thing at point A (top) that you've done at point B at the bottom, and that is to insert a block that locks point A to the adjacent upright on the right. Glue and screw the block and both the timbers either side into one solid block. Point C is where the stresses are most likely to crack the timber, so the horizontal piece you've got there locking point C to the next upright is exactly what you need, and that would have to be repeated in each corner. I had a bit of a look on the internet and this link says NZ rimu steam bends "satisfactorily", but this link says it "has a very poor steam bending classification", so I don't know what the truth is. It might be that you are only partly steam bending the timber, and mostly "cold bending" it when you clamp it to the template jig. I guess the bottom line is that if it doesn't split or crack when you do the bend, it's good enough to fit it into position and anchor it securely. Once you've done that, it'll stay in position and eventually lose the will to spring back straight (particularly if humidity can get into the timber over time). Keep calm and carry on! cheers, Al. |
|
|
|
Post by hilldweller on Feb 16, 2014 11:28:34 GMT 10
Thanks Al - much appreciated and I've added a block as you suggested. Clamps now off that first one and all is well. The other front corner has been bent and is now clamped to the van and tomorrow hopefully when those clamps are freed up I'll be able to get the steamer back and do the two rear ones.
|
|
|
|
Post by Don Ricardo on Feb 16, 2014 15:15:17 GMT 10
G'day Hilldweller, Another impressive piece of vintage caravan engineering happening there at Hilldweller central at the moment with the steam bending. And this from a person who tells us from time to time that she has no skills!! You're doing a great job, and I'm sure that Mabel is appreciating your restorative powers. We certainly all are, and enjoying watching over your shoulder as you work. Don Ricardo |
|
|
|
Post by seeshell on Feb 16, 2014 20:05:32 GMT 10
Hi HD
What a clever little thing you are! What an ingenious approach, and I really do admire the can do attitude. I'm at a bit of loss for words, but what I can say is that Mabel is clearly in the best custodianship possible.
Slow golf claps...
Seeshell
|
|
|
|
Post by hilldweller on Feb 22, 2014 15:19:13 GMT 10
Thank you for those nice comments Seeshell and Don Ricardo. It is great to log in on here and see new replies.  Well the last piece broke as I was attempting to fix it in place  I think it got too dry as I was diverted onto other activities after steaming and it sat in the garage clamped to the bench through a couple of hot dry days. Also think I need another big clamp or two to help with that process. Might be able to get a replacement length of timber tomorrow and start again with the steaming. Fingers crossed. Now assuming things move on from the three cornered van stage, what do I do next? Can I take the roof off? Pleeeeeeease? The rotted canvas, water damaged hardboard and badly sagging framing all need to be replaced. (Apologies for repeating pics but I can't work out how to refer to them, four pages back). 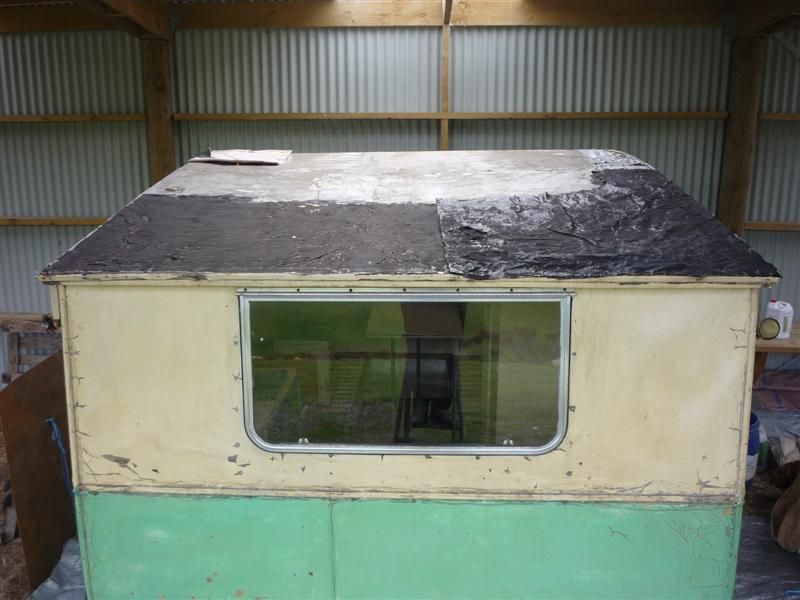 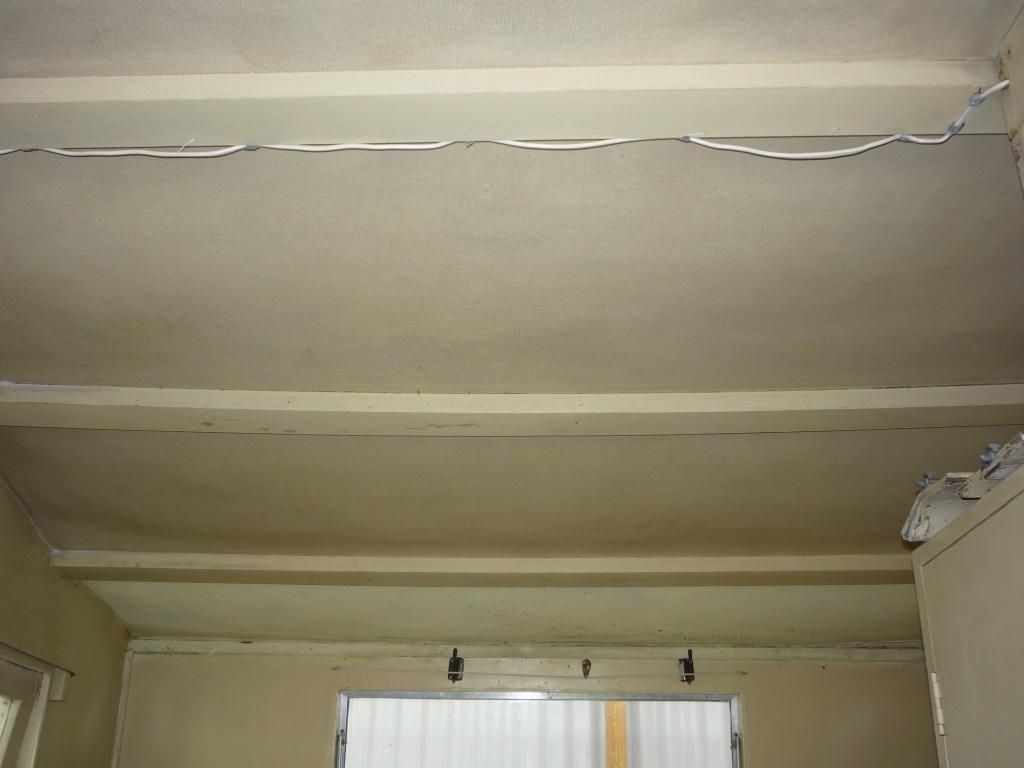 Although I'm trying to keep things original, I think the framing needs to be done differently or it will just sag again. I've seen pics where the roof framing goes both across and fore-aft following the curve of the roof and am thinking that might work nicely, without being too much of a departure from the look of the original. Any thoughts? |
|
|
|
Post by Franklin1 on Feb 22, 2014 17:03:15 GMT 10
Hilldweller, I'd personally be a little nervous about taking the roof off before the four corner steam-bent timbers are in position and glued-and-screwed. I'm only saying that because your photos show the perimeter roof frame is acting as an end-stop for the steam bent timbers at the top, and is helping to prevent them from straightening out as you clamp them in position. If you are not planning on removing that perimeter roof frame, you could go ahead an remove the roof covering, I guess.
What internal head height is there in the van? It seems to me that those roof battens should be sitting on their edge and not on the flat, considering the span they have to support from side to side of the van. If you have plenty of head room to spare, I'd be looking at turning those timbers 90 degrees. The issue you're facing is exactly the reason I ended up putting a partition wall in my project van in line with the hatch. That partition wall on one side, and the wardrobe on the other side, are virtually supporting the whole width of the roof at that point. I'm not saying I won't get roof sag elsewhere in the roof of my van over time, but I think it will be minimal if it happens. I notice there's a gap at the top of your cupboard, so you're not getting any roof support from that.
There's a lot to like about the South Australian double-cambered roof design. It's a great design for getting rid of water, and a great design for preventing roof sag. Maybe some roof bows running front to back might be worth thinking about in your van, if turning the existing timber 90 degrees is not an option.
cheers,
Al.
|
|
|
|
Post by hilldweller on Feb 23, 2014 9:15:43 GMT 10
Thanks Al. You're giving the perimeter roof frame far more credit than it deserves! I can see that it should be acting as you have described (another great explanation, thanks), but it's rotten at all four corners and isn't serving any useful purpose. Part of the reason I want to take the roof off is to get a better look at how far the rot extends so I can work out whether just the last foot or so at each end can be cut off and replaced, or the whole thing. Hopefully the former. However, as you say, first things first - I need to get that fourth corner sorted and then maybe take a closer look at those top rails. I might be able to pull back the edges and assess and fix the perimeter frame before removing the rest. Rotating those roof battens 90 degrees might work - I will check out the head room. I like the look of the double-cambered roofs but wouldn't go that far with Mabel as I don't want to change her shape. Actually in her current saggy state she's kind of a reverse double camber LOL - convex from front to back and concave left to right. It's not a good look! |
|
|
|
Post by Franklin1 on Feb 23, 2014 9:42:29 GMT 10
At least when it rains you have plenty of fresh water available from your roof. It's dawned on me that you don't have a hatch on your van. I wonder if that's one of the reasons why the front and rear windows are set so high up? Are there vents somewhere up near the roof to let stale air out? |
|


 . One-inch flat-head galvanised (?) nails holding the hardboard to the frame, badly rusted panel pins and nails with a square profile for the half-round trim over the joins, upholsterer’s tacks along the top edge where the canvas overhangs, and a random selection of whatever was handy for fix-up jobs over the years. No glue. I am assuming I will make full use of twenty-first century glues when it comes time to put the new cladding on but probably nails as well, since the rows and rows of painted-over flat-head nails are part of her original look.

 .
. 


 . Did manage to go shopping, however, and came home with a solid old rimu door from a house demo/recycling place and then went a bit mad in the big orange shed and added 1x circular saw, 1x electric planer and 1x multitool
 It's surprising how cheap the old timber is if you buy it that way.


 It helps that other jobs like weed control keep getting rained off


 I think it got too dry as I was diverted onto other activities after steaming and it sat in the garage clamped to the bench through a couple of hot dry days. Also think I need another big clamp or two to help with that process. Might be able to get a replacement length of timber tomorrow and start again with the steaming. Fingers crossed.