|
|
Post by Roehm3108 on Dec 12, 2022 14:06:35 GMT 10
Must be sold.
|
|
|
|
Post by Roehm3108 on Dec 12, 2022 14:05:14 GMT 10
There goes many a memory of great times Diane. Happy Christmas. Xx
|
|
|
|
Post by Roehm3108 on Dec 8, 2022 19:01:40 GMT 10
Thanks DonR
The next step is the internal lining of the framed bits - front and rear walls and lower roof sections.
From there I have to firm up the interior layout design, so that I can do the electrical wiring first fit. I want to hide as much 12 volt wiring in the wall cavities, as is possible. The 240 wiring will be in conduits as this will only be below waist level for power points
Once that's done, there is the task of insulation installation before fixing the outer walls.
|
|
|
|
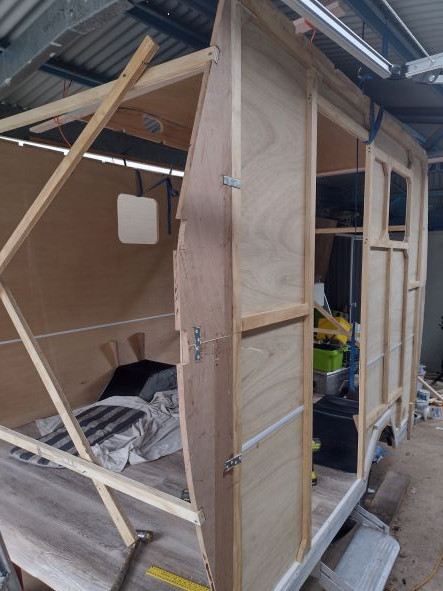
Post by Roehm3108 on Dec 8, 2022 10:59:06 GMT 10
Reached another milestone today. The framing is finished! Rather pleased about actually seeing some shape!  |
|
|
|
Post by Roehm3108 on Dec 6, 2022 14:44:51 GMT 10
A bit more progress today, with the front framing finished. Some might say it's a bit of overkill, but I'd rather err on the side of caution. Too often I see news items locally here, where 20plus ft caravans had no structural integrity and as a result ended up as pulp after an accident! The bit without chocks is where the front window will go.  |
|
|
|
Post by Roehm3108 on Dec 1, 2022 14:54:18 GMT 10
This cooler weather is certainly agreeing with me, just a shame that we're also getting wind-driven rains as well!! The roof is all screwed and glued on and now the rafters for the lower part of the lantern roof are also installed. The whole thing is starting to take on its shape and stiffening up nicely.   |
|
|
|
Post by Roehm3108 on Nov 30, 2022 17:05:35 GMT 10
It was time to see how good a builder I really was!!! Building the roof apart from the framing may sound strange, but I'm pleased to say, the hat fitted to within 3mm!!! This pic was taken before any pinning down. I'm SOOOOO pleased! So good to see it taking shape.  |
|
|
|
Post by Roehm3108 on Nov 29, 2022 15:56:26 GMT 10
|
|
|
|
Post by Roehm3108 on Nov 27, 2022 14:34:25 GMT 10
Those gas bottles should go a long way if the proportions are right!!!
|
|
|
|
Post by Roehm3108 on Nov 25, 2022 21:57:02 GMT 10
Hi all I finished the driver's side interior lining today. Yay!!  I noticed on a video from Caravans plus, where they showed a caravan being built, that the next step after the floor was fitted, was to instal the vinyl flooring. Makes sense because it avoids a lot of corners when you only have to trim around the wheel arches and then the edge of the chassis. So I think I will make that my own next step after the weekend. DonR, I can see where you're coming from in your comparison and agree that once the roof drops on, it will take on its own unique form. |
|
|
|
Post by Roehm3108 on Nov 23, 2022 12:36:02 GMT 10
Some progress looks greater than others and none more so than when cladding starts to be added. Here's the kerbside internal lining finally added.   The frame is really starting to stiffen up and considering the external cladding has yet to be added, I think it will be quite strong. |
|
|
|
Post by Roehm3108 on Nov 19, 2022 8:24:45 GMT 10
Rather strange using OTP pictures!!
|
|
|
|
Post by Roehm3108 on Nov 17, 2022 17:25:25 GMT 10
I see you've started a new post three times for the same subject. Best to keep on one post per subject. It gets too confusing otherwise.
|
|
|
|
Post by Roehm3108 on Nov 17, 2022 14:51:15 GMT 10
A few months ago, the BGS ran a special on 900x300mm tas Oak shelf panels, marked down from $37 to $10. I bought three (don't ask why an odd number!!). Decided now tha they would be ideal for creating the curved front and rear framing. So I bought another pine panel and cut each section diagonally and created the curve within the triangle. It's also as tight a curve as this ply will allow too! Fitted one section to the passenger side frame as below. The other side is ready for attaching tomorrow. For those who are interested in such things, I'm using a Sika polyurethane glue for this framing and thoroughly recommend it. It will NOT move once its dry! A friend who builds gemstone boxes claims he has glued 18mm dowel end to end and tried to break it at the join. but broke it before the join instead! Also FYI, the framing is 1800mm high and the door 1650mm. The lantern roof is set in 400mm from the sides and adds an additional 180mm internal height along the length. To eagle-eyes cobber, yes the front upper section (LH side of pic) doesn't follow the curve, it's straight!! That's where the front window is going, and I suppose I'm taking the easy route to fitting it. I hummed and haa-ed about whether to curve the front or have it bulge out in a triangular fashion and opted for this way. You've gotta try to imagine the curved roof on that framing and I think it will look more "vintagey"!! I'll be doing the same with the wheel arch too. The longest length of this van is only 2810mm (compared to 2600mm on Cino Vardo)  Wheel arch frame  |
|
|
|
Post by Roehm3108 on Nov 17, 2022 8:09:51 GMT 10
Hi SGTL. Thanks for your input, always appreciated. That waterproofing PSU looked interesting too. I felt that for my purpose (particularly exterior grade) I wanted that waterproofing compound. Time will tell how well it works. Looks like we both think alike about upcycling furniture. Here's a pic of the cupboard I picked up at a Tin Can Bay OP shop for $25! I'm a huge fan of OP shops and Marketplace. My lounge is becoming quite a storeroom of treasures I've found. Thankfully I'm the only one who has to put up with the mess!! The roll of vinyl you see in the pic is unused top range stuff sold by the Big Green Shed, which I picked up at less than half price on Marketplace. DonR, had you ventured outside your state a couple of years ago even pre Covid, you would have seen Cino Vardo at Shellharbour. Hopefully we may cross paths next year. 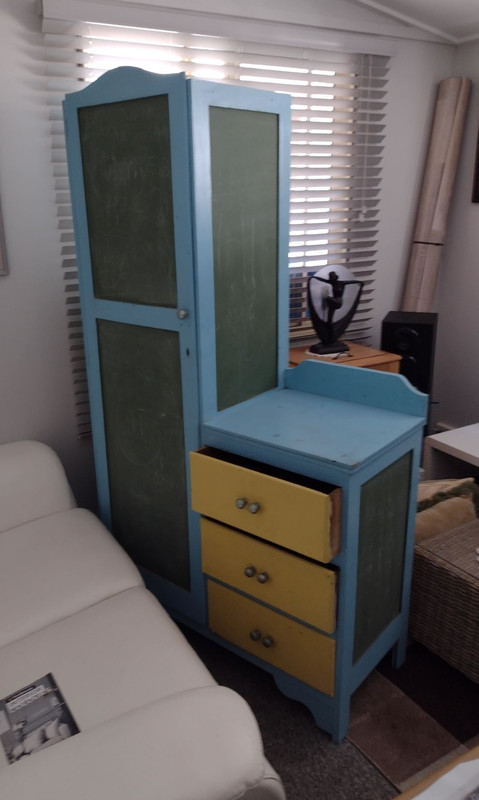 |
|
|
|
Post by Roehm3108 on Nov 17, 2022 7:55:57 GMT 10
Welcome to the forum. You're undertaking an interesting project, building a replica from scratch. Over the years there have magazines which had DIY plans for home-built caravan. Modern Mechanics and Practical Woodworking are a couple. Are you locked into a Don Cadet lookalike?
We have a couple of Don experts on this forum who will surely weigh into the discussion and may well be able to help you further. Good luck with your project.
|
|
|
|
Post by Roehm3108 on Nov 14, 2022 12:55:55 GMT 10
Hi ST
Thanks for your kind words. This is pretty much "seat of the pants" carpentry, especially compared to what I saw in your shed. There was another "white box" that had come to grief on the Bruce Hwy up here a couple of weeks ago, it was backhoe pickup clean-up, with hardly any framing. I'll be happy if mine is an improvement on that style of construction. Double skinning the van makes for some interesting thinking when it comes to building the framing!!
Good to hear I may have given you a bit more motivation to work in your shed. This blog is part of the reasons I keep updating - to motivate others as much as myself.
|
|
|
|
Post by Roehm3108 on Nov 9, 2022 12:51:12 GMT 10
Yay! Driver side framing completed! The trick now is to single-handedly set up the frames and lower the roof onto it before proceeding with the front and back. 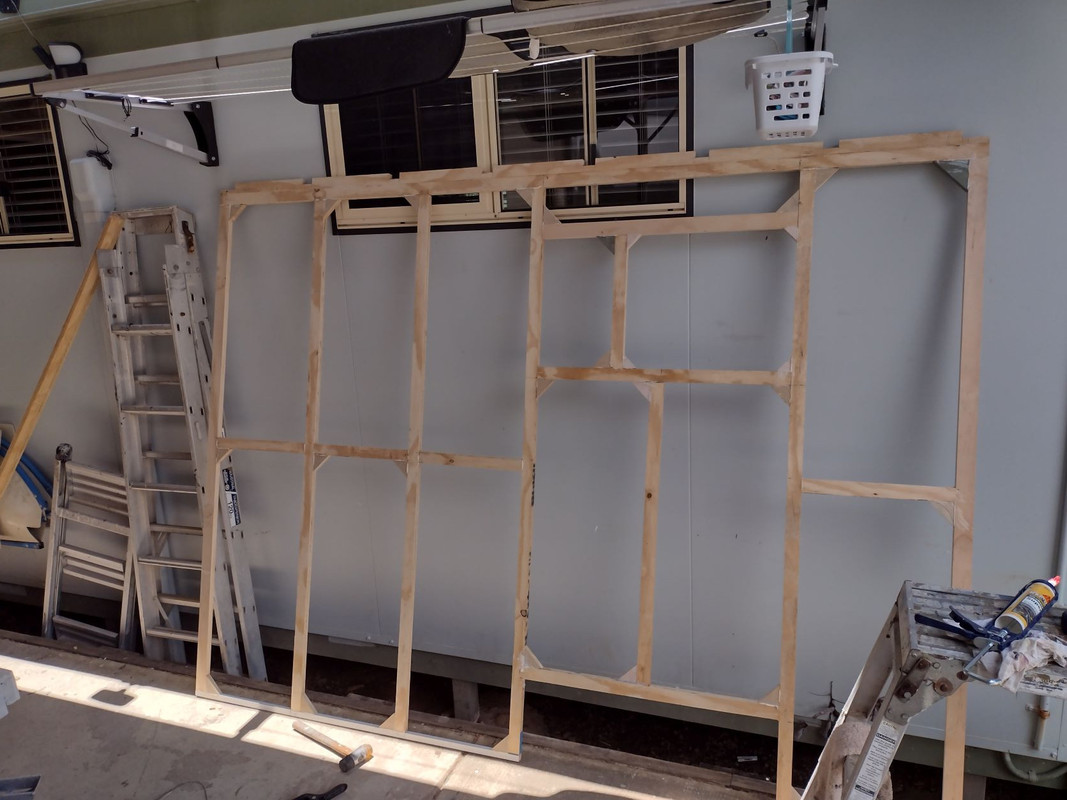 |
|
|
|
Post by Roehm3108 on Nov 7, 2022 10:37:43 GMT 10
Life keeps getting in the way of doing the things you prefer - most of it self-inflicted I hasten to add!! But I have managed to build the frame of one side, which is the section that attaches to the actual chassis. The front and rear framing will incorporate the curve  The unbraced opening is the door (620mm wide x 1650mm high). The larger of the two small upper frames is the window frame (380x457mm) |
|
|
|
Post by Roehm3108 on Oct 13, 2022 17:19:56 GMT 10
Hi all Its been a busy month working in my profession on Caloundra, so not much has happened on the build. I duplicated the sides out of exterior plywood to give the pine framing added protection and they are now attached. SO effectively I had to make two sets of porthole cutouts. Considering I managed to break one of the pieces during construction, I've done the same job three times!!! Then I coated the roof with three coats of the Exterior waterproofing solution, so there is now an extra layer of protective rubberised compound. If it works, it certainly is easier that giving the roof the calico treatment. I also found a door for the rig. BUT it was a RH hinged door and while I could redesign the window location on that wall so that the one wouldn't obstruct the other, I was determined!!! As usual, such things take longer than you expect, but I now have altered the door to a LH hinge. Some pics of the roof with waterproofing compound   |
|
|
|
Post by Roehm3108 on Sept 15, 2022 16:43:17 GMT 10
Hi all A little more progress. Added 15mm insulation to the ceiling cavity  Today I fitted the outer skin to the lantern roof section 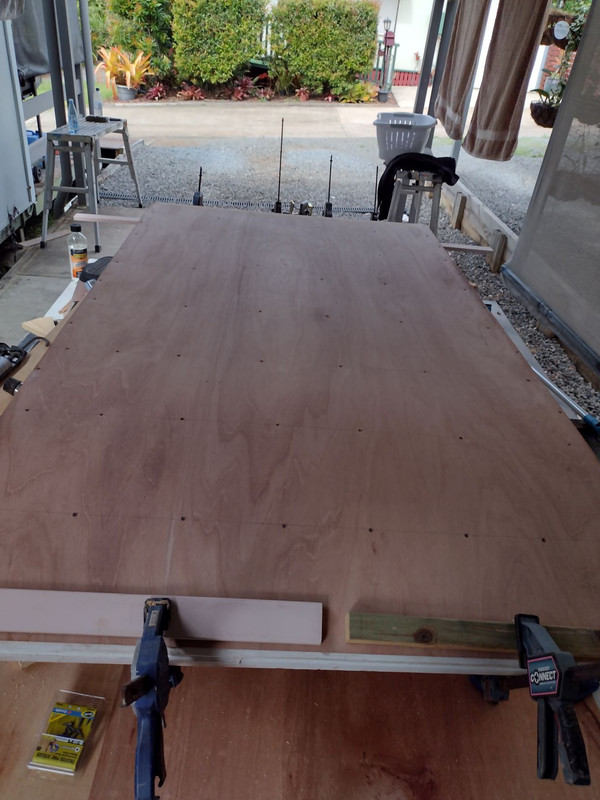 It never ceases to amaze me how different the plywood construction is these days. I'm using 3.6mm exterior ply. OK, so it's three-ply, but the outer layer is really only the thickness of veneer and the inner layer is what look like hoop pine. WIll be interesting to see how this holds up. I'm intending to coat the roof areas with this waterproofing compound instead of a calico cover. Has anybody used this before? I'ved tested it and it seems to adhere really well to the unpainted plywood. I will still add acrylic paint on top of that  |
|
|
|
Post by Roehm3108 on Sept 8, 2022 7:28:49 GMT 10
Hi all I've been a bit distracted last month with other things, including chasing wildflowers to photograph and dealing with a park owner who wants me to stop building my project! Some hassles are sent to try us! I purchased a plywood called falcata for the interior of the build. It is about 1/3 lighter than the equivalent plywood. It looks to be a triply layered sandwich. The outer layers are falcate veneer and the inner core paulownia, which is akin to balsa. The problem is that it seems like it doesn't have the ability to bend as well as ordinary plywood. I never considered this when building the lantern frame and despite hot towels and weights, could not get it to bend to follow the curve I had created with the framing. So a bit of re-engineering was needed. Here are some pics   The future "inside" view  As you can see from the first two pics, the "stringers" at each end had to be "thickened" to cope with the lack of curving in the plywood. To do otherwise would have fractured the outer veneer layer of the panel. Thankfully this is the only "seen" panel that needs this treatment. I have something else in mind for the front and rear wall curves. I will now install the insulation and add the outer plywood cladding while it is at ground level. I must admit that this roof was a bit of a challenge for me! |
|
|
|
Post by Roehm3108 on Aug 11, 2022 18:27:14 GMT 10
Hi Cobber
You certainly are the custodian of a very rare piece of Australia's caravan history. We all know you love it immensely and would hate to see it become something other than what it's intended to be some time down the track. Personally, I believe it belongs in a museum when you no longer use it, to ensure that it remains intact and original.
Meanwhile cobber, use it as much as health and inclination allows. Despite what you claim on your message machine, you're not always down the paddock weeding!!
DonR, I found it rather funny reading the 1936 advice to budding amateur caravan builders! Lucky I didn't read it earlier!!!
|
|
|
|
Post by Roehm3108 on Aug 11, 2022 7:43:08 GMT 10
I think the consensus here and on my own FB site indicates that I need to have three skylights. Not an unexpected result as I have similar feelings. Thanks for your comments cobber, I always appreciate your pearls of wisdom. For me, there is also a 5th reason for a lantern roof - to fit under my carport!!!  . As you might remember, before I built Cino Vardo, I had to change the framing on the carport to a portal frame to accommodate a side to side curved caravan roof. I really need the same thing to happen with this van, so that the sides are lower than the centre. Apart from that, I can tick off three out of the 4 points you mentioned. which ain't bad. As far as condensation goes, I remember having that problem with the Properts too. I notice that it looks like Ol'33 has small vents, as does the Glen. It doesn't look like the Trail-a-Home has any. Mustang has posted a solar powered vent, which I will look into further (thanks Mustang). I will be double skinning this build as well as having polystyrene insulation panels and I think I will wait till I test that out to see if condensation will still be a problem. Interestingly, I didn't have any condensation problems with Cino Vardo. Maybe because there was only one body breathing in it! (don't laugh!!) |
|
|
|
Post by Roehm3108 on Aug 10, 2022 14:26:20 GMT 10
Maybe it's because I live in this upside down country called Austraya, I'm starting this build from the top down. Right or wrong, I'm building the lantern roof first and hope that the body will fit under it. So I've been transposing the drawings onto the timber vertical section and am ready to draw where the holes for the windows are to go. FYI, those upper windows will only be skylights and will not open. I simply don't want to create too many places where water can enter. I originally planned for the skylights to be approx 350mm long and about 100mm high. Porthole windows really cost the earth, so I am adapting $16 Bunnings bunker lights. by using the holding frame and cutting out pieces of flat tinted Perspex. Those fittings are about 200mm long by 100mm high. I have a feeling though that two of those shorter skylights will look a bit lost. So I have attached some pics, seeking your opinions - two or three skylights? The first pic gives you an idea of how the framing will slope by the pencil drawing. Please let me know in the next day or two.    |
|