|
|
Post by shaneg on Mar 23, 2010 7:53:51 GMT 10
Hi VVers,
I've been watching your forum for a while and have learnt a lot from you guys (and gals) and finally took the plunge and bought a van. ( and put something on the forum!)
I picked up a 1965 Olympic Riviera ( 4 bunks in back version) in country SA, owned by the one family for over 30 years but sadly spent the last 6 in the one spot and not undercover so is a bit sad on the outside .......although only cosmetic. (there are possibly some photo's attached......but given that I am technologically challenged it is equally possible that there are not!)
Luckily for me the son of the owner (now deceased) is a mechanic so he checked and greased the bearings and made sure all the lights were working which made the trip from Kadina back to the Adelaide Hills relaxing......in fact I was surprised at how well it towed......towing with a G220 Fairlaine meant power was never going to be an issue but not once did it "buck or sway" and fuel economy was unchanged from when I tow my caged 7 x 4 trailer so very happy with that. Aparently it was originally towed with a black Chrysler Royal.
The interior is totally original and I thought was in good condition but now that I have it home and have started getting my hands dirty it is clear that the very thin ply they used on the cupboards is not standing the test of time so will probably replace cupboard doors and handles which may lead me to commit the crime of changing interior from original.....although will keep it 60's for sure.
The floor in the doorway is very spongy so pulled up the vinyl (and now that piece of floor) and found the original lino tiles still underneath.
Being an early version, it has a weird shaped door with slide down perspex window, without the fibreglass opening "flap"......I think the "flap" is a much better arrangement and looks better so if anyone has a mold or even a whole door I would be interested.
Not sure what to do on the outside......sanded the roof yesterday which did not take long as the paint practically fell off.....normally would just 2 pack paint it but can almost see daylight through some of the roof corners so think something more is called for on top...........any advice/ideas would be extremely welcome.
Actually had my heart set on mid 60's style Globetrotter but stumbled across this Olympic and accidently bought it.....so had better now do justice to it.
Thank you all for your very informative forum........I will try an add to it with progress reports and definately could use advice on restoring a fibreglass van.
Oh yeah.......I think chassis number is 171R....but will get back with a definative response.........and before you ask.....paid $2500 for it.
All the Best
Shane
|
|
|
|
Post by atouchofglass on Mar 23, 2010 8:53:22 GMT 10
|
|
|
|
Post by shaneg on Mar 23, 2010 11:56:50 GMT 10
Gidday Atog,
It is appropriate that you replied because it is largely your fault that I bought an Olympic as I watched with interest your excellent restoration job, and your enthusiasm for these vans seems to be contageous.
My van does seem to be a "cacky light green" colour under the cream paint but then if I keep sanding I come to what apears to be a white gelcoat........and looks in good condition but I assume it can't be good all over or they would not have bothered to paint it. I heard gelcoat can be restored with Penetrol but sounds a bit wishful to me.
I have to admit, it had not even occured to me to thicken up the thin corners from the inside......great idea.......easy and don't need to be quite as fussy.
I seem to only have a floor problem in the entry.......thank god...I just had a look at Tony's pictures and don't want to go there (Excellent job Tony but better you than me!).
My van seems to have had more of a problem with extreme heat than water (welcome to sunny SA!), the moulded bulkhead cupboards above the drivers side rear bunk are somewhat kinked and out of shape...........no idea what to with that......could end up with a couple of interestingly shaped cupboard doors as a conversation point.
Apart from that and the delaminating ply in some of the cupboard doors can't find any huge problems.......yet!
I notice in some of the pictures of restored olympics the aluminium window frames are nice and shiny.......any tricks there?
All the Best
Shane
|
|
|
|
Post by atouchofglass on Mar 23, 2010 13:30:36 GMT 10
Hi Shane Glad to hear there was some positive influences in my Olympic thread.  While the fibreglass shells are pretty good While the fibreglass shells are pretty good - The doors seem to have been a bit of a problem in how well they fit. The upper half is too flexible and will let water in from the top. Hence the floor rotting out in many. Also why I did the floor in fibreglass back into the van. You said"The moulded bulkhead cupboards above the drivers side rear bunk are somewhat kinked and out of shape...........no idea what to with that......could end up with a couple of interestingly shaped cupboard doors as a conversation point." Any chance of photos? Sometimes the roof will sag if there is no support inside. Some of the vans have a bulkhead at the end of the kitchen to keep the shape. As for the window framesResist using any grinder or orbital... they take too much off too quick. Depending on how bad the aluminium is corroded Hand sand with fine grade paper Then Jiff Then a fine grade of steel wool with some detergent Then use a polishing compound like Autosol or similar. Lots of elbow grease. But that is a worst case scenario. There are corner brackets and screws to remove and repair/replace if you pull the windows out and recaulk them. The clean up of the windows is best done with the windows out. Steel wool will leave rust marks on the vans paintwork  I took mine out with lots of timber wedges and lots of time. The rotten ones come out easily.  Take your time and it will all come together.  Cheers Atog ditzygypsy.proboards.com/index.cg....hread=90&page=1 |
|
|
|
Post by shaneg on Mar 24, 2010 6:47:14 GMT 10
Hey there Atog, Attached are some pictures, I think you are correct that the headliner has sagged on one side.......there is definately no sign of damage or repairs to the outer skin........and the other side has had a timber bearer hastily glued on the inside (not actually doing a thing as far as I can tell!) of the roofline inside the cupboards....I guess to stop the same thing happening there.....who knows The buckling of the underside of the cupboards extends the full length of the bunk from back corner to galley bulkhead. ![]() [/img] I'm not too sure how to get more than one photo posted here but there should be at least one. (advice on posting photo's would be appreciated.....I have plenty of them already!) Also, the chassis number weld is a bit shabby but I think it is 1791.....not sure what that translates to in age of van......rego papers say 1965. All the Best Shane |
|
|
|
Post by shaneg on Mar 24, 2010 6:55:53 GMT 10
Another photo
|
|
|
|
Post by shaneg on Mar 24, 2010 6:58:52 GMT 10
Does the clock help date the van
|
|
|
|
Post by firefighter on Mar 24, 2010 6:59:45 GMT 10
|
|
|
|
Post by shaneg on Mar 24, 2010 7:37:55 GMT 10
|
|
|
|
Post by atouchofglass on Mar 24, 2010 8:10:25 GMT 10
Hey Shane You said "and the other side has had a timber bearer hastily glued on the inside (not actually doing a thing as far as I can tell!) of the roofline inside the cupboards....I guess to stop the same thing happening there.....who knows"That bit of hastily and most likely badly glued up piece of wood is to screw the annex rail to. You should be able to see the other end of it in the front cupboard. They were always in a hurry with this by the sounds of things.  Most of the vans don't have a problem with this. But mine leaked through the roof where the screws went in. Over time part of it rotted out and had to be removed. The damage in your van looks like some heavyweight has been hauling his fat ...... out of bed using the overhead cupboard. It doesn't look structural  To fix it - try this To fix it - try this- Clean up/grind/sand the inside of the cupboard with 40 grit or similar rough sandpaper - Fold down the bunk bed - Brace the underside of the o/h cupboard with a strong straight piece of wood from the bulkhead/separator at the front of the kink to as far back as is practical You will probably need another piece of timber bracing it to the floor. There may also need to be bracing clamped across the front of the cupboard to remove as much of the kink as possible If it straightens out the kinkUsing 450 or 600 chopped strand matt fibreglass Strengthen the inside of the cupboard by glassing it up. No more than two layers. After the resin has gone off Remove the bracing, rough up and bog up the outside of the cupboard only where the kinks were. A good bit of fine sanding to match the shape in to the original. Then it is ready for some touch up painting. The ceiling looks in perfect shape apart from that kinked Overhead. So minimal interference with the gelcoat would be good. If you are really game - you could spray gelcoat over the patches.  Not that you need to go to the trouble I did ..... The cupboards could be strengthened using a similar style of cupboard door/framing as in my Olympic. 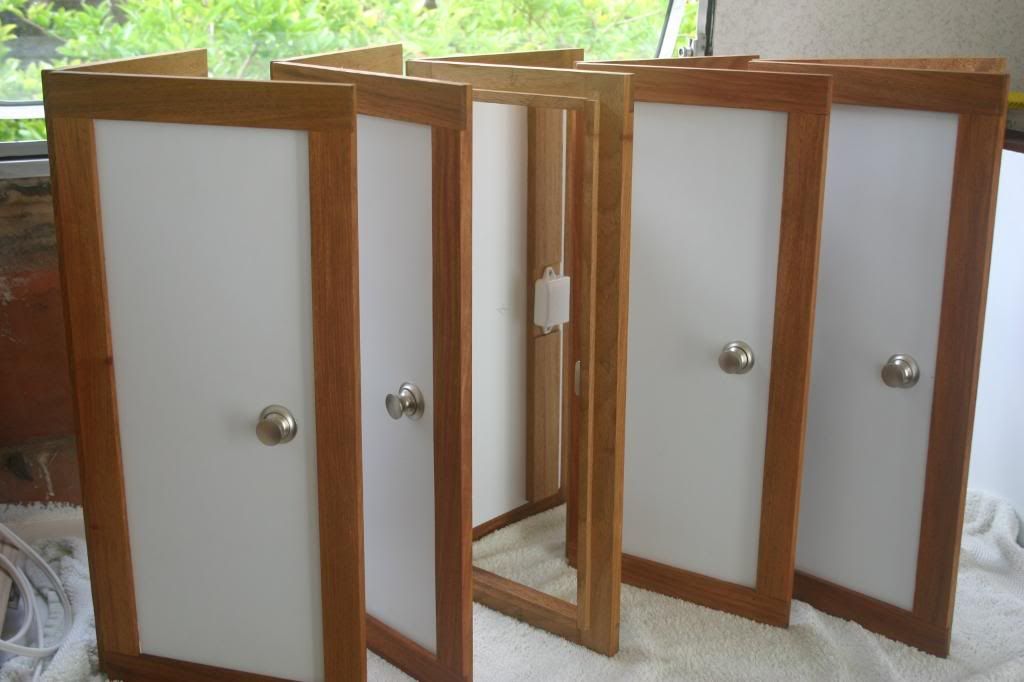 It would also cover up part of the repair. Just a thought Cheers Atog |
|
|
|
Post by atouchofglass on Mar 24, 2010 8:17:21 GMT 10
Hey Shane Just noticed this photo in your album  The same principle applies to fixing that. Except it may need a shaped piece of heavy ply to push it up. It may also need to be drilled in several places to weaken the fibreglass so it will go back into shape. If you do drill holes or cut away any of the glass.Place a piece of waxed laminated board between the ply and the cupboard. This will help shape and keep the cupboard flat. Stops the glass sticking to the ply. Makes it easier to bog/sand to shape as well. By the water damage to the ply it also looks like the clearance lights have leaked water into the cupboards. Very common and easily fixed with Sikaflex or Matrix when you replace the lights. These old girls are long lasting ..... but without maintainance the interiors will suffer. All the best Atog |
|
|
|
Post by shaneg on Mar 24, 2010 9:18:08 GMT 10
Thanks for the excellent advice Atog...........I think I'll do the easy bits first.
Thanks and Regards
Shane
|
|
|
|
Post by boblor on Mar 24, 2010 18:06:13 GMT 10
Hi shaneg
Welcome to the Olympic family. Your van would have been delivered about Aug. 1969, if 1791 is the correct chassis no. I will send you a PM.
Cheers boblor
|
|
|
|
Post by shaneg on Mar 24, 2010 19:17:46 GMT 10
Thanks for that Boblor,
I wanted a 60's van, looks like I just "scraped in"
All the Best
Shane
|
|
|
|
Post by Don Ricardo on Mar 24, 2010 21:28:37 GMT 10
Hi Shane, Good to see that you've caught up with a couple of other 'Olympians'. As you can see on the forum we don't have to wait four years for the Olympics, we have them all year round... ;D ;D ;D Sorry, probably should have kept that one to myself!  Anyway just a little tip on using Photobucket - when you want to post a photo on the forum, just highlight the link under the photo in the little box beside 'IMG Code' and paste it into your post. You need to copy the full link including IMG and /IMG the brackets. I noticed you had a go at posting a pic and it didn't work, so I thought this might help. Don Ricardo |
|
|
|
Post by boblor on Mar 25, 2010 12:43:45 GMT 10
Hi Shane I would recheck your chassis no. as the door on this van does not match the chassis no. you have quoted. Maybe the door has been replaced ??. Are your dining seat bases of fibreglass  . The door shown on your van appears around chassis no. 2000 onwards which would make it a mid '70's model. Will await your response. Cheers boblor |
|


 . The door shown on your van appears around chassis no. 2000 onwards which would make it a mid '70's model.