|
|
Post by karavaninkallista on Sept 25, 2020 17:08:35 GMT 10
Long time lurker, first time poster. Please be gentle with me. I picked up a 1967 Franklin some years ago, but I now have the time & wherewithal to restore it to glory. She's been on a few short trips, but has spent most of the last few years under cover in a carport. Link to photos: photos.app.goo.gl/W5ggUoK7vs7GPrTU6   A previous owner had a collision with the front right corner. The metal was crumpled and made waterproof with duct tape and paint ( wince). It wasn't waterproof. There is some rot in the frame. Undoubtedly there will be rot elsewhere after 50+ years of service. I've taken some of the internal ply out to see what I can see. The roof hatch had lost all structural integrity, and there is water damage under the skin of the roof. At the front there are a few patches in the metal.  At this stage I'm torn whether to retain the metal or replace with plywood. I can work with wood more comfortably than metal. The skin has the heritage but all caravan supply places I've found in Melbourne only have 'modern' metals. Plywood gives a fresh start (say 6 mm side, 3 mm top) but the work to waterproof could be substantial. What are the risks in removing the skin from one side or the top to address the frame? Does the frame of these older caravans distort easily without the frame to stabilising? Is there a preferred practise in straightening this light aluminium? The frame is just tacked to the frame; is there a preference to screw the skin to the frame? The inner roof looks like a caneite, but it has become wet in the times past and isn't particularly secure. Is removing the canine and replacing with say Bondwood a problem? All opinions welcomed! Thanks, Richard |
|
|
|
Post by hughdeany on Sept 25, 2020 17:16:43 GMT 10
Hi and welcome Richard,
Sorry to tell you but the van in those photos is most definitely not a 1967 Franklin!
It looks like a Rowvan or similar from SA from the late 50s or early 60s that was originally Masonite but has been covered in aluminium at some stage has had aluminium windows fitted,which was quite common back then to modernise caravans.It should have a double cambered roof with canine ceiling ,but looks like it’s been flattened for some reason,I could be wrong because it’s very hard to get a good view of it.
If you look in the Down History Lane section you will find lots of pics and info,
Cheers
hughdeany
|
|
|
|
Post by karavaninkallista on Sept 25, 2020 20:22:23 GMT 10
Interesting; the rego is for a '67 Franklin, and the build plate near the tow hitch states 1967. Sounds like a lot of work to fake something - unless the base has been recycled? I'll take a look at some of the other photos you suggest.* Still, whether tis one or t'other, my questions on best approaches remain  [ * Having now looked at the photos, I think you're right about the SA connection. The storage units, ceiling, and skylight are the same as the Rowvan photos. Mystery deepens - but the wee round window is a must-restore! ] |
|
|
|
Post by hughdeany on Sept 25, 2020 22:27:31 GMT 10
Hi again,
Wrong date and brand on a caravan rego is very common,we get at least one a week that is wrong.
It comes about when owners don’t have a date or brand and ask the reg office to put it on,or when the rego office don’t know and put their take on it!
The compliance plate would have been put on when the van was modernised at some stage, or again if a plumber was told what date to put on the plate by the owner.
Cheers
hughdeany
|
|
|
|
Post by Don Ricardo on Sept 25, 2020 23:23:30 GMT 10
Hi Karavaninkallista, I agree with everything that Hughdeany has told you, apart from the fact that your van is a Rowvan. As Hughdeany said if it was a Rowvan, it would have a double cambered roof (ie the roof would curve from both front to back and side to side). The front and rear profiles are also not correct for a Rowvan. However, I certainly agree that your van is a South Australian built van because of its shape, style and the fact that it has a tudor ceiling with exposed ribs on view inside the van. The difficulty we have is that several manufacturers in South Australia built vans to a very similar design, and it can be very hard to distinguish them. At this stage we haven’t been able to identify the manufacturers of them all because it’s a confusing picture. We have also seen quite a few examples where what were originally bondwood/masonite covered vans have been re-clad with aluminium cladding either to modernise the vans or to deal with deteriorating bondwood/Masonite cladding. In that case if you were to take the aluminium off and replace it with ply then you might be just returning it to original! In fact you may find that there is still bondwood under the aluminium cladding underneath the aluminium. There is an example of a Quest van like that here, but you’ll note that the Quest doesn’t have a tudor ceiling, so that means that your van isn’t a Quest. The caneite ceiling was a common feature in many pre-1960 caravans, and not just South Australian vans. It was partly used because of its insulation properties. In the case of South Australian vans with the tudor ceiling, the caneite was often laid over the ceiling ribs, and then covered on top of that with canvas pulled very tight and painted with many layers of paint to make it waterproof. That may have been how your van was originally built. Unfortunately the above doesn’t tell you who built your van, but maybe we can continue to think about it and see what we come up with? It will be good to hear what you decide to do with your van. If you take the aluminium cladding off, you will probably find you have quite a big job ahead of you, depending what you find underneath. But there are lots of examples on the forum of people who have totally re-clad their vans and/or brought them back from an almost very sad end. As a result there a quite a few people on the forum who can provide you with advice. Don Ricardo |
|
|
|
Post by shesgotthelook on Sept 26, 2020 10:15:16 GMT 10
Hello & welcome! 100% agree with Hughdeany & Don Ricardo, you have a South Australian built 1950's van that has been clad in aluminium to preserve it. It can be saved & if you are handy with timber then I say 'go for it'. Here's a link to a Globe caravan that I restored (with a lot of help) that was in a very bad way. Clad in aluminium, it was extremely rotten underneath. We replaced the sides, back & front & calico'd the roof. vintagecaravans.proboards.com/thread/17511/globe-caravan-rescue-restorationCheers, SGTL |
|
|
|
Post by karavaninkallista on Sept 26, 2020 11:11:20 GMT 10
Many thanks all.
@ SGTL - the fittings look pretty close to the example of the Globe caravan, and the profile is not too far off. I think that may be at a first approximation the identity.
So, job 1 will be removing the aluminium. There is certainly ply underneath. I was working on the assumption that this was the ply-bonded-to-aluminium construction that I'd read about for Frankins, but - abundantly clear now - as this is not a F., the rotten ply was probably original.
With regard to the roof, are there any recommended suppliers for approximately 'age appropriate' sun holes? I was initially thinking a sealed acrylic bubble, but that does not permit for venting. I've seen others on this site but they are quite modern looking.
Last question before some serious planning & costing. For the roof I can tidy up the Tudor frame, then bond a layer of ply/Bondwood then waterproofing agent - calico I guess to be true to heritage. However, what of insulation - does a layer of Bondwood normally suffice? Sislation over the Bondwood before the outer skin works?
|
|
|
|
Post by Don Ricardo on Sept 26, 2020 18:15:43 GMT 10
Hi Karavaninkallista,
I'm pleased SGTL has pointed you to the thread on the restoration of her Globe because it shows what might need to be done, but also what can be achieved to bring an old caravan back to life.
Just one point, your caravan isn't a Globe because if you look at SGTL's van you'll see that Globes didn't have tudor ceilings. Their ceiling lining was attached below the ribs of the ceiling to provide a smooth surface. However, the fact that the fittings of your van are similar to the Globe just shows the issues we sometimes face in distinguishing various makes of South Australian vans. But then that's what makes the pursuit interesting!
Don Ricardo
|
|
|
|
Post by karavaninkallista on Sept 26, 2020 19:09:05 GMT 10
Bit the bullet today and removed the aluminium skin on the front and front left.
Underneath there is a creamy / butter yellow painted masonite, presumably the original skin. The masonite near the edges is pretty rotten but on the faces of the sheets it's not too bad. The caneite under the top is very soft; a stiff finger can penetrate the material and there is visible mould. That'll go. The biggest problem now is the front right frame, which has all but disintegrated and the structure was held together only by the aluminium skin. Fortunately the rest of the frame I've seen so far seems to be in surprisingly good condition.
Time to explore this site and see what those who went before tackled this problem.
|
|
|
|
Post by karavaninkallista on Sept 27, 2020 19:33:32 GMT 10
More work, more photos - photos.app.goo.gl/W5ggUoK7vs7GPrTU6The front left and right aluminium is off. The marks of original indicators are there, but no time to waste, & off comes the ply. The ply was in pretty good shape excepting the front left and right leading edge, worse on the left. A few bits of the frame will need to be replaced but nothing major -- or are these naive words? The front curves are disintegrated. It looks like three 30-mm wide strips of 6 mm ply were glued together to create the curve. This suits me to replace; after looking at kerf and steam bending, gluing and clamping is much more straightforward. There is enough remaining wood to replicate the curve, and if I do both curves at the same time then that means I don't need to worry about mismatches.    The caneite is off and the ceiling structures are in good form.  Some of the old masonite internals have distorted from moisture over the decades but these should be straightforward to replace. To misquote a former PM, from what I was expecting after removing the aluminium, I've been kicked up the arse with a rainbow. And, one other little delight, on removing an internal bit of ply I found a S +R in a heart shape written in Liquid Nails. Caravan of love indeed.  |
|
|
|
Post by Roehm3108 on Sept 28, 2020 10:00:00 GMT 10
Hi OP and welcome to the forum. Love your enthusiasm!!
I agree with the other contributors that this is an SA built van of the Rowvan "ILK". But because of the lack of a double cambered roof (curved from front to back and side to side, like a football surface) it certainly is not a Rowvan. What would be helpful in identifying what it is, would be if you could post photos of the side of the van which shows the wheel arch in it. As well, the kitchen cupboards would be good to see in one photo. Am I right that much of the interior was gutted? If you still have overheads, then a photo of the number of overhead doors would also be helpful. From these areas we might be able to work out the brand of the van.
As far as the hatch goes, I suggest you build one yourself. As long as you build a lip on the roof part so that rain can't get under, all you need build is a square hat for it and hinge it. The Rowvan I restored had a crappy hatch and it was a simple thing to replace it. Remember that the front to back sides of the lid would need the same contour as the roofline.
It's interesting that the roof is caneite. Does/did it have a calico cover over it? The main reason for using the caneite was because it's the only material that bends both ways without stressing the grain. That's important for a double camber, but not really necessary if the camber is only from front to back. You could add a new roof with 4mm ply and for authenticity as well as improved sealing, add the calico over it. When you apply calico covering, you generally use about 8-10 coats of paint. Some members have used that insulation paint which would help with cooling. Because it is only single skin, roof insulating is a bit of a problem. Not sure how well your idea would work in regards to the sisalation. I suggest you don't try to "overthink" some of these things. When it all boils down, how often will the van get too hot inside, that you wouldn't actually be sitting outside under the annexe anyway? Some people try to modernise their vans so much that they may as well have bought a modern box and saved money! I saw a vintage caravan recently with a roof air conditioner built into the hatch!
You can actually replace the caneite if you prefer. The big green shed sells it in 900mm x 600mm pieces. Today it's called softboard and is a eucalyptus derivative instead of sugar cane. That would commit you to the calico covering to waterproof it.
|
|
|
|
Post by karavaninkallista on Sept 29, 2020 20:12:40 GMT 10
Roehm3108 - thanks for your comments; I've seen some of your other thoughts on other works so delighted that you've reached out. The Caneite didn't have any calico that I could see under the spot mould and lichen colonies - I'll check the pile of disintegrating crap in the light. I've taken off the metal and the original wheel arches are visible. I'll take photos if this helps with the identification. The wood is not in a happy state, so I'll rebuild to match what is there. If the hatches help, I'll grab photos of those too. Re the roof hatch - Came across these images of a Rowvan [ caravan.hemax.com/Reviews/3232/Retro_1950s_Rowvan_Caravan ] and the 9th image in the slideshow has a roof hatch that matches what is in this one. Thanks for the recommendation just to rebuild it. That'll have a better outcome than an icky plastic hatch. As far as the roof goes, I'm veering to 3 - 4 mm ply, sandwich 10 mm polystyrene sheet and ply on the top. About the same mass as the caneite, but perhaps a bit toastier and avoids all the palaver with calico. All this is a bit in the future, once I've made the necessary repairs to the framing. The van has an electrical inlet on one side and two powerpoints - one in fore, one mid way - as well as a pile of thin wires that could carry only a 12 V DC. I've not taken too much of a look at the electrical recommendations, but thinking about a motorcycle battery and running 12 V for lighting and pop in a battery charger, enough to run LED lighting, radio, and perhaps a small fridge when off grid.
|
|
|
|
Post by Roehm3108 on Sept 30, 2020 8:36:00 GMT 10
It's good to do a lot of pre-thinking about the direction you want to go, BEFORE starting the work. I replaced the hatch when I restored my Rowvan. Here are a couple of pics of the hatch itself and new lip for the opening. 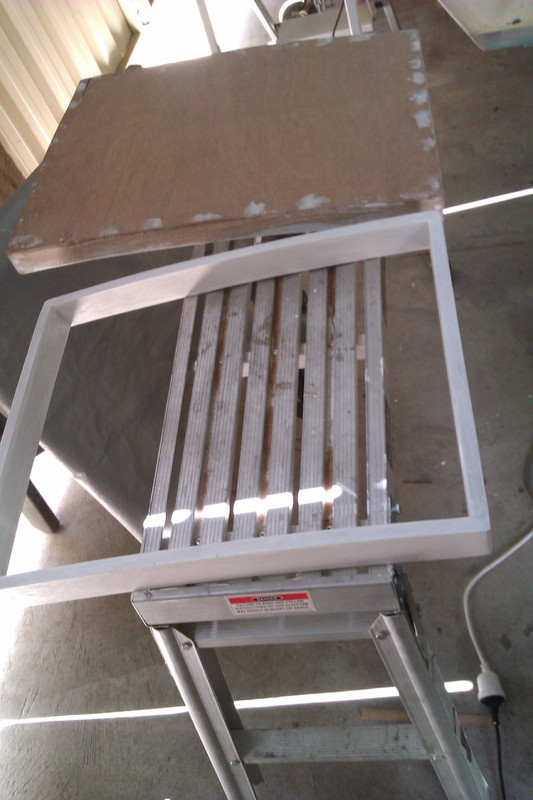 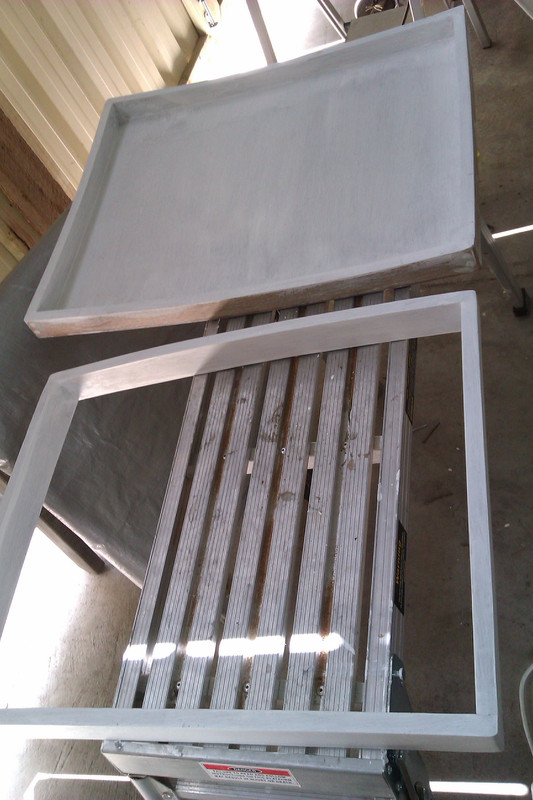 An interior shot of the finished result  I'm intrigued by your idea of sandwiched polystyrene/ply roof. If you're keen to head in that direction, I'd chat with the tech people at Austral Plywood about how to go about doing that. I would think that you would need to glue the polystyrene on "in-situ" and built up in layers because of the bend. You would really need to seal the edges on the final result. Also think about the extra weight you're adding to the roof. It will be interesting to hear what you end up deciding to do about this. The end battery decision you make will depend on the amount of draw you plan to make on it. Using lights only is one thing. Adding a small (or any size) fridge changes the draw a lot. So it would pay to first decide on the uses you want to put the battery to and then consult a battery specialist. I have a 64 amp-hour gsm battery with electric charger, as well as a line to the car battery for charging while driving or attaching to a small solar panel if I'm free-camping. It will depend very much on the style of caravanning you want to do. I have LED 12 volt lighting and a 40 litre Waco fridge in Cino Vardo. |
|
|
|
Post by grandad on Sept 30, 2020 8:48:04 GMT 10
Re the laminating of ply and polystyrene.
Judging from the walls of some Franklins that should provide a very strong and stable roof.
Personally, I would fix the bottom sheet of ply in place first up, then use a paint roller to apply copious quantities of a GOOD PVA glue. I used Sikaflex if my memory serves.
Then another coat of PVA for the top sheet of ply. Have plenty of heavy objects on hand for clamping devices. Pails of water, spare tyre, bricks.....whatever you can find.
And a question please. Might the aversion to the use of calico be just a natural hesitancy for something unfamiliar? I have no first-hand experience here but from what I've read it seems pretty straightforward.
Jim
|
|
|
|
Post by grandad on Sept 30, 2020 8:54:05 GMT 10
re Roehm's concern about the edges. That's a valid observation. Just a thought, but maybe if once you've got the first sheet of ply down you used those masonite strips used in plastering to build up a 10mm edge on all sides. Just glue each strip down one at a time and hold with small brads.
you could run a large rounding over bit along the edges with a router once the roof was finished if you wished.
That will give you a "well" into which you can place your polystyrene.
Jim
|
|
|
|
Post by karavaninkallista on Sept 30, 2020 9:34:57 GMT 10
@ Jim - that was my thinking to create the roof. Tidy up the mesh of the old internal ceiling, paint ply waterproof both sides then decorative one side. Glue top of mesh, adhere ceiling, nail/screw on edge, lather rinse and repeat for the top/outer. Sheets of 10 mm polystyrene are not expensive, and I plan to use them to insulate the walls, now that the outer skin is off. The water repellent nature of PS is also attractive. And yes, nailed it. Calico sounds like a pain to ensure it shrinks well, without wrinkles. While perhaps a decade or so younger than many on this site, I can well do with fewer wrinkles in my life. @ Roehm - thanks for the snaps of the lid. I can replicate that I believe. The battery & electrics will take a bit more thinking, but linking to car battery with the option for solar is a better solution than chasing after a battery charger. On the identification issue, the wheel arch is 75 mm / 3 inches and square in shape. The original ply was too badly damaged to indicate what the exposed shape was, but I've taken a snap of the aluminium shape, which I trust to be reasonably close to what the ply was way-back-when.   There is also an image of the upper left storage and of the kitchen cupboards and storage. I like purple and pink as much as the next chap, and while I enjoyed the 1990s very much, I fear it was an unkind time for this caravan's design and decor. The shape of the older fittings is clear as indentations in the paint, and are a swirling, rococo pattern consistent with design of the time. The current fittings are a bit of Bunnings crap. Above the sink there is a useful set of shelves which I dearly hope to retain. Above the sink there is some damaged ply and a covered up water inlet. Would these older caravans actually have held a bladder to store water?      On taking off the outer, I can see a row of nails that would have formed a platform over the wheel arches, that have long been removed. |
|
|
|
Post by Roehm3108 on Sept 30, 2020 14:45:28 GMT 10
Your photos have probably raised more questions than answers! The fact that this van has a front kitchen sounds like this was an imagination of the original owner. The wheel arch pic tells us that there is no resemblance to any factory built caravans that we know of. The nearest is actually the Rowvan. But the interior has no resemblance to a Rowvan or any others with that style. Most caneite roofed vans have that double camber. Over the years we have found similar vans which are yet unidentified and if you look through the 4 pages here vintagecaravans.proboards.com/thread/14610/caravans-identified-help-identify-orphans you will notice some that are similar but not quite like yours. It could well be that some manufacturers were building/retailing basic caravan shells, without added features like porthole windows and perhaps even double cambers on the roof, which the purchaser then finished off. In many respects you could re-format your interior to one of vans of this style without too much effort and end up with something more to your own liking. As far as the roof goes, don't be put off going the softboard//calico track too much. Many members here have done it successfully the first time they tried. I've done three roofs with it. In your case, because it is not a double camber, the risk of wrinkles is reduced. You can buy claico in 2400mm width. I used to wash mine in hot water to preshrink it, but I know that others didn't even bother to do that without any adverse results. I've managed to do this by myself, but did wish for an extra pair of hands at the time. Regarding the battery, I also have a 240 volt charger fitted for when I'm in caravan parks or at home. My charger monitors the voltage and trickle tops it up when needed. In regards to water storage, some of the early vans had some sort of 10 litre container under the sink into which they plumbed the tap. Others had a rectangular tank on a shelf above the sink, with the tap over the sink. I installed 44 litre tanks internally on the last two vans and plumbed them to the sink. You might need more than that and undersling the tank externally. |
|
|
|
Post by Don Ricardo on Oct 1, 2020 11:59:01 GMT 10
Hi Karavaninkallista and Roehm, I’ve been following your conversation about the identity of Karavaninkalllista/Richard’s van, and thinking through the various possibilities... One possibility is that it is a modified Broadway - see here. The Broadways had the general South Australian profile, only a single cambered roof, a tudor ceiling, and shallow rectangular external wheel arches, all of which fits Richard’s van. The profile of the front and rear walls seem to be similar too, although it is a bit hard to be definitive without being able to see a full photo of the side of Richard’s van. I presume you don’t have a photo of that Richard? There are several other SA-built vans for which we (literally) only know the brand names and have no other details, so Richard’s van might be one of those, but without photos, etc, that is impossible to tell at this point. Don Ricardo |
|
|
|
Post by karavaninkallista on Oct 2, 2020 20:11:26 GMT 10
Laydees an' Gennlemen, I think we have a winner. The photos of the Broadway are very close to what I can see, from profile to door to rear windows. I'll take a few photos of the profile and I've found some more details on the hitch. Time permitting, I'll pop some photos up shortly.
|
|
|
|
Post by Don Ricardo on Oct 3, 2020 17:09:09 GMT 10
Hi Karavaninkallista,
I’m interested to hear that you can see similarities between your van and the Broadways.
I think i have the contact details for the son of the builder of Broadway vans (Raym on the forum), so we’ll try and find out what he thinks.
Don Ricardo
|
|
|
|
Post by karavaninkallista on Oct 11, 2020 19:44:56 GMT 10
A few more photos uploaded to photos.app.goo.gl/W5ggUoK7vs7GPrTU6Work got a bit busy - being on call gets in the way of caravan tinker-y. I've taken three shots on the left hand profile. The shots don't quite capture the front, but there are other photos that show the front. The wobbly masonite interior can be seen. Poor old thing; the damp masonite makes it look like she has too much cellulite. Will be tidied up shortly with new framing woods and new ply.    The left side had a row of nails about 350 mm above the floor, left over from a platform of sorts. Thinking now that the first step is to rebuild the platform and at the same time replace internal 3 mm ply. At the junction of the platform and ply I'll add a row of L-shaped metal - steel or aluminium, say just 10 mm and running the length from the door to the back. This will give a light, rigid structure. I can then screw the frame to this structure that I can then attach the frame. Added a few photos of some details on the towing structure. There is a number that is 345 or 3L5, another number stamped in 78T0 9125 which I suspect at some point was covered up, and then the misleading 01/1967 Franklin panel dating from some point after 1989.    I hope these help with any further ideas to the manufacture. |
|
|
|
Post by karavaninkallista on Oct 17, 2020 19:46:30 GMT 10
A quiet rainy Saturday so out to play. Stripped paint off the Tudor ceiling. A bit of work with a mouse sander and it looks great. Running a window paint stripper - really, just a sharp broad knife - removed much of the deep purple paint over the storage units. Looking lighter and brighter already.
The framing still needs attention. Unfortunately the local lumber yard is being slow in responding to requests on Vic Ash. On reading other threads I stumbled across a link to a local(ish) specialist supplier of Oregon - simplyoregon.com.au. If kiln dried and painted all around before going in it should be a great option.
|
|
|
|
Post by Roehm3108 on Oct 18, 2020 22:24:42 GMT 10
It's always gratifying to see progress, no matter how much. That bit more you don't have to do tomorrow. For my straight framing, I used treated pine house stud timber, which I ripped down to size using a table saw. I originally considered using meranti, but it was more than twice the price of the house studs.
|
|
|
|
Post by karavaninkallista on Oct 24, 2020 17:24:58 GMT 10
Poor old caravan. I've focussed on cleaning out the back and stripped most of the wood out. She really is left on the bones of her arse. But this time I've worked out how to make Google Photos play nicely with the site. Enjoy, dear reader. On the back half most of the ply and masonite in contact with the floor was rotten and has come out. Winds whistle through the back half. Singalong time... I can see clearly now the frame has gone.   On lifting the PVC fake-wood-texture flooring, the substrate was in pretty good condition, a solid tongue-and-groove pine. There was a little rot in the back left corner which I've cut out - a previous owner had glued a bit of 3 mm board over. It should be pretty straightforward to find some short lengths to replace these.  Frame in contact with the metal had largely rotten, so the back half of frame is sitting on 22 mm chocks while I take the opportunity to hit the metal with rust remover. Wood is ordered to rebuild the frame, a job for next week.  Time also to think of what colours to paint the inside. On removing some of the kitchen shelving there are layers of deep purple, a burnt orange, a painful pink, dark sky blue and near the bottom a pastel green. Strongly suspect the green was the original colour so it is at least a colour to aim for. Still, removing much of the dark purple has given a feeling of space and light (although that could also be partially ascribed to the drastic loss in wall cladding).  On the progress side, I've stripped and sanded the Tudor roof structure. Mixing some linseed putty with Tas Oak sawdust from an older project made a pretty good match for colour. Once the side frames are stable, they'll get a stain or lacquer before rebuilding the roof and skylight. At least Little Parrot Friend is happy to see what is going on; swings by most days for a bit of a chat and seed.   It's slow, but the foundations of all building projects take forever and appear to go backwards before the reconstruction. Nearly at the end of this first stage, and a caravan this naked cannot hold any more surprises. |
|
ross
New Member

Posts: 4
|
Post by ross on Oct 25, 2020 19:12:22 GMT 10
Dude! You’ve been busy and there’s fresh air to spare. King parrot reckons it’s looking like you know what’s what, but he prefers more sunflower seeds (he swings past my place for a quang and a cuppa most days). I did have a thought about the timber to replace your rotten framing and I like the idea given above about ripping some treated pine. Pine would be a shed load more forgiving to drive a nail into than KD Vic ash. Also that notion I had about angle iron to stiffen the frame would be better served by a stiff straight bit of timber for the same reason. Anyhoo, let us know when you need a spare set of digits or clamps and I’ll swing past.
|
|


