Deleted
Deleted Member
Posts: 0
|
Post by Deleted on Jul 19, 2019 21:22:20 GMT 10
My 1967 built "Vacation" bought recently from a farmer who used it as a retreat on his farm near the dam.. Have found a few bits n bobs that need attention (leaking 4 seasons vent) but nothing too major aside from needing brakes which I will get done by a professional.According to rego in SA it is chassis number V755. Anyone with any info about these pre Franklin vans feel free to pass on what you know please TIA
For photos of Graeme’s 1967 Vacation see here. Don Ricardo |
|
|
|
Post by hughdeany on Jul 20, 2019 11:36:56 GMT 10
Hi Grumpster,
Your van isn’t a Franklin,it’s a Vacation built in Ballarat.
It looks like a mid 60s bondwood and aluminium model that’s had new windout windows,door and four seasons hatch put in,as well as a changed interior.
If you look in the down history lane section you will see a bit of history about Vacation.
Cheers
hughdeany.
|
|
Deleted
Deleted Member
Posts: 0
|
Post by Deleted on Jul 20, 2019 12:02:22 GMT 10
Hi Grumpster, Your van isn’t a Franklin,it’s a Vacation built in Ballarat. It looks like a mid 60s bondwood and aluminium model that’s had new windout windows,door and four seasons hatch put in,as well as a changed interior. If you look in the down history lane section you will see a bit of history about Vacation. Cheers hughdeany. Cheers for that mate, have found it very hard to find any history on Google etc... because of the name just keeps giving me vacation sites. |
|
Deleted
Deleted Member
Posts: 0
|
Post by Deleted on Jul 20, 2019 17:32:24 GMT 10
Update on the van, I have been out with the BIG lens getting some data on the condition of the roof and 4 Seasons hatch, looks like I will be in for some hard graft once we get the dry weather, nothing a stripping wheel (nylon) on the grinder and a wire brush on the drill can't resolve, then to re-seat the hatch and sheets and reseal the lot with new Sikaflex.. any suggestions / advice will be greatfully accepted  Cheers Graeme Link to the gallery on postimage follows postimg.cc/gallery/2g9q96ohi/ |
|
Deleted
Deleted Member
Posts: 0
|
Post by Deleted on Jul 21, 2019 12:33:11 GMT 10
Hi Grumpster, Your van isn’t a Franklin,it’s a Vacation built in Ballarat. It looks like a mid 60s bondwood and aluminium model that’s had new windout windows,door and four seasons hatch put in,as well as a changed interior. If you look in the down history lane section you will see a bit of history about Vacation. Cheers hughdeany. Cheers for that mate, have found it very hard to find any history on Google etc... because of the name just keeps giving me vacation sites. Update to the story is I have now found the chassis number stamped into the front of t he "A" frame as 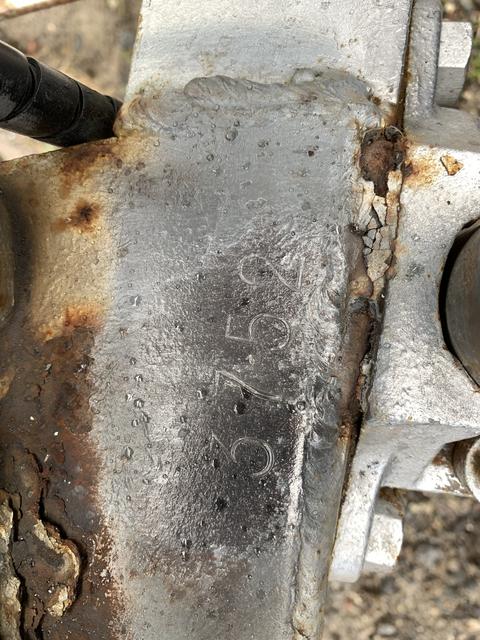 does this alter things a tad.. ?? |
|
|
|
Post by Roehm3108 on Jul 22, 2019 16:47:53 GMT 10
Hi Grumpster You've certainly given yourself a bit of a challenge there. But elbow grease never hurt anyone!!! So are those kaboodle kitchen doors from the big green shed???   You're right that they would all weigh a tonne! To say nothing about what would happen if they got wet!! Good luck with it all! |
|
Deleted
Deleted Member
Posts: 0
|
Post by Deleted on Jul 23, 2019 10:42:24 GMT 10
Hi Grumpster You've certainly given yourself a bit of a challenge there. But elbow grease never hurt anyone!!! So are those kaboodle kitchen doors from the big green shed???   You're right that they would all weigh a tonne! To say nothing about what would happen if they got wet!! Good luck with it all! Hi Roehm, You're right there bit of work but all will be well worth it in the end, most will be in the resealing of the "j" rails and joints and the 4 seasons, but should be done in few days once it stops raining and warms up a bit. As for the doors I think not, they are solid wood and look like they have been re used from a home kitchen of old same as the bench top, most of the carcasses are chip/melamine, so will lose a lot of dead weight once removed and replaced with ply and framing. Cheers Graeme |
|
|
|
Post by Don Ricardo on Jul 27, 2019 17:30:18 GMT 10
Update to the story is I have now found the chassis number stamped into the front of t he "A" frame as  does this alter things a tad.. ?? Hi Grumpster01, Hmmm, that chassis number is a bit mysterious. It’s not a Vacation serial number I don’t think, nor is it in a recognisable serial number format for any manufacturer i can think of. It’s possible it was a number put on the van when it was re-registered at some point. You mentioned a serial number of V755. Can you tell us where you found that? Is it on the van somewhere, or on some documentation? You mentioned your insurance premium in another post. I think the price you got was pretty good. It’s around the same as I pay through Ryno for our van. Don Ricardo |
|
Deleted
Deleted Member
Posts: 0
|
Post by Deleted on Jul 27, 2019 21:13:14 GMT 10
Update to the story is I have now found the chassis number stamped into the front of t he "A" frame as  does this alter things a tad.. ?? Hi Grumpster01, Hmmm, that chassis number is a bit mysterious. It’s not a Vacation serial number I don’t think, nor is it in a recognisable serial number format for any manufacturer i can think of. It’s possible it was a number put on the van when it was re-registered at some point. You mentioned a serial number of V755. Can you tell us where you found that? Is it on the van somewhere, or on some documentation? You mentioned your insurance premium in another post. I think the price you got was pretty good. It’s around the same as I pay through Ryno for our van. Don Ricardo Hi Don, The V755 is what is listed on the Rego papers when I did the transfer but I can't find any trace of it on the van it self, it leaves me in a quandary because if I get pulled over they (copper / scaleys) will expect the rego to reflect what is stamped on the draw bar, also if Insurance ever needs to do an ID check for a claim etc.. there will be a mismatch so, do I get the draw bar restamped with the V755 or do I get the rego altered to reflect what is stamped on the draw bar, or do I get a whole new 13 digit VIN generated for the van and be done with it. I rang SA Transport the other day and after a 30 minute wait on hold they had no idea what so ever, couldn't even tell me how much the change of VIN/chassis number would cost me. SO I am at a loss  |
|
|
|
Post by hughdeany on Jul 27, 2019 21:16:52 GMT 10
Hi Grumpster,
Just get a new vin number and be done with it!
Cheers
hughdeany
|
|
Deleted
Deleted Member
Posts: 0
|
Post by Deleted on Aug 27, 2019 19:12:03 GMT 10
Well been a while since I posted anything, spent the afternoon stripping back layers of silicone and the mould beneath it form around the 4 seasons hatch on the Vacation, remind me never to take up employment as a caravan repairer in my next life  After going through two wire brushes on the drill and a stripper dis, got all the old crap off, back to bare metal and a clean surface, then a wipe down and a new bead of Sika Marine Sealant. Hopefully this has got that sorted.. only two more roofing seams to do. (pics to follow) |
|
Deleted
Deleted Member
Posts: 0
|
Post by Deleted on Sept 3, 2019 16:06:22 GMT 10
Hello everyone, I hope you have had a gorgeous days weather where ever you may be, I finally got into stripping out the bum end of my van today, after finding copious amounts of wetness on the outside I decided today that I would rip out the double bed and the associated panels to see what I am up for... no surprise both sides have water damage, although the off side fairs far worse then the near side, after stripping a couple layers of dress panels below the rear windows all I found was everything painted in black japan paint (bitumen type paint) and water droplets between the framing on the rear wall panel. Looking at the back after removing the dress panel.. 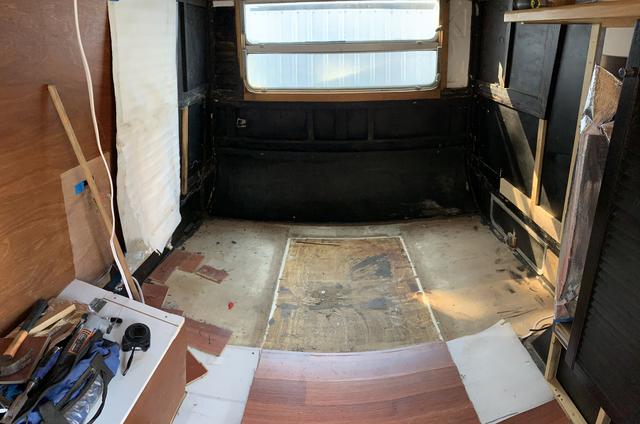 Offside rear corner still with some old bed framing in place 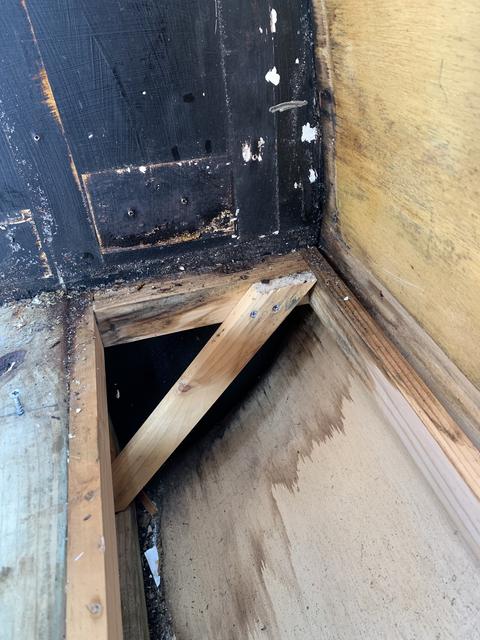 I guess this just confirmed what I already knew that the window needs to come out and be rebuilt, its presently gooped up with several different silicone and rubber type sealants none of which were done well....  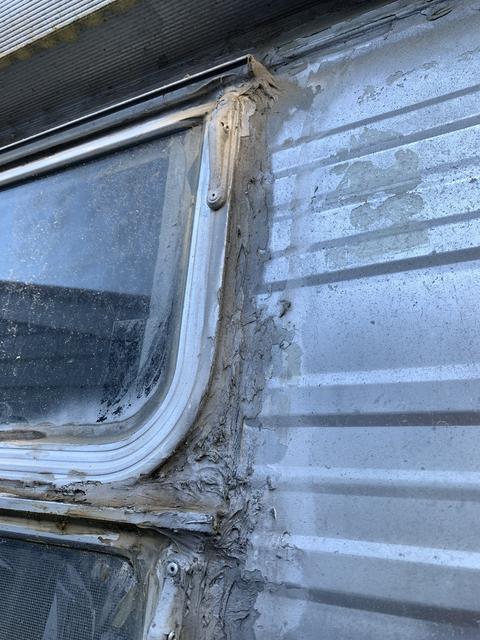 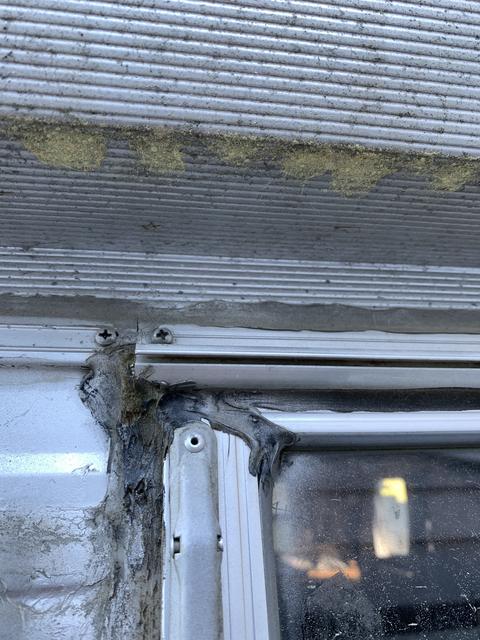 On a brighter note received a new set of screens for the old 4 seasons hatch today from Vintage Caravan Spares on Ebay, great fast shipping and they are perfect, a definite go to for further bits n bobs.. Seriously who ever had the last attempt at renovating this van had no intention of it being weather tight. Anyway that's it for today rain is forecast again next few days so will just be sitting until I can open it up and dry it all out. More to follow as I progress... Hoo Roo The Grumpmeister |
|
|
|
Post by Roehm3108 on Sept 4, 2019 7:02:04 GMT 10
For all the technological stuff they invent, you'd think that by now they would have invented a better silicone remover!! Or banned the use of silicone completely!!
Are you working in the open air, Grumpster? That would really be challenging!!
Good luck.
|
|
Deleted
Deleted Member
Posts: 0
|
Post by Deleted on Sept 4, 2019 17:06:24 GMT 10
For all the technological stuff they invent, you'd think that by now they would have invented a better silicone remover!! Or banned the use of silicone completely!! Are you working in the open air, Grumpster? That would really be challenging!! Good luck. Agree there Roehm, but while cheap tubes of silicone are available people will buy it and use it for the wrong purposes. I guess people don't use foresight very well, they don't consider that paying $15 bucks for a tube of Sika which is going to last 20 odd years if done properly is good value when they can get a cheap silicone for $4 bucks to last until they need to do it again in 12 mths. Yeah still the best thing for removing that crap is the old wire brush on the drill, and one of those oscillating renovator tools with a flat blade. Unfortunately yes out in the open air, I will be getting a tarp big enough to cover the whole van in the next few days but still won't allow things to dry out properly until we get some dryer air and heat.
Took it for a drive to a mate for a quote on hydraulic over ride brakes today, looks like a new drop axle is needed as the old one doesn't have enough room to weld the backing plate for the brakes, have considered using a straight axle which would lift it about 4" but have heard people say they tend to sway when you do that, think a lot of that has to do with their loading as well.
Any comments experience with doing this would be appreciated, it would certainly save me a fair bit of coin and allow me to do the bulk of the work myself.
Thats it from me.
Hoo Roo
Grumpmeister
|
|
Deleted
Deleted Member
Posts: 0
|
Post by Deleted on Sept 14, 2019 18:32:17 GMT 10
Keen to hear anyone's experience with changing from a 4" drop axle to a straight.
By changing from drop to straight I get 100mm lift (& save a few pennies) which would be handy and I can't get my fat gut underneath the chassis as it sits now, which is a pain because I need to relocate the water tank and weld new brackets to the cross members.
Any comments would be welcome.
|
|
|
|
Post by aussieute on Sept 14, 2019 19:51:40 GMT 10
I have changed from a 4 inch drop to 2 inch drop couldn't go for straight as wheel well space and have noticed the van handles worse now am thinking of getting a 4 inch drop made now the company that made it wouldn't do 4 inch for me when brought van home from new to Vic towed at 110 no worrys now 85 is best safe speed as put balance of van towing out cheers chris
|
|
Deleted
Deleted Member
Posts: 0
|
Post by Deleted on Sept 22, 2019 11:58:45 GMT 10
|
|
|
|
Post by aussieute on Sept 22, 2019 13:43:08 GMT 10
I paid $650 with electric brake hubs on it from local Geelong trailer manufacture they wouldn't do 4 inch drop as said couldn't adjust brakes that price seams ok without hubs might have to look into new axel for mine cheers chris
|
|
|
|
Post by Roehm3108 on Sept 26, 2019 7:39:13 GMT 10
Hi grumpster
You asked on another thread: "I know I'm prob a tad late but was wondering if you any internal dimensions, eg kitchen length & depth, bed width & height, dinette widths etc..."
You're probably right that you might be too late to get a response there. I was wondering though, whether you have enough pictorial information to be able to redesign the layout and be pretty close to the original. Hughdeany would probably guide you as far as benchtop heights and cupboard depth goes, or you could make them specific to your own wants anyway.
It is a tad curious that the wall of the doorside doesn't have any windows and wonder whether, going by the internal shot of the stripped out van, there may have been a window on that wall?
Also, could what you refer to as bed framing remains, actually be the framing for the wall curve?
You are aware aren't you that you don't need to re-quote someone else's quote before answering. It takes up less space on your thread that way - unless you want to specifically want to refer to a point the writer is making.
|
|
Deleted
Deleted Member
Posts: 0
|
Post by Deleted on Sept 27, 2019 18:35:08 GMT 10
Cheers for that Roehm3108, The quoting is a bad habit of mine, from old army days, always quote what you are talking in refferance to  Appreciate the input, I have zero images aside from the ones posted elsewhere here and am going to make it up as I go to suit my needs, as for windows there were originally two windows at the rear side/corners of the van which have been removed and plugged as you can just see the outline in the paint here... aside from this there is no evidence of another window on the nearside at all. 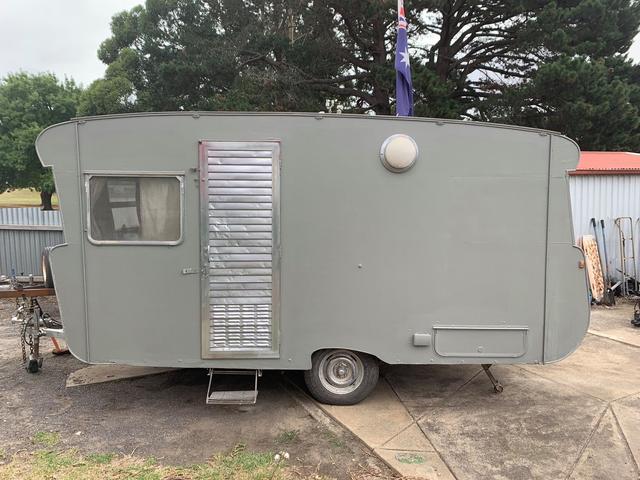 The exposed framing at the back of the van is as suggested the wall framing for the outer skin, the old floor plan is visible with the original floor covering still in place as you can see here.. 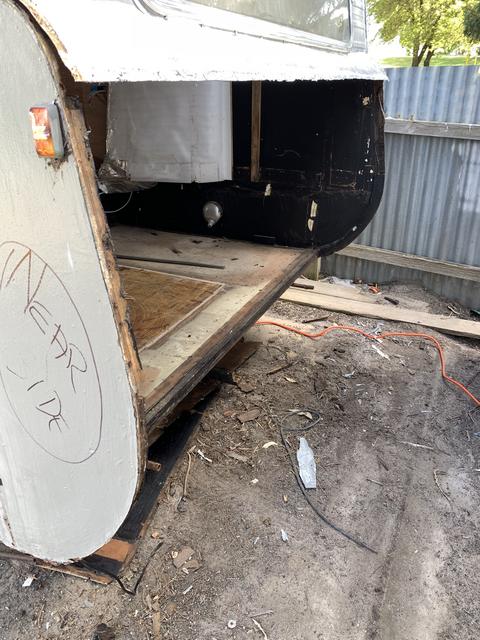 As you can see I spent the day out disassembling the back end today and completely removed the lower sheet of skin along with the mostly rotten inner frame, the two sides will need to be replaced so I will fillet them into place with new timber and a new rear support frame and most likely also re plug the old window openings as they were now sealed and the joints appear to have some moisture in them.. might as well do it all at once while the weather is fine.. This (Off side) is the worst of the two ends for water damage.. 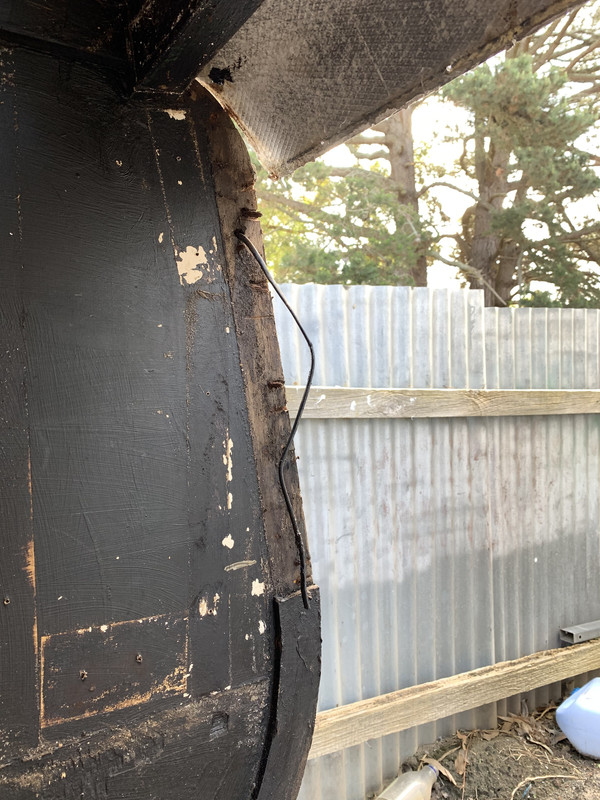 The near side wall is badly rotted but there is not as much seepage into the inner timbers.. 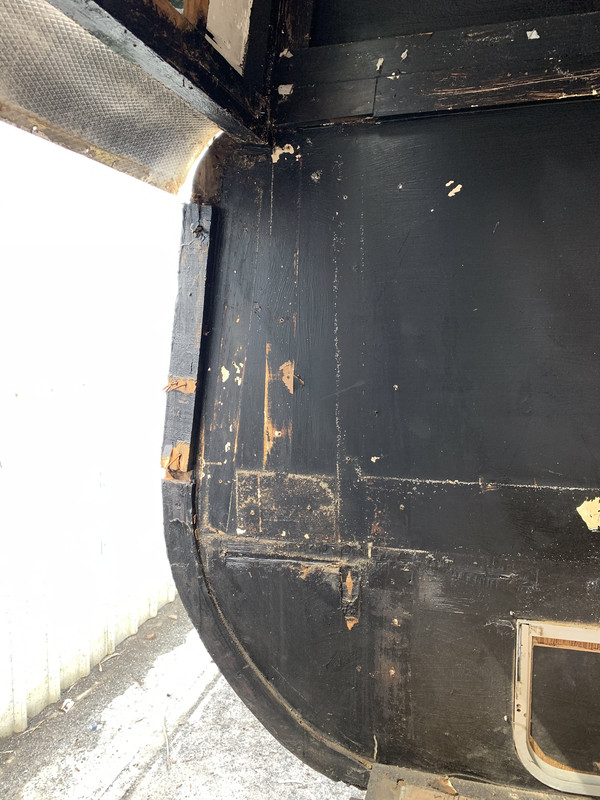 If anything I am learning brand new skills, who said ya can;t teach old dogs new tricks... I have also started a vlog on YouTube now called Grumpy's Hollow... Grumpy's Hollow YouTube |
|
Deleted
Deleted Member
Posts: 0
|
Post by Deleted on Sept 28, 2019 15:26:04 GMT 10
SERIAL NUMBER UPDATE The things you find when you're not looking for them.... Found the V755 serial number that the van is registered under whilst reviewing a clip for my vlog... It's very poorly stamped using a centre punch by looks of it... 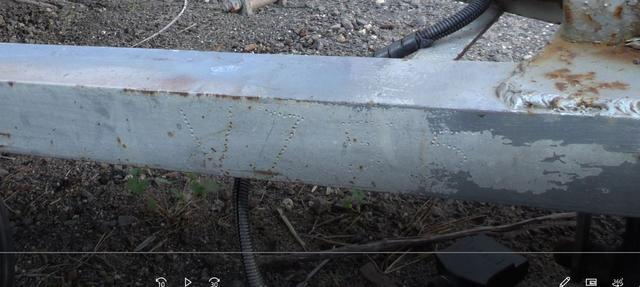 Think I will be amending the rego to reflect the number actually that is on the nearside and stamped with proper numerals..  Otherwise looks like I am replacing the entire wall panel at the rear quarter on both sides, whoever did the plugs replacing the original corner windows did a bloody lousy job, they are all filled with bog and there is copious amounts of water damage where the plug meets the old panels, on both sides of the van.... might even just replace both sides entirely, would definitely be easier then trying to get rid of the pitch they are painted with... |
|
Deleted
Deleted Member
Posts: 0
|
Post by Deleted on Oct 3, 2019 17:31:49 GMT 10
Hello everyone, I finally got the internal out of the van yesterday and took a full load of chipboard and melamine to the tip as a result, now the van is empty.. With the removal of the floating floor and underlay I am now able to see the original floor plan which is going to make rebuilding a breeze...  It also reveals that the original doors were narrower then the door that is now fitted.. 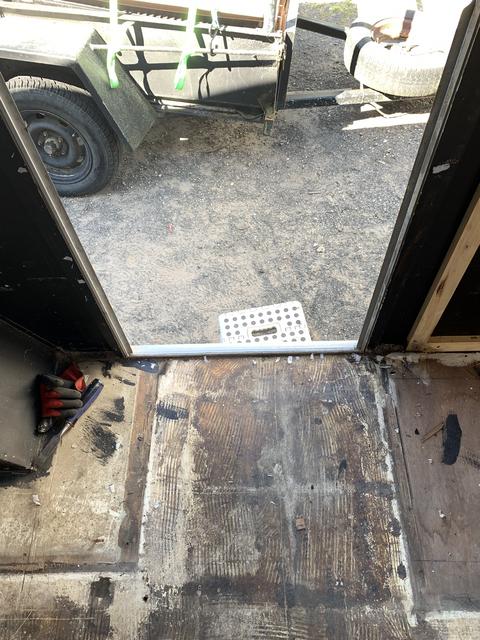 There are a couple of soft spots in the floor which I will replace with lap jointed patches of new ply in due course, with the removal of the kitchen I have found a wet spot in the bottom of the front right corner, not sure if it is just trapped condensation or seepage from the J rail but all will be replaced when the walls get replaced. I bought 8 sheets of 9mm marine ply the other days so all the walls and the associated bitumen/pitch can be gone for ever.. I reckon the last person to reno the van must have had shares on the staple company because everything is stapled down with thousands of the buggers  Have also updated the vlog for anyone interested... head on over to Youtube and search for Grumpy's Hollow there are now 3 episodes live... Episode 1Episode 2Episode 3 |
|
|
|
Post by Roehm3108 on Oct 4, 2019 7:42:13 GMT 10
Grumpy's Hollow is a great motivational tool for yourself and others.
|
|
Deleted
Deleted Member
Posts: 0
|
Post by Deleted on Oct 12, 2019 19:05:29 GMT 10
G'day everyone, Work is slowly progressing on the van with two rear corners having new walls now and a 2nd panel fitted on the nearside.  I have certainly learnt new skills and using tools I haven't use for many years.. |
|
Deleted
Deleted Member
Posts: 0
|
Post by Deleted on Oct 14, 2019 10:20:44 GMT 10
Hello everyone, The van is starting to take shape again with the rear sheet going back on yesterday... certainly amazed me how much lateral stability it provides. 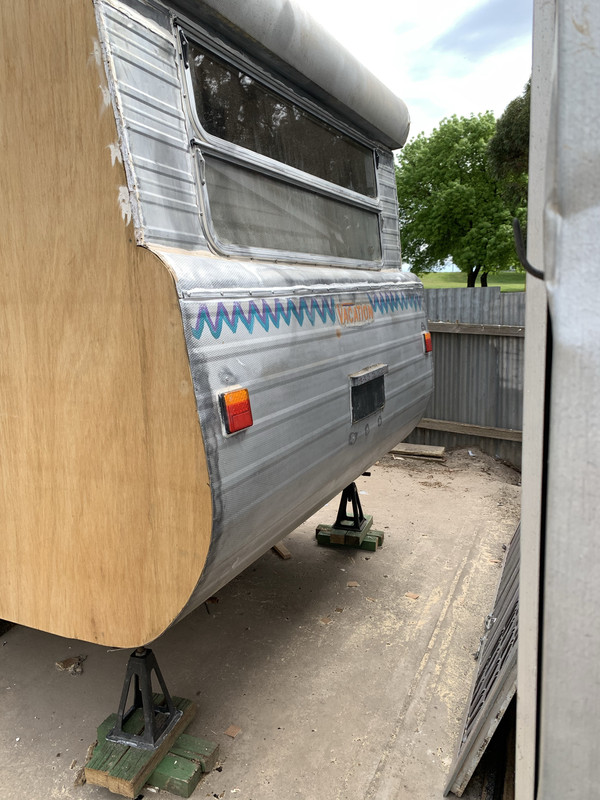 My Youtube vlog "Grumpy's Hollow" has been updated with a couple of new videos
Episode 4Episode 5 Side Wall removal tools I use |
|