Posting photos on the forum using Postimage
Jul 22, 2017 14:26:42 GMT 10
firefighter, gregh, and 3 more like this
Post by Don Ricardo on Jul 22, 2017 14:26:42 GMT 10
Hi everyone,
To post photos on the forum, you need to use an online photo storage platform. Postimage is one of a number of platforms available. This post gives instructions on how to post photos using Postimage on your desktop or laptop.
STEP 1: Go to the Postimage website at www.postimages.org (note 'postimages'), press the 'Sign Up' button and create an account for yourself.
Note: You can upload photos to Postimage without setting up an account, but you can't put photos into different albums, and I'm not sure how you find the photos you've uploaded at a later date if you need to. So, an account seems to be the way to go.
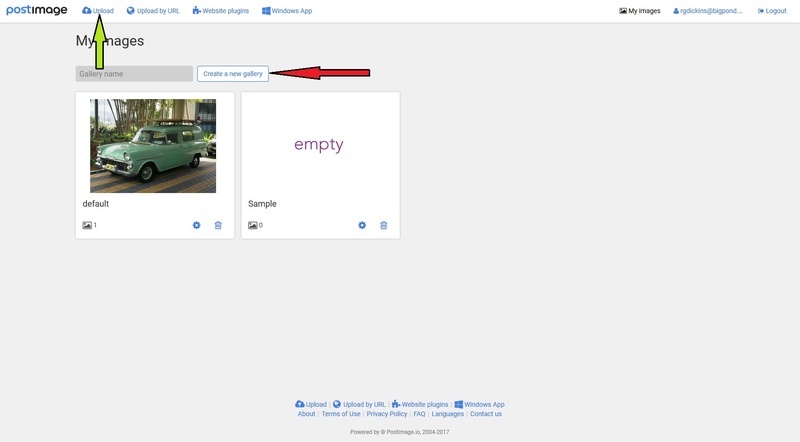
STEP 2: Sign into Postimage and you're now ready to upload some photos. On your home page (see below), click on the 'Upload' icon on the menu (see green arrow).
You can also assign the photos to an album within Postimage by clicking on the 'Create a new gallery' button (red arrow).
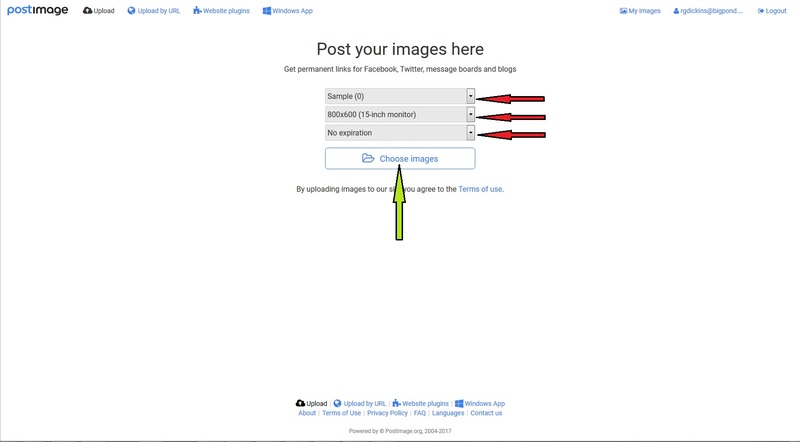
STEP 3: After clicking on the 'Upload' icon, the next screen provides some options for the way your photos will be uploaded (red arrows).
Choose (a) the gallery you want the photos to be uploaded into, (b) '800x600 (15-inch monitor)' for the size of the photo, and (c) 'No expiration' so that your photos don't disappear after a few days.
Then click on 'Choose images' (green arrow). That will take you to a new window where you can navigate to the drive/folders on your computer where you have your photos stored. From there choose the photos you want to upload and click on 'Open'. That will then start the process of uploading your photos to Postimage.
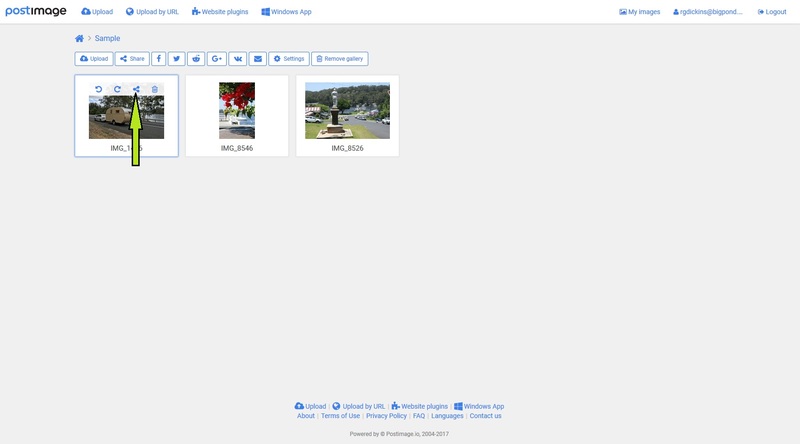
STEP 4: Once your photos have uploaded (and clicked on the album they've been placed in), you will see a screen like this next one, and you're ready to post some of your photos on the Vintage Caravans forum. Choose the photo you want to post, and click on the Share icon (green arrow):
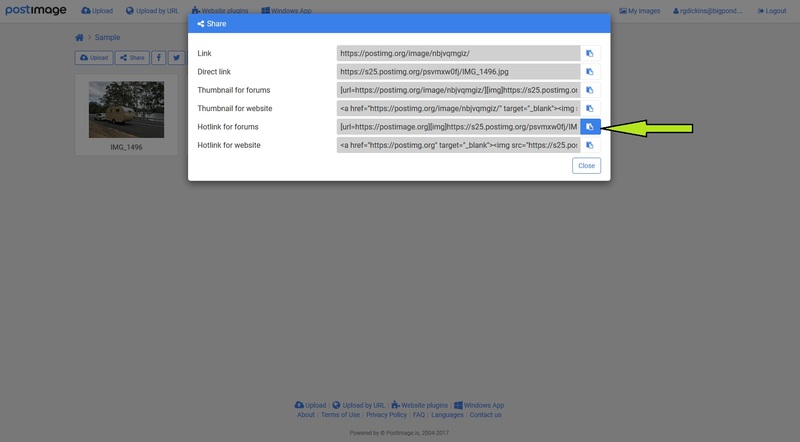
STEP 5: After clicking on the 'Share' icon, a dialogue box will open up providing various options. Click on the copy button for 'Hotlink for forums' (green arrow). That will automatically copy the URL address for the photo you want to post.
STEP 6: Now go from Postimage to the 'Create Post' window on the Vintage Caravans forum, and paste the URL for your photo wherever you want it to appear in your post. It will look like the example you can see below.
(To paste the URL, either click the right button on your mouse and choose 'Paste', or press CTRL+V on you PC keyboard.)
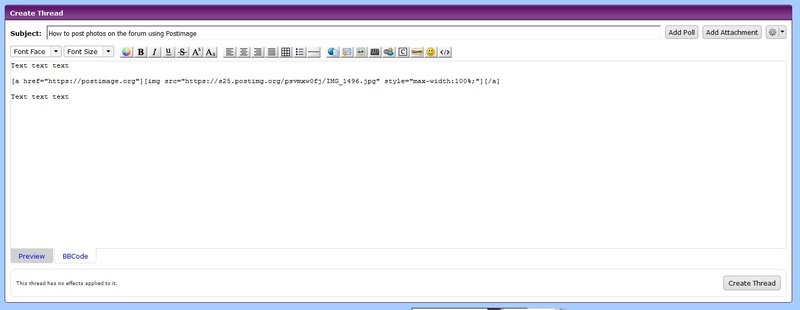
STEP 7: Once you press the 'Create Post' button on the screen above, your post will be published and the photo will display as shown below.
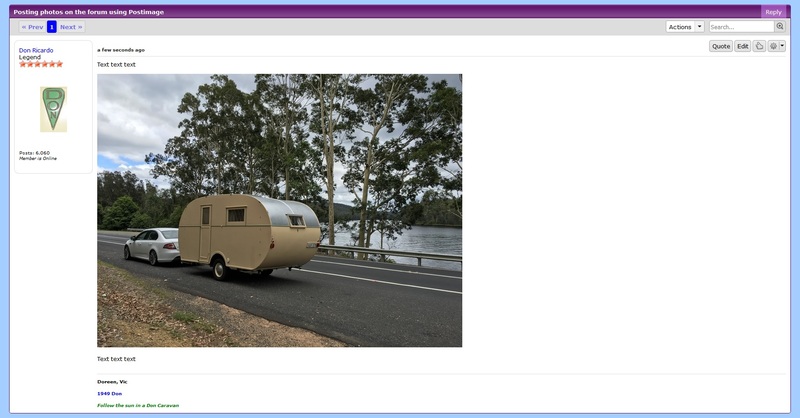
AND REMEMBER: You can post the links for any number of photos into your forum post, one after the other (just like I've done in this post). You aren't restricted to one photo per post, and in fact that makes it harder for people to follow your story.
NOTE: The forum software doesn't seem to take kindly to photo links from Postimage involving 'unusual' filenames. Most photos have a filename such as 'IMG_1496' (that's the filename for the photo of the caravan shown above). However, if the filename is 'IMG-1496[R]' indicating that the photo has been re-sized, the forum software can't recognise the filename and display the photo. This won't be a problem for most forum members, but if you have this problem, there is a way around it. Just let me know and I will explain further.
CONCLUSION: Posting photos from Postimage, may look complicated at first because it involves the above seven steps (six excluding registering, which you only do once). But it's easier than it may seem, and like all these processes, once you get used to it, it's quite straightforward and simple.
If you can't get the hang of posting photos from Postimage, or some of the steps above are confusing or need further explanation, let me know by posting on the forum or by PM (Personal Message), and I'll try and assist you or clarify.
Don Ricardo
for the admin team
To post photos on the forum, you need to use an online photo storage platform. Postimage is one of a number of platforms available. This post gives instructions on how to post photos using Postimage on your desktop or laptop.
STEP 1: Go to the Postimage website at www.postimages.org (note 'postimages'), press the 'Sign Up' button and create an account for yourself.
Note: You can upload photos to Postimage without setting up an account, but you can't put photos into different albums, and I'm not sure how you find the photos you've uploaded at a later date if you need to. So, an account seems to be the way to go.
STEP 2: Sign into Postimage and you're now ready to upload some photos. On your home page (see below), click on the 'Upload' icon on the menu (see green arrow).
You can also assign the photos to an album within Postimage by clicking on the 'Create a new gallery' button (red arrow).

STEP 3: After clicking on the 'Upload' icon, the next screen provides some options for the way your photos will be uploaded (red arrows).
Choose (a) the gallery you want the photos to be uploaded into, (b) '800x600 (15-inch monitor)' for the size of the photo, and (c) 'No expiration' so that your photos don't disappear after a few days.
Then click on 'Choose images' (green arrow). That will take you to a new window where you can navigate to the drive/folders on your computer where you have your photos stored. From there choose the photos you want to upload and click on 'Open'. That will then start the process of uploading your photos to Postimage.

STEP 4: Once your photos have uploaded (and clicked on the album they've been placed in), you will see a screen like this next one, and you're ready to post some of your photos on the Vintage Caravans forum. Choose the photo you want to post, and click on the Share icon (green arrow):

STEP 5: After clicking on the 'Share' icon, a dialogue box will open up providing various options. Click on the copy button for 'Hotlink for forums' (green arrow). That will automatically copy the URL address for the photo you want to post.

STEP 6: Now go from Postimage to the 'Create Post' window on the Vintage Caravans forum, and paste the URL for your photo wherever you want it to appear in your post. It will look like the example you can see below.
(To paste the URL, either click the right button on your mouse and choose 'Paste', or press CTRL+V on you PC keyboard.)

STEP 7: Once you press the 'Create Post' button on the screen above, your post will be published and the photo will display as shown below.

AND REMEMBER: You can post the links for any number of photos into your forum post, one after the other (just like I've done in this post). You aren't restricted to one photo per post, and in fact that makes it harder for people to follow your story.
NOTE: The forum software doesn't seem to take kindly to photo links from Postimage involving 'unusual' filenames. Most photos have a filename such as 'IMG_1496' (that's the filename for the photo of the caravan shown above). However, if the filename is 'IMG-1496[R]' indicating that the photo has been re-sized, the forum software can't recognise the filename and display the photo. This won't be a problem for most forum members, but if you have this problem, there is a way around it. Just let me know and I will explain further.
CONCLUSION: Posting photos from Postimage, may look complicated at first because it involves the above seven steps (six excluding registering, which you only do once). But it's easier than it may seem, and like all these processes, once you get used to it, it's quite straightforward and simple.
If you can't get the hang of posting photos from Postimage, or some of the steps above are confusing or need further explanation, let me know by posting on the forum or by PM (Personal Message), and I'll try and assist you or clarify.
Don Ricardo
for the admin team

