|
|
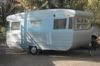
Post by maplegum on Apr 6, 2015 19:51:40 GMT 10
Surely after 4 days straight of cleaning and polishing aluminium window frames and trim, I am no longer a rookie? You guys can now give up your secrets and give me the ‘short cut’ to get amazing results. I’m waiting…. I have scrubbed, polished and buffed 4 days of my life away and all I am left with is shiny, pitted aluminium! Like this! I just can’t shift those black spots! 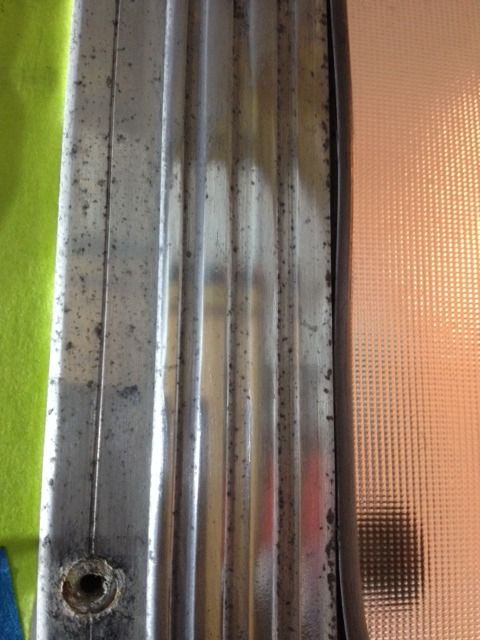 So far I have experimented with the following techniques; Various grades of steel wool with Auto Glym metal polish. Various grades of steel wool with Auto Sol Aluminium polish. Various grades of steel wool with Purple Polish Various grades of steel wool with Jiff cleaner. To be honest, they have all had very similar results. There does not seem to be a stand out amongst them. I was so hopeful that the Purple Polish would be the answer to my prayers as you guys had praised it so much. There is a little hood above the windows. What I am finding that the area underneath the hood is so badly pitted and has a build up/growth on it that none of these products even look at. It just makes it shiny lumpy stuff. It looks awful. 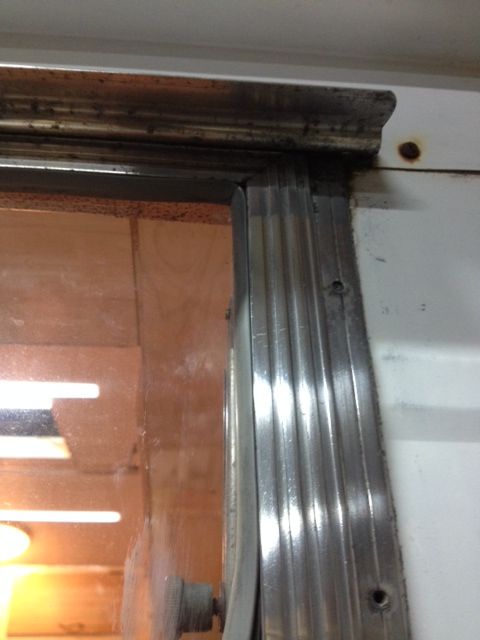 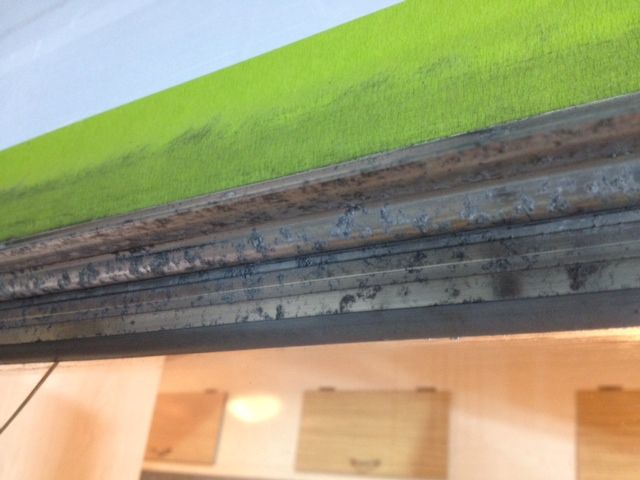 We have tried a range of power tools with all types of attachments. They are either too abrasive or don’t quite work for us. What works OK is a drill with a buffing pad wrapped in 000 steel wool. It works OK in areas that you can get a good run at. Having said that, it still doesn’t get rid of this growth that has accumulated underneath the hoods. How do you clean around the screw holes and get them looking good again? 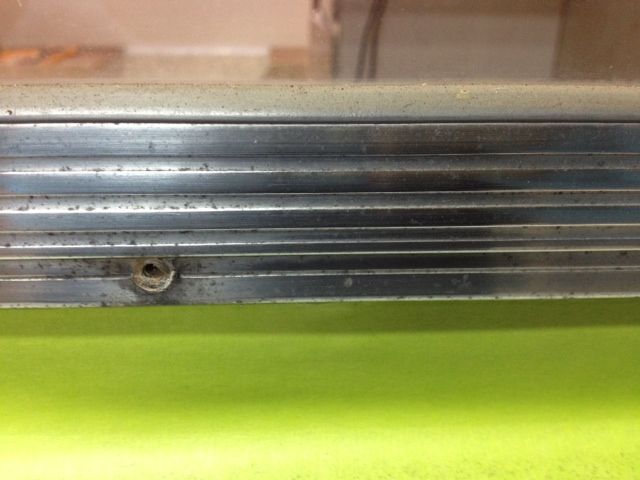 Does everyone else have ‘perfect’ aluminium trim? Were you able to bring it back to it’s former glory? Please don’t tell me I need to scrub longer and harder. There are test areas I spent a considerable amount of time on experimenting with scrubbing and polishing and no matter how long I dedicated to the area, I couldn’t get it looking great. I feel kind of defeated. Would the deoxidiser stuff help ? I’ll buy it. I’ll buy anything to make this work . HELP please  |
|
|
|
Post by DC3Td on Apr 6, 2015 20:30:21 GMT 10
The pitting is oxidization.Due to either moisture or combination of mixed materials - metal screws in aluminium don`t work.You could try a soft brass bristle brush.I can`t see why any ali polish/steel wool hasn`t worked for you.However all is not totally lost.Remove the ali strips & grab yourself some fine grade wet & dry paper.Rub back in a direct line all the ali surfaces making sure the paper is kept more wet than dry.Hair dryer dry.Then repolish.Use a pair of cotton gloves so hand moisture isnt attracted to the ali surface.As for the pitting? Could try silver silastic to fill in the pitted areas or find same moulding.
|
|
|
|
Post by Observatory on Apr 7, 2015 9:02:54 GMT 10
What DC3Td said and also; to polish out the nooks and crannies, it's better to have the window frames dismantled (a little tricky to get apart with old rusted steel screws). Also had success with 600 wet and dry - gets a lot of the pitting out; (straight lines but follow the 90 degree on the corner window bends - less wonky sanding marks).
|
|
|
|
Post by retrocaravans on Apr 7, 2015 10:40:32 GMT 10
To save some elbow grease, pull the glass out and get them lightly soda blasted first, then polish.
|
|
|
|
Post by maplegum on Apr 7, 2015 15:56:22 GMT 10
Thank you everyone. I'm going to try to tackle this job with the sand paper and see how i go.
|
|
|
|
Post by Kathleen B on Apr 9, 2015 7:28:10 GMT 10
Oh my i cant believe you were doing the same job i was last weekend!! After trying everything my husband found this stuff from an off road shop...a bottle of acid wash that dillutes so we tried and oh my god it worked a treat!! I wish we'd found it earlier! Apparently truckies use it to shine big alum things on their rigs.
|
|
andys
New Member

Posts: 27 
|
Post by andys on Apr 9, 2015 9:02:24 GMT 10
I'm currently cleaning up the aluminium frames on my van.
The frames are in very poor condition, so after taking them apart I used 200 grit wet and dry paper (even that doesn't get all of the marks out, but makes a big difference), followed by Autosol aluminium polish using 0000 steel wool.
I've only completed 1 frame so far, but it no longer looks it was left at the bottom of a lake.
Good luck
|
|
|
|
Post by maplegum on Apr 9, 2015 13:18:04 GMT 10
So Mr Maplegum left me alone with power tools.
Wire wheels on a drill.
Oops.
Now to repair the damage I've made. I've just been trying to sand out my 'enthusiasm' I had with the power tools.
Dammit.
|
|
|
|
Post by Observatory on Apr 9, 2015 14:17:43 GMT 10
Hi Maplegum, those scouring pads impregnated with stainless steel bits (in the cleaning section at the supermarket) work well for getting the power tool marks out. Used in straight lines in one direction - following the direction of the alum. strips. The surface will still be a bit rough but can be gradually shined up with wet and dry sandpaper; then steel wool.
|
|
|
|
Post by maplegum on Apr 9, 2015 18:34:05 GMT 10
Well that was an all day affair repairing the damage I did.
All better now.
After 8 hours of working on it today, I have one reasonable looking window. Only another 4 or 5 windows to, along with the entire aluminium trim around the edges of the van. Should be done scrubbing by 2017.
Mr Maplegum bought some of that de-oxidiser solution, just to humour me I'm sure. It's now sitting alongside all of the other polishes and solutions that have not helped to make this task any easier at all.
So far, most success with sand paper of various grades, then polish on steel wool, then purple polish. Then wine, lots of wine.
You know how I mentioned in another thread that Mr Maplegum let a few 'f bombs' fly in the restoration process? Guess what? I win.
|
|
|
|
Post by DC3Td on Apr 9, 2015 21:37:04 GMT 10
Oh my i cant believe you were doing the same job i was last weekend!! After trying everything my husband found this stuff from an off road shop...a bottle of acid wash that dillutes so we tried and oh my god it worked a treat!! I wish we'd found it earlier! Apparently truckies use it to shine big alum things on their rigs. Yep,you certainly can use Acid Wash or Mag Wheel Cleaner on aluminium but for heavens sake pay attention to the directions & use acid proof rubber gloves,goggles & mask as some of these particular products can be and are totally lethal.Being in the auto detailing trade we use these products on tray back trucks/tanks/bull bars etc to bring back to near new or highly more presentable & it is the one product i take no chances with even after some 30 years of using.On a bare window frame you would place it on a sheet of cardboard (an old box opened out) spray on,let it froth up & hose off straight away.Depending on oxidisation,25,50 or 100% neat.Mag wheel cleaner (especially the one i use) will kill your grass & whiten your concrete so keep it away from these areas if you don`t want splash patterns.Being what it is i very rarely have mentioned it here because it can be mis-used unintentionally bringing on all sorts of dramas. |
|
|
|
Post by Kathleen B on Apr 10, 2015 6:52:08 GMT 10
Oh sorry yes you're right but the bottle has massive warnings so of course you would need to be extremely careful but looking at the size of a caravan it was the saviour of my back.
|
|
|
|
Post by DC3Td on Apr 10, 2015 18:01:39 GMT 10
Oh sorry yes you're right but the bottle has massive warnings so of course you would need to be extremely careful but looking at the size of a caravan it was the saviour of my back. Funny how people don`t always read or see the warnings - like Stop signs on a road etc.To reduce streaking spray across ways from bottom up maybe a metre wide.Let it really froth up & hard hose spray off.Shouldn`t pose a problem on glass but `vans with perspex or Lexan windows i would probably tape a garbage bag over.Decades ago when not thinking i donned a pair of kitchen gloves,vigorously cleaned some material with steel wool in a large plastic container of the acid not realising that the scrubbing action had perished the finger tips of the gloves just enough to allow the acid to sit within.Job done,hands washed it wasn`t long before i realised why my finger tips were beginning to throb.End of the day my hand felt as though i`d hit the finger tips with a block hammer.Probably lasted twenty four hours solid & lost a nail in the process.Lesson learned. |
|
|
|
Post by colnce on Apr 10, 2015 21:01:37 GMT 10
maplegum
As with my van you will probably find the 'pox' has eaten into the metal. Salt air one of the culprits. I set about filing down the good metal to get to the bottom of the pitting, then the usual polishing methods. Having eight windows to do i decided in the end that near enough was good enough. After all a fifty odd year old van needs a bit of patina.
|
|
|
|
Post by maplegum on Apr 10, 2015 23:26:02 GMT 10
maplegum As with my van you will probably find the 'pox' has eaten into the metal. Salt air one of the culprits. I set about filing down the good metal to get to the bottom of the pitting, then the usual polishing methods. Having eight windows to do i decided in the end that near enough was good enough. After all a fifty odd year old van needs a bit of patina. She had spent the last 5 years living by the ocean so that will explain why some of the 'pox' was so deep I guess. i have come to the conclusion that near enough is also good enough. I Won't be entering her into any shows, I just want to get out there and use and enjoy her! Having said that, the window that I did complete looks great, it's just not 'perfect' but I can live with that  |
|
|
|
Post by King Woody on Apr 11, 2015 13:41:14 GMT 10
Hi Guys. After nearly six months (not continual) of grinding and polishing I've got what would be acceptable standard of shine to a 1968 viscount set of window frames. They were nearly as bad as your's in some areas! My 2 cents worth is that you can't get rid of the pitting unless you sand back to below the lowest point in the worst pit. Mostly an un thinkable solution as the frames are not that thick! Patina is the key here! These are 50 year old vans and have had an incredible life! Our job is to rescue and restore - where practicable. Where not, you accept and highlight the good bits!! Ha!
My journey began with 80grit, 120grit, 200grit, a nylon scouring pad, the course wheel on the bench polisher, the soft pad on the bench polisher and then a wipe over with purple polish to "shine it up" After 8 windows on the Viscount, I've got forearms like Popeye! It's just damn hard work, and it wouldn't be something I'd tackle again. It would definately be a deal-breaker if I was looking at another aluminium framed van to restore!
In Real Estate it's Position, Position, Position.... In vintage vans it's Patina, Patina, Patina!
Happy trails
Mark
|
|
annienpete
New Member
Email now Ammt1961@gmail.com Old address doesnt work. System won't accept new address!!!
Posts: 34 
|
Post by annienpete on May 24, 2015 23:05:43 GMT 10
Hopefully some may find this helpful.
I eventually went and checked out what would be done with aluminium boats - and was recommended a pot of pink paste by 3M brand - called marine metal restorer and polish. About $45 for 500g. It must be used in a well ventilated area - and followed up with copious amounts of cloth to polish with. Use gloves as an awful amount of black, presumably oxide, is created. The results with persistence have been really good - even on pitted aluminium.
Had done steel wool, wire brush, copper brush, car polisher thing. A lot of our old van had been painted aluminium, so with sides off and up on work bench, and saturated with paint stripper, washed in warm water afterwards - and following the 'cut and polish' product - results have been quite amazing. What isn't too pitted just gleams...
Need strong arms and healthy shoulders!! And good excuses for blackened hands at times in this project!!! Annie.
|
|
alprov
Junior Member

Posts: 84
|
Post by alprov on Apr 30, 2017 11:08:05 GMT 10
A big thankyou to all the posts above , just about to start on my first window after temporarily fitting outer skins on one section & have found these posts very very helpful .
|
|
|
|
Post by Mustang on Apr 30, 2017 19:36:06 GMT 10
How to Polish Tarnished Grooved Aluminum Windows
There's not a product, brush, potion that I haven’t tried to rejuvenate old aluminum,
I’m yet to find anything that works, better than this method:
(I’ve removed, polished replaced, 24 x windows to date)
Best method I have found for polishing grooved tarnished aluminum: (Non Oxidized)
1) Course steel wool , (pending condition) sprayed with INOX (pending condition)
(WD40 is too light & dries out quickly)
With this first step it is important to remove all lumps of tarnish. You can spray the surface with Inox & run over with a flat chisel, before the steel wool, minor scratches will be removed by the wool, cavities from heavy tarnish are best left as part of the history.
2) Medium steel wool (any tarnished condition)
3) Fine " " " " “
Steel Wool is cheap, it wears out, change your pad when it balls up.
You should have reached a semi shine by the “fine” stage, if not you may have skimped on stages 1 & 2.
Now the secret is to finish with steel wool 0000 still saturated in INOX.
Rub like no tomorrow, then de-grease the Inox.
Next Step
I have tried Purple de-Oxidizer, Purple Polish, White bull bar shine, most others....
I now recommend AUTOSOL, apply after all of above, cheap & it works,
However once you achieve a shine, maintenance with Purple de-Oxidizer followed by Purple Polish will give you a slightly higher gloss.
It takes time, you cannot rush it, set small targets.
|
|
|
|
Post by Warrenk on Apr 30, 2017 22:10:19 GMT 10
Cleaning the windows is a job I have putting for a while but I am about to get serious cleaning and polishing them. I made up wooden frame to screw the frame onto so I can hold it down easily. I going use my water blaster with a sand blasting attachment using fine crushed glass and give the frame light going over to clean it I did a small test area and the aluminium comes up pretty clean. From this point I used soapy stainless steel wool, then 1000 wet/dry then 1500 then purple polish. It comes up pretty good. After reading Mustang's post I think I will use his prceedure after I use the fine crushed glass.
Warren
|
|
aza
Junior Member
Posts: 64
|
Post by aza on May 2, 2017 14:32:01 GMT 10
I recently did all the windows and J mold on a 1964 Modern. I purchased a grinder and replaced the grind stones with a cutting pad and a polish pad. I then used a medium cut compound and a polish compound to finish. This of course means removing all the windows from the van. However that was my intentions anyway so I could redo all the seals on the windows and the van. All the windows on the Modern where very much like yours maplegum, including the top trim of the window, and they all came up a treat. In fact I have had a few people ask me where I got 'new' windows from for my van.
If anyone is interested in seeing the result I have a Facebook page : Just Retro Caravans
The pictures of the Modern are a little way down the page now because it was a while ago however I have also just polished a water filler using the same method. The filler was in very bad shape but it also came up really nice.
The water filler is pictured at the start of my page currently and shows what can be done using a polish wheel and cutting compound.
Cheers
AZA
|
|
|
|
Post by Mustang on May 3, 2017 12:04:33 GMT 10
I recently did all the windows and J mold on a 1964 Modern. I purchased a grinder and replaced the grind stones with a cutting pad and a polish pad. I then used a medium cut compound and a polish compound to finish. This of course means removing all the windows from the van. However that was my intentions anyway so I could redo all the seals on the windows and the van. All the windows on the Modern where very much like yours maplegum, including the top trim of the window, and they all came up a treat. In fact I have had a few people ask me where I got 'new' windows from for my van. If anyone is interested in seeing the result I have a Facebook page : Just Retro Caravans The pictures of the Modern are a little way down the page now because it was a while ago however I have also just polished a water filler using the same method. The filler was in very bad shape but it also came up really nice. The water filler is pictured at the start of my page currently and shows what can be done using a polish wheel and cutting compound. Cheers AZA Can you quote the products you used? |
|
aza
Junior Member
Posts: 64
|
Post by aza on May 3, 2017 13:06:18 GMT 10
Josco is the brand I have used. Available at most hardwares.
The cutting and polish compounds are solid bars, not a cream, and are applied to the cutting/polish pad.
I think the white bars are for final polish, brown bars are medium cut and black are hard cut.
|
|
|
|
Post by Mustang on May 4, 2017 7:05:55 GMT 10
Josco is the brand I have used. Available at most hardwares. The cutting and polish compounds are solid bars, not a cream, and are applied to the cutting/polish pad. I think the white bars are for final polish, brown bars are medium cut and black are hard cut. As a knife maker I have the solid bars & Ia'm familiar with steel polishing, but it never occurred to me to use these on the soft aluminium. I guess because our Viscount windows were in such poor condition, at the start. Cheers |
|
|
|
Post by kerri on Jun 24, 2017 21:27:52 GMT 10
Thank you everyone for all these posts. You are saving me hours of pain. I will be cleaning my frames soon.
|
|