|
|
Post by Sam Ferraro on May 15, 2007 22:52:38 GMT 10
Hi all About 12 months ago I registered on your site as “Need a Shed” to build my vintage caravan look-alike. I did think about buying a real vintage van & restoring it but all the ones I looked at were in my opinion, too far gone. Unable to find a shed at the time, someone from this site suggested that I build it under a tarp if I had to. Whilst I did find someone kind enough to offer their shed so I could complete the shell of the van, I have now got it at home under a cover finishing off the inside. Just thought I would bring you up to date with the progress by enclosing the following pictures. Constructing the chassis was the easiest part of building this van: 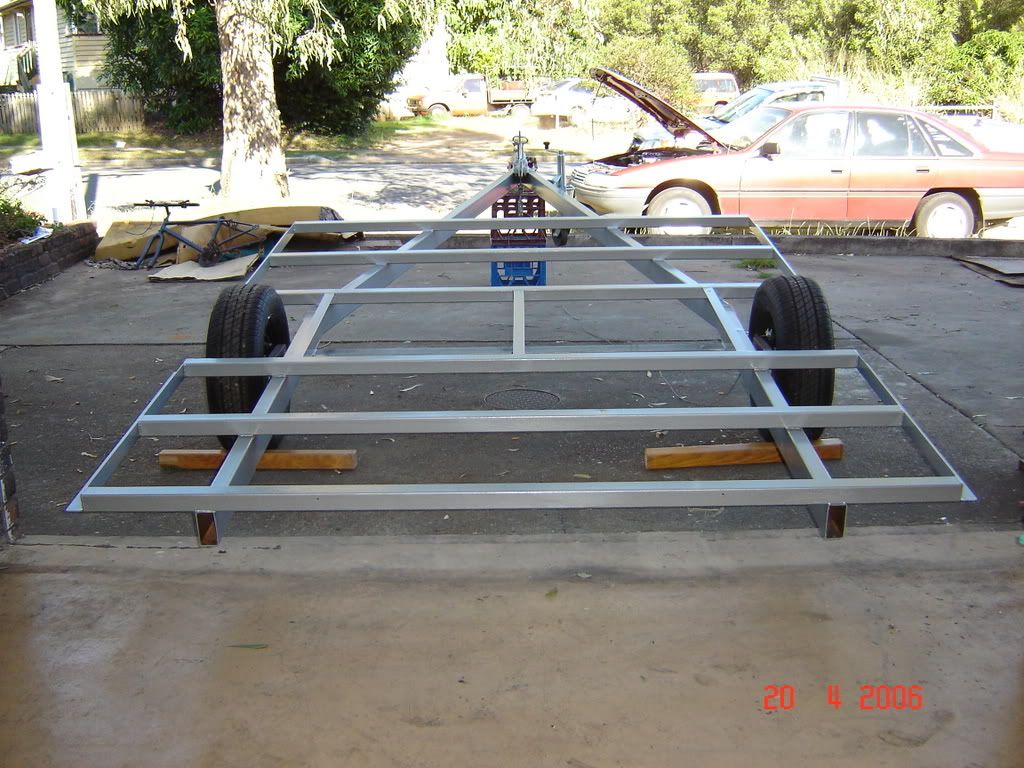 The curved laminated beam was constructed by gluing & clamping strips of ply around a mould I cut out of craftwood. 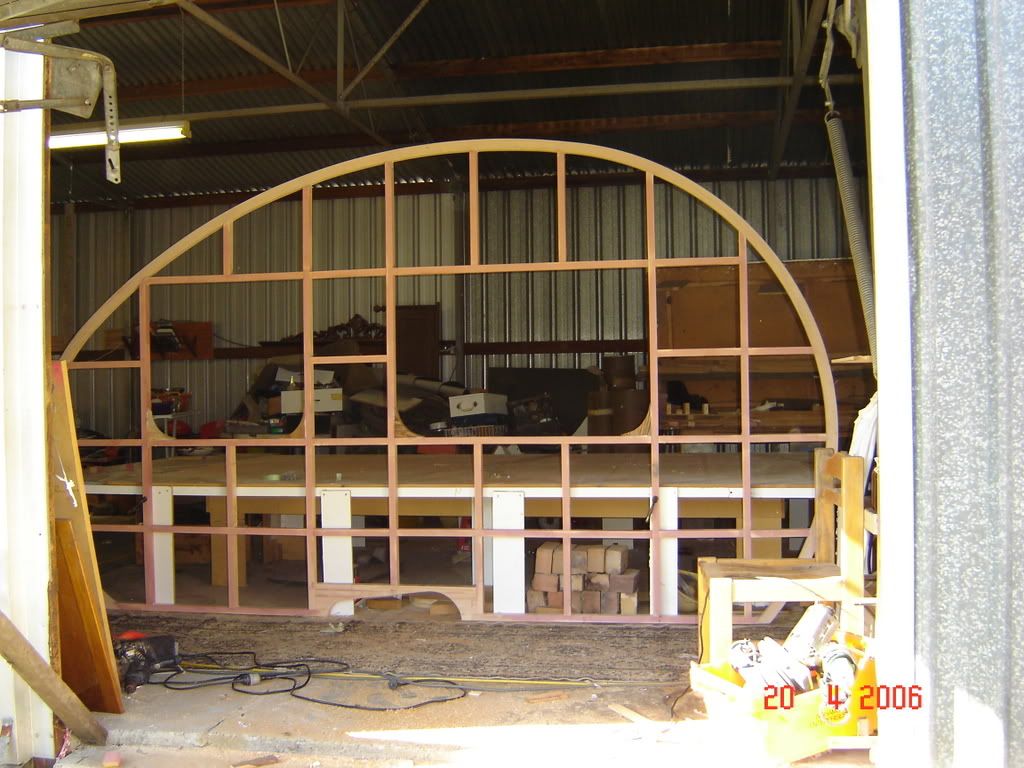 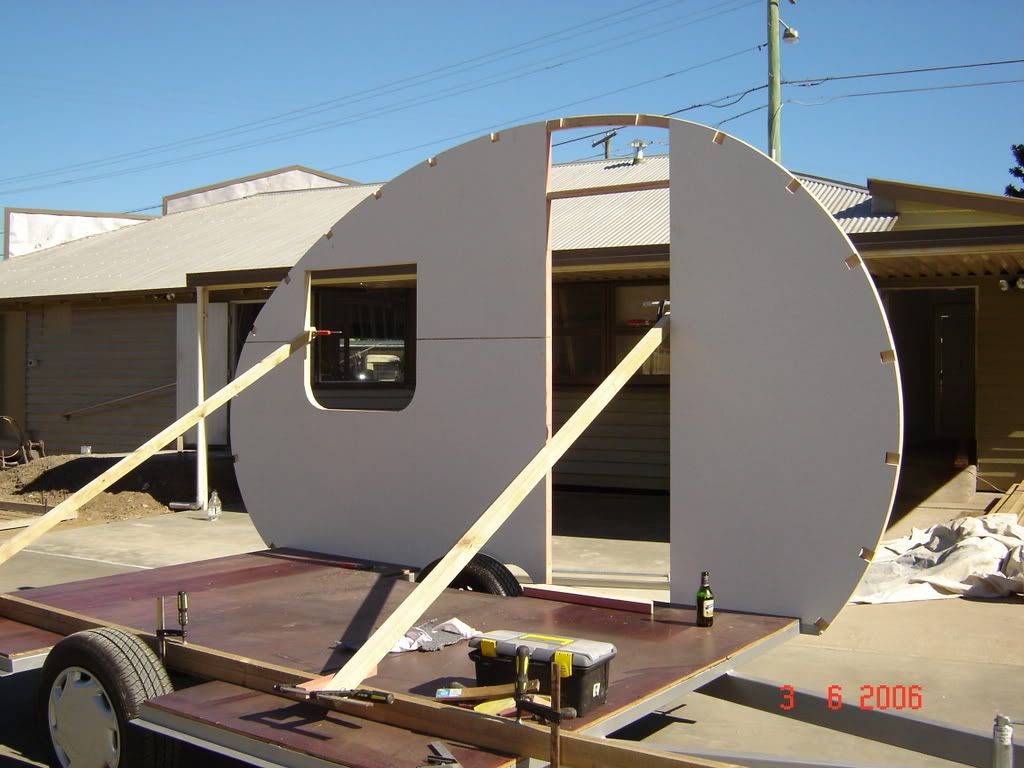  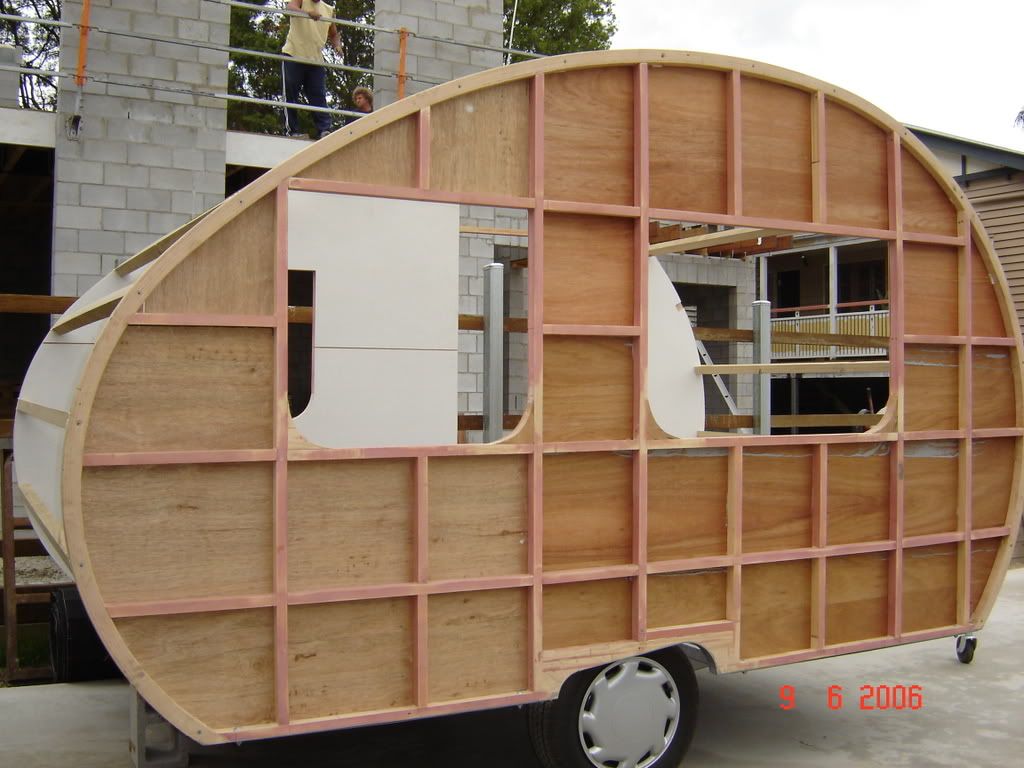 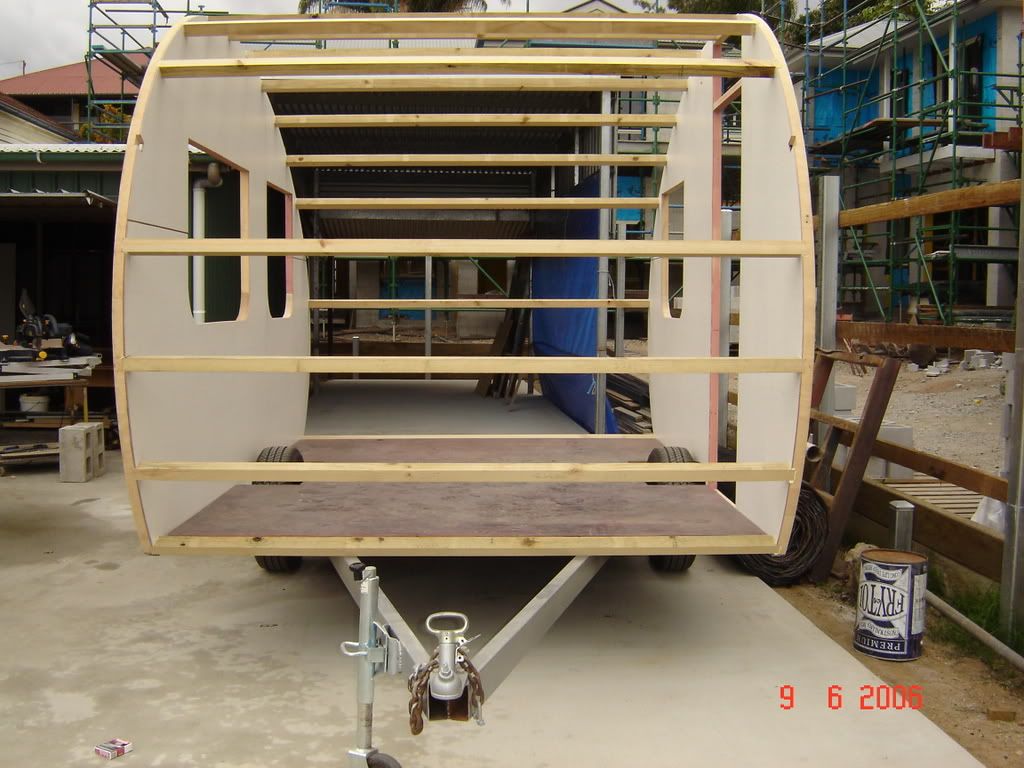 This looks nearly finished but there is still a long way to go. I will provide photos of the inside as I progress it a little further. 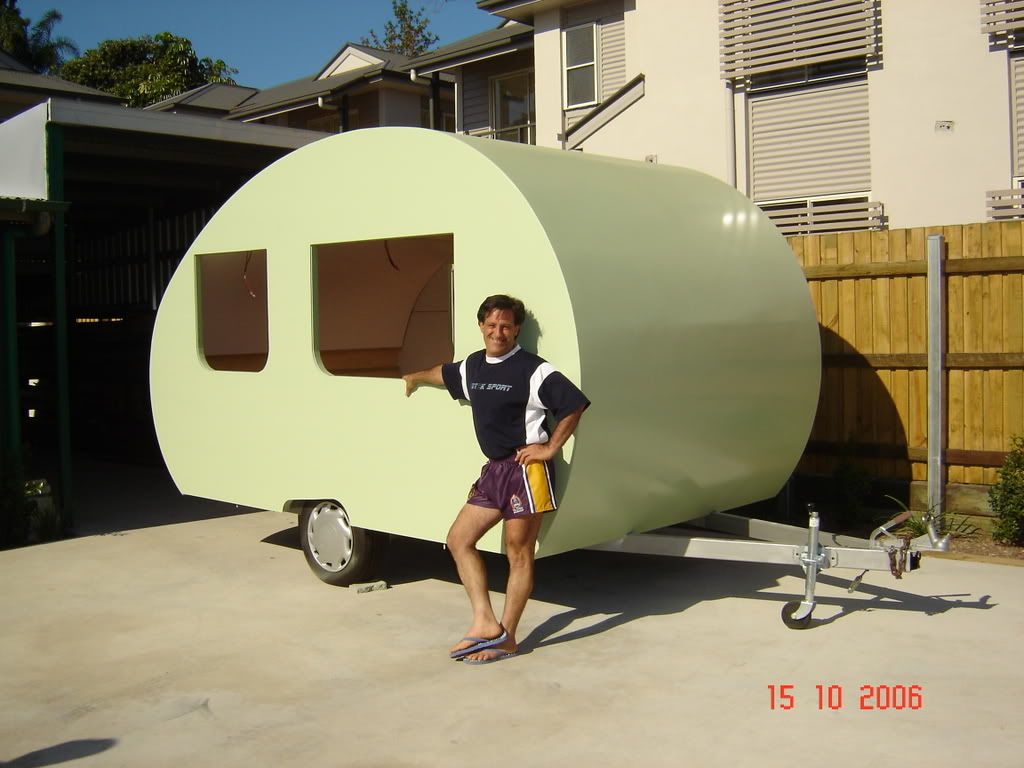 |
|
|
|
Post by tinnie on May 16, 2007 1:09:53 GMT 10
Hey Sam, Great job thus far, that is a classic and unique style. Can't wait to see what you do with the inside. It also looks like the van wasn't the only construction project going on around near your place! Cheers and keep up the great work, Tinnie  |
|
|
|
Post by jnigrelli on May 16, 2007 9:08:41 GMT 10
beautiful job.
any chance of sharing particulars of the build? design program, joinery methods, wood type, sheathing thickness & species, ad infinitum....
thanks for posting this - very encouraging!
|
|
will
New Member

Posts: 0
|
Post by will on May 16, 2007 9:11:08 GMT 10
 ;D  great work sam it looks like you have a handle on the construction side of things probably a better way to go than repairing a bad oldie keep up the great work Will and Lyn
|
|
|
|
Post by Scoot on May 16, 2007 9:48:39 GMT 10
Wow thats a really good job, construction looks a bit like PH except you seem to know what your doing and your job is a lot neater than mine,
Scoot
|
|
|
|
Post by s f on May 16, 2007 21:51:31 GMT 10
Hi Tinnie, Jnigrelli, Will & Lyn, & Scoot.
Many thanks for the great responses. I am a lover of all things old / with character and when I found your web site I spent hours looking at photos of all your great vans, I just had to have one. Over the months, especially lately, I had lost motivation, started having regrets about starting this project & thought why didn't I just go out & buy a new van. Your kind and positive comments have given me a new drive.
Jnigrelli,
I am more than happy to provide any information that may help you in your endeavours but please remember that I am not a carpenter / joiner etc. Hopefully the following will answer some of your questions:
This is the first time I have built something without first designing it complete with dimensions. I knew I wanted a small van, about 12 ft & roughly what I wanted in it.
I started by constructing a temporary table supporting 3 x (2400 x 1200) craftwood sheets laid side by side.
· I then made a compass out of a length of wood which was used to draw the outline / shape of the van on the table. I used 3 centre points (one for the curved front, one for the curved roof & one for the curved rear). I just kept adjusting each radius until I had the shape that seemed to flow and that I was happy with. By the end there were lines everywhere, a bit confusing !!!!!!!!!!!.
· I then drew a line 50mm in from the outer line which gave me my inner & outer dimensions to construct my laminated beam.
· I then cut out inner & outer jigs out of craftwood as per the above.
· I cut sheets of 8mm bending ply into 42mm strips.
· The inner jig was screwed to the table.
· I glued & layered the ply strips to the inner jig constructing the laminated beam.
· I then applied pressure to the glued ply strips by encasing it with the outer jig & clamping it.
· When the glue had set, I screwed down the outer jig & unscrewed & removed the inner jig.
I then constructed the supporting inner framing:
· Framing Timber: 31mm x 42mm treated pine
· Laminated beam: 8mm x 42mm bending ply
· Glue: Unibond (highly recommended by people in the trade)
· Timber joins: All glued & screwed
· Inner lining: Standard caravan lining compressed to frame using
Sikaflex (no visible wholes).
· Notches for roof rafters: Side of laminated beam was notched out to house roof
rafters.
· Outer skin walls: 6.5mm plywood (marine grade glue)
· Outer skin roof: 4mm plywood (marine grade glue)
The walls & roof were Sikaflexed & nailed to wall frames & roof rafters.
All joins were filled with Sikafles for waterproofing & sanded back.
Hope this helps & makes some sort of sense. If you have any other questions I am more than happy to share my experiences / stuff ups.
Cheers
Sam
|
|
|
|
Post by will and lyn on May 16, 2007 21:56:06 GMT 10
;D Hope to see more of you on he site Sam keep on keepin on Mate well done Will and Lyn
|
|
|
|
Post by aussietanker on May 16, 2007 22:10:45 GMT 10
Sam .... you are da man .....
that is totally AWESOME .... pklease, please, please do not under any circumstances give up on it ... keep on going mate ...
regards
A|T
ps ... what city are you in ...
|
|
lulu
New Member
Posts: 4
|
Post by lulu on May 16, 2007 23:19:32 GMT 10
WOW you have such talent, well done to you! Give yourself a massive pat on the back, you're doing great! LuLu
|
|
|
|
Post by jnigrelli on May 17, 2007 9:03:06 GMT 10
i think some times we can let the design process fester into minutea and loose track of the original intent. obviously you have surmounted that dichotomy and hit the ball out of the park!
please keep everyone posted as you finish and move inside.
thanks and best regards,
j
|
|
|
|
Post by scootman on May 17, 2007 9:54:41 GMT 10
The more I look at the pics of your van, the more I feel like getting some petrol and some matches and sneaking up and burning it to the ground.LOL only joking. ! You are doing a great job, dont worry about losing interest and leaving it for a while. PH sat in the garage for months with nothing being done to her, but now that she is finished all is good, hang in there.
Scoot
|
|
Deleted
Deleted Member
Posts: 0
|
Post by Deleted on May 17, 2007 20:37:24 GMT 10
Ooooooo waaaa JBJ Boy are you gunna get a smack  Ya cant go round talkin like a drongo. Its enough to give ya "Flatulence" ;D ;D George W Bush . Now what century was that he embarrased the queen with the other day.. oh its ok .. he was only out by 100 years. |
|
|
|
Post by SF on May 17, 2007 21:29:31 GMT 10
Hi everyone,
I really appreciate all your kind encouraging words, I didn't expect to get such a great response.
I was actually contemplating not posting the photos on the site because I felt like a bit of a fraud after seeing all your beautiful old classics, I am glad I did.
When I progress a little further with the inside cabinets, I will take some photos & put them on the site.
A / T, I live in Brisbane, if you are up this way please call in.
Thank you everyone.
Cheers
Sam
|
|
hknut
New Member
Posts: 46
|
Post by hknut on May 17, 2007 22:06:24 GMT 10
Hi Sam,
Fantastic job so far it looks great, but with all projects you can lose some steam and need to have a breather. I am sure that when this is finished and you start using it, the admiration of others will make it all worth while and the effort will be well rewarded. Keep up the good work and don't forget, your not on a time line. Hope to see more.
cheers hknut
|
|
Deleted
Deleted Member
Posts: 0
|
Post by Deleted on May 18, 2007 8:01:44 GMT 10
Hi Sam To quote you: "I was actually contemplating not posting the photos on the site because I felt like a bit of a fraud after seeing all your beautiful old classics, I am glad I did." Maaattttteeee Dont ever worry about what others have got to say about what you have done. There is plenty of armchair critics out there that will chime in and blow the whistle on you. But thank god they are in a very small minority on this forum. I have spent the last 12 months on and off building a teardrop from the ground up from new and recycled bits so i understand what your going through. vintagecaravans.proboards30.com/index.cgi?board=photo&action=display&thread=1152161646There is days when ya just need to knock the lid off a beer and look at your project and... there are days when ya can feel you are making great progress. The job will slow when you start the inside fittout but hang in there and take it as it comes mate. No rush eh  . I reckon your doing a great job. Certainly going to be a solid van and totally unique. When finished you won't have to worry about running around tightening screws up, nailing things back on that have worked their way loose like they do in the old vans when you tow em long distances. keep those progress shots coming And remember "life is good while your working with wood" Reddo - President of "The Royal Society for the Preservation of Bondwood Caravans" ;D ;D ;D |
|
|
|
Post by jnigrelli on May 18, 2007 10:33:31 GMT 10
|
|
|
|
Post by thethreebears on May 18, 2007 17:58:06 GMT 10
Hi Sam
What a magnificent job!
We are also in Brisbane. Just purchased "Groovin" a 1958 Purdon 10ft bondwood - restored to its former beauty by Jailbarjuice. You are very welcome to visit.
Send me a personal message if you want contact details. Otherwise register on the site so people can contact you.
Barb
|
|
|
|
Post by PennyP on Jun 6, 2007 8:51:03 GMT 10
Hi Sam,
Your work is fantastic..although I am far from an expert. Judging by the hard work and effort (not to mention the tears) you have put into creating this splendid van I understand that the answer would be NO NO NO..but I thought I would ask anyway. Would you ever consider building a shell for someone else depending on the price. I would customise the inside myself but I thought I would be cheeky and ask.
Penny
|
|
|
|
Post by Roehm3108 on Jun 6, 2007 21:28:21 GMT 10
What a great job!!!! Mid-life crisis you say Beats goin out with bad women any day.............. I think  Congrats and keep up the good work! Ray |
|


 ;D
;D 


 .
.

