|
|
Post by akeepsake on Jan 8, 2015 15:06:47 GMT 10
Al your a machine ! Just be careful if the missus realizes your domestic she'll have you doing the ironing next!!!
Keep up the good work ! Always love your posts!
Cheers Andrew
|
|
|
|
Post by DC3Td on Jan 8, 2015 20:55:07 GMT 10
You must have the patience of a saint Al.But considering all the other bits & bobs you`ve done i guess one shouldn`t be surprised at your deftness.(there is a "t" in that last word!)Well done. gordon
|
|
|
|
Post by Don Ricardo on Jan 8, 2015 22:13:33 GMT 10
G'day Franklin1,
I think you are the only one on the forum that thinks you're a mug! The rest of us just think you're awesome - because we are all in awe of your multi-skilled self!
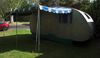
I just showed Dona Ricardo your curtains, and we are both very impressed at both your skill and your creativity.
Looking forward to seeing the curtains in place now...
Don Ricardo
|
|
|
|
Post by Franklin1 on Jan 13, 2015 16:13:33 GMT 10
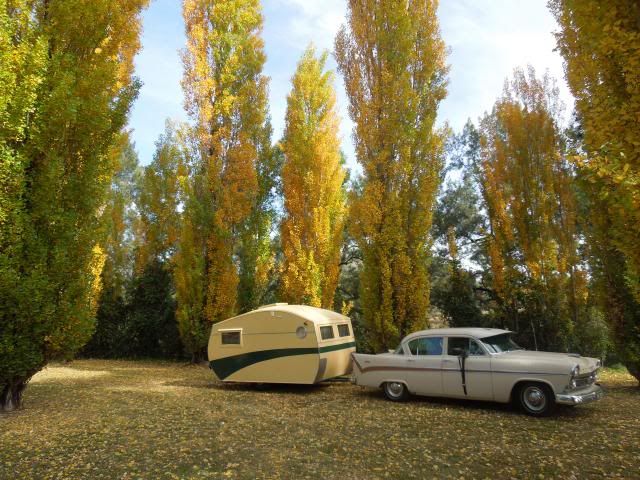
Thanks guys for your supportive comments.  Went into Spotlight on the weekend for some felt for a different project, and noticed this material on the clearance rack... 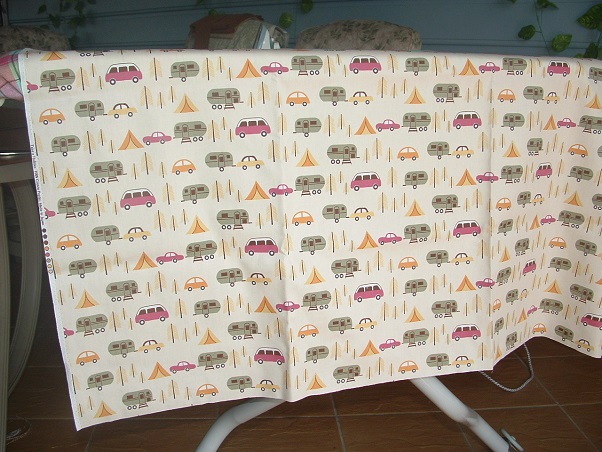 Price was reduced to $5.60 a metre, so I lashed out and bought a short length of it. Every second row of vans has the door on the "correct" side, so the design is 50% ridgy-didge.  Had a bit of a muck around making a couple of placemats out of it. Had to go on the internet and learn how to fix the edge binding properly, including the mitred corners... 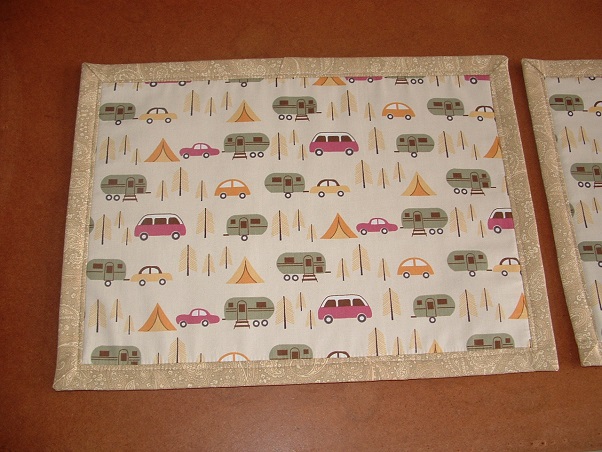  For the backing, I just used some of the leftover upholstery material from the van seats... 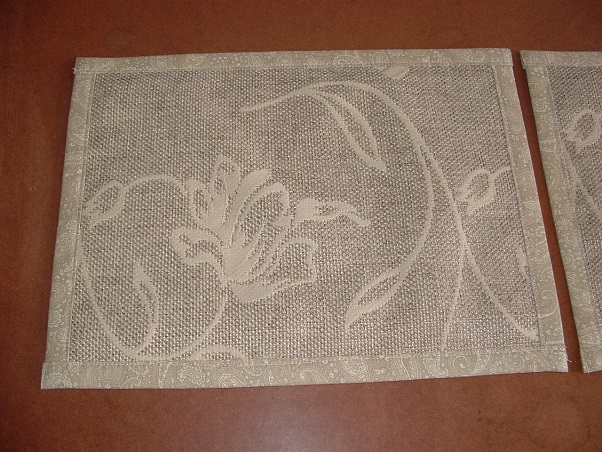 I reckon this material would look good made into a shirt for the next Vintage Nationals Dinner! Might have to go back and get some more...  cheers, Al. |
|
|
|
Post by cobber on Jan 13, 2015 18:59:35 GMT 10
G'day Al, I've said it before, you really are.....  ....and I'll say it again, you really are..... I'd like to know how you get so much work done, and take and post photos, and spend so much time fossicking around in Spotlight and that shed place you've got down your way, and still make progress on your project..... I've been to Spotlight, I never find anything in that place worth finding   It's good to see you are making progress even when on 'light duties' Cobber. |
|
|
|
Post by Franklin1 on Jan 27, 2015 15:48:04 GMT 10
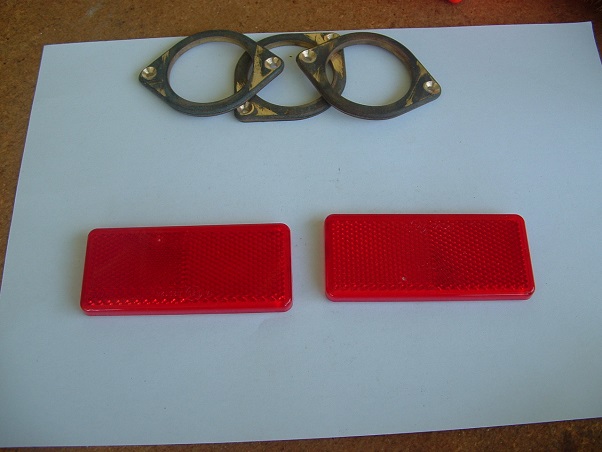
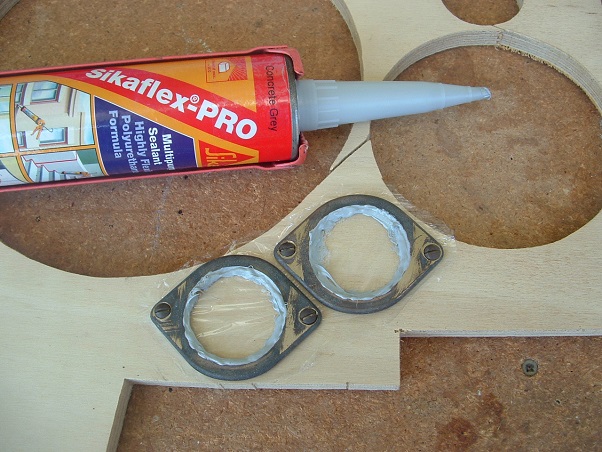
How to make fake vintage reflectors for the van...
You might remember the little copper water tank that was created for the van...

The tank originally had three brass flanges crimped to the inlet/outlet holes in the tank. These flanges were removed when the holes were blocked up, and put aside for future use...

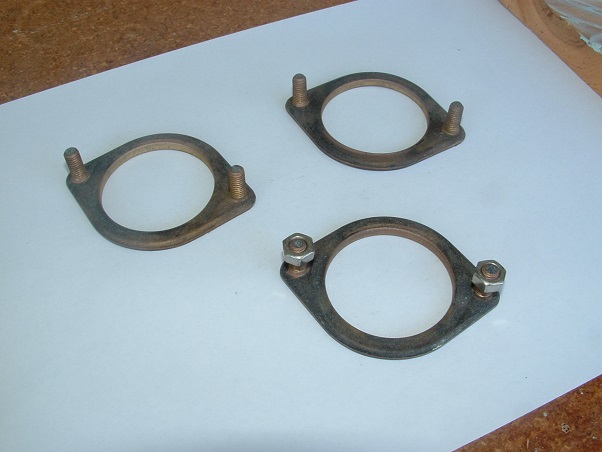
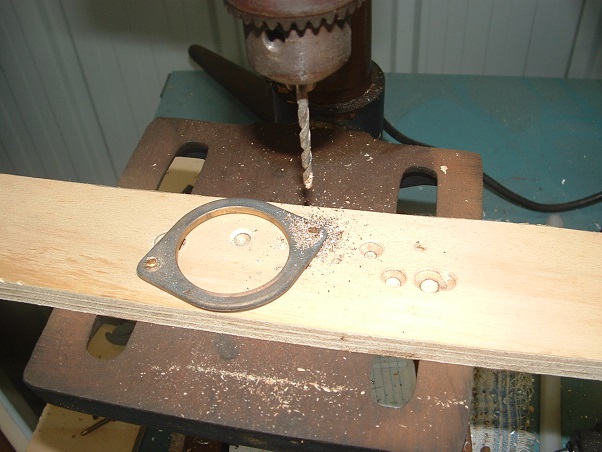
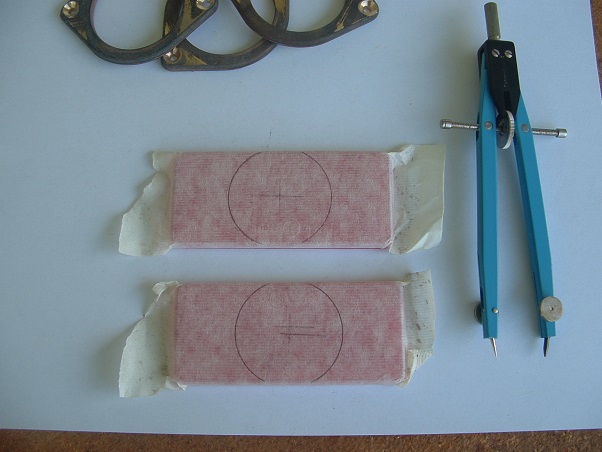
Last week it was "future use" time, and I cut the threaded bolts off the flanges, and drilled screw holes in those positions...
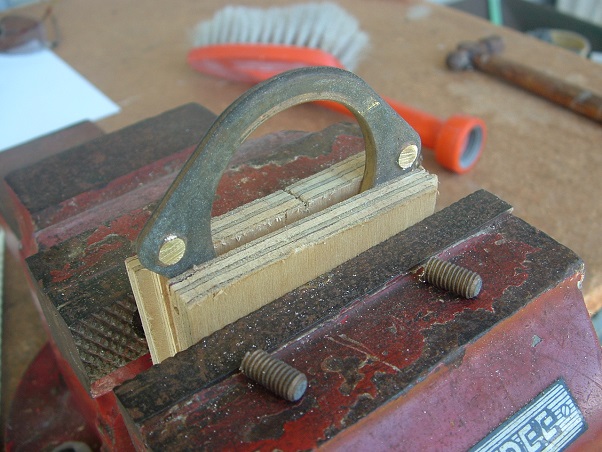

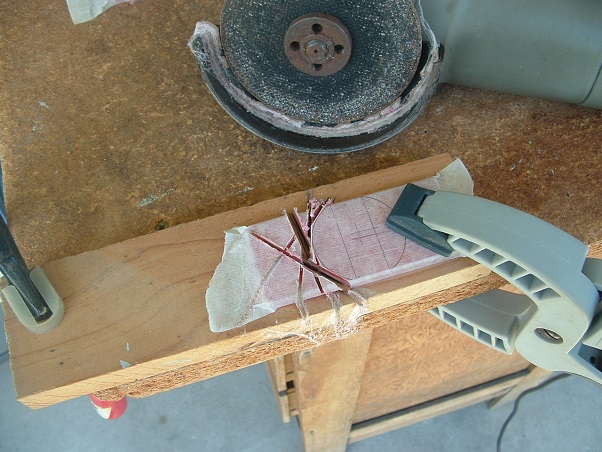
I had bought a couple of reflectors, and these were marked up and cut to size...
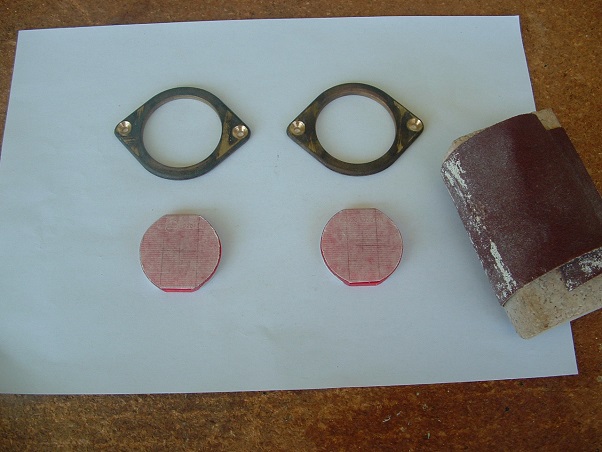
Then the flanges were mounted onto some scrap plywood, and a bead of sealant put around the inside of the flange. The reflectors were pushed down into the sealant, and then everything cleaned up to give a neat finish...
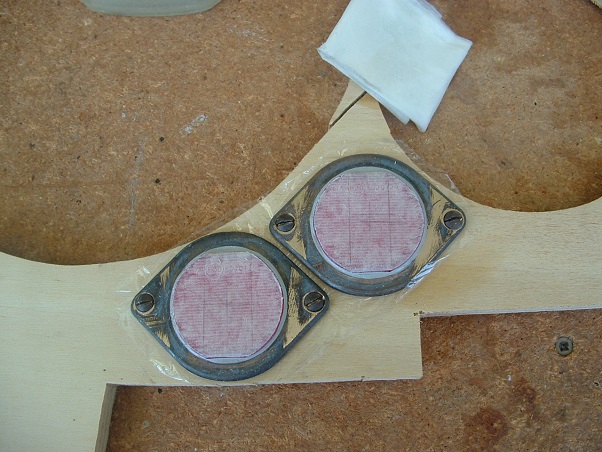
After the sealant had cured, the flanges were painted up to the desired colour...
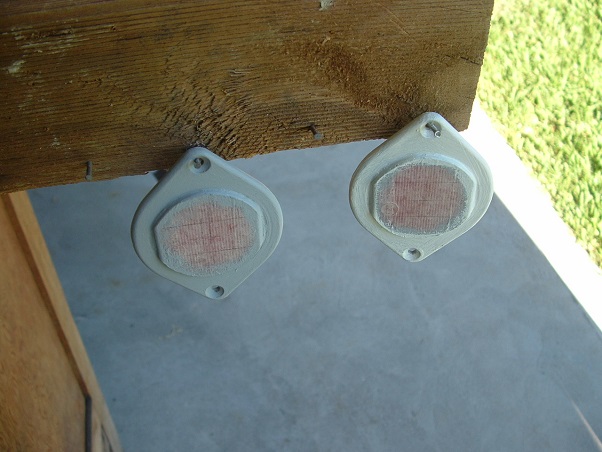
The finished reflectors are a good size in proportion to a typical vintage tail light - not too big; not too small...
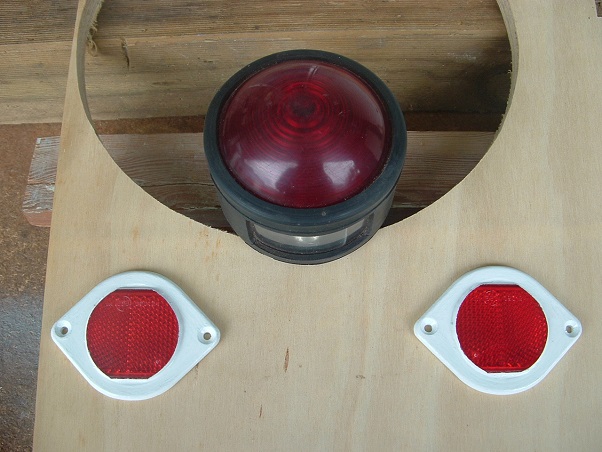
Now, the big question is - Are these reflectors ADR approved?? Well, if the letters A-D-R stand for Amateur Designed Reflectors, then yes I have approved them! 
If I ever find another one of these flanges, I can make a set of white reflectors for the front of the van.
cheers,
Al.
|
|
|
|
Post by DC3Td on Jan 27, 2015 17:00:17 GMT 10
As usual Al,you come up with some pretty damn good stuff. ADR? Al Doesit Right.
|
|
|
|
Post by Franklin1 on Feb 25, 2015 16:10:56 GMT 10
February update:Door - I finally got the door made, after creatively avoiding it for a number of months. When I checked the door opening with a rafter square, none of the corners was a perfect 90 degree angle, so I thought it made good sense to use the cardboard template method to at least get the basic shape of the door correct... 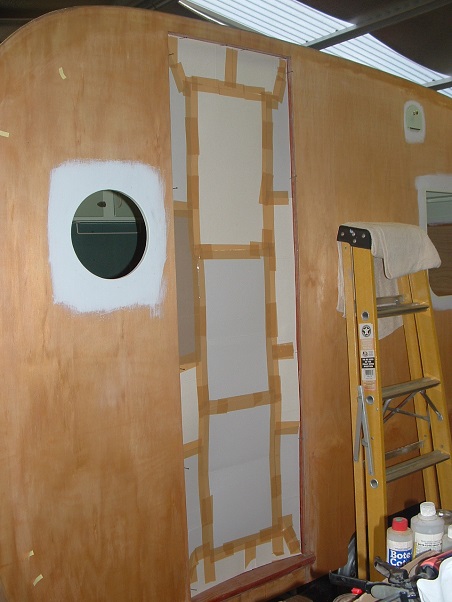 The cardboard template is laid on the plywood backing, and traced around before cutting... 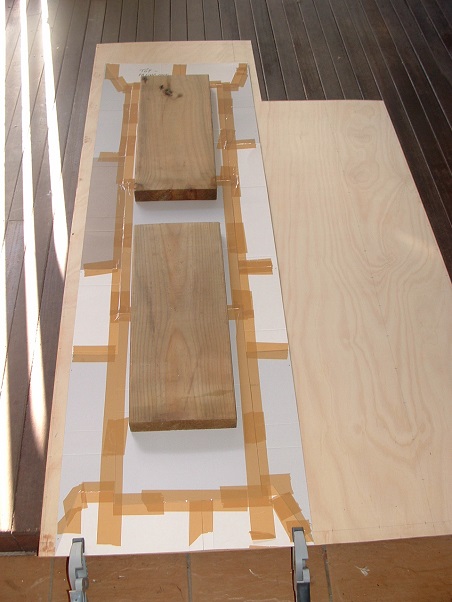 Internal framework glued onto the backing ply... 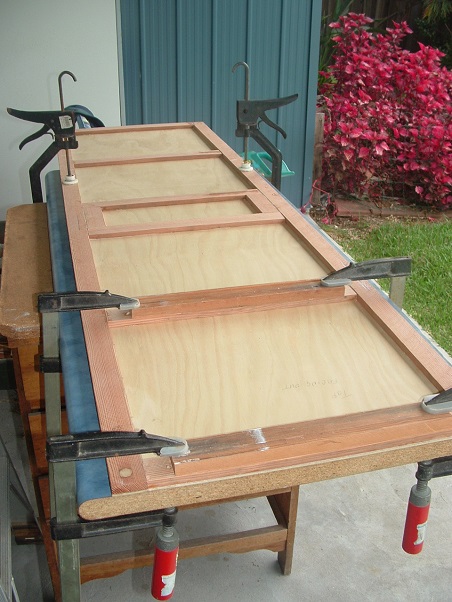 Then I can muck around making sure it fits the opening properly, ensuring the same gap all the way round... 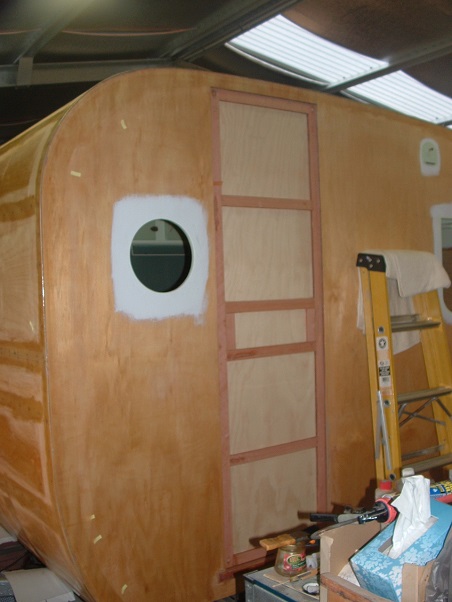 I could pull it out and put it back in as many times as I liked, for checking and trimming to get the right fit... 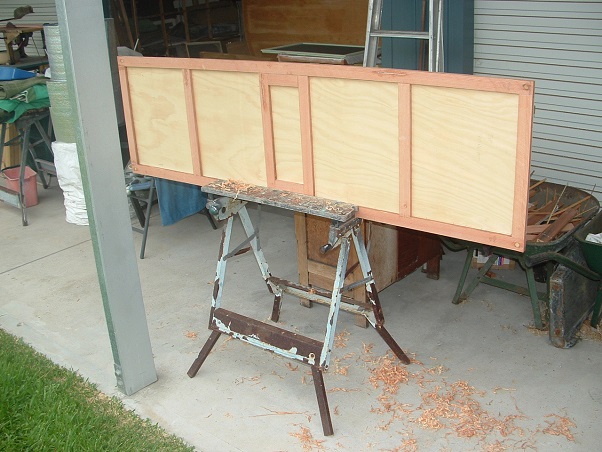 Once I was happy with how it looked, I glued the outside ply facing on, and trimmed it up with a router after the glue had cured...  Then it was a matter of chiselling out the hinge locations, and fitting all the necessary hardware...  Window stays - Window stays - This one was a bit of a complicated job, because I didn't have much left of the original stuff. From the three original windows, all I had to go on was this... 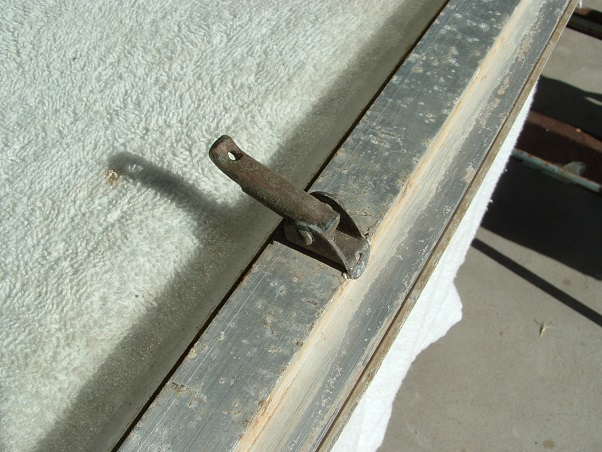 ...and this... 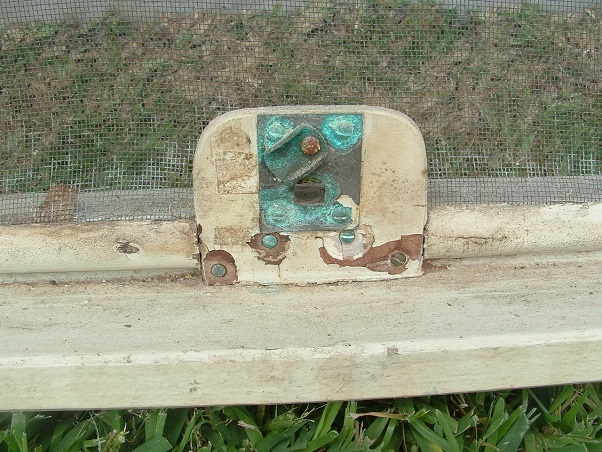 But those two bits were an indication that the original stays were similar to the stays used in my 1956 Franklin caravan... 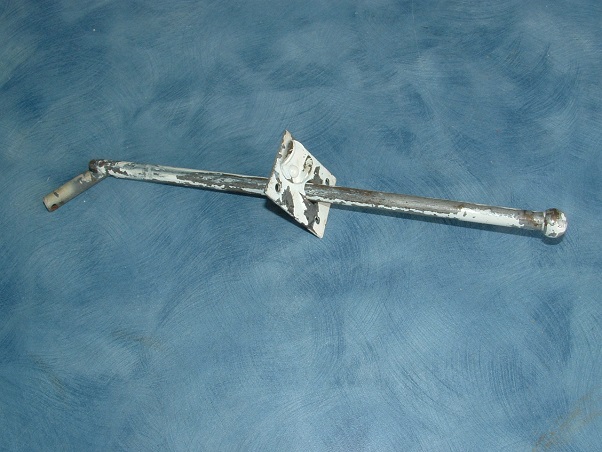 I didn't have the machinery to accurately make the elbow joint like the Franklin one has, so I had to think of another way of making the stays. I used some scrap aluminium sheet and angle to make a reasonable likeness of the catch, and bought brass rod and brass end caps for the stays. The end result is not exactly the same as the original, but it seems to do the job ok... 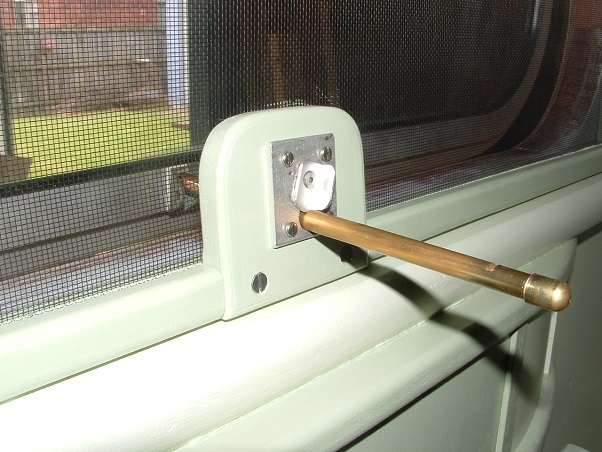 Front splashguards - Front splashguards - Originally there was a full-width sheet of aluminium covering the lower front half of the van. When I salvaged that sheet and examined it closely, it looked pretty ratty with corrosion along the bottom edge, and a gazillion holes drilled up and down both sides... 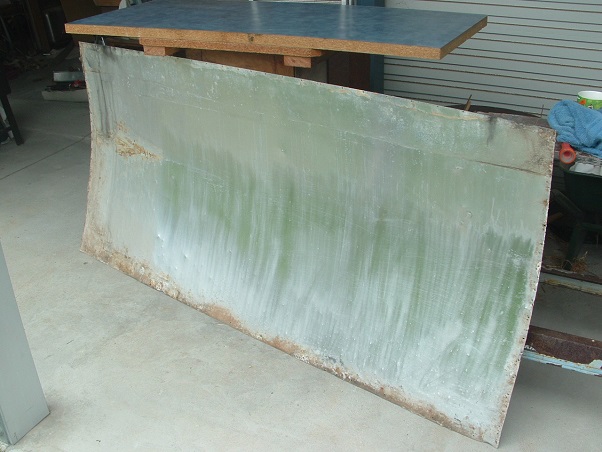 I decided to cut the sheet up and have smaller splashguards on the lower front corners instead. Once again the cardboard template method came in handy...  The end result doesn't look too bad... 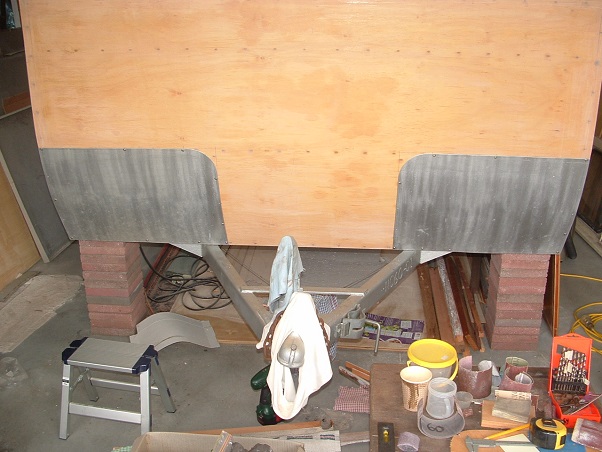 Other jobs - Other jobs - Elsewhere on the van I've been marking up and temporarily fitting all the bits and pieces around the outside of the van, to make sure I've got all the screw holes in the right places. These photos show the front rolled awning in position, complete with some fancy scroll brackets I found in Bunnings...  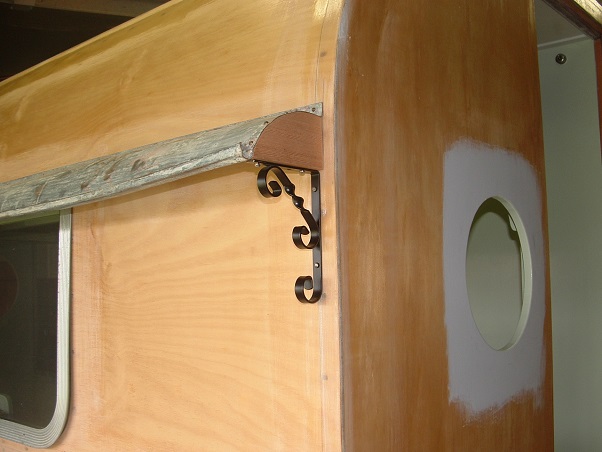 Other bits and pieces such as window weather strips, power inlet/outlet covers, and port-hole window frames fitted... 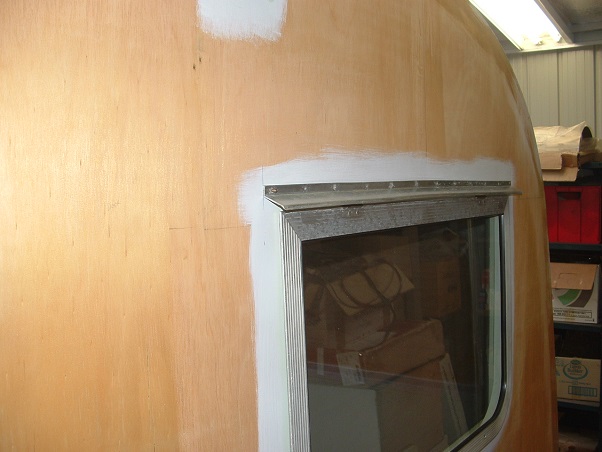 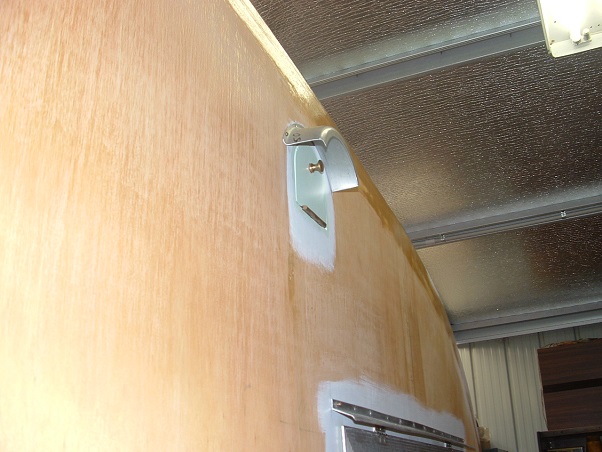 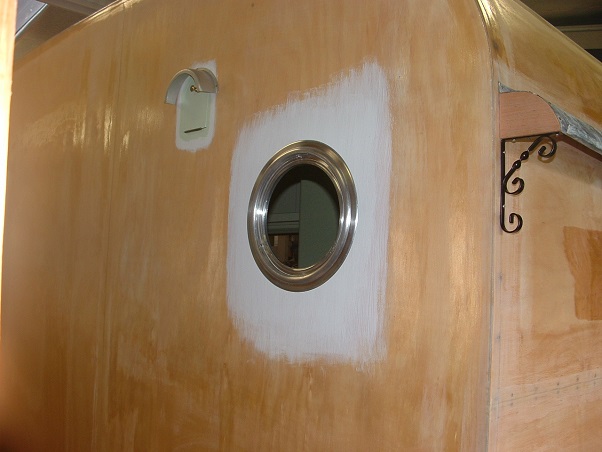 The next big job is to glue the roofing canvas on, but I've been waiting for our typical crappy February humid weather to rack off, and get some decent Autumn weather to work in. cheers, Al.
|
|
|
|
Post by Geoff & Jude on Feb 25, 2015 16:44:48 GMT 10
hi al this little project of yours keeps getting better and better with everything you do. it's going to be a real shame to take it out in the weather once it's finished. it might ease the pain of seeing it all wet and dirty if you sell (or donate) it to some sympathetic admirer of your work. one name comes to mind but i might be more sympathitic.  geoff 'n jude |
|
|
|
Post by akeepsake on Feb 25, 2015 17:45:18 GMT 10
Al another great progress post ! Well done .. Love your work! I too had a full width aluminium stone guard which I cut down to the same profile as what was originally there using the old fixing holes as a guide
Are you going to add a trim around your guards ?
Anyway it's going to be a rolling work of art when your done !
Keep up the good work
Cheers Andrew
|
|
|
|
Post by humpyboy on Feb 25, 2015 20:37:20 GMT 10
I've said it before and I'll say it again Al, Love your work.
|
|
|
|
Post by Franklin1 on Feb 26, 2015 8:14:00 GMT 10
Thanks guys for your feedback. And thanks to all those "Likes" as well. GeoffnJude, I'm struggling with the concept of handing the van to another owner, after having spent FIVE YEARS of my time working on it... There's something about "enjoying the fruits of my labour" that has a pleasant ring about it. akeepsake, I'd like to at least explore that option to see if I want to go ahead and do something like that. Only problem is, I'm blowed if I know what I should be searching for. I've tried a few different key words, but I can't readily find that sort of trim. Do you (or does anybody else) know what the actual name of that trim is? The best I could find was this picture showing the sort of profile that this type of trim has, but I haven't had any success beyond that.  Is this something that would be used in the boating industry perhaps? Most of the Google results related to car trims, or bathroom tiling trims. cheers, Al. |
|
neilncheryl
Full Member
 Make God laugh, tell Him your plans.
Posts: 324
|
Post by neilncheryl on Feb 26, 2015 18:47:11 GMT 10
Have you tried Clark Rubber Al?
I have found them to have a reasonable selection up here
|
|
|
|
Post by shesgotthelook on Feb 26, 2015 20:28:48 GMT 10
Type 'Rubber Extrusion trim profiles' into your search & click on images.
|
|
|
|
Post by Franklin1 on Feb 26, 2015 21:04:10 GMT 10
Thanks folks for your replies. I did a bit more searching today, and discovered a couple of items that matched the picture in my head of what I was trying to look for... The first is known as mudguard piping, or wing piping, or fender piping - depending on which country you live in... 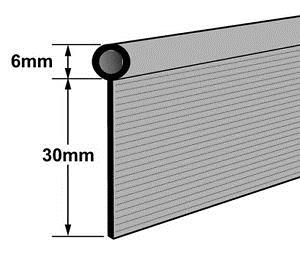 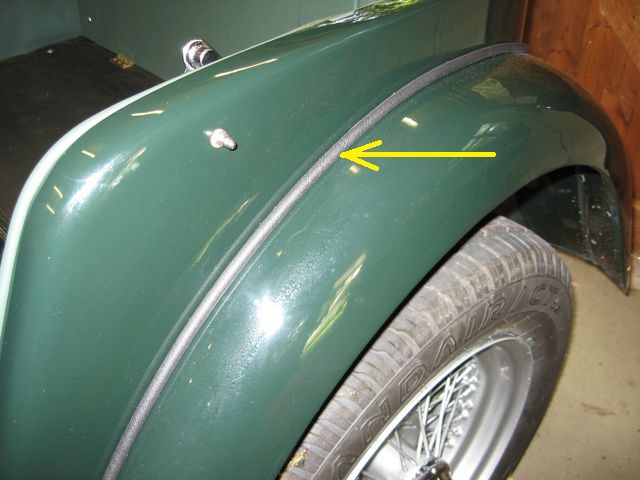 I think the 6mm diameter top of the piping would be far too thick when poking out the top from behind the 1mm-thick aluminium splashguard sheeting. The 30mm flange/fin is a good size though. Plenty of room to position the screws to go through it. The second item is known as PVC piping welt, or welting, and has a top of 3mm diameter, and a flange/fin of 6mm width... 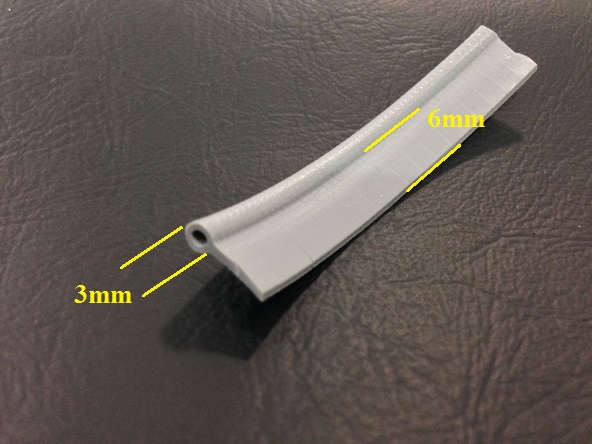 The 3mm piping top would probably look ok poking out from behind the sheeting, but the 6mm fin isn't enough for me to anchor the screws through. I've already drilled the holes 6mm in from the edge of the sheet, so the screws would just miss grabbing onto the plastic. I think I might go with my original plan of plastering the back of the aluminium sheet with butyl mastic, and screw it into position with cuphead washers and screws. As long as the sheet is sealed properly around the edges, it should do the job ok and look fairly neat. Thanks again for your ideas. cheers, Al. |
|
|
|
Post by akeepsake on Feb 26, 2015 22:49:02 GMT 10
Al never been a big fan of the piping reckon it cheapens the overall look ...but that's just me! What I am doing is using Aluminium mould which is about 10mm wide and has a profile like a crescent moon if you get my drift. I will tack the guards in place and then apply some mastic around the edge then fit the moulding over the top and fix it with pin head brass tacks . Alternatively it is wide enough to drill and countersink and use flat or dome head slotted screws . I'm in the process as we speak so will post some pics of the final result when done Ps the blue is the old paint off the Jennison these moulds were used on the corners as later protection 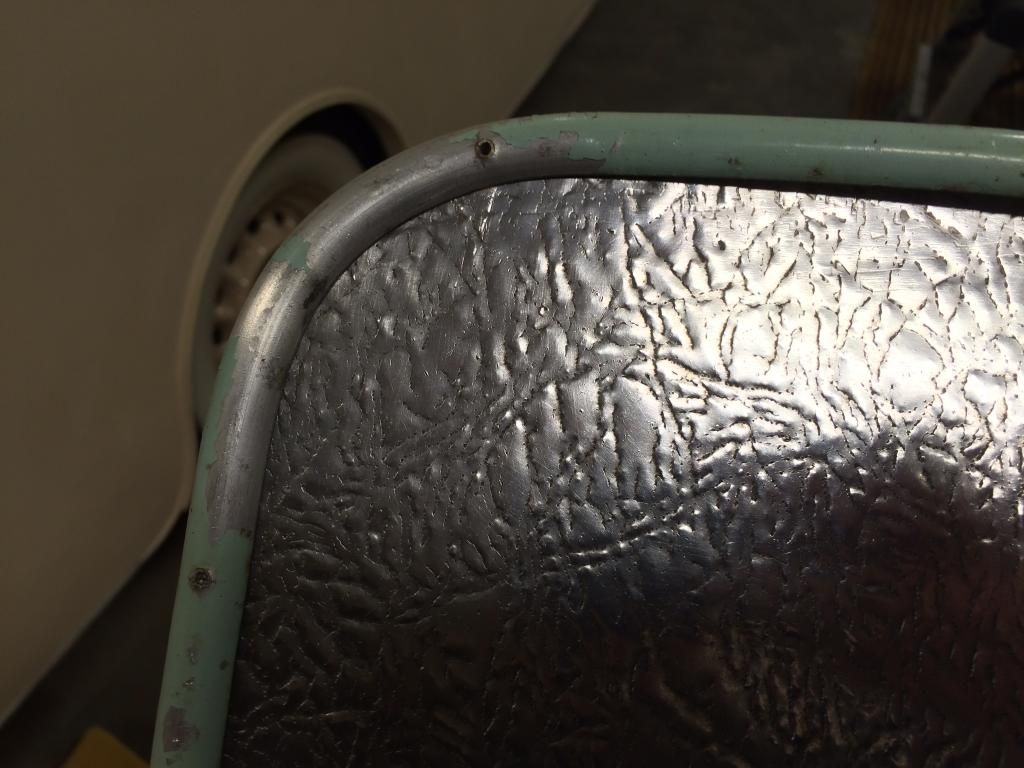 |
|
willow5075
Full Member
Willow & the MOTH
Posts: 355
|
Post by willow5075 on Feb 27, 2015 5:16:35 GMT 10
Mammoth job you are doing there, will be wonderful when you are finished
|
|
|
|
Post by Franklin1 on Feb 27, 2015 8:08:33 GMT 10
akeepsake - Ah-ha! Now I understand what you were getting at! Unfortunately, it's too late for me to consider your option because I've already drilled all the holes around the splashguards. And a bit of techo information, in case you weren't aware - when you say, "fix it with pin head brass tacks", what you are talking about is brass escutcheon pins. I have them in 10mm, 16mm, 19mm, and 25mm lengths in the shed, if you are looking for some spares. I've used the 19mm pins to fix the aluminium strip around the table edge (because that's how it was done originally). One caution about using plain brass on aluminium in exterior locations is the corrosion cell that occurs between the two metals. Best to put a smidge of sealant under the head of the brass pin where it makes contact with the aluminium. Even better is to go find stainless steel escutcheon pins and use them. The corrosion cell between the s/s and the ali is far less. The J-mould on my 1956 Franklin was nailed in position with s/s escutcheon pins, not screws, and still looks good after 60 years, whereas I can see corrosion under the head of the brass pins on the original table moulding in the van I'm working on. willow5075 - Thanks for your comment. If my van ends up looking anywhere near as good as your Sundowner does, I'll be a happy man. I just wish I was as lucky as you've been in finding out the history of your van. What a great story for you. cheers, Al.
|
|
|
|
Post by akeepsake on Feb 27, 2015 11:11:43 GMT 10
Hi Al yes understand the principals of dissimilar metal corrosion as I worked as a electrician for the local power supply company and was often called to faults where copper cable had been connected to aluminium service cable and corrosion had eaten away the joint until it became open circuited ! Aluminium is on the higher end of the Anodic side and copper on the catholic side however correct me if I'm wrong but stainless steel is even higher on the cathodic scale than brass therefore more susceptible to react with the presence of moisture than brass ! I have a special grease called penetrox which used will stop this problem ! But I'm not an authority and stand corrected ! See table below the best way to go is galvanized steel! 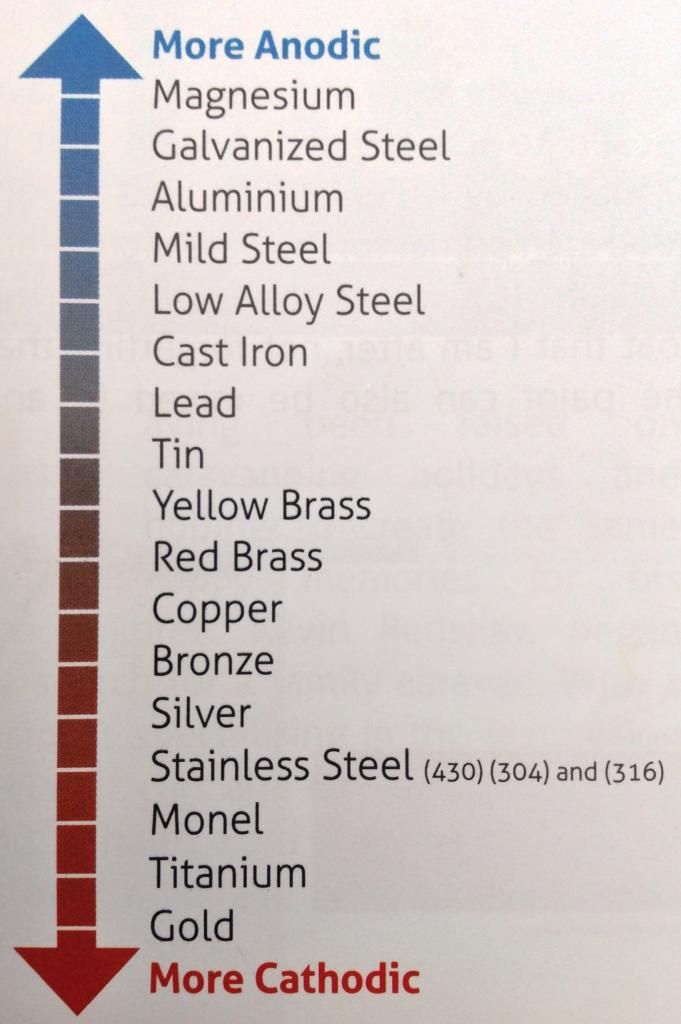 |
|
|
|
Post by Franklin1 on Feb 27, 2015 15:10:11 GMT 10
G'day akeepsake, Without getting bogged down in the nerdy science side of things, your diagram shows the basic corrosion list. However, stainless steel can either be down the bottom, as shown in your diagram, or it can be up closer to the top - between Cast Iron and Lead - and closer to Aluminium than the brasses. (see this short report for further reading). I'm not sure when caravan manufacturers first started using stainless steel screws to fix the J-mould onto the sides of vans, but certainly the vans in the 1970s Classic Caravans era were using them. A 1977 Millard poptop I restored a few years ago had no evidence of corrosion when I pulled all the fixing screws out of the mouldings. That means 35 years after the van was built. Contrast that with a 1992 Windsor van that had zinc-coated screws doing the same job and which were all rusted to bu**ery after only 22 years. For the sorts of jobs we are trying to do, it's all about the relative surface areas of the two metals. A small stainless screw (or nail) in a larger aluminium surface means reduced corrosion, compared with a brass screw in the same position. cheers, Al. |
|
|
|
Post by akeepsake on Feb 27, 2015 17:42:11 GMT 10
Well believe it or not I ended up using stainless pins to attach moulding anyway!! They were recycled from corner moulds and no corrosion evident from over 40 years in place so why not I said! Thanks for the info and interesting what can have effects and what don't !
Never thought fitting guards could be so complicated!! Check the Jennison files later tonight for results Very happy!
|
|
|
|
Post by redmr2red on Mar 1, 2015 15:32:37 GMT 10
Any Upholsterer can make that Mudguard piping from a strip of vinyl (color to match your van) sewn around a string or cord (the diameter to suit your job) for very little cost.
|
|
|
|
Post by DC3Td on Mar 1, 2015 20:44:28 GMT 10
Actually Al is pretty deft at sewing so i`m surprised he hasn`t taken a strip of calico/canvas folded it over a length of nylon rope,sewn a line along its length(keeping the rope taut)& voila! Done ala olden days mudguard piping.
|
|
|
|
Post by Franklin1 on Mar 3, 2015 18:00:25 GMT 10
Roofing canvas - about 18 months ago, I was fortunate to buy a piece of 14oz canvas from the ebayy seller listed in our supplier section. This particular piece of canvas is known as "loom state" because it is the base canvas before the colours/stripes/patterns are applied to the surfaces. It isn't raw cotton as such, because it seems to have been treated with some sort of waterproofing substance, although it will still allow water through eventually. This is the piece... 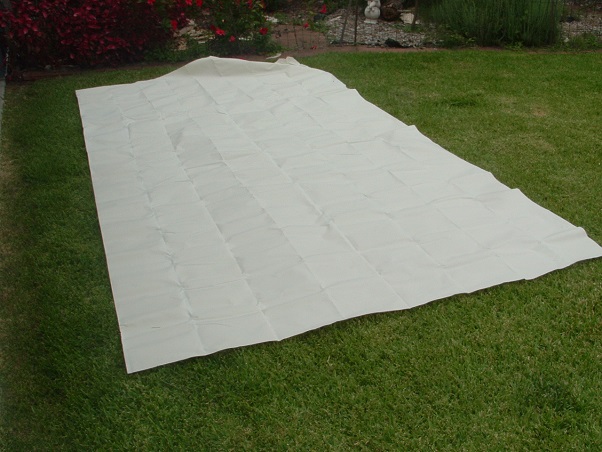 I recently washed it in the washing machine to allow for shrinkage (and it was no mean feat to get a piece of canvas 4m x 2m into the machine. Lots of groaning noises during the washing cycle. ). Oddly enough, there wasn't any shrinkage at all, as it turned out. I've been experimenting with a small piece of it, to see how well it adheres to the Bote-Cote resin surface on plywood. I found some old Diggers "Gripcrete" in the shed that was waaaay beyond its 'Best Before' date - more gluggy than the milky mayonnaise consistency that it used to be. However, I persevered and spread some of it out over the ply surface, and stuck the canvas onto it. Left it for a couple of hours, and then tested it for adhesion. It took a fair bit of force to pull the canvas away from the ply - the Gripcrete acted more like old chewing gum after you've stepped on it... 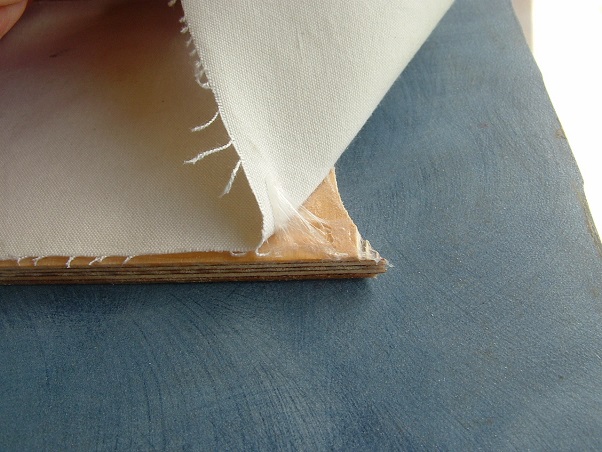 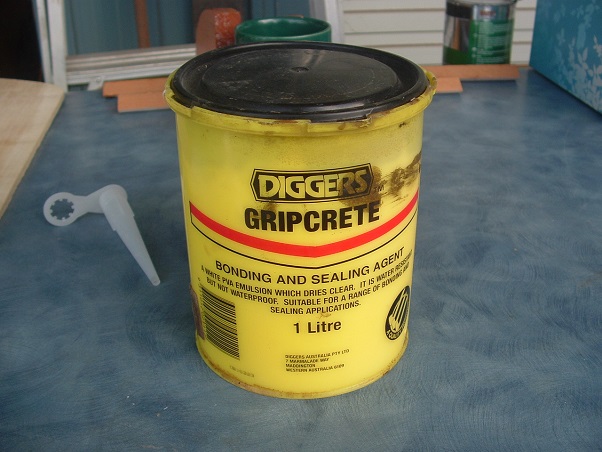 A water test on the canvas showed the water beading on the surface, but it does eventually soak into the canvas after a fair number of minutes... 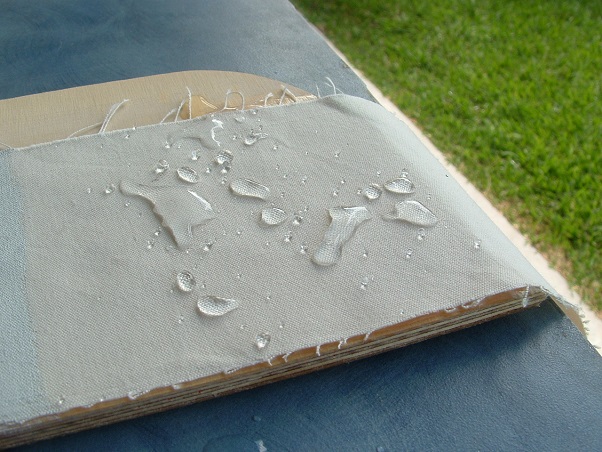 That beading worried me when I wondered how well paint would stick to the canvas, but a test patch of primer/sealer showed it coated quite well without any apparent issues... 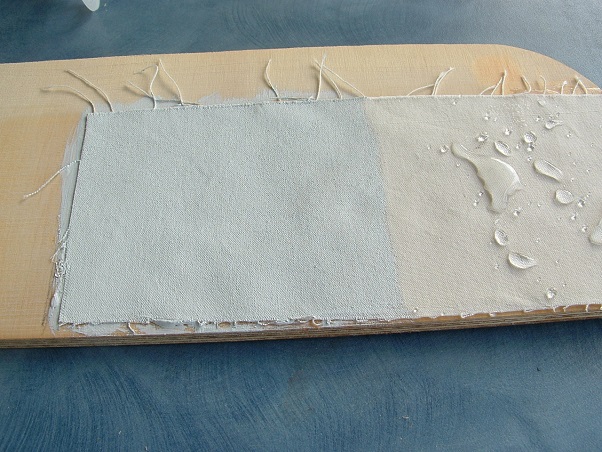 So now I'm sort of ready to take the plunge and put the canvas on the roof, and I was wondering if anyone who has used Bondcrete has any tips or tricks to pass on. It looks like I'll be doing it single-handedly, so any ideas on how to best do it would be appreciated. On the side of the Bondcrete can, they give guidance of 4 litres covering 3.5 square metres - is that what people have found?? And just a bit of useless techo info: The typical calico material has a fabric weight of approx 165 grams per square metre (gsm). The 10 ounce duck canvas that was used on the roof of these caravans in the old days, has an equivalent fabric weight of 339gsm, or about twice the weight of calico. The 14oz piece I'll be using has a weight of 475gsm, or three times that of calico. Might go close to being able to use the roof of my van as a trampoline. cheers, Al.
|
|
|
|
Post by griffin on Mar 3, 2015 21:46:20 GMT 10
Hi Al
This is going to be a Rolls-Royce caravan by the time you finish with it, nothing spared it seems.
I used Bondall Timber Sealant to stick and seal my original canvas back onto the roof. It had never been bonded on just put on and painted over. I managed to get the paint off without too much damage to the canvas and stuck it down. To be really effective I had to inject it through the canvas to seal the wood and get a good bond and it worked really well. On the test piece water pilled up and stayed there for ages until it evaporated. I've not had any problem, never got a drop in the van last year to Broken Hill. There was some rain there as you likely remember!
Keep up the excellent work and information flow.
Cheers
George
|
|


 ....and I'll say it again, you really are.....