|
|
Post by Franklin1 on May 6, 2008 20:44:32 GMT 10
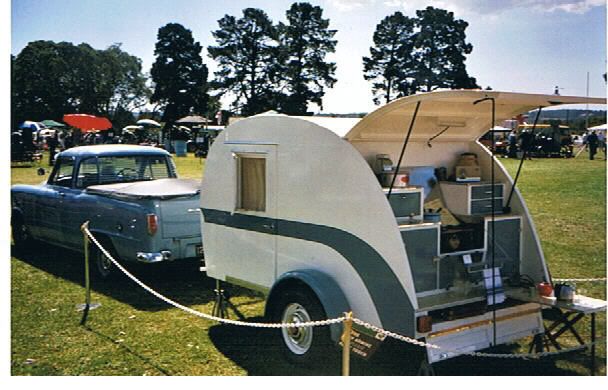
Well, it's been a long two years since I bought this van, and during that time many obstacles have got in the way of the planned restoration. One of the major obstacles was the garage fire we had last September (and covered elsewhere on this forum). But finally, work was recently completed on a new replacement garage. We added a few thousand to the insurance payout, and had the replacement built a metre higher than the old one. This allowed us to put 2500mm high roller door openings in front and back, which allows the vans to be taken from the shed out back, through the garage, to the street out front. This photo shows the garage on fire back then, and the new garage now...  So, last weekend we were finally able to shift enough crap back out of the shed to put Franklin1 into her new home...  ...and the restoration has now commenced. This is what she looked like when I bought her two years ago, although the rear shot is after I took the lights and galvanised sheet cladding off just after I got her home...  Yesterday and today were spent removing heaps of screws/nails/fittings/bits of galvanised sheeting, so that the plywood can be taken off. The original colours were cream walls and green ends/top, as these photo show... (Note there was no Franklin stripe on the side, like Franklins got later on) 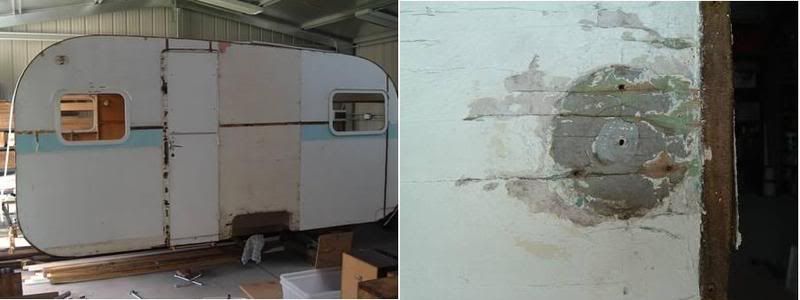 The ply cladding on the sides is four sheets per side, with the joins covered with a wax-coated strip of gauze or cotton webbing... 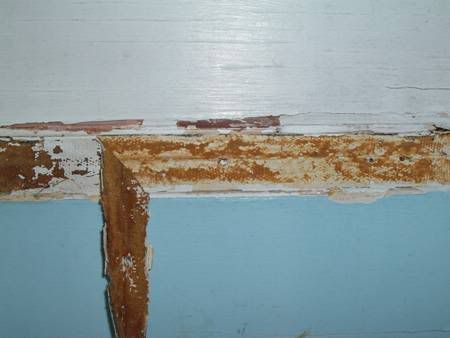 The splash-guards on the front must have been fitted at some later stage. This photo shows a previous coat of blue paint under the guards...  And then to the rip-tear-bust part of the restoration. These photos show the wood rot in the front corner (one of many areas with rot), and a piece of side cladding off, and the rear cladding off. I had previously stripped the inside of the van not long after I bought it...  During the demolition process, I'm looking for any evidence that Geoff Robinson might have left behind to verify he built it (and if you just asked "Who is Geoff Robinson?", he's the guy who supposedly built this van as his first backyard attempt, and then went on to establish Franklin Caravans in the years following.) So far I've only found this bit of scribble - just inside the door...  So there we are so far. The aim is to completely dismantle the van, and work from the ground back up. More to come as progress is made... cheers, (finally ;D) Al. |
|
|
|
Post by cobber on May 6, 2008 21:43:18 GMT 10
Good on ya Al, Something else that has probably delayed you starting work on your 'van is the great job you have been doing for all of us in the “Down History Lane” section of the forum, blowed if I know how you have found the time to do all that research, thanks anyway  . I see you have a skillion too... and room for a few more (I think flash people call 'em awnings) Cobber. |
|
|
|
Post by Don Ricardo on May 7, 2008 23:26:24 GMT 10
G'day Al, As a person with very few practical skills  (but quite a few impractical ones ;D), I really admire those V V'ers like you who undertake a ground up re-build! I am sure the result will be fantastic. I'm looking forward to following the project via the forum. Reminds me of that old adage 'I really enjoy work, I can watch it for hours'. ;D At least I can't get into trouble by just watching - providing I keep my big mouth shut about paint colours!! ;D ;D ;D By the way - great shed, and how good is it to have doors so that you can access it every which way? May the Franklin arise anew from the bits on the floor like a phoenix out of the... No, wait, that's probably an unfortunate image under the circumstance - perhaps I better just stick with 'hope everthing goes smoothly - you've got plenty of people cheering you on, including me'. Regards, Don Ricardo |
|
|
|
Post by Franklin1 on May 8, 2008 21:52:51 GMT 10
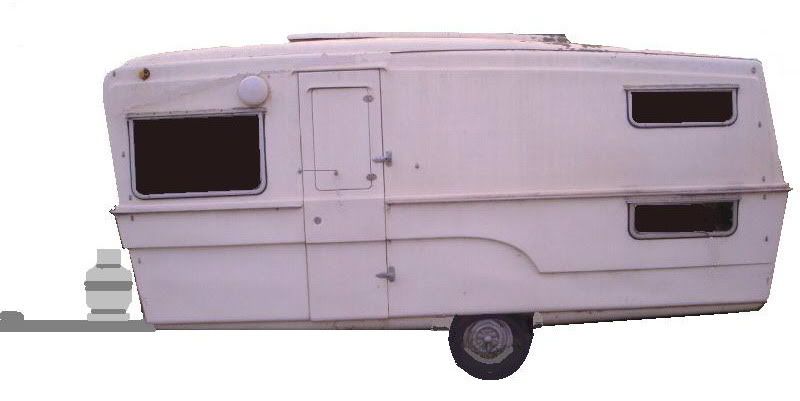
Ya know Don, there may well come a time when I think, "Why don't I just stand in front of an open fire burning 20 dollar notes and whipping myself with a red hot poker?"  This is only the second time I've done anything on an old caravan. First time was in the mid-1970s when I bought a little 10ft bondy and gave it a quick make-over...bit of paint, put flyscreens in, other small stuff. Took it on a trip to Wagga for a holiday, and then sold it not long after to scrape together the deposit for a house (as we did). Wonder whatever happened to that old van?? This time, I'm in the deep end from the start. I figure the worst I can end up with is something like this...  ...but then I've still got the number for Reddotel Restorations if I think I've ventured too far out of my depth! ;D ----------------------------------------------------- Got a question for cobber: The door lock on the van is a Wilmot Breeden brand (at least that's what's on the key)...  The lock works ok, but is a bit sloppy in the barrel. Can these things be restored? Are they worth the effort/cost? ----------------------------------------------------- Got another question, this one for you mechanical boffins: Does the hub arrangement on my van have a particular name, given that it isn't wheel studs and nuts, but has 'wheel bolts' which screw through the wheel centre into the hub plate?  What are the pros and cons of this design versus the other sort(s)? ----------------------------------------------------- Now to today's progress report on the van... I've taken the bottom two panels off the nearside so far. This photo shows the wood rot in the frame at the rear (all four corners will be the same), and the section of ply around the wheel arch 'shot to bits' (which is why there was a strip of galv sheeting down the side of the van covering this area)...  Before I can take the top two panels off the side, I have to remove the galv cladding off the top. This cladding is made up of six pieces of galv, all soldered along the joins, and screwed through as well... 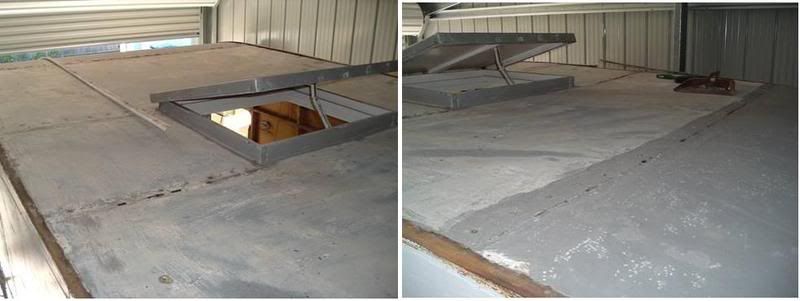 Unfortunately, the person who did it was very 'thoughtful' (NOT!) and soldered over the top of a row of screws...  This meant I had to go and dig out my Primus gas plumbing gear, that I hadn't used in yonks, to melt the solder. Found the bottle first, and of course it's empty, innit?  Get in the car and up to the local garage and fill it up. Home and connect the hose/blowtorch up and do the gas safety leak test using a cigarette lighter soapy water, and of course it leaked like a sieve, dinnit?! ( Grrr). Back out again to the local gas supplies for new O-rings and washers. Home and do the replacements, and still she no work. Test this, check that, adjust those, but still nothing. Round about this time, I'm thankful for having spent a week last year at the Reddotel Relaxation Resort, learning breathing and chanting techniques for remaining calm when frustration overtakes you. There's nothing like deep breathing, and chanting "You@#$%^& miserable heap of %&(*!!" at your equipment, to help you through the tough times... Finally found the problem to be the new washers being slightly thicker than previous ones. I have two washers in the gas tap that screws into the bottle. The extra thickness wouldn't allow the tap to screw far enough into the bottle to press the needle valve down to let the gas out. Go figure... Late today, after many hours of being p*ssed off, I melted the solder and undid the screws...  Tomorrow the roof sheeting comes off! cheers, Al. |
|
|
|
Post by cobber on May 9, 2008 8:52:52 GMT 10
Al, Your asking me if you should go to the trouble of restoring the fine British car lock that is original equipment on your Franklin, and has also been fitted to some of England's most prestigious cars. If you were to change the lock brand people who know nothing would not know the difference  , but if you restore the Wilmot Breeden lock every once in awhile somebody will come along and say something like “I see the door lock is a Wilmot Breeden.... my Triumph has that same brand lock on it”You could then say “yes I believe they were also used on Daimlers and Jaguars back in the 1950 & 60s” And so that then leads into a friendly discussion on British cars and what lousy weather they have and how you once visited England (or would like to)....... and so it goes . Yes I'd restore it Al, or just clean it up and use it as is. Cobber. |
|
Deleted
Deleted Member
Posts: 0
|
Post by Deleted on May 9, 2008 9:55:42 GMT 10
I'm cheering ya on Al. If ya think demolition/dismantling tests your patience just wait til ya get to a point where ya start recontsructing. It can take ten times a slong and 10 times more patience.......but it will be worth it. I have made the staff at reddotel intersmashinal sit and watch a video of your slow and diligent disassembling process. They are still keen on the "wrecking ball and sledge hammer technique". It is hoped that they will gleen patience and a better understanding of the restoration process by following your progress.... Unfortunately i dont hold out much hope of things changing too much around here. The workers have a mission statement "Either it stays in one big bit or its reduced to 1 million little bits in a 1/2hour" English door latches  .. you are lucky to have a pommy knob .. people WILL notice:-X Keep the commentary coming. ... I am like the bloke on the Guiness advert.. "I like to watch" Reddo
|
|
Flattop
Full Member
 Kowabunga!
Posts: 133
|
Post by Flattop on May 9, 2008 13:07:15 GMT 10
Al, Your asking me if you should go to the trouble of restoring the fine British car lock that is original equipment on your Franklin, and has also been fitted to some of England's most prestigious cars. If you were to change the lock brand people who know nothing would not know the difference , but if you restore the Wilmot Breeden lock every once in awhile somebody will come along and say something like “I see the door lock is a Wilmot Breeden.... my Triumph has that same brand lock on it”You could then say “yes I believe they were also used on Daimlers and Jaguars back in
the 1950 & 60s” And so that then leads into a friendly discussion on British cars and what lousy weather they have and how you once visited England (or would like to)....... and so it goes . Yes I'd restore it Al, or just clean it up and use it as is. Cobber. But when you buy the parts say it is for your Morris, the price drops from the Jag/Morgan/Alvis prices. my 2d worth. ;D |
|
|
|
Post by Franklin1 on May 9, 2008 17:47:06 GMT 10
Catch-ups:1. Thanks for the info on the lock. So you're telling me I've got a lock from the door of an English car? How cool is that?! 2. Thanks Col for the info on the hub. When I took the wheels off, I discovered what you've said about trying to hold the wheel while the bolts are undone. A bit tricky, but since the hubs seem ok, I'll leave them as they are. No brakes on this van (749kgs). 3. Reddo, have the Reddotel answering machine on at all times. I've got the number on speed dial ;D Update:Another fussy, fiddly day. Had to melt the solder joins on the galv cladding so I could lift the individual sheets off the roof. Me and me Primus gear are best buddies again Didn't let me down today. These photos show one join being melted, and then after that sheet is removed, you can see the sticky waxy cotton strip where the sheets overlapped... 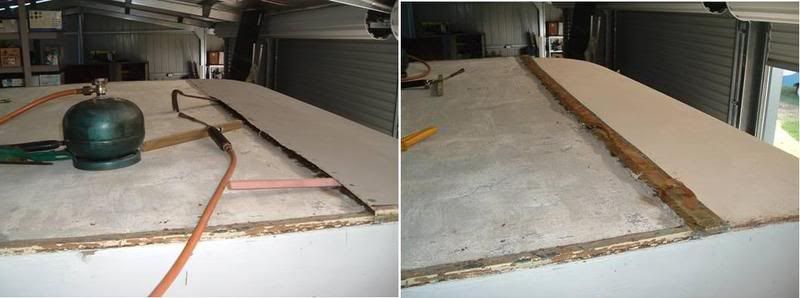 Whatever that waxy stuff is, it's good stuff. Still sticky after 50 years. I'll have to try and track down something like it for the rebuild. This photo shows the ply roof after all the galv was removed. The roof is covered in six pieces of ply, all butt joined...  ...and I can see evidence of it having been covered in canvas originally (textured appearance in the paint coating). The roof ply looks to be still in pretty good condition, so I'm confident I can reuse it. I'll know better after I take it off. At least it will be easier to store these smaller sheets rather than having to deal with one large roof sheet  Following photo shows front-on shot of how the van looks at the moment...  Next step is to remove all the rest of the ply cladding so just the frame is left standing. More to come, but I think I'll have a break over the weekend. Mums Day on Sunday, so best wishes to all the Mums on the forum... cheers, Al.
|
|
|
|
Post by Franklin1 on May 16, 2008 17:39:33 GMT 10
G'day All, the van has had the cladding removed from one side and both ends...  ...and I am now up to the stage of planning for rebuilding of the frames. I spent most of this week being a mad scientist. I am determined to learn how to steam bend timber so that the new frames are built the way they did back in the old days. I have no first-hand experience with steam bending, so I read up on everything I could find about the subject on the internet. Then I scrounged around the local Recycling Centre for bits and pieces to make a steam generator. First I was going to use 50mm sewerage pipe for the steam box, but when I tested this stuff, the steam makes it go really soft. This photo shows the water drum on the burner, with the initial test pipe which went soft and toppled over out of the drum. I then tested a radiator hose which worked well...  The plasic pipe idea was then abandoned, and a wooden steam box was built as per info on the internet...  Once the steam is up and flowing through the box, the timber to be bent is inserted into the box and the open end plugged up with rag. Steaming time is 1 hour per inch thickness of timber (width and length don't matter apparently), so for 19mm (3/4 inch) timber it is steamed for 45 minutes. I tested the whole kit and caboodle using some scrap radiata pine, just to see what happens. After steaming the timber I bent it around the top van frame to see whether it bends easily or is difficult. Radiata pine is only rated as "average" for steam bending because it is full of knots, so I wasn't expecting a perfect result. After steaming, the pine isn't soft like cooked spaghetti, but it does bend reasonably easy around the generous radius I was testing. You only get about 20 seconds to do the bend before the timber cools too much, so clamping has to happen FAST! Unfortunately my scrap piece cracked in two places during bending, so I didn't get a perfect result...  ...But at least I feel confident I'm heading in the right direction. The scrap piece was certainly bent more afterwards than it was originally, so I was pleased with that. The timber they used back in the old days was Alpine Ash or Mountain Ash which isn't as readily available these days. In NSW, these species of timber are collectively branded/marketed as Tasmanian Oak, which is very expensive to muck around with. My next step is to test bend some freshly treated pine from a local company that do the pressure treatment on site. They call it "Waxwood" (you can Google if you're interested), and it doesn't contain arsenic or chrome in the treatment. When it's freshly treated it is sopping wet which the internet says leads to better steam bending of timber. I'm hoping I can use treated pine for the outside bent framework and also in other areas wherever water is likely to get into the van in future years I'll keep you posted, cheers, Al. ps. Remember Professor Julius Sumner Miller??... "Why is it so?"That's what I've been like this past week |
|
|
|
Post by firefighter on May 16, 2008 19:36:29 GMT 10
  hi professor al 10 out 10 for trying to bend your own timber for the repairs needed for the franklin...... if it all works out you could have a nice little bussines bending timber for other vintage vanners  sky the limited you could even put reddotel out of bussines  al.... if it does not work out for you............. company in my old home town bends timber for any job the timber benders 37 east st daylesford vic 53484233 f/f ;D ;D ;D ;D ;D ;D
|
|
raym
Full Member
Posts: 128
|
Post by raym on May 18, 2008 23:48:30 GMT 10
Hi Franklin 1
To steam bend timber it is best t use green timber (not kiln dried or air dried, as this makes it brital). The timber must be a long grain timber not a short grain, Western Australian Karri is ideal, Jarrah is not suitable as it has short grain. I have often thought of how to obtain an ecconomical suitable timber for this. I have thought of using new roof tile batterns, as these are green and approximately 38mm x 25mm usually from the Australian Oak family with reasonably long grain. I think these would work.
Raym
|
|
tonyh
Full Member
"Dolly" 1967 Riviera
Posts: 256
|
Post by tonyh on May 19, 2008 18:16:09 GMT 10
Hey Franklin 1, Whats this Lots of ingenuity in the stands. Very clever! Your the one doing all the specialist stuff - with all the contraptions for bending wood etc - that's a black art in itself!!!!! At least I left my girl with her clothes on - a bit much parading your best girl on the forum nude shame on you ;D ;D Hope you get the process sorted - looks like your on the right track to mend her sore bones Keep up the good work. cheers tonyh |
|
|
|
Post by tinnie on May 21, 2008 0:13:29 GMT 10
Hi Al, I have only just found this thread. Congratulations on undertaking one of the most thorough franklin restorations in history. Gutsy project and the way you are tackling it is superb, I will watch the rsto (and your timber steam bending) with much interest and delight. Good luck with it! Cheers, Gristy (Only got one Franklin ) |
|
|
|
Post by Franklin1 on May 22, 2008 18:25:58 GMT 10
G'day All, Further steam bending trials were done today, and I think we're onto something GOOD!! ;D ;D I went to the Waxwood people the other day to get some 42 x 19mm freshly treated pine, but they were all out of stock for that size (bummer!). Yesterday I had a truckload of treated pine delivered for two big fencing projects. So I'm moping around today, and suddenly has this bright spark! "Hmmm...wonder if one of those fence palings could be used in a trial?" So I sorts through a stack, and looks for a paling that's fairly free of knots. Puts it on the table saw and rips it up the guts. Puts the two halves together and planed the edges to get the rough stuff off. I ended up with two lengths 1.8 metres long x 48mm wide x 15mm thick. This photo shows the two lengths, and a comparison of the width versus the width of the van frame (35mm)...  So off into the steaming box with one of the lengths. Remember that this is freshly treated, so it is still sopping wet. The 15mm thickness means we steam for 40 minutes. Then take it out of the steam box and quickly clamp it around the frame. And THIS time we get an almost PERFECT result. Only one crack where a large timber knot was on the severe part of the bend...  Optimism shoots skywards! Time now to test the timber around the second tightest bend, down at the front bottom. Second piece of timber goes into the steam box... ...And once again the ball is almost dead centre between the posts! ;D ;D Photo shows the bottom bend, with a lesser crack at a knot...  Notice also in the last photo how soft the surface of the timber is from the impression the clamp has left after clamping. So what have I discovered this time... 1. As raym says above, "green" timber is better than starting with dried timber. This freshly treated pine timber behaves the same as green timber. 2. "Green" Radiata pine will steam bend ok (so far anyway) providing you can avoid putting the larger knots in the critical bend section. 3. Green timber stays hotter longer after steaming than dried timber, giving a longer time available for bending and clamping. 4. Bending this 48mm wide timber was no harder to bend than the 42mm dried stuff used in the first trial. Not soft like cooked spaghetti, but it wraps around the frame fairly easily. Where to next? In the truckload of fencing timber out on the front lawn, I have 415 timber palings. If I can find just four with very few knots or at least no large knots, then I think I can do all the bent sections of the van frame. Each paling costs $1.47, so four of them is about 6 bucks. Hell of a lot cheaper than paying $15 for a 6ft length of Tassie Oak 40mm wide (and I'd need 8 lengths which would add up to $120 total ) Wish me luck! cheers, Al. ps. Firefighter, yes I did discover the steam benders at Daylesford when I did my search on the internet. Always a good fall-back position. pps. gristy, did you notice the burner I'm using for the steam box is the trusty old Superchef BBQ?! Forty years on and still going strong! |
|
|
|
Post by firefighter on May 22, 2008 20:56:15 GMT 10
|
|
|
|
Post by Franklin1 on May 22, 2008 22:08:52 GMT 10
Hey f/f, I won't comment about firefighters and fairies...
What you do in your own spare time is a matter for you and your psychiatrist ;D ;D
All of the existing framework in the van is radiata pine except for the bent timber around the outside of each side frame. The cross-members holding the two sides together are radiata pine as well. Apart from me splitting some of the pine framework when I was trying to get the ply cladding off, it has stood the test of time well. Most of the plain steel nails had absorbed moisture out of the timber over the years, and had swollen with rusting. They were pretty well locked in tight. I'll be using hot-dipped galvanised nails in the rebuild...but skew-nailing them in alternate directions as I go around the frame.
cheers,
Al.
|
|
|
|
Post by Franklin1 on May 27, 2008 20:56:12 GMT 10
Some more steam bending trials today. Harking back to the previous trial for a moment, the following photos show the strips that I've trialled so far for the front top and bottom curves. The centre photo shows how the timber "springs back" when the clamps are taken off a few hours after bending. The internet said to 'overbend' the timber so that when it springs back it will be approximately the curve you originally wanted. I don't know how much it should be overbent...you must have to do some trial and error. The last photo shows what happens when you try to bend the timber back to the frame after it has been drying for a few days...  However, since this is all about learning how to do it properly, today I tested a couple of strips of treated pine on the rear curves. The rear bottom is the most severe of all four curves, and the rear top is the least severe. I decided to use more clamps spaced closer together around the bend to see if that made the bending process easier (it does ;D ). Both bends were successful with no hint of cracking anywhere...  I'm going to leave the clamps in position and allow the strips to dry out for a few days or more. Hopefully that will reduce the amount of springback in the timber when the clamps are taken off. Only problem with leaving the clamps on is that I only have enough clamps to bend two strips at a time (...I used 23 on this test ). Could be a long slow process Till next time, cheers, Al. |
|
|
|
Post by scootman on May 27, 2008 22:12:42 GMT 10
Al . scoot here. I cannot resist putting my two cents in. When I built PH I went through the same as you are now. How do I bend wood? Im the end , and very successfully I might add. I cut thirty Ml strips of 5 ply into lengths and put them into a jig on the ground I made out of tent pegs. , if the bend was a really tight curve I scored the outer edge of the timber so that it wouldnt break. Then once it was all in place I laminated another piece around it, glued and screwed, glued and screwed. Two days later when the jig was removed I had two perfect frames for me to build PH around.
Cheers Scoot.
|
|
|
|
Post by scootman on May 27, 2008 22:20:54 GMT 10
I think this is a pic of the frame Cheers scoot  |
|
|
|
Post by Franklin1 on May 28, 2008 9:16:29 GMT 10
Scoot, your van is an excellent example of how laminating strips of ply will achieve the same result. Unfortunately for me, I have a brain that wants to understand how the frames were done originally by our forefathers. One of our members wrote recently elsewhere on the forum: "Most of us have found this site after first buying a van as a bit of a joke and then slowly but surely become addicted to the hobby to the point of obssession / addiction
( understatement in some cases )". He must have had me in mind when he wrote that. Despite being told and reading on the internet that steam bending is "all too hard", I have found after a few goes that it is fairly easy to do, providing you have the right timber and suitable equipment. At least now I have an appreciation of how they did it all those years ago. I now have more options in how I rebuild the frames. And I can now add "steam bending skills" to my resume. Might help in the 'afterlife'... ;D ;D cheers, Al. |
|
Deleted
Deleted Member
Posts: 0
|
Post by Deleted on May 28, 2008 11:13:45 GMT 10
Hi Steamer Al For future reference Could you post a few pixs of your "steaming apparatus" and a brief "how to" under the tech section . I think i or someone else may have raised the question before about steaming and bending timber and started a post in that section??. Once i see it over there i will come back and remove this request from your thread. Long grain timber seems to be the go . i was told that they use to steam/boil " the timber in a long length of pipe full of water over and open fire. Timber use to come out like licourice and could be easily bent and left in a jig overnight to cool off. Scoot. Good photo and top job on PH mate. The process you describe is exactly how the old fugly van was built. three layers of 3 ply overlapping at the joins by at least 600mm. All glued and screwed together.. end result the same as steaming, and a tight radius obtainable with care and patience. Strength is in the laminate.... just look what they are using for load bearing roof beams in new houses nowadays. Composite laminated ply 250 X 100mm .. whereas we use to have a solid lump of Hardwood... Reddoldboiler |
|
|
|
Post by Franklin1 on May 28, 2008 21:12:21 GMT 10
Good idea, reddo! I'll put together some clearer photos and add a bit of blurb to them.
cheers,
Al.
|
|
|
|
Post by Franklin1 on Jun 9, 2008 19:52:02 GMT 10
G'day All, well there's been a bit of a lull in working on the van frames. Seems the local timber yard is having trouble getting stocks of 42 x 19mm treated pine and I just have to be patient. About a week ago I steam bent the curves for the front sections again, to replace the original trial ones that cracked. This time no problem, and all bends have been left clamped in position for air drying while I wait for the timber stocks to be sorted out...  So I've done a little bit of "fussing around the edges" elsewhere on the van in the meantime. Cut off some redundant metal bits that were left on the drawbar, and gave a temporary spray of undercoat. I'll have to re-do the gas bottle holder down the track...   We've copped the wet weather over the last week coming down from Qld, so stuck inside for many days. Decided to give the creative side of my brain a bit of a workout in the shed, and make a clock for the van. I'd been given an empty pendulum clock case a few years back (...it was for one of those "One day I'm gunna" projects)...   I decided to chop it up, strip it back, rearrange it, stain and lacquer it, and then reassemble bits of it to make a new frame. Then I spent a considerable amount of time on the computer designing and creating a new clock dial to suit the diameter of the glass...  Next, I pinched the hands and quartz movement from another clock (...yeah, I know...quartz movements are not 'vintage' , but at least this one makes the tick-tock sound like old clocks do). I put everything into the melting pot, gave a bit of a stir and a few magic words, and ended up with this...   I was pretty happy with the end result. The frame measures about 12" high and 10" wide, with the clock dial being 7" diameter. I'm thinking I will be able to use it as a cupboard door on the middle cupboard above the dining table, by putting hinges on one side and a catch on the other. I'll make it fit somewhere... Other than that, I've just been bludgin'... ;D ;D cheers, Al. |
|
|
|
Post by Franklin1 on Jun 13, 2008 21:49:17 GMT 10
Earlier in this thread I made mention of the sticky waxy cotton gauze that was used to seal the J-mould around the edges (and the galv sheeting on the roof). I raised the question "What is it, and where do I get some?" From time to time on this forum there has been talk about what was used back in the old days, and what is available these days. Various people suggested 'aircraft tape'. While stumbling around the internet looking for info about other things, I came across this product...  DENSO SEALING TAPE An impregnated hemp tape that was often used under edge moulds to prevent water leaks. Suitable for 20mm-30mm flanges. Available in 10 metre rolls. DENSO SEALING TAPE An impregnated hemp tape that was often used under edge moulds to prevent water leaks. Suitable for 20mm-30mm flanges. Available in 10 metre rolls.
4525-090
It is listed in the product catalogue for this caravan supplier: Canterbury Caravans & RV's
(Situated inside World of Caravans Complex)
140 Canterbury Road, Bayswater Victoria 3153
Telephone 03 9729 8188
Fax 03 97614430
www.canterburycaravans.com.au/new_page_14.htmAnd so I wonder, I just wonder, whether this is the stuff I'm looking for?? I think a phone call follow-up is in order... Al. |
|
Trish_M
Full Member
1950's Home Made Bondwood "Bettie Moonya"
Posts: 275
|
Post by Trish_M on Jun 20, 2008 22:05:01 GMT 10
OOOOH I love the clock! Well done!
Can't wait to see it mounted in the van.
|
|


 .
. (but quite a few impractical ones ;D), I really admire those V V'ers like you who undertake a ground up re-build! I am sure the result will be fantastic.
 Get in the car and up to the local garage and fill it up. Home and connect the hose/blowtorch up and do the gas safety leak test using
  , but if you restore the Wilmot Breeden lock every once in awhile somebody will come along and say something like “I see the door lock is a Wilmot Breeden.... my Triumph has that same brand lock on it”
 .. you are lucky to have a pommy knob .. people WILL notice:-X