|
|
Post by richard on Jun 27, 2011 15:44:34 GMT 10
Van has arrived! Many photos to come. Having had a good look at the van it is really clear that it was very high-end when it was made. Beautiful drop-axle, high-end stabilisers (rusted solid then brackets rusted so much one has fallen half off the van), over-engineered chassis, interior fitout all excellent. Quick good news summary: - Interior is in better shape that it looks like in the photos, and the interior grey colour is also a lot nicer in-person that via photographs. Combined, that probably means no interior re-painting required.
- Interior cabinetry woodwork requires no repairs, other than hardboard bed-bases being replaced. I'm pretty sure I can cut some ply rectangles without much trouble...
- Exterior fibre-glass is as solid as Exocet said, no major issues. A few patches and minor repairs required depending on exactly where things like fridge vents need to go. Some minor damage from trip up, nothing serious.
- Perspex isn't perfect, could re-use it if I have trouble making new windows. All windows easy to remove and repair/replace seals.
- Door is a bit wobbly, needs removing, frame checked, re-hung on new hinges, but appears to be solid and fits well. Nice hardware (other than hinges).
- Wiring is all in very good condition other that the exterior cable that runs to the car, but there's a junction box just inside the front of the van that will allow it to easily be replaced. Interior wiring basically looks like new.
- Interior chrome hardware is pretty much all usable as-is. Clean and a polish with some AutoSol and they'll be fine.
- I think I've found the chassis plate! It was on the moulded fibreglass drawbar cover. Has a couple of layers of paint on it, I'll strip it very carefully and see if I can make out any numbers.
- Roof lining is going to be easier to make good than expected. Roof is twin-skin, interior skin is in solid condition, just needs existing vinyl removed and replaced. Lining is actually still very well attached, only peeling round the outside. May have to see if it can be re-glued round the edges, actually, it didn’t want to come down easily.
Anyway, that's the good news - the van itself needs less work that I'd allowed for based on the photos. Mixed news: This is all the "as expected" or some good/some bad stuff. - Rear lamp covers are going to be very easy to re-chrome (much better that expected, almost usable as-is), but the mild steel base-plates have rusted away so much it isn't clear if they can be used as patterns to make new ones. I'll probably be able to struggle through, the lamp bases don't need to be an exact copy. Lenses were always going to need replacement.
- Side lights are definitely not usable, and have a very curved base so I have to get the same ones: Flat-base alternatives I found simply won't fit. That said, I've found the correct ones, so I should be OK.
- Hatches were originally very well made (double-skin galvanised steel over hardwood frames) but need to be re-made from scratch. Latch hardware 95% intact (missing one small piece, night be in the "parts bucket").
- Window seals are all completely shot, even the fixed windows. However they’re all made such that they’re easy to get out. Trim extrusion round fixed windows is available new, so I’ll just buy however many metres rather than trying to polish up the existing stuff. Movable window frames are all in perfectly serviceable condition – better than I was expecting, no obvious corrosion.
- Mudguards were galvanised steel, and the gal is shot. That said, the guards themselves were very well made to begin with and look salvageable if I'm gentle & careful. Rust converter, then a two-pack rust-encapsulating chassis paint, then some sort of chip-guard.
The bad news is that you can tell it spend 50 years near the ocean. The chassis was never galvanised and it's marginal as to whether it would be easier to get the existing one roadworthy or just turf it and build a new one. Axle is definitely shot, so are the springs. I'll probably just bite the bullet and build a new chassis that's a close replica of the original one. I'd already allowed for a new hitch, draw-bar and axle. Moving from that to " new chassis" doesn't seem like such a big deal. It will also mean I can engineer in the Alko torsion axle properly, and route the brake electrics really nicely. Chassis is extremely simple: Two big box-section side-members with a dozen or so angle-iron cross members and a box section draw-bar welded underneath. No complex cross-bracing or reinforcing, just really big sections. Paint the new chassis with POR15. There was some sort of rear bumper bar... but it's actually fallen off after the supports rusted through. I'll try and find a suitable replacement, not sure what the original one looked like. |
|
|
|
Post by hilldweller on Jun 30, 2011 8:41:36 GMT 10
You must be pleased to have it home where you can take a proper look at it. Since you commented on the nice door hardware is there any chance you could post a pic of the door handle at some stage? My van doesn't have one and while duct tape works well it isn't really a permanent solution LOL. It would help to know what I need to look for and I suspect the doors on our vans are from the same mould.
|
|
|
|
Post by richard on Jun 30, 2011 9:45:32 GMT 10
You must be pleased to have it home where you can take a proper look at it. Since you commented on the nice door hardware is there any chance you could post a pic of the door handle at some stage? My van doesn't have one and while duct tape works well it isn't really a permanent solution LOL. It would help to know what I need to look for and I suspect the doors on our vans are from the same mould. I'll try and put one up before the weekend. There's a brass interior pull handle - a slightly ornate bar on a brass plate. There's no exterior handle, it uses a Yale door lock - you turn the key and pull on the key itself to open the door. It does need a better striker plate - there wasn't a decent sized one and the door frame has a small chuck out of it where the bolt has broken the fibreglass. |
|
|
|
Post by richard on Jun 30, 2011 9:58:29 GMT 10
|
|
|
|
Post by hilldweller on Jun 30, 2011 10:30:31 GMT 10
Thanks for the info on the door  Interesting how the hatch is made. I'd assumed it would be f'glass. |
|
|
|
Post by overlanda on Jun 30, 2011 21:15:48 GMT 10
Gee there is something wrong with the 12 volt wiring. It is colour coded ;D ;D ;D ;D ;D ;D most old vans that i have worked on didn't have that !
Gerald
|
|
|
|
Post by richard on Jun 30, 2011 22:10:29 GMT 10
Gee there is something wrong with the 12 volt wiring. It is colour coded ;D ;D ;D ;D ;D ;D most old vans that i have worked on didn't have that ! Gerald Colour coded, proper little junction blocks, well secured, main front/rear loom is double insulated, etc. Very well made van was very well made. |
|
|
|
Post by richard on Jun 30, 2011 22:16:40 GMT 10
Here's a picture of the interior door handle and the door lock. Exterior has a little pull handle that is hinged at the top and doubles as a knocker. Visible (just) in the bottom photo. Apologies for the poor quality of the recent exterior photos, it was quite dark and outside flash range, so I had the ISO cranked up. Makes the photos grainy.   |
|
|
|
Post by hilldweller on Jul 2, 2011 14:41:40 GMT 10
Thanks heaps Richard. That pull handle on the inside is rather classy |
|
|
|
Post by seeshell on Jul 2, 2011 17:27:01 GMT 10
Hi Hilldweller and Richard
I agree it's classy - but I wonder if it's original? I would have thought that the 50's 60's aesthetic of fins would mean something more mid century modern/"eames-y"/chrome coloured than turn of the century?
For my part I think someone's liked the handle and added it later - unless there is more hardware elsewhere in the van of a similar style? This is somewhat supported by the outdoor handle. From what I can see of the exterior door handle, it's chrome, with a finger pull latch. Stylistically - very different!
However, that aside, I'm sure it's going to come up lovely, especially with all the thought you are putting into it.
Cheers
Seeshell
|
|
|
|
Post by humpyboy on Jul 3, 2011 10:06:16 GMT 10
Looks to me like it was fitted buy a profesional, all slots the same way ;D ;D ;D ;D ;D
|
|
|
|
Post by richard on Jul 4, 2011 10:44:34 GMT 10
Did some measuring, poking around and cleaning over the weekend. Measured chassis dimensions and had a poke around seeing how it was made and just how rusty it is before making the call to replace it or not. Advice from my engineer father-in-law was to err on the side of caution and replace it. Next question is how to replace it - I can do a lot more measuring and get an exact copy made or I can use the measurements that I did in about an hour to order a kit of pre-cut steel lengths and then copy the existing one without have to work out every little thing. That would also let me tweak the location of mounting tabs if required, etc, etc. I have access to a couple of stick welders, but for something this big I'm tempted to buy a little MIG. Two further discoveries on the " Really expensive well made van was expensive and well made" front: It has PRB/Repco powered hydraulic brakes - the sort that have to be plumbed into the car to work... Totally unsalvageable, but they look effective (and expensive). I have the original owners manual for them, I'll stick up some scans or photos. I also found the original blueprints for the van's wiring, as an actual blue-line diazo print on linen paper by an electrical engineering firm... |
|
|
|
Post by exocet on Jul 5, 2011 20:10:56 GMT 10
Hi Richard, its hard to believe that the Wayfarer is actually NOT in my garage anymore. My wife remembered to put the wiring blueprints etc back in the van, weren't sure whether they might come in handy or not. The brass internal door handle is not original, the gentleman we bought it from put in on there. If you are interested I can detail a little more history of the van if you want, as you are the 4th owner from new and I can supply all of the previous owners names. Provenance I think they call it, lol. Exocet
|
|
|
|
Post by richard on Nov 20, 2011 12:44:07 GMT 10
Belated update. The Jaguar has chewed up almost all my spare time since the caravan arrived (there's an update in the Jag thread). But there has been some progress on the caravan, and I have a week booked to work on it over the Christmas / New Year's break. Over the last few months it has also changed from my caravan to our caravan to "her caravan". My wife has decided that since I have the Jag, she gets the caravan. We're still working on it together, but she's decided that it's hers for a couple of reasons: - Makes her feel better about how much the Jag has cost this year.
- Means she gets final say on colours & interior
I have managed to remove the rubber stone guard at the front (though a fair bit of gelcoat came off with it) and I've managed to sand back about half of the van before the air compressor died (since fixed). I'v also found a really helpful boat repair & paint supplier: Marineware at Rozelle (very local from my perspective). He has a whole pile of fibreglass materials, fillers, paints, etc. I'd selected "AwlCraft 2000" and the AwlGrip system to paint the caravan, but unfortunately it isn't available in DIY friendly quantities. EG: the AwlGrip epoxy fairing compound comes in a 2 gallon pack as the smallest quantity. Similar problems with some of the other layers of the system. Dan of Marineware was able to put together a pack of materials to do the paint job that are compatible with each other, cheap (enough) and available in the quantities I need. Only downside is his min quantities aren't small (5m fibreglass cloth, 4l resin, etc). That said, it's cheaper to buy 5m of cloth and a 4l tin of resin than it is to buy a couple of fibreglass repair kits from Bunnings. Order list: - 5m of 300gsm satin fibreglass cloth
- 4 litres of polyester resin.
- 1 sheet (8x4) 20mm high-density closed cell foam sheet.
- 2 litres of Jotafair epoxy filler
- 5 litres of Penguard Highbuild two-pack
- "Some" 3M guide-coat powder (so I get the sanding right)
- 1 gallon Awlgrip 545 epoxy primer + converter & reducer
- 1.25 gallons Awlcraft 2000 two-pack top-coat + converter & reducer
The fibreglass is for: - Repairing two cracked sections at the front below the windows.
- Glassing in a couple of new wood frames, same spot.
- Repairing boot lid so new hinges can be fitted more similar to originals.
- Patching a couple of holes.
- Making the new hatches (see below)
The paints & fillers can all be applied by hand (spatula or brush & roller) other than the top-coat, which has to be sprayed to look really glossy. Given that the 2-pack top-coat is over $100 a litre, needs special spray equipment, lots of skill to get right and is incredibly toxic when sprayed (isocyanate 2-pack) I've decided to leave the top-coat to a professional. Found a guy to do it: Cam Smith of Yachtomod. He's interested in the project and keen to give it a go, and has access to spray booths big enough to do yachts so fitting a caravan won't be a problem. I'll do everything up to the final epoxy primer, he'l check my sanding is acceptable and then put on the top-coat. Another decision is a change to the construction of the hatches (since I have to get 5m of fibreglass cloth anyway). The original hatches galvanised sheet over a hardwood frame. The gal has rusted away, the wood has rotted & split, they are really heavy and not very well insulated. New plan is to make replacement hatches out of high-density foam (possibly with wooden sides) and then cover the whole thing with fibreglass. Fair, sand, spray. Much lighter that originals, much more weather-resistant and much better insulated. Should match the rest of the van better as well. Last update is that the exterior colour scheme has changed, it's now going to be "Sea Foam Green", single-colour, all over. Should look awesome. Still planning to replicate as much of the original metal trim as I can find. Colour should be similar to this (or Google "sea foam green"): 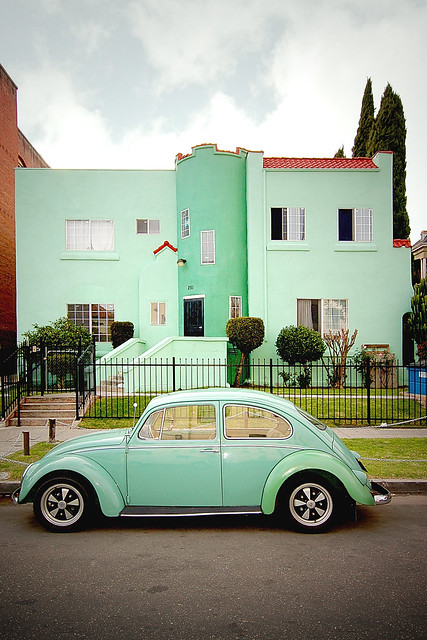 |
|
|
|
Post by richard on Nov 20, 2011 13:13:49 GMT 10
The AwlGrip website also has some pretty good guidance on how to prep fibreglass for doing their top-coats as well. Here's the current paint-prep plan:
1: Clean: Pressure wash with household detergent, or scrub with Ajax. Clears any dirt/dust/mould release/wax off the shell. I'll also need to remove all the duct tape and clean off the glue.
2: Sand: Sanding, sanding, sanding. I have a DA air-powered sander I'm using. Also wearing a high-end gas mask since I'm assuming that some of the paint on the van is probably lead based. Have to remove all old paint (half done) and any really soft & porous gelcoat so I have a solid surface for the new finish.
3: Exterior repairs: I have to cut out a couple of sections of shell and some of the woodwork under the front window. This is probably also the point where I move the van inside the shed and switch to using the electric DA sander which has a vacuum attachment. Also remove all windows, any remaining trim and take the hatches off. Remove door, repair door frame, make new hatches, etc, etc. There's also a few cracks & splits that will need a little reinforcement.
4: Fill & fair: Repaired sections will need a coat of epoxy filler. The gelcoat was badly damaged by removing the rubber stone guard, theta entire section will need a thin later of filler. Then make with the more sanding...
5: Highbuild: Mask up the window holes, apply high build two-pack primer. Apply 3M guide coat, sand. Repeat - high build, guide, sand.
6: Epoxy primer: Awlgrip 545 epoxy primer. Expensive, apparently very, very good. Apply 3M guide coat, sand. Repeat - prime, guide, sand.
During all this, also have to build the hatches, repair door & boot and run all those through the same process.
At that point it's ready to go back up to Sydney for top-coat painting from a "paint" perspective. But it probably also needs to be towable, which means before it goes back to Sydney it will need its new running gear.
I'm also not sure what to do re the windows & towing. I need the windows out to do the paint-prep and re-spray the shell, but I need the window holes covered to tow it up the freeway. I might need to make some temporary window covers out of really thin plywood?
|
|
|
|
Post by hilldweller on Nov 20, 2011 14:20:56 GMT 10
Hi there. I was wondering how you were getting on as I went back to this thread and others with Kennedy pics a few days ago before embarking on overhead cupboards. Sounds like you've got it all sussed on the paint front. Mine is also nearing painting - another week or so - but I'm going to get someone to do it for me. Was originally going to do at least the sanding myself but I just haven't got the time. Like your colour choice Or should that be 'her' colour choice LOL? I'm thinking blue and white but it changes almost daily. No idea what the original was. Will be very interested in answers to the windows/towing question. Painter wants it with windows out and reckons OK to tow provided the back as well as front is out, but I'm nervous. The good thing is having the window out will force me to get them fixed/replaced and put back in, and then all I need is a door handle and reflectors and it will finally be road legal. Please post pics of the painting if you can |
|
|
|
Post by richard on Nov 21, 2011 0:53:58 GMT 10
Her choice, but I'll get some input Other option would be to go two-tone with a white/cream top and the sea foam green below the waistline. Would cost a fair bot more for the paint job - booking the booth is $600 for a day and you can't do two-tone in a single session. Then again, I'm spending $1,800-ish on paint and exterior prep materials, excluding my labour. Getting it the right colour scheme at the end is going to be important. Hope I'm right in thinking that the paint job is going to last 20 years I've seen boats sprayed with this stuff from almost 20 years ago - they still look amazing. Should last on a van. |
|
|
|
Post by jordane on Nov 22, 2011 17:06:40 GMT 10
Hi Richard The Windows for our Franklin Freeway were purchased from Fairlight Plastics Manns Road Gosford www.fairlite.com.auWe took in originals but i imagine you could send then the dimensions Good Luck Emma |
|
|
|
Post by richard on Nov 29, 2011 7:29:20 GMT 10
Some slight progress this weekend: 50 years of grime removed with a pressure washer (amazing how much difference that made) and I've started removing external hardware. The pair of top hatches have been removed and I have two of the five opening windows out of the shell. I'm planning to remove all of the external hardware before doing any more sanding - I want an actual bare-shell to work on. Since the bulk of the paint is off the shell (and I'm removing windows) the van has been moved into the shed. Sanding from now on will probably be done with a vacuum attached - will be a shame to stop using the air-powered DA. The window frames holding the glass are in good condition other than the catches, which are made of three different metals: Aluminium, mazak & steel, and have thus seized into a single lump. Trying to unlatch the windows resulted in the pop-rivets that hold the catches on shearing. So all ten window catches will need to be replaced. The frames will also need to be pulled apart (some already doing that on their own), cleaned, new caskets, re-assembled. The opening windows are held open by some sort of friction-based strut. They're interesting, I'm hoping to be able to clean them up and re-use them. The window frames on the shell itself need some serious clean-up, but I'm hoping they won't need to be removed. Having reversed the van into the shed, it appears that either the dropped axle is overdone or the springs have sagged. The van needed planks under the wheels to avoid grounding out at the rear. The tow-ball on the ute I'm using to move the can round the farm is a little high, but even so, I'll aim for another inch or two of ground clearance with the replacement axle. I've also done some more measuring and inspection of the existing chassis. It would have to be removed and a massive amount of time put into stripping the fairly heavy rust (at the point where you can pull flakes of rust off). Then I could try and apply anti-rust epoxy paint - but the main chassis rails are a welded up box section. Impossible to clean the inside of the chassis rails, so it would continue rusting quietly from the inside. Thus: I've decided to " repair" the chassis by cutting out the "rusty sections" (IE: all of it) and replacing them with new steel. So I've measured up all the various pieces of the chassis and I've asked for quotes from a couple of local steel merchants. Question: The current chassis is made from the current materials (nearest metric section listed) - what do people think of the material sizes, especially thickness (which is a guess based on what's left): - Main chassis rails: 75 x 50 x 2.5mm RHS.
- Drawbar rails: 75 x 75 x 2.5 mm SHS
- Front & rear cross rail: 75 x 25 x 2.5 mm C-section (unavailable - will have to substitute)
- Eight cross beams: 60 x 20 x 2.5 mm Angle
I'm guessing that 2.5mm thick will be sufficient for the main sections (that seems to be what was used originally - it's probably 1/8 inch) and I'll be buying "SupaGal" steel which has a thin layer of galvanising. The cross beams are in odd-sized sections that don't seem to be obviously available. C-section steel is now only available in 4mm and up, and the 60 x 20 angle doesn't seem to be a current section either. The obvious alternatives for the cross beams are: - 50 x 50 x 2.5mm angle.
- 50 x 25 x 1.6 mm RHS
- 75 x 25 x 2.5 mm RHS
I'm leaning towards the box sections - they'd be hugely stronger. Anyone have an opinion on which one I should use? New chassis (excluding axle & other hardware) will be about 100kg if I'm driving my calculator right. It's been many years, but I used to be able to weld pretty well (did a TAFE course in the 90's). Currently planning to use a stick welder (since I have one), but I am tempted to buy a MIG for speed & neatness - any comments? |
|
|
|
Post by LinPet on Nov 29, 2011 17:18:10 GMT 10
Hi just looking at the van - I love it, we have a kennedy but not a finny. The tail lights you got are off a Zephyr ute. I have only seen 1 finny in the flesh but it had series 1 Zephyr sedan lights , have put a photo of a tail light for reference and a photo of the finny we saw down on the Murray. I have been in the Zephyr club Qld since 1978 (but looking for a Jaguar 420 g now) I may know someone that has good tail lights if you need them? Peter. 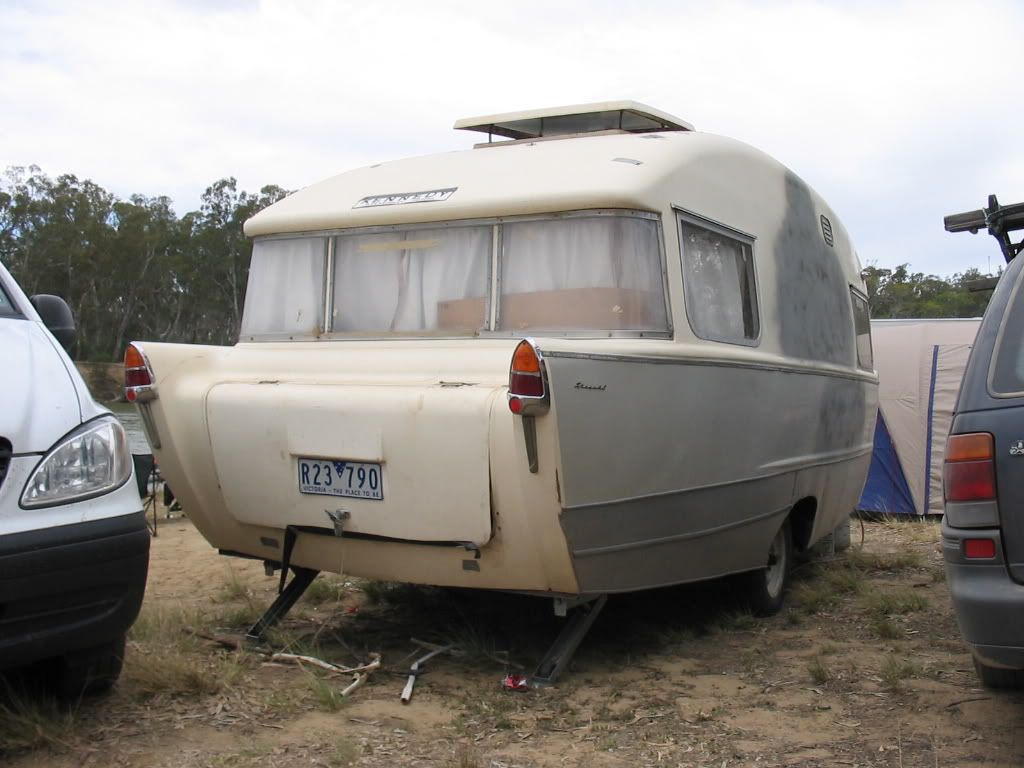 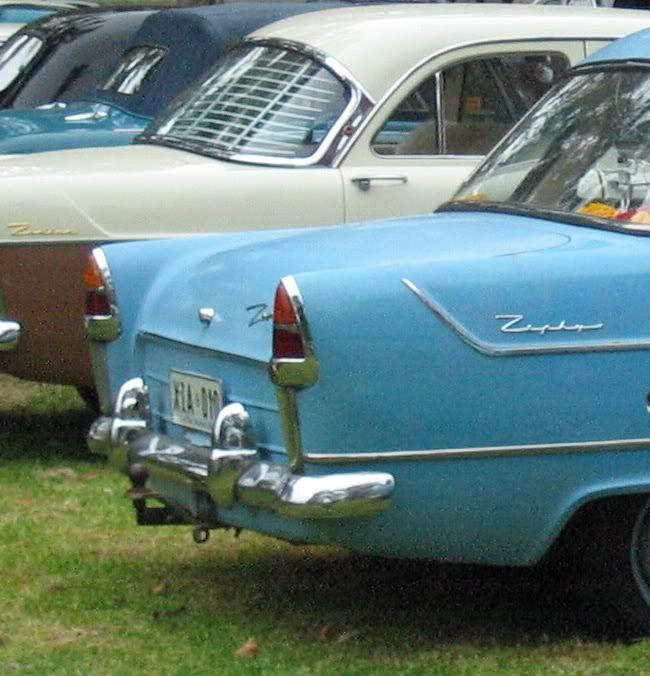 PS: If you are interested in selling the finny - we know of a really good home ......  ;D |
|
|
|
Post by richard on Nov 29, 2011 20:20:36 GMT 10
I may know someone that has good tail lights if you need them? Peter. PM me the details! ;D I have a reasonable set of chrome surrounds, but they need to be re-chromed. Lenses are average to poor, and the "spear" under the light is unusable. The steel bases are completely rusted away. So a decent complete set of rear lamps would be really helpful. |
|
|
|
Post by Franklin1 on Nov 30, 2011 20:30:27 GMT 10
G'day richard, There's no short answer to your queries about the steel for the chassis. Having spent 36 years at the local steelworks (now retired), I can offer some general information. Steel these days is much stronger and lighter than steel produced 60 years ago. You won't need exactly the same dimensions as is currently on the chassis. For the two main bearers that the springs attach to, you could use 75 x 50 x 2.5mm RHS. You could also use this size for the drawbar arms, however if you plan on doing a bit of "off road" travel, you might want to bump the drawbars up to 75 x 50 x 3mm. The front and rear cross beams can be 75 x 25 x 2mm. The only consideration here is what you might want to anchor to the 25mm width. It can sometimes be a bit narrow to try and put fastenings through it. The size of all the other bits and pieces in between will depend on what will be fixed to them. For example, if you are putting any new floor pieces in, you'll want a fairly wide surface (say 50mm width) to allow room to fix both sides of the flooring joint onto the steel tubing underneath. Keep in mind that by using RHS tubing, you are effectively saying that anything fixed to the tubing will be via self-tapping screws. I have no idea how well these sorts of screws stand up to the rocking and rolling of highway travel. You might want to use a combination of rhs tubing and angle iron around the chassis. At least the angle iron will give you the opportunity to put some nuts and bolts in as the means of anchoring the van together, rather than relying solely on self-tappers. I see on the internet that this supplier in Melbourne is listing C-channel in 75 x 40mm size, but doesn't say what thickness it is. I suspect it is imported product, or manufactured out of local sheet steel, because the two Australian steelmakers don't have it in their product lists. The same Melbourne supplier also has angle steel in 40 x 40 x 3mm, or 50 x 50 x 3mm. All this stuff is in black steel, not Supagal. I'm not sure it's worth the added expense of buying Supagal for making a chassis. Wherever you weld you'll destroy the zinc coating (which is very light anyway), so you'll have to paint that area with a zinc-rich paint to restore the protection. And you'll only be able to do that on the outside of the tubing, which leaves the inside welds prone to corrosion. I think with these old caravans that if you're not storing the van beside the ocean or in long grass, then black steel with a decent paint coating is good enough. If you end up deciding to go with black steel, have a look at whether this bloke can give you a better price, if you live in the Sydney region and if they can deliver to you. This bloke is a trader who sources products for you. I bought my plywood through him for a lot cheaper than retail. cheers, Al. |
|
|
|
Post by richard on Nov 30, 2011 21:19:05 GMT 10
The existing floor is bolted (coach bolts? have to pull up the lino to check) to bits of sheet steel that have been welded to the frame members. So there's a bit of channel or angle with a 2-inch piece of sheet steel welded to it with a bolt through the middle.
I was planning to make some bolt brackets out of 2.5mm steel - I have access to sheet metal tools (guillotine, pan-brake, band-saw) so making up a dozen brackets to weld on for bolts doesn't worry me.
I'm planning to fit an Alko axle - I might get some 4mm channel to reinforce the axle mounting point (or double up on the side members?)
I have a really nice, brand-new, folding jockey wheel that Exocet put on the van when he sold it to me that requires 75 x 75 (I think). I'll check how much thread is on the U-bolts - maybe I can shorten them and fit it on 75 x 50. The exist draw-bar may also be salvageable - again, it was fitted by Exocet less than a year ago, but I need to cut it off and I might not be able to refit it easily.
New question: Any major problem doing the fabrication with a DC stick welder? It's what I have and know how to use, but if everyone says "OMG! Buy a MIG!" I'll probably do so.
|
|
|
|
Post by hilldweller on Dec 4, 2011 10:18:20 GMT 10
In response to your question a few posts back about towing without windows, I don't know the 'correct' answer but can report I towed the Caravelle about 20 ks on Friday with all the windows out, the hatch off, and the door held shut with duct tape and a bungy cord. I was nervous and avoided the motorway in order to go slowly but there were no problems. Hoping all will be well for a few more ks to get it back to the window place when the painter's finished. I think your van has supports dividing the big front window into three sections? Mine doesn't have that - just a big wraparound window front and back so if it can cope I would have thought your Finny would be fine unless there's some structural problem with the f'glass shell. Happy to be contradicted by the experts if I've done something I shouldn't have and got away with it |
|
|
|
Post by richard on Dec 6, 2011 13:27:58 GMT 10
Does anyone have a really good idea what the tare weight of my caravan would be? The Kennedy thread seems to suggest "13 hundredweight" - 660kg? That seems really light. I'm going to be ordering a new axle soonish and I need to give a mass estimate to Alko so they can build it to suit.
To get from tare to gross - add the weight of the water, the LPG cylinder, spare wheel (if I fit one) and everything we pack in the van.
I was going to assume water + 200kg? Anyone have an opinion?
I'm also increasing the weight of the chassis by 20kg or so as I'm using slightly heavier sections.
Still seems like it's going to come in under a ton.
|
|


 Interesting how the hatch is made. I'd assumed it would be f'glass.


 ;D
;D 
