|
|
Post by Don Ricardo on Sept 6, 2021 21:10:29 GMT 10
Hi Surf Tragic, I’m glad you’ve found the serial number plate and the Don badges for the Mount Martha van, and also to confirm that the serial number is 934. Your photo is much clearer than the one I have. If you go to the link I gave you for the van, you’ll see I’ve re-titled the thread, but if you’d prefer me to name the thread something else, just let me know and I’ll make the change. Always satisfying to put the pieces of a jigsaw together so we can begin to see the whole picture.  Don Ricardo |
|
|
|
Post by Surf Tragic on Sept 6, 2021 23:28:30 GMT 10
Hi Don Ricardo
That is exactly how I would have titled the posting, thank you, I'm glad this has come together so well.
Surf Tragic
|
|
|
|
Post by Surf Tragic on Jul 1, 2023 15:44:11 GMT 10
Looks as though I've got my Mojo back so work has started again on the old Van. It's good to walk away from all the projects every now & again, it's a good feeling to be back.  1 1 by Surf Tragic, on Flickr I've started with the front & back seat 'lids'. One was so smashed it had to be completely re-built, the others needed a few new rails & new ply, someone gave them a rough go.  2 2 by Surf Tragic, on Flickr  3 3 by Surf Tragic, on Flickr  4 4 by Surf Tragic, on Flickr Remember these old "Yankee" screwdrivers ? I had them in an old Carpenters tool box from my Building days, they made short work of the slot-head screws, it made me remember me using them for 100's of screw fastenings on my 1st boat in 1963 !! They work remarkably well.  5 5 by Surf Tragic, on Flickr |
|
|
|
Post by hilldweller2 on Jul 9, 2023 9:30:31 GMT 10
Great to see you're back into it Nice pics. |
|
|
|
Post by Surf Tragic on Jul 10, 2023 23:06:04 GMT 10
 6 6 by Surf Tragic, on Flickr This seat lid had a fracture so rather than renew the ply, fitted a support piece under, the old ply is fairly distorted but is solid, so did a lot of re-nailing & gluing.  7 7 by Surf Tragic, on Flickr They were then all sanded & painted.  8 8 by Surf Tragic, on Flickr  9 9 by Surf Tragic, on Flickr Both lids hinged & fitted.  18 18 by Surf Tragic, on Flickr The double bed at back hinged together & set in place. |
|
|
|
Post by Surf Tragic on Aug 1, 2023 12:54:44 GMT 10
This is the space under the seat near the door, formally had a water tank, but I intend to install a new tank under the floor.  11 11 by Surf Tragic, on Flickr To make better use of this space, I bought a Dometic drawer frig which fits really nice there, it also puts a bit more pressure on me to finish the project. It's 30L & should be quite useful. The old icebox will still be used for storage. 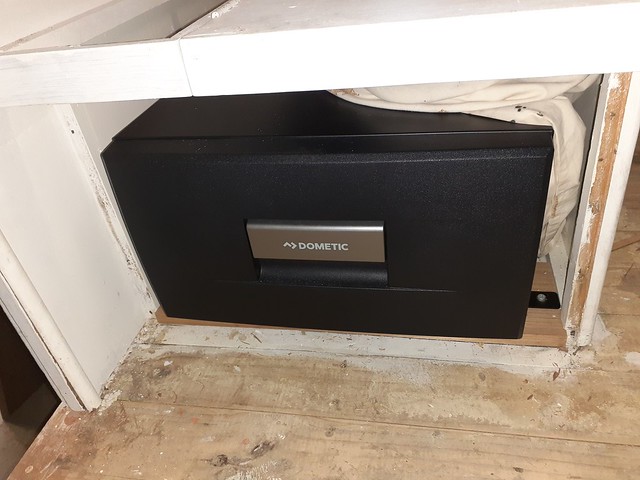 12 12 by Surf Tragic, on Flickr Now between the seats at the front wall under the table, I made a false wall to house 240V electical cables, it will be easy to push them through the conduits, also 12 V wires, I don't want any wiring on show, also don't want to weaken any framework by boring holes through the slim studs. 20mm insulation fits around the conduits better than loose wiring too, that part has been sheeted now & no-one would know what's been hidden in there..  12a 12a by Surf Tragic, on Flickr The Electrician has decided he will come & do the job...at last..., that has really slowed the project & made me feel like giving up for a while, but he is the best Tradie & very particular, so hopefully, this week !!! Cheers. Surf Tragic. |
|
|
|
Post by Don Ricardo on Aug 10, 2023 17:54:42 GMT 10
G'day Surf Tragic, I've just been catching up on what you've been achieving with #343. Very thoughtful, creative and clever as always. I always love the solutions to problems you come up with. Your father applied a bit of creativity to the van, so perhaps it runs in the blood?  I'm interested in the conduit for the 240v wires across the front. Is that for the little frig? I'm looking forward to seeing more posts as the project continues. Don Ricardo |
|
|
|
Post by Surf Tragic on Aug 10, 2023 22:57:12 GMT 10
Howdy Don Ricardo Great to hear from you too, I'm feeling good at present & can imagine finishing this project now, the sheds quite a bit uncluttered as planned & I can concentrate on #343, no other projects in my face. Yes the conduit is for the Frig wiring, also am fitting a Power Point outlet on the offside exterior, could be useful in the "imaginery annexe", also can go that way with the 12V wiring for the clearance light on that side, maybe an outside light too.. I'm very interested in your style of annexe & will send a PM later with some questions about it. The Electrician has left me a roll of cable, I want to thread it neatly to the power inlet & 5 PP's, dont want him boring holes with large augers & weakening the frame, he has agreed then to fit it all off & install safety switches/fuses, Battery, Charger, 240-12V transformer & whatever is needed. I have the transformer for the Frig. All that gear is going where the bath was. It's a great chance to bring the van up to date without it showing, it's like hiding all the phillips head screws where no-one can see them. Cheers, Surf Tragic |
|
|
|
Post by Surf Tragic on Jun 26, 2024 14:32:02 GMT 10
The project nearly stopped due to delays of simple ordinary items being not available for the running gear, so I started with dismantling the spring leafs, de-rusting them, painting & reaassembly.  1 1 by Surf Tragic, on Flickr  2 2 by Surf Tragic, on Flickr It took months for 14" Ford rims to turn up, (I ordered Ford because Don Ricardo used Holden) , there's a great Trailer Parts Supplier in Albury, but I guess it's a sign of the times with lack of parts. I had to have the rims before we could weld up the drop axle as the wheels had to be an exact fit in the Arches, & we didn't know what back-set they were until they arrived. So eventually they arrived & the Engineer cut & welded it all up, the axle fitted perfect & clearance for the tyres in the arches is perfect.  3 3 by Surf Tragic, on Flickr Electric Brakes  4 4 by Surf Tragic, on Flickr  5 5 by Surf Tragic, on Flickr At last ! Some wheels. The Chrome Hubcaps come from 'Antique Tyres' |
|
|
|
Post by Roehm3108 on Jul 2, 2024 7:32:53 GMT 10
|
|
|
|
Post by Surf Tragic on Jul 3, 2024 17:47:18 GMT 10
G'day Roehm 3108, what a cheeky Caravan Builder you are ... .. I suppose I'd better fess up, I knew I shouldn't do this, but I started working on the '53 Cusso !! I knew it could be a deadly move & could easily mean a stop on the old van, but really I've found a nice spot of doing a bit on each whenever I feel like it.  |
|
|
|
Post by Roehm3108 on Jul 4, 2024 14:55:34 GMT 10
Hi ST. Totally agree that it is good to have a bit of variety in life. So glad that you're not frittering your life away in front of the tele! As you know, I'm not a car person and can't get enthused over them. I do understand there are those who do! Hopefully both rebuilds will come together and be launched at the same time! Keep it up!!  |
|
|
|
Post by Surf Tragic on Jul 4, 2024 23:39:12 GMT 10
 168 168 by Surf Tragic, on Flickr  169 169 by Surf Tragic, on Flickr I used 5mm "BendyPly" on the ceiling, it was easy to use & available from a Stockist in Albury, it used up 3 sheets 2440 x 1220 & is more $$'s economical than Caneite. The 13mm Caneite was available in Melbourne & Goulburn NSW, but very expensive both to buy & cost of delivery. To buy local there was a Minimum buy of 10 Sheets, so the decision was easy. There will be 20mm of insulation in the ceiling, so the Caneite won't be missed. Ply is much lighter ( and stronger) too, so that will even up the weight of all the extra rafters up top, I weighed it & did the calculations. !! A very pleasing result.  20240702_164720_resized 20240702_164720_resized by Surf Tragic, on Flickr  20240702_164615_resized 20240702_164615_resized by Surf Tragic, on Flickr All 240V & 12 V wires have been run, I eventually connected with a new Electrician who is retired but working 7 days a week, he checked it all out & finished off the 240 V outlets , he said he enjoyed the work. Pity to have to part with the guys who did all my electrical when I was in business, but they're too busy for this fiddly stuff where there's little money to be made,  they promised many times to come but never ever turned up, so hard to get Tradies. Surf Tragic. |
|
|
|
Post by Surf Tragic on Jul 4, 2024 23:51:09 GMT 10
Sorry about the huge photos, have never had to choose size since I started with flickr, but will check it out for next lot. ST
|
|
|
|
Post by Roehm3108 on Jul 5, 2024 7:49:19 GMT 10
Lookin' good ST! I bought softboard back in 2012 when I had to replace the roof of the Rowvan. Got it at Bunnings in those days, but I haven't seen it there anymore. It came in 900mm x 1200mm sheets and was a eucalyptus tree derivative rather than sugar cane. Just some useless information for you!!!!
|
|
|
|
Post by Surf Tragic on Jul 8, 2024 18:28:09 GMT 10
 1 (2) 1 (2) by Surf Tragic, on Flickr A lot of the original moldings like 'quad' & 'D' mold are so brittle that I have to make copies to suit. The mold at the ends of the rounded cupboards have been made from ply, so I used some 12mm Marine ply I've had here for the boat to remake 3 pieces as shown in these photos. A jig is made first to guide the router bit, the curve is copied from the original piece of Caneite.  2 2 by Surf Tragic, on Flickr The first router pass.  3 3 by Surf Tragic, on Flickr Use a scratch guage to make a line to cut the width of the quad needed.  4 4 by Surf Tragic, on Flickr At this stage the drive belt on the Bandsaw breaks doesn't it ??!! , so after ordering a new one, it arrives after 2 weeks.  5 5 by Surf Tragic, on Flickr Cutting is easy & accurate , doesn't chip the face like a Jigsaw. so theres a minimum of filing & sanding to finish it off. |
|
|
|
Post by Roehm3108 on Jul 9, 2024 8:03:06 GMT 10
What a clever little builder you are! Always helps to have the right tools, to say nothing about the skills!
|
|
|
|
Post by Surf Tragic on Jul 12, 2024 14:38:29 GMT 10
 7 7 by Surf Tragic, on Flickr A few of the moulds that've been shaped  7B 7B by Surf Tragic, on Flickr Lots of the original to have paint removed & lots more to make from Hoop Pine. Time consuming but satisfying !  9 9 by Surf Tragic, on Flickr  8 8 by Surf Tragic, on Flickr They fit good so worth the effort. The quad on the curve below the one made of ply are giving me some grief, will have to try soaking them in boiling water, it's amazing how such a fairly small curve can snap the timber, It will be good to have them all fitted soon. Cheers, Surf Tragic |
|


 they promised many times to come but never ever turned up, so hard to get Tradies.