|
|
Post by Surf Tragic on Aug 9, 2017 22:21:17 GMT 10
A few photos of the very final finish items for the 120, thought I would post them here as it's all Don stuff, & all the other photos are gone for now. 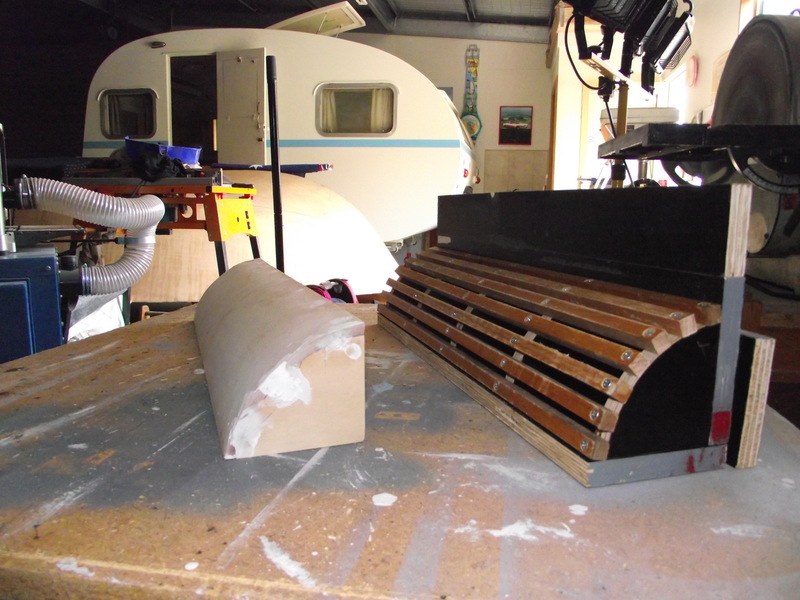 This is the mould made for the curved lid over the water tank at the sink. It is made of 8 layers of 1mm ply glued & clamped. 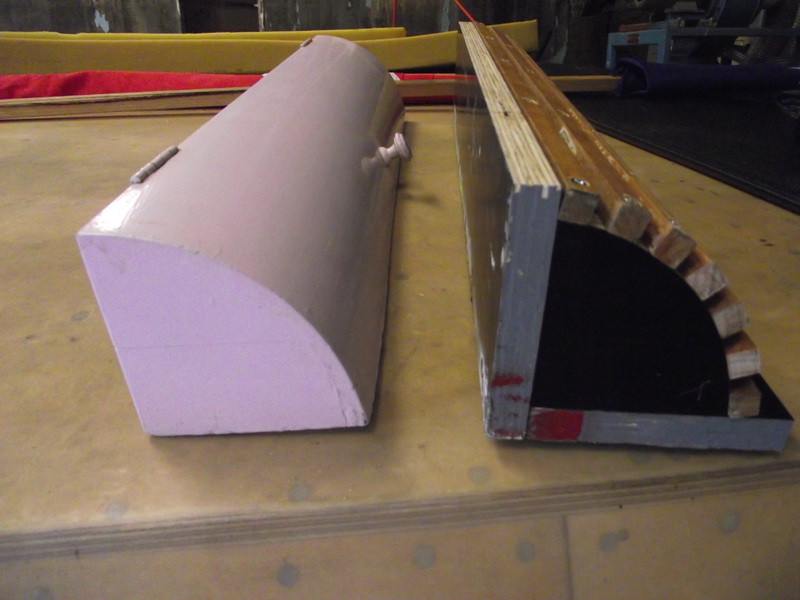  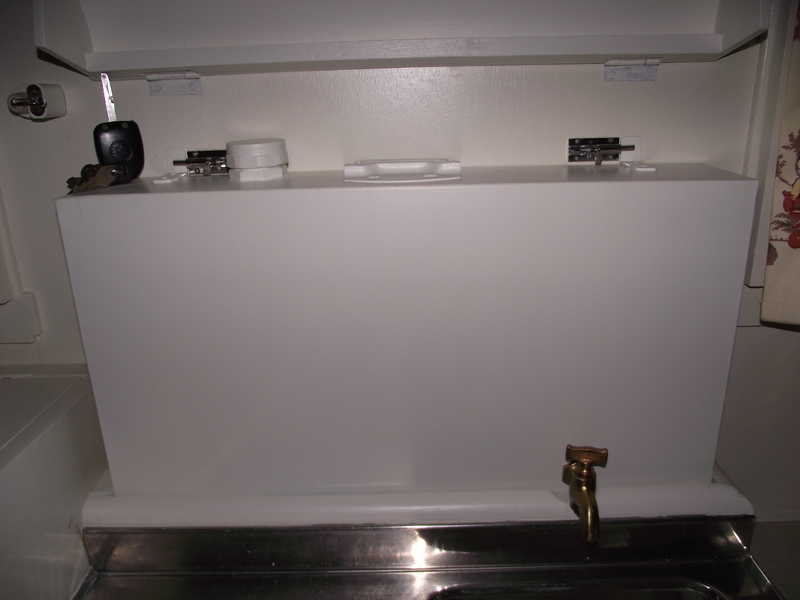 Plumber made a new tank, soldered to original specs, he did a beautiful job. 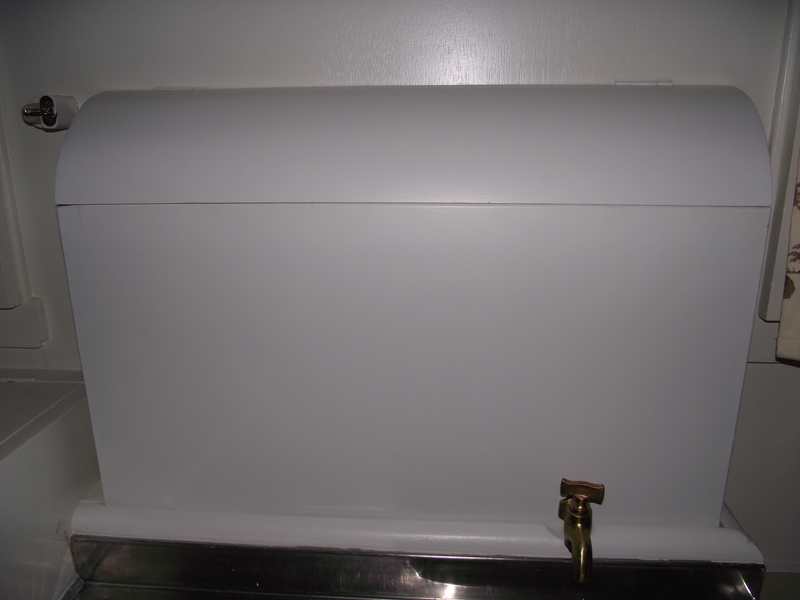 New lid fitted  Local Woodcrafters made 5 of these knobs to original specs, and that's the final piece for the 120. Surf Tragic. |
|
|
|
Post by Surf Tragic on Nov 25, 2017 20:46:03 GMT 10
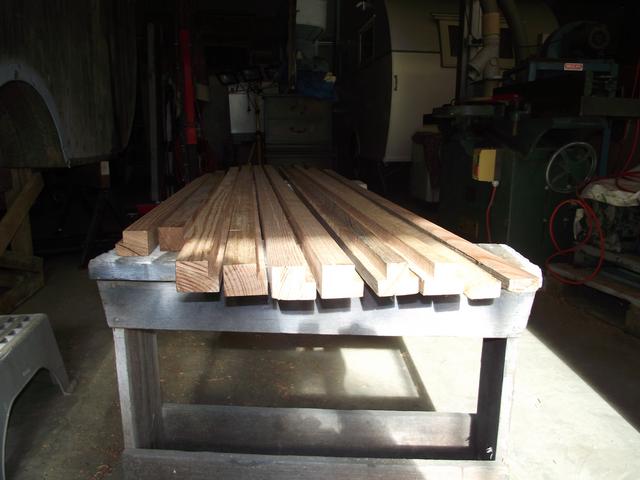 This is all bearer timbers cut from my stock of dried hardwood that has been saved over the years 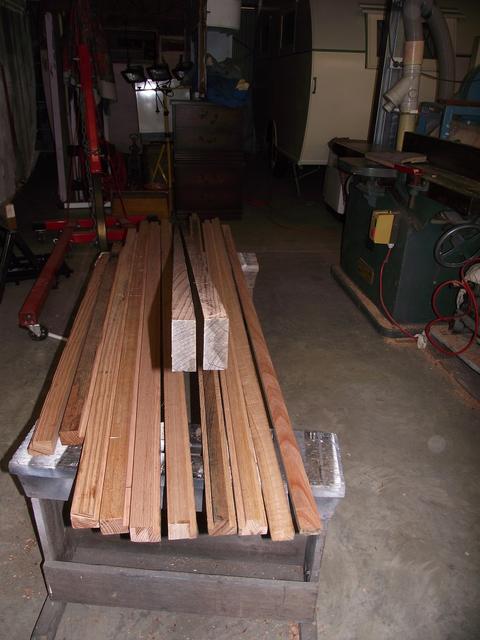 Every bearer has some rot in the ends so it is all coming out. 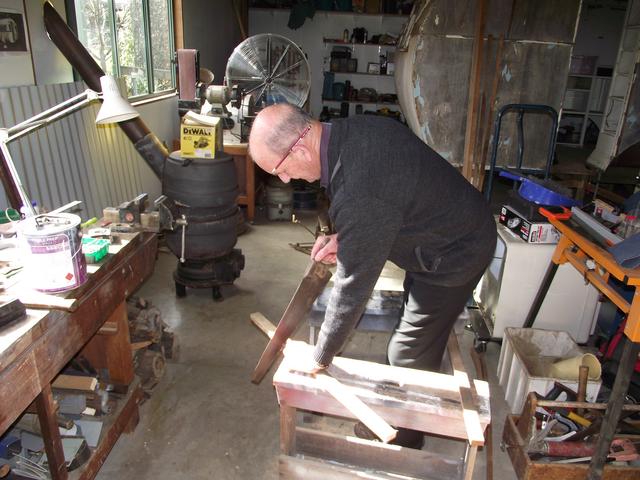 Wal Robinson presented me with the saw I am using here, it belonged to Ernie J Scott who was the Foreman at the Don factory, and was most probably used in the construction of this same van. This is real proof of its new life with me cutting repair pieces of studs for the walls. The saw is as Wal gave it to me, is quite sharp, and cuts true, I thought it fitting to use it on this van which was built in 1948. 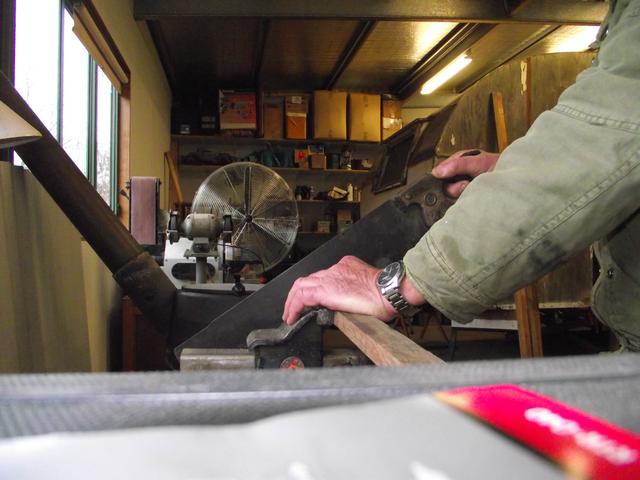 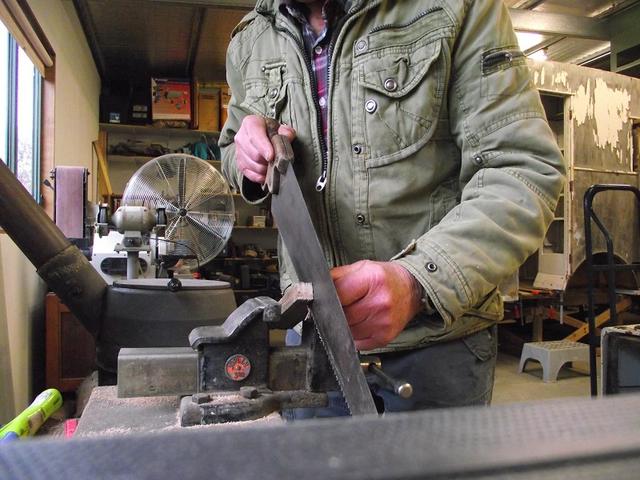 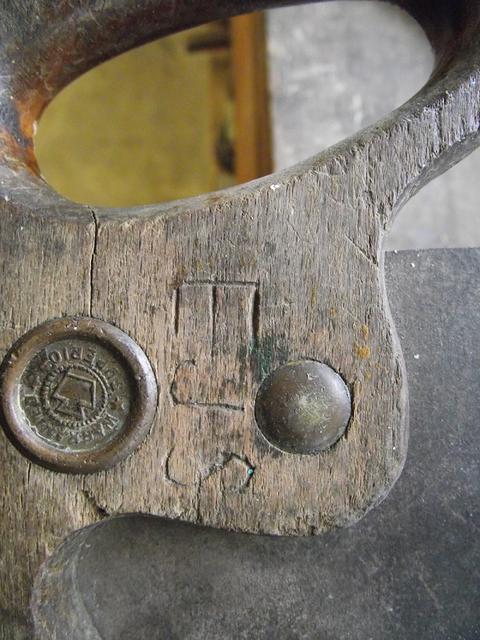 This gift is highly valued by me & can imagine it will be framed & hung with all the other memorabilia. Thanks again Wal. 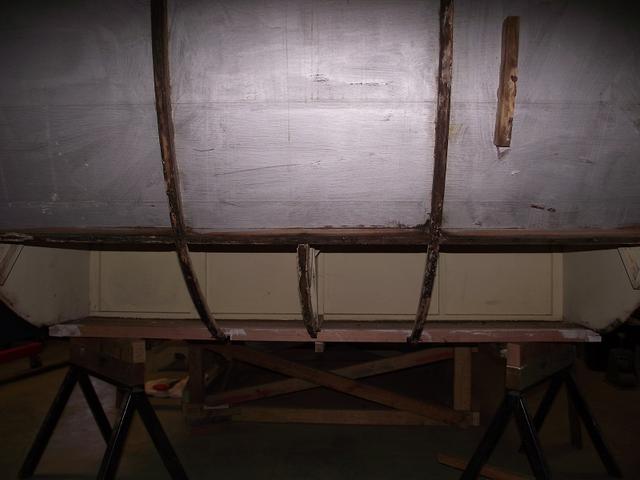 At the back showing the bearers at the bottom edge fitted 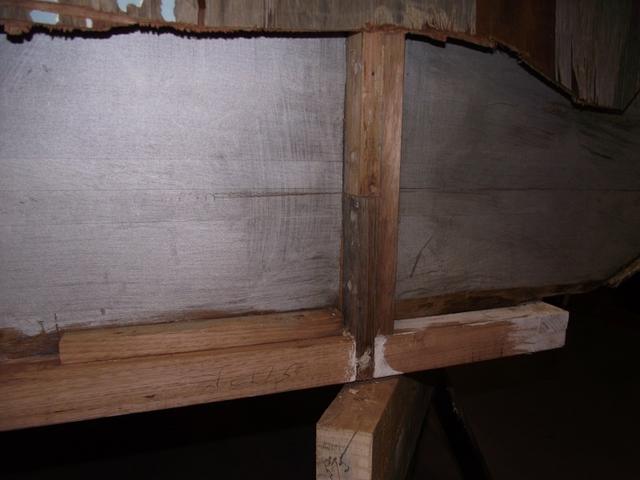 Along the side bearer, with the lower end of the 1st stud renewed 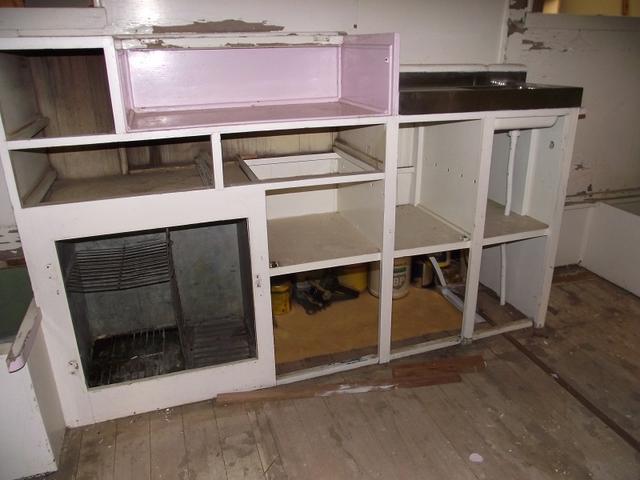 Everything that unscrews inside has been dismantled, wheel arches taken out. 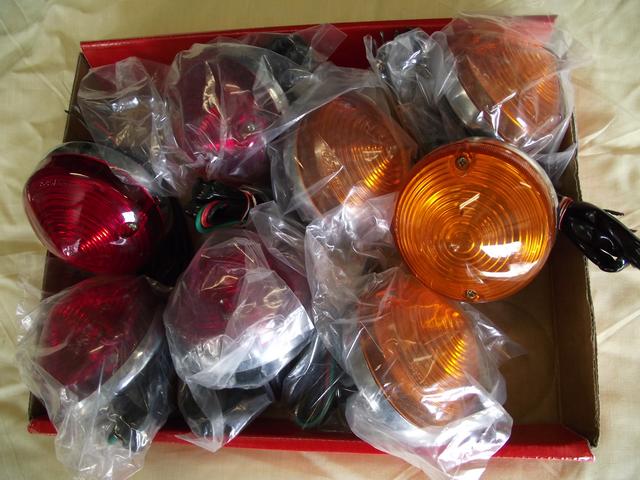 Am very pleased to get these lights, Wal Robinson has again helped out & sourced these appropriate era items for me, thanks a lot Wal. If anyone else would like some, just PM me & I will give you Wals' contact details. Surf Tragic |
|
|
|
Post by 2sneezles on Nov 26, 2017 19:29:27 GMT 10
hi we would love some of the lights thanks
also how did you lift the body of the don off the trailer ? was it difficult?
|
|
|
|
Post by Surf Tragic on Nov 26, 2017 20:34:19 GMT 10
Hi 2sneezles The body is relatively easy to separate from the chassis, there's about 12 bolts to take out & that's all there is to it. I set up 4 purpose made steel stools, one to support each corner of the body, take the wheels & axle off, lower the chassis to the floor & slip it out! There is a lot more support the Don needs when taking ply off, and so I repair about 1/4 of the van as I go, otherwise it would end up a pile of matchwood on the floor  Check your messages as I will send Wal Robinsons contact details for the tail-lights. Surf Tragic |
|
|
|
Post by Don Ricardo on Nov 26, 2017 22:53:31 GMT 10
Hi Surf Tragic, Wonderful to see the progress being made on your parents' Don. As always, I really admire your work and the meticulous care you take with your restorations - and this one is a labour of love for you. What a thrill to be using Ernie Scott's saw too! Such a special gift for you. It's amazing what Wal Robinson pulls out of his treasure chest.  I'm looking forward to seeing more photos as the work proceeds. Don Ricardo |
|
|
|
Post by Surf Tragic on Nov 27, 2017 22:15:53 GMT 10
But wait, there's more !! 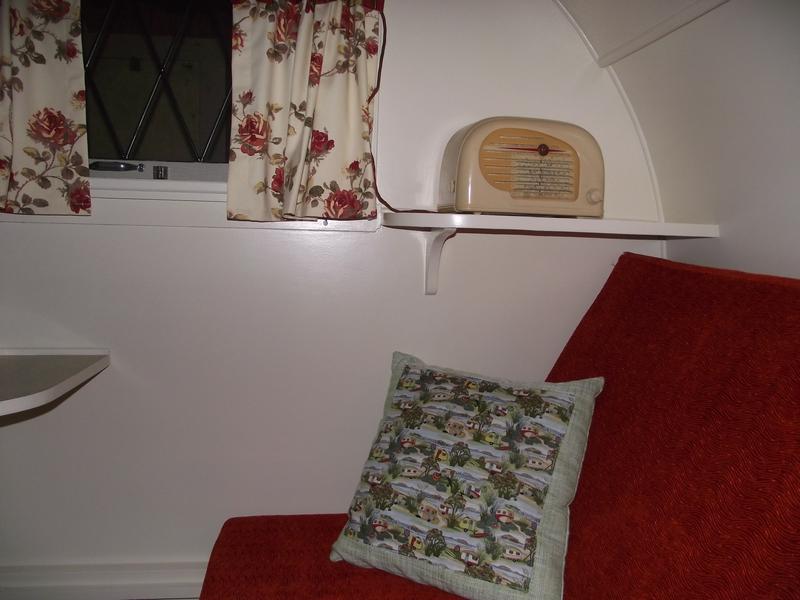 We had a great visit with Don & Dona Ricardo recently and they presented us with this special cushion which features many Vintage Caravans. This is the first piece of furnishing we now have that is so suitable for any Vintage Van and looks quite in place in the Don 120, but will be keeping it for the Family 140.  Thanks Don & Dona, what a nice gesture, it was a great day we had. Surf Tragic |
|
|
|
Post by Surf Tragic on Mar 12, 2018 20:54:28 GMT 10
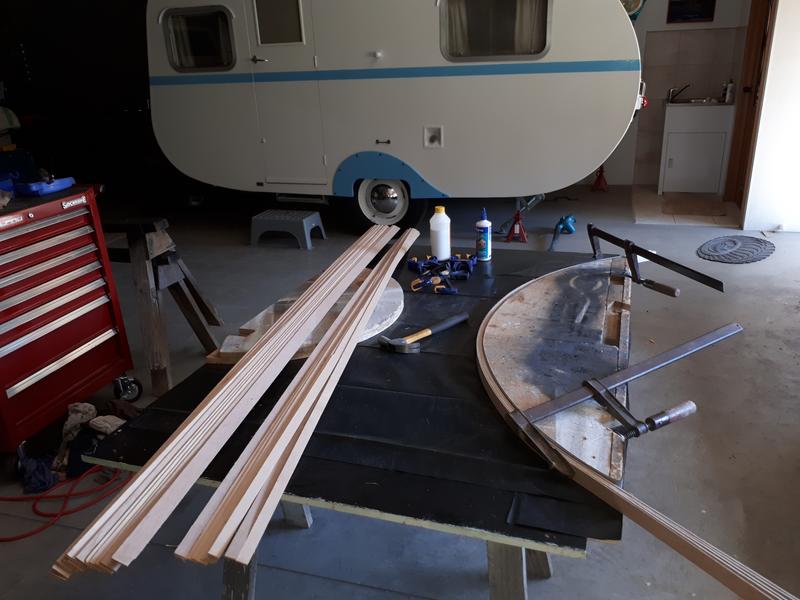 After re-organizing the shed somewhat in anticipation of some visitors during the 2018 Nationals, I have got back to the old van & made some curved ribs to replace the rotted ones at the back. I did spend some days trying some steam bending, but finally fabricated them the easy way, laminating, using strips of ply. 6 bigger ones & 2 short ones for backing blocks.  Some for around the wheel arches  Apart from that, there's been days spent extracting bent studs along the bowed out side, quite interesting work. |
|
|
|
Post by darrenblake72 on Mar 13, 2018 7:44:19 GMT 10
What an awesome story and goes to show you what a small world it is at times
I hope the build goes to plan and you get to do some traveling in the old family van
|
|
|
|
Post by Surf Tragic on Mar 13, 2018 22:30:29 GMT 10
Hi darrenblake 72 Hopefully we get the chance to use the old Don again, this one is VERY time consuming, but evry moment is enjoyable Surf Tragic |
|
|
|
Post by Surf Tragic on Mar 25, 2018 19:35:12 GMT 10
With the 2018 Nationals so close there had to be quite a bit of cleaning up in the shed to make it safer to walk around, that is largely done and am back working on the van again. 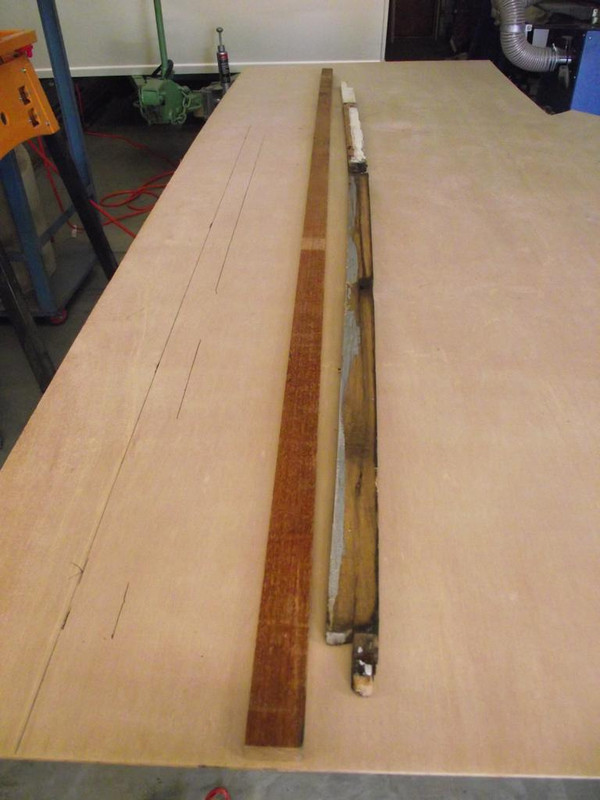 This is how much the side has bowed out, every stud will be replaced. I am using Tassie Oak, having been told it is the same/similar as Victorian Ash when we used to buy in packs & resell, We harvrested Vic Ash ourselves for the Timber Mill at Mitta Mitta, stacked it for drying and processing into Kiln Dried, beautiful timber. The Tassie Oak was bought in, it has been straightened and still have a small pack of 135x19 in long lengths to 5.4m in stock, it is a delight to use. One has to be extra careful of the splinters & recently had one cut out at emergency, 1 suture, that's probably the 3rd in my lifetime so not too bad..... I couldn't get this one out, !! 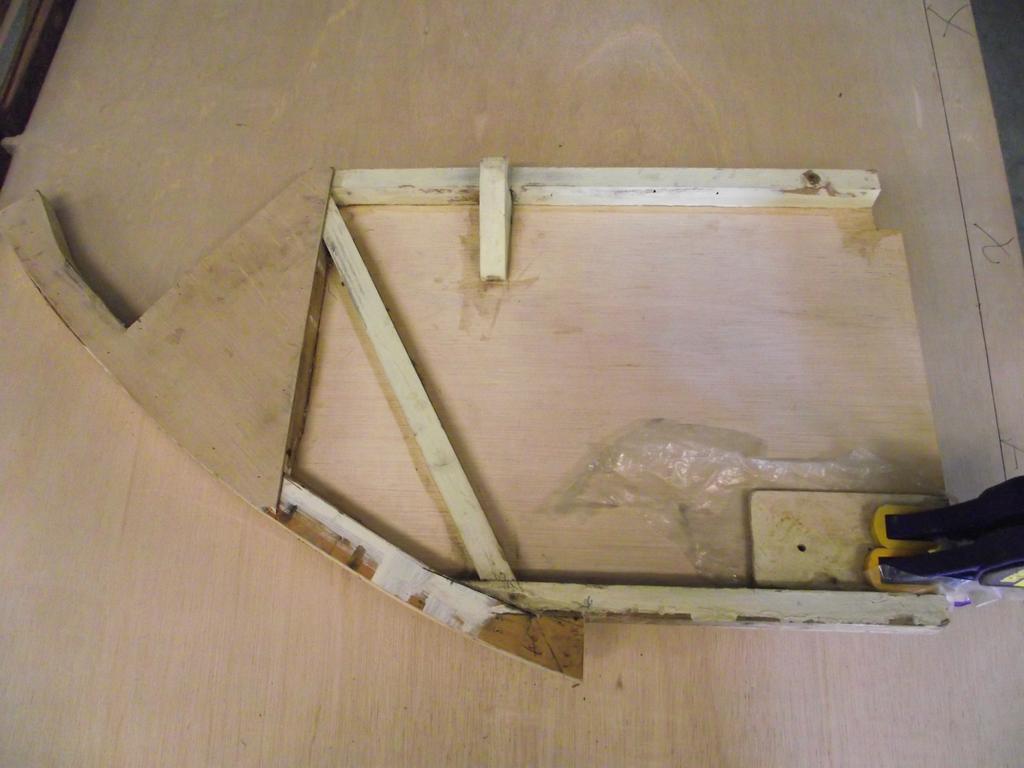 The divider under the back seat needed re-skinning with ply, the frame was dismantled & re-used. 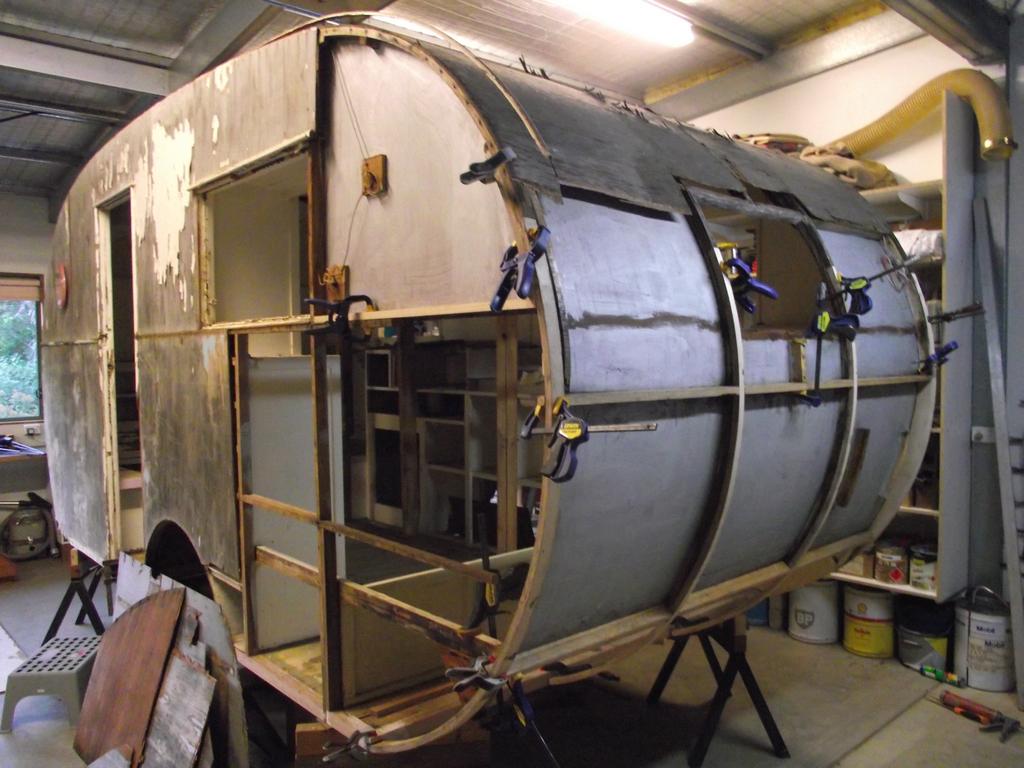 Test fitting the pre-made laminated ribs 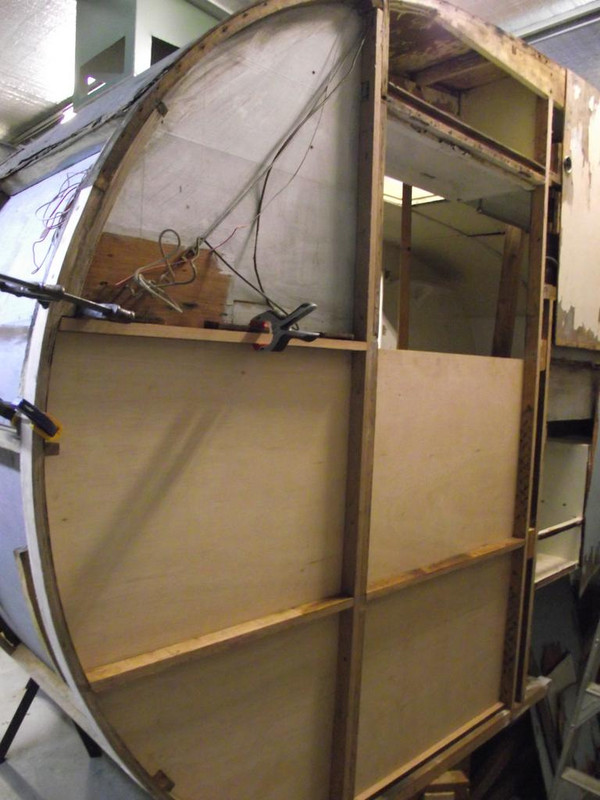 These may be the only two interior ply panels that need renewing, they have rot and are badly buckled around the lower edges, the rot intrudes right into the interior. 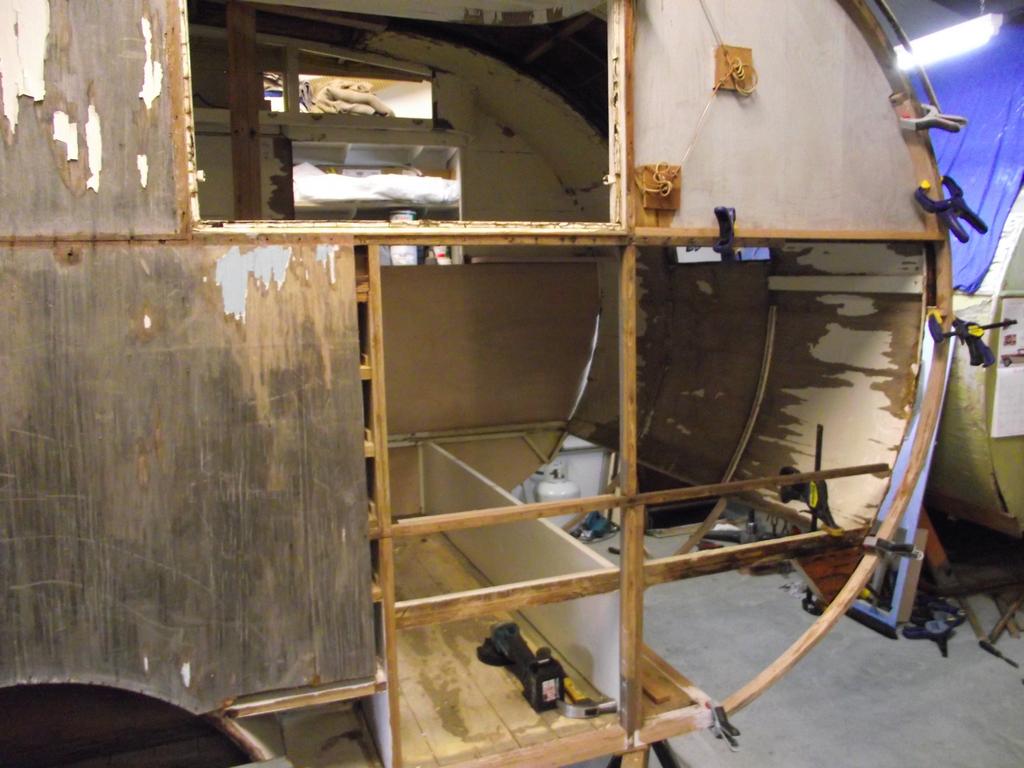 This shows the timber support for the bunk Dad made for me, the van ozzes history/sentiment, memories aplenty, and makes it special to be renovating, thinking constantly of how my father fastened that piece on, & other bits, and here I am undoing the screws he used, I am keeping the pieces whether I re-use them or not. Of course I'm not sentimental!   I've never seen a Don with this much frame exposed. The back sheet had to come off too, it fell into two pieces, I was hoping to re-use it, but it was very brittle with unseen rot behind some strips where the sofa slides up & down. 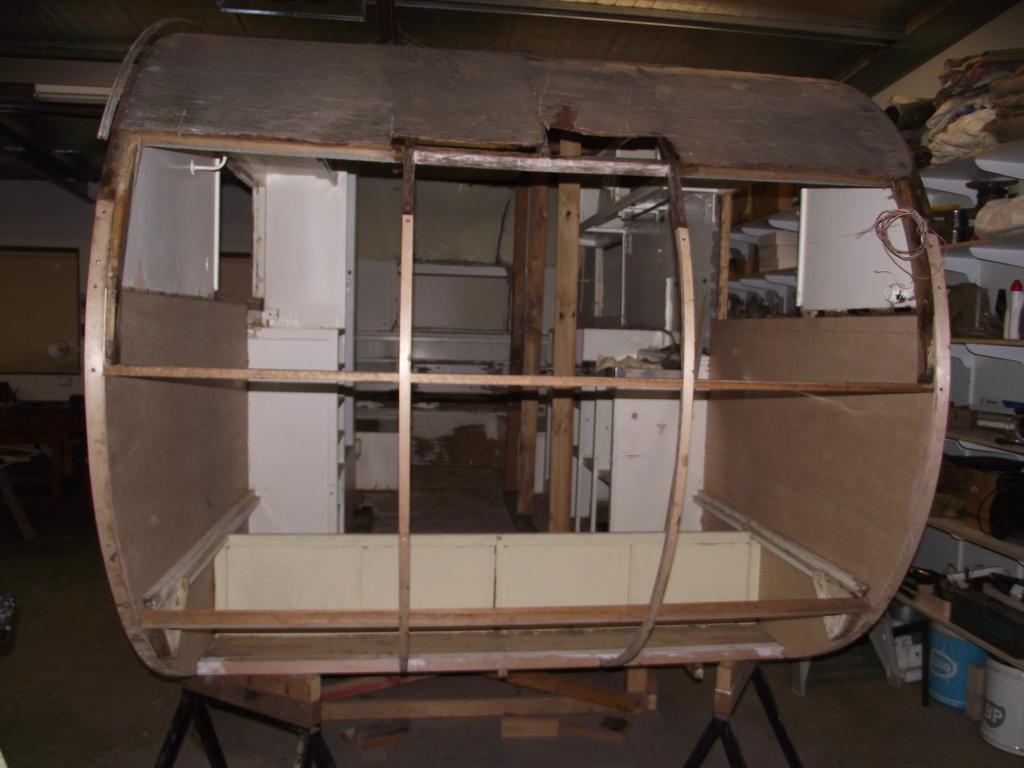 The back stripped out, didn't know it would have to be this extensive. 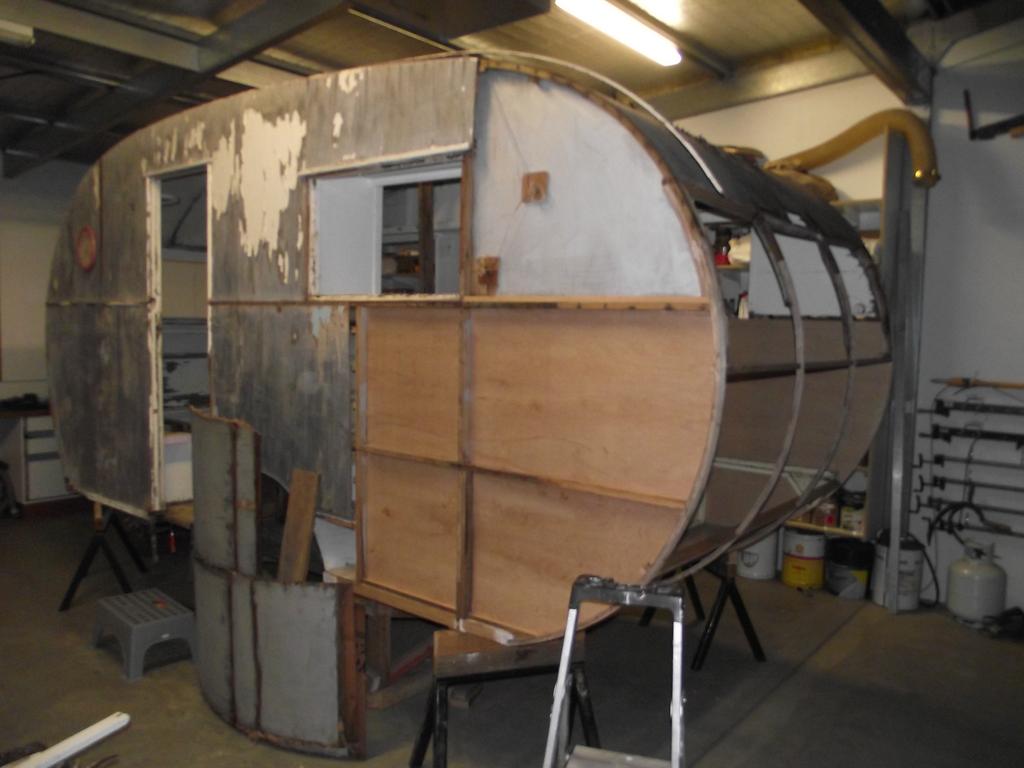 you can feel the structure strengthening daily. The support stools at each corner & more underneath have been levelled with a Laser before starting ply removal. 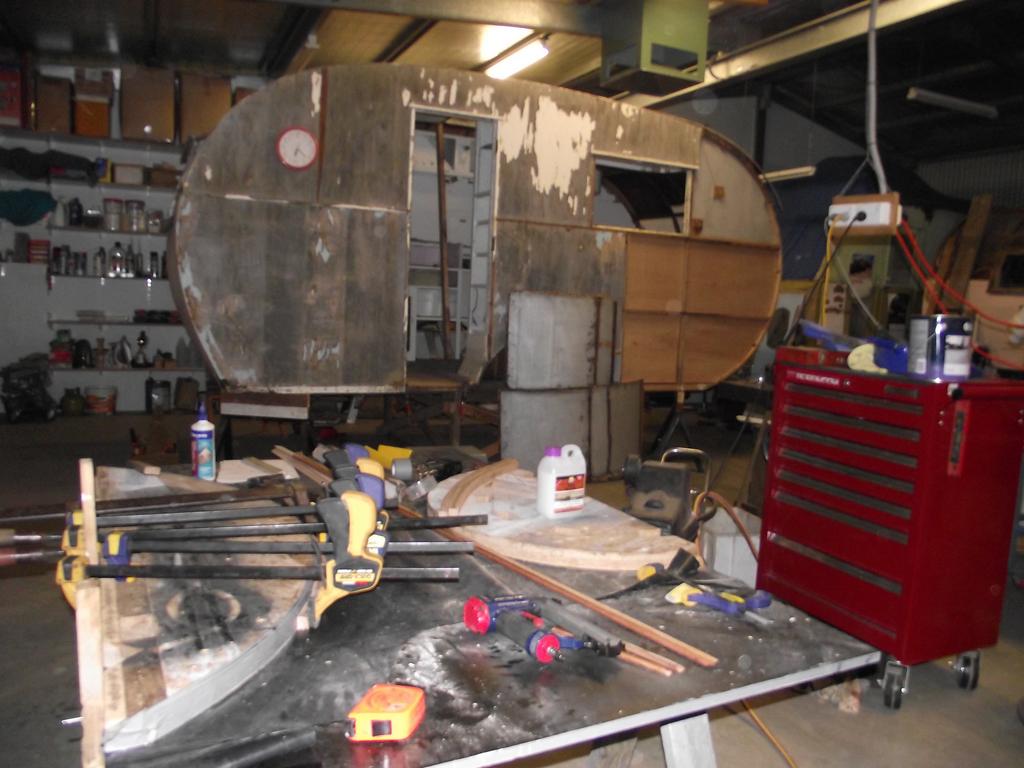 A lot more curved pieces have had to be made, the jig is getting plenty of use. I use a brad gun to hold the strips to the pyneboard jig then plenty of clamps, the brads do no harm & the finished rib is easy to pry off the jig, then cut the protruding brads off with small angle grinder. With boat building using ply that is to be polished, "plastic" brads are used, they sand off and are unseen when lacquered over, no rust! I used a sheet of Formply covered with a sheet of plastic over, screwed the forms/jigs on, duct tape around the curve, easy dismantling. Surf Tragic. |
|
|
|
Post by Roehm3108 on Mar 25, 2018 20:39:42 GMT 10
|
|
|
|
Post by Surf Tragic on Aug 21, 2018 20:17:34 GMT 10
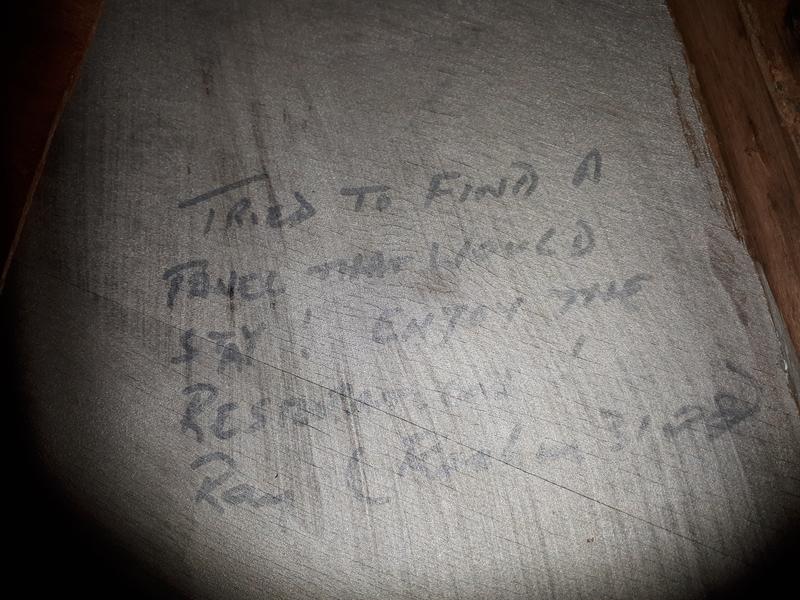 After the Shed visit from members of the forum during the 2018 Nationals, I started on the van again & found this hidden around the side in a wall cavity, sadly, the sheet had to be removed Ray, it had rot around the edges !. it says TRIED TO FIND A PANEL THAT WOULD STAY! ENJOY THE RESTORATION! RAY (Roehm 3108) It made me chuckle.  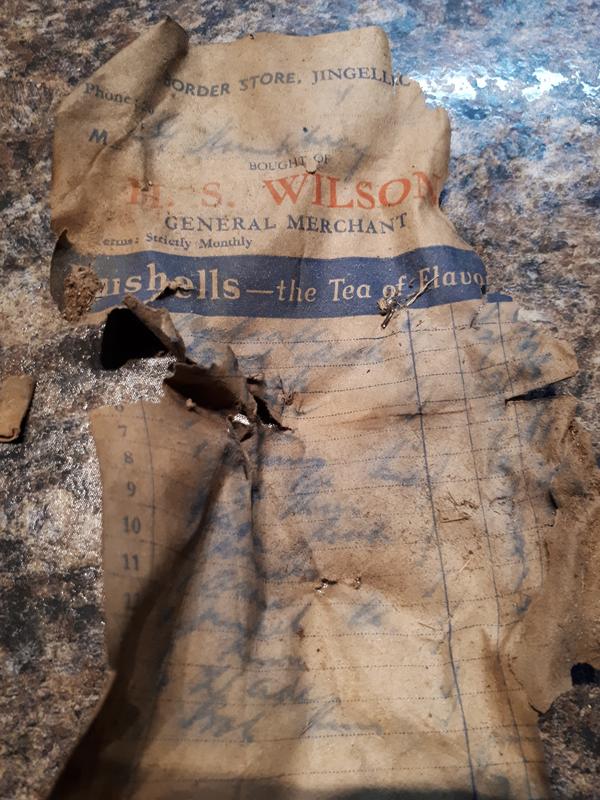 Found this in a cavity when dismantling, a receipt from the Border Store at Jingellic, part of the history that I wrote, we were there 12 months living in the van while Dad built a house for his bro-in-law, fires burnt all we owned that was stored in a shed on the property, it must have been about 1951, pity the date on the grocery docket is missing. Dads name is there though. The van & car survived. Also in another wall cavity were 5 threepenny bits, valued at about $200, so got the purchace price of this van back !!! 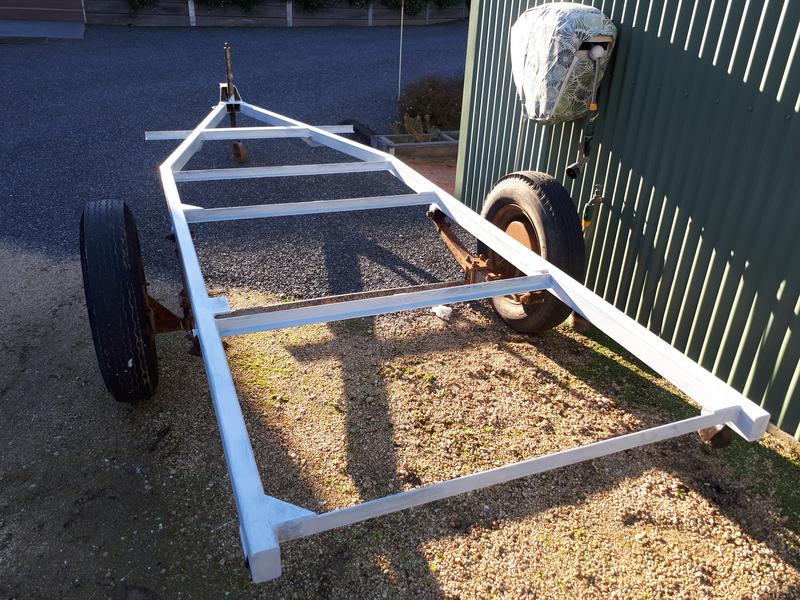 Refurbished/new? Chassis ready for finishing coat of paint. Surf Tragic |
|
|
|
Post by Franklin1 on Aug 23, 2018 8:58:55 GMT 10
G'day surftragic,
Gosh, this thread continues to be such a great story! You keep finding more evidence to prove the history of the van, and you find a windfall along the way!
This project definitely needs to be finished, so no mucking about...get stuck into it!!
cheers, Al.
|
|
|
|
Post by Don Ricardo on Aug 25, 2018 14:13:34 GMT 10
Hi Surf Tragic, Glad to see the work on No 343 is continuing. And what a treasure trove you've found on the way! The docket from Jingellic with your father's name on it is fantastic. I love the idea that the threepenny bits would cover the cost of buying the van. Maybe your Dad and Mum left them for that purpose? Better hiding place than the Christmas pud! Don Ricardo |
|
|
|
Post by Surf Tragic on Aug 25, 2018 23:52:04 GMT 10
G'day Franklin1 Now if someone like you orders me to get stuck into this project, I just take notice, extract select overdrive in whats left of the grey matter  and things start to happen.  The frame is very mis-shapen and there's a lot of "humouring" being done to get it to look right when it's doing 90 KPH down the highway . I'm doing the last side wheel arch and won't post any photos as it doesn't.... and won't.... look any different for some time yet. Some days it's one step foreword & two steps backward. When it comes to re-skinning the outside I will be looking up your posts re the joins. Thanks Al. Don Ricardo, I was pleased to find the grocery docket and would like to get it restored, it's like an old parchment & fairly fragile, someone might be able to steer me in the right direction? My sister in the US said she got goose bumps when she saw a photo of the docket, she & my other sister went to school at Jingellic for the 12 months we were there. Surf Tragic |
|
|
|
Post by Surf Tragic on Dec 17, 2020 13:56:52 GMT 10
Having been busy the last year or so, there hasn't been much done on the old 140, but have got a bit of a go-on recently. I want to use this van sometime and so I will have to push myself a lot more. It is hard to fit ply on the inside of a curve, so I tried pre-bending it like this, poured boiling water on them a few times & let it soak with towels. It was still difficult to hold in place without using blocks & screws until the glue dried  1 1 by Surf Tragic, on Flickr  2 2 by Surf Tragic, on Flickr  3 3 by Surf Tragic, on Flickr Sagging Roof & Cupboards  4 4 by Surf Tragic, on Flickr The force of the ply made it pop off the nails, so had to use lots of blocks & screws until the glue set.  5 5 by Surf Tragic, on Flickr The window can be cut after, it causes too much distortion in the sheet to pre-cut it. |
|
|
|
Post by Surf Tragic on Dec 20, 2020 15:38:12 GMT 10
 6 6 by Surf Tragic, on Flickr Now for the part I've procrastinated about continually, what I do here will be revealed as I go along !! selected Tassie Ash for cross beams, usually I'm dressing timber to straighten it, but here I especially dressed it with a camber up of about 10-15mm to try and counter the sagging curved ribs  7 7 by Surf Tragic, on Flickr Looks pretty rugged doesn't it ? now to replace all these & see if it all straightens up.  9 9 by Surf Tragic, on Flickr To get the old cross beam out, it had to be cut in two pieces, so to get the new ones back in, they had to be cut in two also, I found it best to cut about 200mm off one end & thred the longest piece past the curved pieces, there was quite a bit of strain on some to force it into the notches. Then the 2nd piece is inserted, predrilled to screw both together to make a mini laminated beam. I forced the 2 beams apart with chisels, squirted plenty of glue between them, & screwed them together while they were propped from the floor to camber upward. After removing props, most times the sag disappeared & all timbers straightened & came into line very nicely. Mind you, there was lots of fitting, sawing, chiseling, fastening.  10 10 by Surf Tragic, on Flickr  11 11 by Surf Tragic, on Flickr  12 12 by Surf Tragic, on Flickr  13 13 by Surf Tragic, on Flickr several places I had to fit 3 cross beams together all screwed & glued while propped up, left a day until glue dried, when the props came out, the beams were perfectly straight. All this didn't happen in a hurry |
|
|
|
Post by Don Ricardo on Dec 22, 2020 11:59:18 GMT 10
Hi Surf Tragic, I'm so pleased to see that you've started work on No 343 again. Each little step is a step closer to the finished project, but from your comments, some of the steps are quite complicated and complex to achieve. It's excellent that you've got the know how, creativity and skills to be able to achieve the result required. I was really interested to see the technique you've used to straighten up the cross beams in the roof - a bit along the lines of the procedure we used to strengthen the floor in our 140, but your solution is much more elegant! I was also really interested to see the size of the original beams in the roof of the van. They really are quite substantial and more heavy duty than I had anticipated, although thinking about it...I've climbed all over the roof of our van when painting the roof and there's never been any sign of movement. Just as well, or else I might have been up for a task like the one you're tackling at the moment. (PS I don't climb over the roof now - I work from each side or through the hatch! Just thought I should clarify... ) I will look forward to further instalments of the story. Don Ricardo |
|
|
|
Post by Surf Tragic on Jan 8, 2021 21:44:01 GMT 10
 14 14 by Surf Tragic, on Flickr A birds eye view, this feels very solid now. lots of humps to plane off the ribs that run from front to back, also, hollows filled with thin strips of timber glued & nailed, then trimmed with hand plane. I like using the hand plane as there's more control, much like "fairing" a boat, not only are straightedges used across from side to side, but the eye is used finally to see if it's 'fair', or looking good. A straightedge was used underneath so the ceiling will be all in line too Quite a few pieces had to be replaced, band-sawn to shape & fastened under the ribs, which are still very solid. 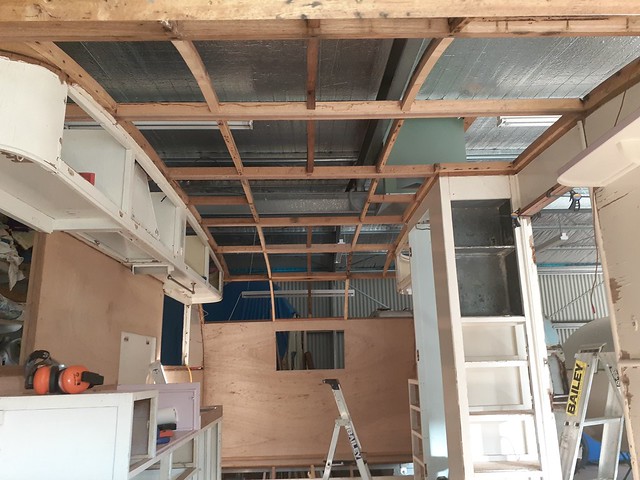 15 15 by Surf Tragic, on Flickr That is all the framing restored and straight, it even lines up with the shed purlins now !! The van is almost ready for ply sheeting to be fitted  16 16 by Surf Tragic, on Flickr These bolts have steel straps welded on top, they are for fastening the stabilizer legs to the bearers.  17 17 by Surf Tragic, on Flickr The straps prevent the bolts from turning inside the wall where they can't be accessed.  18 18 by Surf Tragic, on Flickr The brass blocks are worn badly where the threaded rod wind them up & down.  19 19 by Surf Tragic, on Flickr A local engineer turned these up for me. He is always interested in what I am doing with the vans & wants me to take it around when it's finished. The blocks ended up so exact, every bit of rust had to be filed off the threads to make them work smoothly, & of course will be better still when they are greased.  20 20 by Surf Tragic, on Flickr Straightened, cleaned, new bolts & washers, ready to paint, the new brass blocks were fitted much later as I had to wait months for them.  21 21 by Surf Tragic, on Flickr Painted & fitted, tested. |
|
|
|
Post by Surf Tragic on Jan 24, 2021 21:09:50 GMT 10
 22 22 by Surf Tragic, on Flickr There's a few things to be done to these steel wheel wells, a bit of panel beating first, all the paint needs to come off.  23 23 by Surf Tragic, on Flickr Three fairly large holes are in each guard where Dad bolted some self-styled spats, had to be soldered up, so seeing they are Gal coated, I was able to use spirits of salts (Hydrochloric Acid) brushed on & that cleaned it up enough to solder the holes, then filed it, added a smear of body filler, it sanded up well.  24 24 by Surf Tragic, on Flickr A few coats of paint later. See the other distraction nearby, I've been using stripper on that metal too & am very pleased with the result. I have to keep focused on the Van !!  25 25 by Surf Tragic, on Flickr  26 26 by Surf Tragic, on Flickr I've decided to completely strip all surfaces of paint, that's in the cupboards too. There's a light coat of enamel on top which comes off easily, but this original cream stuff takes 3 coats of stripper to get off, it' really stinks too, & the reason I'm going to so much trouble, is that I am trying to eliminate the special smell that comes with the Dons in particular.  27 27 by Surf Tragic, on Flickr  28 28 by Surf Tragic, on Flickr  29 29 by Surf Tragic, on Flickr I'm going to bore you to tears with these photos, but I have to prove I'm doing something that's almost soul destroying, not really, just needed to say that to get it off my chest it has to be the meanest type of work anyone could do though, and I couldn't manage too many hours each day, scraping paint from inside cupboards, under cupboards, outside cupboards. I do a lot of talk asking myself why I'm doing this, hope I get an answer later Ron.!! I had to scrape & clean the souls (soles) of my shoes after each session so it didn't get all over the shed. I don't want to even think about what's next......... the dreaded sanding ! Surf Tragic |
|
|
|
Post by sportsman 1 on Jan 25, 2021 6:28:41 GMT 10
Fantastic work ST. Most of us will understand where you are coming from.
Just keep in mind where you are going and all will turn out for the best - and I mean that because your vans are the best.
|
|
|
|
Post by Surf Tragic on Jan 25, 2021 13:57:53 GMT 10
Wow, thanks Sportsman 1 for your comments, and it does me good to post photos here, adds pressure to keep me going ! The "thumbs up" interest gives me a good boost too thanks all.
I need to rally my Electrician to do the 240V wiring next. AND ..... I plan to insulate as much as possible while there's an opportunity to do it.
|
|
|
|
Post by Roehm3108 on Jan 25, 2021 15:19:10 GMT 10
Hi ST
My mind is spinning at what you've done so far, but even more so at what you still have to do. I found that keeping up the pics on this site helped me focus with my build, because it was very easy to slacken off on such a large job.looking at what you've done, you can understand that builders hate renos, be it houses or caravan, and insist on hourly rates rater than a total job quote.
As DonR said somewhere on here, each day spent in that shed is one day closer to completion. Silly question perhaps, but you don't reckon that a good primer/sealer/undercoat would get rid of that smell you're talking about? Anything to not have to do that much sanding!!!
Keep up the good work.
Ray
|
|
|
|
Post by Surf Tragic on Jan 25, 2021 20:27:55 GMT 10
G'day Ray
I daren't think too much on what's to be done yet, most of it is stuff I really enjoy, only the painting & prep work for that makes me slow down a lot.
Don Ricardo said "I'm so pleased to see that you've started work on No 343 again. Each little step is a step closer to the finished project", so true, you only have to do each job once !
You're right about the paint killing any odours, that's why I'm using Oil based paint from here on, I'll show you in the next postings.
|
|
|
|
Post by Surf Tragic on Feb 6, 2021 17:59:11 GMT 10
 30 30 by Surf Tragic, on Flickr These are added to show I really did scrape all the paint off !!  31 31 by Surf Tragic, on Flickr  33 33 by Surf Tragic, on Flickr The last van I didn't paint underneath, but decided it was the thing to do here, so using a Garage creeper & donning (no pun intended) a full face mask, it seemed that a drill with a disc was all I could manage to use as it was the lightest & most effective thing to use. 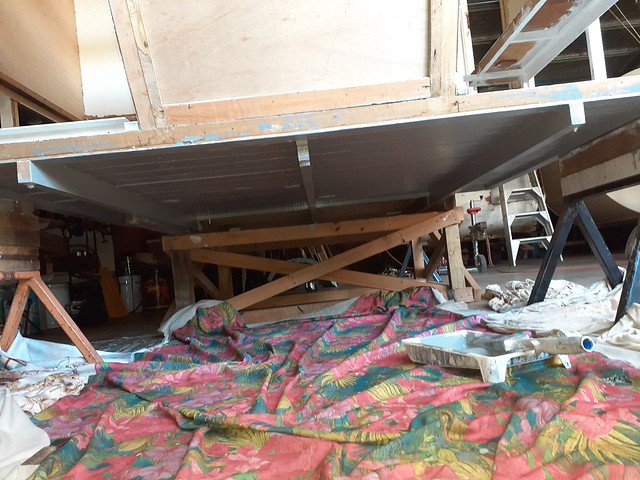 34 34 by Surf Tragic, on Flickr One coat of sealer undercoat & one grey finish enamel. A small roller & brush made it easy to do.  35 35 by Surf Tragic, on Flickr With all the grit sliding off the face mask like bulldust, I was thinking there would be some mud from Red Gulley Road Amamoor where we lived just out of Gympie, also sand from Noosa & Peregian where we camped, maybe grime from the highway between Qld & Vic, all covering myself as I worked. The good thing is nothing got past the mask into my lungs & eyes. The boards were coated with a bitumenous type of paint, it didn't come through the white sealer.  36 36 by Surf Tragic, on Flickr There was a fair bit of timber replacement in these wells too, I intend insulating in here before refitting the metal guards.  37 37 by Surf Tragic, on Flickr Finally after sanding, an undercoat sealer in oil based paint, have since sanded & prepared for a Satin Enamel. Every surface that doesn't have ply & Caneite fixed to it has been painted with the thought of deodorizing the whole van. There's places that have never seen paint before, it must be a shock for the old girl. next job is the Electrical, a bit of fun for a change. |
|


 and things start to happen.
  The frame is very mis-shapen and there's a lot of "humouring" being done
