|
|
Post by Roehm3108 on Jan 12, 2019 6:33:12 GMT 10
The colours have toned down a bit since the Rubik's Kube days, DonR. Hmmm, a roehming pulpit? Or should that be a roehming pushpit?   Reminds me of the Lutheran Pastor who, several times a year travelled on what was known as the "tea and sugar" train from Port Pirie to Kalgoorlie, and preach, baptise and marry people along the way!!! Not sure if people held off on dying so that he could bury them as well!!!   |
|
|
|
Post by Roehm3108 on Jan 14, 2019 21:15:02 GMT 10
Hi folks The barn door has been hung and lock fitted. Had a burst of enthusiasm and even fitted the porthole and ship's cabin light fitting (got that in Ireland in 2014 which nearly got me arrested at Dublin airport when the security people thought I had a hand grenade wrapped in newspaper inside my carry-on bag!) Here are a few pics of the work. SGTL, the porthole glass hasn't got a skippy, but it does open and I even worked out a way to fit bronze flyscreen. The brass fittings have all been coated with clear varnish. To keep the weight down, the outside ring is made of marine plywood. The brass section already weighs 2.5kg! Light fitting to centre roof rafter 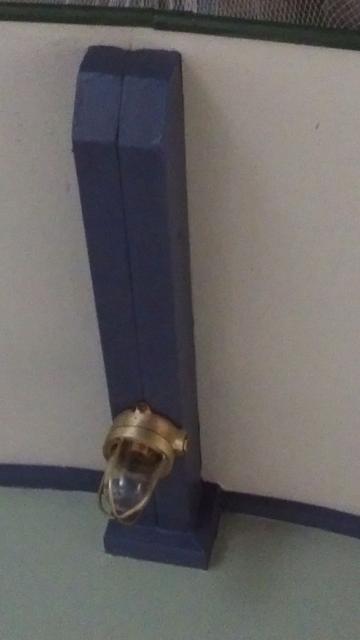 Door 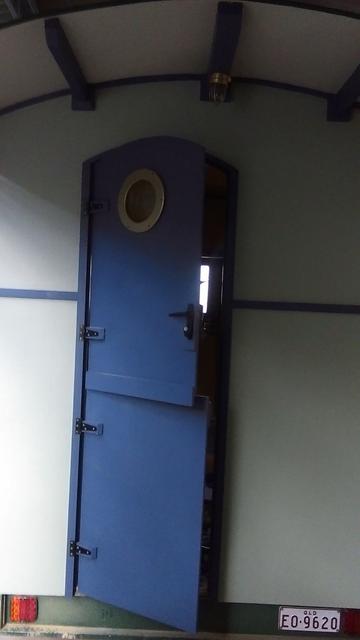   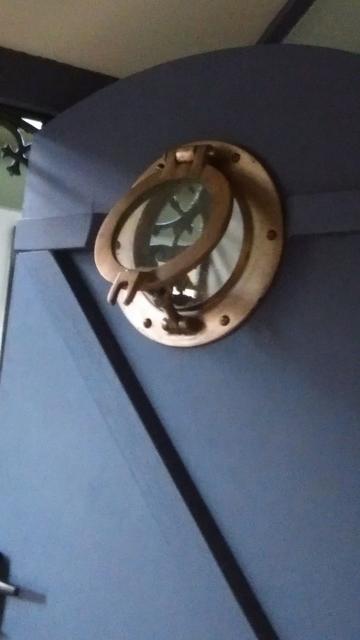 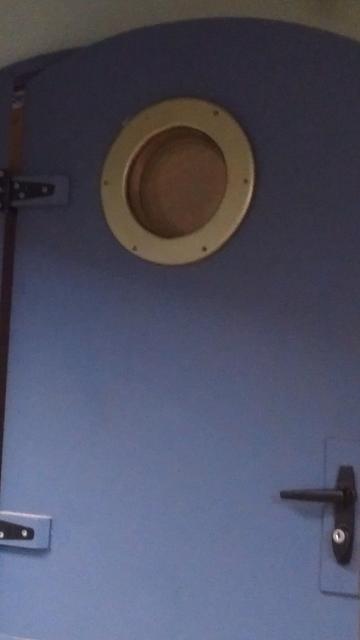 A couple of bloopers: 1. When I built the storage box for the bottom part of the barn door, I didn't allow enough for the swing, so had to cut a corner into in. 2. When I measured up the door location, I wanted it as far as possible to the left, yet still allow it to be against the wall panel. The measurement was right, but I forgot to factor in that the decorative corners had to be fitted inboard a bit, so that now the door actually hits the lacework. Will have to bring down a bumper from the roof bearer and add a rubber stopper. The door swing only misses the back was by about 6 inches. I will live with that! |
|
|
|
Post by DC3Td on Jan 14, 2019 22:03:26 GMT 10
Wow Ray....you`ve certainly done some amazing workmanship......or is that 'personship'? Either way a truly amazing project.
|
|
|
|
Post by Roehm3108 on Jan 23, 2019 6:20:07 GMT 10
Cino Vardo is now no longer nameless. Had to go to Brissy last Sunday, so went for a slight detour to Toowoomba to pick up the sign on the way home, a 600km round trip! 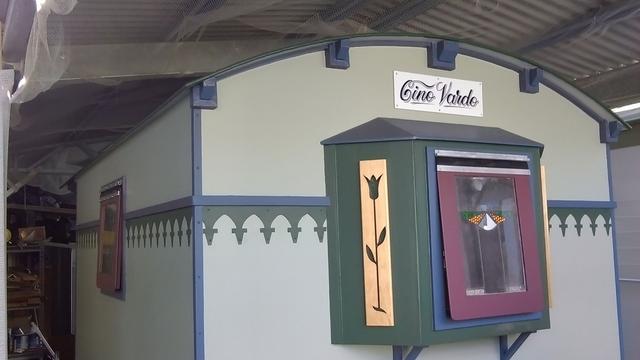 |
|
|
|
Post by Franklin1 on Jan 23, 2019 23:35:29 GMT 10
G'day Ray, love what you've done so far. I reckon a couple of steerable wheels on the front (Hutchison dolly??) and a couple of Clydesdale horses pulling you along, would be picture perfect in the end!  
Have you tested whether the front bay window interferes with opening the rear door of your tow car? The huge handbrake handle my brother made for my van stops me opening the rear door of my Prado all the way. Bit of a nuisance trying to load and unload stuff out of the back of the car when the van is hooked on.
cheers, Al.
|
|
|
|
Post by Roehm3108 on Jan 24, 2019 10:39:00 GMT 10
Gee Al, you know how to frighten a bloke. I had a door opening problem with my first Propert when it was open and never even considered it here. So I raced out to the careport of misadventure as soon as I read your comment, with tape measure!! All Good!!! There is still about 400mm of clearance from bay window, with rear door up!!! |
|
|
|
Post by Roehm3108 on Jan 24, 2019 17:05:45 GMT 10
This pic will probably have some purists howling even louder than since the great slothead screw debacle!!!!  Yep, fitted a bag awning on Cino Vardo today. It made her feel real good and she has promised to provide me all the shade I need!!!! Got it at Aldi's on special!! 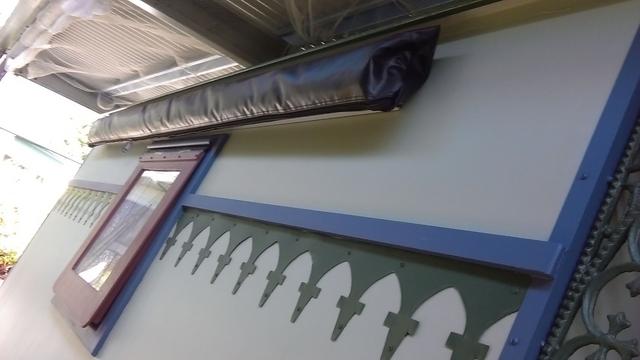 |
|
|
|
Post by sutcac on Jan 26, 2019 23:26:31 GMT 10
As they say Ray......each to their own.....hey?
|
|
|
|
Post by Roehm3108 on Jan 30, 2019 21:32:30 GMT 10
A bedtime story A few months ago there was this old bloke who wanted to build a gypsy caravan. Being old, one of the most important things for him was to get a good night's sleep after all that vocal exercise, and elbow lifting, and in general just keeping himself nice all day long when he went on caravan runs. So he starts looking for a bed! Not just any bed though. You see, he wanted to build a concertina bed base that would shrink to half its width when not in use. And of course, you really can't have a huge bed in a caravan that only has 2600mm cabin length! After all, there's heaps of other stuff to fit in. He's even toying with the idea of fitting an ensuite and loo!!! So the bed had to come in two pieces. Innerspring would be too heavy (and expensive, considering he's surviving on a single pension!!) So he trots downtown to Gympie and behold he spots:  Overjoyed he fronts into the shop and breathes in the elixir of all things (well almost) rubber, foam and glue aplenty. He starts chatting to a whippet of a guy who was about 80 in the shade, probably a jockey/strapper for Phar Lap at one time and explains his problem to him. Staff person said, "come into my testing room!" The testing room had an even stronger sniff of the glues and a table the size of two ping pong tables. There our bloke tried all sorts of combinations of foam bedding. Finally the old bloke tried this combo and promptly fell asleep! 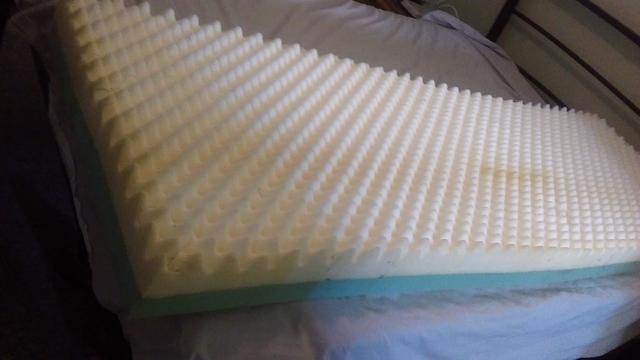 So the old bloke ordered the mattresses before the chassis of the van was even built, let alone any walls and roof erected. Within a week they were ready and he took them home and stored them under his bed, getting his fix of residual glues fumes for a couple of months!! But then he had another problem. The mattresses came without a cover for them!! So one day while he was basking on the lovely Sunshine Coast, this bloke went where few men dare to tread - Into Spotlight!!! But he did have some previous basic training about these types of stores. He had already ventured into Lincraft and when very young, the bra section of Cribbe and Foote in Ipswich!!! And if you can find what you want in Lincraft (or Cribbe and Foote), you qualify for any store that sell women's stuff of ANY sort!!! At Spotlight our bloke is looking for material to cover his mattresses and of course it's all the wrong widths for his purposes, without wasting a third of the overpriced material anyway. So, being a clever bloke he looks at the doona cover specials rummage box and finds a couple of double bed doona covers with different materials on either side. So this week our bloke is ripping apart brand new doona covers, probably sewn by a 10 year old child in Bangladesh somewhere gets out a borrowed sewing machine that he's never used before and after much cursing and swearing that nearly gets him banned from the village where he live, ends up with covers that look like this: 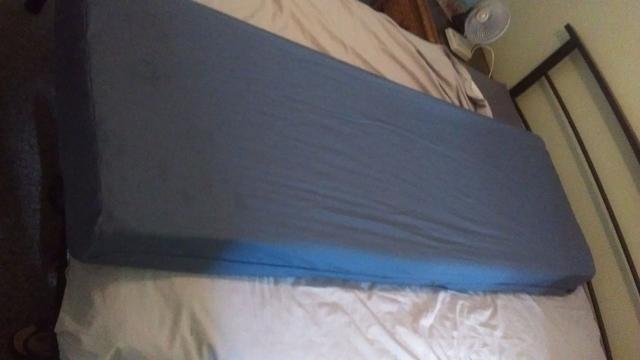 He even managed to transplant part of the button panel, so that he didn't have to make his own and can now strip the mattress if it ever needs to be washed. And the old bloke was very happy, cos now he can use the other side of the doona cover for his curtains!!!! |
|
|
|
Post by Roehm3108 on Jan 31, 2019 7:32:10 GMT 10
Hi All Some of you vintage vanners would remember Wal and Anna Robinson at the last Nationals at Wangaratta. They are not members of this site, but check things out as occasional lurkers, whenever they are in an internet cafe. They were recently on a boating holiday on the beautiful Hawkesbury River and snapped a couple of gypsy caravans camped nearby, in the upper reaches past Windsor. Being the good spotter that they are, they photographed them and sent me a couple of pics. Thought I'd share them here. Thank you Wal and Anna 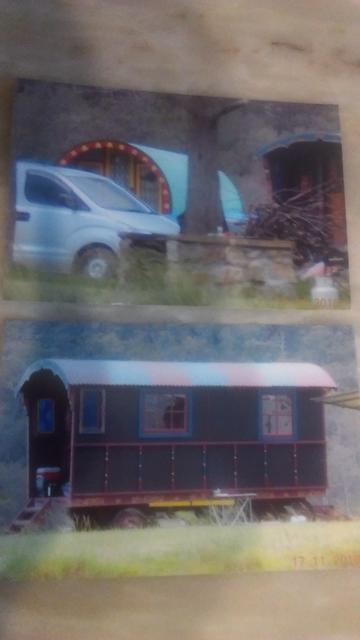 If anyone knows anything about these vans being there, that would be great. |
|
|
|
Post by Don Ricardo on Jan 31, 2019 18:39:51 GMT 10
So Roehm... Who's this old bloke of whom you scribe? I thought you were building Cino Vardo all by yourself, but it sounds like you must have someone helping you? Isn't that cheating? Don Ricardo |
|
|
|
Post by Roehm3108 on Feb 9, 2019 22:20:38 GMT 10
It didn't seem that long ago that I put up a pic of the first corner post for Cino Vardo. Now, the exterior is as good a finished apart from the veranda floor and lights, which will be last on the "todo list".This past week has been spent prepping and painting the interior. My blank canvas looks like this:  It looks a bit boring on the photo, but I had this colour especially matched to the curtain material at Bunnings. In "real life" the colour looks far more interesting. The velvet texture of the material gave the paint scanner a real challenge, but I am so pleased with the match that was achieved. AND THAT'S ALL THAT REALLY MATTERS, ISN'T IT??? The first item on the construction list will be a sliding bed. When opened it will be 1200mm wide. You will see a drawing of the style of bed I'm talking about in the first or second page of this thread. This pic is really only to set the historical point of the beginning of the interior construction work. To the underside of the bed frame, I will instal thee pull out dining table. the pull out will be a modern triple arm drawer sliders, capable of holding 150kg! I like the sliders because of their compact construction and that they can be locked in the open and closed position. And DonR, once you're over three score and ten, you gain the right to the "old bloke" handle. Don't confuse me with those members who use cheap old people labour as they restore their vans and try to claim the credit for themselves!!!!!!!!! I do use a builder consultant who is a tad over 80, but his health is such that I can only use him on a rare occasion when I need something held on the outside and screwed internally. I took the bed/dining concept to him and I think he's shaking his head a bit!!! |
|
|
|
Post by Roehm3108 on Feb 13, 2019 19:50:58 GMT 10
Hi all As you would have heard on the news, the past few days have seen some heatwave conditions in my part of the world. The "official" temps were nowhere near the "real" temps in some place, I assure you. To prove to Don Ricardo that I really am an old bloke, today, before heading out to the carport of misadventure, I decided to do the right thing and slip slop slap. I remember keeping one bottle of sunscreen after tossing out all those past their "use by" date, during my last move. Put on said sunscreen and when I looked at the bottle again, Sure enough, it was sunscreen, but for dogs! I had previously used it on my faithful dog Jack before he went to doggy heaven in 2014. Still seemed to work!! Despite the weather, I have been plodding on with working on Cino Vardo. As I said last time, I wanted to start on building the bed. Specifically, it had to slide to half its width when not in use and also have a pull-out dining table. Here are the pics of the result so far (still needs a bit of a tidy up) Bed in closed position 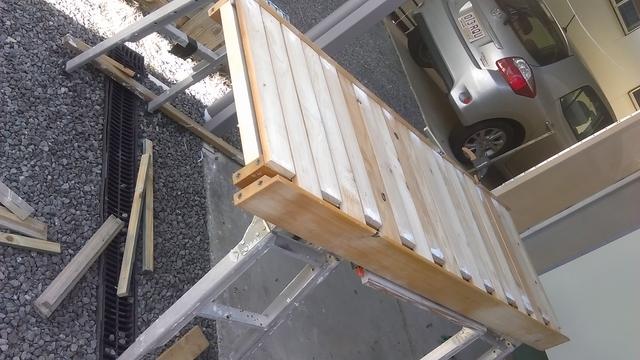 Bed in open position 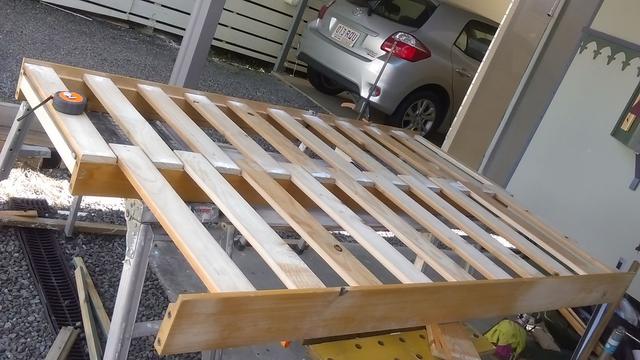 Bed in closed position but with sliding dining table out 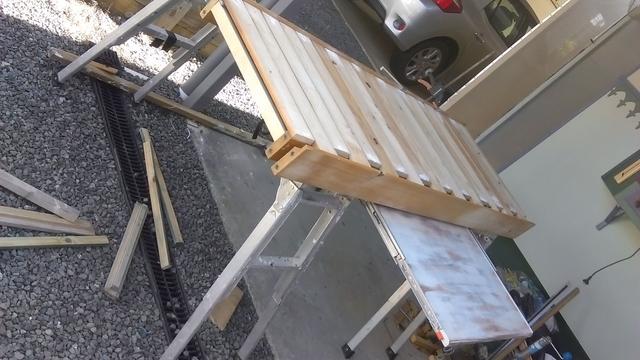 I probably won't be installing it till early next week, but it will be an interesting fit. The base is 1900mm long, while the width of the van between the studs is 1920mm!! The base was built from two single bed bases I found at a local OP shop for $10 each! The dining top is also from an OP shop purchase of a coffee table for $25, because I liked the distressed look which someone had given it. Conversely, the locking drawer runners (125kg capacity) were just over $80 and the right angle aluminium brackets a cool $50!!! But I'm happy with the result and it was worth it. |
|
|
|
Post by grandad on Feb 14, 2019 7:55:53 GMT 10
Hi all ................. but it will be an interesting fit. The base is 1900mm long, while the width of the van between the studs is 1920mm!! Good luck with that. Pics please. This is going to be interesting. Jim |
|
|
|
Post by sportsman 1 on Feb 14, 2019 21:28:10 GMT 10
Sounds easy to me, just put it in on a 45 degree angle and lower it down.
You should have around 10 mm gap at each end!!!!!!!!!!!!
Good Luck with that.
Leigh.
|
|
|
|
Post by Roehm3108 on Feb 15, 2019 19:04:25 GMT 10
With a restless night worrying about whether I would make the bed fit, as well as a forecast cooler day, I shuffled my "todo" list around and decided to instal the bed into Cino Vardo. Had a few problems with a saggy guide rail, which froze the last 20mm of the slide into the closed position, But here is the result by this afternoon Bed in closed position 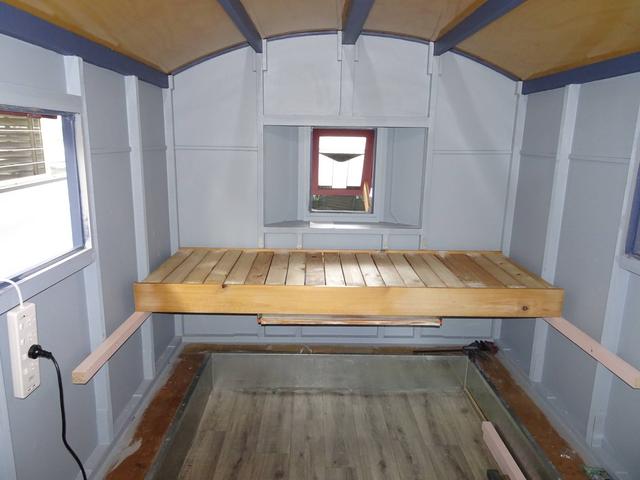 Bed in closed position with dining table out  Bed in open position with table closed 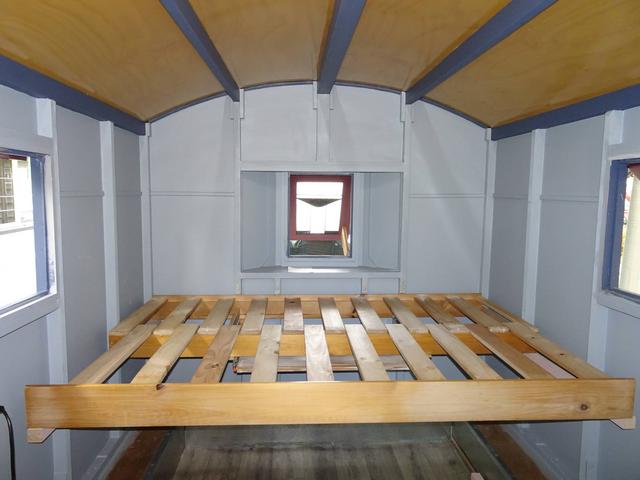 The bed is attached at the back with four strap hinges, which will enable me to lift the bed for any necessary jobs under the bed. So glad all's working OK |
|
|
|
Post by grandad on Feb 16, 2019 7:53:18 GMT 10
Well done mate. Looks great
Jim
|
|
|
|
Post by Gypsy 10 on Feb 16, 2019 21:29:21 GMT 10
All looking very good. Patiently waiting for the finish.
|
|
|
|
Post by Roehm3108 on Mar 15, 2019 21:39:02 GMT 10
Hi all As you would have heard, the weather here has been far from kind and now that I want to work inside Cino Vardo, I really wish that autumn would hurry along. It a bit hot trying to work inside CV for any length of time. Perhaps it's the heat, but the old brain has gotten itself a bit fuddled since my last post. Tried building an overhead cupboard because someone had given me a couple of small old doors, and after building cupboard found that the door frames were out of square and besides which looked pretty cacky anyway, so I demolished everything and tossed it all into the skip. New slate,for new ideas! When I lived in South Gippsland area, I scored a couple of meat safes. which I restored, bolted together and used as a pantry in the little miner's cottage I was renovating there. This is them:  I don't use them much apart from CD storage now, but they did give me an inspiration around some sort of theme for the interior of CV, a 30's to 50's Australiana furniture theme. At the moment, the plan is to utilise the meat safes and instal them in the van and then have similar doors for the rest of the fitout. So now I had to master that router again and manufacture a door frame for the first other door. A couple of pics of my routering efforts!  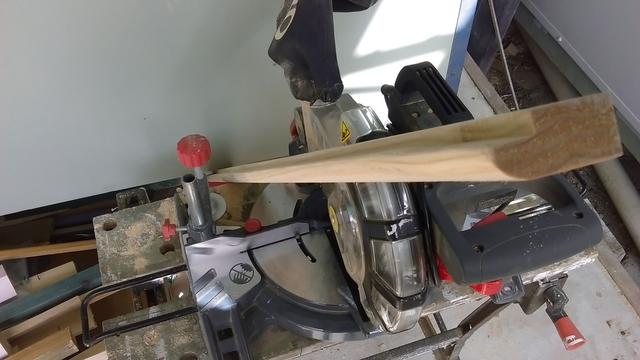 A trip to Brisvegas sourced stainless steel mesh @ $150 per metre by 1.5 metre width!!! I was in luck, in that because it was an end roll that had 1.8 metres left and they only sold in 1 metre increments, I got the whole end roll for the price of 1 metre! I thought I would show what a door looked like with the mesh inserted into the front panel, Front  Back 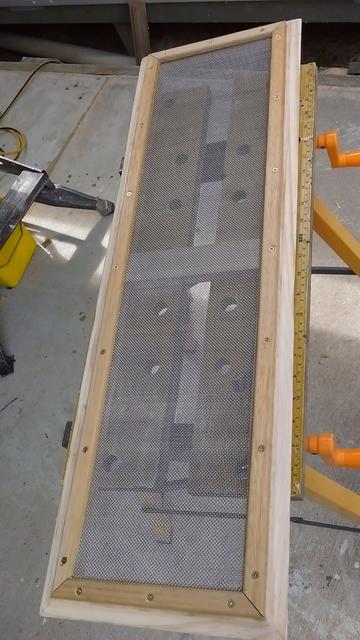 The intention is to stain the new doors to the colour of the meat safe door frame. The rest of the meat safe framing will be painted the same colour as the other cupboards. My dilemma is whether I should take out the panels of the meat safe doors and also replace them with the mesh, or even make new doors for the meat safe which will exactly match the door of the rest of the cupboards. Of course, you can then argue rightfully, why even use the meat safes, if you're going to make new doors. I could keep the safes intact (they're worth about $500 for the pair) and simply frame up cabinets instead and then there is no problem of whether it will match. So feel free to comment!!! |
|
|
|
Post by Don Ricardo on Mar 16, 2019 20:09:20 GMT 10
See Roehm, there you go doing 'real work' again while I just sit at my desk examining microscopic variations in photos. Oh, well each to their own area of competency, I guess. That is a very nice piece of work you've done with the door, though. Congratulations. Cino Vardo will be a real work of art when it's finished (in fact it already is!). Don Ricardo Desk Jockey |
|
|
|
Post by Roehm3108 on Mar 16, 2019 20:52:29 GMT 10
Ride that desk hard, DonR! I'm certainly not claiming competency in my particular work and sometime dislike having to pay for the stuff-ups I've made. You should see some of my routering efforts!!! I reckon Jesus knew what he was doing, taking all those years honing his carpentry skills before becoming a preacher. Doing it the other way around is not easy!! They have me working for real tomorrow, so will meditate on my cupboard dilemma during m drive to Brissy.
Have to say that I and the rest of the forum really do appreciate the amount of research you put into this hobby. For those like me, it is akin to watching grass grow. But then we wouldn't have a forum with such valuable information in one place!!
|
|
|
|
Post by Roehm3108 on Mar 28, 2019 16:03:56 GMT 10
Hi Folks Well nobody was game enough to have an opinion as to whether I should adapt (mutilate!) my meat safes and sacrifice them to Cino Vardo. I didn't have the heart to do that to those two pieces of history, to say nothing of keeping their value intact. As Mustang will attest, the humidity up this way has been terrible for this time of year, and not really conducive to doing too much. But I have made a promising start to the kerbside cabinetry. You have to disregard the current colours and lack of hardware, but hopefully it will give some idea of what it's going to look like. A view from the driver's side window (cupboard doors shut) 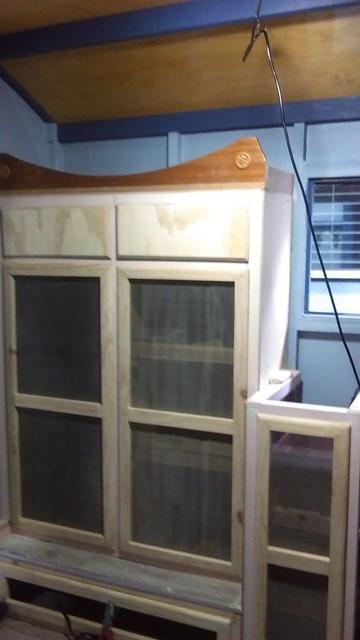 A vies from same window with doors open 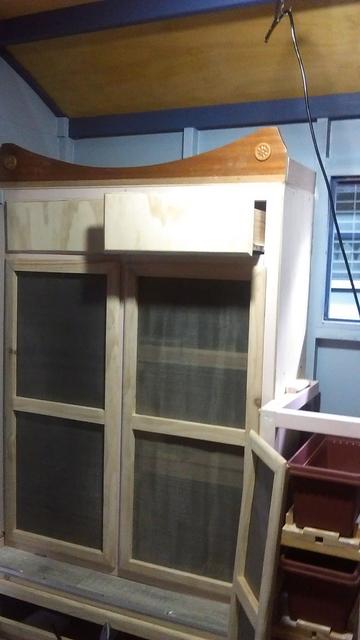 a view from rear door looking forward to bed 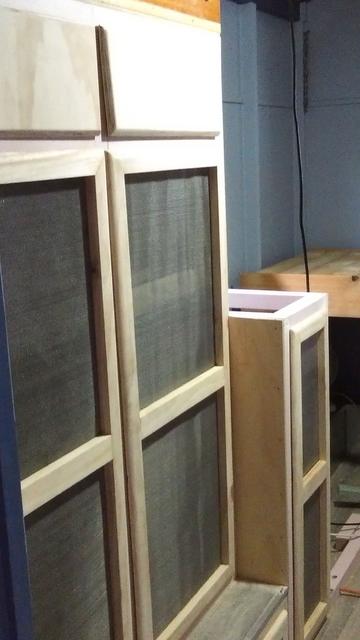 To explain what I've done: The double door cupboard is a "copy" of the meat safes but with some variations. What were little storage compartments on the original had a hinges flap door. Because I don't have enough old hardware hinges, I decided to turn that into a couple of drawers for storing the "small stuff" like hankies etc. The two main doors has shelves on the right and hanging space on the left. Because of the "ledge" along the side, I had to build a plinth for this unit to sit on. You will notice there is also a narrow horizontal door under that plinth. That will be for such things as shoe storage. I am undecided about keeping that curves shelf front on the top of the cupboard. I really doesn't qualify as it is chipboard!!! There will be something there so that I can use the top of the cupboard as a shelf! To the right of this cupboard, there is what I call a base cupboard, only about 300 mm wide. This will eventually have a small benchtop on it. But this cupboard will be my pantry. No, I am not going to grow my veggies in that cupboard! Yes, they are two planter boxes, but it just happens that they were the only ready-made box I found at Bunnings, that would fit the space. Saves me the job of making something up. The space between that base cabinet and the edge of the bed will be for the seat. |
|
|
|
Post by Geoff & Jude on Mar 28, 2019 17:31:46 GMT 10
it's really starting to look the goods now ray.
think you'd better talk to judy pretty soon to get a spot reserved for shellharbour in october so all we southerners can have a good old geek at it (and try to spot the built in error that deflects from the real errors, not that we think there will be any real errors).
geoff 'n jude
ps. will you need orthopedic shoes to be able to see into the top drawers.
|
|
|
|
Post by Roehm3108 on May 11, 2019 11:42:07 GMT 10
After a bit of an enforced break to give my knees a rest, I hve finally finished the carpentry work of the driver's side (kitchen side) of the van. The sink cupboard, a single seat to the left of it and open storage bin beside that. 44 litre water tank is under the seat and storage bin  A closer view of the seat and storage bin with tank under 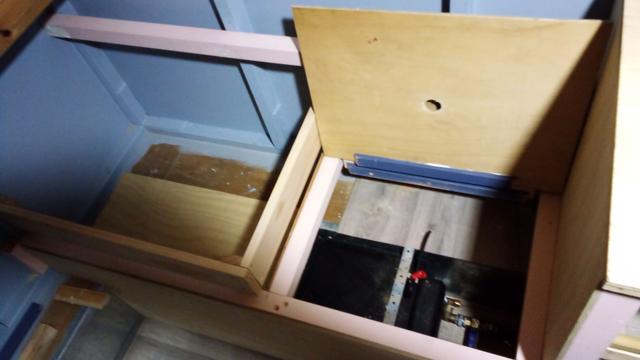 Kitchen cupboard with mesh doors in place. You will notice a setback solid door to the right of those. It's a half depth cupboard for storing camp stove and BBQ plates as well as disposable gas containers. This is vented to the outside of the van for safety. Doing this leave me some back wall space half under the sink for attaching chairs and foldup table etc 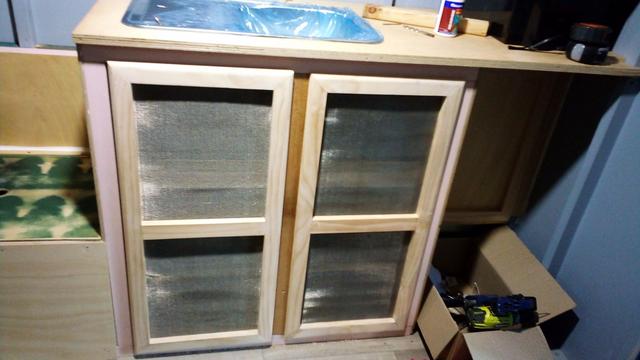 Slowly filling up the space! |
|
|
|
Post by Roehm3108 on Jun 11, 2019 14:00:38 GMT 10
Hi all Just to let you know that you haven't been forgotten in the past month. Sometimes whatever progress you make is not really visible, such as filling holes, and prepping the surface for painting. The outside of the cupboards have now been undercoated and painted, only the inside yet to do. Pic 1 gives you a glimpse of colour the cupboards will look like. Before you all go "yuk!" wait till it's all assembled. You might still go yuk anyway!! Pic 1 shows the kitchen cupboard, so I decided to make some storage space on the wall above that area for condiments and mugs. If you look above the bed in Pic 2, you will notice another storage shelf about the bed. This will be for spare bedding etc. I found that I had built the slide-out table far too big, so much so that you couldn't get beside it to sit on the bench. So I had to cut the top down, which then resulted in needing shorter drawer slides. I stained the dining top in an oak colour and it is now fitted. I had the longer drawer slides spare, so decided to build a drawer on the floor below the bed for the fridge. Makes it much easier to get the fridge out now. Pic 3 shows the table and fridge drawer in the open position. The "to-do" list is slowly getting shorter!! 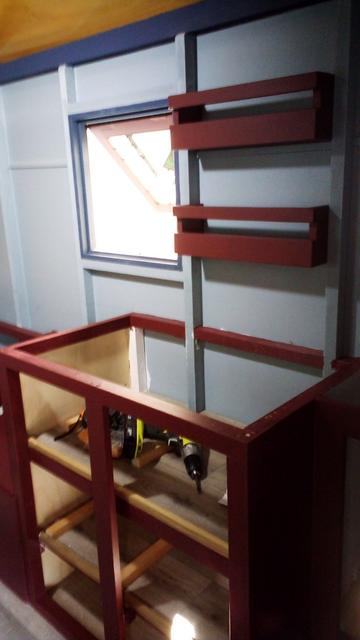 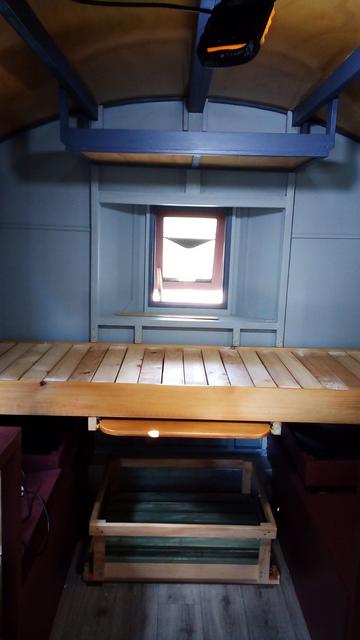  |
|


 Reminds me of the Lutheran Pastor who, several times a year travelled on what was known as the "tea and sugar" train from Port Pirie to Kalgoorlie, and preach, baptise and marry people along the way!!! Not sure if people held off on dying so that he could bury them as well!!!


 Yep, fitted a bag awning on Cino Vardo today. It made her feel real good and she has promised to provide me all the shade I need!!!! Got it at Aldi's on special!!


