|
|
Post by Roehm3108 on Oct 5, 2018 6:59:22 GMT 10
Mustang, because she was a clairvoyant, she would have known that I wasn't going to have a reading NOR pay to take a photo! I do like that roof too! Wonder if DonR would undertake the challenge of explaining the difference between a lantern roof and a Mollycroft roof.
|
|
|
|
Post by Geoff & Jude on Oct 5, 2018 8:53:32 GMT 10
hi ray
clerestory, overstory, mollycroft (and lantern) rooves are all the same, just different names. (a bit like tomato and tomato).
in actual fact, calling these types of rooves lantern rooves on a caravan is a misnomer, since lantern rooves are meant to be circular, like a lantern (as seen on top of cathedral domes).
mollycroft is just the terminology given to romany caravans.
geoff 'n jude
|
|
|
|
Post by strugglebrook on Oct 5, 2018 15:22:48 GMT 10
I will now be busy all afternoon googling all them big words !!
PSK.
|
|
|
|
Post by Roehm3108 on Oct 10, 2018 7:51:04 GMT 10
Hi All Now Geoff (or Jude!), you're taking the easy way out of explaining a Mollycroft roof. I know that it's another name for lantern-roof and all them other words strugglebrook is now looking up!! But the term Mollycroft is interesting in that it sounds like it was named after someone (possibly Molly Croft?). Perhaps this could be the hot topic of debate at Shellharbour next week!!!! Meanwhile, some progress has been made on Cino Vardo Items 1-5 of the "to-do" list are done. Here is the top of the door frame 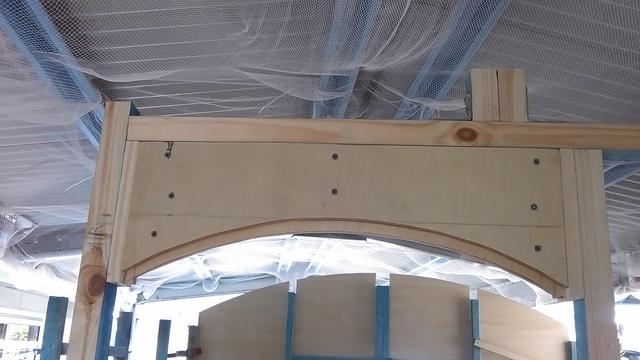 The rear wall panels permanently fitted 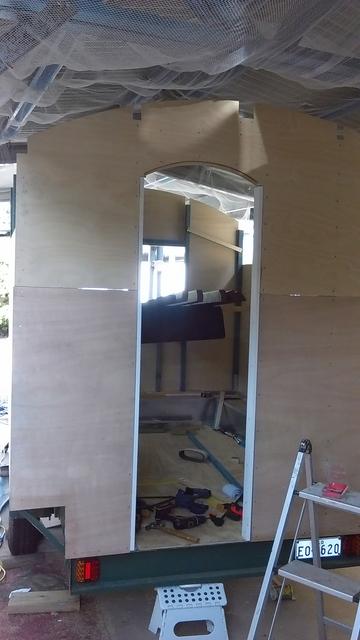 Roof bearer notched in. My trusty (Ozito) planer of some 12 years finally died and I had to invest in a new one! The newbie handled quite well getting the angles right on the bearers. My trusty advisor said I should use a table saw but I didn't trust my skills with that! At least if I made a mistake on the planer it wouldn't be as severe! 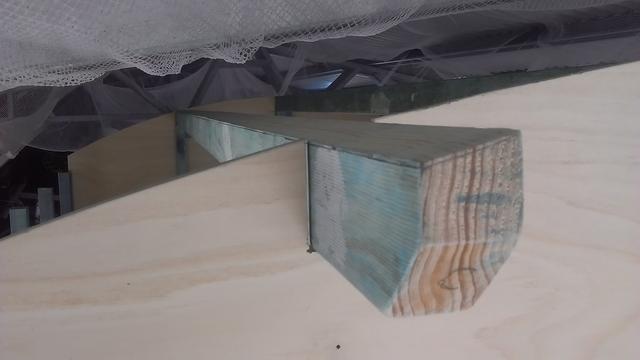 Starting to see the effect of what the roof will look like. 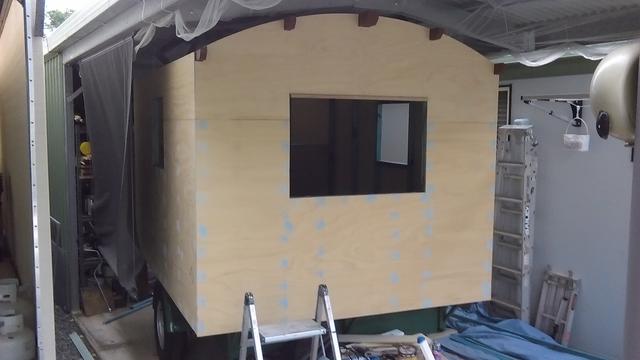 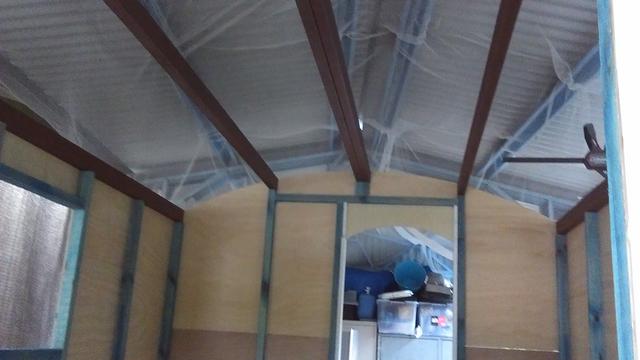 One for DonR! This rocking chair would fit on my back patio!! AND, Christmas is coming up!! 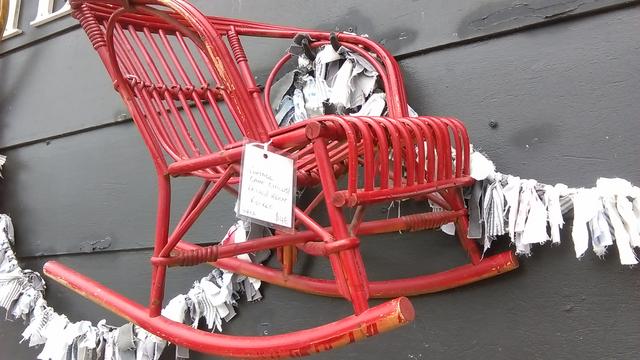 |
|
|
|
Post by strugglebrook on Oct 10, 2018 10:00:16 GMT 10
Now I am totally lost, all the big words. Now we have Molly Croft ? Is she related to Alice ? Apart from all this technical talk I am loving the build Ray.
Strugglebrook.
|
|
|
|
Post by Roehm3108 on Oct 21, 2018 7:05:21 GMT 10
Hi All The weather here hasn't been too kind for me during the past week or more. Thankfully, the farmers around here have grins from ear to ear! Have been getting some small things done. I am using 11 mm marine ply for the barn style door, which while very strong, is till a bit too thin for things like hinges and locks. So "blocks" had to be built for them. I also decided to reinforce the door panels with the Z framing on the back (I'm sure there is a more technical name for them, but don't know what that is!). The night after I added the reinforcing, I realised that I hadn't thought of the porthole window I wanted to add into the door! And, of course, I had glued and screwed the reinforcing bar. Mr google can be quite helpful at times, and after some research, I found that you can unglue a water based blue with a heat gun. Had no heat gun, but HAD been carting a hair dryer around with me for so many years, since when I still had hair! It did the job and enabled me to re-do that bar so that the porthole hole could be cut. 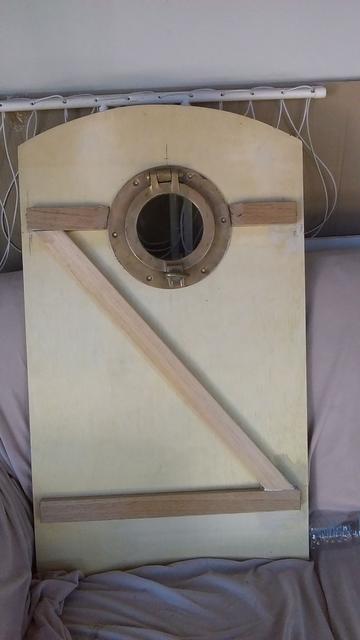 Because I had to external porthole fitting, I decided to build one out of wood 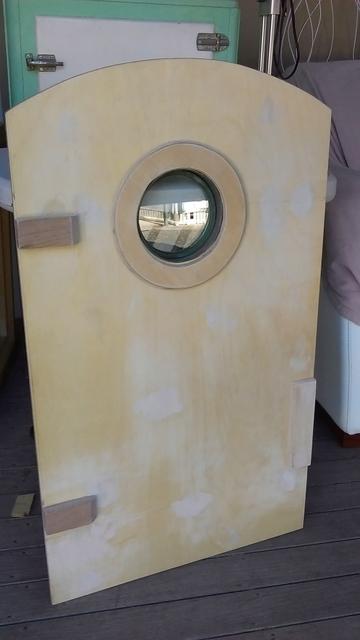 Yesterday I set about finally fixing the roof bearers permanently. They are strapped on internally like this 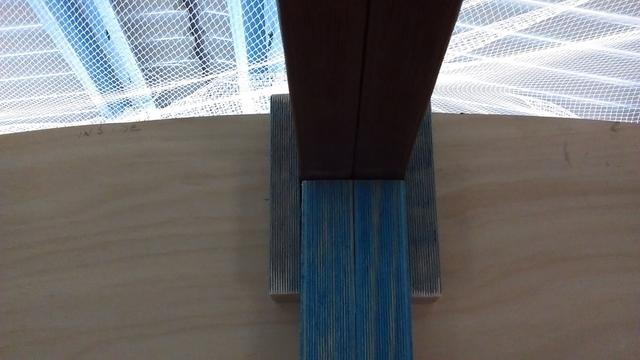 To give a good weather seal, I framed the front of the bearers. The black stuff is an adhesive/sealer which plays havoc with your hands. Very difficult to remove, so hopefully it will also seal well. I still have the back section to do. 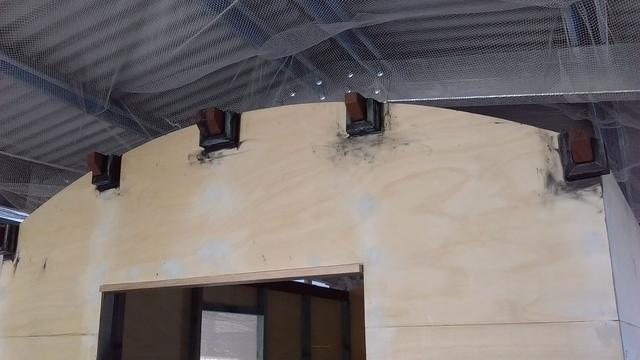 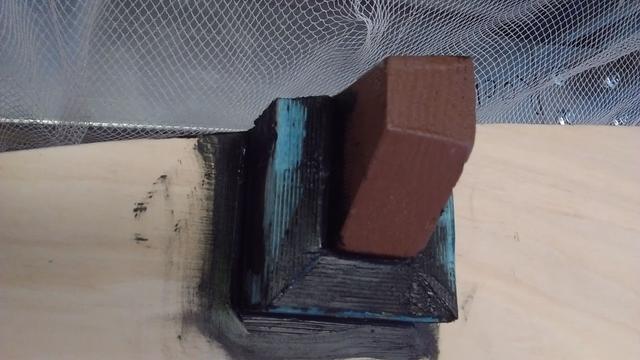 |
|
|
|
Post by DC3Td on Oct 25, 2018 4:48:56 GMT 10
|
|
|
|
Post by Mustang on Oct 25, 2018 8:17:29 GMT 10
Aahh sleepy Tassy, extra sleepy Queeny. |
|
|
|
Post by Roehm3108 on Oct 25, 2018 10:26:27 GMT 10
So that's what sent you to Queenstown Gordo - women😁😄😃
|
|
|
|
Post by Roehm3108 on Nov 2, 2018 6:47:37 GMT 10
Hi All Well, for some reason (probably overkill) when I decided to varnish the underside of the roof before installing it, I used Marine varnish. On the third coat, I missed about an inch wide strip, which I didn't notice till it had dried! I used one of those throwaway rollers, and used a different nape roller applying a fourth coat, which ended up being a patchy mess. So a fifth coat had to be applied! Painting that ceiling has cost me the best part of $150 in paint alone!! Ouch! So today I will start installing the roof sheets. Meanwhile, I have installed the bay window! Primed: 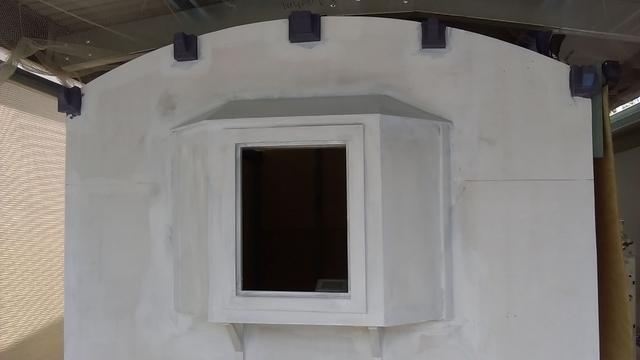 Wall painted one coat in its forever paint, but only a test coat for the window and dummying the leadlight window 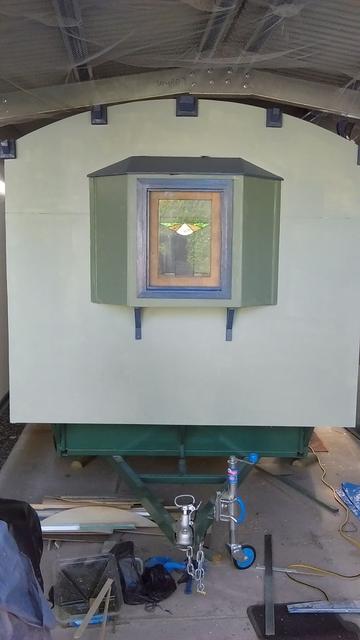 Trying a different colour for the bay window (actually the same as the base of the trailer). Have yet to decide which to use 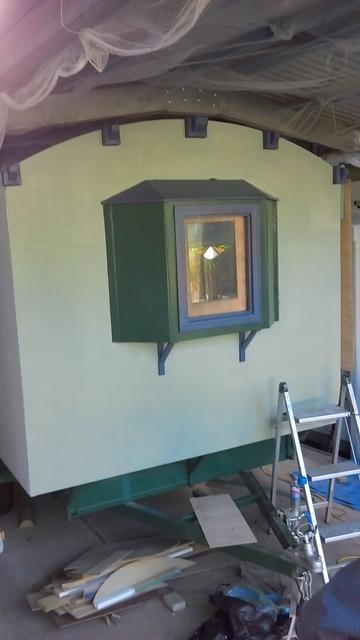 |
|
|
|
Post by Mustang on Nov 2, 2018 17:51:37 GMT 10
Bay window looks great, I like the two colours.
|
|
|
|
Post by Roehm3108 on Nov 8, 2018 16:50:42 GMT 10
What a hot week it's been here Qld, all one could do was stay under the air-con! Tassie is sounding really good Murray!!! Finally got the roof over the van part finished. Still have to do the verandah section. 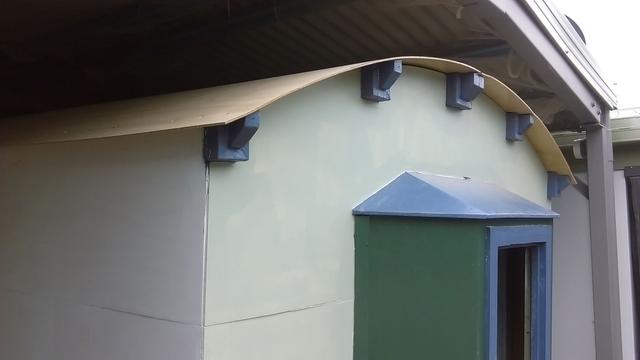 Decided to seal the section where the wall hits the roof with high density foam strips 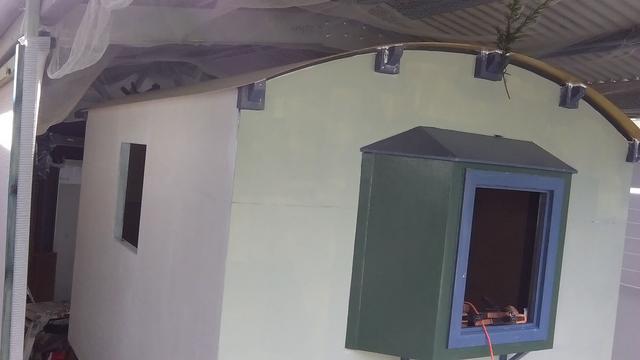 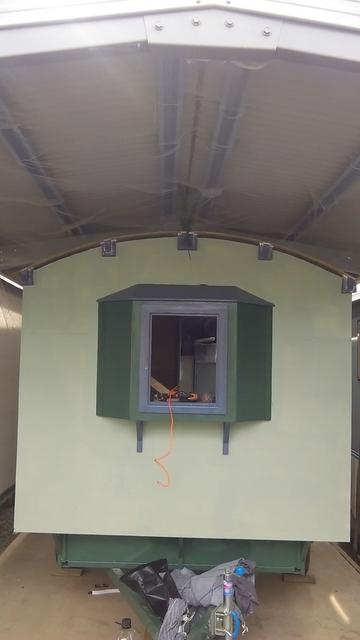 The obligatory "tree" to signify the top floow!! 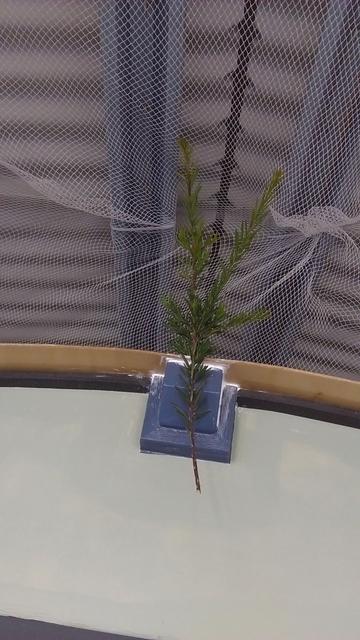 Am rather happy with the end result of varnishing the ceiling 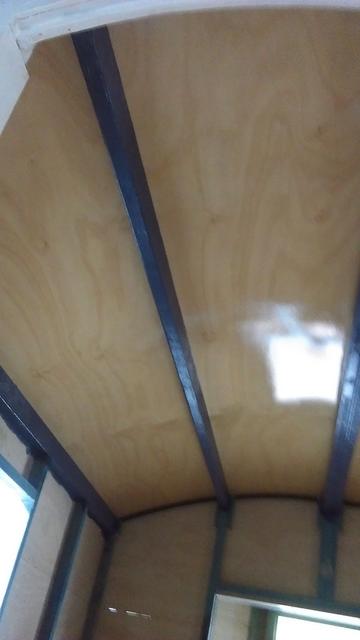 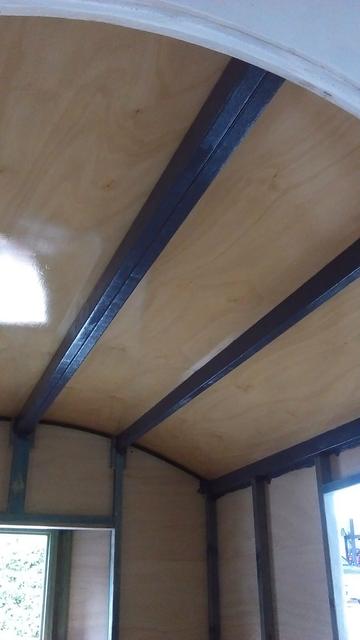 The next step after fitting the verandah roof is to seal all the butt joints with 50mm fibreglass tape. Then comes the process of fitting the calico membrane. |
|
|
|
Post by Roehm3108 on Nov 10, 2018 6:46:13 GMT 10
Here is the verandah roof, fitted yesterday  All 200 plus screw-heads have also now been covered with sealant from prying cobber eyes! Which does beg the question - has anybody applied fibreglass tape over a polyurethane sealant? Did it stick? |
|
|
|
Post by shesgotthelook on Nov 10, 2018 7:22:42 GMT 10
|
|
|
|
Post by Roehm3108 on Nov 10, 2018 10:31:17 GMT 10
Hi SGTL I only ever use/buy a sealant that says it's paintable on the container. At the moment I am using Parfix adhesive/sealand and Selleys D-Mastic and paint certainly sticks to it. A couple of days ago, I applied some of the sealand/adhesive to a waste piece of ply to test the stickability of fibreglass. Made up a batch of resin this morning and applied a piece of tape to the sealant. I rough sanded one section and left the other section unsanded. The result is that fibreglass REALLY does stick to polyurethane sealant - the unsanded as well as the sanded. As I will be laying calico on top of that, I don't have to worry too much about "pretty"! I read the info on the link you gave me. I was a bit concerned about this comment "Duram Leak-Seal Tape can be applied over the wet polyurethane sealant provided that the bead of sealant is no more than 10mm wide." Being an old-fashioned sort of guy, I am always a bit worried about some of these new "you beaut" products, especially when it comes to expected life-span of use. So, after this test, I will go back to old faithful fibreglass!!!  |
|
|
|
Post by Roehm3108 on Nov 13, 2018 21:35:48 GMT 10
Many years ago, in another life, I did a spot of painting and decorating in the snooty South Melb area. In those days I could jump from one hip of a terrace house to another with no problems at all! Not so today!!  Working on Cino Vardo's roof means I am 2.5 metres off the ground, and I don't like it one little bit, especially as I don't have scaffolding. Nearly did a whoopsy, while up there when the front of the van reared up as I walked to the back of the roof! Yep, forgot to put down the back leg on the van!! Goes a long way to explaining a pulse rate of 130 this evening!!  This morning I gave the 50mm fibreglass tape I laid on the joins, another coat of resin Yes, a few resin dribbles, but hey, like cobber's screws, it'll all be covered very soon. 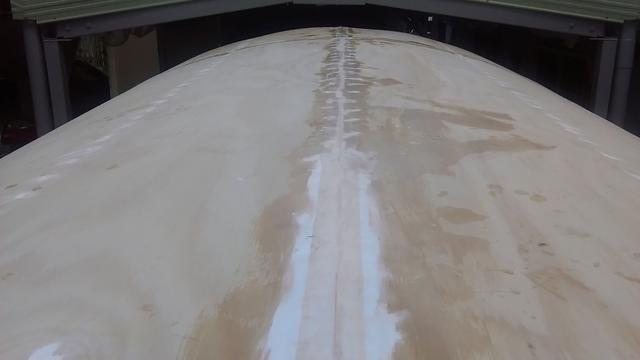 This arvo, I also applied a thick coat of Zinser PSU (primer, sealer, undercoat). To give those young guys like cobber a sense of perspective of the size of the rig, I took these two pics in my efforts to appease him. The first is before the psu went on. Compared to the Hunter Minor, the roof looks huge, as does the cubic space in the interior of that empty shell. The overall roof length is 3200mm The Hunter Minor was only 2900 metres long. Which means DonR has to raise even more money with his crowd funding, to cover the fare increase on the Tassie ferry!!! 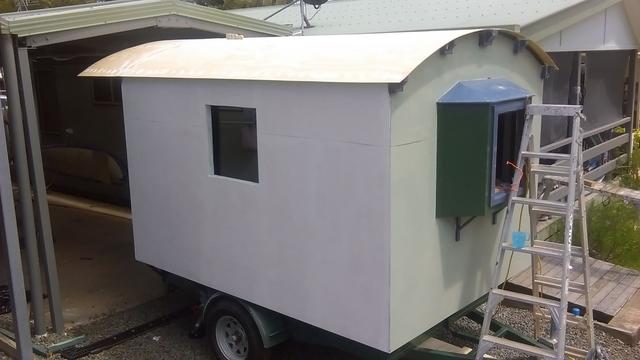 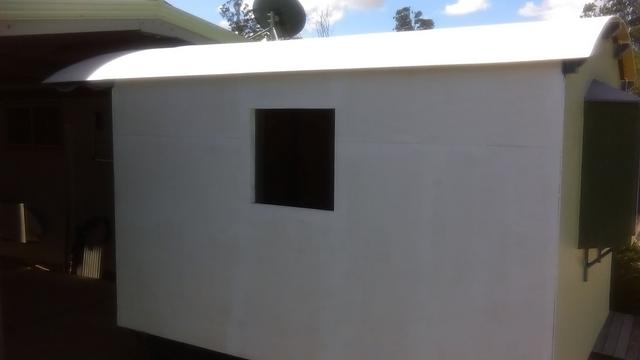 Hope that's better for you Mr slothead cobber |
|
|
|
Post by cobber on Nov 14, 2018 14:20:13 GMT 10
Yes thanks Ray for dragging her out of the shed and showing us where you're up to, she's looking good 😘I can't see any problems with the screws you've used and it is good to know, you know, that slot heads are the only way to go when it comes to fitting out the interior 😜
May I suggest 🙄? The more stained timber you use inside the more she will look like a gypsy van ( blonds love gypsy vans and stained timber )
Cobber
|
|
|
|
Post by Roehm3108 on Nov 14, 2018 16:36:11 GMT 10
Methinks that somewhere in the annals of Franklin1's posts he issued a warning about pre-washing calico, before using it as a waterproofing membrane. I'll repeat the same warning here. I bought 2400mm wide calico, knowing I had a roof curve of 2200mm on 2000mm wide Cino Vardo. Washed the calico twice, the second time in a warm wash cycle, just to be sure. The result was that across the width it shrank almost 200mm!!! I had about 25mm overhang on the sides. Today, for me was a bit of a hump day. I say that because despite having re-covered two previous caravan roofs with calico, each van is different. In this case, there was no hatch opening to work from, and I knew I would be going up and down from that roof, while maintaining a steady gallop (not the dance) in the Qld warmth. So, no time for selfies on the roof, but here is the end result - one gypsy caravan covered with calico. No, the pegs are not permanently attached, just there to glue the calico under the roof ply. I am so pleased that this job is now behind me. 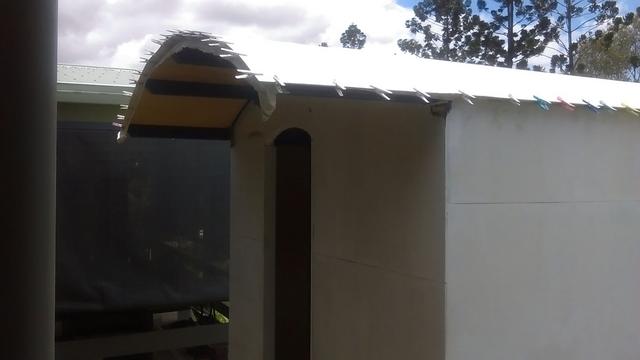 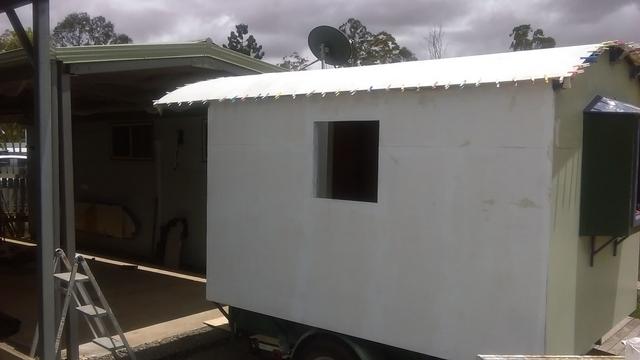 For those of you contemplating doing this to your roof, watch out with your paint calculations! The roof area on Cino Vardo is about 6.4m2. The Zinzer PSU initial coat used about 3 litres. Applying the coat with the calico, slurped about 5 litres (not much left from a 6 litre can!) I have bought another 6 litres for the additional top coats and expect to use most of that (probably three extra coats. I know there will be some who will probably say that it's a bit of overkill - perhaps, but I'm not prepared to chance it leaking. You can guarantee that it will happen at the most inopportune time and place. |
|
|
|
Post by Franklin1 on Nov 14, 2018 17:24:19 GMT 10
Hi Ray,
Yes, you are correct in remembering me posting about calico shrinkage. I got caught when I made the curtains for my van. I had planned to put calico at the back of the patterned curtain fabric to protect the pattern from sun-induced fading. I went about measuring all the curtain sizes, and cut the calico into pieces to match those sizes, with a small amount of wastage allowance. Then I put all the pieces in the washing machine. At the end of the cycle, not only did I have pieces that were riddled with heavily frayed edges, but I also had pieces that were about 100mm shorter in width and length than I required. Needless to say, all of the pieces were thrown into the "spare parts bin", and some urgent recalculations made for larger replacements.
Have enjoyed reading about your project progress! You're doing some interesting and thoughtful work there! 
cheers, Al.
|
|
|
|
Post by Roehm3108 on Nov 21, 2018 7:10:49 GMT 10
At a point where there is not much "visible" progress, but work is happening. Ended up with an air bubble under the calico on the roof. Had to go to the big green shed for a marinade injection needle!!! It worked!! An inexplicable thing happened after laying the calico - the ply section between two bearers of the rear veranda section developed a slight sag when it was saturated with paint. So I needed to go to a new plan for the edging for the curved section. Had bought pinch-weld rubber, but decided instead to use aluminium J mould and try bending it to shape. After a couple of muck-ups, here is the result. It looks like the J mould is supporting the ply very well. All the moulding is glued and screwed (with 1/4 inch slothead screws Mr Cobber), then sealed. 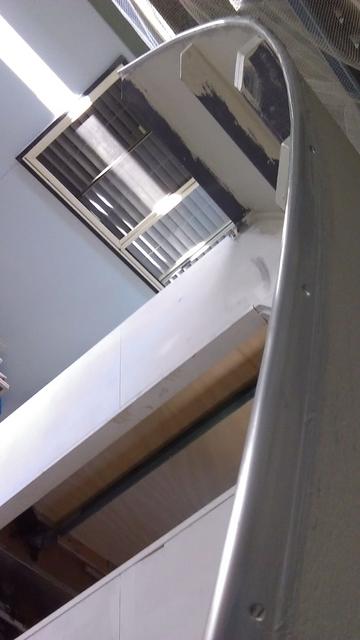   |
|
|
|
Post by King Fisher on Nov 22, 2018 15:28:47 GMT 10
looking fantastic and so cute, by the way being fairly lazy and not too conversant with domestic appliances.. myself I did not pre shrink the calico when I did the roof on Bessie in Fisher's Resto, but I did make sure I had plenty extra to start with, and kept stretching it was I went. |
|
|
|
Post by Roehm3108 on Nov 22, 2018 15:38:14 GMT 10
You raise an interesting point King Fisher! Does one NEED to prewash the calico before fitting it?
|
|
|
|
Post by Geoff & Jude on Nov 22, 2018 16:30:39 GMT 10
Does one NEED to prewash the calico before fitting it? well ray, when we calico'd the aerolite, we didn't bother to pre-wash/shrink the material, we simply painted it on with a heavy coat of paint. two things resulted. firstly, the surface of the calico was a bit "fluffy" because it wasn't washed but that was fixed by light sanding before the second coat. secondly, there were no folds or puckering, presumably because as the first coat dried, it might have shrunk slightly and tightened the material. either way, not washing the calico didn't cause any significant problem in the long run. geoff 'n jude |
|
|
|
Post by Roehm3108 on Jan 9, 2019 20:57:05 GMT 10
Hi folks December has been rather busy for me, I actually had to work! That, plus the heat curtailing painting efforts, meant that my "flexible" plan of finishing the outside by the end of the calendar year flew out of the window a tad. But some progress has been made, fear not. Through a friend of a friend, I had a nameplate signwritten. It will be delivered later this month. Totally chuffed with the work: 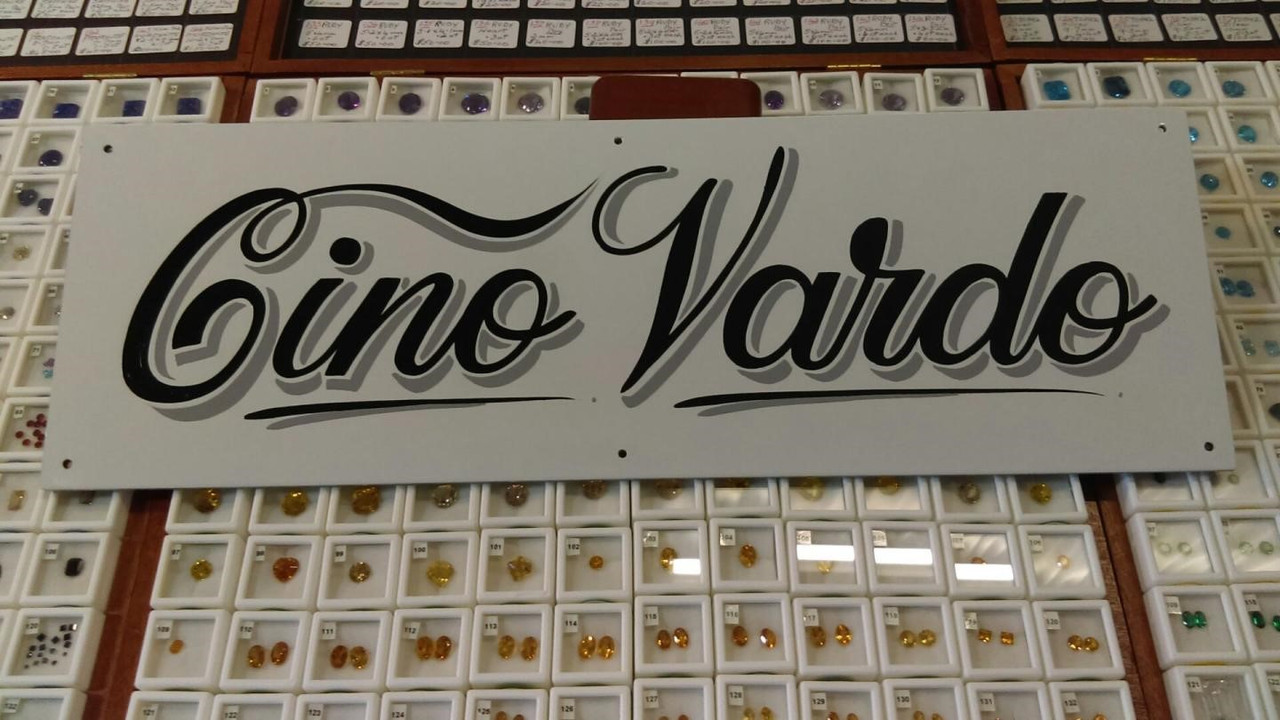 I got my foreman over one day to help me instal the beading over the plywood joins - he held things for me on the outside while I worked from the inside. This enabled me to paint the walls. Decided to highlight the beading as I had some fretwork from an old Q'lander that I tidied up and fitted below the beading on the front and side walls. Had a few problems fitting the windows, even managing to drop one and hitting myself in the mouth with it, in the process! Not as nimble as I used to be! Finally finished hanging them today, so a good excuse to photograph and post the result so far. Still have to instal a reinforced rubber and aluminium overlay across the top of the window to protect it from possible rain ingress. This will be done after I finish some paint touch-ups first. Here are a few pics: 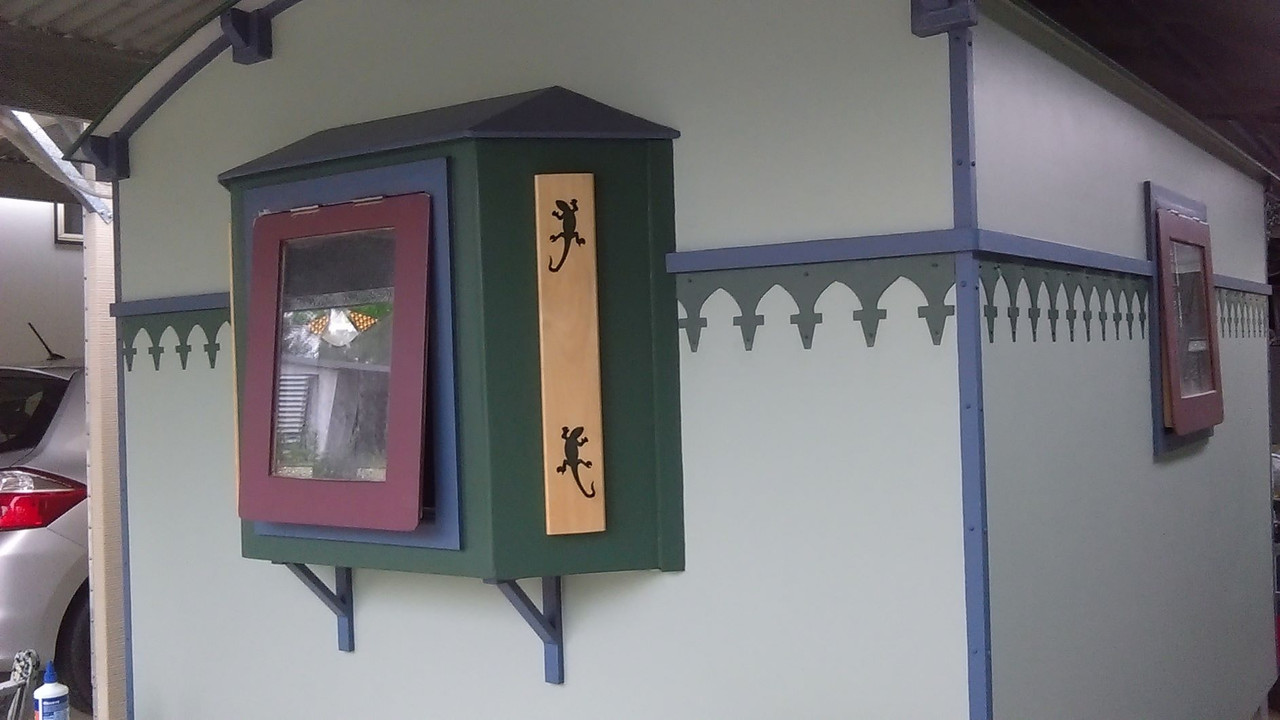 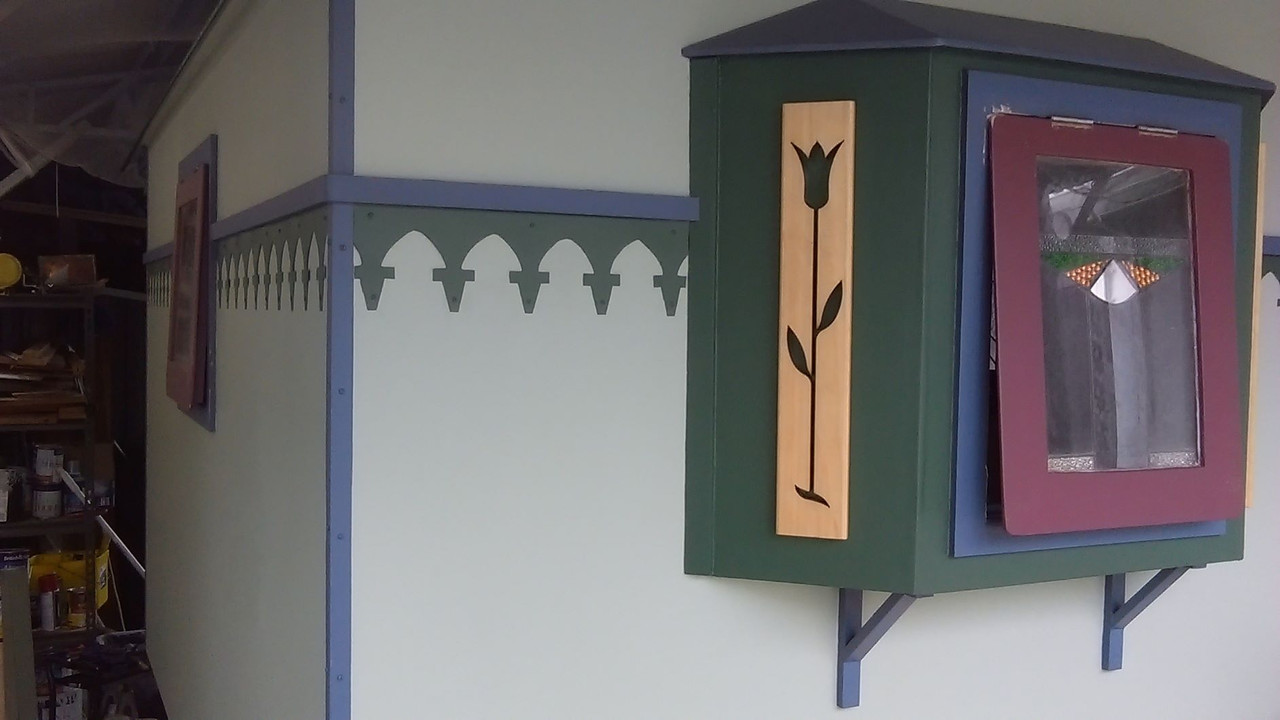 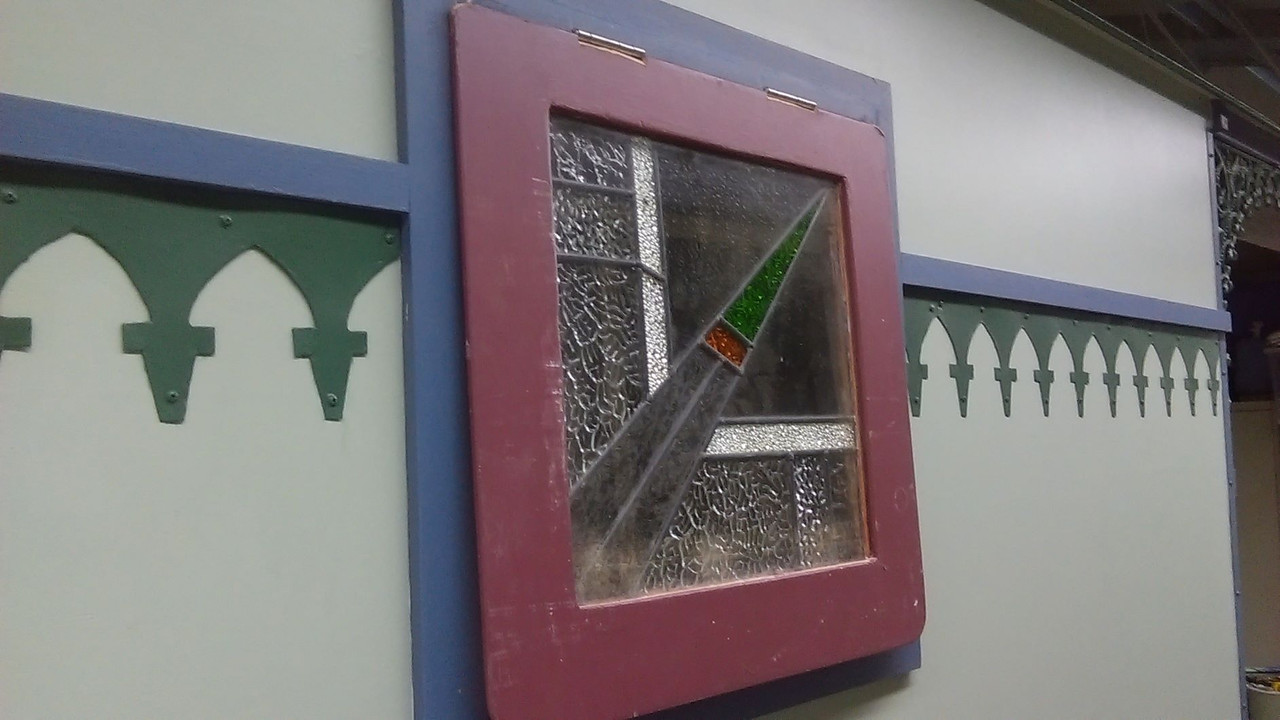 Mr Koala should recognise the two feature pieces on the bay window returns - they are verandah paling features from the BGS! Some time ago I salvaged a couple of unbroken corner lacework pieces from the Tip Shop for $5 each, so decided to utilise them as a decorative support for the back verandah roof. 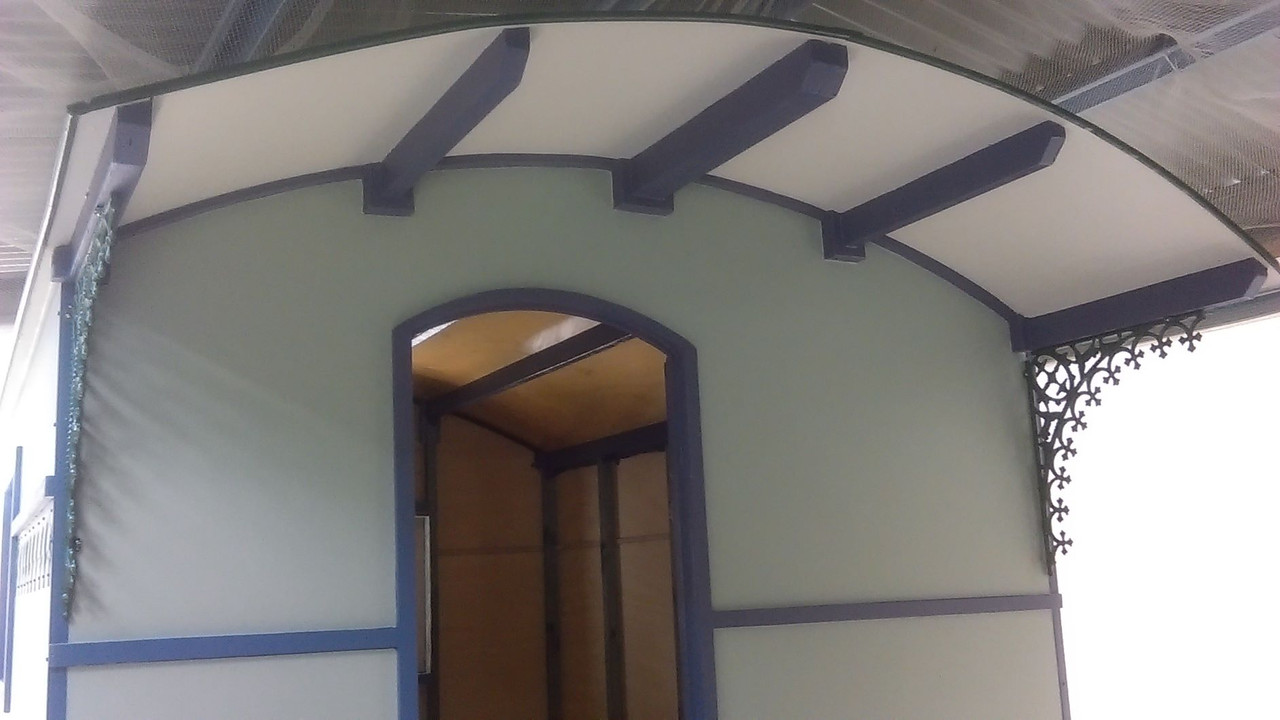  I still have to instal the back door with its fittings and the verandah light, before I move into the inside. The verandah floor will be done after the interior is finished. |
|
|
|
Post by Don Ricardo on Jan 10, 2019 20:47:21 GMT 10
|
|


 Working on Cino Vardo's roof means I am 2.5 metres off the ground, and I don't like it one little bit, especially as I don't have scaffolding. Nearly did a whoopsy, while up there when the front of the van reared up as I walked to the back of the roof! Yep, forgot to put down the back leg on the van!! Goes a long way to explaining a pulse rate of 130 this evening!!


