|
|
Post by evanthesunshine on Jan 21, 2018 20:14:40 GMT 10
Good Evening All. Quite new to the forum, so please be gentle! We posted an introduction to ourselves and 'Evan', back in March 2017 in another thread, so I thought I would copy it here for posterity sake! A short introduction first. My wife and I (particularly the wife, who has a great interest in caravans and has been looking religiously for at least the last 6 months) have recently purchased a 1962, 15' Sunshine caravan, which appears to be in amazing condition, when compared to some of the "Before" conditions we have seen in the forums!
We are very new to the Vintage Caravan scene, but have already fallen in love with our purchase.
In addition, it turns out we have bought the caravan from the son of the original owner, who as it happens is actually the builder of Sunshine Caravans, and between himself and his brother, owned the Sunshine Caravan business! I guess that means we have good provenance for our little van, but it gets better. We are naming the van "Evan", in honour of the original owner, who has now gone into care. Judging from the interactions with his son and family, they are wonderful people, who have agreed to share photos and stories of Evan, and their family adventures.
My wife and I were very lucky to find Evan, and indicated that as far as possible, Evan would be kept in original condition. The owner went so far as to drop the price of Evan significantly to enable us to take the van, as he felt the van would remain loved and cared for in it's original condition with us!
I just need some advice as to how to go about ensuring Evan is completely safe and roadworthy, while keeping the original features safe! Would it be more appropriate to start a new forum devoted to our little project?
As I have said, the actual van is in amazing condition, meaning we are only intending decorating the inside to our taste with mattresses and curtains. It really is in that good condition.
Photos will follow, once I have worked out PhotoBucket!
So moved to Flickr - at Moderator suggestion. (Yes, I think the wife and I have read every page on the forums. Just love the renovation threads!) Some photos below. As you can see, Evan does not need a massive amount of work, just the immediate jobs: - Roof stripped and flowcoat applied
- New Tow Hitch (?). Not sure if this is necessary. Advice? (The original is in excellent condition, and has been used already!)
- Building a bunk "pod" that will be freestanding in the double bed area. We are embarking on a round Australia trip with the two kids for at least 12 months, in about 8 months time!
- Window sealing
- New hatch. Currently under construction
- Complete install of 12V solar and management system. (Intent is to be able to free camp.)
- Need to pay attention to rolling gear and suspension
- Several other small projects
Anyway. That's the intro. We will be careful not to ask too many newbie questions before checking the Technical Info sections and other threads first. There is so much info and links here already! Cheers Craig  IMG_2619 IMG_2619 by Craig Whinny, on Flickr  IMG_2505 IMG_2505 by Craig Whinny, on Flickr 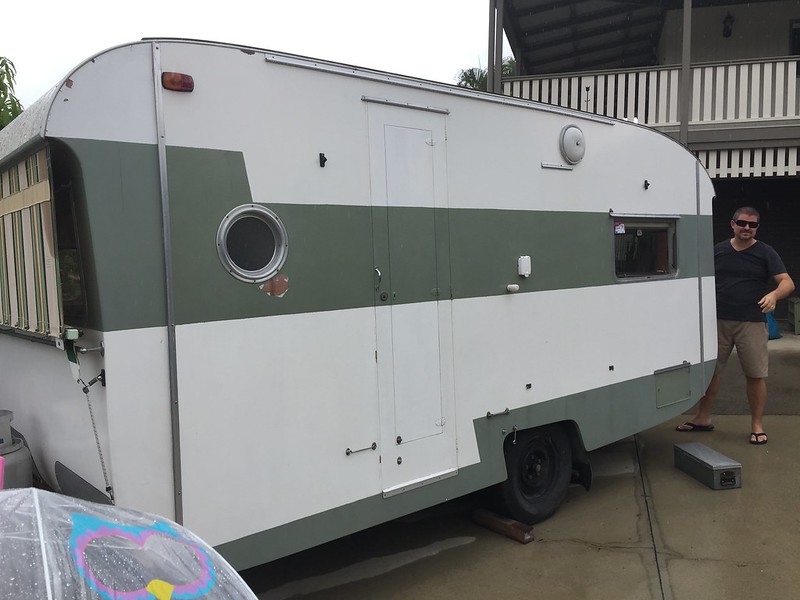 IMG_9708 IMG_9708 by Craig Whinny, on Flickr 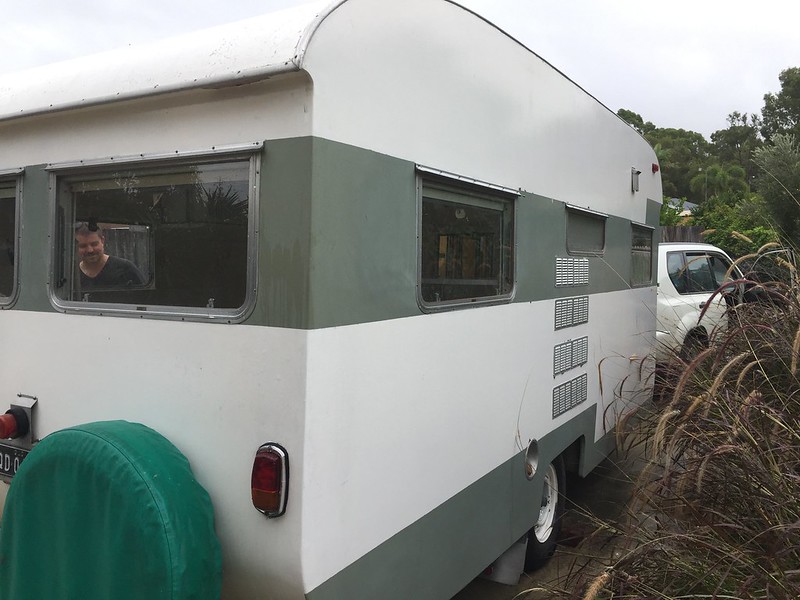 IMG_9725 IMG_9725 by Craig Whinny, on Flickr 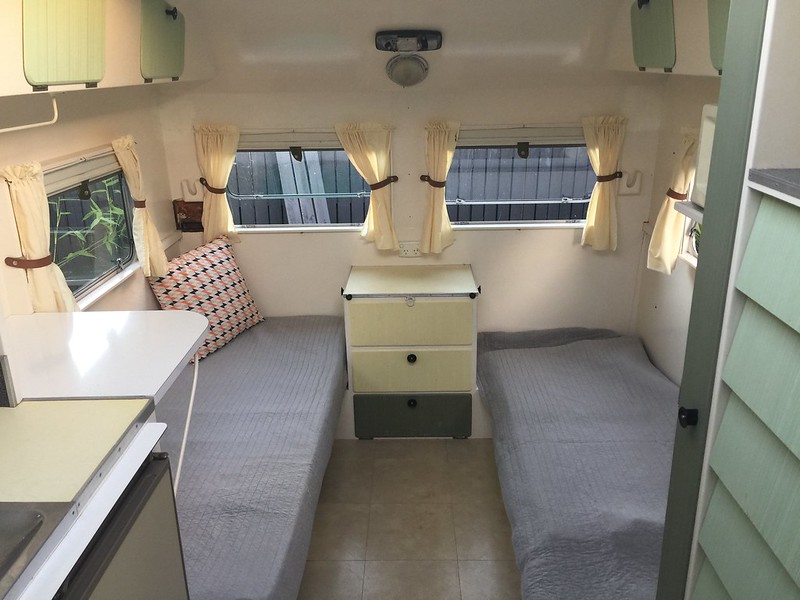 IMG_4272 IMG_4272 by Craig Whinny, on Flickr 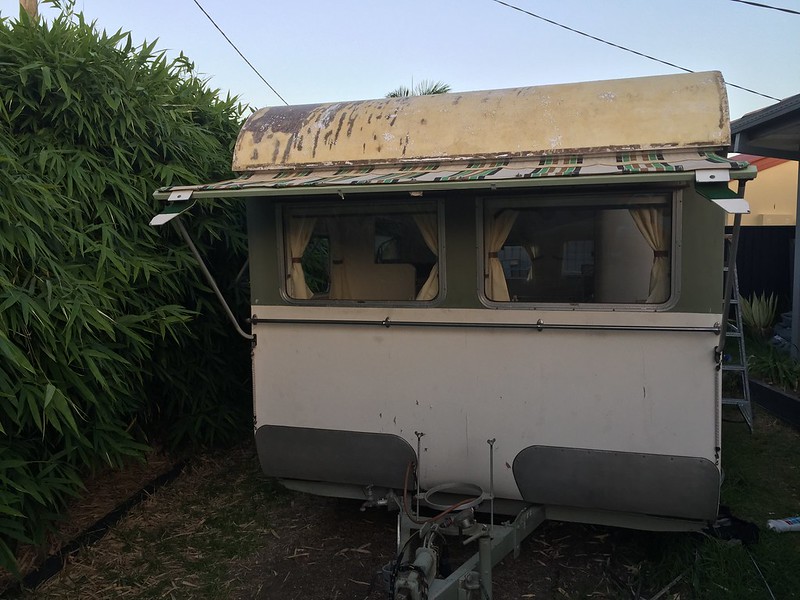 IMG_4320 IMG_4320 by Craig Whinny, on Flickr 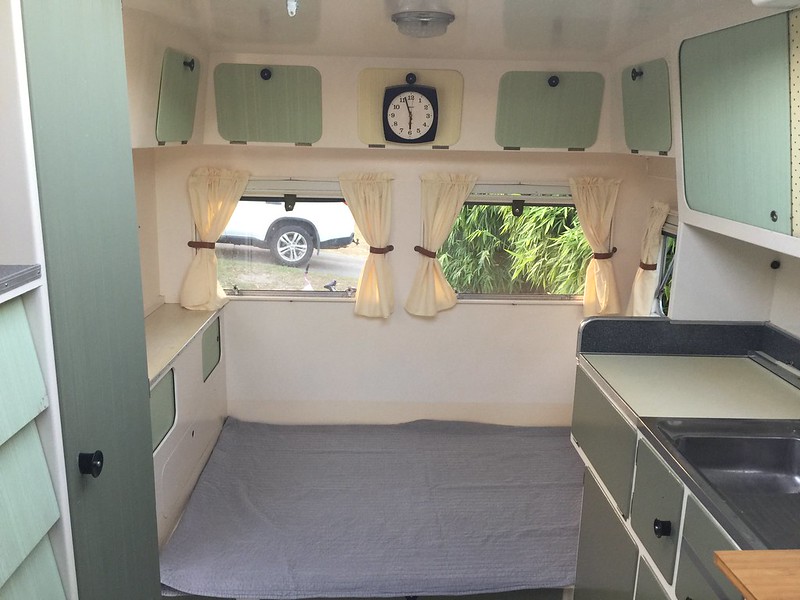 IMG_4310 IMG_4310 by Craig Whinny, on Flickr 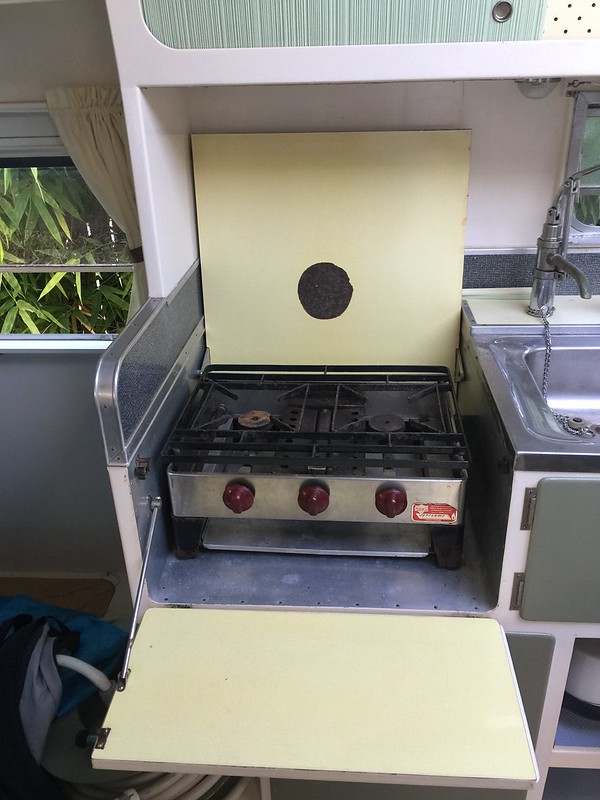 IMG_4303 IMG_4303 by Craig Whinny, on Flickr |
|
|
|
Post by shesgotthelook on Jan 22, 2018 7:34:28 GMT 10
Hello & welcome. What a magnificent van, not sure how I missed your post in March! Re the tow hitch, I recommend going with what is the safest for you & your family. Sway bars can be a good addition too although it really depends on how well your van travels. I gather it has hydraulic brakes, so if they work well, leave them alone. If it didn't have any brakes, I would suggest electric. Happy travels & please keep sharing your restoration & camping pics. SGTL
|
|
|
|
Post by Roehm3108 on Jan 22, 2018 9:05:20 GMT 10
Welcome to the forum OP. Like SGTL, I have no recollection of seeing your original post so thank you for re-submitting the pics. I am a firm believer in using weight distribution hitches when towing caravans above 750 kg gross. I know there are some on this forum who disagree with me, but I think as responsible caravanners we should err on the side of caution. I your case, if you're travelling around Oz and have children aboard, you owe it to them to maintain the highest safety level you can. In your pics, it looks as though you're towing your van with an Nissan Xtrail. Is that correct? I know they are supposed to have a 2 ton towing capacity, You gross weight of that van will come very close to that and with the vehicle fully loaded with passengers and other gear, you need all the braking help you can get, or the van will "push" the towing vehicle in an emergency braking situation.
|
|
|
|
Post by Don Ricardo on Jan 22, 2018 22:13:53 GMT 10
Hi EvanTheSunshine, Great to see you posting again, and also that you have persevered with posting photos. Sunshine vans are quite thin on the ground, so it is really excellent to see some photos of one of the larger models, and an example in such good condition as yours. Comparing it to the advert on the 'Down History Lane' Sunshine thread, is your van the 13 ft 9 in 'family model'? It looks a bit longer than that though. How long is it? Regarding the question you asked about the hitch, there is no requirement to change the coupling if it is in good condition and capable of doing the job. You don't need to change anything on your van to meet modern requirements - vans before about 1989 can be used with original equipment. However, you do need to feel and be safe, of course. I tow our van with the original 1949 coupling, but also need to use weight distribution sway bars with my modern car (and we've fitted brakes for the same reason, because the van had none originally). Shesgotthelook apologised to you for missing your post in March 2017, but I note that in fact she actually did respond to your post back then, so well done to her. A few other people 'Liked' your post too, but I think we were probably waiting for the photos before responding further. Well, now we've seen them, and they were worth the wait!  Good luck with the preparations for your trip. It sounds like a wonderful idea. And don't be hesitant to ask questions if you can't find the info you need on the forum. We'll certainly answer them if we can. Don Ricardo |
|
|
|
Post by evanthesunshine on Feb 11, 2018 15:21:52 GMT 10
Thank you all for the replies and suggestions. Firstly, apologies if it sounded like I was complaining at the beginning. I only brought the original post across, and made note of it, as I was too lazy to retype it all again! The van has weight distribution bars and cable brakes which seem to be working well. I completely agree with all the comments about brakes and weights and safety. I am just finishing the roof over the next couple of weekends, and will then repaint the exterior. Once that is done, I am going under the van to strip the chassis as best I can. At that point, I will raise the van off the ground and drop the wheels, etc off to inspect the brakes and drums. I would imagine it would be best at this point to have the van weighed? It is currently registered, but is stated as under 750 kg.When we picked up the van, we were told it is a very light van at around 650 kg with no extra gear inside (personal belongings, etc). I'm no expert, but it seems to me the van would be close to or over that weight unladen, not considering also that there is a layer of fiberglass on the roof which was not there originally? So, we have decided not to take the caravan out again until we know it's full weight, and ensuring the undercarriage (sorry, I work in Aviation!), is rated to take the laden weight. If necessary, I am considering replacing the whole axle, etc with a heavier rated setup with electric brakes. and once we know the full weight, it may even necessitate a replacement tow vehicle? Not sure about getting it registered here for the increased weight, but I assume it is just an inspection, with evidence of the load ratings / physical dimensions of the axle, hubs, etc. Lastly, don: The van is 4.8 meters long which is approx. 15.7 feet. I am not sure where the measurement is usually taken, however I have measured the body of the caravan (ignoring the drawbar, etc) from the front to the back corner, externally? I hope that's correct. I will post some more photos this afternoon, especially of the hitch, which I assume would be fairly common one at the time?! Anyway, makes the caravan difficult to steal, I guess. Kind regards all, Craig |
|
|
|
Post by Don Ricardo on Feb 12, 2018 8:58:04 GMT 10
G'day Evanthesunshine,
The standard way to measure the length of a (vintage) caravan is to measure the length of the cabin 12 inches above the floorline (so ignoring the A-frame). The reason for the '12 inches above' is that most caravans have a curve down at the floorline which makes it difficult to work out just where you're measuring from and to, and measuring 12 inches higher normally eliminates that problem.
According to the specifications chart in the various early 60's Winser caravan manuals, Sunshine offered a 'Thirteen' which was 13 ft 3 in long, and a 'Super Sixteen' which was 16 ft 6 in long. It looks like your van is a 'Super Sixteen'.
You posted that your van is 15.7 feet long (I am presuming you mean 15 ft 7 in?). Was that measured at the floorline? Your van has a 'lean forward' front as well as the curves to the floorline at both ends, so I reckon if you measure the length of the van 12 inches above the floorline it will come out at 16 ft 6 in.
On the matter of weight, Winser lists the tare weight (ie unladen without water, gas, personal belongings, etc) of the Super Sixteen as 18 cwt. That converts to 914 kgs, so I'm not sure where the previous owner got 650 kgs from? That's not just a minor variation! Add the fibreglass roof and it sounds like you do need to visit a weighbridge, just so you know for sure.
I would expect that the axle and springs installed by Sunshine would have been appropriately rated with a good margin to spare, but who knows?
Don Ricardo
|
|
|
|
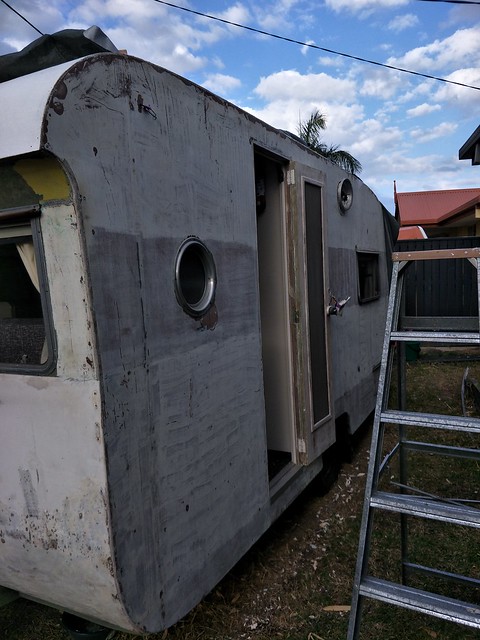
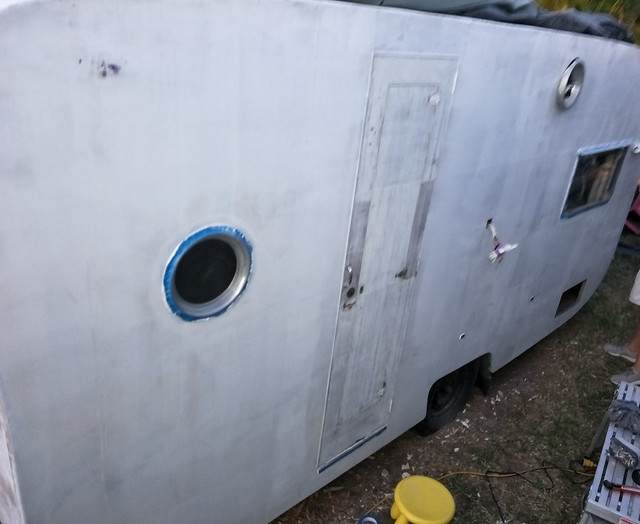
Post by evanthesunshine on Sept 1, 2018 12:46:57 GMT 10
Hello All. Quite a while since our last post, but we are finally starting to work on Evan. - A couple of small rot repairs
- Stripped roof of paint and reapplied gelcoat and flowcoat.
- Cleaned J Moulds
- Started stripping exterior paint (40% complete) ready for new topcoats
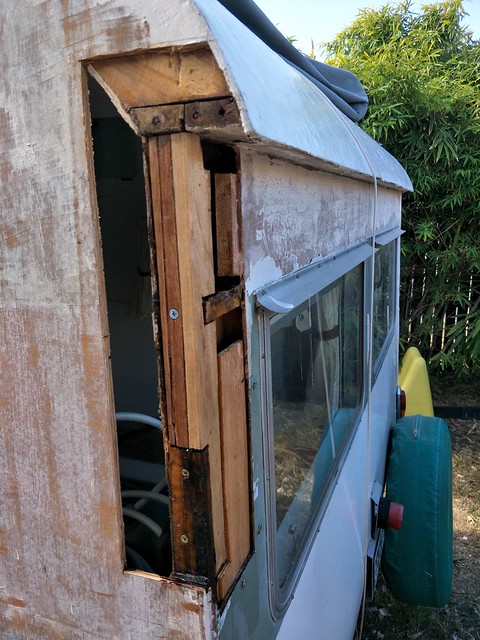
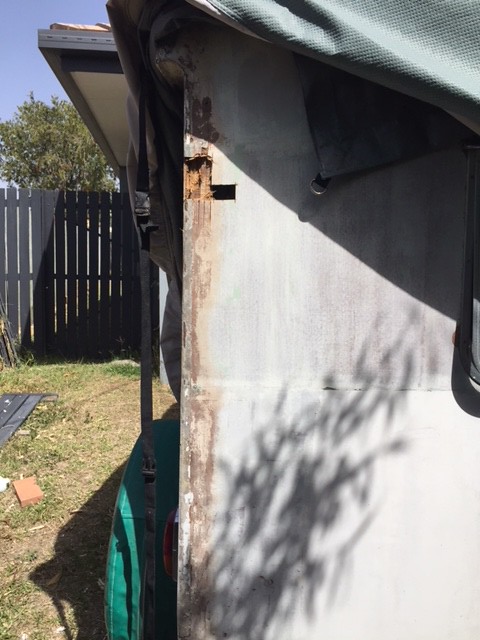
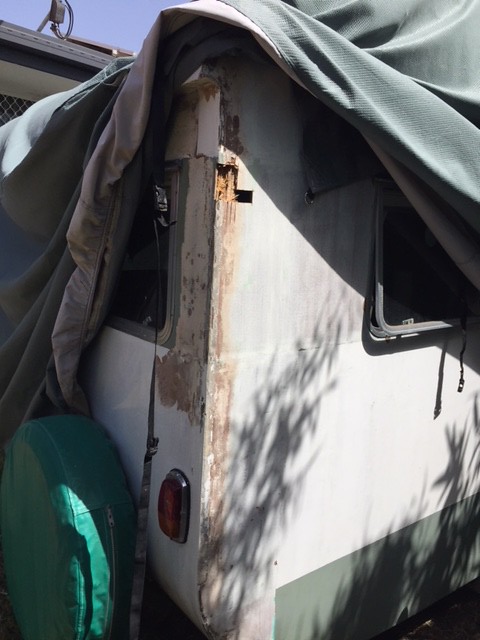
There will be more pics soon, however we need to ask a question of the VV collective, please. I have read so much about rot repair, and am confident on the approach, but just want to confirm I am on the right track. Evan, in the back corner RHS, has what appears to be fairly substantial rot in the main corner vertical "bearer". (Not sure of the correct term). The ply is also rotten approx. 8 cms from the corner forwards on the side, and approx 5 cm from the corner across the back, and most of the height of the bearer. My approach is to basically cut the ply back far enough to ensure all of the rot is removed in the ply. At the same time, I will investigate the bearer and replace as far as I need to. The pics below show the area, and a couple of exploratory cuts where we know the rot is worst. While making this cut, however, it turns out the sides of Evan are only single skinned. The front and rear are double skinned. (This may be standard (?) I just didn't realise!). So the questions are: - Is cutting back / replacing the single skinned side at this location a threat to the strength / rigidity of the van?
- Is there anyone on the north side of Brisbane who has done this to a bondy, whom we could chat to personally? Even have them come and have a look? (We are happy to pay them for their time, as well!)
|
|
|
|
Post by Roehm3108 on Sept 1, 2018 15:31:57 GMT 10
Hi ETS! Such a pity to have to find rot in your van! But you are using the right approach towards finding the depth of the problem. It certainly looks like you will need to do a bit of "cut and pasting" here. In regard to the single skin issue, this explains why the weight of the van is relatively low. If you compare a caravan structure to a house, the vertical framing is like the studs on a house, which supports the roof etc. The ply can be compared to the bracing ply, which stops sideway twisting. So they are both important to the whole. Have a check here vintagecaravans.proboards.com/thread/16161/wayfarer-18-foot-tandem-840?page=2 where Koala had to make repairs to his Wayfarer after an accident. He managed to create a very good join between new and old ply. Not sure of the thickness of the ply on his van, but hopefully he will chime in with some advice to you about repairing the ply. You will need to expose all the rot and make sure that you cut it all out and suitable reinforced. |
|
|
|
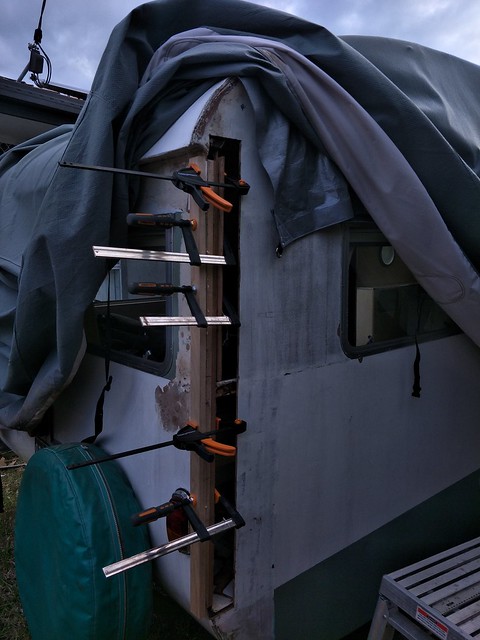
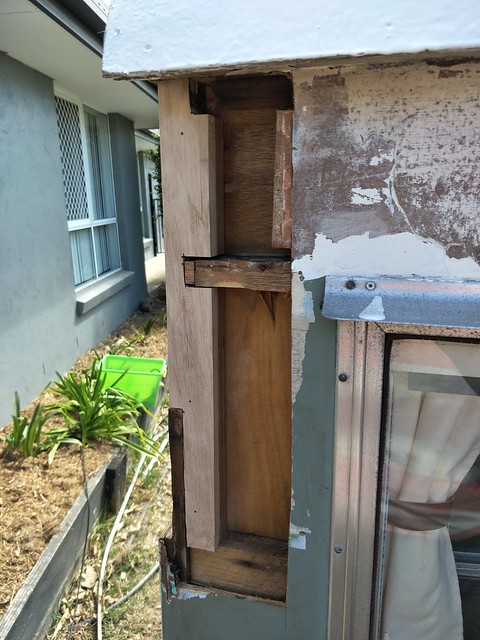
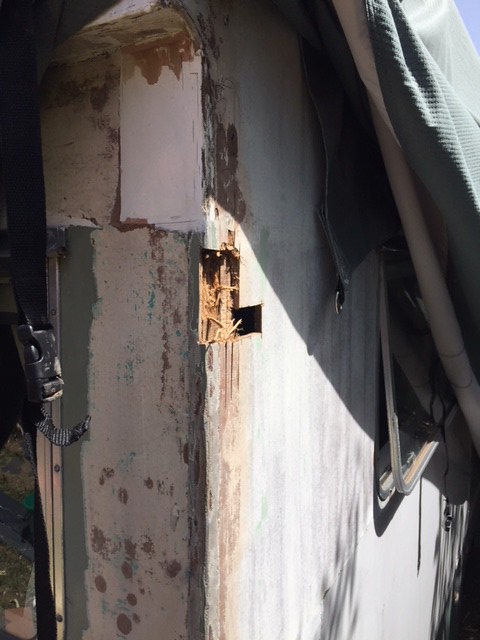
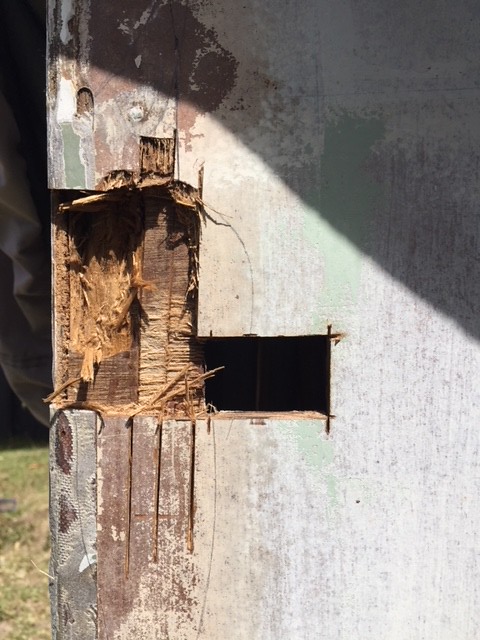
Post by evanthesunshine on Sept 5, 2018 18:43:24 GMT 10
Hello All. Thanks for the advice and detail, Roehm. I see what you mean about the comparison with a house frame! Only became apparent once I started to cut into it. I guess there are quite a few ways to repair things. I just get a bit hesitant to go cutting sometimes! A couple of more pics showing the extent of damage and the removal underway. The link was great. Given the single-sided ply, I think the simplest approach is to remove all the rot, completely replace the vertical member at the corner, then layer a new ply sheet over the inside of the existing sheet. This will leave the exterior sheet short as shown in the photo. I can simply insert a new ply piece to replace, and then bog, sand, paint? I am thinking I will use epoxy / resin to add strength, as I have seen this approach on another thread. Awesome source of info, this site!  IMG20180902111755 IMG20180902111755 by Craig Whinny, on Flickr 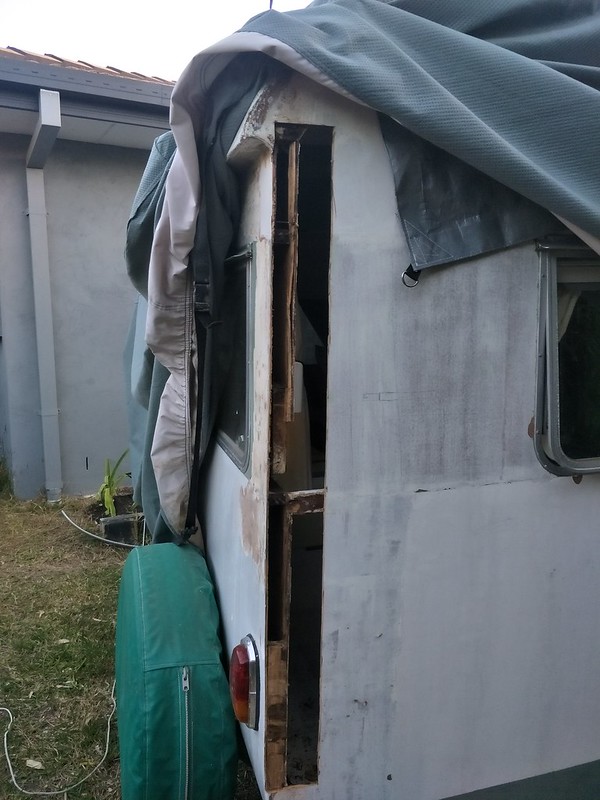 IMG20180901171631 IMG20180901171631 by Craig Whinny, on Flickr 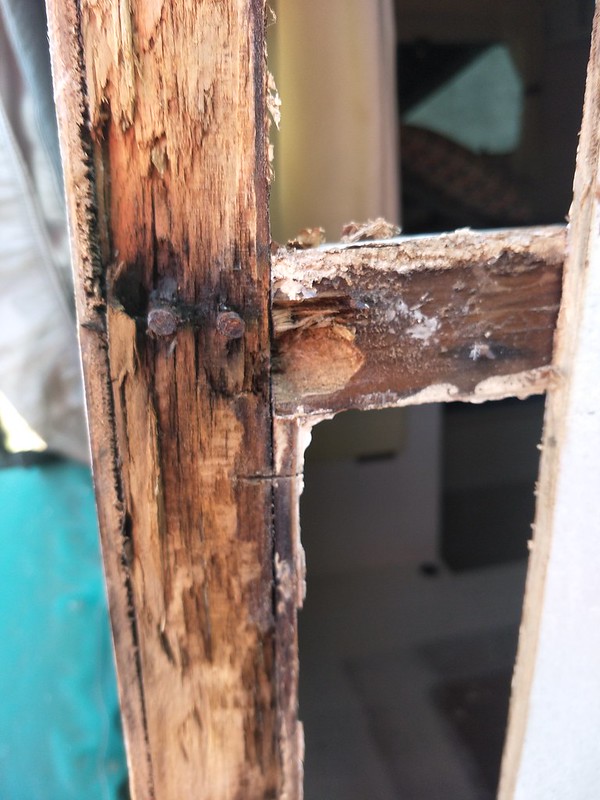 IMG20180901155258 IMG20180901155258 by Craig Whinny, on Flickr 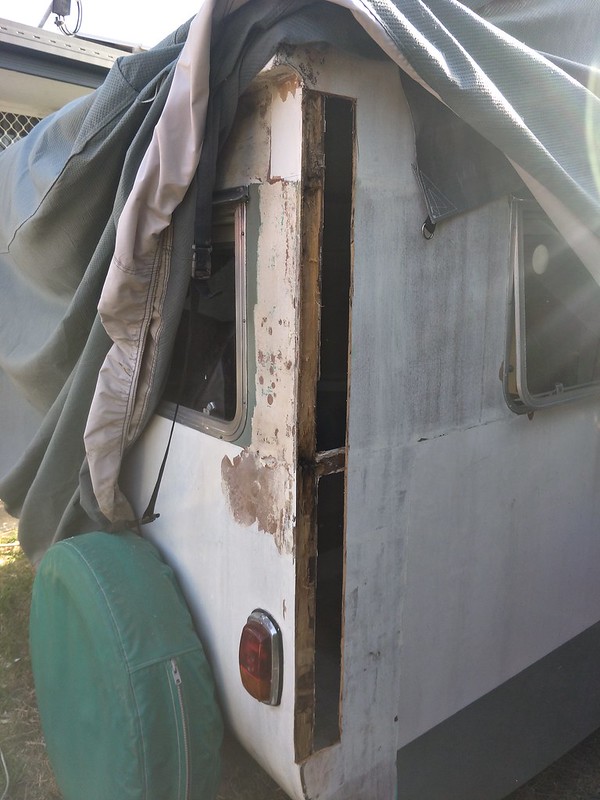 IMG20180901155246 IMG20180901155246 by Craig Whinny, on Flickr This weekend we are intending to strip the rest of the exterior and prepare at the door side and front for undercoating. We have also found what appears to be a fairly significant amount of soft ply in the roof area while putting the new coating up there. I decided to finish the full coat while underway, knowing I had to come back to it later. Not sure of the extent yet though. Will update soon! Craig. |
|
|
|
Post by Koala on Sept 6, 2018 20:17:52 GMT 10
Hi Craig You have a nice van there and I feel that you are on the right track to tidy the van up nicely and repair the damaged area. I feel rather honoured that Ray (Rhoem3108) should refer to me to assist with your repair.  Firstly I will just say that I don't claim to be any sort of a expert in caravan restoration but I do have quite a few years experience which has been overseen by friends who could be classed as experts. I started to write step by step instructions for you on how to repair your van but although it is a relatively simple job, the instructions were getting quite lengthy. It may be best if you could give me a ring on 0404468560 and maybe I can verbally walk you through the process. Koala |
|
|
|
Post by evanthesunshine on Sept 14, 2018 19:29:17 GMT 10
Evening all. @ Koala: Thank you very much for the reply, and I would very much appreciate your advice and guidance. We have just returned from some time in Toowoomba, so apologies for the slow response. If it's OK, I will call you over the weekend and seek your advice generally. However, I will detail a particular issue now, we have run into in the last couple of days. - Evan is built out of what I have been told was called Res-Ply, though I have no idea what it is, other than a 7mm thick, two-ply sheet. When stripped and sanded, it has a slight wooden grain, though mostly it appears as a fairly uniform brown colour, and MAY have an opaque white film / surface, though that may be an old primer used by previous owner.
- We have stripped one side and sanded flat. Then applied a Zinsser 3-in-1 sealer, undercoat, primer. Directions indicate it should have been able to be recoated within 1 hour, and completely hard after 24. Two days later of bright, warm sunshine, the paint can be ripped off by running a fingernail gently along the surface!
- Here's the potential issue: I used acetone to clean the ply surface, about half an hour before applying the undercoat. Why?, I hear you ask?!!! Well, for a day job, I build military helicopters, and we use acetone, etc to clean surfaces all the time. Though the surfaces are composite. My father is a biochemist and has indicated acetone is an organic hydrocarbon, so would not have much problem with causing paint to have issues.
Do you have any experience or advice for this? I have basically decided to strip the whole side again, and then run test patches on other parts of the stripped van, to determine if it is the acetone (likely), or the Res-Ply. Photos can be provided, though they are simply the same as the caravan sides above, just stripped and white. I will post progress pics of the rot repair, which is a lot more successful, next. We have now found rot in the exact same place on the rear LHS. At least I am more confident of dealing with it now! Thanks Koala, and any one else who can offer any help. Craig |
|
|
|
Post by Roehm3108 on Sept 15, 2018 7:55:36 GMT 10
Hi ETS I think you need to prep this surface the same way as if you were painting a laminate surface. I don't think Zinser 3 in one will work for you. White Knight now have a laminate prep paint and top coat. Some years ago I used a product called ESP as a surface prep and as it is still available at the big green shed, it must be OK. It's quite easy to use too - simply wipe it on. Check here www.bunnings.com.au/flood-500ml-esp-easy-surface-paint-preperation_p1566526 |
|
|
|
Post by Don Ricardo on Sept 15, 2018 21:15:33 GMT 10
Hi Evanthesunshine, I've done a bit of digging around for info about res-ply but not come up with a great deal. However, I think it may be similar to Plas-ply or Rescote, both of which were plastic coated ply. If I am wrong, someone will be able to tell us. There's some information about various types of cladding here.Don Ricardo |
|
|
|
Post by shesgotthelook on Sept 16, 2018 8:23:17 GMT 10
Jeff Chrisfield of Phoenix Caravan fame, sent me this photo and said that it was Rescote. 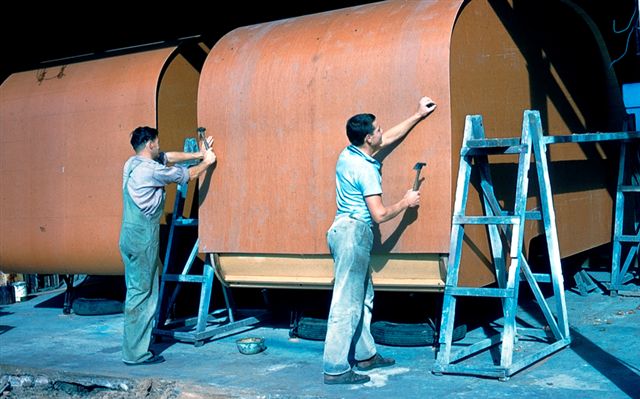 |
|
|
|
Post by grandad on Sept 16, 2018 9:15:40 GMT 10
|
|
|
|
Post by Koala on Sept 16, 2018 11:54:50 GMT 10
That must be the stuff that the side walls on the Wayfarer are built. Mine painted ok but can be a bit of a problem if you sand through the coating.
Koala
|
|
|
|
Post by hughdeany on Sept 16, 2018 16:51:59 GMT 10
Hi all,
I remember Ralph Symonds rescote was used by most builders back in the day,and was touted as being available in up to 30 ft sheets!
Culberts build a caravan plans used this rescote as well.
Cheers
hughdeani
|
|
|
|
Post by Roehm3108 on Sept 16, 2018 19:43:56 GMT 10
Folk, the OP is saying that his problem "ply" is 7mm thick, which certainly wouldn't bend like in the Phoenix photo. As well, OP has indicated that the standard repaint method (PSU then topcoat) is not holding. So he is still left with the problem! AFter re-reading your post OP, it could well be that you are on the right track and the acetone is the problem, considering you started your painting within half an hour of cleaning. There could still have been residual undried acetone in the grain of the surface. I recall doing something similar some years ago, when using thinners and ended up with the same results. I had to start all over again, resanding right back to the base surface. For me it was only cupboard doors, thankfully. In future, when working with your van, keep off the turps (sorry - acetone or thinners!!)  |
|
|
|
Post by evanthesunshine on Sept 23, 2018 18:06:37 GMT 10
Evening VVérs. Just got back from holidays in Coolum. Very nice! Thank you all for the replies and advice and guidance. It is very much appreciated. All of the links and info on the Res-Ply, etc have been very helpful, and mirrors what the previous owners' son told me about the material. So my findings and way forward are: - Strip painted side back again, sand and prep
- Use the ESP surface Prep
- Reapply Zinsser PSU
I will undertake a test patch first as either way, the ESP should assist, whether it was the acetone, or another factor (the ply, etc). Funnily enough, we tried a piece of scrap marine ply with the acetone first on one area, and another clean, then applied the PSU, and both came up the same.... as in, the PSU bonded on both well. Not really conclusive though. @sgtl: love the pic of the Phoenix Caravans. A couple of posts tonight, as progress has been made, and the pics are uploading as I type this! Craig |
|
|
|
Post by evanthesunshine on Sept 23, 2018 20:32:07 GMT 10
|
|
|
|
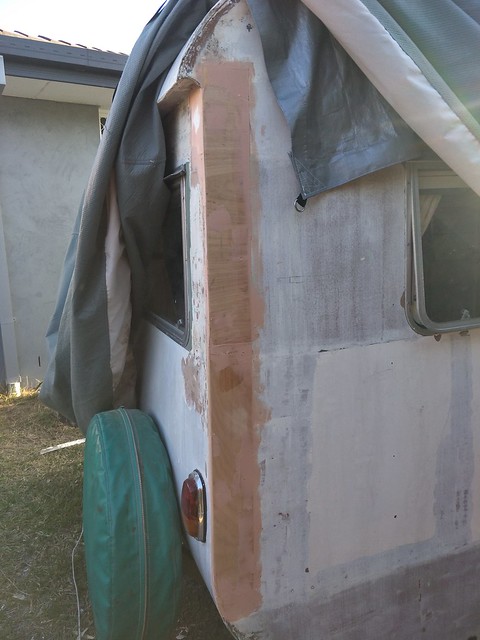
Post by evanthesunshine on Nov 1, 2018 9:58:09 GMT 10
Good Morning VV'ers! It has been a while since we last posted, and carried out any work on Evan. We have been busy with holidays, finishing an Engineering degree and work. This one is just a short post to show the finished patch on the rear side. It will be bogged in this afternoon and hopefully by the weekend we should be in a position to apply the first undercoat. We are using the ESP surface prep, as suggested above, and Zinsser PSU. 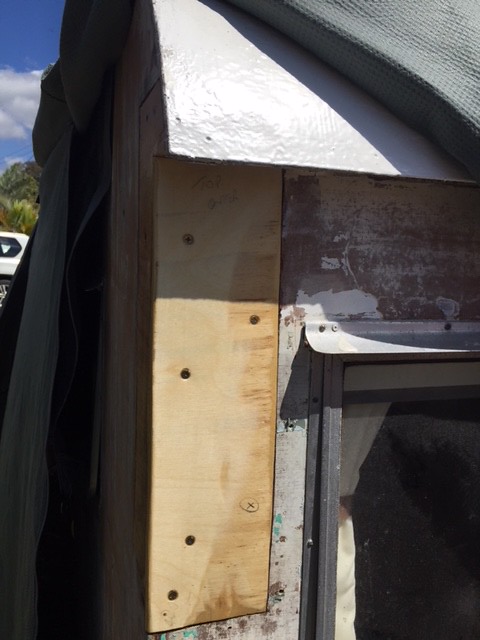 RearRHSPatch RearRHSPatch by Craig Whinny, on Flickr The photo below is of the kitchen window. I have removed the small slot headed screws, as I wanted to investigate how difficult it is to remove the window for paining the van. I have never been able to get a clean look to edges when painting around things like windows, etc, where I have to tape up. I believe removing the windows will give the best result. In addition, I have some concerns about the external seal between window frame and the van wall, on two of the rear windows. Question is: Is the best look achieved by removing the windows, giving a straightforward paint surface to work with? Is it best to reseal all the windows anyway?Any thoughts you can give would be appreciated! 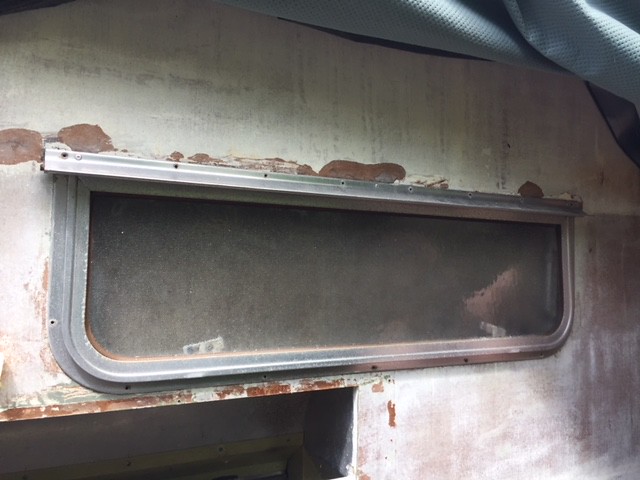 KitchenWindow2 KitchenWindow2 by Craig Whinny, on Flickr Thanks all. Craig. |
|
|
|
Post by evanthesunshine on Nov 1, 2018 10:20:02 GMT 10
Further questions to the above post:
The reason the window is still in the van is that I could not remove it without risk of damage to the bondwood. I expect it is just the sealant?
What is the best way to remove these windows?
Should I use a heat gun to soften the sealant and then cut them out with a blade / similar tool?
Thanks.
Craig
|
|
|
|
Post by Geoff & Jude on Nov 1, 2018 15:32:46 GMT 10
hi craig
use a 2" scraper under the frame to break the sealant.
start working across the bottom then work your way up each side bit by bit, giving the frame a bit of a pull from time to time to see if it will release completely.
when you replace it, don't use silicon sealer - it's much better to use selleys butyl mastic because it remains soft for long periods and doesn't set hard and crack to allow leaks.
before finally fitting the window, put it in place and pencil around the frame, remove the frame and mask up close to the pencil line before refitting using the sealant.
once fitted, the excess sealer will be squeezed onto the masking tape and if you leave it for about a day or two, when you carefully remove the tape, there'll be no mess to clean up on your shiny new paintwork. (it might help to run around the frame with the corner point of the scraper before removing the tape to create a release line for the sealant).
good luck, geoff 'n jude
|
|
|
|
Post by Roehm3108 on Nov 1, 2018 21:28:33 GMT 10
Geoff wouldn't suggest this method unless he has tried it himself and had it work for him.
I would have some worries about breaking that wall material in the attempt. I tried your heatgun idea recently ETS, but was only needing to separate water-based glue that was only 24 hours (not years) old, rather than whatever sealant you have there.. I used a hair dryer and it worked a treat. If using a heat gun, I wouldn't use it on full heat, as they are quite a bit hotter that hair dryers.
|
|
|
|
Post by Geoff & Jude on Nov 2, 2018 7:13:27 GMT 10
Geoff wouldn't suggest this method unless he has tried it himself and had it work for him. last tuesday to be precise. geoff 'n jude |
|


 Firstly I will just say that I don't claim to be any sort of a expert in caravan restoration but I do have quite a few years experience which has been overseen by friends who could be classed as experts.