|
|
Post by Observatory on Sept 19, 2014 19:02:02 GMT 10
Hi there, started removing the old paneling... at this point in time, I considered a career in a food van  Then I got onto cutting out the new panels with a stanely knife. 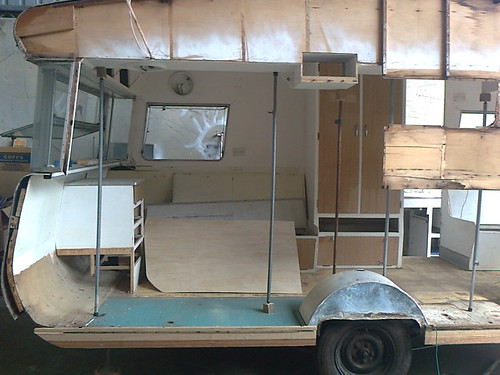 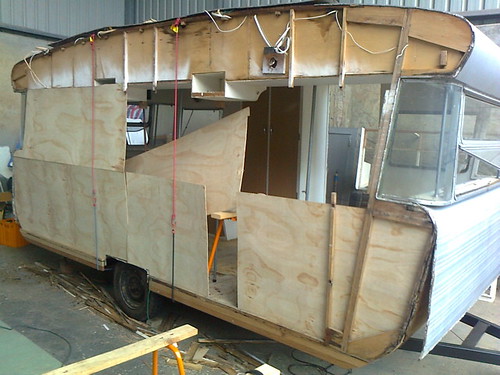 At the end of the day I put the frame back in for strength. So next week going to do a bit more panel adjustment and then tack it all together with a air powered, narrow crown stapler.  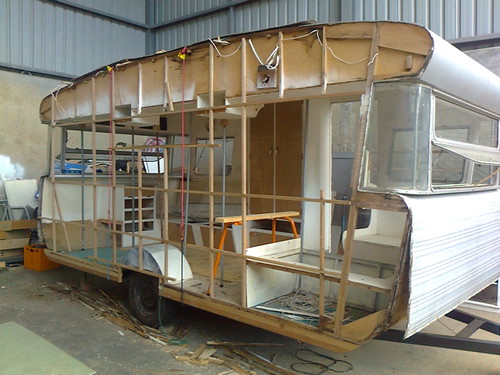 |
|
|
|
Post by DC3Td on Sept 20, 2014 7:11:56 GMT 10
So,bringing in the big guns now with air powered stapler.Well its certainly coming along nicely Pete.
|
|
|
|
Post by Observatory on Sept 20, 2014 11:04:19 GMT 10
Hi Gordon,
Yes busted the piggy bank on the stapler. The hand action staples were just too wide and not deep enough to hold well. And considering how many staples are used to hold the cladding in place - especially along the lower front and back cladding, I went the big gun.
Cheers
Pete
|
|
|
|
Post by Observatory on Sept 22, 2014 18:20:47 GMT 10
Panels and frame went in today... Lap joints glued and screwed... Frame glued to the panels... Panels tacked in with staples... 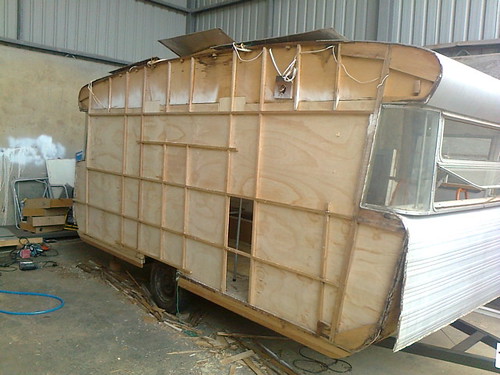 |
|
|
|
Post by DC3Td on Sept 22, 2014 19:14:07 GMT 10
So,we going for western red cedar or that new fangdangled aluminium cladding that has polystyrene backing? Ha. Looking good Pete.Running any clearcoat over the bare timbers? gordon
|
|
|
|
Post by Observatory on Sept 22, 2014 19:41:00 GMT 10
Thanks Gordon, clear coat could be a possibility. I think I got an old tin of clear floor lacquer that needs using up  Oh yeah and I forgot to mention before.. I drove past a whole bunch of office insulation off cuts a couple of weeks ago and which is fire retardant (and free!). It's an inch thick which is a perfect thickness to insulate with. Pete EDIT: 29/1/15 decided against using this insulation due to it's ability to soak up lots of water like a sponge  . Went instead for some polystyrene sheets (also free - from the tip). |
|
|
|
Post by Observatory on Sept 24, 2014 18:14:13 GMT 10
Cut the windows out today... The air staple gun is proving its worth... And came up with a silicon scraper made out of some 4mm x 40mm aluminium scrap - works very good. 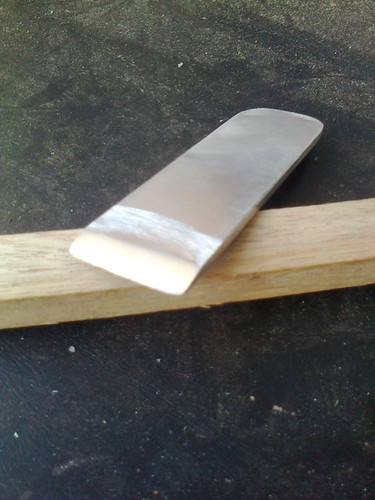 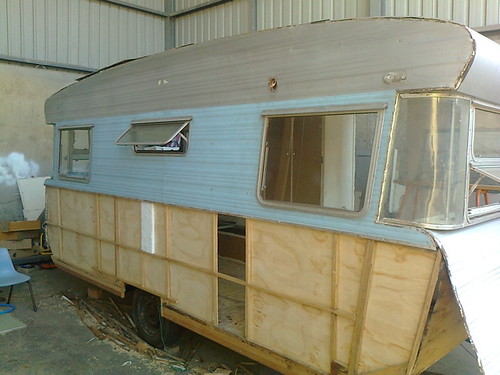 |
|
|
|
Post by DC3Td on Sept 24, 2014 19:23:54 GMT 10
All very good Pete but you forgot the clearcoat didnt you?.Scraper from scrap a good idea too.
|
|
|
|
Post by Observatory on Sept 24, 2014 19:33:18 GMT 10
Ha ha, the clear coat not forgotten Gordon - just knocked off for the day.  . The cladding is currently only held on by 4 screws to give the alignment for the window framing. She's all lining up very sweet. cheers, Pete |
|
|
|
Post by grandad on Sept 25, 2014 18:38:41 GMT 10
A great job Pete,
And you've documented the build incredibly well.
I'm sure it will be of great help to others in the future.
well done!
Cheers
Jim
|
|
|
|
Post by Observatory on Sept 26, 2014 18:45:51 GMT 10
Thanks Jim. If anyone gets some clues from my build then that's great; it's certainly a steep learning curve doing a first time resto like this.  Today got onto the booty of the van. To get the thickness of these new shaped pieces of meranti; I glued on a layer of scrap 4mm 3 ply brace. I used the aluminium cladding as the template to pencil the shape. 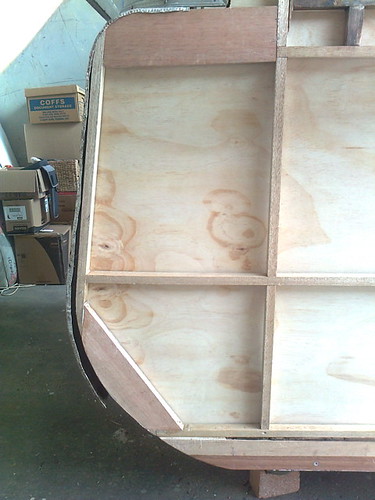 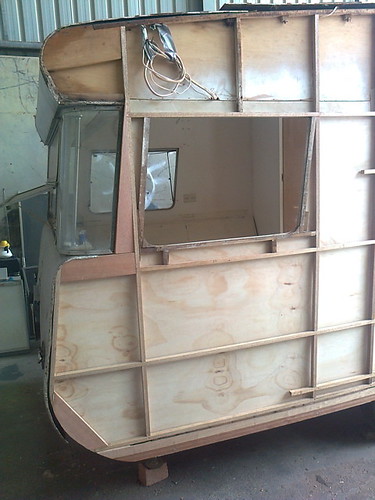 At the end of the day - lots more glue, staples and some clamps. NOTE: with the inner panels I found the frame with the staples by pushing drawing pins through the panel into the frame then attaching a straight line of string for a guide. Worked well. 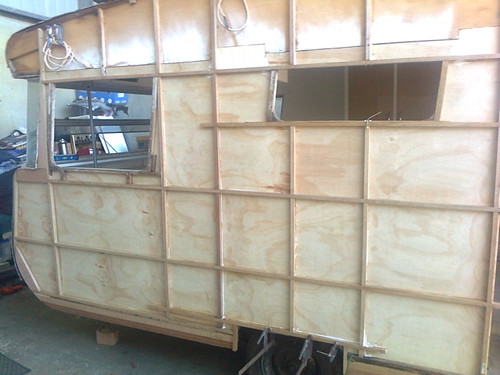 |
|
|
|
Post by DC3Td on Sept 27, 2014 9:53:47 GMT 10
Gday Pete.If i`m reading your above post correctly,you`re adding a 4mm thick ply strip to the meranti to give you the desired thickness? Now what you might have to check is once you fit the side cladding & position the J mold in place is that the screws pick up solid timber & not bed between the ply & the meranti.That said a bead of sika or such like along all the framework will seal any water that might weep under the screw heads.When we used to build buses decades ago we fixed sheeting like laying tiles - drilled & popped from the centre out.Stops buckling.Well thats my 2 cents worth. gordon
|
|
|
|
Post by Observatory on Sept 27, 2014 10:50:38 GMT 10
Read me spot on Gordon; i.e. The 4mm 3ply is sandwiched between the meranti and the wall panel faces to give the correct thickness.
Good tip on potential problem of screws seating between the join. I'll watch for that when refitting the cladding and j-mold.
Also good tip on preventing the cladding buckling by drilling and screwing from the center out.
Thanks heaps,
Pete
|
|
|
|
Post by Observatory on Sept 30, 2014 14:14:38 GMT 10
Difficult decision time...  The new wall is bowing out (see photo) from the pressure of the upper cupboards and the fact that they've sagged for many years after water damage. The sink cabinet is not butting up square to the wall due to the outward bulge in the wall. I'm afraid it's gotten too big a job to correct as it would probably mean removing the ceiling/roof and untying all the cabinetry to put in new battens. It's sad to compromise on the quality of this build but I think it will now be a "salvage" rather than "restoration" job. 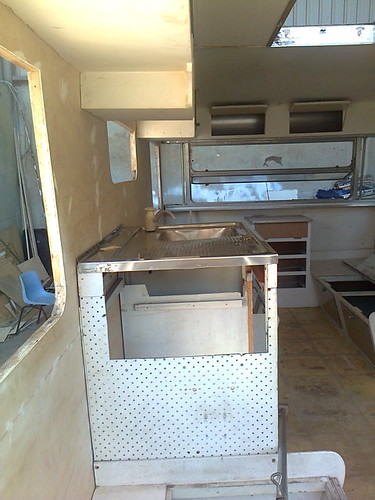 |
|
|
|
Post by cobber on Sept 30, 2014 16:26:42 GMT 10
G'day Pete, I once owned a Don caravan with the same problem ( a feature of Don caravans I have been told  ) I squibbed on doing the restoration and it eventually finished up in the hands of forum member Colin. My understanding is, he replaced much of the damaged frame work, as you have done, then he removed the sink cupboard and adjacent cupboards, tied a strap from the bowed-out wall across to the other side and pulled the bowed wall into line. He then re-installed the cupboards fixing them securely to the floor and the wall. I don't know for certain sure, but I imagine he would have fixed metal diagonal straps in both directions within the cupboards before releasing the restraint strap. So as to not mess up your thread I'll just give links to the Don. This photo shows just some of the frame work that was replaced. img.photobucket.com/albums/v369/mate/mate030/ScannedImage-11.jpgThis photo shows the cupboards free standing and the blue strap used to pull the wall in img.photobucket.com/albums/v369/mate/mate029/ScannedImage-21.jpgWhen finished she came up looking pretty good, he's very proud of his effort, so am I  , and you will be proud of yours too when you finish it. img.photobucket.com/albums/v369/mate/mate028/ScannedImage-27.jpgCobber. |
|
|
|
Post by DC3Td on Sept 30, 2014 17:21:08 GMT 10
Don`t you dare give up Pete....Now:simple solution - a length of scrap timber maybe 4x2 placed its length under the ceiling cupboards.Now gently prop up till you can see they`re level.As you lift the prop you`ll probably see the sink cupboard align with wall.Check the sink cupboard for level.Add a couple of screws through the sink cupboard frame to a couple of frame studs.Now your wall is pulled in straight.Until you`re ready to finish the upper cupboards,cut a couple of timber props & position them say,one each end of the sink which will keep the upper cupboards more or less level.Then its up to you how you finish it off.Maybe a couple of wrought iron style shelf supports from the big green shed? You`ll probably have to add a couple of screws from the outside frame through or vice versa or both.That way your upper cupboards remain flat to the wall/the wall stays flat & the support brackets keep it all together.Ok.afternoon teas over,back to work. gordon
|
|
|
|
Post by Observatory on Oct 1, 2014 13:17:43 GMT 10
Okay no quitting got it  BTW I wasn't giving in; just realising that compromise was on the cards. Either way this job is getting done!  Thanks Gordon and Cobber for giving me some new options and tips - so appreciate the helpfulness of this forum. So had a rethink and as the photo shows: propped up the upper cupboards with metal poles... Also pulling the wall in with a thick pine beam; using rope attached to a metal girder of the shed wall. Internal, diagonal bracing in the upper cupboards sounds like the way to go - probably about five of them to evenly distribute the tension. And of course screwing and gluing the sink cabinet into the frame while the wall is tensioned. There is a hell of a lot of pressure on those upright poles at the moment, so I think I'll give the structure a day or so to settle in to the new position. Okay tea breaks over - back to work... 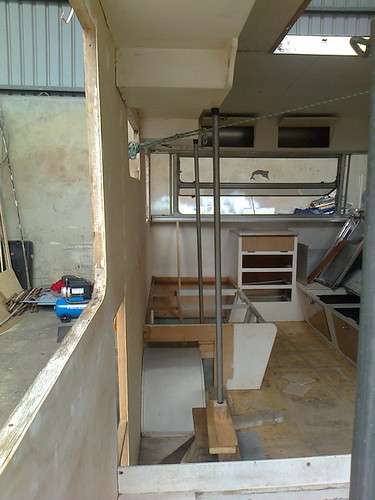 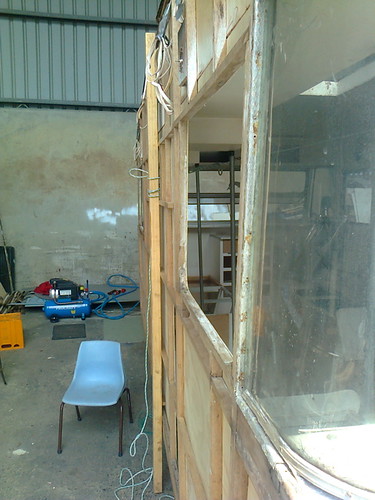 |
|
|
|
Post by DC3Td on Oct 1, 2014 17:46:35 GMT 10
Gday Pete.Ok,i see you`ve removed the sink cupboard which i guess is allowing you move about the job more easily & sort that out also.Now i dont know if you have any scrap steel lengths lying about but i`m thinking a couple of reo lengths (pretty cheap to get hold of) cut to the outside width of the van PLUS allowing for 2 bends at right angles say 50mm each end which gives you the scope to place them across from each window openings as braces.So as you work along the inside whatever width it is at one end will be the same at the centre & other end.You may of course have other idea/s.Anyhows it looks like youve got it under control. gordon
|
|
|
|
Post by Observatory on Oct 1, 2014 19:11:20 GMT 10
G'day Gordon,
I like your cross bracing idea but maybe with a little tweak: use a long upright pine beam on the outside of each window and pull the wall in square with two ratchet straps - one strap on the front opposite windows and one the back two? The reason I'd prefer using wood is that the pine beams are flexible + cushioning to the frame and would be in contact with all the horizontal frame beams from top to bottom - creating a more even pressure on the whole frame.
My concern with using rio is that it might apply too much pressure to one point in the frame - risking cracking it.
Pete
|
|
|
|
Post by Observatory on Oct 2, 2014 15:36:57 GMT 10
Howdy, the ratchet straps are in place and have pulled the cheeks in - a bit like fish face - exaggerating  Tomorrow I will reposition the cupboard supports so the sink cabinet can go back in. I'm thinking metal screws to hold the sink cabinet firmly into the chassis. Bought some of that metal strap to brace the upper cupboards as well. The trick will be attaching it to the battens and wall frame inside those tiny cupboards.  Pete 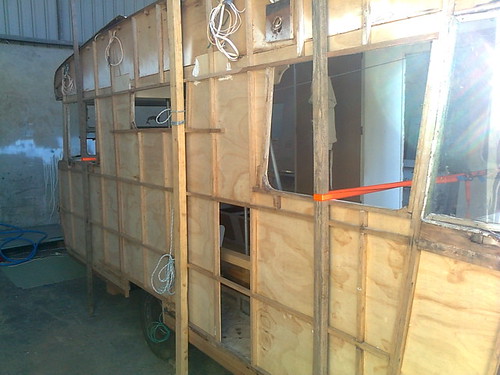 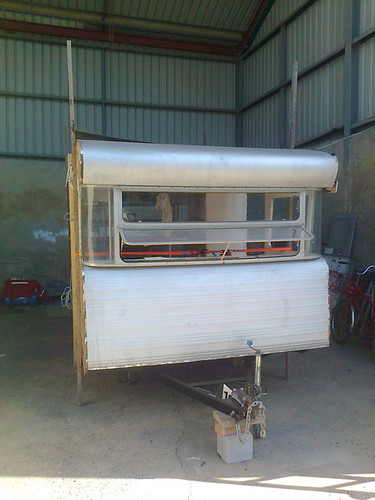 |
|
|
|
Post by greedy53 on Oct 2, 2014 17:31:33 GMT 10
question how do you take the body of the frame is there screws or bolts thinking of doing this to repair the frame
|
|
|
|
Post by Observatory on Oct 2, 2014 19:09:50 GMT 10
Hi Greedy, This is the only van I've ever worked on and it really depends entirely on what model van you have. Have a read through page 1 of this thread - i've described there how I did it. I don't think I missed out anything. Some caution though; the jacking up process was a bit flawed in my approach. In hind sight it would have been better to use some stronger cross beams made from hardwood to prop up the body that don't flex as much as mine did. Check how strong your supports/z rails are before even thinking of jacking it up - mine were very weak. And of course those terrible cheap saw horses are hopeless. Important to jack it on each of the four points a bit a time and listen to it creak while your heart is in your mouth.  Have a look at this resto as well: valiant restoCheers, Pete |
|
|
|
Post by DC3Td on Oct 2, 2014 21:54:06 GMT 10
Hi Pete.Yep very good idea using the ratchet straps & has been done before.Reason i went with reo idea (you could weld a flat steel lug each end) was after we framed our buses using 1" x 1" tube we would find warping from the welding so back then we`d use same sized tubes with welded lugs on each end to brace the frame as we went along riveting the zincaneal sheeting.Yes,the frames were welded in a jig/checked for square/warp etc but there was always some degree of warp.Once the sheeting was attached everything came together as it shouldve.I still have a roll of that ghastly brown sealing tape.Still moist after 45 or so years ago.These days though they just run beads of sika across the frames & push the sheeting onto it with bare minimum use of rivets.Anyhows,seems things are working out alright for you. gordon
|
|
|
|
Post by Observatory on Oct 3, 2014 15:24:50 GMT 10
G'day Gordon, I'm so lucky getting tips from someone who built buses.  thanks mate! Propped up the cupboards like you suggested Gordon. The inside is looking straighter now. Moving slowly at the moment as this part has required a lot of careful thinking. Will rest the brain over the long weekend.  Cheers, Pete 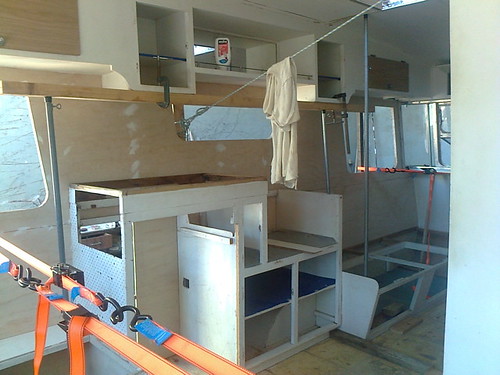 |
|
|
|
Post by DC3Td on Oct 3, 2014 17:40:04 GMT 10
Now youre cooking Pete.Well at least the kitchen unit is in place so thats a good start.Now i dont know what you have in mind as far as splash backs go - tiles/laminex/ali or ss sheeting but every caravan should have a spice rack right? So....once youve decided whats going on that wall section i`m thinking a rack smack bang in the middle above the kitchen window.Why? Why not.It doubles as a support for the upper cabinetry.Likewise you could also situate one each side of the centre which maybe could be used for glasses/mugs/nick nacks.Screwed in with slot heads (as we all know Cobber loves to see) your top cupboards aint going nowhere.Another Observatory moment - check your top cabinetry for level & also see what depth (height actually) you have from floor to under top cabinets.You might have to fudge a couple of mils in the overall scheme of things. Cheers.Enjoy the w/e. gordon
|
|