|
|
Post by akeepsake on Mar 3, 2015 22:13:55 GMT 10
Agree with George! It'll be a first class van when it's done and this thread is a great source of innovation and ideas for others to follow.
I used a exterior waterproof membrane as used under tile floors to waterproof floors walls etc ( check out my Jenno thread it's on there) it stretches 3mm so won't let you down . Also I used water based paint as it's more flexible than oil based
Cheers Andrew
|
|
|
|
Post by Franklin1 on Mar 24, 2015 18:18:27 GMT 10
Replacement window rubber dilemma...
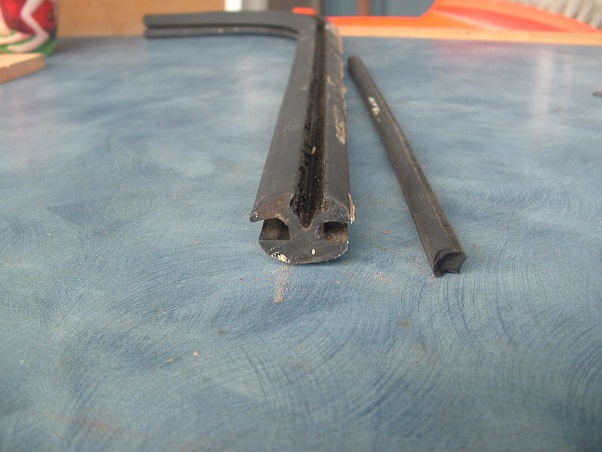
I have two fixed windows at the front of the van, and the fixed window at the rear. I have not made the cut-outs in the plywood yet, and won't until I actually get replacement rubber. The window rubber is the H-channel style with the filler insert...
I can't seem to track down this rubber size at the usual suppliers in the Sydney region. This is what I've discovered so far...
1) Clark Rubber was sourcing their rubber profiles from Spectrum Rubber, but severed that connection about 12 months ago. My local Clark Rubber store is winding down its stocks pending their Head Office announcement of a new supplier. Larger Clark Rubber stores may still have some "left over lengths", but once they've gone, that's it. The size I wanted wasn't available at my local store.
2) Spectrum Rubber source some of their rubber from Rare Spares. It just so happens the size I'm looking for is a Rare Spares item, but is "temporarily unavailable" and they don't know when it will be available again.
Has anybody recently bought window rubber the same size and profile as what I'm looking for?? I've looked through the list in the Techo Parts thread, but nobody there puts the actual dimensions with the profile diagrams, so I don't know whether I'm looking at stuff that might be suitable.
cheers,
Al.
|
|
|
|
Post by JBJ on Mar 24, 2015 19:11:27 GMT 10
Hi Al,
We have an upholstery shop up here that carries a fair stock of rubbers. If you let me know how much you need, I will go & check their stock for you in the next few days.
I'm happy to buy it for you if they have it, & mail it to you.
JBJ
|
|
|
|
Post by brucenan on Mar 24, 2015 19:20:22 GMT 10
The local Windscreens O'Brien here in cairns have a good range. Maybe give them a try if they are handy. Bruce
|
|
|
|
Post by Franklin1 on Mar 24, 2015 20:43:37 GMT 10
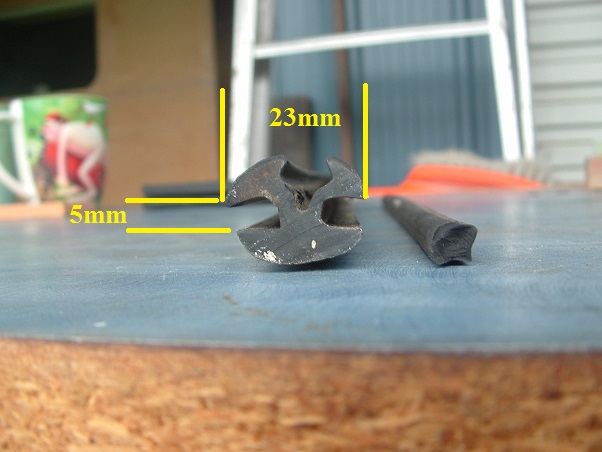
Thanks guys for the feedback. One thing that frustrates me about the Oz supplier websites is the lack of detail showing against the products. It's hard to know for sure if what you're looking at is the right stuff or not. Here's a couple of screenshots from the website of a rubber supplier in the UK. Note the level of detail provided, including the minimum radius that each profile will bend around... 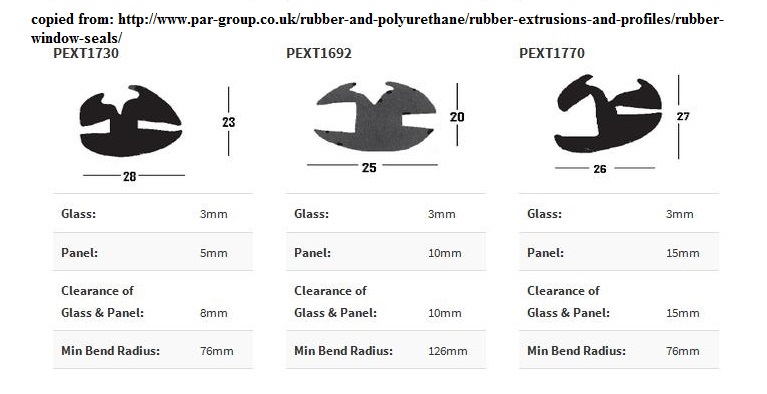 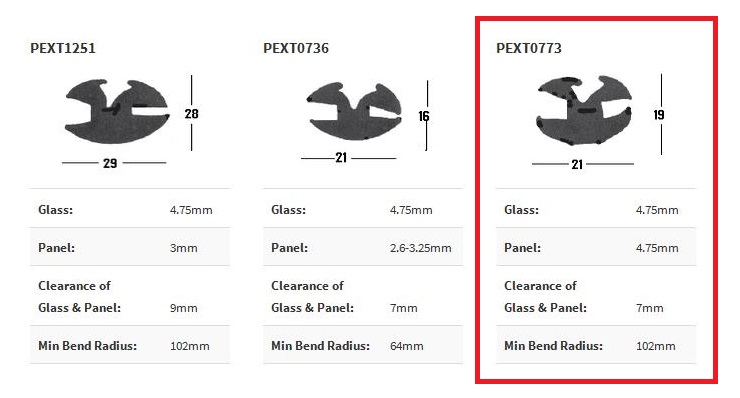 I just wish the Oz websites were as sophisticated.  JBJ, if you do happen to be near the upholstery shop in the near future, I need eight metres length for each of the rubber profile and the filler insert. The profile size I need is the one I've put a red border around in the above photo. The glass in the van windows is 4mm thick, and the plywood surround is 4.5mm thick. From what I read on the internet, the channel gap in the rubber profile can be up to 1mm greater than the thickness of the frame/glass it's being fitted to, so rubber with a gap of 4.7mm both sides will still seal both my glass and ply. I'd appreciate you checking out your upholstery shop for me. Thankyou very much for the offer.  cheers, Al. |
|
|
|
Post by JBJ on Mar 25, 2015 18:29:46 GMT 10
Hi Al
Went to local upholsterer, & they have no stock of the rubber I used.
It was made by UES international, part number 679-2.
I looked at their website, & it appears no longer available
Sorry I cant produce anything for you
JBJ
|
|
|
|
Post by Franklin1 on Mar 25, 2015 18:38:36 GMT 10
Thanks for trying, JBJ.  I'm just waiting on cobber to provide some info about the thicknesses of the glass and ply on the two vans he used a Spectrum Rubber profile on. Seems I might have been looking at the wrong item number in their catalogue, and that maybe, just maybe, the stuff cobber used is the one I need. Fingers crossed... cheers, Al. |
|
|
|
Post by Franklin1 on Apr 8, 2015 19:43:28 GMT 10
March update: Ok, so I'm running a bit behind with this update, but I've spent the better part of the last three weeks sanding the whole of the outside of the van, to get the gloss off the Bote-Cote resin surface (and wore the layers of skin off a couple of fingers in the process  ). ).
Today I glued the canvas onto the roof, but I'll take a couple of steps back before I talk about that bit...
I tested Digger's Gripcrete on a test piece of canvas a couple of weeks ago. It seemed to stick the canvas well to a piece of plywood, and after a week to let the Gripcrete cure completely, it took quite a bit of force to pull the canvas off the ply.
However, after reading on this forum about people using paint to stick down their calico, I decided to do another test using acrylic primer/undercoat to see how well that stuck the 14oz canvas I was using. The end result was that it took about twice the force to pull the canvas away from the Gripcrete versus the force to pull the canvas away from the paint...
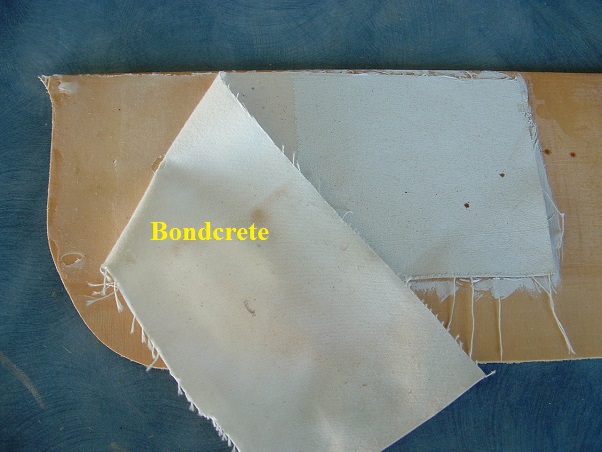
(sorry, I labelled that Bondcrete, when it should read Gripcrete )
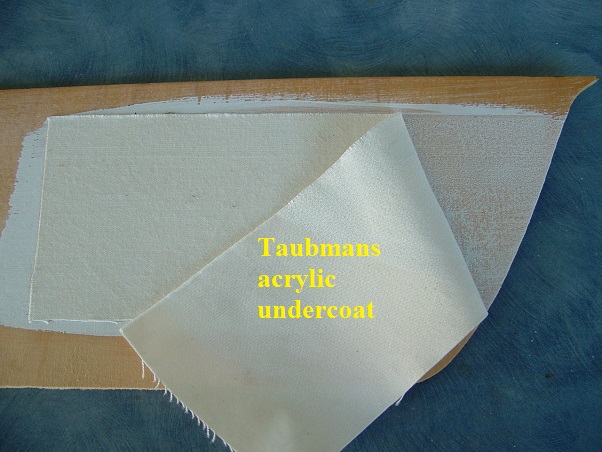
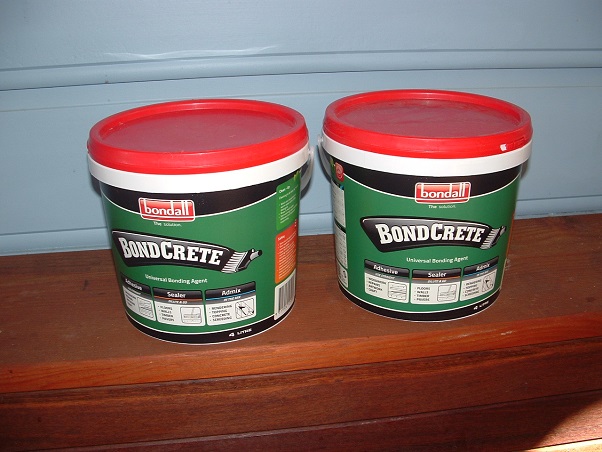
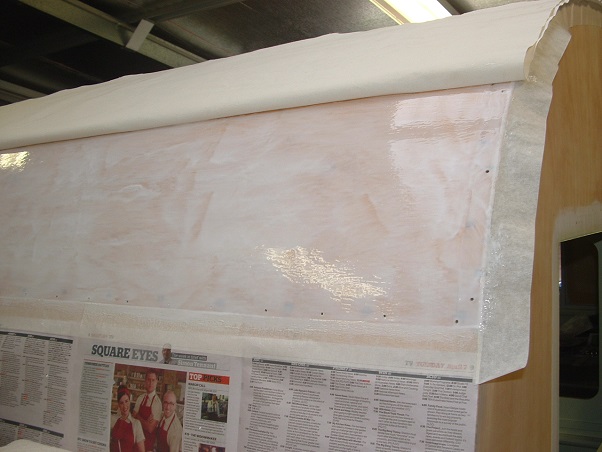
The test convinced me that using Bondcrete (the equivalent product to Gripcrete) was a surer option for the heavyweight canvas I was using. I bought two 4-litre containers of Bondcrete because they said 4 litres was enough to cover only 3.5 square metres, and I'd calculated that I had 7 square metres of roof area...
First job was to mask off the borders where the canvas would be cut after glueing...
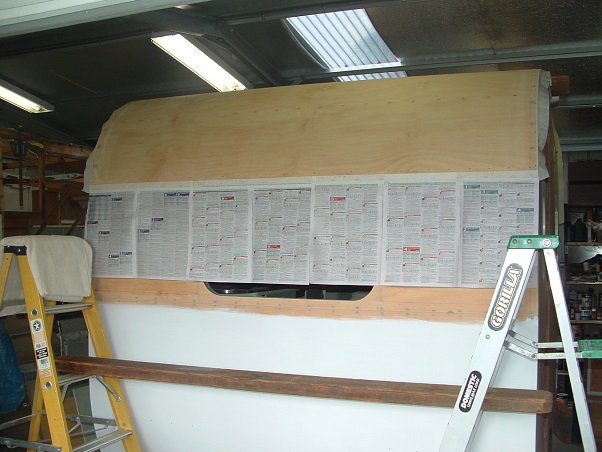
Then line the canvas up and start applying the glue from the front, and sticking the canvas down...

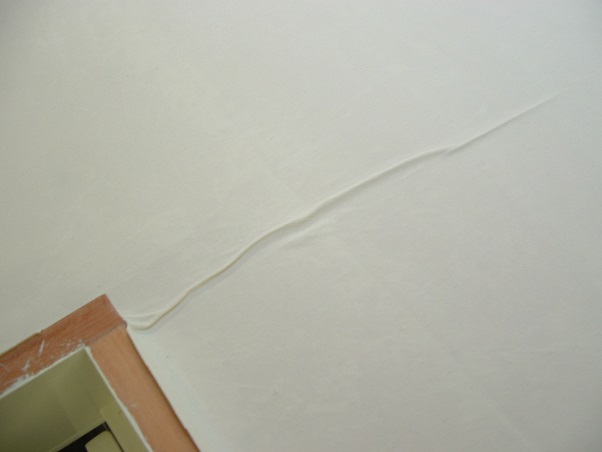
Everything was going well until I got to the hatch opening, where it all went haywire. I ended up with creases in the canvas, and no matter what I tried to do, I couldn't remove the creases altogether. I could only shift them to another position in the canvas. You only get a certain window of time to work with the Bondcrete before it starts to go off, so I ended up manipulating the creases to run off the corners of the hatch opening. They will become a landscape feature for birds flying overhead ...
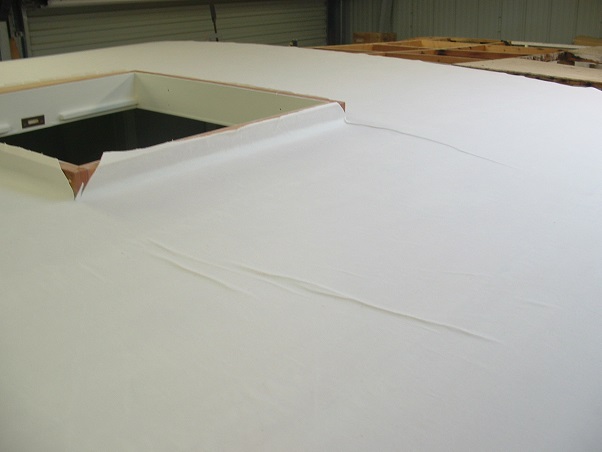
I guess the trick must be to knock out the hatch opening framework before recanvassing a roof, so you've got a completely level roof to work on. Then reinstall the framework after the canvas has dried.
I managed to get the canvas to sit flat at both ends of the van that are visible at street level, so at least those sections worked out ok.
And just getting back to the amount of Bondcrete needed... I ended up using a mere 1.5 litres for the whole roof, nowhere near the 8 litres they said it would take. I presume the Bote-Cote resin I'd previously applied to the plywood would have sealed the surface so the Bondcrete didn't soak in, but still it didn't seem to add up. I certainly didn't skimp on applying the Bondcrete, as this photo shows...
I've already thrown my Bunnings receipt away, otherwise I'd take the other 4-litre container back and buy some mastic sealant with the proceeds.
cheers,
Al.
|
|
|
|
Post by penguin on Apr 8, 2015 20:29:01 GMT 10
Looks good Al. You continue to raise the bar. Even without the receipt you can still return products to the Bunny-hare house and get a store credit.
|
|
|
|
Post by Franklin1 on Apr 9, 2015 11:38:23 GMT 10
Thanks for providing that info, penguin. I wasn't aware of the store credit option, but I took the spare 4 litres back this morning and it was no hassle at all. I bought the mastic for the J-moulds with the credit, so that's saved me wasting $45 on 4 litres of Bondcrete I didn't need. cheers, Al. |
|
|
|
Post by akeepsake on Apr 9, 2015 12:01:23 GMT 10
Al looking good I reckon the bondcrete will be a great sealer/waterproofing and I wouldn't worry too much about the wrinkles on top as most things that age have wrinkles!  It would be very hard to do on your own so well done! |
|
|
|
Post by Franklin1 on May 31, 2015 18:46:39 GMT 10
April/May update:
I'm running behind with these updates, but my four-year-old laptop decided to cark it a month ago, and wouldn't let me have access to any of my files or progress photos. I had to wait for a techo friend to visit recently and salvage all the info. Got a new laptop now, and still figuring out how to drive it properly...
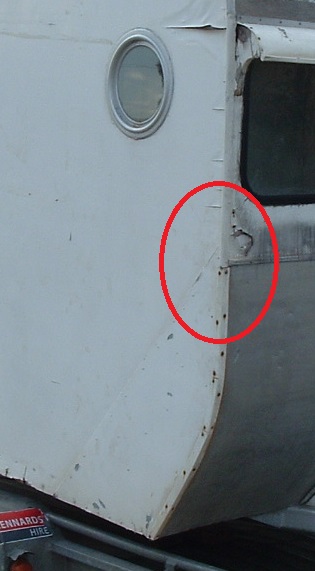
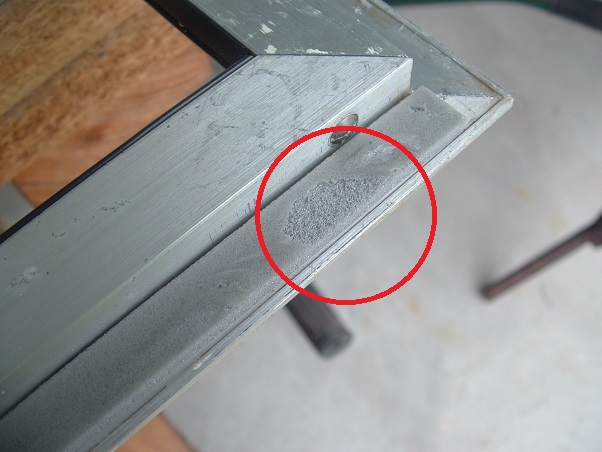
J-mould - Some time in the history of this van some repairs were done to all four lower corners, to cover rotted plywood with sheet metal. Rather than unscrew the J-mould and prop it out of the way while doing the repairs, they hacked it off at the top of the repair, and then fashioned some aluminium angle in an amateurish way to cover the corners. The screws they used in the ali angle weren't the best either. This photo shows how a typical corner of the van looked when I bought it...
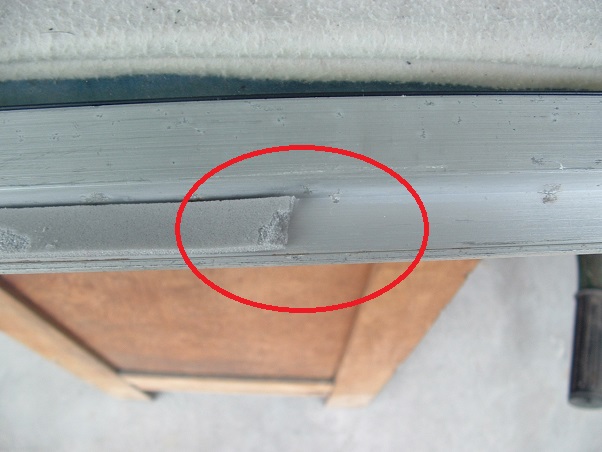
After cleaning up the J-moulds, and temporarily fitting them recently, I was left with moulding that was now too short to be of any use...
What to do?? Well, the only option was to hack it back even further, which I did, and it now lines up with the front and rear ends of the roofing canvas (ps. I didn't "hack it" really - cut it nice and neat )...
The fibreglassing that I did around all the edges will have to provide the necessary protection where it's not covered by J-mould.
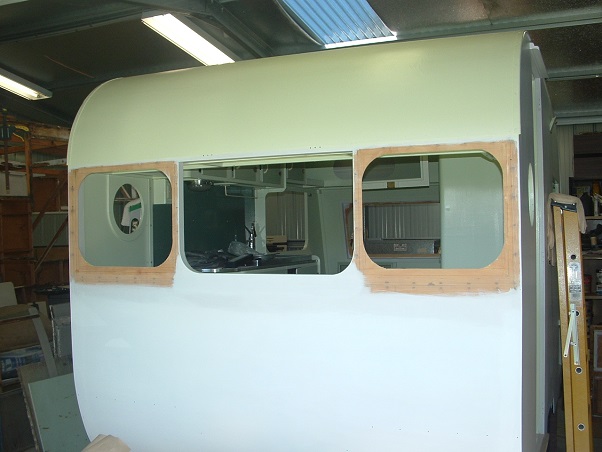
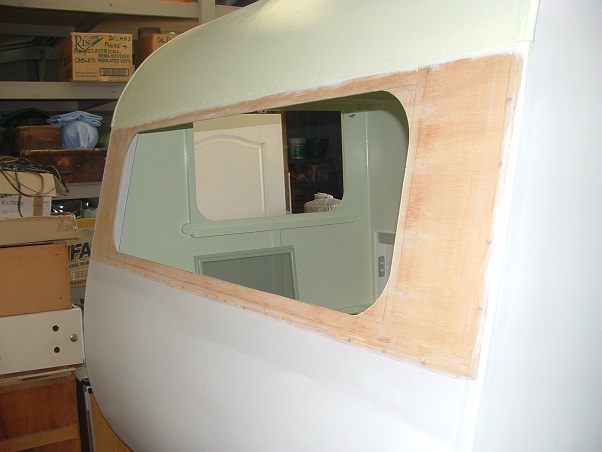
Fixed window rubbers - This ended up being a fairly "complicated" exercise. Cobber kindly sent me a sample of the Spectrum rubber profile he used on one of his vans. The dilemma with these rubber profiles is knowing for sure whether they will bend neatly around the radius of the glass corners. My glass had 3" radius corners, and I feared I was going to end up with the same problem that Sgtl experienced with her Phoenix caravan . The glass in both front windows of my van was pretty scratched and chipped, so I decided the safest option was to get new 4mm glass cut and have the corners cut to a 4" radius instead of 3". It cost me $100 to have the two front windows and the large rear window cut and all the edges chamfered.
At the time of putting in my glass order, I was talking to the fella about window rubbers, and he told me they source all their car window rubbers from Oz Auto Moulds & Rubbers in Hallam, Vic. I had a look on the Oz Auto website, and they sell a few different sizes in the H-Mould rubber profiles ( www.ozautomoulds.com.au/c/27/h-moulds-rubber ). One of the profiles seemed like it would do the job I wanted, and after submitting an enquiry I went ahead and ordered some.
The rubber I bought is known as "machinery rubber", and is 30mm wide, compared with the Spectrum rubber profile of 25mm wide...
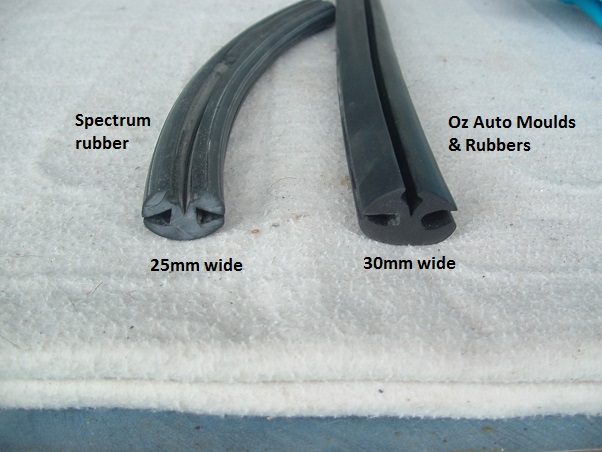
You can also see in the following photo that the Spectrum rubber has a sort of "ribbed" appearance, whereas the Oz Auto rubber is plain...
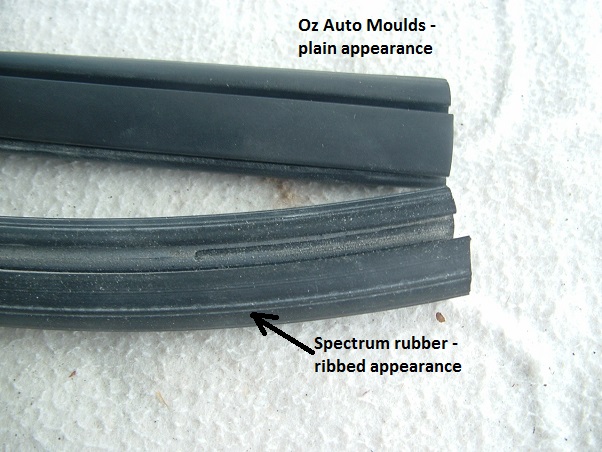
What swayed me to the Oz Auto rubber was the cost, and the convenience of buying it. The Spectrum rubber profile was $30.58 per metre, including the filler insert, but you have to drive to the store and buy it (which is a 250km round trip for me, or about $40-odd worth of petrol and four hours of my time). Total cost from Spectrum for 8 metres would have been approx $245 plus petrol plus time. The Oz Auto rubber was $6.23 per metre including the filler insert, and I could order it over the internet. Total cost for 8 metres was $49.84 rubber, plus $33.62 shipping to my home, for a total of $83.50, or less than a third of the Spectrum deal.
The Oz Auto rubber I bought is code number OZ1059, and the filler insert is code number OZ GL2.
I'm still waiting on my brother to come over and give me a hand fitting the windows in position, but I've test-fitted the rubber around the glass corners, and it fits quite neatly. The openings in the plywood have been cut in readiness...
Side opening windows - I've had a frustrating and annoying experience when fitting these windows back on the van. When I refurbished them, I scraped off all the original felt seal around the perimeter, and replaced it with closed-cell foam tape. When I fitted the windows back on the van recently, and then tested them to see how well they operated with the new window stays I made, the foam tape wanted to keep sticking to the surface of the gloss paint on the plywood surround. Not only did it want to stick to the paint, but in some cases the bloody stuff wouldn't let go, and it ended up ripping away from the window frame...
So now I have to redo these windows from scratch, and I'm thinking I need to use some sort of felt seal like was used originally. I've searched and searched, but I can't seem to find a supplier who sells the felt in 12mm wide rolls, at least not within coo-ee of my place anyway. This is the sort of stuff I'm thinking I need...
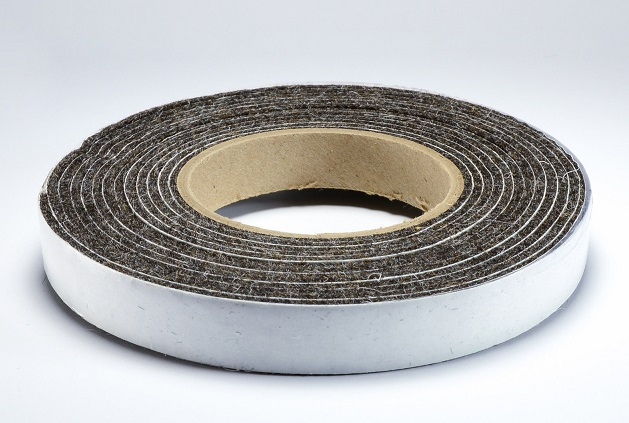
Those of you who have refurbished your aluminium windows to seal against the ply walls - what did you end up using, and how well is it working? Does anybody know where I should go looking to buy a roll (or two) of 12mm-wide felt that is 3mm thick? I need 10 metres to do three windows, plus I'm going to put it on top of the hatch frame opening so the hatch is cushioned when it is closed.
cheers, Al. |
|
|
|
Post by cobber on May 31, 2015 20:35:44 GMT 10
G'day Al, Thanks for the info regarding window rubbers, quite a difference in cost per metre aye ? why didn't you tell me about Oz auto moulds before I bought mine ( are you sure they're not made in China ) I have added them to the rather long list of window rubber suppliers in the suppliers list. Cobber. |
|
|
|
Post by sportsman 1 on Jun 1, 2015 15:42:00 GMT 10
Hi Al, hope all is good with you again!
For felt try:
Australian Felt Specialists Pty Ltd,
44 Springfield Rd, Blackburn, Vic. 3130
Ph 9894 0175
Email sales@felt.com.au
Ask for Colin
We use them for all sorts of felt for all sorts of applications at work. They supplied felt for the window seals on the Clipper.
They can probably send direct to you or I can pick it up and send it.
Cheers,
Leigh.
|
|
|
|
Post by Franklin1 on Jun 1, 2015 17:49:21 GMT 10
Thanks, Leigh - will give them a call tomorrow and see how I go.
As a fall-back position, I've found a supplier in Cairns, FNQ, who has the product I want, and will ship to my home. Can't believe I have to search 2500kms from home to find someone who stocks the product. 
cheers, Al. |
|
|
|
Post by sportsman 1 on Jun 2, 2015 10:27:42 GMT 10
Hey Al,
just thinking why not get some more J mould and run it down the rest of the corners at the front? If you make the join neat (as if you wouldn't!) I think it would be hardly noticeable, finish it off better and protect the corners from damage.
Leigh.
|
|
|
|
Post by Franklin1 on Jun 2, 2015 19:32:25 GMT 10
G'day Leigh,
Firstly, the J-mould - I did think about replacing the whole lot of the J-mould, but decided I could live with it covering just the edges of the roofing canvas. The van sort of looks similar to the Country Club caravans in the DHL section. My fibreglassing isn't as good as the CC vans, but if you stand a reasonable distance away, it doesn't look too bad. About 3 kilometres would be a reasonable distance...
Secondly, the felt supplier in Vic - I rang them this morning, and the number transferred to a fella in a car somewhere. He thought he could do something for me, and he would ring me back when he got back to the office. It's now 7:30pm and I'm still waiting for him to ring.
I've ended up ordering a roll from the supplier in Cairns, and hope to have it in about 5 days.
cheers, Al. |
|
|
|
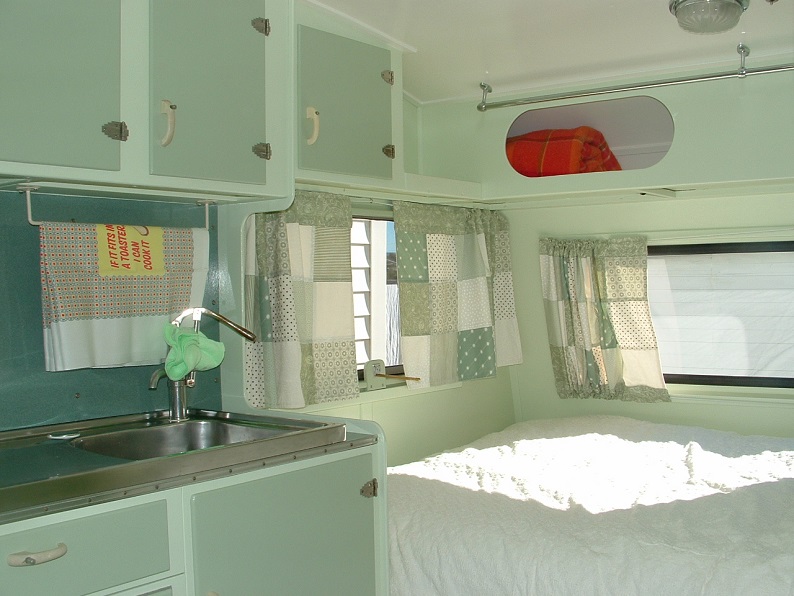
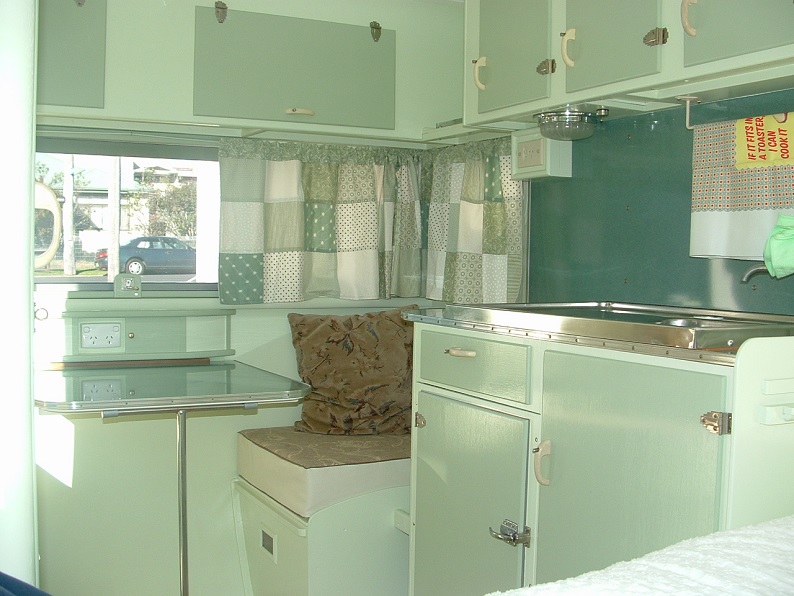
Post by Franklin1 on Jul 5, 2015 21:58:07 GMT 10
June update:
There's been a flurry of activity over the last month, to the point where last Wednesday 30th June, the van was rolled out of the shed for the first time in four years or so...
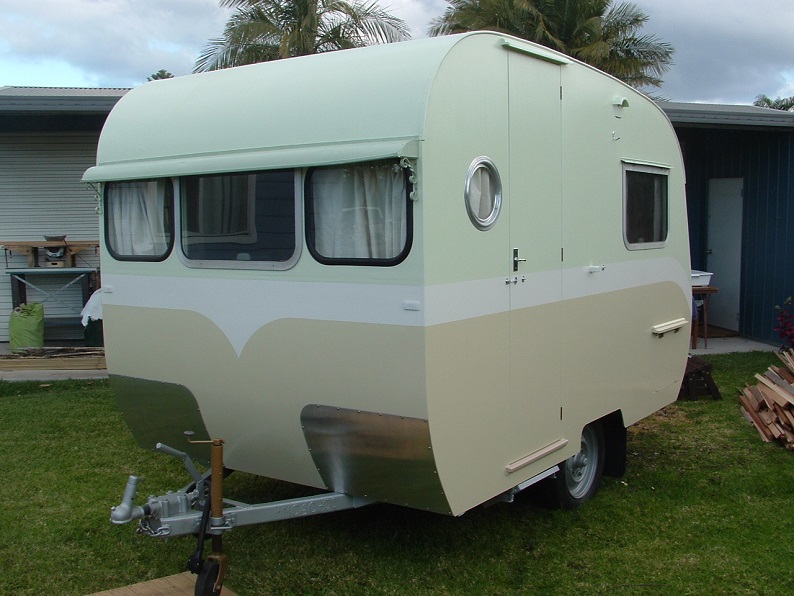
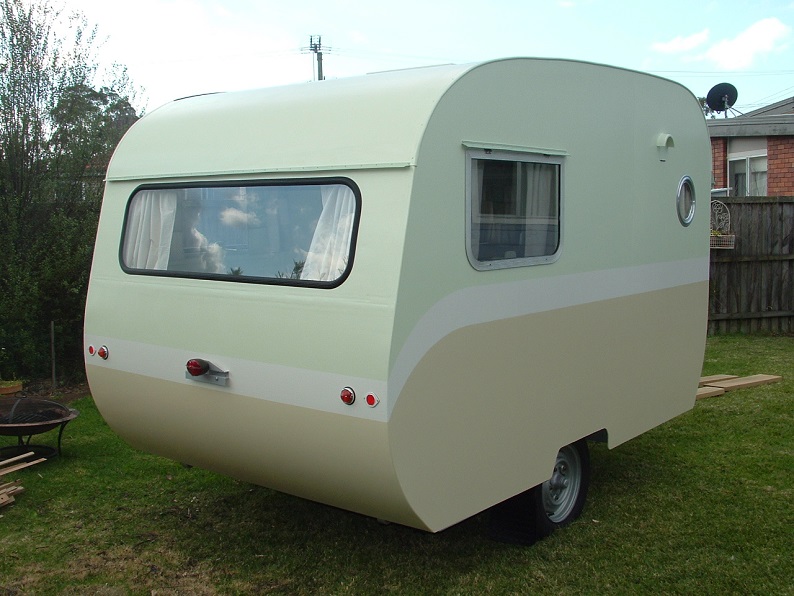
Registration:
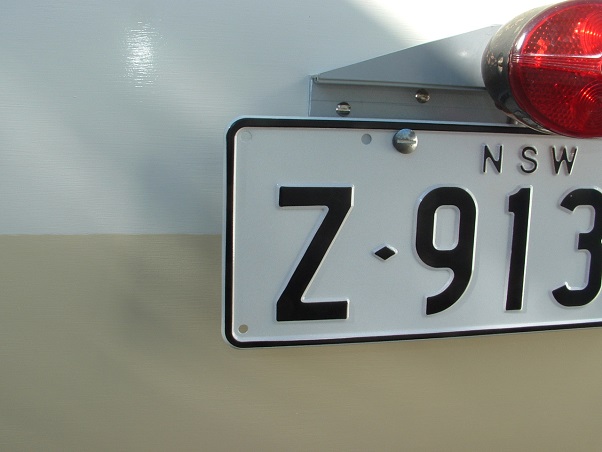
1. In fairness to other owners of original condition "Newcastle" caravans, I have had this van registered as a "Walsh" caravan due to all the changes I made in it. The Walsh name allows me to keep the connections to John Walsh Caravans, who I firmly believe the van was built for. 2. The van has a tare weight of 748kgs, which is quite high for a little 10ft 8ins van, but I guess that's what happens when you use 9mm ply throughout the interior cabinetry work. 3. I wasn't aware you could get a NSW Trailer plate with a white background. I thought they only came in yellow. I paid the extra $10 for the white version, which blends in better with the white stripe on the van...
First trip:
I'm taking the van on its maiden voyage up to Katoomba NSW next week, to celebrate a friend's 60th birthday. I'll be up there for a week testing the van out in freezing weather to see how good the insulation is, that I put in.
I still have a few finishing touches to complete (awning; name plate; other bits) but I've run out of time to have them ready for Katoomba.
Hope you've enjoyed the story of the rebuild of this caravan...
cheers, Al. |
|
Deleted
Deleted Member
Posts: 0
|
Post by Deleted on Jul 5, 2015 22:58:35 GMT 10
Hi Al,
What a supreme effort you have achieved,against odds that would put the rest of us on the back burner!
The van looks fantastic and I'm sure you will get a lot of enjoyment out of it,as I have in watching your progress.
Cheers
hughdeani
|
|
|
|
Post by Don Ricardo on Jul 5, 2015 23:28:07 GMT 10
Only one word for it Franklin1...
M A G N I F I C E N T !
Just showed the photos to Dona Ricardo. Her reaction? "Oh, wow!" She said to tell you she loves the curtains.
Don Ricardo
|
|
|
|
Post by cobber on Jul 6, 2015 8:05:40 GMT 10
WELL DONE AL
The story of this 'restoration' has been an educational experience for everybody, and a great asset to the knowledge base on this forum of how problems can be solved.
We look forward to inspecting it in the flesh and seeing how you have integrated all the clever ideas into the overall design 
Cobber.
|
|
|
|
Post by Geoff & Jude on Jul 6, 2015 8:49:47 GMT 10
it's going to be a real shame to take it out in the weather once it's finished. it might ease the pain of seeing it all wet and dirty if you sell (or donate) it to some sympathetic admirer of your work. geoff 'n jude GeoffnJude, I'm struggling with the concept of handing the van to another owner, after having spent FIVE YEARS of my time working on it... hi al she's turned out to be a real beauty, something you can be very proud of. by the way, our original offer still stands if you want to give her away. geoff 'n jude |
|
|
|
Post by JBJ on Jul 6, 2015 14:31:12 GMT 10
Hi Al,
Good to see you get it completed.
Now you need to get out & enjoy it. I've completed a couple of projects over the years, & have found the best part is being out camping & travelling in it.
You have done a great job, & I hope to see it one day
Thanks for the enjoyment we all got with your postings
JBJ
|
|
|
|
Post by Franklin1 on Jul 6, 2015 17:14:11 GMT 10
Thank you all for your very supportive comments. The van has turned out just as I hoped it would, considering a lot of the time I was just feeling my way around about how to do various parts of it. In the few short trips I've towed it so far (to the Blue slip man, and back to the local servo) I've had a number of people make positive comments about how it looks. One fella getting petrol at the servo came over and gave me "10 out of 10" for the van, and offered me a job repairing rotten timber in the second-hand vans he sells locally. After 5 years on this project, I declined and said "I'm over it!!" I look forward to participating in the various events in the future, including the Nationals next year. See you on the road... cheers, Al. |
|
|
|
Post by shesgotthelook on Jul 6, 2015 17:18:14 GMT 10
' I declined and said "I'm over it!!" ' Phhhhht, that's what they all say. |
|


 ).
).


