willow5075
Full Member
 Willow & the MOTH
Posts: 355
|
Post by willow5075 on Nov 8, 2013 19:50:14 GMT 10
Hope that weather doesn't cause you any grief!!
|
|
Deleted
Deleted Member
Posts: 0
|
Post by Deleted on Nov 9, 2013 5:18:56 GMT 10
Hi Doug You sure are going the whole hog on that sunliner... keep the pix coming . Its enthusiasm like your showing us that motivates others ( well it should motivate others) to get out there and have a go at doing some resto work on their vans... anything is possible if you set your mind to it. Good stuff.   How is that fire situation today?? Always an uneasy time when you can smell and see smoke when you live near bushland...  Reddo |
|
|
|
Post by seeshell on Nov 9, 2013 10:07:55 GMT 10
Hi Doug
You're setting a cracking pace young man - after the floor in the Olympic, I appreciate how much work is involved in what you're doing, and how many skinned knuckles you get.
However, there's something good about getting down to your van's "drawers" and making sure it's all right. Sure it's a lot of work, but you always know there's no surprises lurking there, hey?
But please be careful! Don't get so preoccupied that you get caught out by those fires. Might be time to pack the Justin Case, and throw it in the back of the car so you and your Bride could make a quick getaway. Most of all, be safe!
Cheers
Carley
|
|
|
|
Post by cruisindoug on Nov 9, 2013 17:42:28 GMT 10
As the others have noted Willow, thats a fire - came pretty close to town but pretty safe where I am. Thanks for the encouragement Reddo ... glad your still talking to me since my defection to the fobbergross side   Got lots to do still but getting something done every day I don't have to go to work is the goal at the moment - chiping away at it. Thanks Carley too, time is on my side at the moment as I have some time off work, so progress is happening. Pretty safe where I am from the fires, but keeping an eye out just the same. Todays progress, tackled the clean up of the biggest repair I will need to do, the drivers side rear corner; the more I looked the more I found! 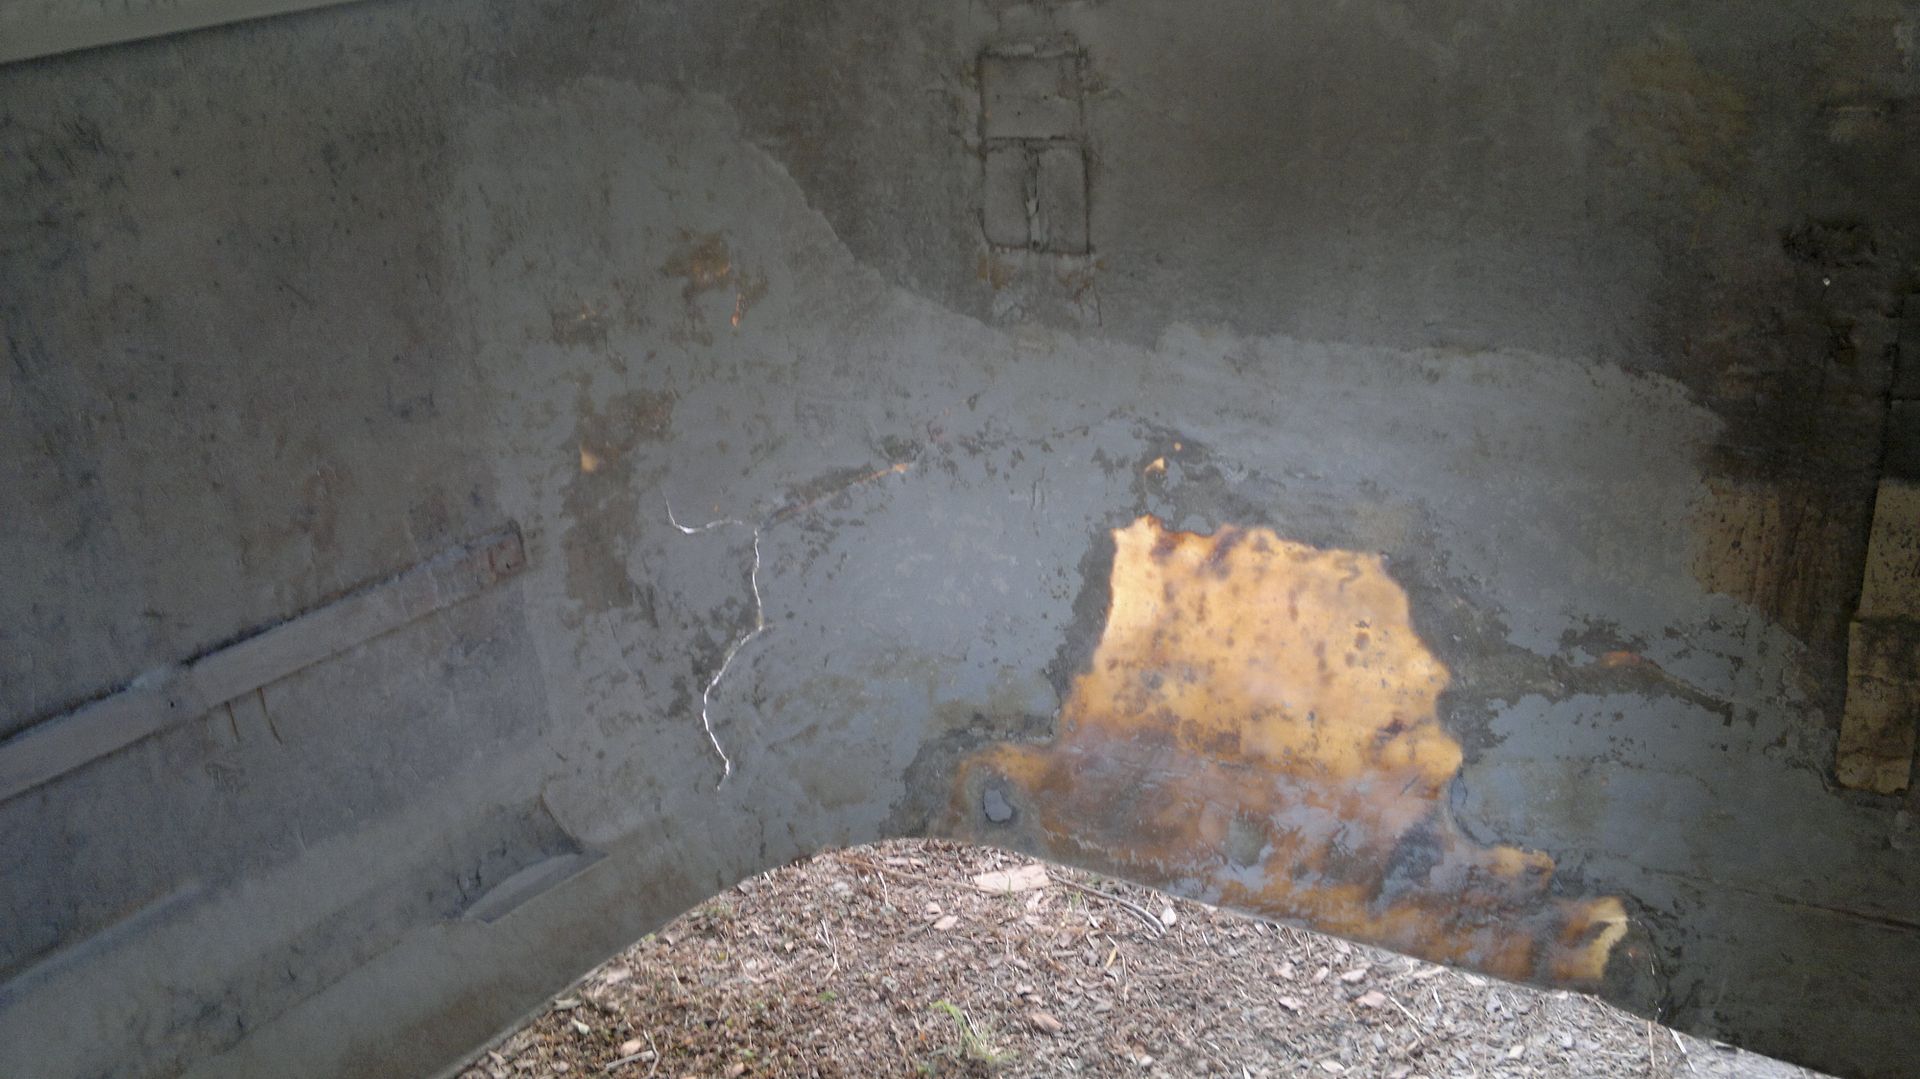 Apart from the huge chunk that has been replaced totally there is cracking all the way up the side you can see the lighter area where I have been sanding it back. Lots of resin but very little matting has been used. The whole side and rear is distorted it must have had a huge shunt (the chassis is bent in the same spot too) at some stage. 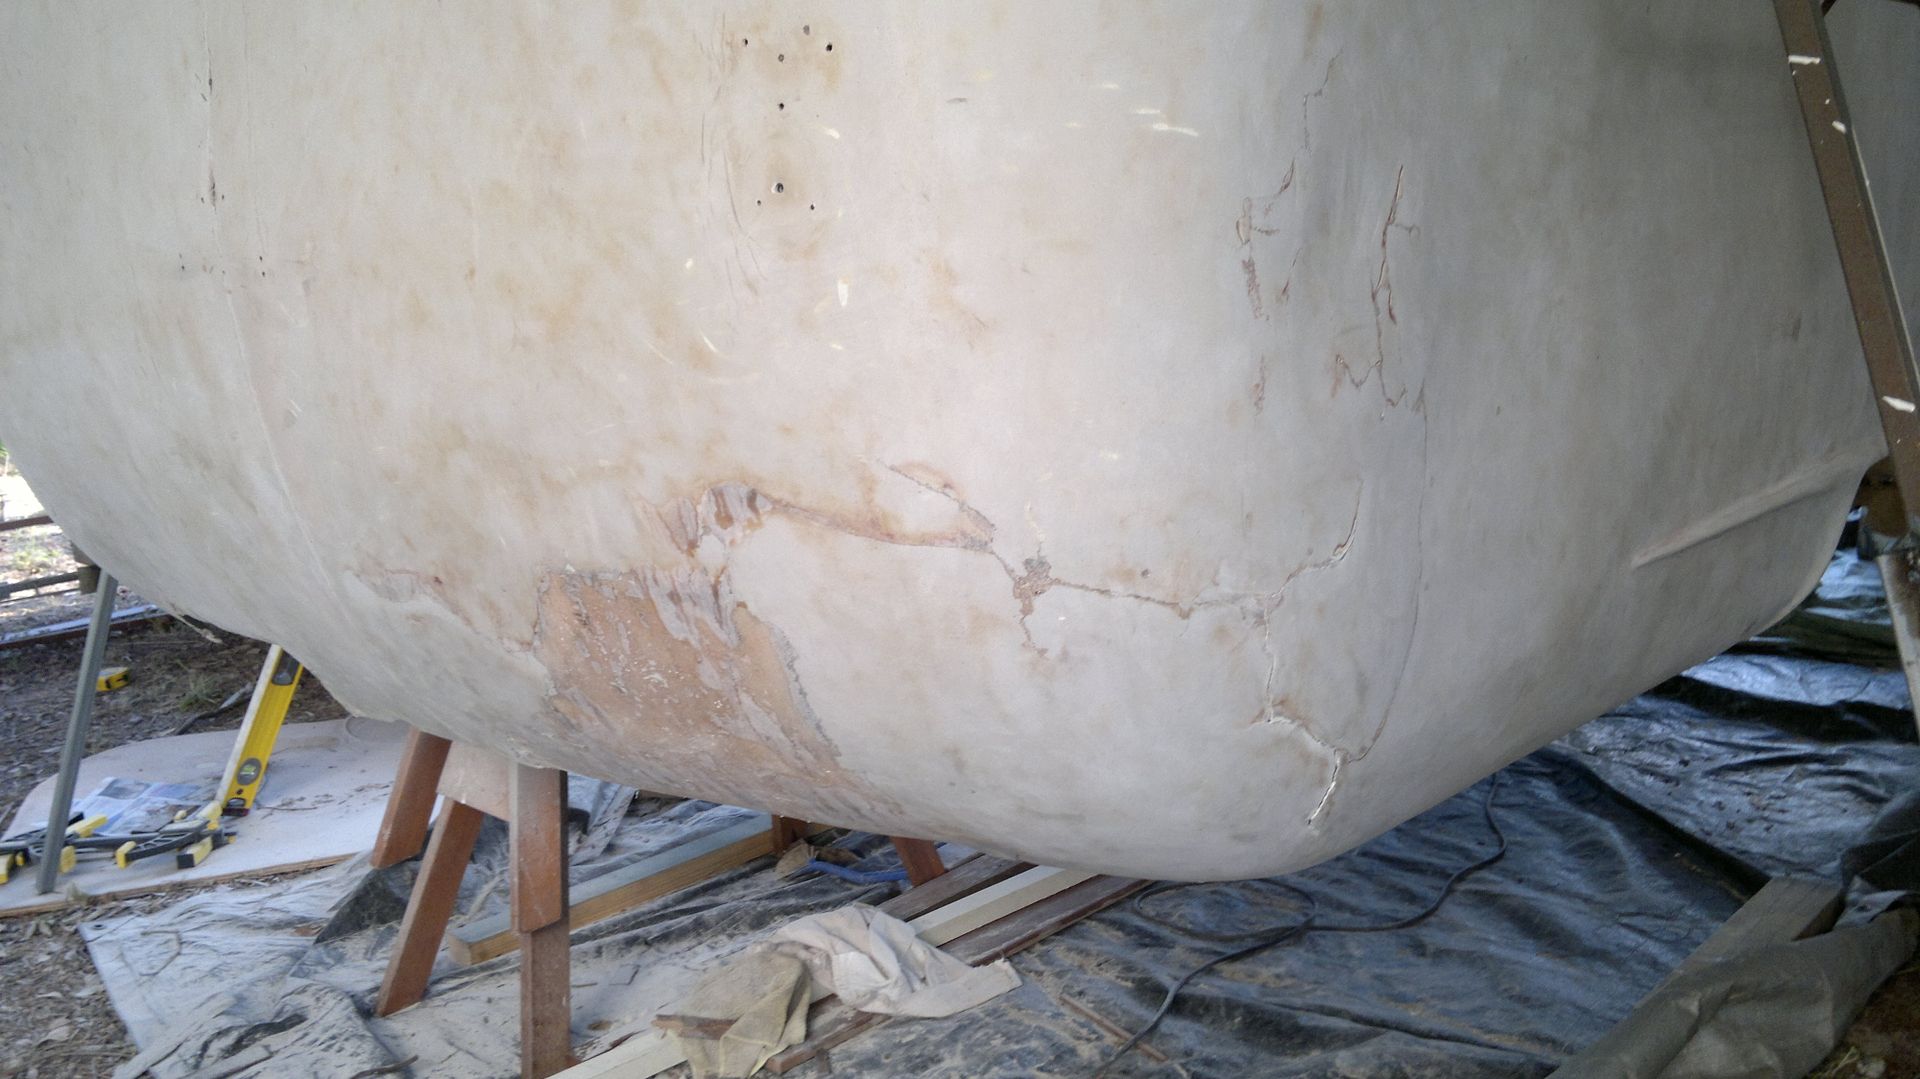 Hard to see but the whole side is collapsed in: 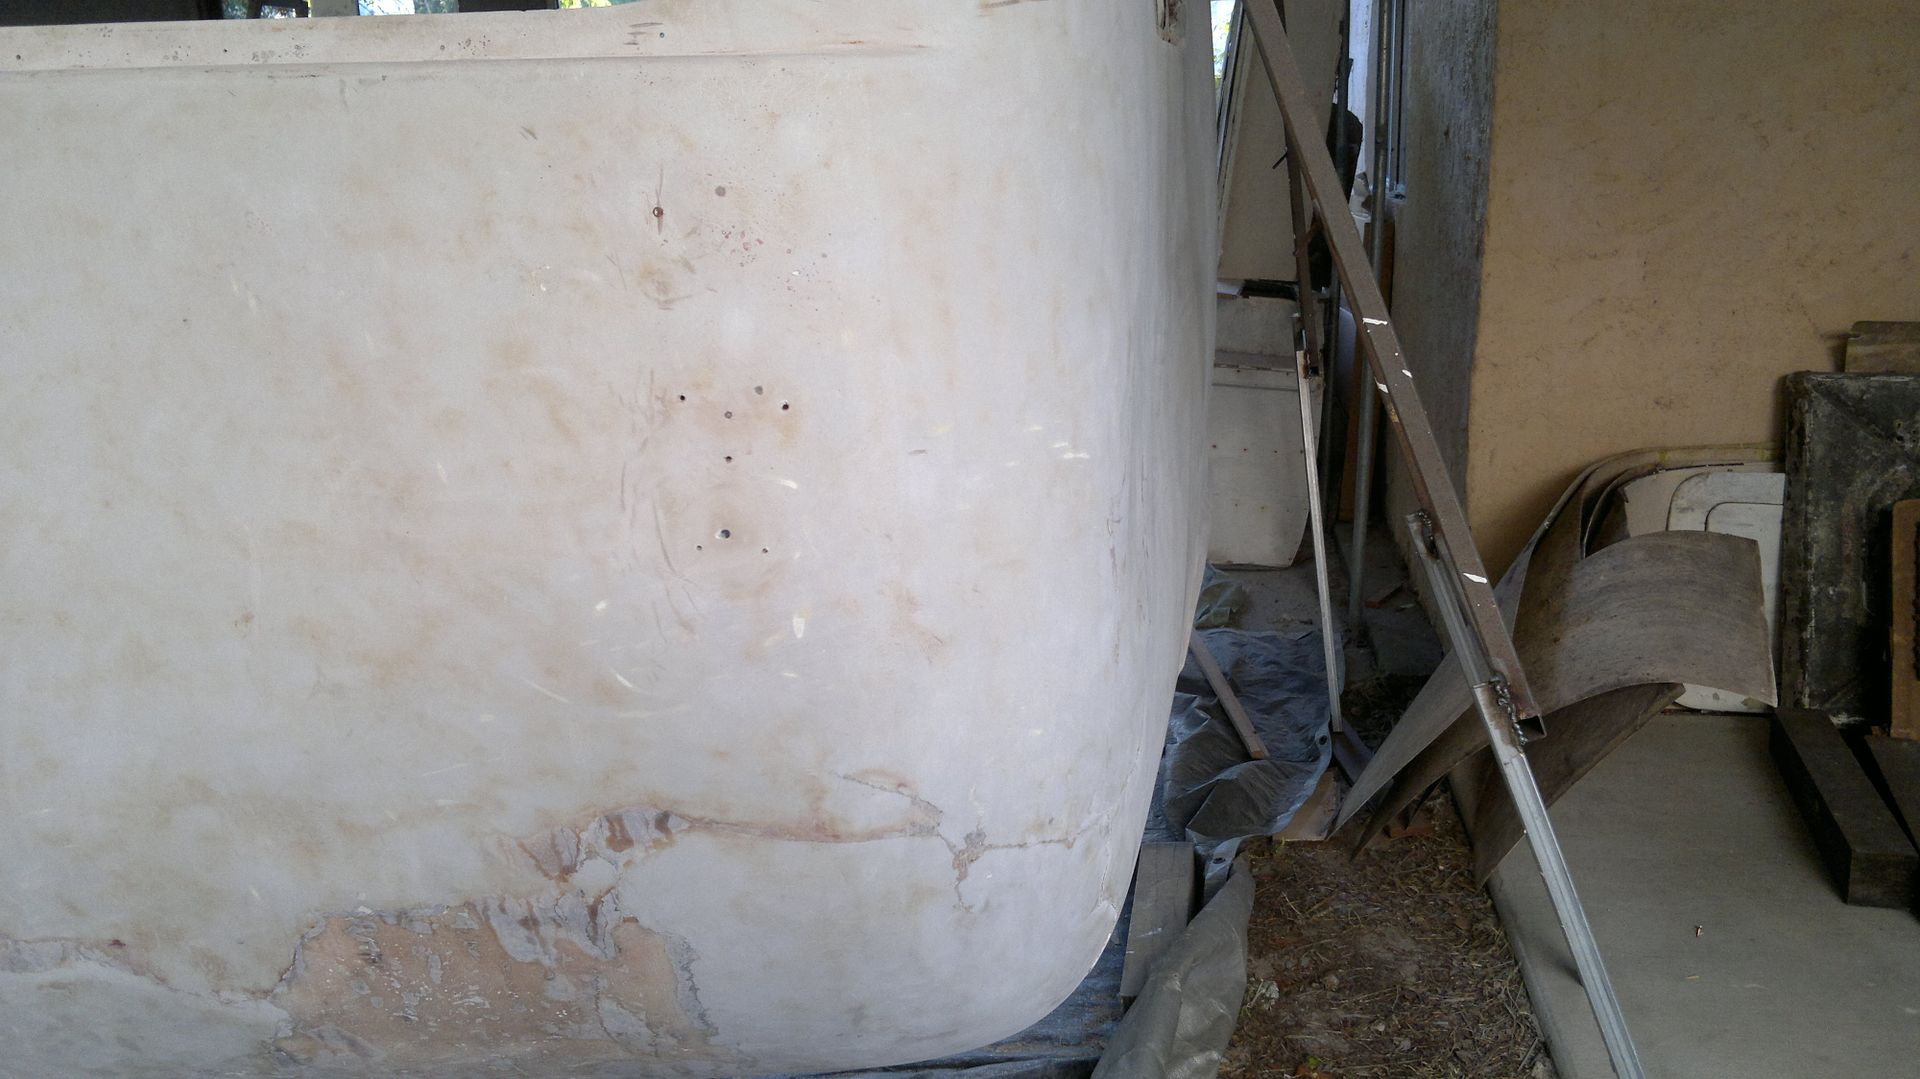 So there will be a bit of "figuring" to do with pushing the side out and getting the right shape accross the back - the floor will still fit as it needs to go outwards - as long as it doesn't end up having to go out too far! Have a fair bit of wiggle room as I was aware of it when I cut the floor. Started making the floor one big piece: 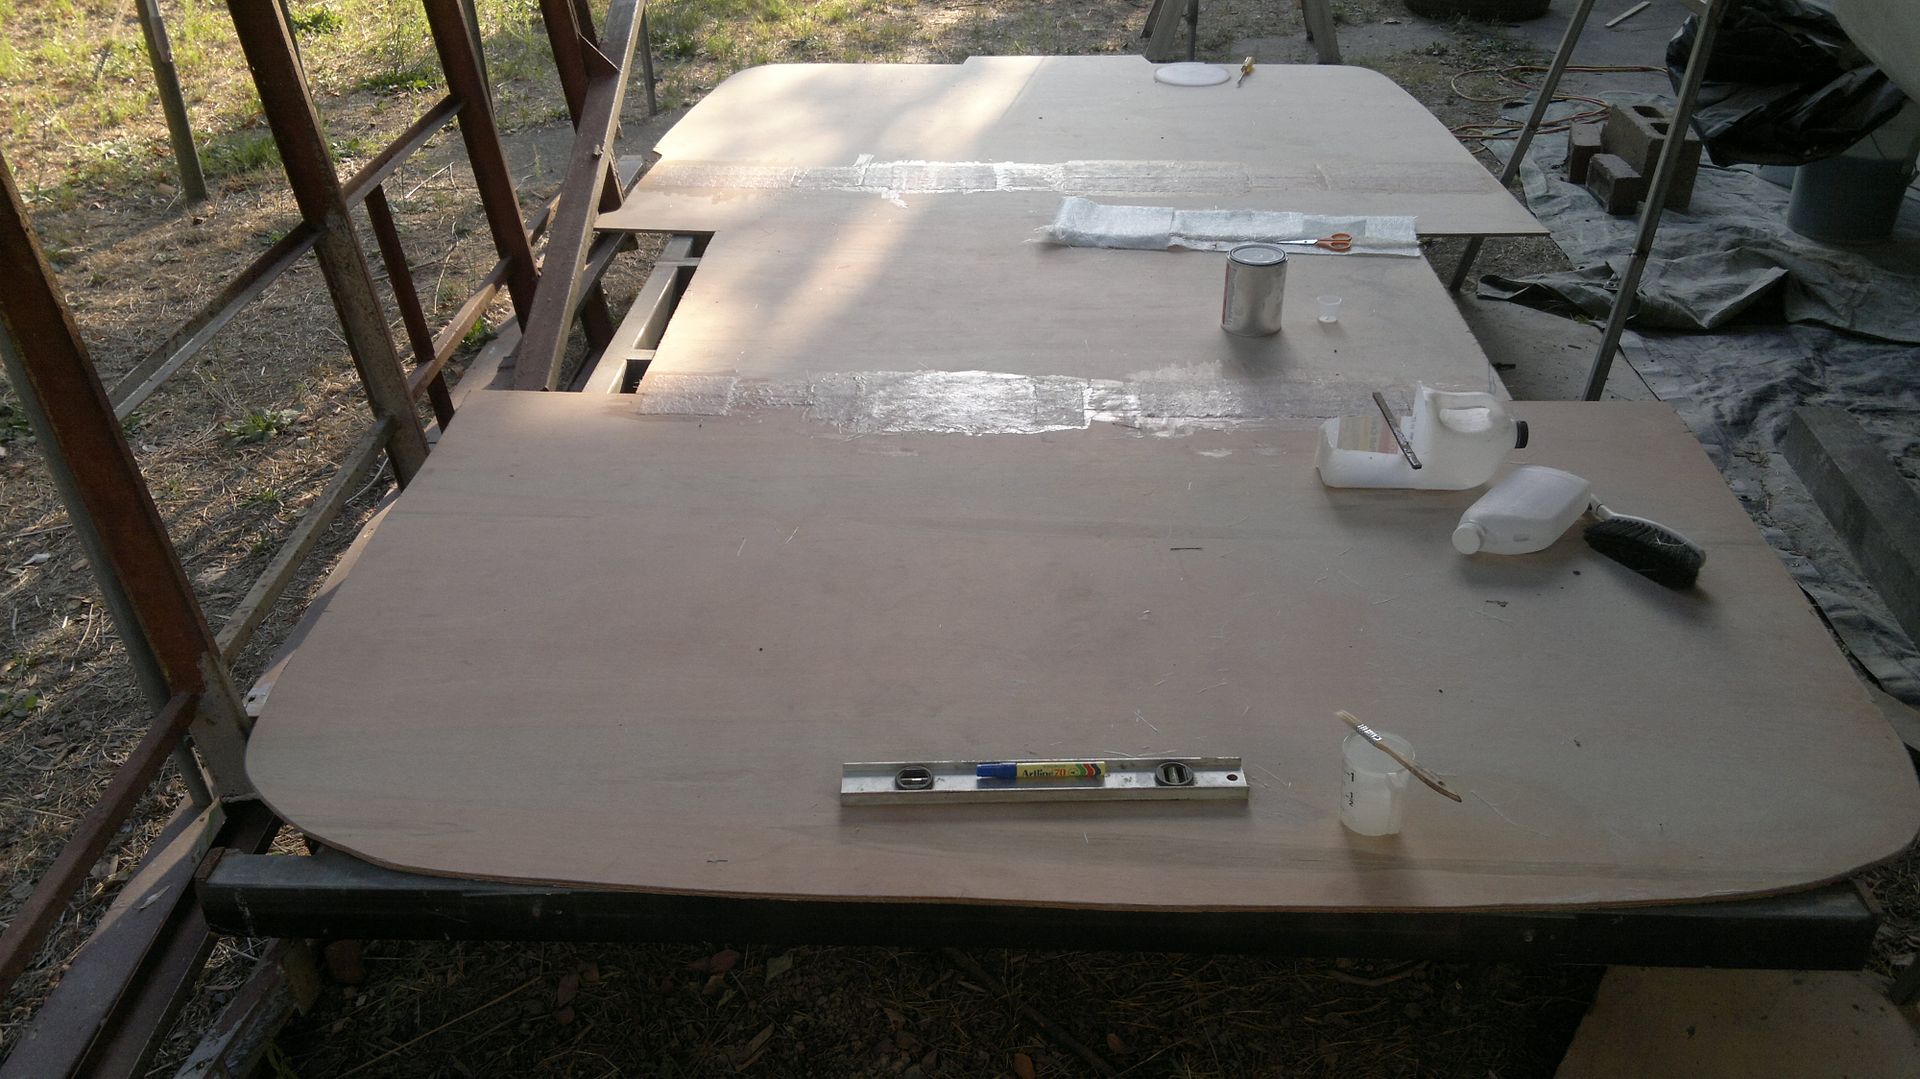 And attended to some smaller repairs - this just stabilised with some matting over the top so it can be filled / smoothed from the outside.  Thats it for today! |
|
|
|
Post by cruisindoug on Nov 10, 2013 18:42:49 GMT 10
|
|
|
|
Post by cruisindoug on Nov 13, 2013 17:32:02 GMT 10
Made a start on the repair at the rear, you can see in this pic how the left hand side is shaped differently to the right - apparently they weren't perfect from the factory but I reckon they were closer than this is ... 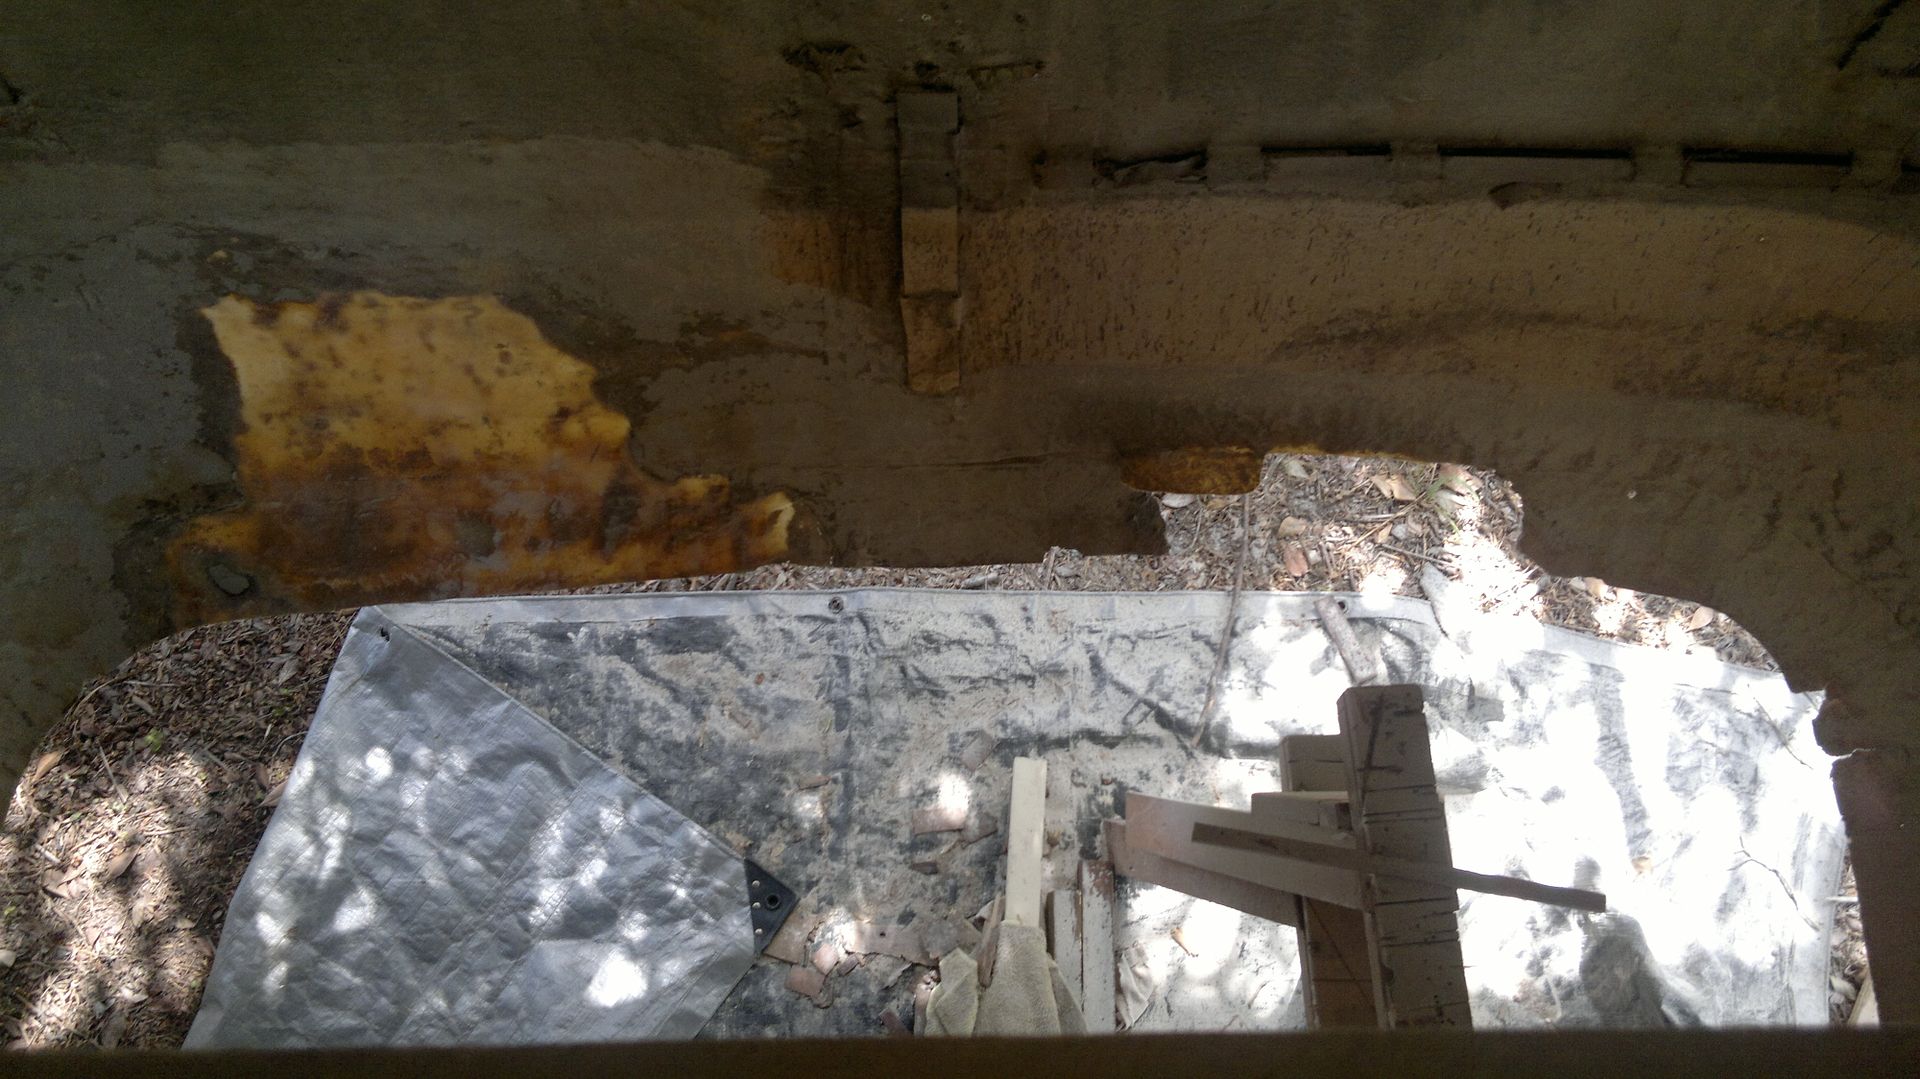 So made the big cut and pushed it all around to get it somewhere near where it needs to be, about 25mm rearwards: 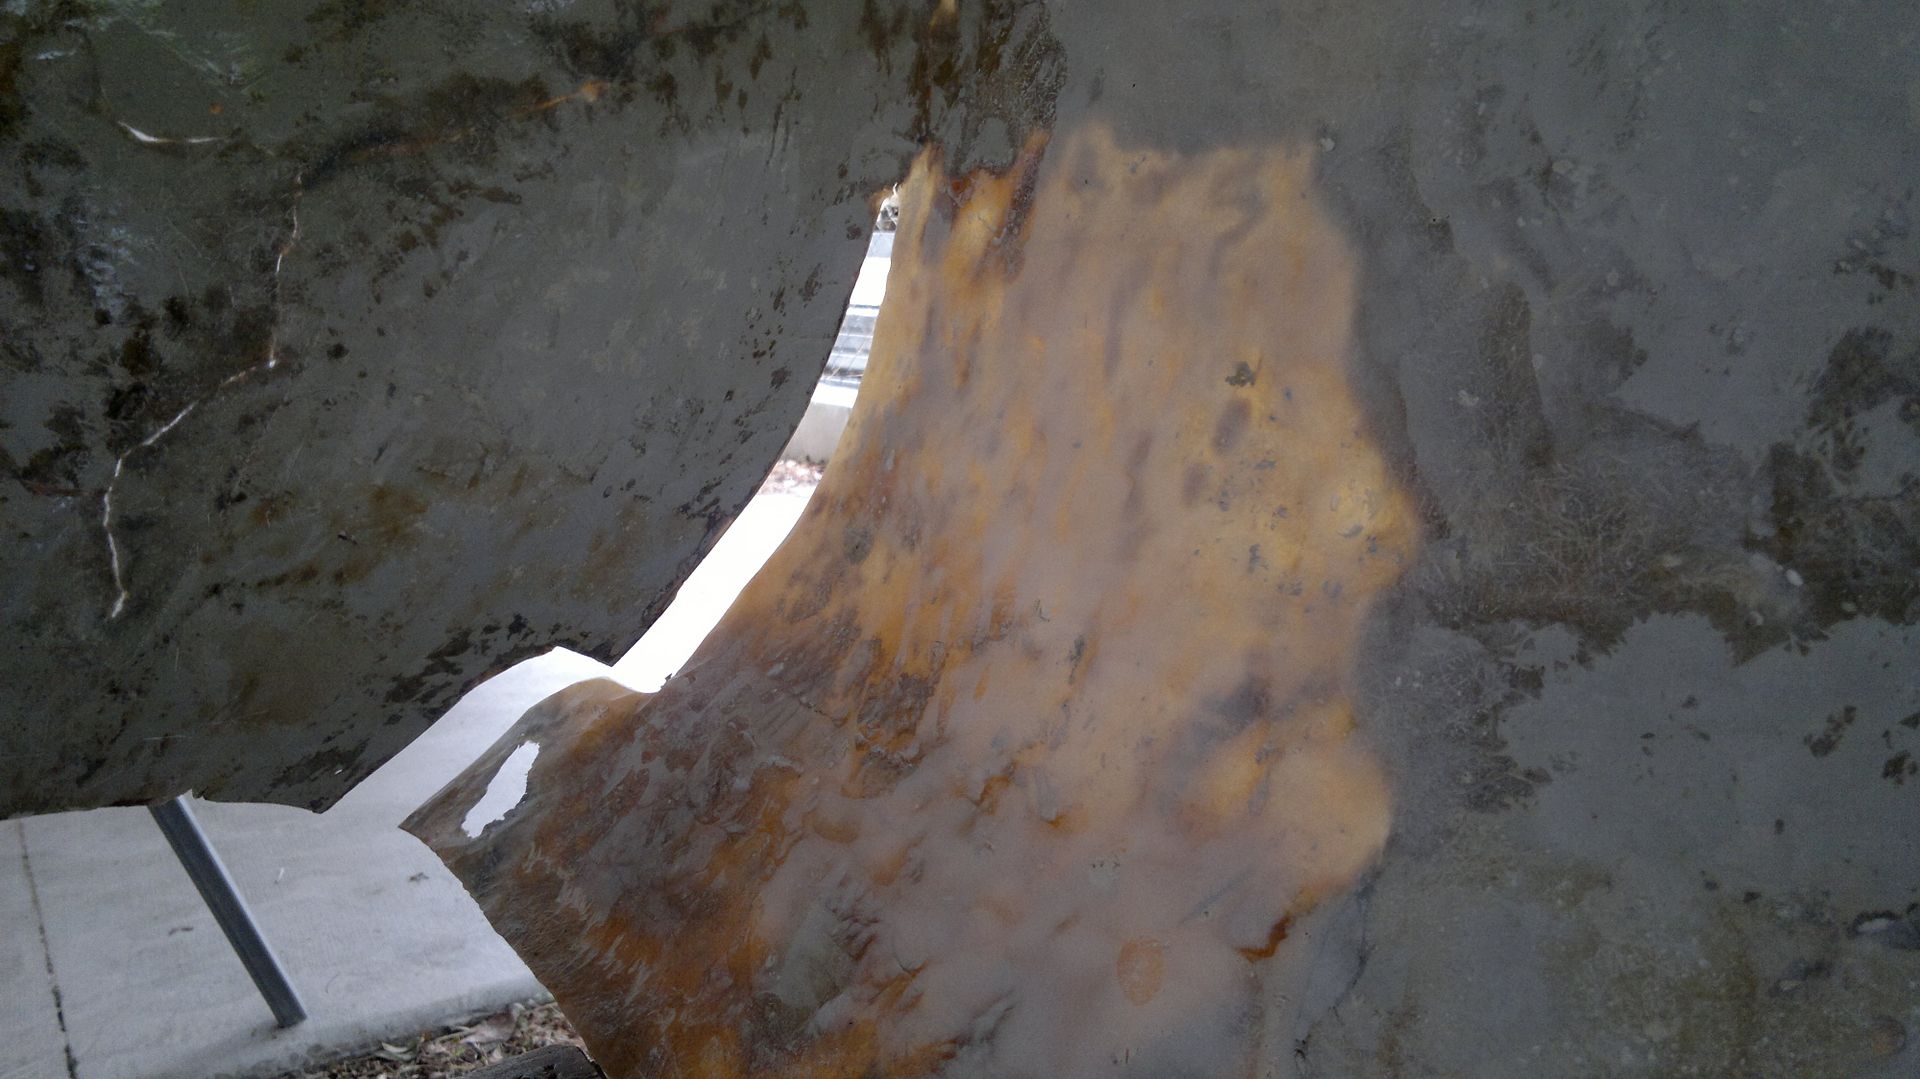 And glassed it up: 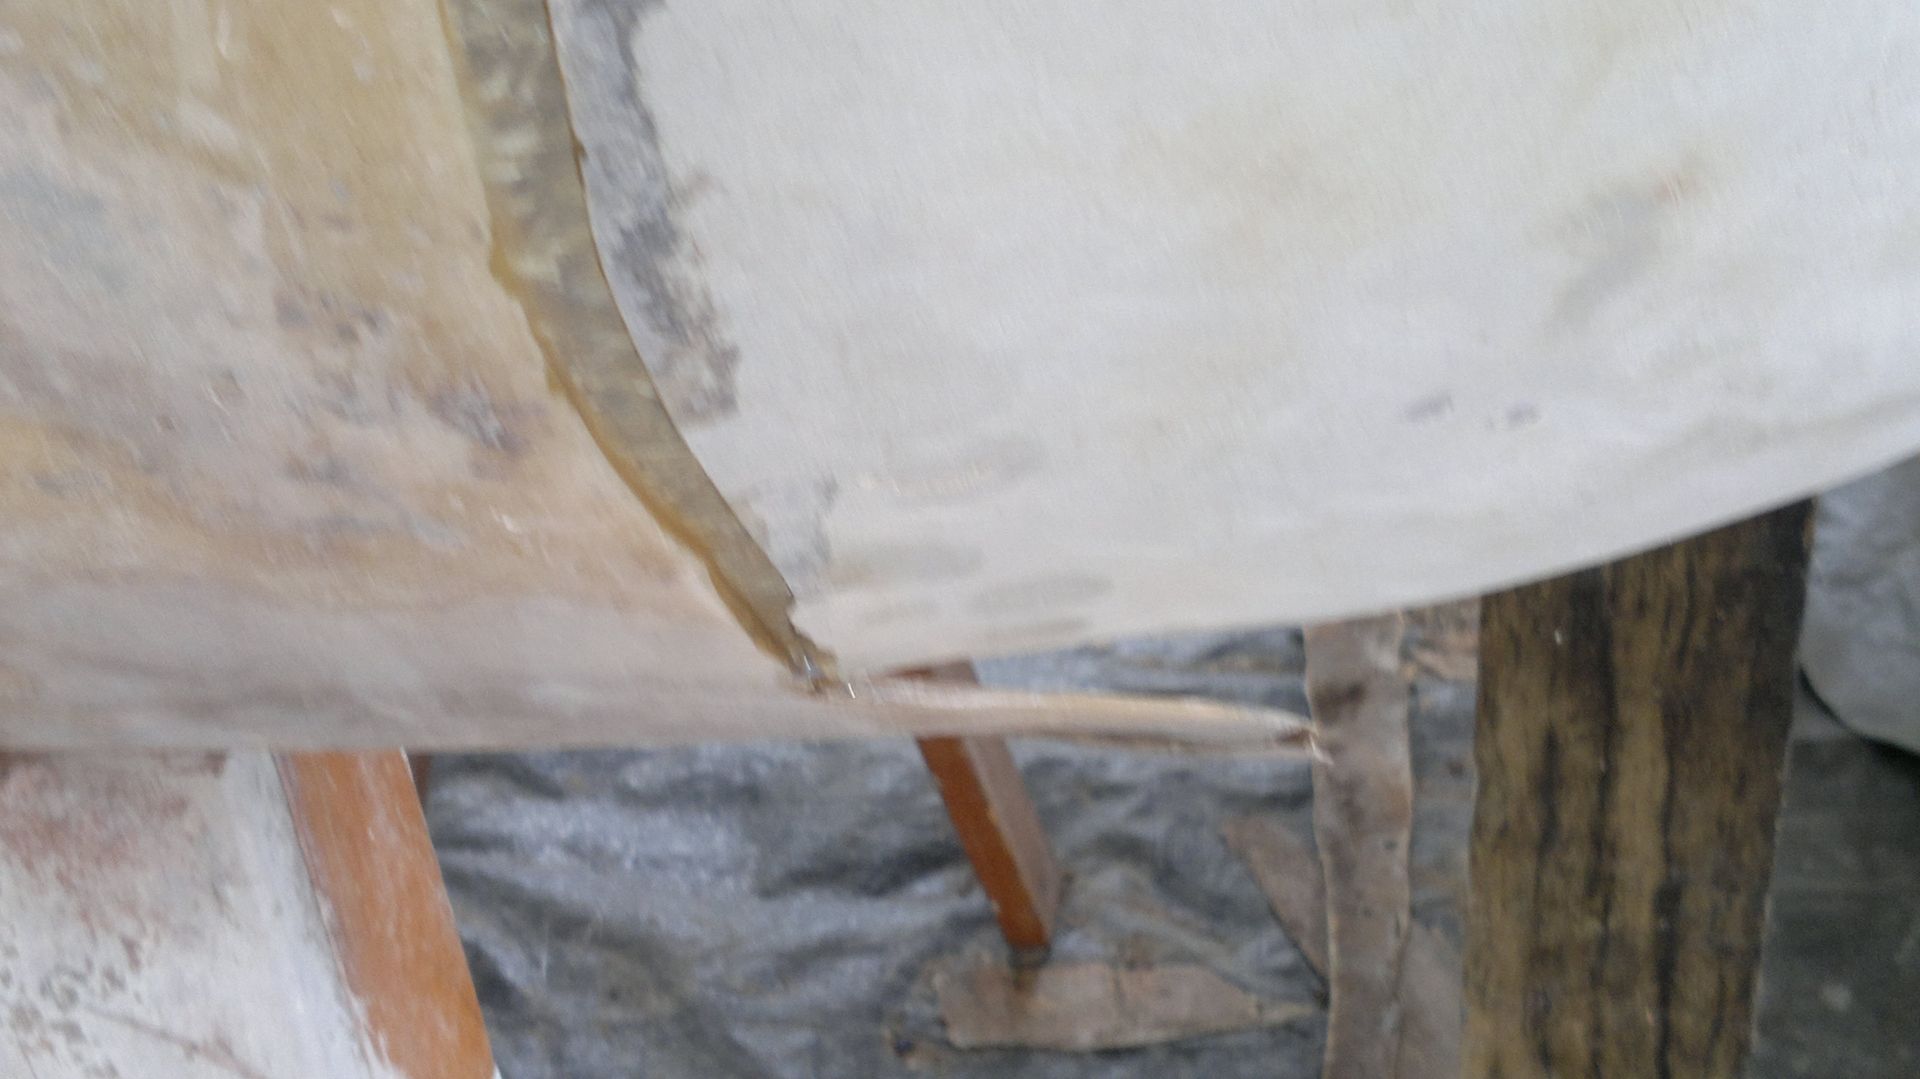 Now just need to cut out the waste bit and reshape the fill in piece, and (hopefully) will look a lot more symetrical. Cheers Doug |
|
|
|
Post by retro64 on Nov 15, 2013 7:16:03 GMT 10
Hi Doug,
Thats a mighty fine effort youve put into one very lucky Sunliner.
By the looks of it this particular van couldnt have ended up in better hands.
Have to agree with you that its the perfect van to tow behind your gorgeous ute.
Our first van was a Sunliner and I have to say of all the vans we have it is still my personal favourite. When we are
getting ready to do a trip somewhere, even if Ive previously agreed to take another van away, I still ask Lionel to hook up the Sunliner.
Theres just something so special about them thats hard to describe. The round? egg? shape always makes me smile and everywhere we take it other people smile too.
We both wish you all the joy that ours has brought us.
Sincerely best of luck,
Elona and Lionel,
retro64
|
|
|
|
Post by cruisindoug on Nov 21, 2013 16:29:11 GMT 10
Thanks Elona and Lionel, heres hoping it comes together as it should! Day off today so back into it, local real estate donated an old sign (yes they knew they donated it ) which served as a mould to rough in the new sections needed in the back. 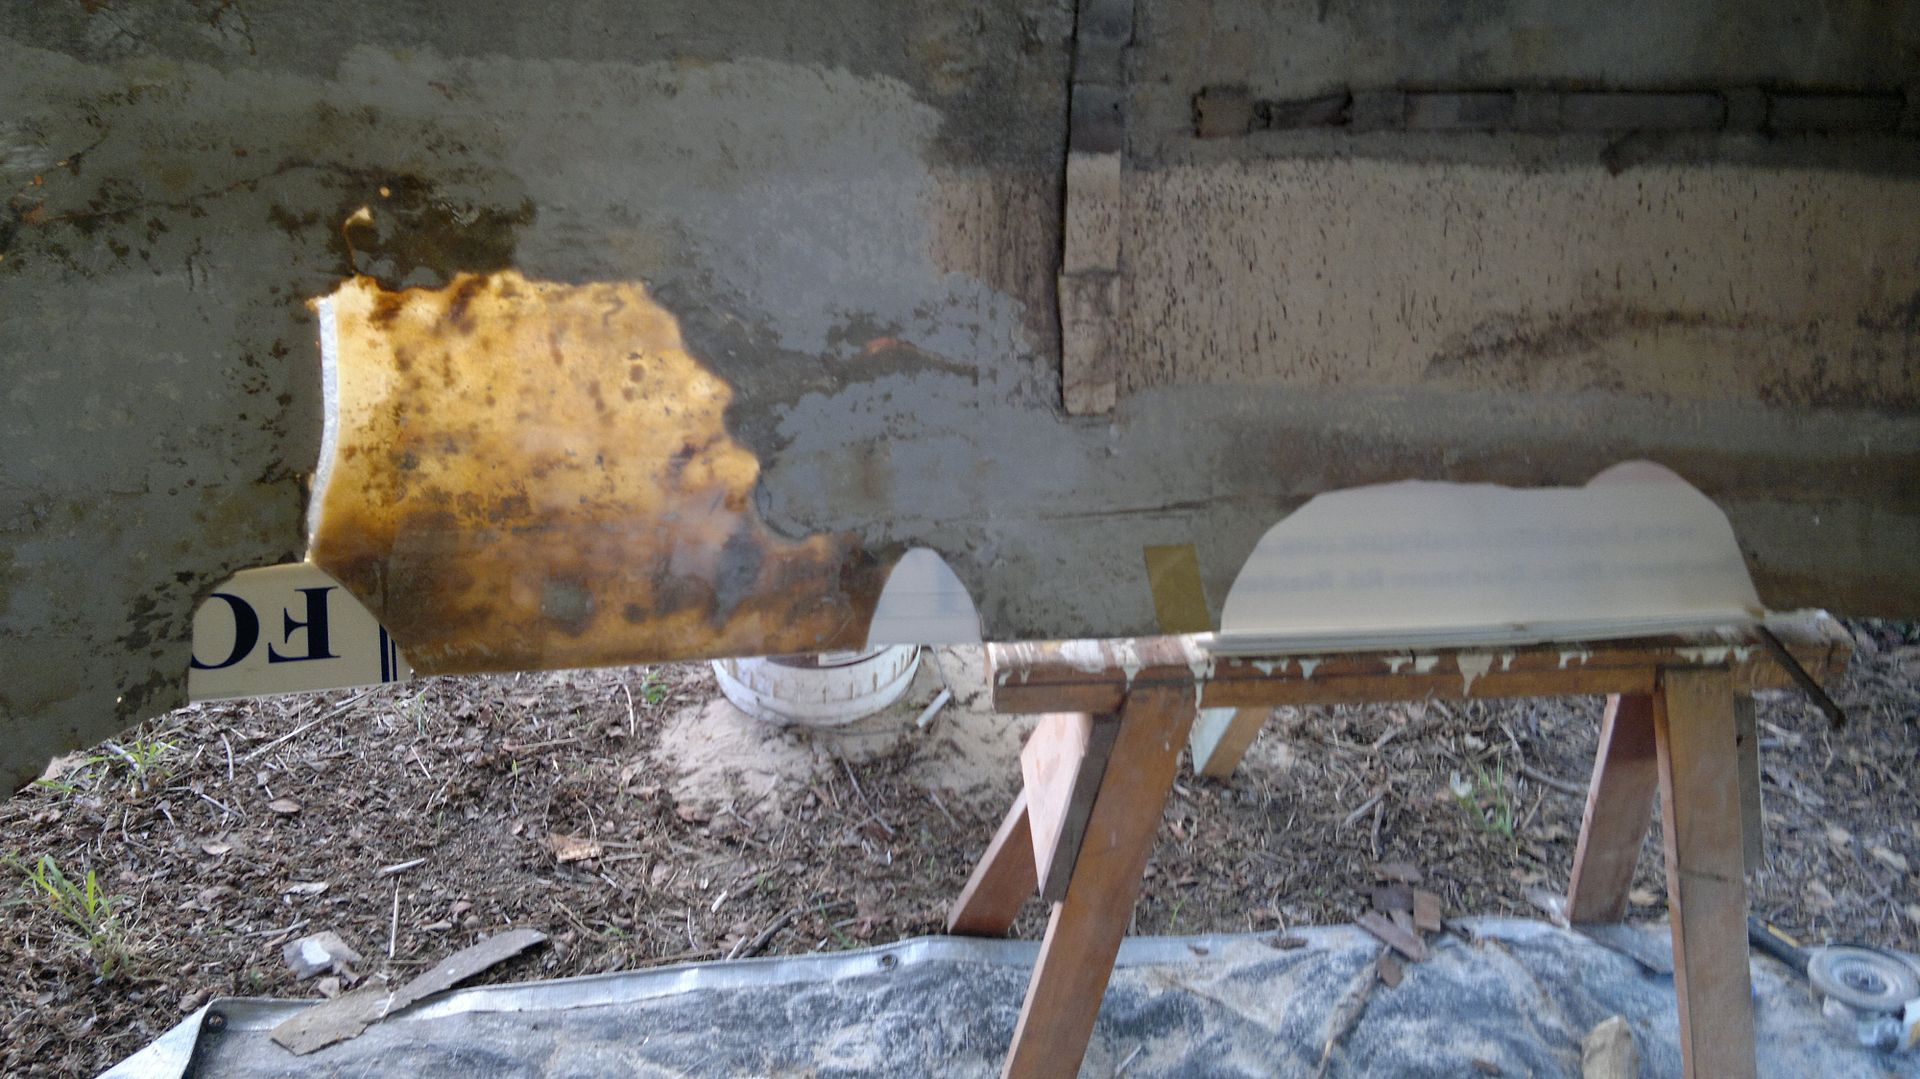 Finished off the fiberglass coat on the underside of the floor: 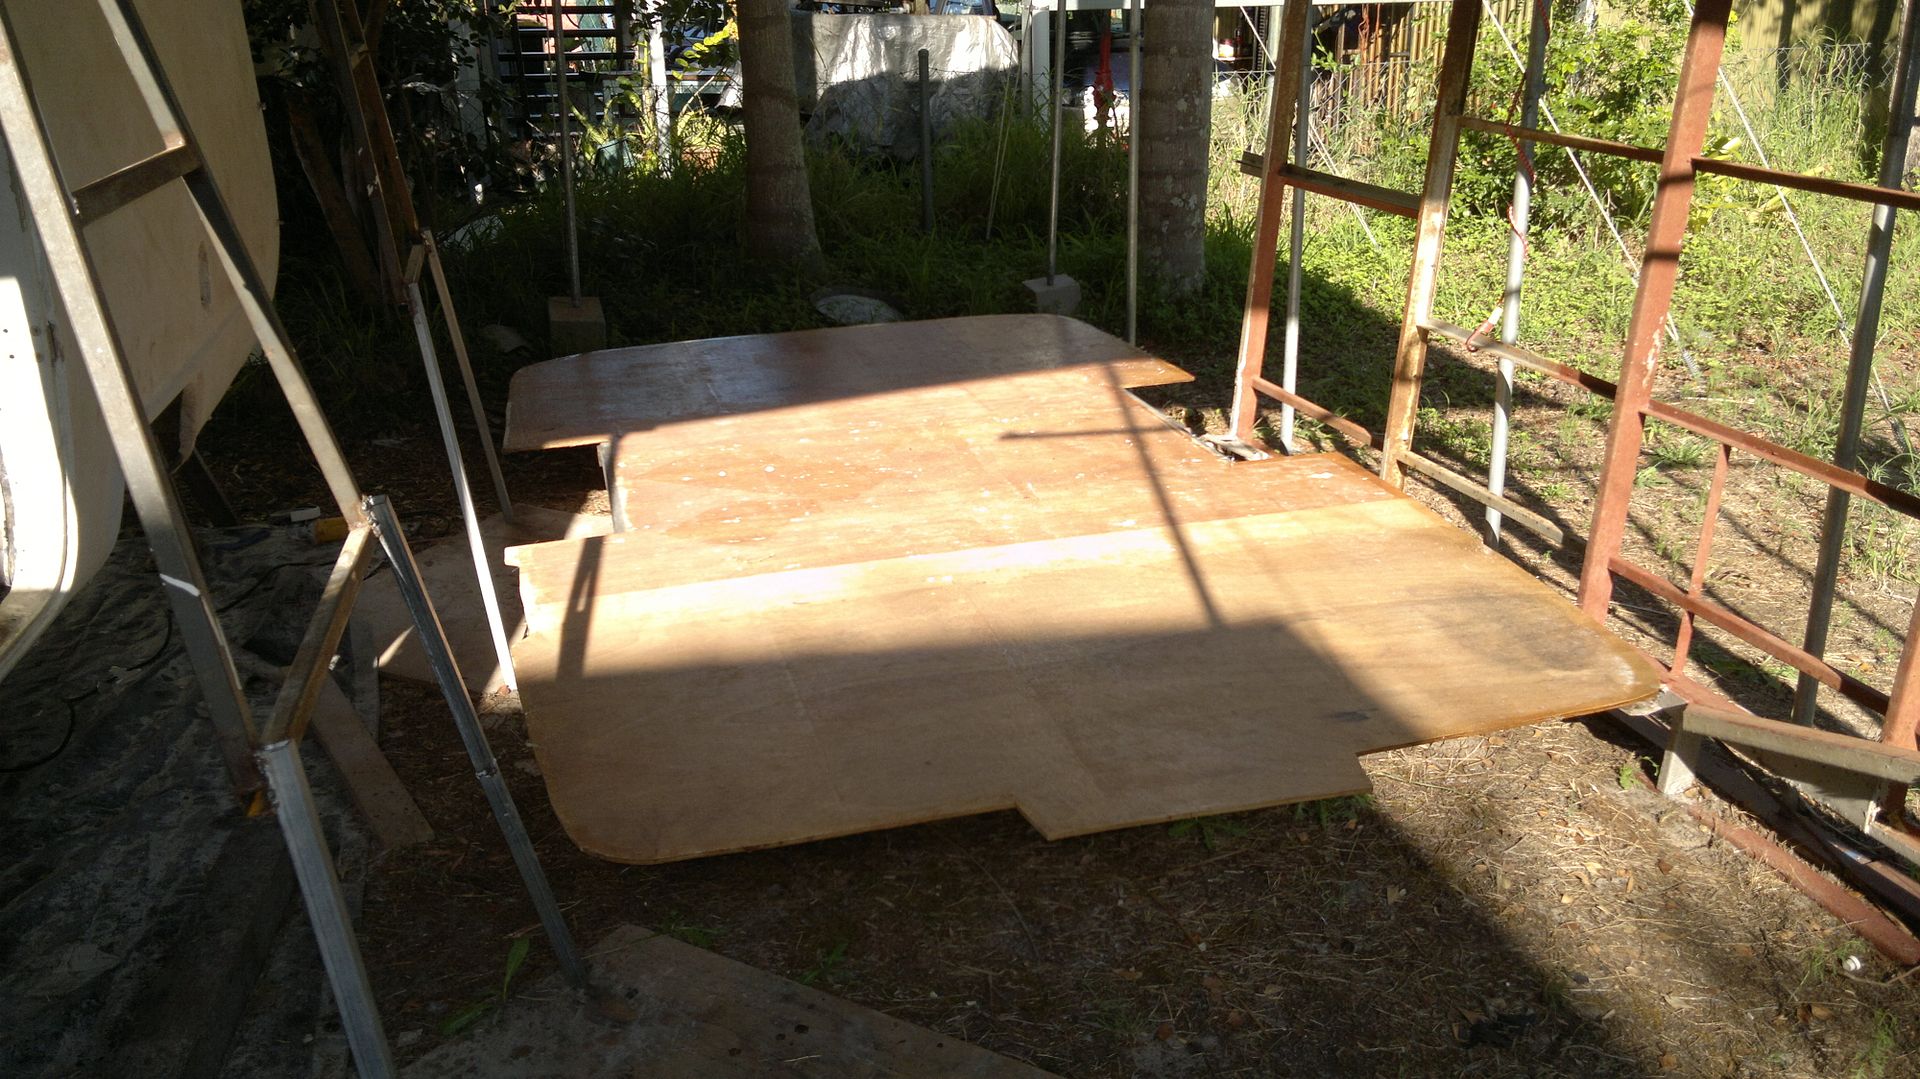 I reckon its made a fair difference doing the cut and push out on the back, still a bit to do but its reasonably close to my eye. 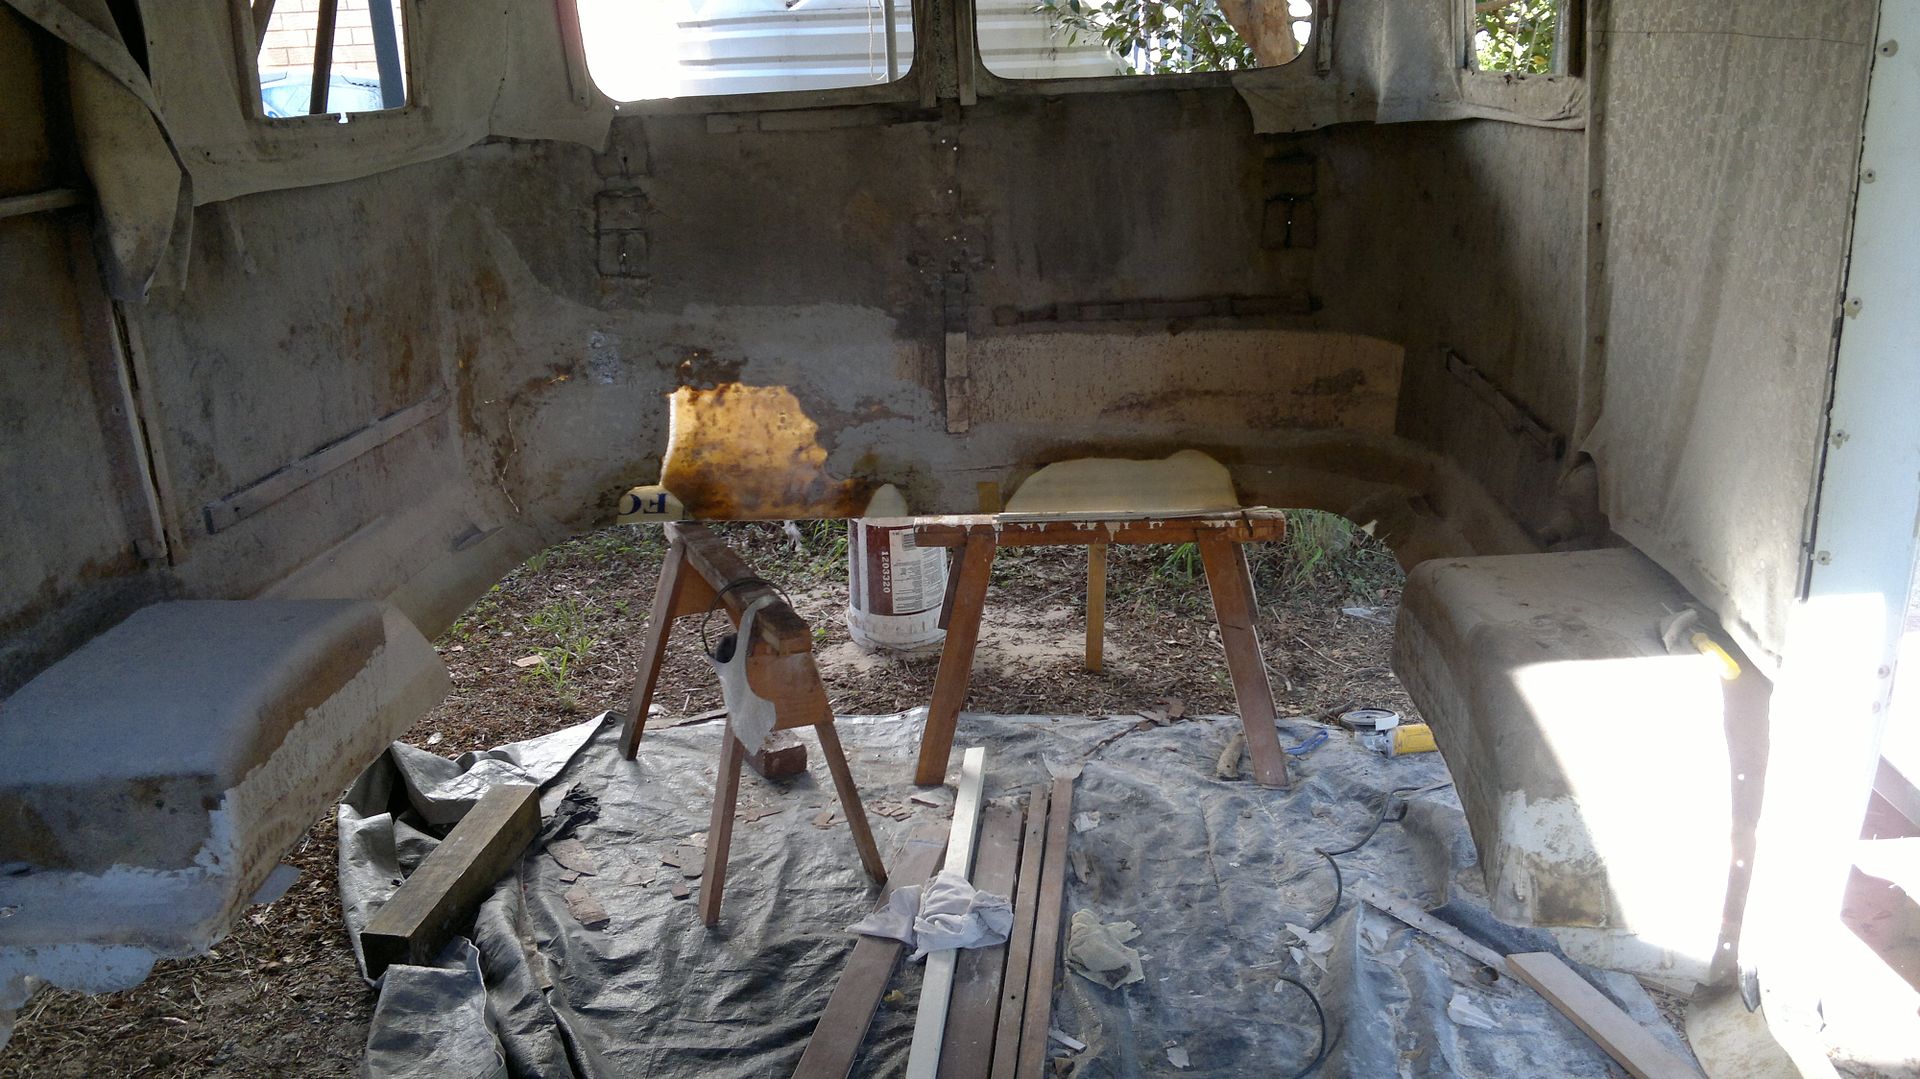 Cheers Doug |
|
|
|
Post by cruisindoug on Nov 26, 2013 17:17:39 GMT 10
Bit more done today, went around doing all the small repairs to the lower edge trying to get a nice straight neat line. Lots of fiddly bits and pieces - and one bigger one: [ 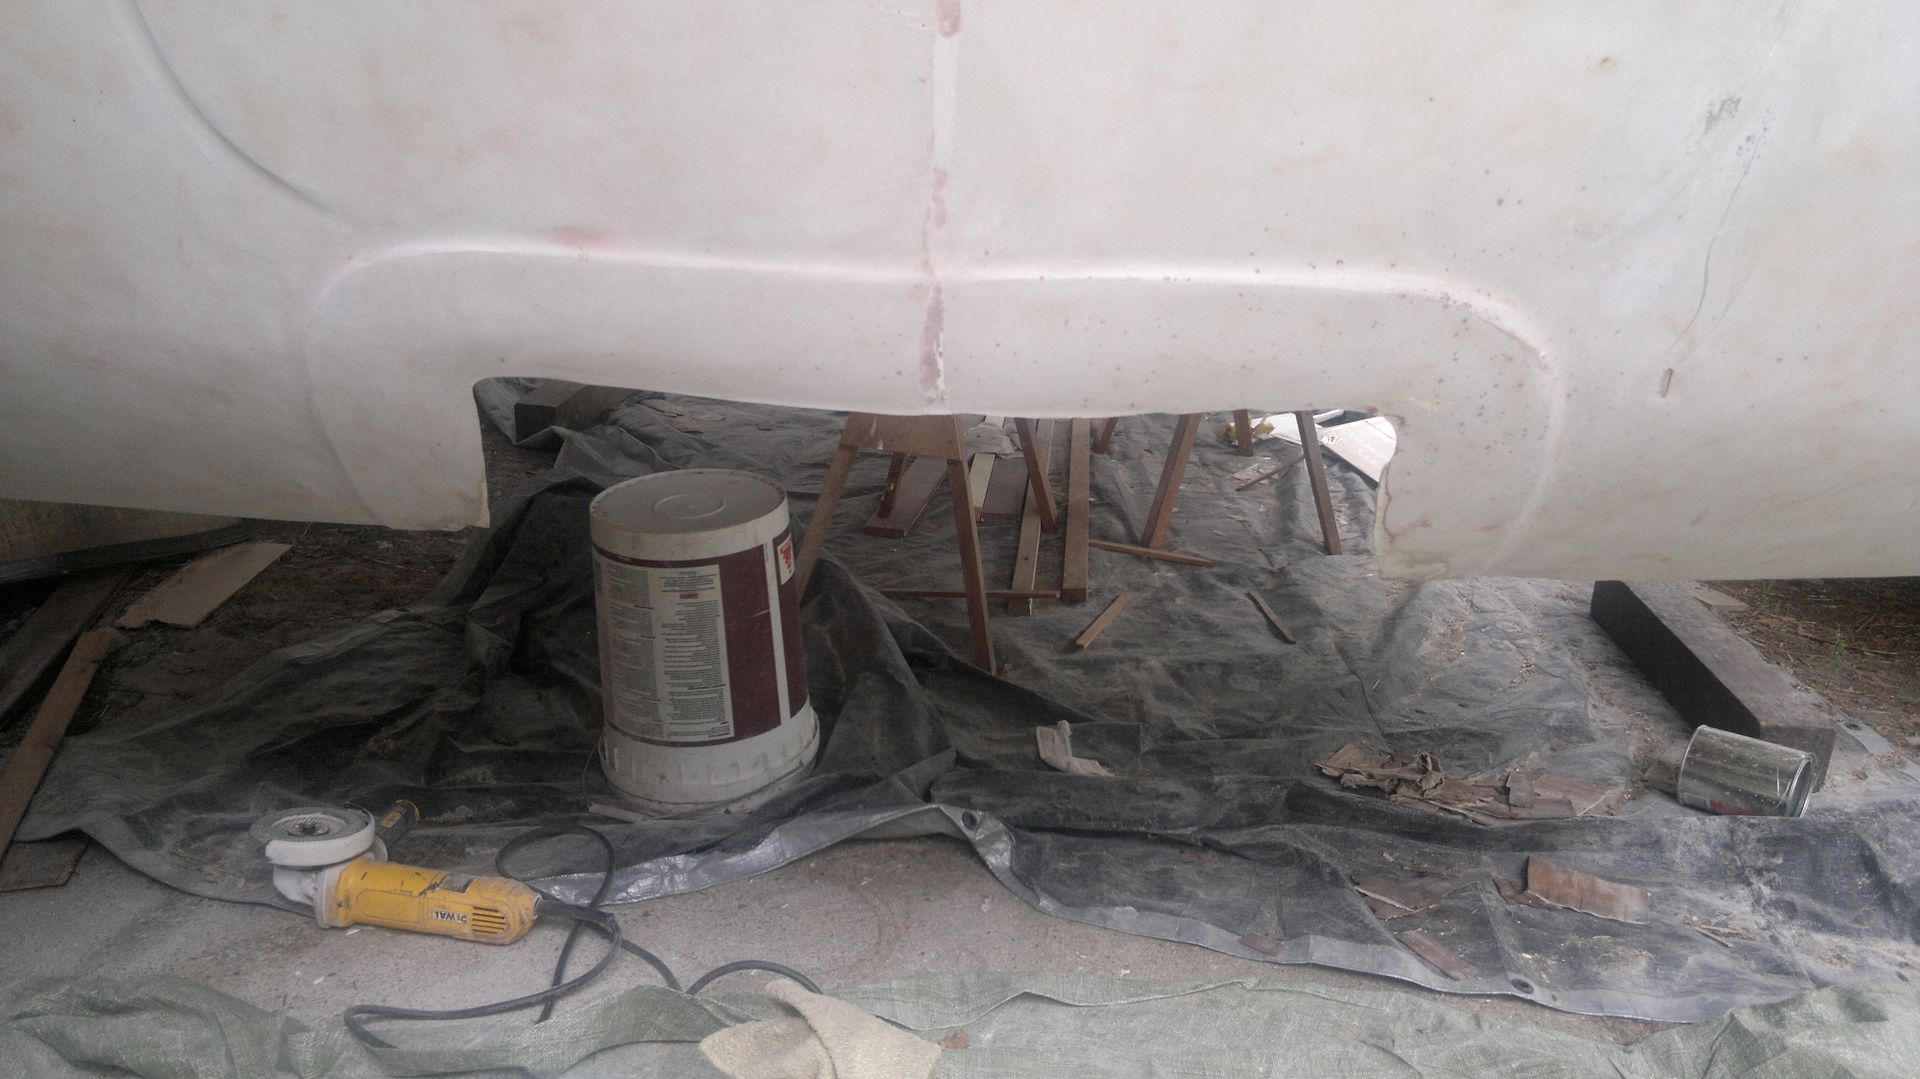 Decided I don't need the squared off section where the plugs go in, its not purely asthetic; that section is the only section where the floor isn't above the lower edge of the fibreglass by about 75mm ... and being right at the front I reckon its susceptible to letting in water especially when on the road in the rain. Given the whole front section of floor had rotted out, I reckon changing this section to smooth it out and lower the level of the fibreglass will help keep the floor, particularly the edge of it, dry. Time will tell. Out came the trusty Corflute  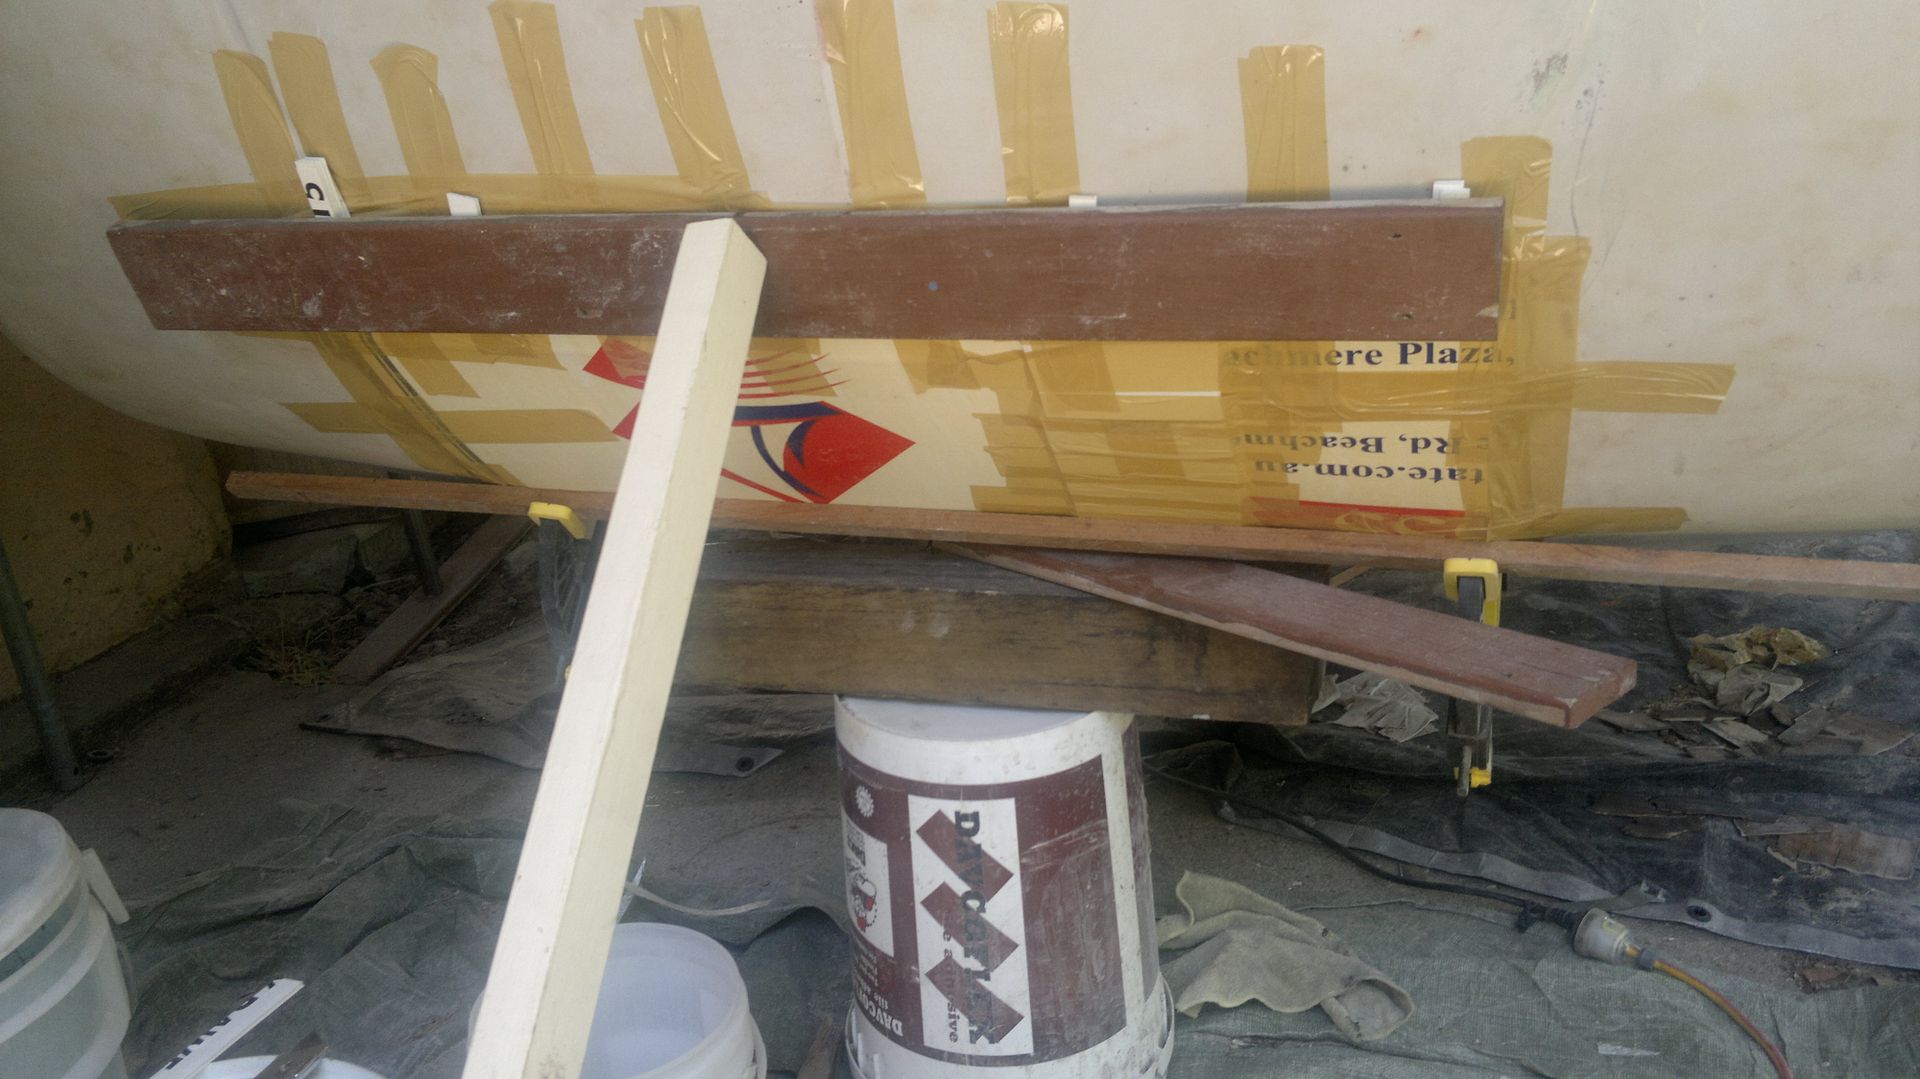 And into some glassing: 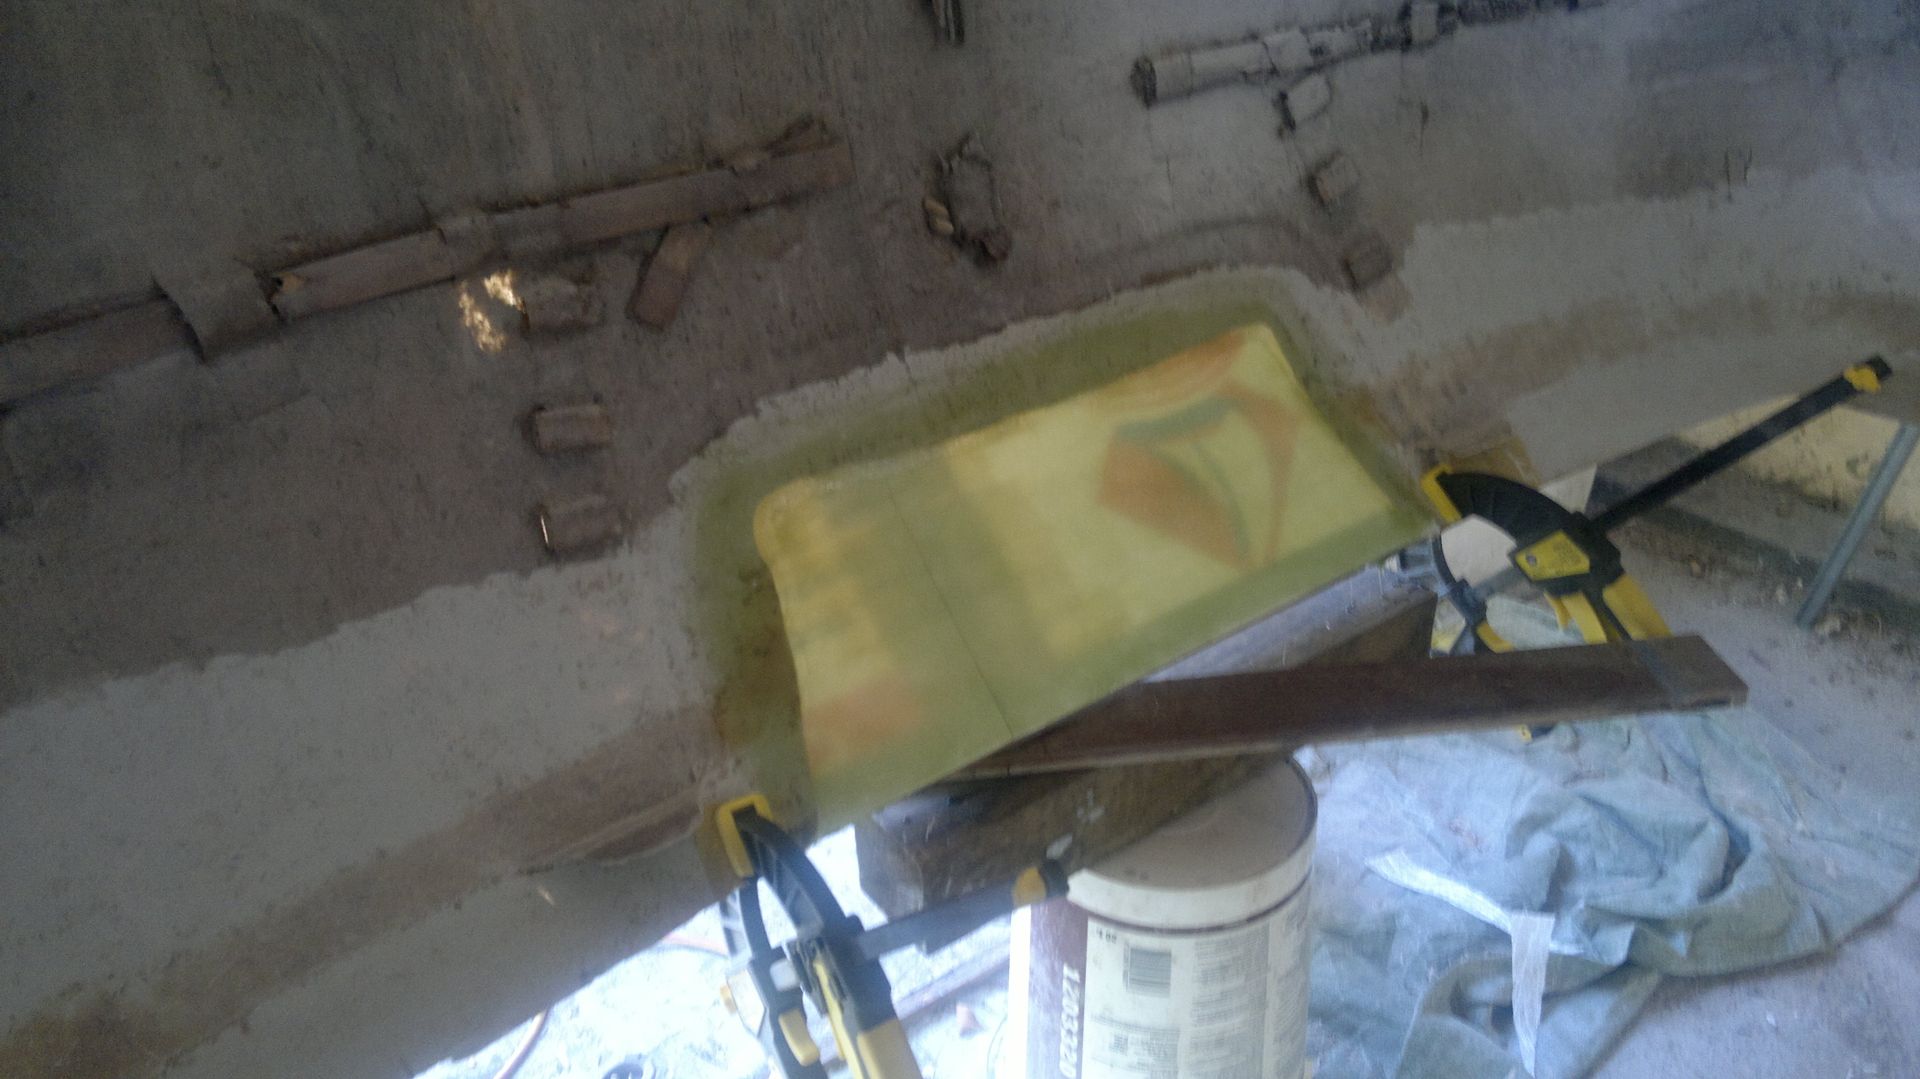 Added some extra layers to the rear repair as well... 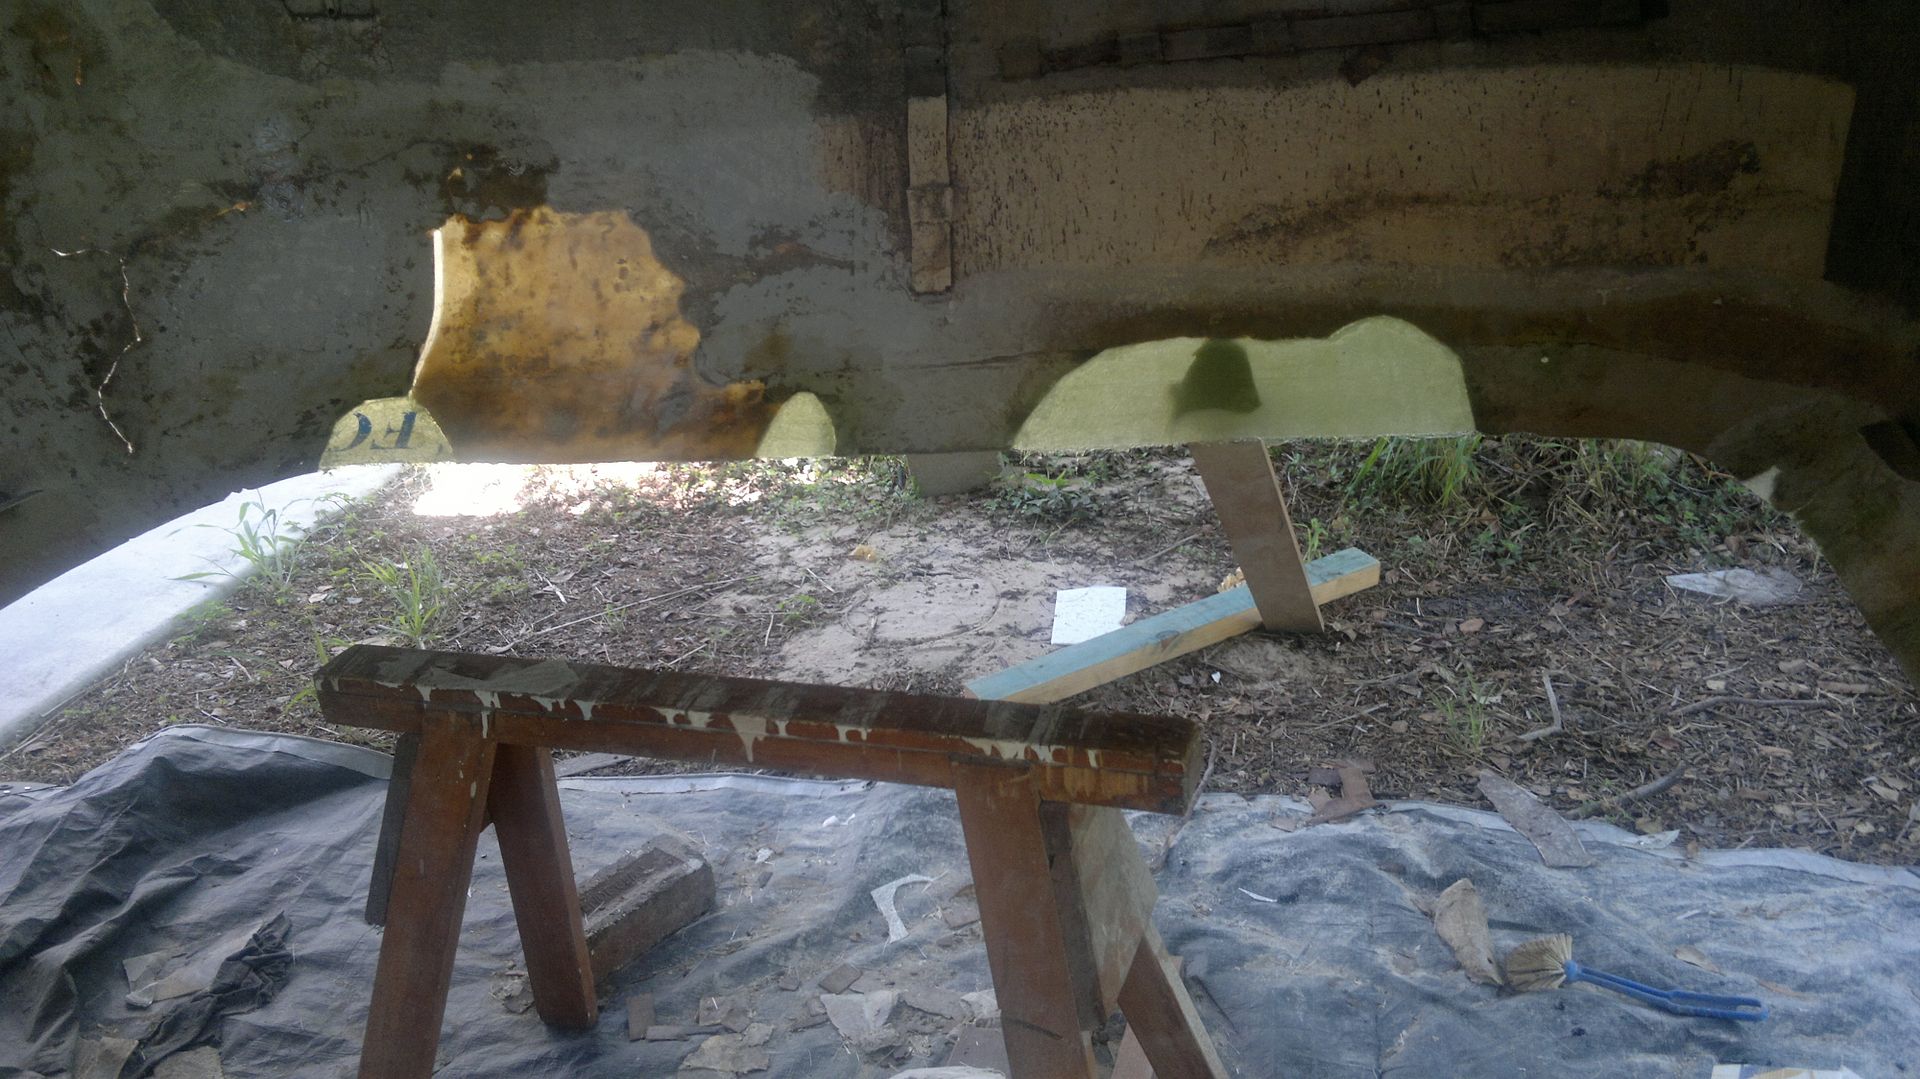 With the mould off it looks reasonably close, might have to do a bit of a cut and shut to adjust how it matches up, the tape gave way in the top corners when it was going off and has allowed the two top corners to pop out a bit, once its hardened I will look at doing it then. 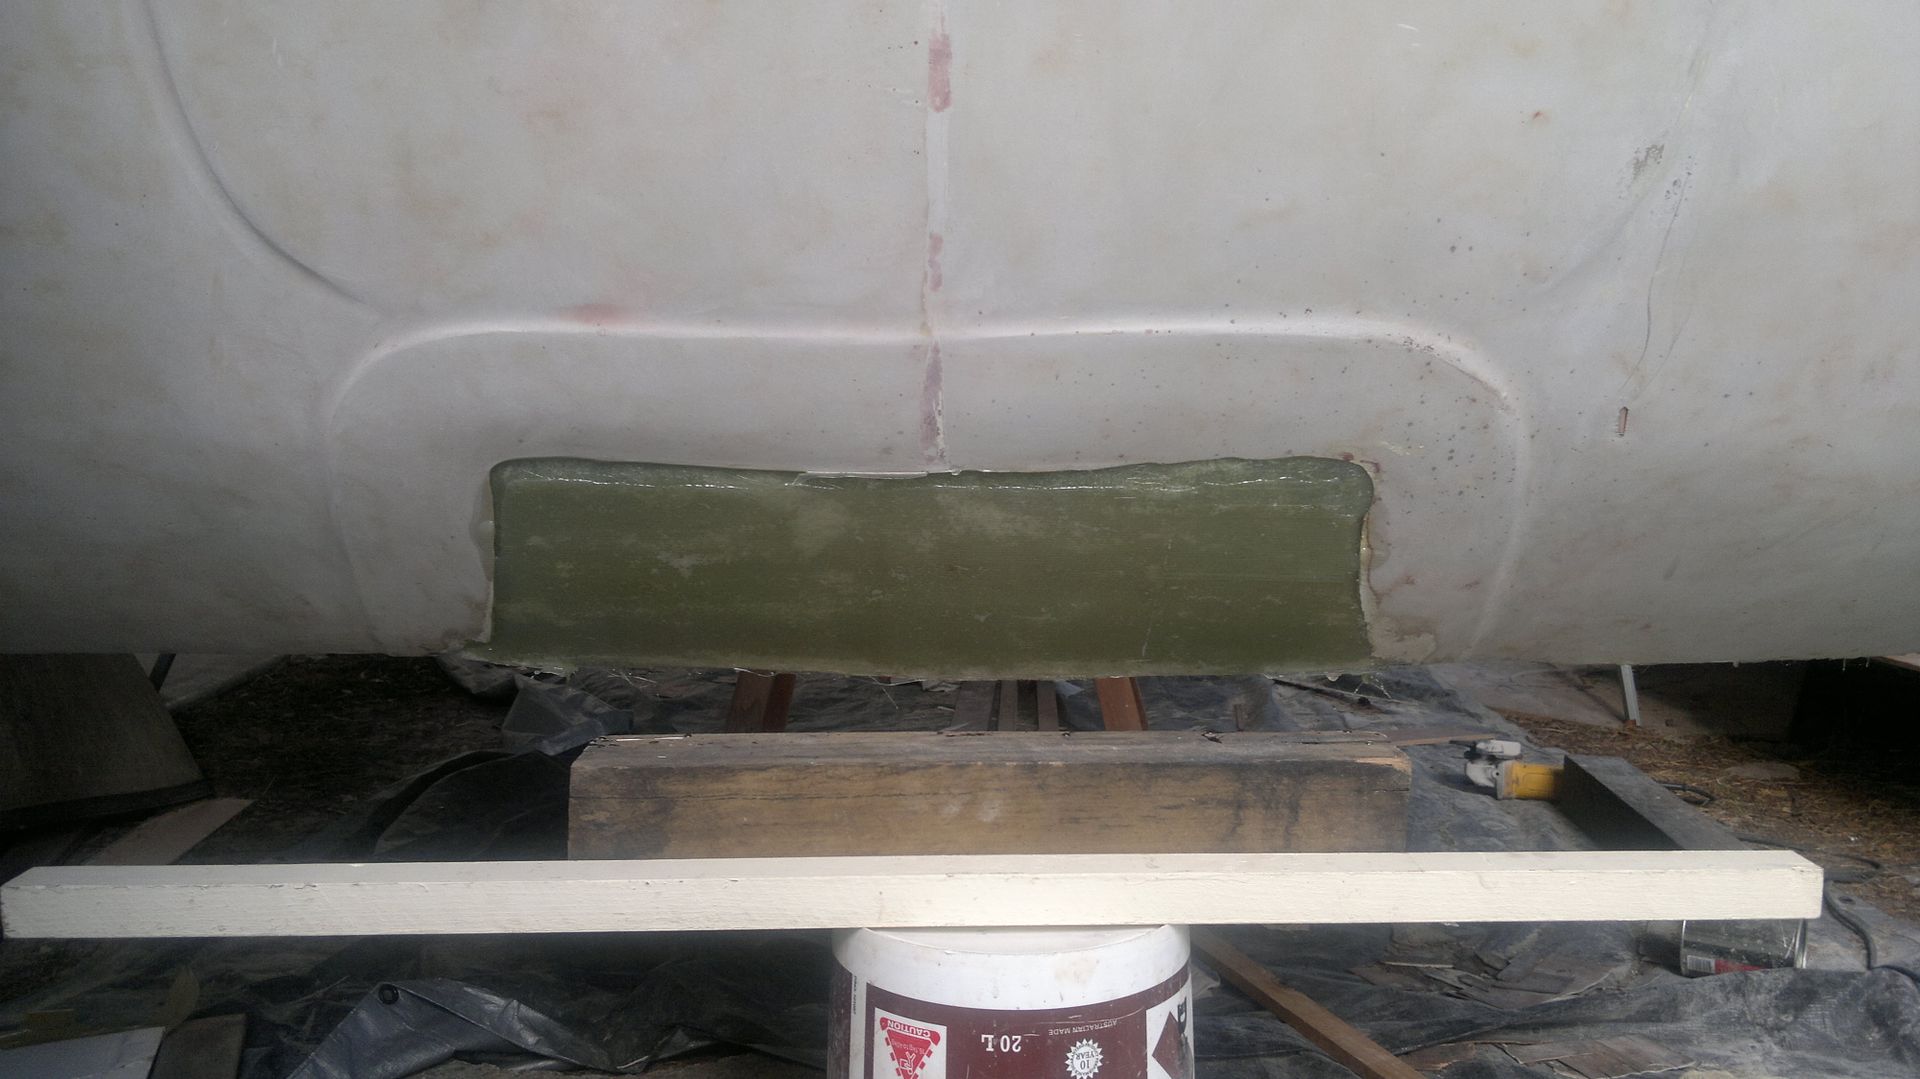 Thats it for today - another day playing tomorrow! Cheers Doug |
|
|
|
Post by Franklin1 on Nov 26, 2013 20:48:26 GMT 10
It's a great story you're putting together, Doug, and a really interesting read. The "how-what-when-where-and-why" of what you're doing, plus the explicit photos, will surely be of immense help to any others contemplating working with fibreglass. It's a quality job you're doing, and a credit to your enthusiasm. ;D cheers, Al. |
|
|
|
Post by cruisindoug on Nov 27, 2013 17:34:21 GMT 10
|
|
|
|
Post by humpyboy on Nov 27, 2013 18:23:37 GMT 10
I told you that they were BIG like I said you can use them as outriggers on a mobile crane ;D ;D ;D glad to see they arrived okay, did it take you long to unpack them? ;D the van is going nice, wanna come down here and do mine when your done? |
|
|
|
Post by cruisindoug on Dec 1, 2013 18:40:01 GMT 10
Nah didn't take long to unpack Derk, just whipped one end off each with the box cutter, very nice job though they were safe and sound ... I think you might be on your own with your van ;D ;D ;D ;D , my hourly rate might be a bit high for you! Not much to look at in terms of progress today, its amazing how much time goes in measuring, shifting a fraction, remeasuring, eyeballing, shift a bit more ... you get the idea! Finally settled on the correct position as best as I could do, and started glassing it in - once these go off overnight, I'll cut the remaining tabs out and finish it off - then it will be into some chassis work for a while. The original floor looked to be about 15 - 20 mm out in the front drivers side, quite a lot really, but it is much closer now ... 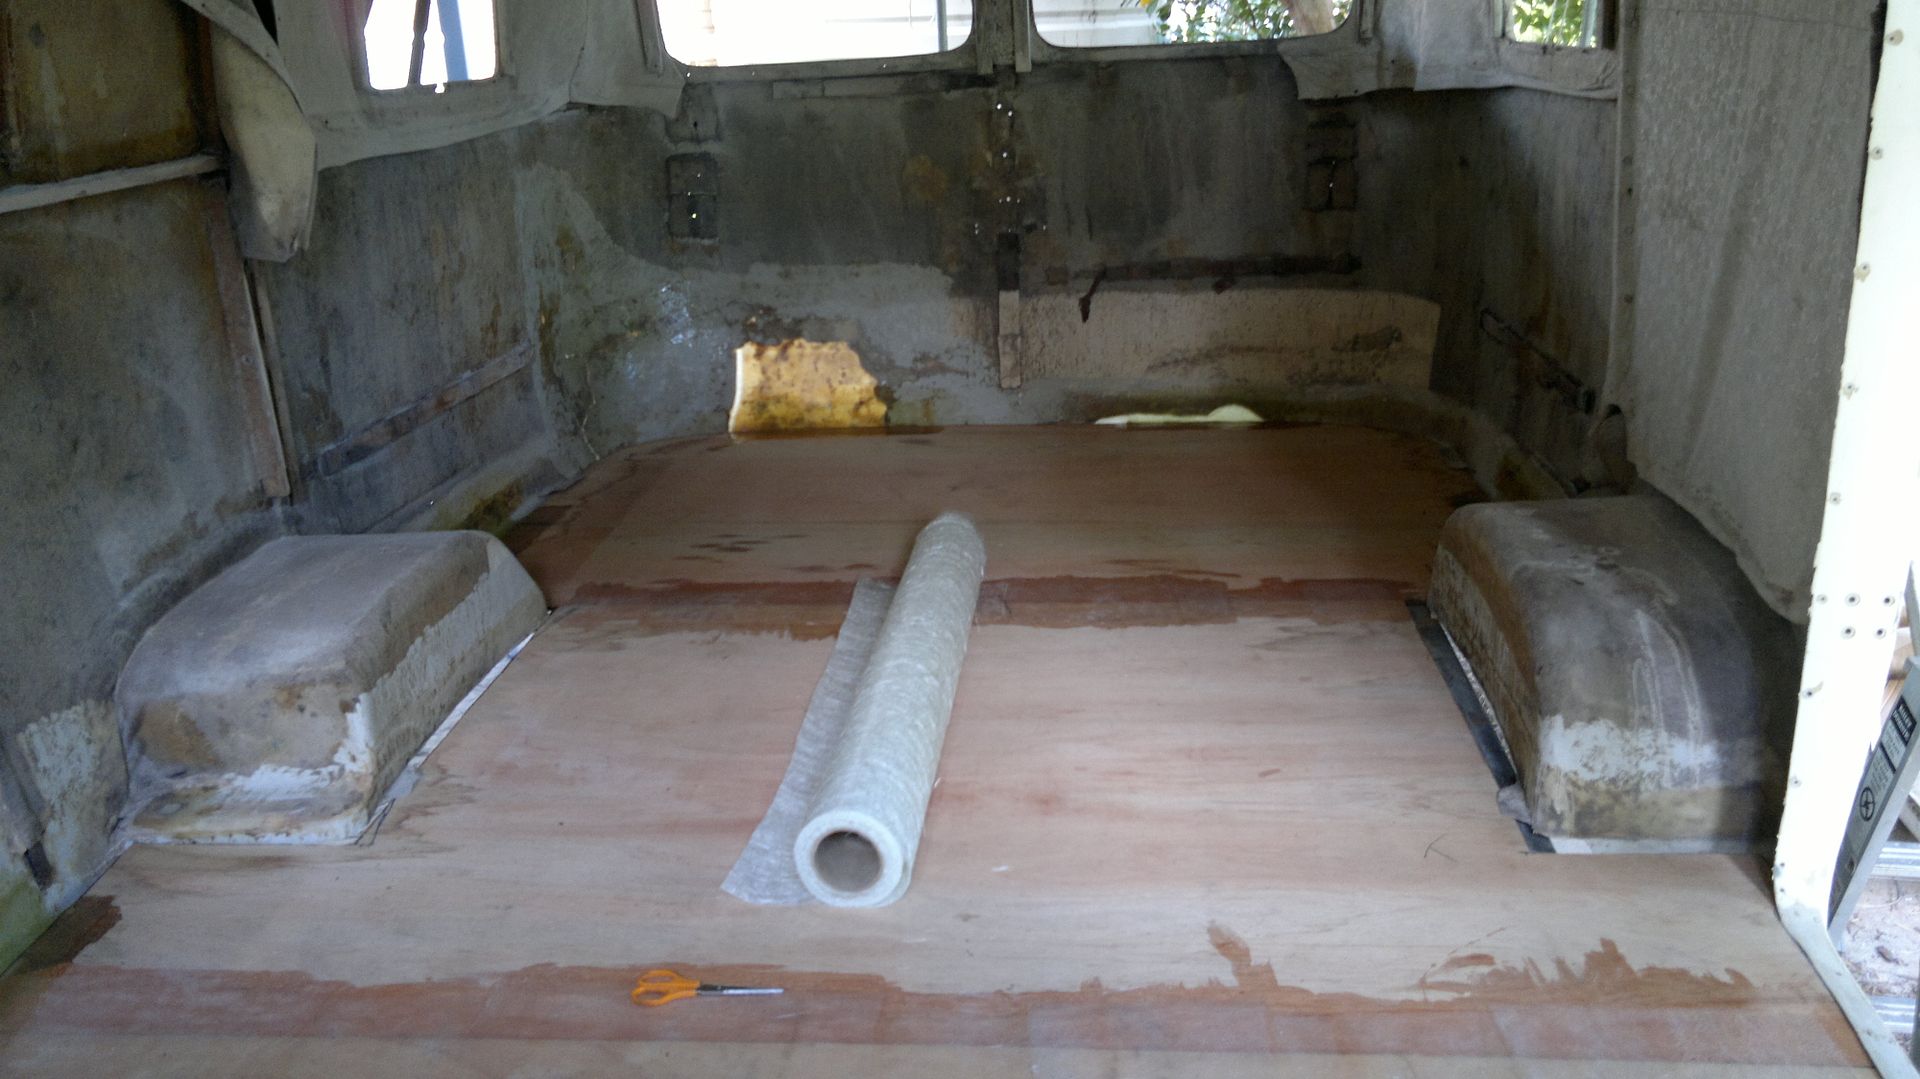 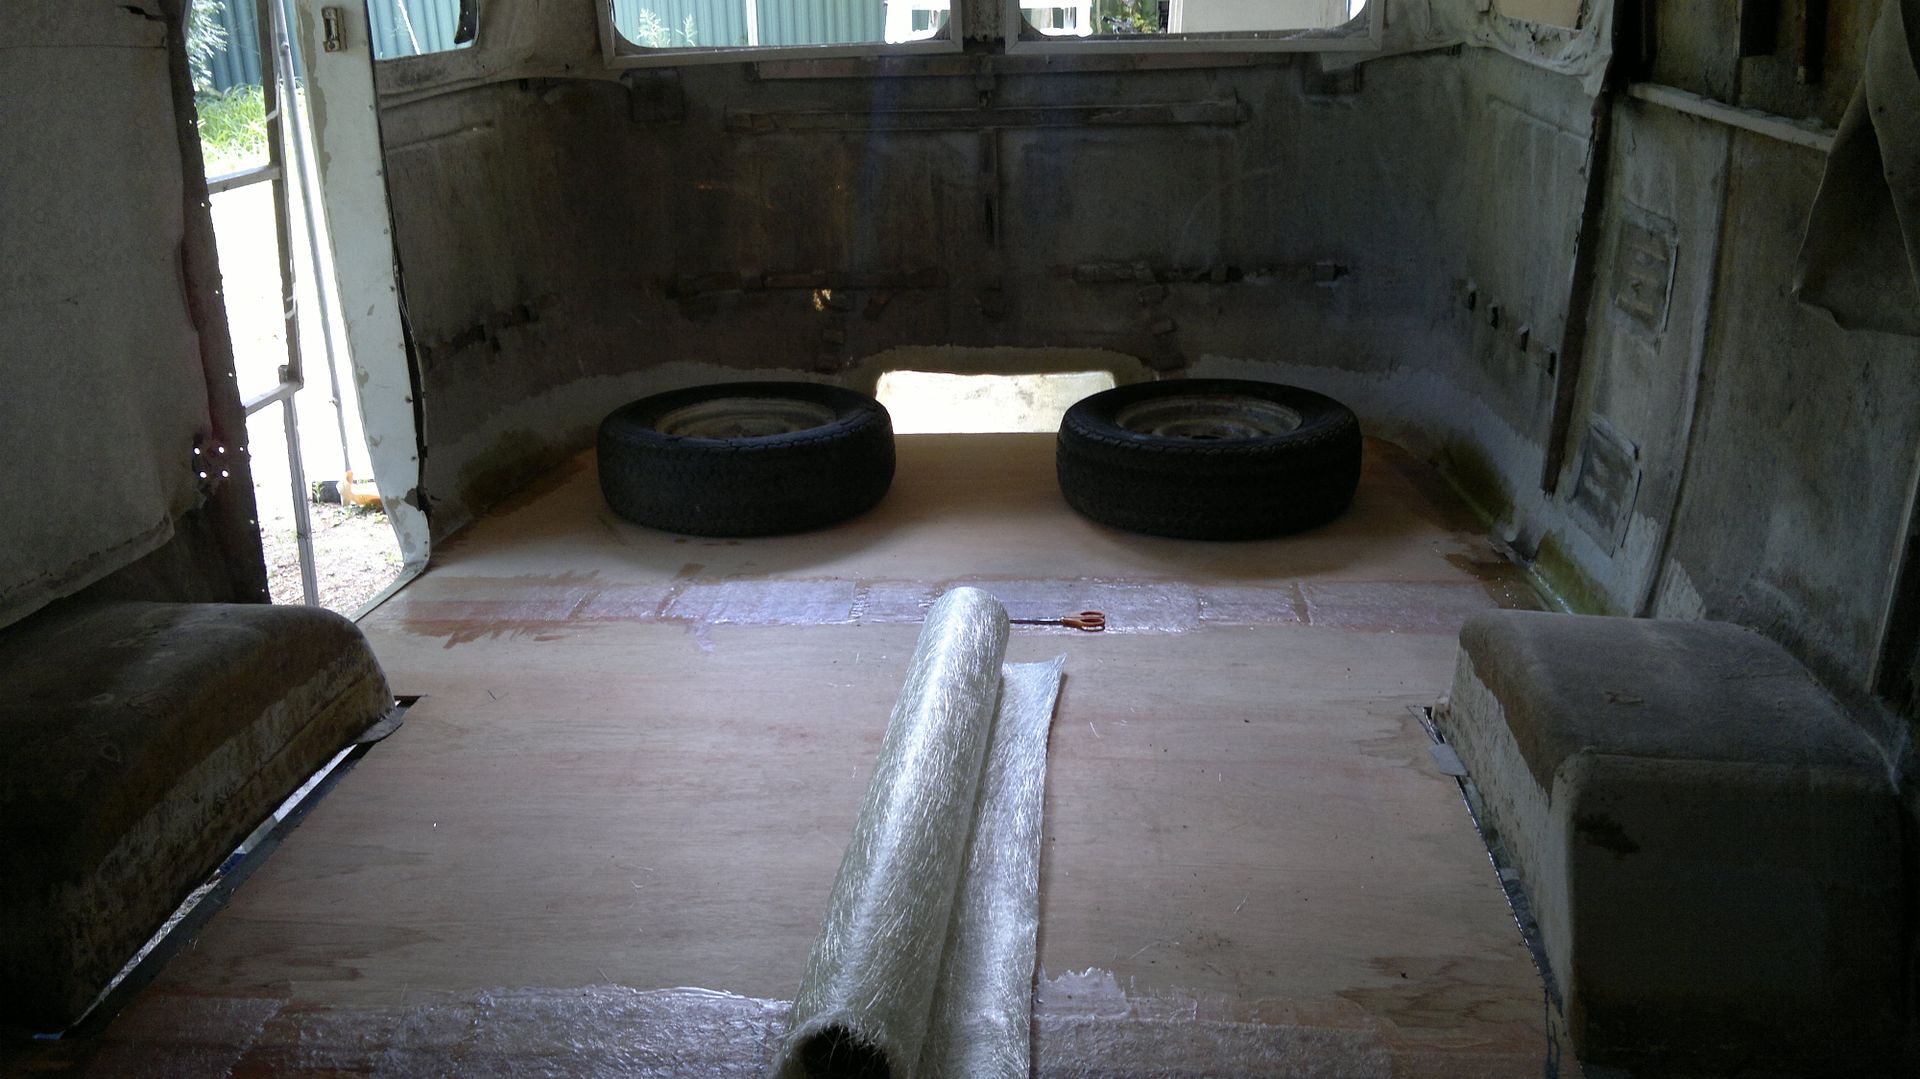 Cheers Doug |
|
|
|
Post by cruisindoug on Dec 3, 2013 15:01:55 GMT 10
Finished glassing in the floor except for a little bit around the door way, it still needs more work to get a good fit for the door so have left it for now. Will come back to it shortly. Got into some metal fabrication today just for something a bit different; made a start on getting rid of the rusted sections. Stated with the hardest bit, the front cross braces, I was hoping to get away with just changing the front channel, but the rear part was too far gone. Couple of hours with the grinder, and finally the area was prepped: 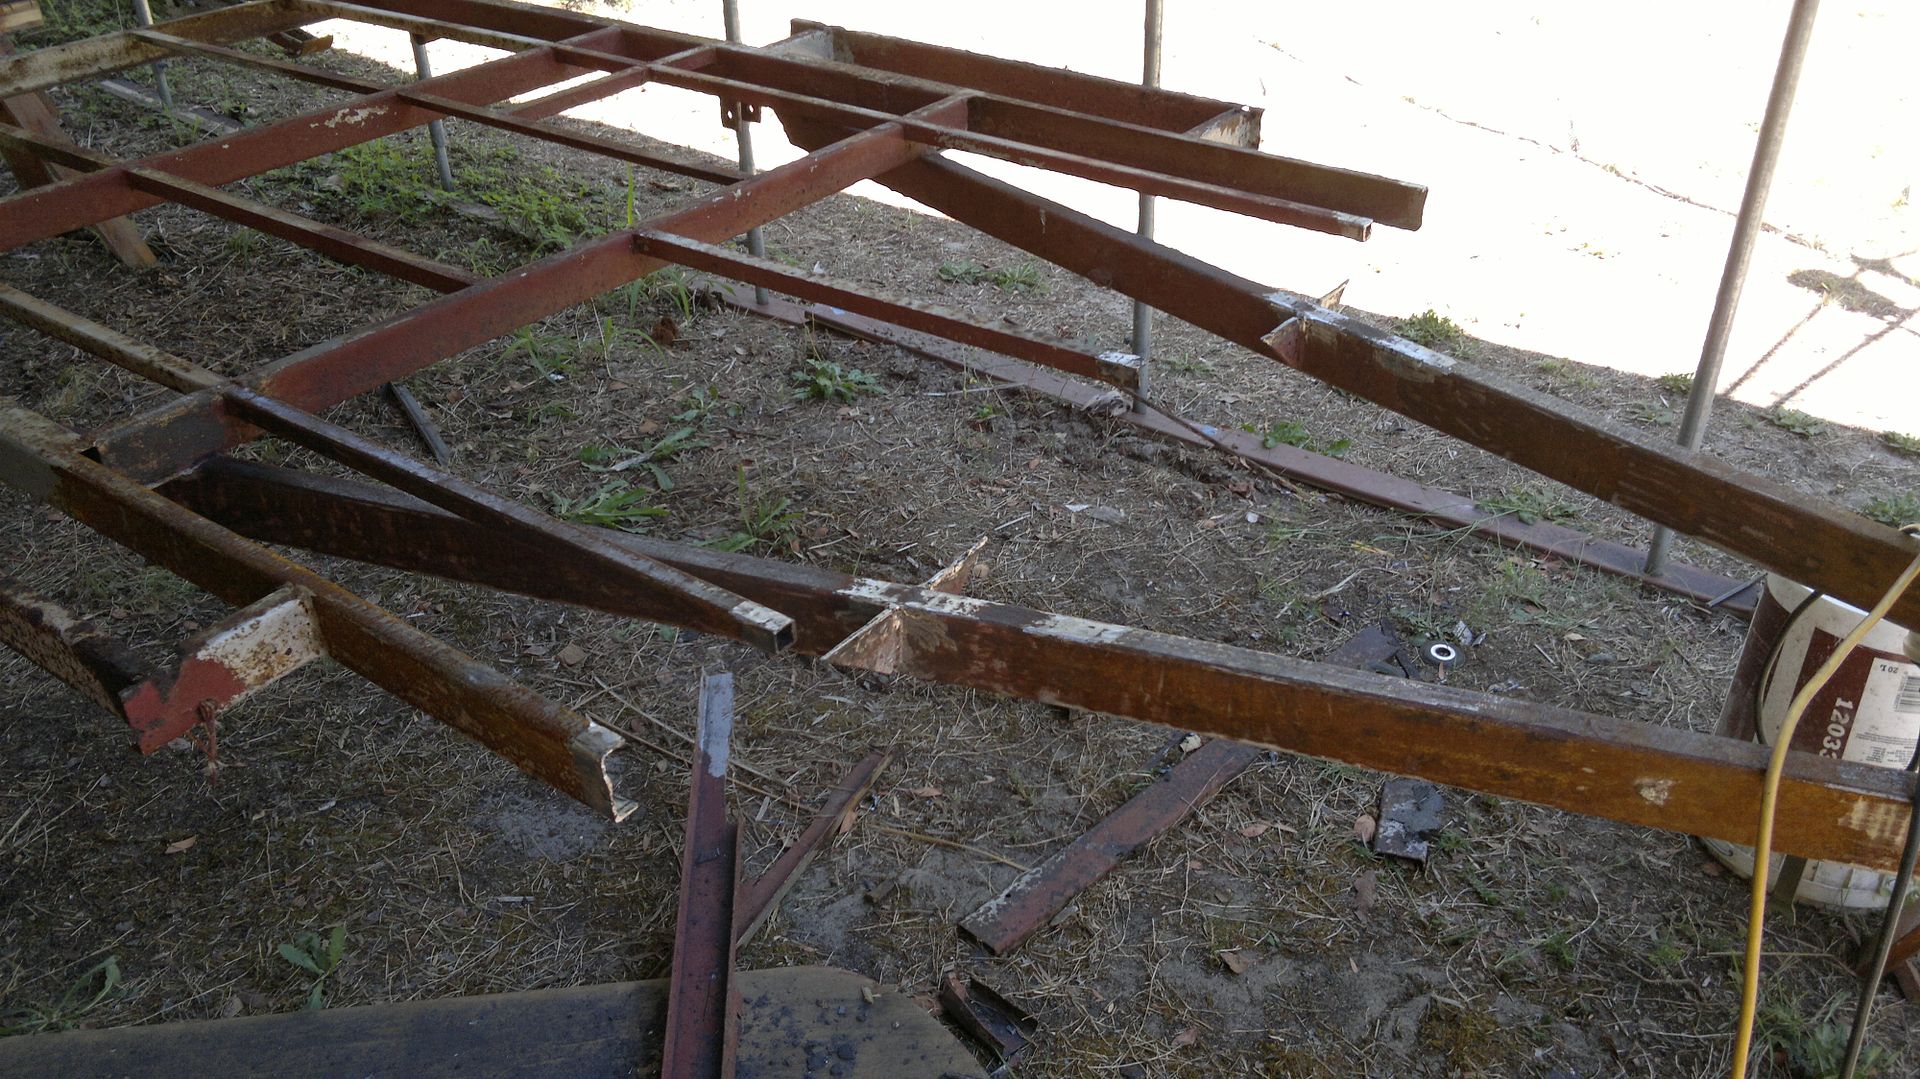 And cut out the replacement sections - bit more fit and fiddle and it will be ready to weld. 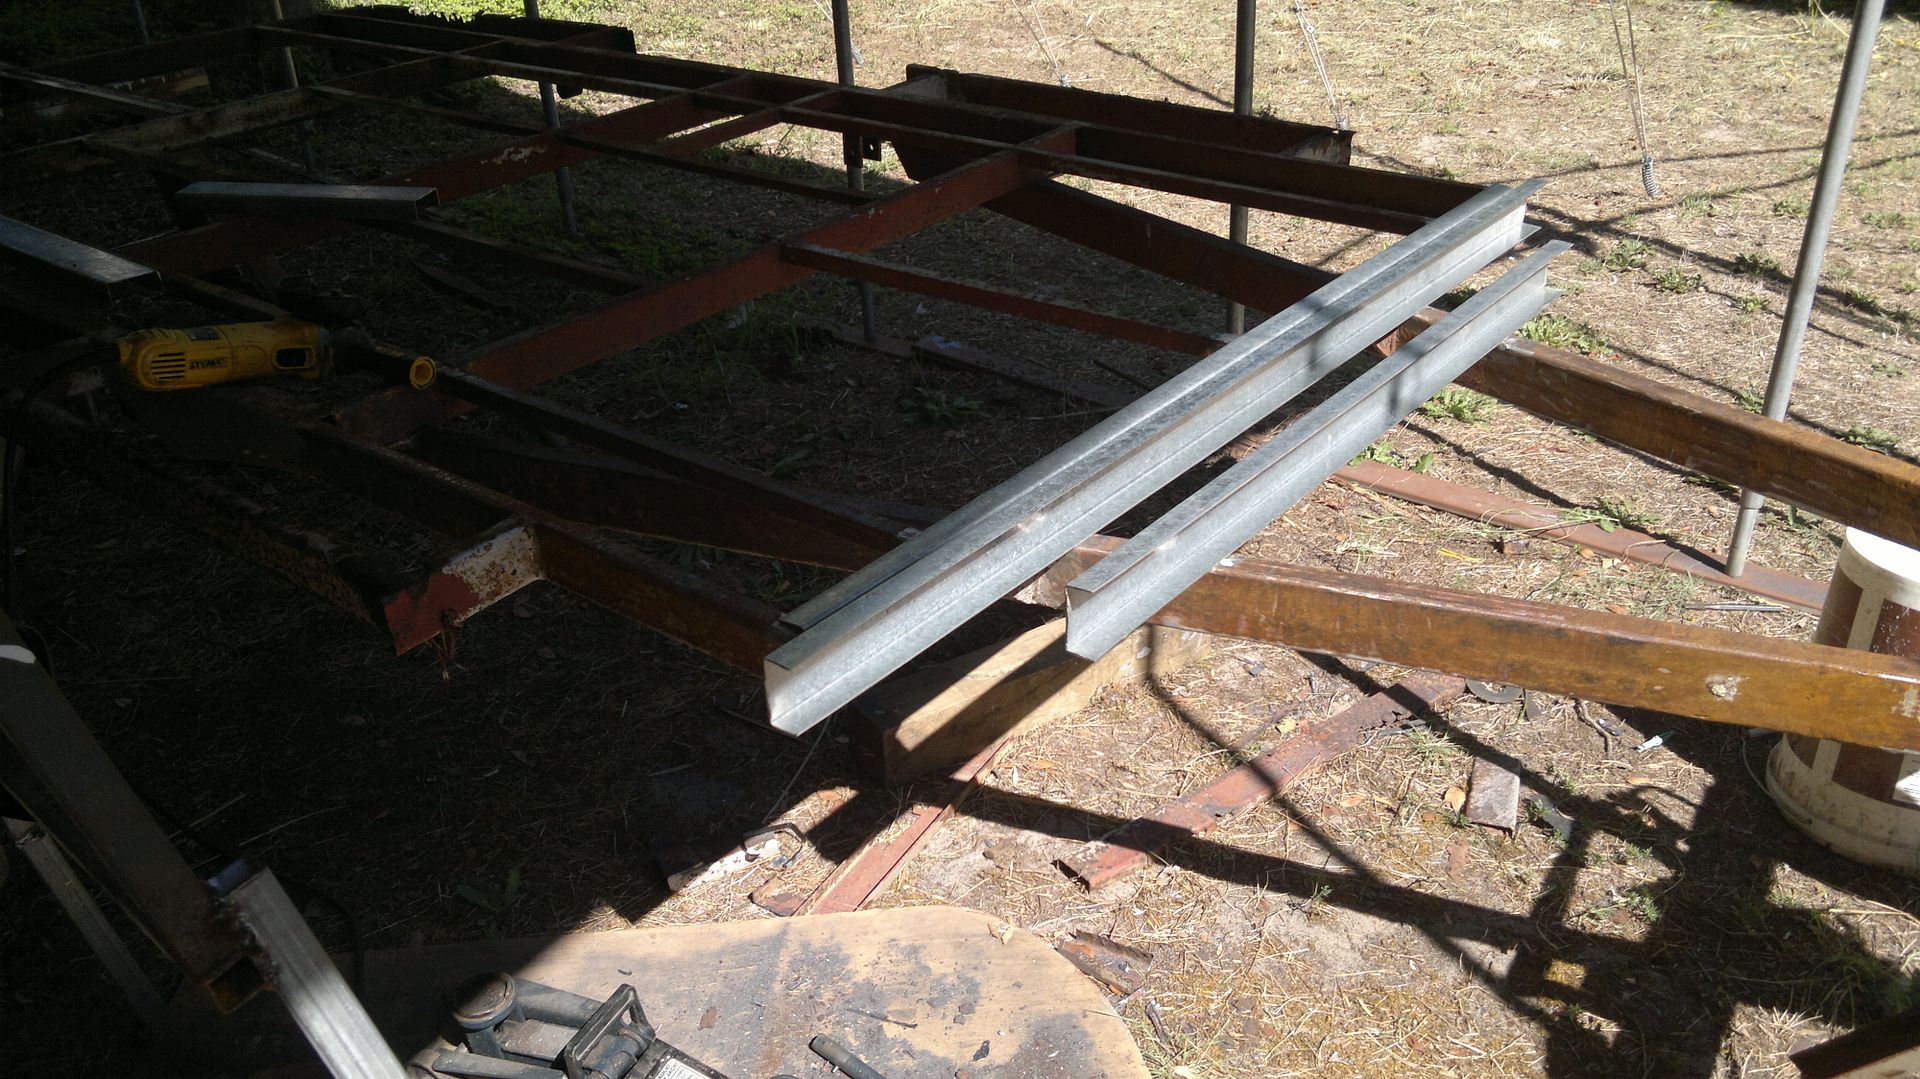 Cheers Doug |
|
|
|
Post by cruisindoug on Dec 4, 2013 16:08:52 GMT 10
Got the pieces from yesterday welded in (from the top) as well as making and welding in the two front outriggers. I elected to make them about 25mm narrower than original to allow for easier reinstallation of the chassis. 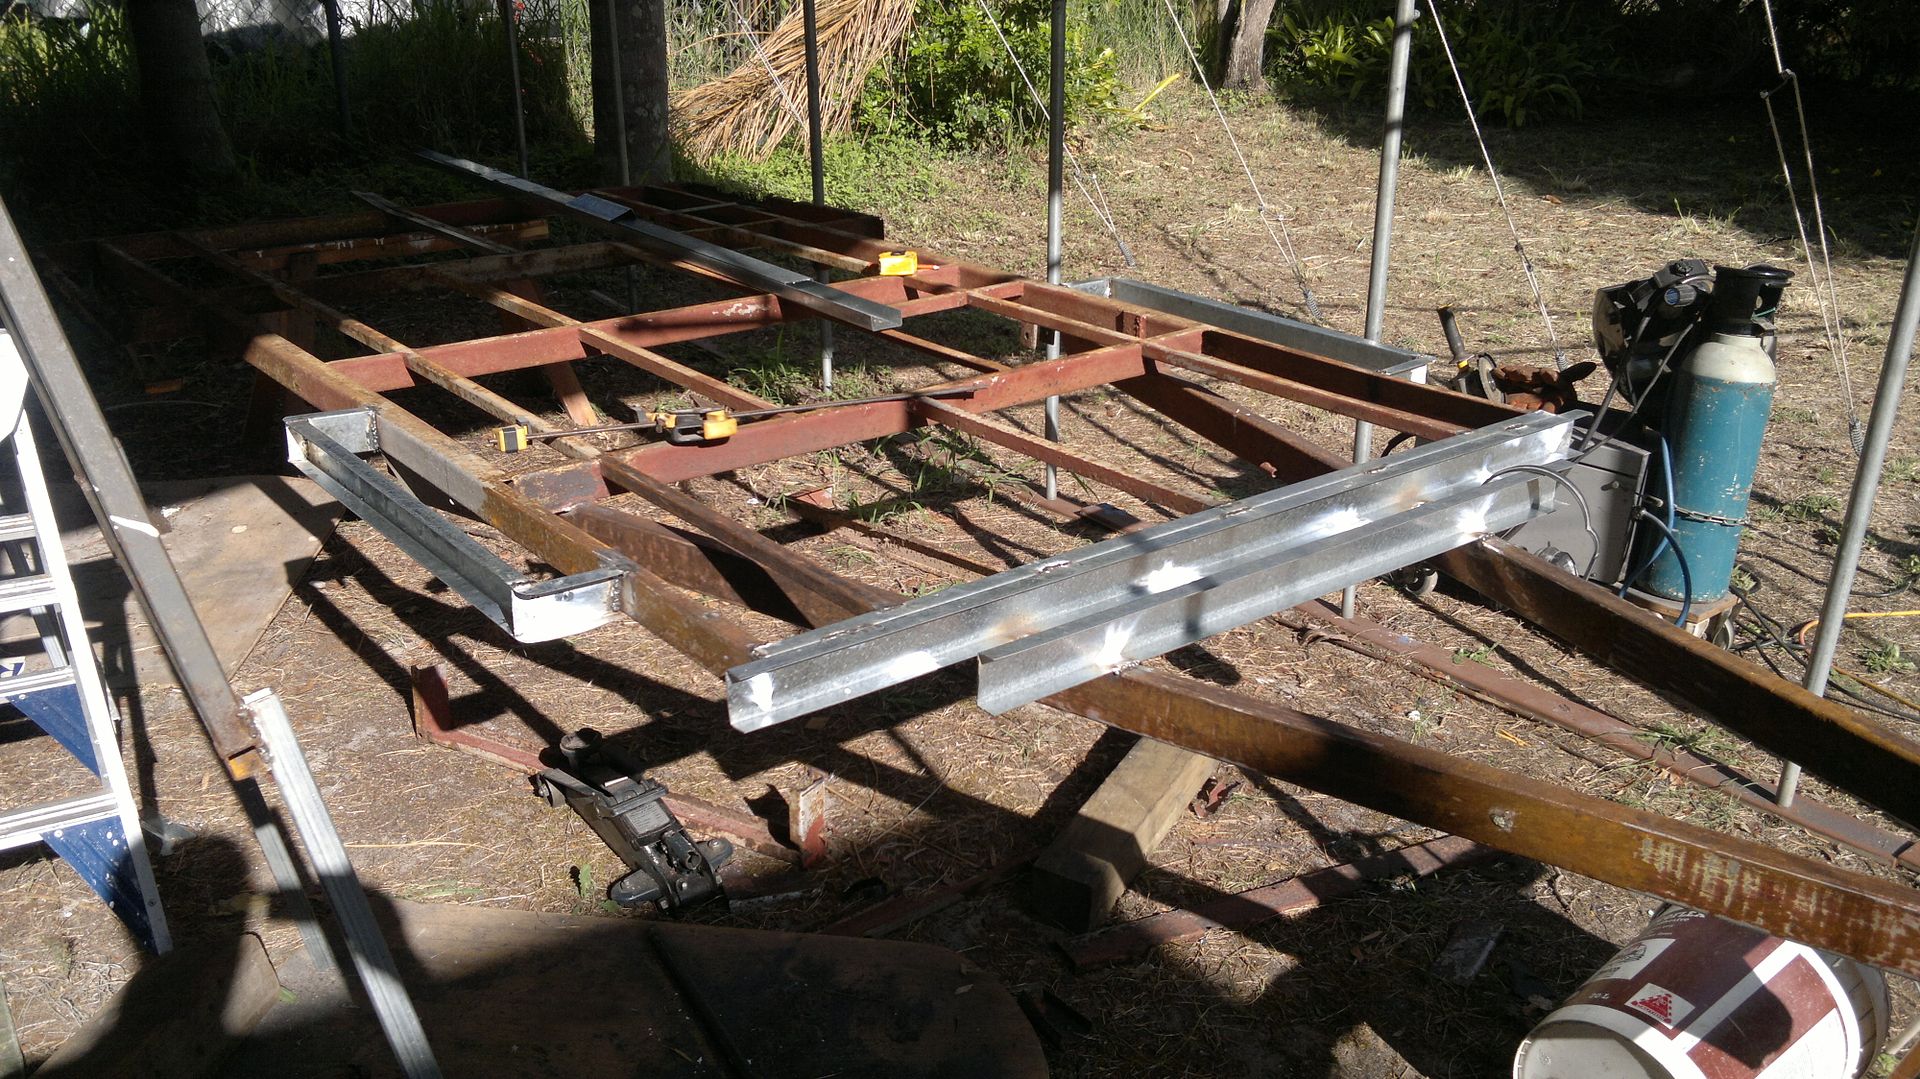 Not a real lot done today but progress just the same! Cheers Doug. |
|
|
|
Post by cruisindoug on Dec 10, 2013 15:45:12 GMT 10
Grabbed a couple of hours to get some work done on the Sunny today, got the rear section cut, fitted and squared up - only tacked in as I ran out of gas always in the middle of a job aye! 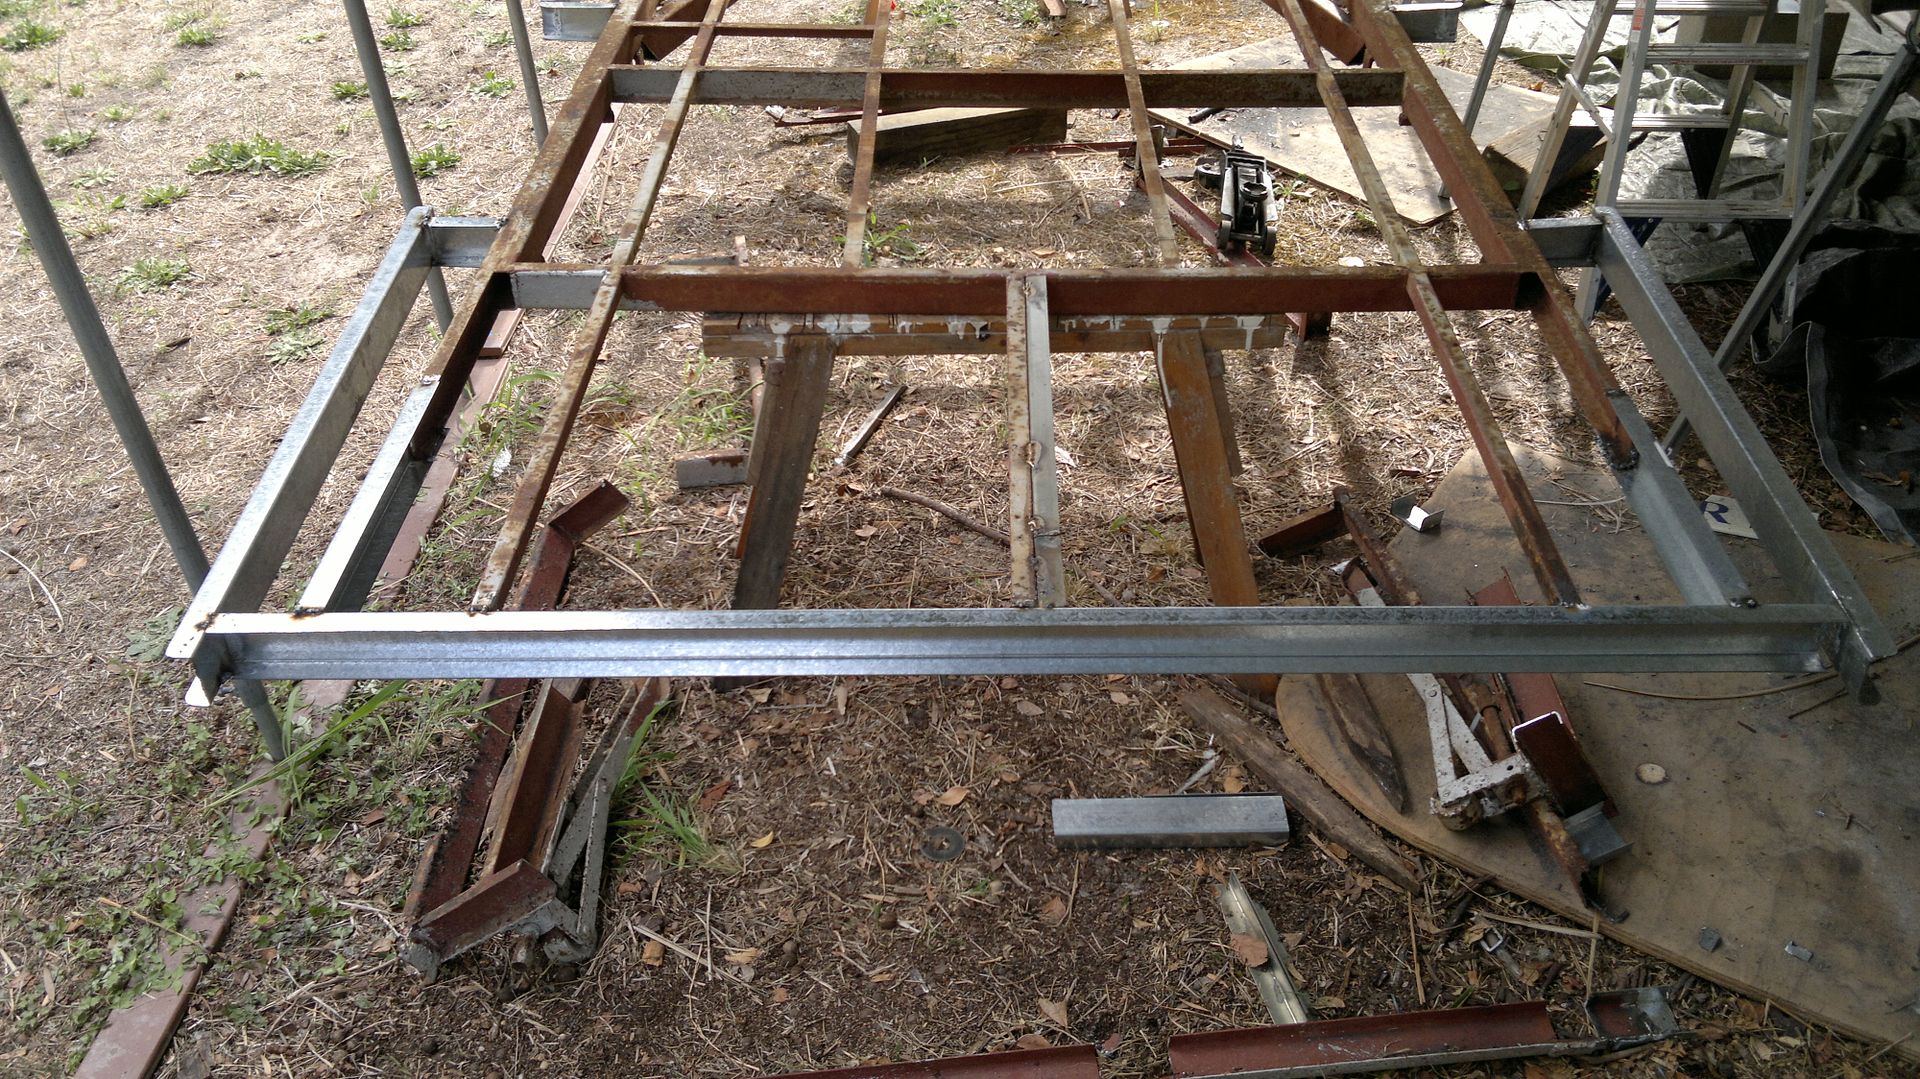 Cheers Doug |
|
|
|
Post by cruisindoug on Dec 16, 2013 16:01:43 GMT 10
|
|
|
|
Post by Surf Tragic on Dec 16, 2013 19:01:15 GMT 10
G'day Doug Just did a catch up with your project, it is a pretty big rebuild. I can understand the chassis work, that sort of thing is very satisfying work. The structure is probably twice as big as the Don chassis I am familiar with, but maybe the Fibreglass shell needs full support, a bit different to the ply panels which become sort of a structural beam themselves. Anyway, I will watch the project with all the fibreglassing, patching, & groundwork you're doing, sure will be worth it in the end  Maybe the drill will show up, I'm chasing my stuff every day here with tradies running around at the moment, glad my drill is engraved as it was in the back of another ute (not mine) ready to leave the property recently we all have Makitas ;D ;D Cheers .........ST |
|
|
|
Post by cruisindoug on Dec 19, 2013 7:46:17 GMT 10
Nah ST its definitely grown legs and walked, nowhere to be found, and no tradies or the like been here that could of "accidentally" picked it up. Picked up the new drill - I went AEG they currently have a 6 year warranty, and have had their tools before and been happy - and got the stabilizers mounted up (temporarily) I reckon they will work pretty well, if they cant reach the ground and level the van its time to find a better site! 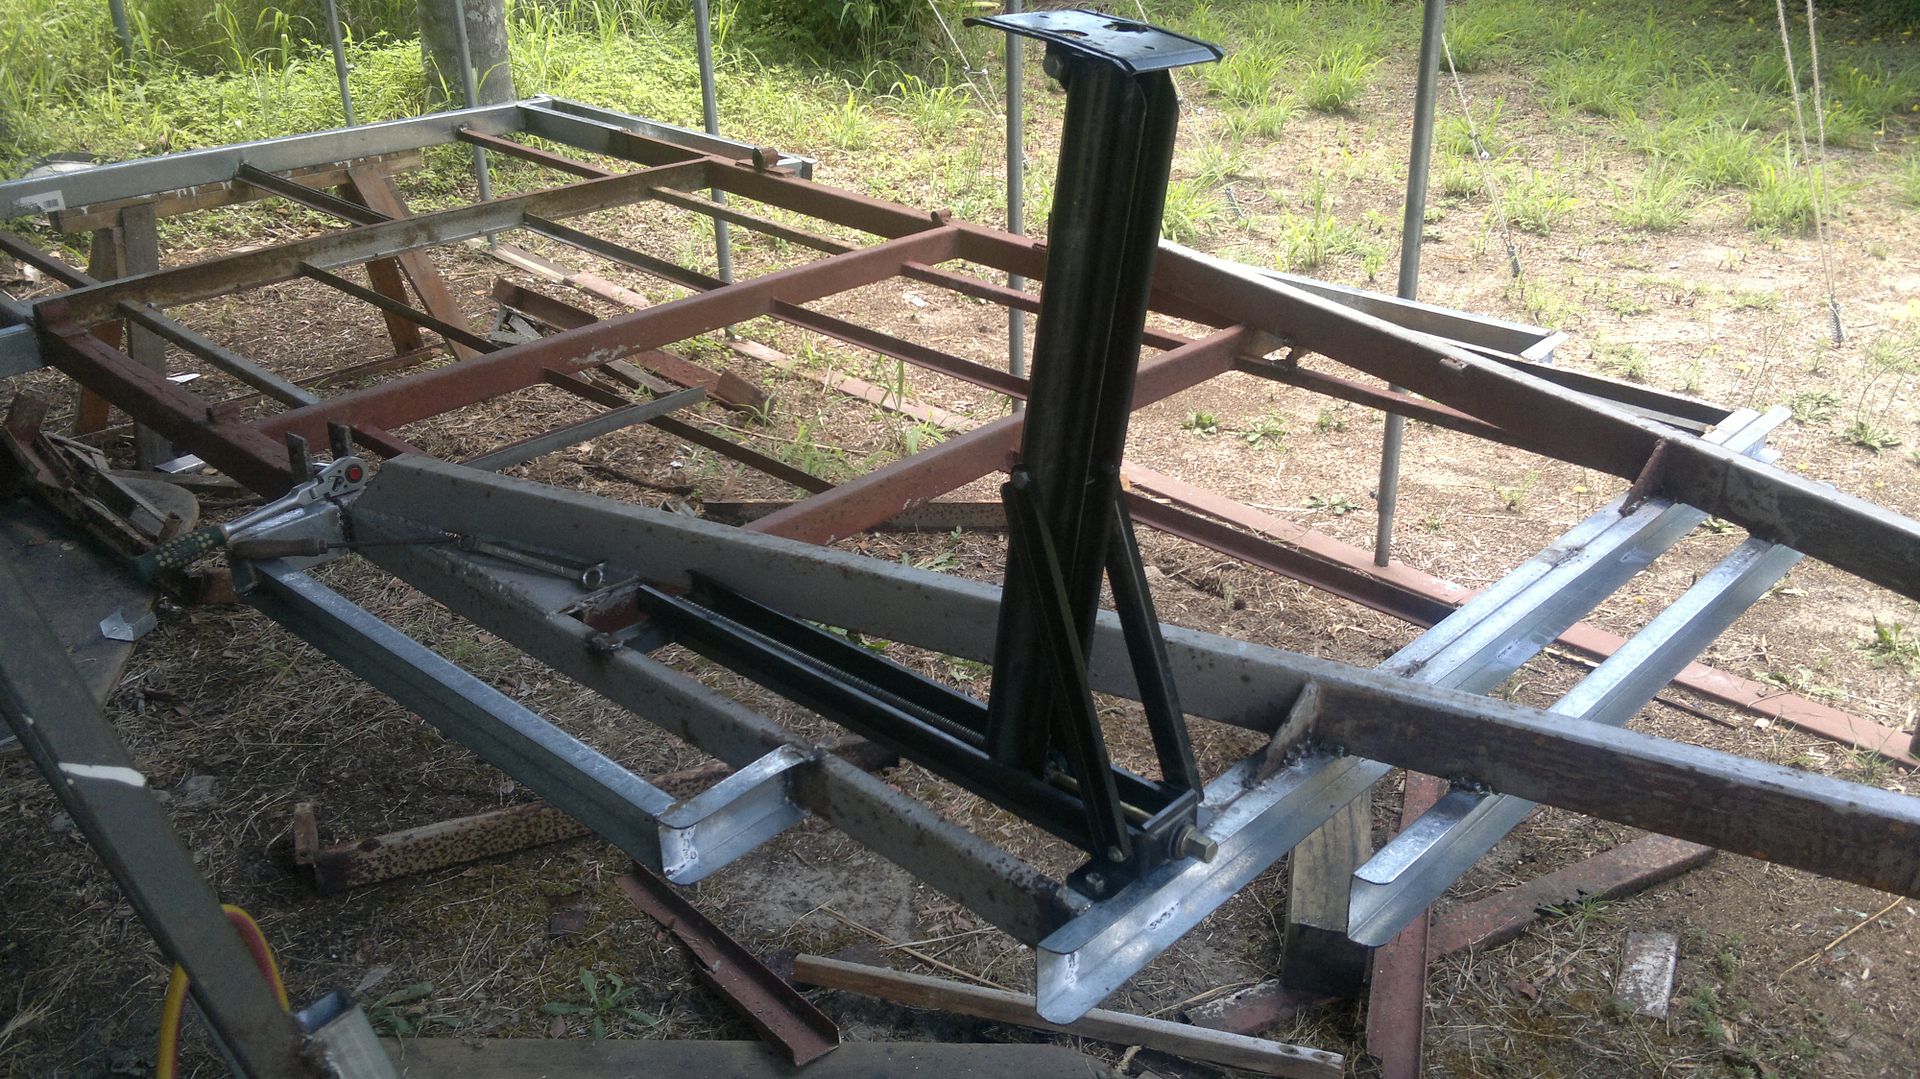 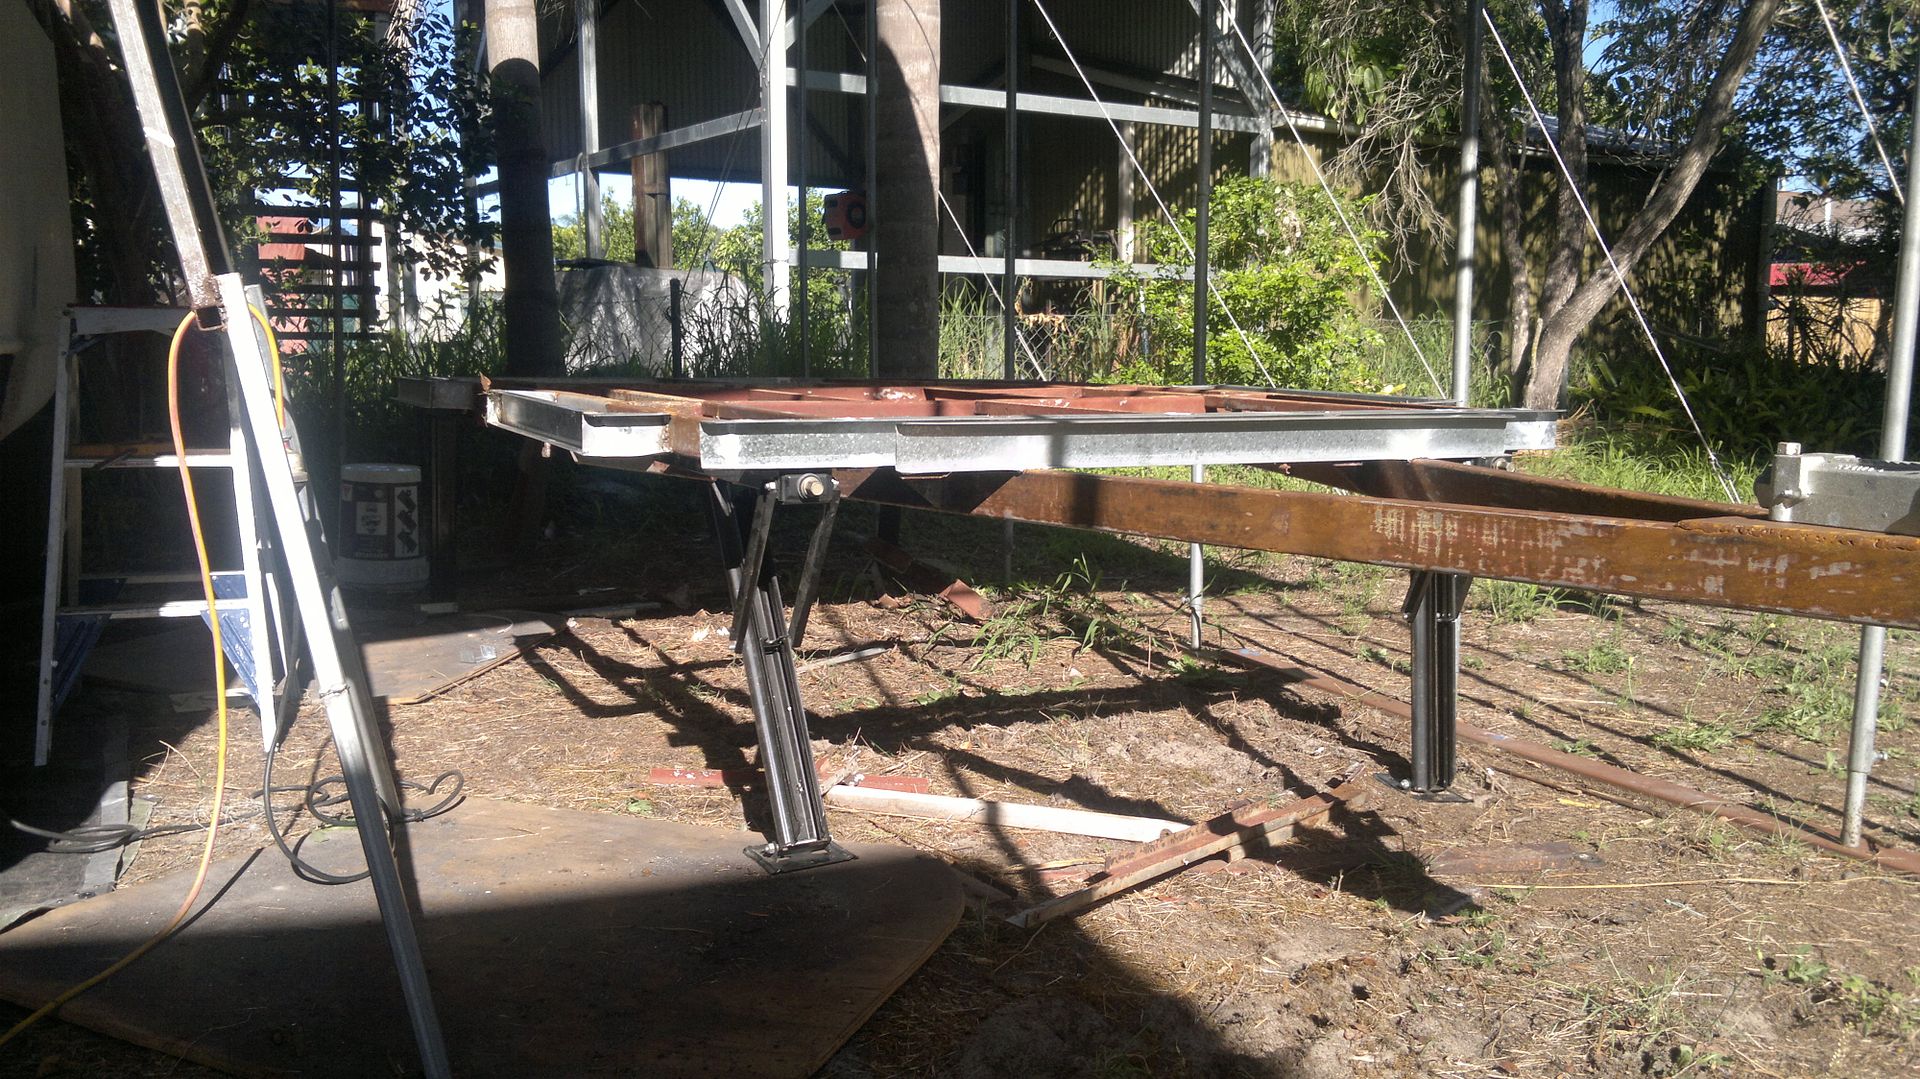 That's it till the new year, have some domestic duties and shopping to do next couple of days and then its time to hit the road yay! Cheers Doug |
|
|
|
Post by claireandruth on Dec 19, 2013 8:07:25 GMT 10
Hi Doug, this is inspiring! We won't be able to take scooby (our 65 sunliner) to a shell but I will start sanding back the chassis in the new year to remove what looks like surface rust. Can I ask a question? Our van looks like she has eminent white paint on the chassis. Is that standard? I will be using rust prevention paint and thought white would good, or else the black gloss you can get. What will you do? Claire
|
|
|
|
Post by cruisindoug on Dec 19, 2013 11:39:33 GMT 10
Claire PM sent |
|
|
|
Post by cruisindoug on May 6, 2014 18:05:46 GMT 10
Well its taken a lot longer than I hoped or planned to get back into the Sunny, can't believe we are into May already! Got stuck in yesterday and made a start on the BBQ rack / gas bottle holder set up; its been milling about in the brain for a while how I wanted to tackle it, so got myself some steel and started playing: 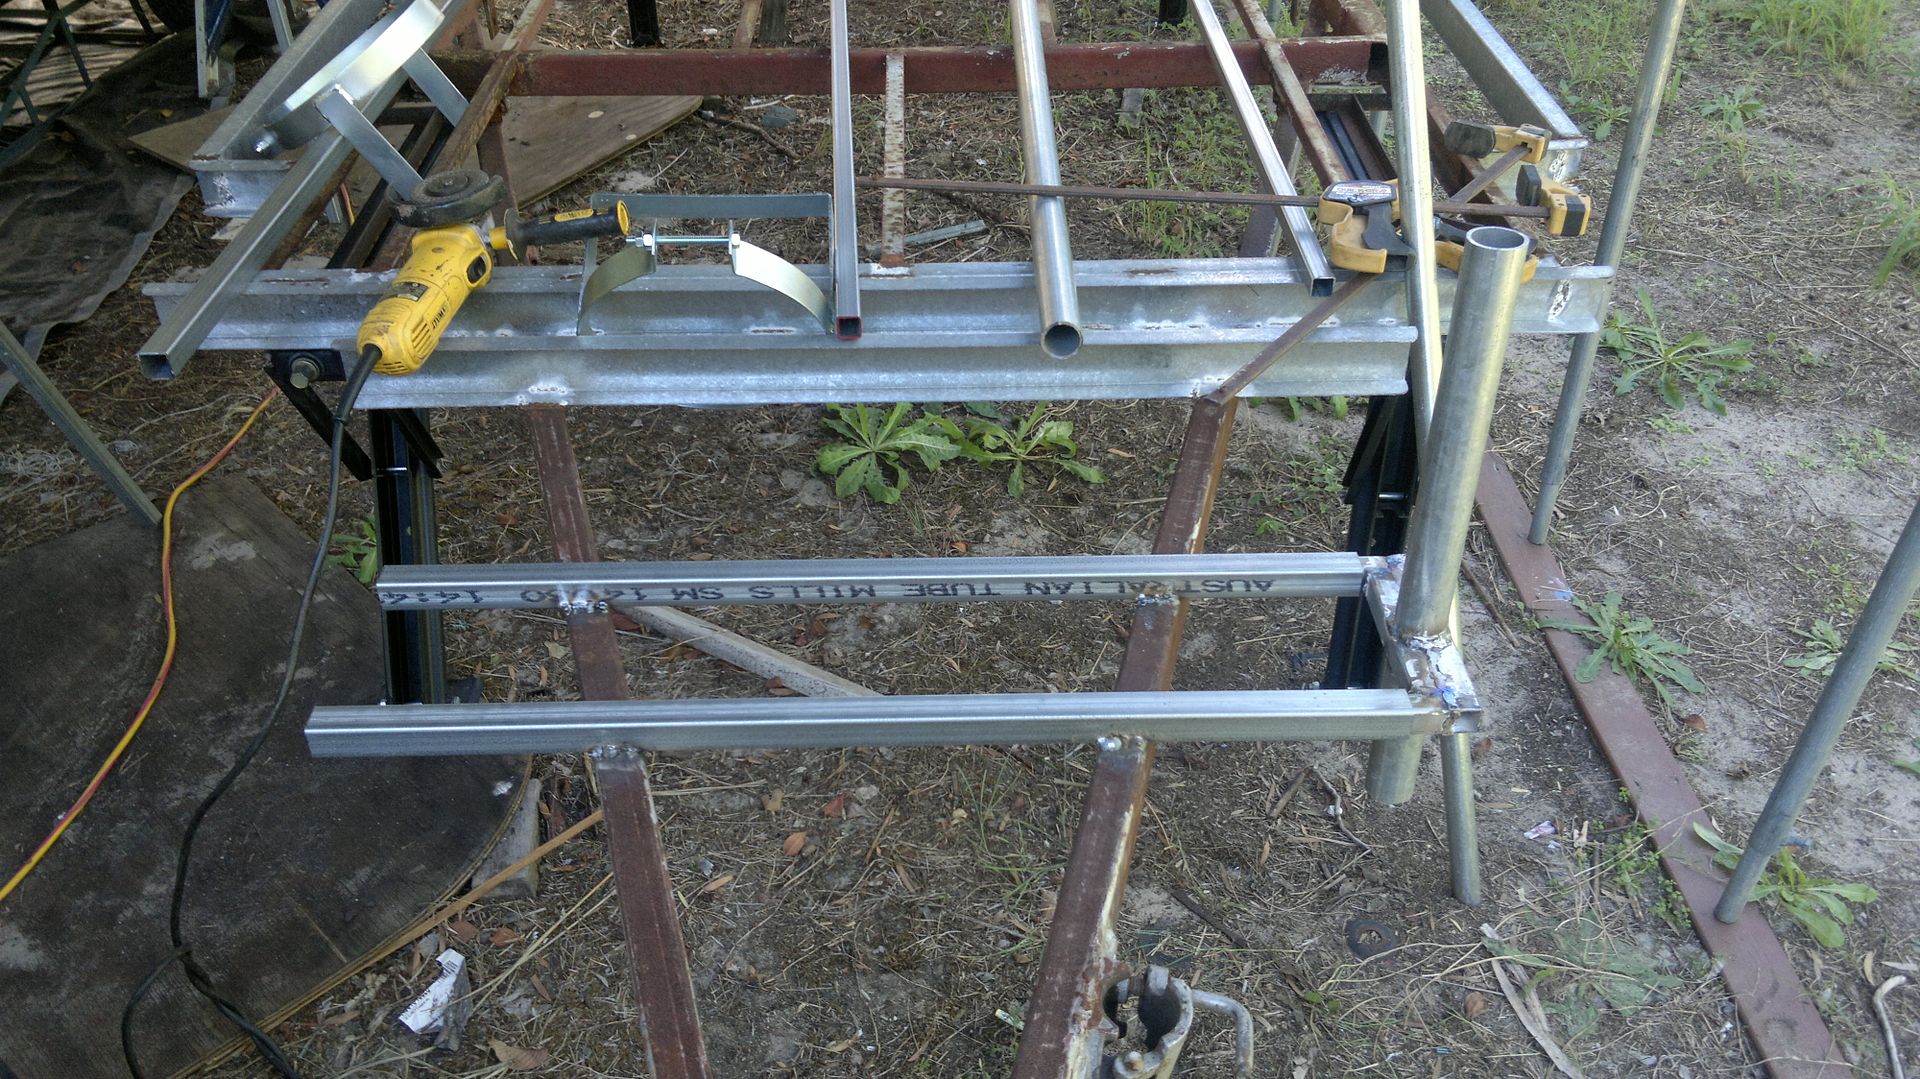 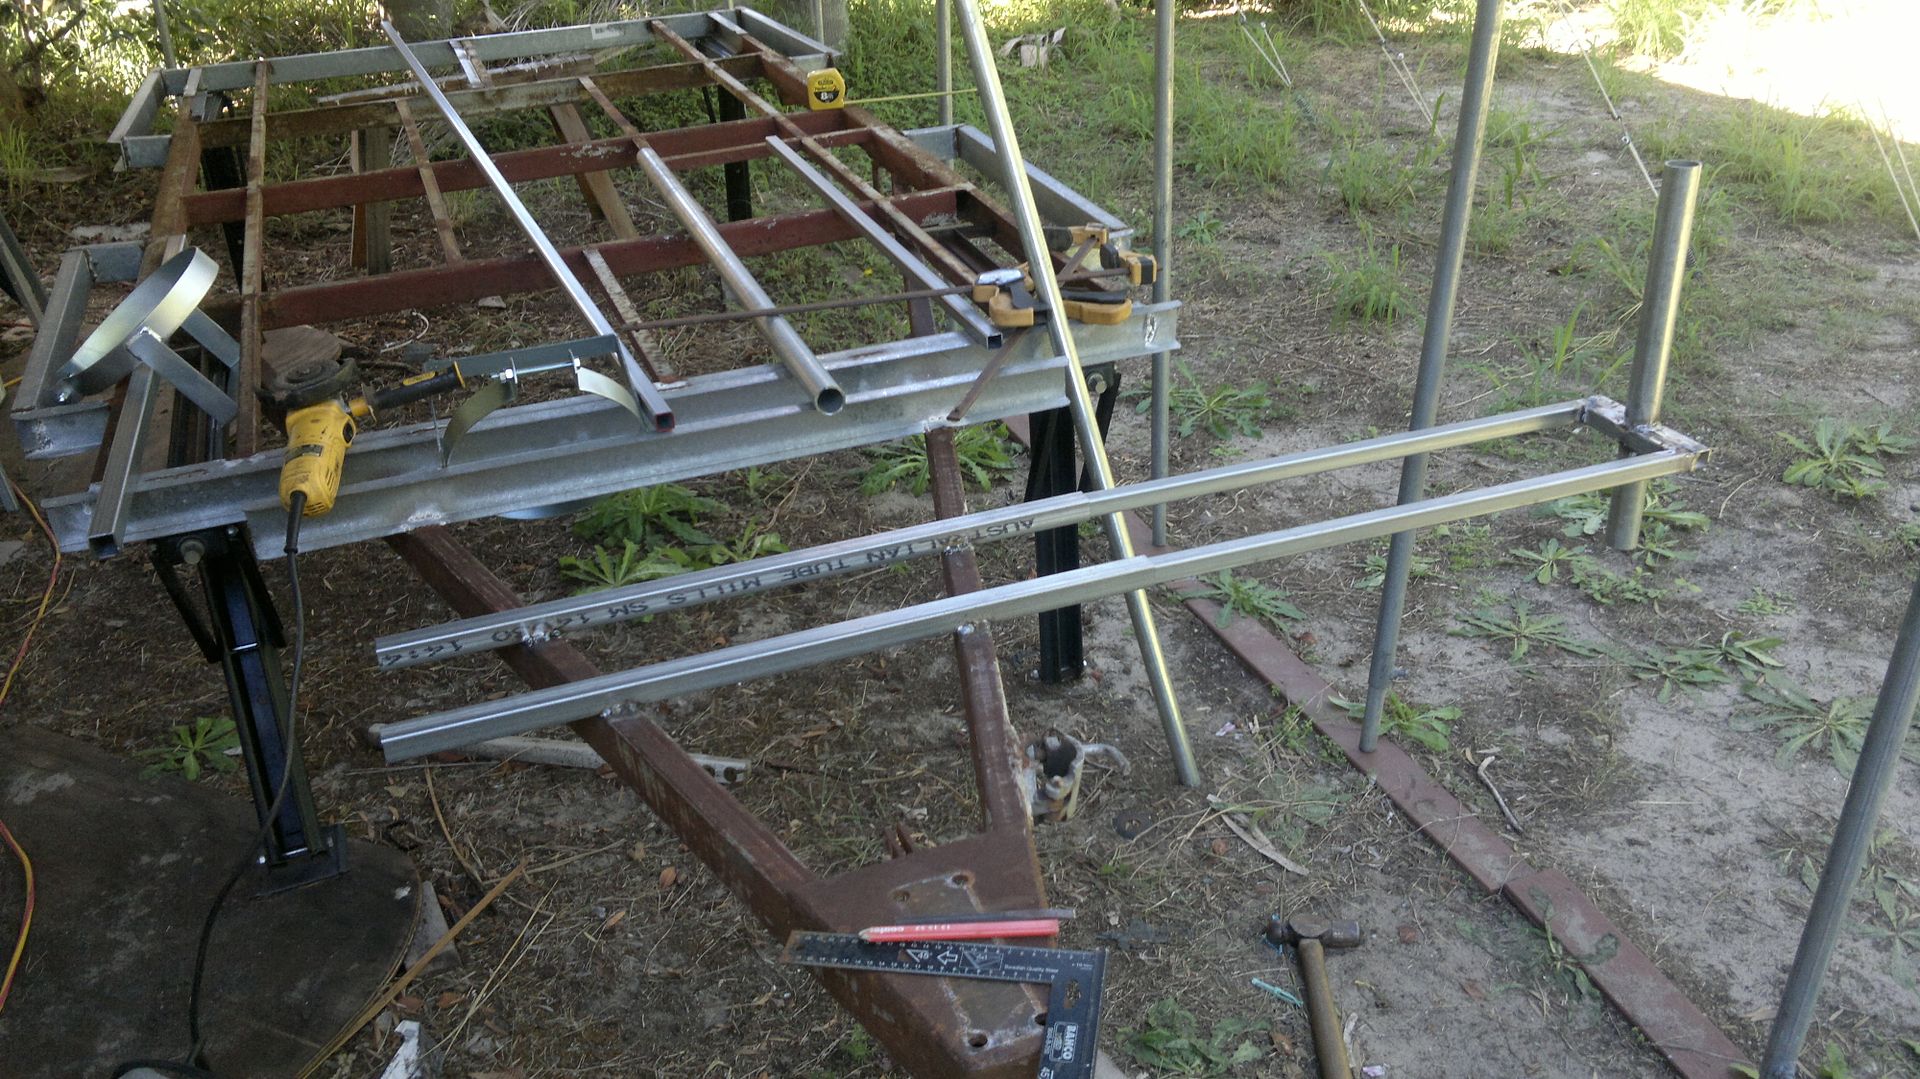 Don't worry the top was just tacked together in a hurry to see how things were progressing! 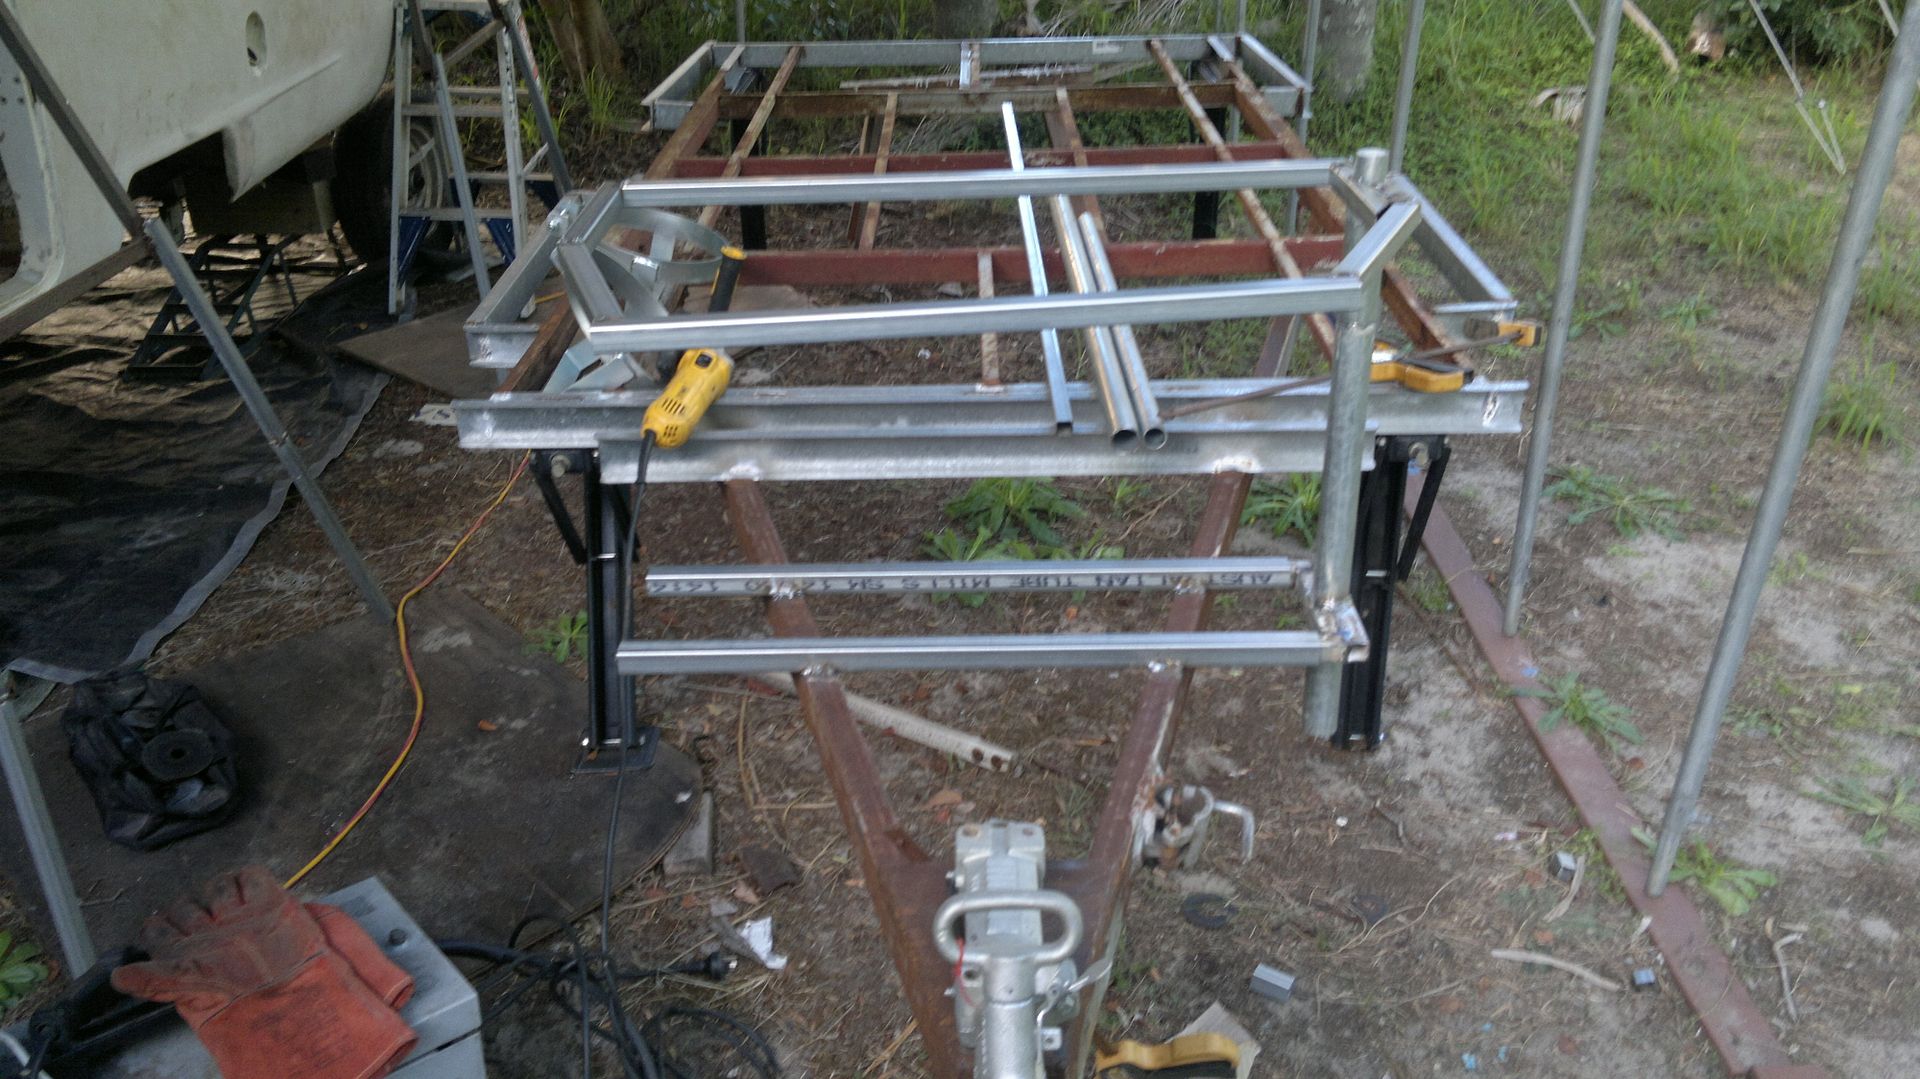 So today was spent getting the top squared up, and doing lots of fiddling about getting things looking good, and making the travel rest. 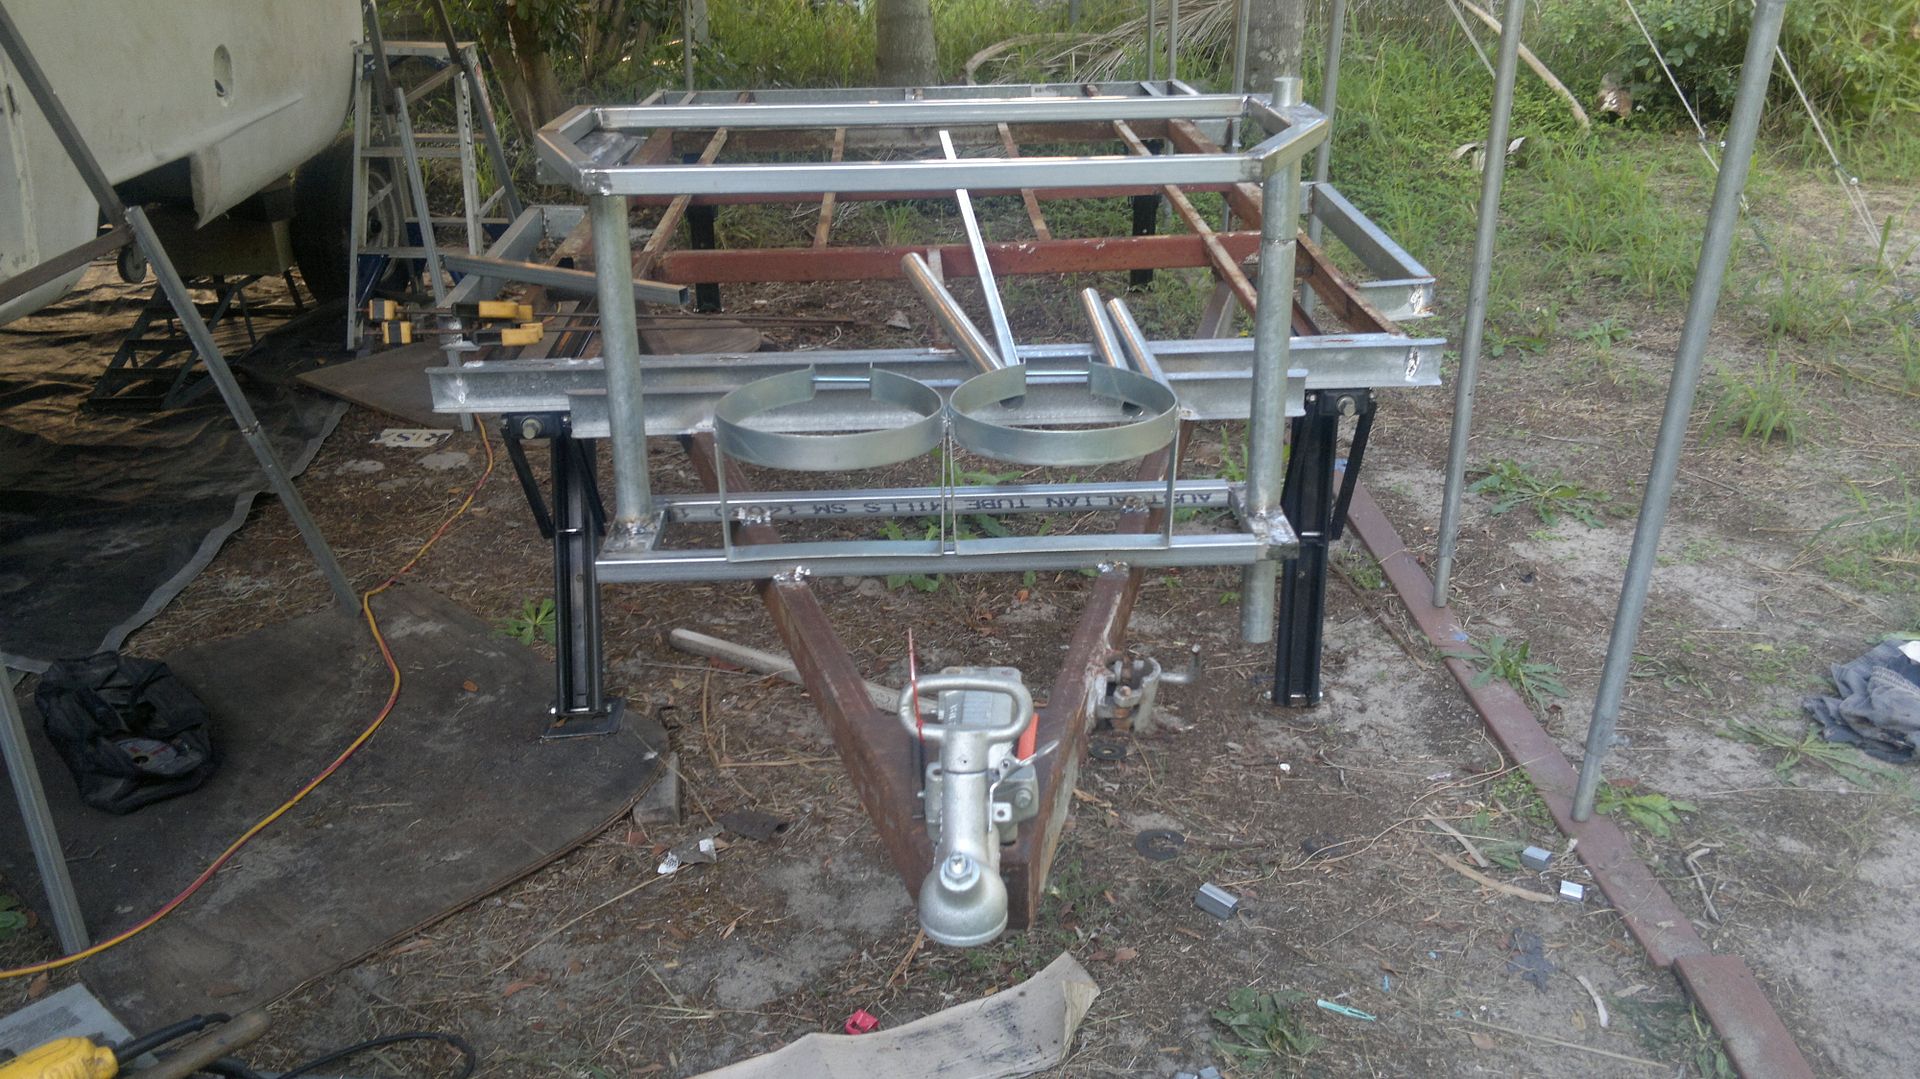 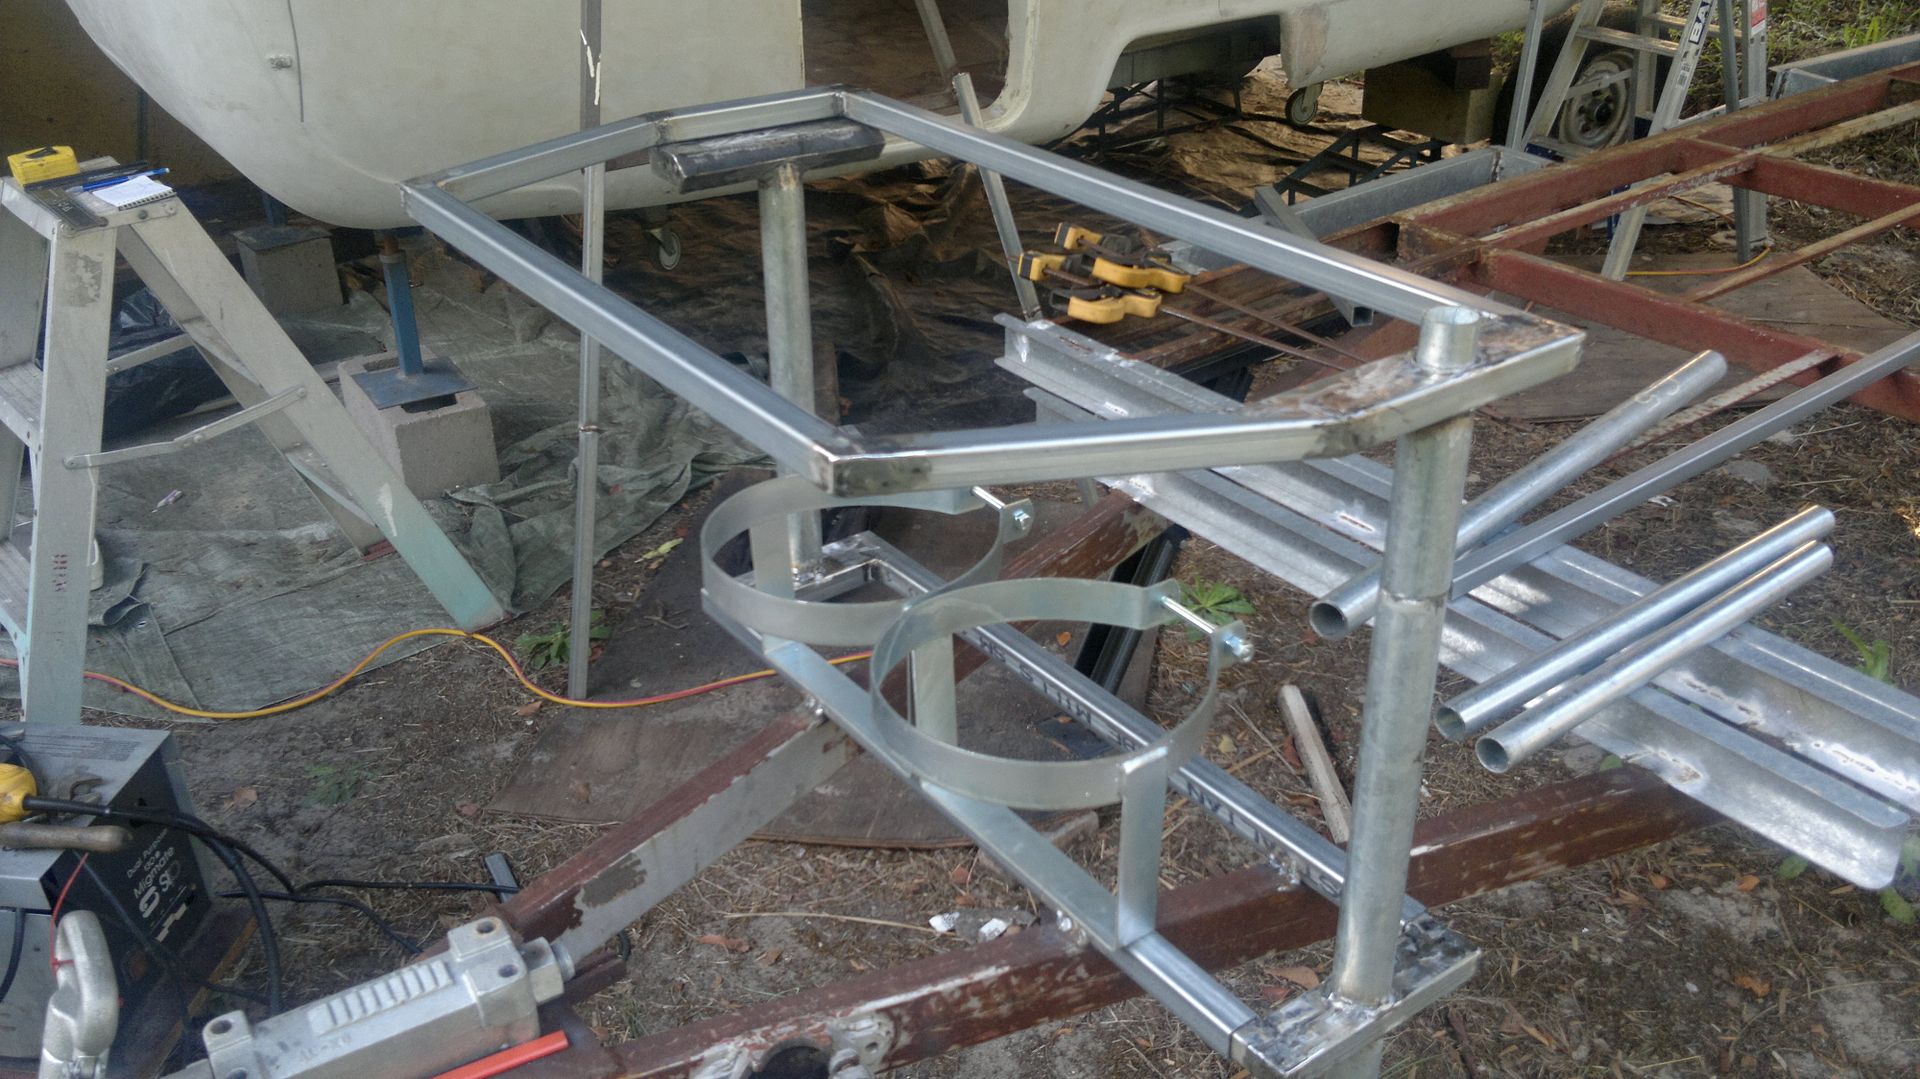 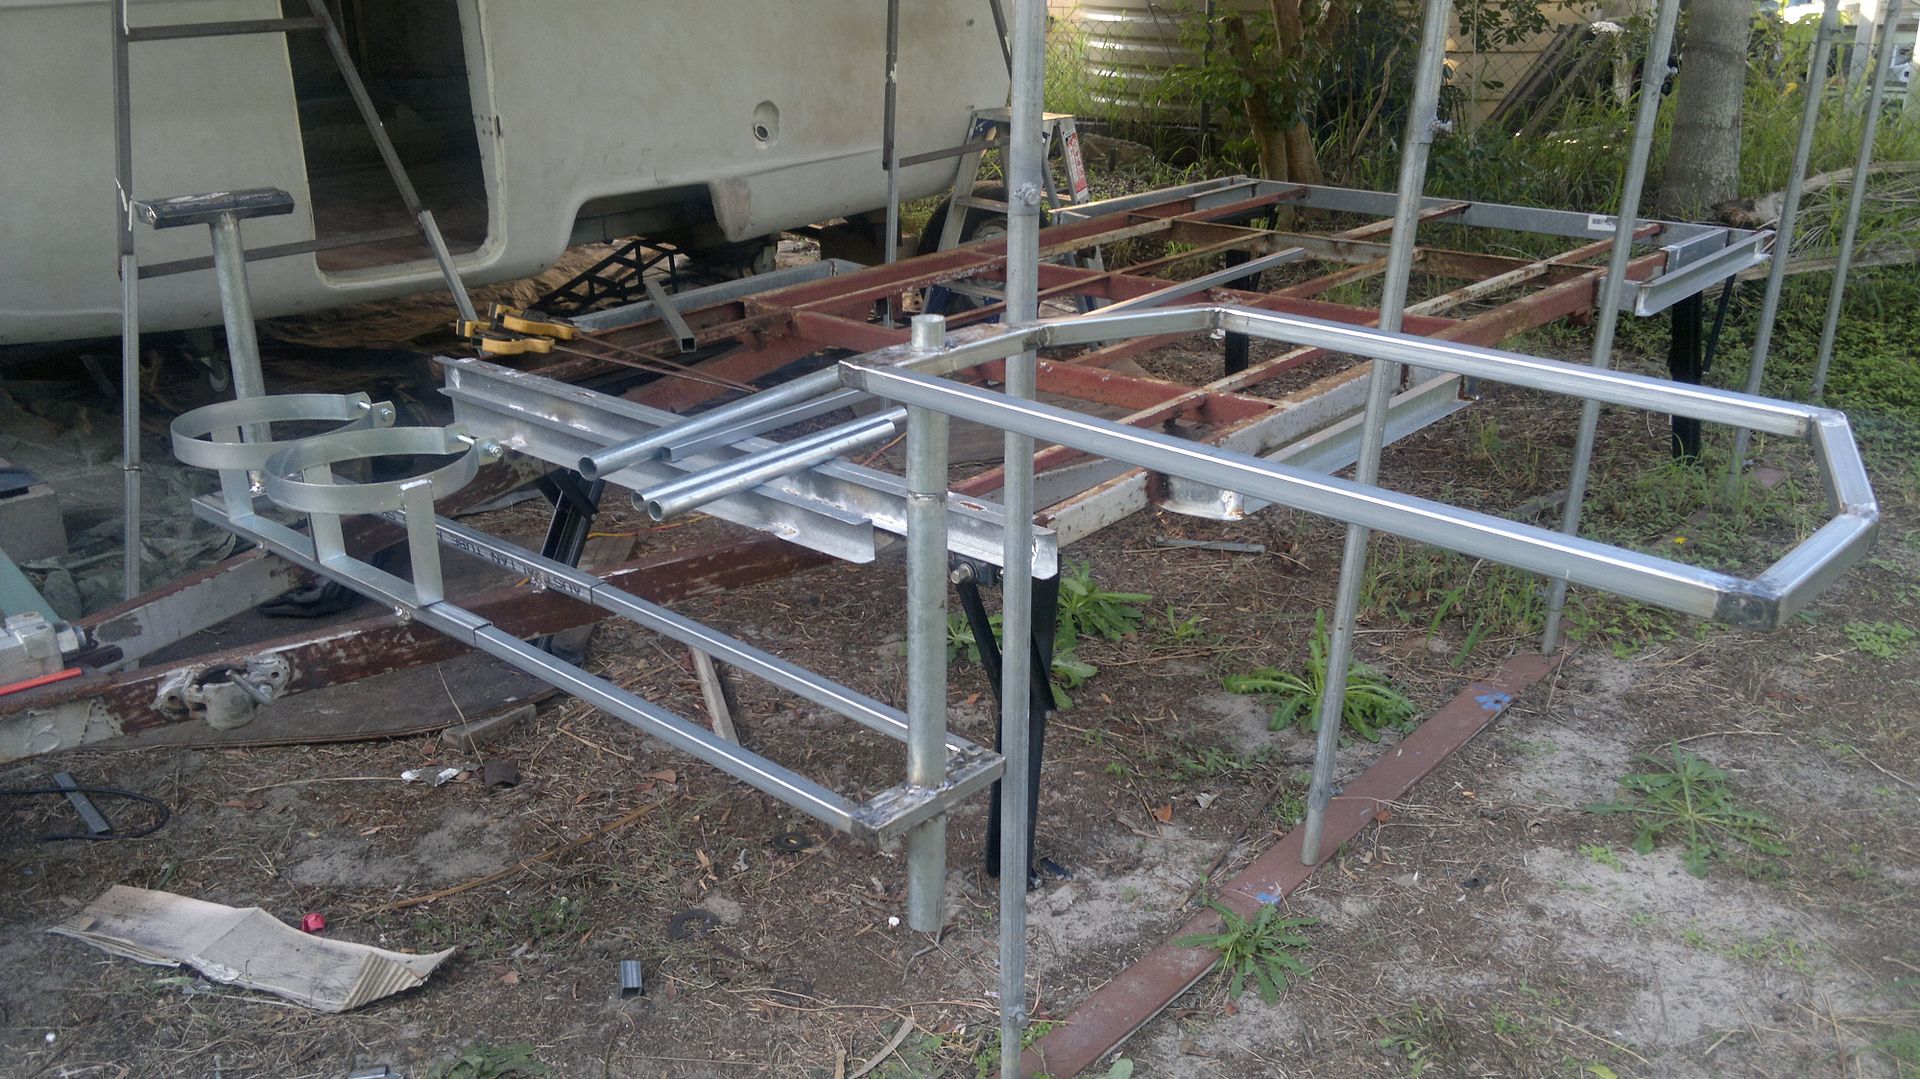 I reckon I might get away with just a drop down foot at the pivot for stability, I was counting on having to add a couple of swing down legs to the end when it is fully extended as well, but so far seems very stable at the pivot when its slid in, so hopefully all will be good. Another day at it tomorrow! Cheers Doug |
|
|
|
Post by sutcac on May 6, 2014 18:36:30 GMT 10
Hi Doug. Like the design.
I reckon fold down leg/legs(adjustable) would be the go. Help direct the fat from the plate into the catch can!
Plus take some weight(torque)from the drawbar
What weight do you reckon it will add to the ball with the 2xgas bottles as well as the cooker/plates etc?
|
|
|
|
Post by cruisindoug on May 6, 2014 19:10:29 GMT 10
G'day Clyde, the steel in it so far is 12.5kg, plus 8 for two 4kg bottles, haven't weighed the bottle holders yet but say another 4kg for them, the cooker I want is 8.5kg, add another say 8kg for the top board plus one small brace across the middle, maybe some legs all adds up to about 41kg ... a lot in terms of an estimated 70kg target ball weight! (Based on the total weight for the van target being 700kg)
BUT, there is more to the story ... I'll be adding a spare wheel carrier at the very back, plus the tarp and poles will be stored under the bed probably in a rocket launcher through a hatch, so I'll be getting probably more weight added to the back than on the front - should pan out somewhere close to being weight neutral once all said and done because the leverage effect at the rear is a little shorter that at the front.
I will have a couple of options of where to mount the batteries according to how it all pans out, the fridge is going to end up near to a standard position, possibly a little further back if I mount it a bit higher (over the wheel arch) as I am considering - could be a bad idea as it would increase the height the weight is carried at ...
Lots to consider, but I still have some options there.
Cheers
Doug
|
|
|
|
Post by telemike on May 7, 2014 9:09:54 GMT 10
I just weighed my new sunliner and it had 100kg ballweight almost empty. It had a full 9kg bottle and annex poles on the bar, jack and pegs and spare under the dinette, original heavy cushions in the dinette, and a full canvas annex on the bed at the back (with a foamy mattress). otherwise the van is completely empty. I am suprised at such a high ballweight and will weigh the bits to see what is contributing to it. 70kg ballweight would be preferable, but that is a lot of weight to shift.
|
|