|
|
Post by Franklin1 on Mar 1, 2023 16:41:37 GMT 10
2002 November
This is the earliest record of the vintagecaravans(dot)com domain name, taken from the internet archives (the Wayback Machine):
______________________________________________________________________
2004 March
A change was made to enable contact through a web mail link at the top of the page:
__________________________________________________________________________
2004 August
The "Discussion Forum" has commenced by this time, with the link near the bottom of the page in yellow text:
____________________________________________________________________________
2010 December
A "Forum Member Profiles" initiative had been introduced, where members paid to have the story of their vans linked to the home page:
The list of stories is shown as follows:
________________________________________________________________________________
2013 March The layout of the home page has undergone a significant change:
________________________________________________________________________ 2021 March
The website name has been changed to vintagecaravans.proboards(dot)com:
__________________________________________________________________________
2022 January
The vintagecaravans domain name appears to now be dormant:
_________________________________________________________________________________ Note to Don Ricardo: feel free to edit/change/relocate any of the above thread or info.
------------------------------------------------------------------------------------------------------------------- 1. Type web address in field and press [Enter]. Wait for response.
2. Click on any of the years that the archives show a result (the black bars). 2015 is used as an example. A calendar for that year will show dates that the web pages were archived. Move your mouse pointer to find a date that has a pop-up time stamp attached to it (example July 9). Click on that time stamp.
|
|
|
|
Post by Franklin1 on Feb 26, 2023 18:41:03 GMT 10
G'day cobber, I'll see what I can recover from the website's early days, and post it in the DHL section. I remember we were able to salvage some info about picnic baskets that we thought was permanently lost from our main Board. Will see how I go.
Cheers, Al.
|
|
|
|
Post by Franklin1 on Feb 26, 2023 13:17:28 GMT 10
G'day All, if you are familiar with using the internet archives (ie. Wayback Machine), you can see what the original Vintage caravan website homepage looked like in the old days. The earliest record is 28 November 2002, with plenty of examples following since that year. www.vintagecaravans.comCheers. Al. |
|
|
|
Post by Franklin1 on Oct 30, 2022 18:56:32 GMT 10
G'day humpyboy, I don't get on the forum much these days due to time spent on other interests, but I check it from time to time and play the "Wonder whatever happened to so-and-so?" game.
Pleased to hear you are still alive and kicking, and you're looking forward to not having enough hours in the day once you retire. All the best for your future!
Cheers,
Al.
|
|
|
|
Post by Franklin1 on Sept 25, 2022 11:17:53 GMT 10
G'day DonR, on my Motorola android phone, there is no "Add attachment" button showing, only an "Add poll" button.
I have to scroll down to the "Desktop version" button at the bottom of the screen, as you described.
Cheers,
Al
(...still alive and kicking, but doing other interests these days)
|
|
|
|
Post by Franklin1 on Jun 24, 2022 20:19:35 GMT 10
G'day All, I'm not having much luck getting a copy of this book. I ordered and paid a total of $90.20 back in April for the book and shipping. The current status of my order is that Booktopia don't know when they will get supply...
To rub salt into the wound, I discovered in late May that the price of the book had been reduced by 30%, from $85.25 down to $59.40 ...
And ever since paying for the order, I've been getting emails for promotions of "free shipping" and other benefits... If you are thinking of purchasing this book, I would suggest you sign up for an Account with Booktopia, and then do nothing but sit back and wait! Eventually you should get an email offering 'free shipping' for a limited period of time. That will save you approx $7.95 as well as the saving from the lower price of the book itself. cheers, Al.
|
|
|
|
Post by Franklin1 on Apr 19, 2022 22:01:32 GMT 10
G'day Mustang, the Aldi stockcheck website says there is stock of these "decorative planters" at Birtinya, Brightwater, and Kawana stores. Not necessarily the caravan version, but perhaps so.
Cheers, Al.
|
|
|
|
Post by Franklin1 on Apr 2, 2022 15:09:57 GMT 10
G'day redmr2red, I hope I'm answering the question you are asking... I think you are talking about the copper rivets that were used to fix the brass clip to the canvas. Not everyone used the copper rivets, and the awning that I bought years ago to use for my van had a different set-up. These photos show the rusty washers that were slightly overlapped on the outside of the canvas, and then an aluminium rivet was fixed through the canvas and into the clip... I drilled all those rivets out, and threw the rusty washers away. Then I bought some 12mm wide x 2mm thick aluminium strip from Bunnings, and cut up some small lengths to use as a backing plate. Drilled new holes in the plate for the aluminium rivets, and set them similar to how it was originally... It's been 7 years now since I remodelled that canvas awning, and it still functions without problems today (- actually used it again for 5 days in constant rain during a trip last week). Hope this helps, Cheers, Al.
|
|
|
|
Asbestos
Aug 8, 2021 9:52:56 GMT 10
via mobile
Post by Franklin1 on Aug 8, 2021 9:52:56 GMT 10
G'day katiek78,
When I restored a 1976 Millard poptop, there were two distinctly different sealants used around the van. For the windows and the door, a bluish butyl mastic was used, which was still soft and pliable after 35 years. For the aluminium cover strips around the wall/roof joints, a cream sealant was used, which was rock hard and brittle.
A member on the Classic forum submitted a sample of the cream sealant on his van for testing, and the result came back positive for containing asbestos.
I'm inclined to think the sealants used up until 1985 might contain some asbestos, because asbestos use in building products started to be outlawed at that time.
The asbestos locations in caravans built before 1985 are:
- brake shoe pads
- insulation in the gas/elect fridge
- vinyl floor tiles
- a heat shield built into the wall behind the stove
- sealants used to weatherproof the van
Hope this helps.
Cheers,
Al.
|
|
|
|
Post by Franklin1 on Jun 25, 2021 21:43:57 GMT 10
Thanks for that - it shows up on a number of other websites as well. Prices can vary by quite a few Pounds!
220mm Polycarbonate Double Porthole Window 23/25mm thickness CAMPERVAN camper
£14.94 - 22.99
|
|
|
|
Post by Franklin1 on Jun 25, 2021 21:24:42 GMT 10
G'day surftragic, Firstly let me say how much admiration I have for the effort you put into all aspects of Vintage Caravan preservation - from the recovery process to the final restoration process. You certainly put in a 150% effort in everything you put your hand to!  ------
I had a major failure with the closed-cell foam that I put on my windows initially. The surface of the foam wanted to keep sticking to the gloss paint on the van, so that when I tried to open the window, the foam ended up ripping from the window surround... I had no choice but to go back to the felt strip that was on the windows originally. The difficulty was trying to track down suitable felt for the job, and I ended up searching, searching to eventually discover it in Far North Queensland. I bought my 10m roll about 7 years ago, and from memory it was about $30 posted to my address in NSW (about $20 for the 12mm wide felt roll, and $10 postage). It was much cheaper to buy the felt roll in the USA, but the postage costs from there were horrendous. My van has now been finished for six years this month, and the felt strips have withstood the test of time so far. You may find you end up with a similar problem with your foam strips sticking, particularly if you use the high gloss oil-based paint on your van (whereas mine was only gloss acrylic paint). Sending continued good wishes as you work your way through your list of Don caravans! cheers, Al.
|
|
|
|
Post by Franklin1 on Jun 25, 2021 20:48:22 GMT 10
G'day sgtl, That iqdigitalo link you've given above is being blocked by my Norton Antivirus as a "known dangerous webpage". What is the actual name of the window so I can maybe locate it without risking a visit to the link you've given?
cheers, Al.
|
|
|
|
Post by Franklin1 on Jun 25, 2021 20:33:18 GMT 10
G'day cococabana, and welcome to the forum! 
Here's the long-winded explanation of how to get to that link:
/ menu (left hand side of page/screen) / Articles, FAQ and Guides (down the bottom of menu) / Caravan Windows & Vents (top right of pop-out box) / Step-by-Step Windout-Window Repair (last one in the Windows list)
Hope this helps.
cheers, Al.
|
|
|
|
Help
Apr 29, 2021 21:48:10 GMT 10
via mobile
Post by Franklin1 on Apr 29, 2021 21:48:10 GMT 10
G'day lolahons, Perhaps they could help you over on the Jayco owners forum? www.jaycoowners.comOtherwise, a phone call to the technical Dept in the Jayco factory might point you in the right direction. Cheers, Al. |
|
|
|
Post by Franklin1 on Mar 5, 2021 16:36:27 GMT 10
For the interest of those attending the Nationals, there has been a saga about the demolition of the causeway between Victor Harbor and Granite Island. The latest news is that the causeway will be demolished, with major works beginning later this month or early April. cheers, Al.
|
|
|
|
Post by Franklin1 on Feb 26, 2021 9:25:23 GMT 10
G'day Di, and a big "hello" from me for your reappearance as well! Searching for handles is like looking for the holy grail. I'm still looking for plastic push-button handles, six years after finishing my van. The most difficult thing I've found is knowing what 'key words' will yield some worthwhile results, because the people that list their items can sometimes use really obscure words. For example, these handles on etsy are listed as "antique modern kitchen cupboard handle latch NOS, national lock co N61-308", and your chances of discovering these handles are limited if you use the word 'vintage' in your search. You can sometimes get some leads from searches like this oneFor your list of ebay sellers that you follow, there is a seller in California USA who often has one or more cabinet handles/pulls listed. The downside is that there is rarely the number you are looking for, but it is a useful source to see what some of the vintage handle designs looked like. The other downside is that postage costs from the US are now horrendous. The ebay seller is okatiedid, who also lists other bits and pieces for the vintage American trailers, some of those parts being used here in Australia. Good luck with your search. cheers, Al.
|
|
|
|
Post by Franklin1 on Jan 11, 2021 23:05:35 GMT 10
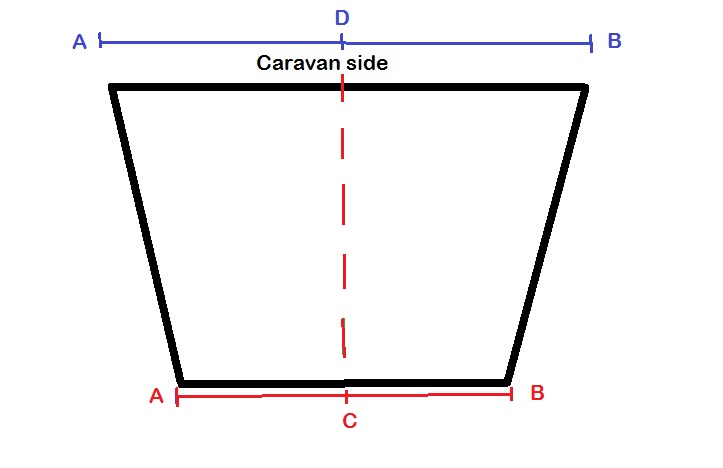
I've made two canvas awnings for my vans, plus converted a heavy duty tarpaulin to make a wet-weather awning when required. In all cases, the awnings look like this when they are cut to size... I buy the piece of canvas big enough to do the job without any joins. Usually I get canvas that is 2.2 metres wide, and by the time I've put hems around the edges, it comes down to about 2.1 metres from caravan roof out to the awning poles.
This is how I measure the van to mark out the canvas... Red line A-B is where I want the height of the outer edge (the poles edge) of the awning to line up with the van. Measure the halfway point of line AB and mark as C. Draw a line perpendicular from C to top of van roof and mark as D. Curve of roof will be covered by marking AD and DB on canvas, either side of halfway point... Does that make sense?? cheers, Al.
|
|
|
|
Post by Franklin1 on Jan 10, 2021 19:15:16 GMT 10
G'day mustang,
Your fittings are known as "quadrant stays". I increased the tension applied by the wingnuts, by fitting leather washers to either side of the bolt in the slides. This means less force required to get suitable tightness.
My hatch is super heavy and will always flop either way front or back, when I lift all quadrant stays up to their full height. I've ended up raising only one end to take advantage of, or to protect from, the prevailing wind.
The advantage I've found with these type of stays is that I can partly lift any one of the four sides of the hatch. This has been useful in strong wind/rain.
Cheers,
Al.
|
|
|
|
Post by Franklin1 on Jan 8, 2021 19:49:39 GMT 10
G'day morgzord, Scroll down the page to the Specifications and see if the measurements match the flat section of your threaded spindle ends. The flat end in your photo doesn't look too bad, but sometimes these can get "oval shaped" from wear and tear during the up-and-down winding over the years. If the CaravansPlus winder suits your needs, I'd buy two of them. Keep one as a manual winder, and cut the end of the second one to have the socket and a few inches of rod attached. That way you can insert the socket/rod into a cordless drill and do similar to what Mustang does with his set-up. cheers, Al.
|
|
|
|
Post by Franklin1 on Dec 2, 2020 20:29:07 GMT 10
G'day Ray, I was browsing in Gumtree and came across this version of your creation: cheers, Al.
|
|
|
|
Post by Franklin1 on Nov 18, 2020 20:38:00 GMT 10
G'day geomac,
A similar product is sold on ebay in the UK, and various sellers there will ship to Canada. The item you found in CaravansPlus is bent on one side only, whereas the items in the UK are double-sided bends. Perhaps you could cut the bend off one side to make it suit your requirements?
Search for: STATIC CARAVAN WHITE PLASTIC WINDOW CAPPING/TRIM - 25MM X 10M + FREE PINS
There appears to be two different widths available: 25mm and 37mm
Hope this helps,
cheers, Al.
|
|
|
|
Post by Franklin1 on Oct 14, 2020 20:26:40 GMT 10
G'day Belinda,
The sharpest (tightest) radius you have to bend the ply around is the roof curve above the front window. If that radius is 500mm or greater, then 4mm ply will bend around that ok. If the radius is less than 500mm, you'll have to go to 3mm thickness.
The wall sheets could be fitted as follows, to minimise the amount of joints:
1) first sheet from front of van to right side of doorway. Only a small joint between sheets at top right of door. 2) second sheet from right side of doorway to right side of window. 3) third sheet from right side of window to rear of van (this would be a relatively narrow strip of ply sheet).
I wouldn't bother about scarfing the sheets. It's too complicated for the thicknesses you'll be using. These days the polyurethane adhesives will give a good weatherproof joint if you join the sheets over a timber frame stud. Use small hot-dipped galvanised nails/panel pins to fix the sheets while the adhesive sets.
I used nickel-plated brass screws to fix the j-mould into position. I bought mine from Classic Fasteners in South Australia. Another option is to source some escutcheon pins/nails made out of stainless steel. I think shesgotthelook sourced some from the UK for one of her Viscount restorations.
Is the condition of your van really so bad that it requires ALL the ply sheets to be replaced? That's some pretty serious deterioration over the last 10 years or so. 
cheers, Al.
|
|
|
|
Post by Franklin1 on Sept 23, 2020 21:29:05 GMT 10
G'day Belinda,
When I rebuilt my "Walsh" van, I used 4mm ply for the front-top-rear curved sections; 6mm for the side walls; and 12mm for the floor. The 4mm ply bent around the sharpest radius on my van, which was the curve above the front window (similar to what you have on the Atlantic).
I used "exterior grade" ply with B-B faces for all the thicknesses I bought. Exterior grade has the same glue bond as marine ply, so will withstand weathering. Marine ply is a select grade of ply that doesn't have any small gaps in the layers when you cut the edge. Exterior grade will have some of these small gaps (called 'voids') but you can seal these gaps with polyurethane adhesive and make your own version of marine ply much more cheaply.
The "B-B" faces are suitable for painting, and will reduce your costs for the ply compared with the premium "A-A" grade which is used for staining.
I used a chemical paint stripper to remove the paint from all the metal parts I wanted to salvage and re-use. I found this method didn't damage the surface of the metal, and cleaned up nicely with soapy steel wool after the paint was stripped off.
cheers, Al.
|
|
|
|
Post by Franklin1 on Sept 4, 2020 21:43:27 GMT 10
G'day All, A couple of days ago, ABC News ran a story about the trophy for this year's Melbourne Cup. The trophy will tour around Victoria prior to the big race in November, with the tour including a stop at the Fosterville Gold Mine where the gold for the trophy is mined. You can read the complete story here if you wish...
Accompanying the story is a photo of this year's trophy on a tree stump, with some sheep in the background. But what's important to this forum is what is showing even further in the background...
Now, here's the dilemma...which would you rather have? - the trophy, or those two vans at the back?? 
cheers, Al.
|
|
|
|
Post by Franklin1 on Aug 9, 2020 17:45:29 GMT 10
G'day nelliem, when your poptop is lowered and locked down for travelling, there should be a small gap between the poptop roof and the lower caravan roof. The poptop roof rests on the scissor lift springs when they are collapsed, and shouldn't touch the lower roof. The black line showing around the perimeter is the accumulation of dirt from the air/wind getting into the gap during travelling. Raise the poptop roof and clean that black muck off with soap and water. No rubber cushioning is required if the poptop roof is sitting correctly when lowered down.
Cheers,
Al.
|
|